RSS
 

Posts Tagged ‘Second’

Sensor sales help Sony triple net profit in second quarter

04 Aug

Sales of image sensors helped push Sony to triple its net profit after the second quarter this year, up to 82.4 billion Yen. Sales of Devices, the category containing Sony’s sensor business, rose 35% year-on-year, which Sony attributes to higher demand of mobile products containing its sensors. Read more

Articles: Digital Photography Review (dpreview.com)

 
Comments Off on Sensor sales help Sony triple net profit in second quarter

Posted in Uncategorized


24 Frames Per Second: Finding Photographic Inspiration From Cinema

25 Jul

I don’t believe that, as a photographer, it didn’t occur to me for quite some time to look to movies for inspiration and lessons I could use in my own art. But as I’ve grown as a consumer of movies and art, I’ve learned to look more closely at the choices filmmakers have selected in order to convey information to Continue Reading

The post 24 Frames Per Second: Finding Photographic Inspiration From Cinema appeared first on Photodoto.


Photodoto

 
Comments Off on 24 Frames Per Second: Finding Photographic Inspiration From Cinema

Posted in Photography


A second glance: two takes on the Leica X

07 Nov

Leica has built up a significant reputation since it created its first 35mm film camera 100 years ago. That reputation means different things to different people, and hangs over every new model  its name is applied to. The Leica X (Typ 113) is the company’s latest fixed-lens APS-C camera. Designed, developed and built by the German company, it commands a substantial price tag. So what’s it like to shoot with and what do you get for your money? We handed the camera to two photographers to see what they thought.

Articles: Digital Photography Review (dpreview.com)

 
Comments Off on A second glance: two takes on the Leica X

Posted in Uncategorized


Second Skin With Alana Tyler Slutsky

20 Jun

Alana Tyler Slutsky showcases her Second Skin photo series on Fashion Photography Blog (FashionPhotographyBlog.com)FashionPhotographyBlog.com caught up with Photo of the Week winner, Alana Tyler Slutsky to find out what has been happening since she shot her winning photo from her “Painted Ladies” series. Based in Brooklyn, New York, Alana Tyler Slutsky photographs fashion, beauty and portraits. From our previous interview with Alana, we discovered that she loves to play with color and light, as well as the idea that “fashion is fantasy.”

Alana Tyler Slutsky showcases her Second Skin photo series on Fashion Photography Blog (FashionPhotographyBlog.com)

So where is the photographer at now in her photography journey? According to Alana, she is constantly growing, ever-learning and ever-experimenting, “Now, I understand what I’m doing a lot more. Everything is premeditated and every detail is planned out It’s no longer a guessing game where I plop down lights and move them around to get what looks good – rather I go in with a plan of where everything should be placed, what modifiers should be used and what the f/stops should read. Also, I won’t shoot without a team. Before I used to shoot with whatever was lying around and would do the makeup myself (that was a total joke!) or have the “model” do it themselves. Nowadays I won’t work unless I have a team of hair, makeup and wardrobe. These are all details that tie together to make an amazing image. If you’re missing one, it’s like trying to drive a car with a flat tire – it just doesn’t quite work.”

The last article that we spoke to Alana she showed us an example of an experimental concept, back from when she was first testing lighting, became the inspiration for her recent “Second Skin” editorial shoot that got published in Creem Magazine. It was coincidental that around the same time she won Photo of the Week. It must have been meant to be. So how did the shoot for “Second Skin” come about? Alana explained, “The “Second Skin” images were the brain child of my makeup artist, Cassie Kurtz and myself. We spent a few hours on the phone bouncing ideas back and forth until we came across this one. I like to think that the “Painted Ladies” images were buried deep within my subconscious and the underlying idea of that series helped shape the “Second Skin” shoot.

Alana Tyler Slutsky showcases her Second Skin photo series on Fashion Photography Blog (FashionPhotographyBlog.com)

To create shoot, Alana shot this series using an Alienbees strobe, a soft box and a reflector. For photographers who are starting out and don’t have the budget for expensive equipment, Alana recommended “Paul C. Buff/Alienbees is an amazing company for young photographers! Not everyone has tens of thousands of dollars in order to own all of their own pro gear (such a Profoto/Broncolor etc…). Paul C. Buff is an affordable solution with the greatest customer support ever! Definitely check them out if you’re in the market for some lights. It does not hurt that they have almost every modifier you’ll be looking for! (No. I’m not paid by Paul C. Buff/Alienbees to promote them… I’m just a huge fan!)”.

Speaking of lighting, I asked the photographer, how is her lighting setup different now? She replied that “My light is a lot more controlled. Now, I know exactly what I want and figure out a proper set-up and what the light-output should read before ever setting foot on step. Being good at lighting is all about knowing how to manipulate it – from shadow transitions to color temperature.

Alana Tyler Slutsky showcases her Second Skin photo series on Fashion Photography Blog (FashionPhotographyBlog.com)

To find out more information about this shoot or contact Alana Tyler Slutsky feel free to visit any of the following:
Blog: http://alanatylerslutsky.blogspot.com

Website: http://www.alanatylerslutsky.com

Facebook: https://www.facebook.com/alanatylerslutsky

Twitter: https://twitter.com/alanaslutsky

What do you think about Alana’s new work now compared to her previous Photo Of The Week entry? Please post your comments in the comment section below.


Fashion Photography Blog

 
Comments Off on Second Skin With Alana Tyler Slutsky

Posted in Uncategorized


Working with a Second Shooter – Legal Ins and Outs

23 Nov

The Importance of Being or Having a Second Shooter

second-shooter-event-photography-02

If you have ever done any kind event photography, weddings in particular, you already know how important it is to hire a second shooter. You’re trying to adequately photograph hundreds of people, often in multiple locations in the same venue. You’re good, but you’ve yet to master the finer points of time travel and being in two places at once. Similarly, if you’re still looking for your way into professional event photography, you already know how important it is to be a second shooter. This is your chance to learn from someone who has already walked in your footsteps. It is the opportunity to hone your skills, connect with a mentor, establish relationships, and start building your portfolio.

Ownership of the Images

But who owns the second shooter’s photographs?

Common sense would dictate that if I am contracted to shoot an event, all of the photos taken by me or anyone working for me fall under my copyright, and therefore belong to Guyer Photography. One of the main things I learned in 14 years of practicing law, however, is that contractual situations are rarely ever common, and are often devoid of sense.

“Whoa. Hold On. Did you just say, ‘contract?’”

Yes, but relax, we’ll come back to that in a minute.

For now, it’s important to know that copyright law makes two facts abundantly, and undeniably clear. First, an image is copyrighted from the moment the shutter clicks. I’m not going to get into copyright registration  in this article, except to say that registration is not necessary for copyright protection to take effect. Compose, focus, click, done. Copyright protection. That’s it. Just like magic. It is the second fact, though, that creates a potential problem for photographers and their second shooters. Not only does the copyright spring to life  at the very moment of capture, but the copyright actually belongs to the photographer who presses the button.

I’m going to go get myself a snack while you ponder the ramifications of that point.

guyer-photography-second-shooter-copyright-1

Okay, so by now you’re thinking about your images showing up on your second shooter’s website and the value of those images deflating like a hot air balloon in a thunder storm. But, have you also considered that if the second shooter owns the image they may also be able to prevent you from sharing, blogging, posting, tweeting, advertising, marketing, printing,  or doing anything with it other than passing it along to the client? There are so many ways that this copyright ownership technicality can take an otherwise great working relationship and turn it sideways if you aren’t careful. It’s a scary proposition, but it’s a minefield which can be easily avoided if you just take a few simple steps to protect yourself.

Put it in Writing

Most photographers who hire second shooters, do so on a job-by-job basis. They are there to do what you need them to do, when you need them to do it, but technically they are independent contractors, not employees. As such, having a contract in place is essential. A photography work for hire contract will cover everything from copyright and compensation, to confidentiality and liability.

Copyright – Retain It, But Be Fair

This is going to be the most important paragraph in the entire contract. Here is where the photographer stakes their claim to the copyright of all images taken by their second shooter in the course of photographing the event. The language must be clear that the photographer retains all copyrights associated with the second shooter’s images. If your contract contains nothing else, make sure it contains this copyright protection. Without it, it’s your second shooter who owns the images outright, not you.

This is also where the photographer may choose to outline what rights, if any, the second shooter has to those images. I may choose, for instance, to allow the second shooter to use his or her photos in a print portfolio but not on a website. Or, I might tell them they can have unrestricted use of the images, but not until six months after the wedding date. Another option might be to let them use the images on their website, as long as it bears a credit line that reads “Photographed for Guyer Photography.” You can come up with any set of conditions you feel to be reasonable, but you are also well within your rights to explicitly state that they cannot use the photos ever, for any reason. Obviously, this is an extreme example and I do not recommend it. A good second shooter works hard and should have something to show for it.  They also have their own communities in which they share their experiences and opinions. If word gets out that you aren’t letting your second shooters use their images, good luck finding any who want to work with you down the road.

You are in business for a reason, and giving away your copyright is not that reason. As outlined below, there are other important elements to the contract, but getting the ownership question answered early and clearly is crucial to the survival of your business.

guyer-photography-second-shooter-copyright-2

The Relationship

It is important to clearly state that the second shooter is not an employee, but an independent contractor. If they are an employee, you could be responsible for liability issues, as well as insurance and taxes. Any one of these could push you into a variety of financial pitfalls. Be clear, and spell it out. Leaving it open to interpretation will only lead to headaches down the road.

Compensation

This is pretty basic. You have to make sure that the contract properly reflects whatever compensation you’ve negotiated with your second shooter. Be specific. If you are paying them a flat rate for the entire job, indicate that in the contract. If you are paying them hourly, make it clear what the rate is and how many hours you plan to cover, as well as an agreed-upon rate for overtime. Events rarely stick to a schedule and often run longer than expected. If you are contractually bound to pay for six hours, plan for what happens when the reception is still going strong at six and a half hours. You don’t want to be negotiating this while you’re waiting to get the shot of the bride and groom leaving. This is also the section of the contract where you need to cover expenses like parking, meals, travel, etc.

Gear

This is the perfect place to spell out what gear you expect your second shooters to have with them when they show up at the venue. Whenever I hire a new second shooter, one of the first things I do is email them a complete list of my gear and ask them to send me a complete list of theirs. By detailing what is expected of them up front, I avoid unpleasant surprises on the day of the wedding.

Delivery Schedule

Some photographers put delivery schedule in the contract, and some don’t. I put it in, not because I feel the need to tell you how much time you have to get your images to me after the event, but to make sure you understand that I will hide your car keys in the bushes if need be to ensure you go absolutely nowhere before clearing your memory cards onto my laptop. I realize this comes off a bit harsh, but there are practical reasons behind it. First, I was burned once and had to refund an entire wedding because the second shooter lost an important memory card. Second, unless the second shooter is going to be editing the images, there’s really no reason to wait.

second-shooter-event-photography-01

Liability

As long as you’re getting everything else in writing, why not take a few lines to address what happens when your second shooter breaks your equipment, or gets broken himself. What unforeseen expenses are you willing to take on and which will you make certain he understands are his personal responsibility?  If you don’t deal with it as a possibility in the contract, it will be too late to deal with it as a reality in the emergency room.

Confidentiality and Non-Compete Clauses

I was extremely lucky when I started out in this business. I found amazing photographers who were generous with their time, knowledge, and gear. I believe in giving back and paying it forward. If you work for me as an assistant or second shooter there is virtually nothing I won’t share with you. I’ll answer your questions, make suggestions, offer critique, and tell all my friends about you, to help get you more work. I’ll do all of that and more, right up until that moment when you break my confidence. My event is not the time or place for you to be handing out your freshly printed business cards. When you meet your friends for drinks after the job do not discuss my prices, my marketing materials, or even this contract. You’re looking for your place in this profession and I want to help. Look out for me and I’ll look out for you.

Ideally, you and your second shooter should be able to view this contract as a mere formality. If you can’t, you may not be right for each other. But if you can, the two of you could be on your way to a long, mutually beneficial relationship. Honest and open communication of expectations is an important two-way street. Nobody wants to train a new second shooter every time an event comes along. You want someone in your corner who has your back and knows how you want things done. As much as you may like and respect your second shooter, you both need to get on the same page and make sure that reasonable expectations are met, particularly and most importantly when it comes to ownership of the photos.


NOTE: The advice in this article and the accompanying sample contract is based on my experience as a professional photographer and does not constitute legal advice. While the principles discussed are widely applicable, every jurisdiction is different and you should consult a local attorney for specific legal advice. – JJG

Editors note: Please keep in mind this article is the writer’s opinion on how to handle this issue. I’m sure each photographer has a different approach to hiring second shooters. If you have any suggestions or comments please add them below and let’s have a discussion. 

Post originally from: Digital Photography Tips.

Check out our more Photography Tips at Photography Tips for Beginners, Portrait Photography Tips and Wedding Photography Tips.

Working with a Second Shooter – Legal Ins and Outs

The post Working with a Second Shooter – Legal Ins and Outs by Jeff Guyer appeared first on Digital Photography School.


Digital Photography School

 
Comments Off on Working with a Second Shooter – Legal Ins and Outs

Posted in Photography


Fujifilm announces X-E2 – second generation mid-level mirrorless

18 Oct

X-E2_Silver_Front_18-55mm.png

Fujifilm has announced the X-E2 – its latest mid-range mirrorless interchangeable lens camera. The X-E2 gains many of the upgrades seen in the X100S, including on-sensor-phase-detection that underpins the company’s unique digital-split-image focus aid. Beyond this the 16MP X-Trans camera has received a series of hardware adjustments and revisions in response to feedback about the X-E1.

News: Digital Photography Review (dpreview.com)

 
Comments Off on Fujifilm announces X-E2 – second generation mid-level mirrorless

Posted in Uncategorized


Second Skin: Kevlar Backpack for Life & Travel in War Zones

21 Aug

[ By WebUrbanist in Design & Products & Packaging. ]

emergency war zone backpack

For many of the world’s citizens (and travelers), the threat of bodily harm from war or terror attacks is a daily fact of life. Constructed of bulletproof material, this backpack is designed to reduce the risk of personal injury in unstable regions.

emergency disaster survival backpack

Dubbed Rhino Skin (part of Second-Chance Gear) and designed by Hadassah College graduate Hila Raam, the pack’s back and side straps pull forward and wrap around the wearer to form bulletproof vest.

emergency backpack bomb shelter

On top, a likewise projectile-and-debris-resistant hood can be deployed when one hits the proverbial deck upon hearing an air raid siren, helping shield the wearer, if warned, from additional shrapnel injuries.

emergency hooded attack protection

While it will not do much in some  extreme, close-proximity situations (where nothing short of full body armor would help), it does cover the head and torso, protecting vital organs and reducing damage potential from rocket, mortar or bomb strikes.

emergency bullet proof pack

From the designer: the Rhino Skin is “a modular backpack combining kevlar used as a civilian personal protection system in
countries or areas that are under daily attacks, protecting against debris and impact created from missile and rocket attacks.This unique bag pack protects the essential life or death body areas … the head, neck, back and the sides of the body. Most important the brain, heart, liver and kidneys are fully protected.”

Share on Facebook


[ By WebUrbanist in Design & Products & Packaging. ]

[ WebUrbanist | Archives | Galleries | Privacy | TOS ]


WebUrbanist

 
Comments Off on Second Skin: Kevlar Backpack for Life & Travel in War Zones

Posted in Creativity


A Twist on the 365 Project: One Second a Day Video Project

02 May

Extra photos for bloggers: 1, 2, 3

Doesn’t it feel like 2012 was just a couple weeks ago?

Maybe your New Year’s resolution was to start a 365 Project where you snap a photo every day.

Well, what if we told you that you can make a time-lapse of your life by taking a one second clip every day? That’s what Photojojo pal, James Bernal did for the all 366 days of 2012.

Think about how awesome yours would look — it’d be a 6-and-a-half minute mosaic of your year!

James put together an awesome guide detailing how to shoot, what to shoot, and how to keep going when you’re ready to set the camera down.

A Guide to Shooting One Second a Day

p.s. Win a traveling photo booth! We’re giving away an Instax camera & more with Brit+Co. Enter to win right here.

p.p.s. Even moar giveaways! Our pals at SnapKnot (the wedding photographer directory) are giving away a Nikon D800 or Canon 5D Mark III. Here’s how to enter.

Why it’s cool:

First, watch this. The one second a day video James made of his 2012.

2012 in 366 Seconds from James Bernal on Vimeo.

Sometimes, we take our days for granted. A project like this will help you reflect on your life as it happens.

Imagine being able to look back on any day and instantly remember what you did, who you met, what you learned, or how you felt.

While you’ll be able to have a really nifty video time capsule of your life and a fun way to share your year with others, it can also be an ingenious and powerful way for you to be able to remember what you’ve accomplished over the year and how you want to make it even better.

Undertaking this project will also improve your camera skills. For real! Keeping your eyes peeled for your one second each day, you’ll be sizing up the world for good moments and you’ll naturally want to attempt new shots to keep it fresh.

When to Start:

paint-sm While you might think you missed the boat with starting off your project on January 1st, 2013, the truth is, this is about your life and you can start your project anytime!

You can start it on your 27th birthday, the first day of your round-the-world trip, a random Tuesday, on your first day of college, or Chinese New Year!

There’s also no rule for how long it should be, so you can keep this up for 3 months or a whole year or even keep doing it for the rest of your life!

Tools For Putting it all Together:

paint-smA Camera.
Or even better, all the cameras. You can use any camera that’s able to take video, and preferably at least 720p so you can share it with the rest of the world.

You don’t have to stick to one camera either, so don’t be afraid to use different ones as long as their quality is as good as your main camera. Nowadays, most smartphones, point and shoots, and GoPros can shoot in glorious HD!

An Editing Program.
You’re going to need to put this puzzle together somehow! Some editing programs have more bells and whistles than others but you won’t need to get too over your head.

All you really need is to put your clips in order and find a sweet song to make it all flow together nicely. Our suggestion – iMovie and Windows Movie Maker are free and work just fine.

If you’re planning on using an iPhone exclusively as your one and only camera, then there’s now a recently launched app that helps keep you organized and edit all your footage together! It’s called One Second Everyday.

STEP 1: GET TO SHOOTING

paint-sm Get out there and shoot your one second clip everyday! Take your camera everywhere. Yeah guys, everywhere.

You never know what you’re going to encounter once you walk out your door. Take it to work, parties, the beach, school, the DMV, wherever.

Document the first time you tried a churro, your walk in the park, that bike ride over the Brooklyn Bridge, or maybe the impromptu dance party that erupted while you were waiting for the bus.

Take a Step Backward!
It’s easy to get so wrapped up in being a cinematographer that you forget to take a look around you and give us a little more context about where you are.

paint-sm

If you’re pointing your camera at a delicious pizza you’re about to eat, it could be even more interesting if you take a couple steps backwards (but watch your step!) and show us you’re eating a pizza … at the Grand Canyon.

Get Creative.
We’re not gonna lie, taking a memorable video of each and every day is going to be a tough workout for your eyes and brain, but hang in there. We know you can do this!

Try out new angles and different techniques, or maybe throw in a one second time-lapse in there if you’re pretty handy with that stuff. Don’t forget to hand your camera to others from time to time so you can also make a cameo in your video!

Sticking with this project, you’ll naturally become more creative with your shots when you’re forced to come up with something new every single day.

Get a reminder.
There might be days you’re so busy you forget all about your project. Don’t let up! Put an alarm or a reminder on your phone to make sure you remember to snap a video of something each day!

STEP 2: GET UP AND GO OUTSIDE

paint-sm Seriously, you guys, keep shooting.

There are 86,400 seconds in a day. More than a few of those are gonna be totally worth getting on tape!

Everything is fair game.
From your awesome roadtrip, to the C- you got on your biology test, to that flat tire you had to change (in the snow!), everything is worth documenting.

It’s natural to want to remember all the good times but don’t be afraid to point your camera at some of the less-than-stellar moments. It’s all part of the story of your life and every moment is equally important.

Don’t Stop.
This is the most important tip.

You’re gonna get tired of shooting a second a day, and you might want to skip a day. Don’t give up.

Even if you think there’s nothing interesting happening, go outside and make something happen. There’s always something worth documenting, even if it’s just you walking your dog (especially if it’s a particularly awesome dog).

I also found it helpful to tell my friends about my project and they were crucial in keeping me motivated. They’d even ask “Hey, can I be your one second clip today?”

STEP 3: DOWNLOAD YOUR FOOTAGE

paint-sm As the days fly by and you fill up your memory cards with footage, you’re gonna have to start downloading your footage to your computer.

It’s going to be a little different from computer to computer, but it’s pretty simple. Make a main folder, and organize your clips in a way you can easily keep track of what’s where.

More importantly, stay organized. Seriously, guys, 365 different video clips are as unruly as a bag full of puppies (although not as cuddly and definitely not as cute).

You’re gonna have a much easier time if you regularly organize your clips into folders for months over the course of your project. It would also be a really good idea to make a backup of all your footage so you don’t lose all your work in case an elephant stomps on your computer.

Step 4: START EDITING

paint-sm Import your clips into iMovie (free) or Final Cut Pro if you’re a Mac fan. If you’re running windows, try Windows Movie Maker (free) or Adobe Premiere.

Most movie editors are laid out with a little area for all your clips and another area called a timeline. The timeline is where you’re gonna be placing your clips and organizing them.

Editing is a lot like solving a puzzle – you’re moving all your clips around into the right order by date. While you rearrange the clips where they belong, you can start ‘trimming’ them down to 1 second each.

Those fun kids over at Vimeo have a couple good lessons to help get you started on whatever editing program you’ve got!

  • Editing with Windows Live
  • Editing with iMovie
  • Trimming & Cutting with iMovie

STEP 5: THROW A PHAT BEAT ON IT

paint-smJust like photography, music is a universal language. Go through your music library and find a bumpin’ song that you can add to your video!

Was there a song that was your jam while you were shooting this project? If Polka is your thing, that’s cool too! Try out a couple different songs and see which one sets the mood you’re going for and really goes with the flow of your movie.

STEP 6: THE HOME STRETCH

Add some titles, effects, and finishing touches to your video.

Hit the export or share button and upload it to Youtube or Vimeo, so you can showcase your masterpiece to the world!

Wanna see more examples? Here are two more of our favorites!

Brittany Bravo’s 2012.

Cesar Kuriyama’s Year 30.

1 Second Everyday – Age 30 from Cesar Kuriyama on Vimeo.

Take it further

  • Watch Cesar Kuriyama’s TED talk all about the making of video (above). It’ll inspire you!
  • Get more advanced with your video editing, try a time-lapse.
  • Learn how to make a stop-motion video!
  • Check out our guide to Project 365, the inspiration behind the one second a day video

Related posts:

  1. The Flip Video — The $ 100 Digital Video Camera that’s Tiny, Cheap, and Fun! Remember those shoulder-mounted VHS camcorders dad used to haul out…
  2. An Inspiring Stop-Motion Video (Modest Mouse Fan Video) Stop-motion photography ain’t easy. It requires patience, patience, planning, patience,…
  3. Vacation Photos with a Twist — or What to Do with All Those Pictures of Your Feet June’s Photojojo made possible by… ~Have a cool photo product…


Photojojo

 
Comments Off on A Twist on the 365 Project: One Second a Day Video Project

Posted in Equipment


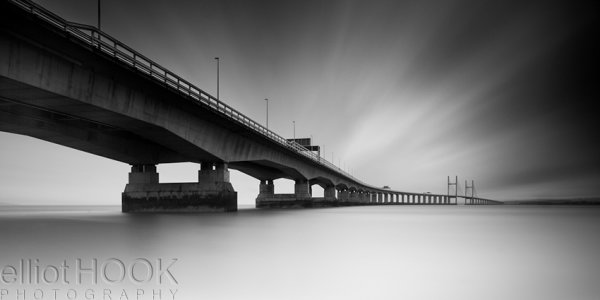
How I shot and edited it: The Second Severn Crossing

24 Mar

Second Severn Crossing - how I shot and edited

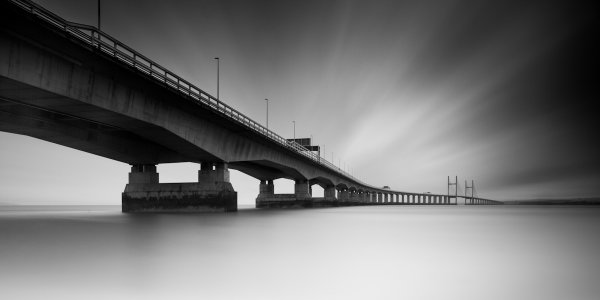
The image above is a long exposure taken of the Second Severn Crossing, a motorway bridge that crosses the River Severn, just outside Bristol, England.  I have been asked a number of times how this image was processed, what software/plug-ins were used, so I thought it would be a useful exercise to explain it here.

Shooting the image

I had been thinking about this shot for a while and I knew that there were a couple of important elements that I needed to consider when trying to capture the image:

  • I was really keen to get low, relative to the bridge, and shoot a wide-aspect image across the river.   Fortunately, there is a footpath that runs along the river bank, under the bridge, that is easily accessible by car (Google maps link).
  • I wanted to capture a long exposure so I could contrast the movement of the clouds against the static structure of the bridge.  Therefore, there was no special planning in terms of weather or time of day, as I was happy with a cloudy sky in the middle of the day, as long as there was a strong wind – fortunately, over the 2012 Christmas period, the UK offered those conditions in abundance.
  • I wanted to fill the frame with silky-smooth water, so as the River Severn is a tidal river with one of the largest tidal ranges in the world, I ensured that I would arrive at the location around high tide.

The image, as captured straight out of the camera, is shown below:

How I shot and edited - second severn crossing - image 1

The image was taken at ISO100, 12 mm, f/10, with a 5 minute exposure (299 seconds to be precise).  I used a 2-stop graduated neutral density filter to evenly match the exposure of the sky with the river, and used a 10-stop neutral density filter to produce the long exposure.   As the highlights of the scene were easily contained, I over-exposed the image to ensure that I captured the maximum amount of movement in the clouds, knowing I would be able to correct the exposure/contrast during post processing.

Processing the image

The processing of this image was performed in Adobe Lightroom 4.

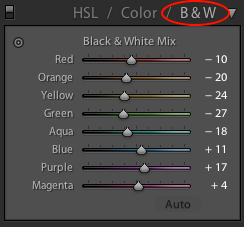
The first step was to convert the image to black and white using the B&W selector in the colour panel (on the development pane).

lightroom BandW selection

How I shot and edited - second severn crossing - image2

The initial image after a straight B&W conversion, lacking in contrast

Given the significant amount of foreground, I decided to crop the image at this point, using a 2:1 aspect ratio, to give the wide-aspect image I was after and to stop the foreground being a distraction during the rest of the processing.

How I shot and edited - second severn crossing - image3

Cropped to a 2:1 aspect ratio

I then needed to address the lack of contrast and over-exposure of the initial image.  Therefore, I set the white (+33) and black (-40) points and adjusted the contrast (+40) to set the overall exposure for the image.

How I shot and edited - second severn crossing - image3-1

Initial exposure adjustments made

I then applied a graduated filter to the sky (shown below) to adjust the exposure (-1.74), contrast (+100), clarity (+100) and highlights (+12).  I wouldn’t usually increase either the contrast or the clarity to +100, let alone both, but in this instance doing so acts to bring out a full range of tones within they sky and so emphasise the movement captured in the clouds (the increase in contrast/clarity is also a very good way of highlighting any dust spots present in an image!).

How I shot and edited - second severn crossing - image4

Showing the graduated filter being applied to give impact to the cloud movement in the sky

Next, I applied a graduated filter, from the bottom of the frame, to the water (shown below).  I used it to increase the exposure (+0.80) and reduce clarity (-100) in order to brighten the water and reduce the local contrast to give that bright, smooth water effect that can be key to an image such as this.

How I shot and edited - second severn crossing - image5

Showing the graduated filter being applied to the lower section of the image to smooth out the water

When applying the graduated filter to the sky, it also acted on the bridge in the top left corner of the frame, making it overly dark, losing detail.  Therefore, I used the adjustment brush to paint a mask over the affected portion of the bridge, using a low flow, in order to be able to build up the desired effect gradually.

How I shot and edited - second severn crossing - image6

The mask drawn with the adjustment brush is shown in red

To the adjustment mask, I applied an increase in the exposure (+1.08) and shadows (+18) to bring out some of the detail in the bridge that was lost after applying the graduated filter over the sky.

How I shot and edited - second severn crossing - image7

Nitce the extra detail now visible in the upper left portion of the bridge after application of the adjustment mask

I then applied a graduated filter to each corner on the right hand side of the image, shown below.  The top graduated filter was required to subtly blend a vignette caused by me stacking the 10-stop filter and the ND filter holder.  The bottom graduated filter was required to tone down the water at the edge of the frame.  The exposure was reduced in both instances.

How I shot and edited - second severn crossing - image8

The two final graduated filters shown merged into the same image here)

The final edit that needed to be made to the image was to remove all of the dust spots (you’ll be glad to know I’ve since had my sensor cleaned) and hot pixels (the bright white pixels that result from the extreme exposure time) to give the final image:

How I shot and edited - the second severn crossing - final image

The final image (click to enlarge)

So there you go, using a few relatively simple edits, it was possible to produce this high-contrast black and white long exposure without the need for any additional plug-ins or software packages outside of Lightroom 4.  The initial image may have lacked impact and that can often be the case with long exposure shots, however by shooting in raw, you can exploit the captured detail to create the image you had envisioned.

If you would like some tips to help you take long exposure images, such as the one above, please check out this earlier post.


Post originally from: Digital Photography Tips.

Check out our more Photography Tips at Photography Tips for Beginners, Portrait Photography Tips and Wedding Photography Tips.

How I shot and edited it: The Second Severn Crossing


Digital Photography School

 
Comments Off on How I shot and edited it: The Second Severn Crossing

Posted in Photography


Nikon D2H 8 Frames Per Second

10 Jan

yep…