RSS
 

Posts Tagged ‘Same’

Capturing the same sunset, 2 years apart

04 Sep

$ (document).ready(function() { SampleGalleryV2({“containerId”:”embeddedSampleGallery_3692727126″,”galleryId”:”3692727126″,”isEmbeddedWidget”:true,”standalone”:false,”selectedImageIndex”:0,”startInCommentsView”:false,”isMobile”:false}) });

This is an interesting exercise / study on photography and post processing.

I took both of these photos from exactly the same spot (slightly different focal length 16mm vs 17mm), in the middle of the winter, at the same time of the day, but two years apart. The big difference in the landscape appearance is that two years ago we could hardly see any snow, but this year it was frozen solid from the middle of November until the very end of March.

Canada. Montreal. Lachine | Location: 45.42907, -73.68791

I also used two very different processing methods for each photograph. For this year’s photo I used an HDR Photography workflow, using Lightroom, Photomatix and Photoshop. As you can see, I processed it heavily in Photomatix: the colors are vibrant, and the details in foreground are prominent.

For the older photo, I used an “old school” single RAW Lightroom processing technique. To achieve the warm, softer look I used the Split Toning feature in Lightroom. At this point I am not sure which one I like better. They look very different, but I kind of like them both.

It’s an interesting experiment in how taste and technique (and two years time…) can make the same scene look totally different.


Viktor Elizarov is a travel photographer based in Montreal, Canada. He’s also the man behind PhotoTraces, a travel photography blog and community of over 60,000 photographers. Visit Tutorials section of his blog for free tutorials and free Lightroom presets.

Articles: Digital Photography Review (dpreview.com)

 
Comments Off on Capturing the same sunset, 2 years apart

Posted in Uncategorized


Video: Four top-notch portrait photographers shoot the same model

18 Aug

There are two types of kind-of-clichéd photography challenges that are actually quite inspirational and informative: (1) A great photographer using a cheap camera, and (2) Several top-notch photographers shooting the same thing. This video by portrait shooter Jessica Kobeissi is a great example of the latter.

In the latest episode of her new series “4 photographers shoot the same model,” Kobeissi goes up against Joey L, Dani Diamond and Brandon Woelfel to see who can capture the most consistently great portraits of the same model—in this case, Charlotte McKee.

All four photographers get to pick one location and outfit, and the entire group has to shoot each of the scenarios. In practical terms, that means only one of the outfits and locations will be ‘familiar’ and ‘comfortable’ for each photographer. Oh, and you only get three minutes to shoot…

To see the final shots from each of the four photographer, check out the video up top. And then scroll down to reveal who shot each photograph:

Outfit 1
J.1 – Brandon
J.2 – Dani
J.3 – Jessica
J.4 – Joey

Outfit 2
D.1 – Jessica
D.2 – Brandon
D.3 – Joey
D.4 – Dani

Outfit 3
JL.1 – Dani
JL.2 – Joey
JL.3 – Brandon
JL.4 – Jessica

Outfit 4
B.1 – Jessica
B.2 – Joey
B.3 – Brandon
B.4 – Dani

Articles: Digital Photography Review (dpreview.com)

 
Comments Off on Video: Four top-notch portrait photographers shoot the same model

Posted in Uncategorized


The same but different: Canon EOS 6D Mark II shooting experience

29 Jun
Spot the difference: on the outside, the Canon EOS 6D Mark II looks a lot like its predecessor, but it’s a considerably more powerful camera.

The Canon EOS 6D is something of an oddity in digital camera terms, having been in continuous production for almost five years. But finally, the time has come for an update to one of Canon’s most popular models, and it has arrived in the shape of the EOS 6D Mark II.

Unusually for a new Canon product, we had the chance earlier this month to use a late pre-production EOS 6D Mark II ahead of its official announcement. What follows is a first take on how the camera performs, based on a two-day shooting excursion, organized by Canon, to the Yellowstone National Park in Wyoming.

Detail is rendered well by the 6D Mark II’s new 26MP sensor, and Raw files sharpen up nicely.

EF 24-70mm F2.8 II | 1/400 sec | F8 | ISO 100

The first thing that struck me about the EOS 6D Mark II is how similar it feels to the original 6D. Ergonomically, Canon really hasn’t changed the basic recipe much. When the two cameras are compared side by side, it’s pretty hard to tell them apart from a moderate distance and even in use, there are more similarities between the models than there are differences.

Key specifications:

  • 26.2MP full-frame Dual Pixel CMOS sensor
  • 45-point PDAF autofocus system (all cross-type)
  • Dual Pixel live view / movie AF (80% coverage vertical / horizontal)
  • 7560-pixel RGB+IR metering sensor
  • ISO 100-40,000 (expandable between ISO 50-102,400)
  • 6.5fps continuous shooting
  • 1.04 million dot, 3″ fully-articulating touchscreen
  • 1080/60p video
  • Built in Wifi + NFC and GPS

The major operational difference is also the most obvious. The 6D Mark II’s rear LCD is fully articulating, and touch-sensitive, in line with recent Canon DSLRs like the EOS 80D. In fact, the 6D Mark II handles a lot like a slightly up-sized 80D in general. It also shares a lot of the same technology, in particular the same 45-point PDAF system and Dual Pixel autofocus in live view and movie modes.

The 6D Mark II handles a lot like a slightly up-sized EOS 80D

As such, for 80D users looking to make the jump into full-frame, the 6D Mark II would be a very sensible upgrade – aside from the lack of a built-in flash on the 6D, there’s virtually no learning curve.

From behind, you can see that the 6D Mark II offers almost exactly the same control layout as the original 6D. There’s no dedicated AF joystick, but the rear 8-way controller can be configured for direct control over AF point positioning via a custom function.

The 6D Mark II incorporates a latest-generation Digic 7 processor, which enables an impressively fast continuous shooting rate of 6.5 fps. I haven’t had a chance to shoot any action with the 6D II yet, but even during extended shooting of bracketed Raw images it didn’t keep me waiting. Canon claims a burst depth of 25 Raw + JPEG Fine shots at 6.5fps with a fast UHS-I card and this seems accurate, based on my experience.

The downside of adopting the 80D’s PDAF autofocus system is obvious when you put your eye to the viewfinder

The 6D Mark II’s viewfinder experience is pleasant, thanks to a magnification of 0.71x and 98% coverage vertically and laterally. Sub-100% viewfinder coverage is just one of several differentiators that Canon uses to distinguish its non-professional models (a single card slot being another) but the loss of that 2% is unlikely to cause any problems in normal photography.

Autofocus response in one-shot mode is fast and positive, but the downside of adopting the 80D’s PDAF autofocus system is obvious when you put your eye to the viewfinder. Because it is inherited from a cropped-sensor camera, the AF array occupies a comparatively small, central area of the 6D II’s frame. The relative lack of lateral AF coverage means that the 6D Mark II won’t be particularly versatile when it comes to off-center compositions or tracking, but to be quite honest, I suspect that most potential buyers won’t care.

If you really need super-accurate AF tracking from a Canon DSLR, you’ll need to save up for an EOS-1D X Mark II. But based on our experience of the closely-related 80D, the 6D II’s 45-point cross-type AF system, coupled with the 7560-pixel RGB+IR metering sensor is likely to be more than adequate for everyday shooting of mostly static subjects.

A handheld shot at the long end of Canon’s latest 100-400mm telezoom, straight out of the camera. At ISO 1250, some noise is visible, but it’s not problematic.

EF 100-400mm F4.5-5.6 II | 1/320 sec | F5.6 | ISO 1250

By contrast (no pun intended), autofocus in live view and movie modes is peerless, thanks to Canon’s Dual Pixel AF system. With 80% vertical and lateral coverage, and the option to set focus point by touch, the 6D II arguably offers better autofocus with the mirror locked up than it does in conventional viewfinder shooting mode.

Video: No 4K, and nothing flashy.

I didn’t shoot much video in Yellowstone (certainly nothing good enough to include in this article) but the 6D Mark II’s video mode is essentially the same as other recent non-professional Canon DSLRs. That means 1080/60p with a familiar, standard feature set. No 4K, and nothing flashy. Sorry, videographers – the 6D Mark II isn’t the low-cost 4K B-camera you might have been hoping for.

Some people will be largely ambivalent about this. After all, this isn’t 2009 anymore and following the arrival of Sony’s a7-series there are plenty of other options out there for enthusiast videographers that want to shoot 4K video with Canon EF lenses. It’s a shame though, because an affordable 4K-capable camera with Dual Pixel AF really would be a wonderful thing. Maybe one day…

At any rate, I have no doubt that several video-dedicated sites are typing furious blog posts about it even as we speak.

Despite the unexciting video specification, Dual Pixel AF does makes the 6D Mark II a very simple, relatively versatile movie-shooting camera, and certainly an enjoyable one, especially for casual hand-held shooting.

A big difference compared to the original 6D is the Mark II’s articulating screen. This is great for tripod-mounted shooting, and for grabbing low-angle stills. It’s useful in video mode, too, where setting focus by touch is especially handy. The 6D Mark II’s Dual Pixel AF system in live view and video is excellent.

Even for stills, the articulating touch-sensitive LCD is extremely handy. The majority of my dawn and dusk shooting in Yellowstone was conducted with the 6D Mark II on a tripod, in live view mode with exposure simulation turned on. Compared to a fixed screen, the 6D II’s articulating LCD is a lot more useful, as well as being a lot more comfortable to use from waist height. And while some people will always make the case for tilting, as opposed to side-articulating displays, I came to really appreciate the ability to pop the screen out for vertical compositions, too.

A tripod-mounted shot, taken at as long an exposure as I could manage without an ND filter. This image was composed vertically, in live view mode. Although the 6D Mark II doesn’t offer focus peaking, the magnification feature in live view mode provides a detailed enough on-screen image for accurate manual focus.

EF 24-70mm F2.8 II | 0.3 sec | F14 | ISO 100

Canon’s live view implementation is pretty mature at this point, and features like a real-time histogram, and powerful magnification for accurate manual focus are very useful. I wish the electronic horizon could be overlaid on the live view display, but it’s not hard to work around. I also wish the 6D Mark II offered focus peaking, but in practice the 10X magnified live view display offered enough contrast for accurate focus, even in pre-dawn light. And of course Dual Pixel AF is so good that there’s less need for manual focus anyway.

I don’t know what this insect is (perhaps a reader could tell me?)* but I think it enjoyed the 6D Mark II’s flip-out screen as much as I did.

The 1.04 million dot LCD features an anti-smudge coating, but not an anti-reflective coating. As such, dirt and fingerprints clean off the screen very easily, but I did find myself increasing screen brightness for live view work in bright conditions.

* UPDATE: A reader tells me that this is a Salmon Fly (Pteronarcys dorsata). That was quick!

While I wasn’t able to perform any controlled testing, the 6D Mark II’s newly developed 26MP sensor appears to deliver excellent results across its native ISO sensitivity span. In good light, at low / medium ISO sensitivities, images look exactly as I’d expect from a modern Canon DSLR. I don’t really care for Canon’s default JPEG rendition, which tends towards rather mushy detail at a pixel level, but the colors are great and there’s a lot of detail in Raw files.

Because of the current lack of 3rd-party Raw support (and to honor a request from Canon) my workflow up to now has been to perform a basic tonal conversion in Canon’s bundled DPP software, before outputting files as 16-bit TIFFs to Photoshop for sharpening. While I’d probably never find myself shooting in the ‘Landscape’ Picture Style except by accident, I did find that applying (and then modifying) this profile in DPP gave pleasantly bright, vibrant images of the Yellowstone springs.

The 6D Mark II is dust and weather-sealed (but only with a lens attached). This view shows the remote control port, to the lower right of the lens mount, covered with a rubber cap.

You’ll find plenty of images in our samples gallery, but I’m reserving judgement on exactly how well the files from the 6D Mark II compare to competitive cameras until we’ve received robust ACR support. According to Canon representatives, the 6D Mark II should outperform the original 6D (which it very evidently does) but may not offer the same kind of dynamic range and absolute resolution of the EOS 5D Mark IV.

When shadow areas are lifted by a couple of stops, there’s no obvious banding, but noise becomes prominent

I had the opportunity to accidentally run a kind of halfway test on the 6D Mark II’s shadow dynamic range when shooting bracketed images of a dawn eruption from Old Faithful, heavily backlit by the rising sun. When shadow areas are lifted by a couple of stops, there’s no obvious banding, but noise becomes prominent, suggesting that the 6D Mark II’s sensor probably isn’t ISO-invariant. This isn’t a surprise, but watch this space for confirmation from our lab testing once we receive a shipping sample.

This shot was deliberately exposed for the highlighted vapor cloud of Old Faithful’s eruption, lit from behind by the rising sun. I adjusted the exposure in Canon’s DPP software to recover midtones and shadows.

EF 24-70mm F2.8 II | 1/400 sec | F11 | ISO 100

Something that prospective 6D upgraders should be aware of is that the increase in resolution from 20MP to 26MP will show up flaws in cheaper lenses. I was mostly shooting with Canon’s excellent 16-35mm F4L and 24-70mm F2.8L II on the trip, both of which deliver very good edge-to-edge sharpness, but images from the cheaper 24-105mm F4L II don’t look great towards the edges. That said, I am probably more inclined towards pixel-peeping than the average 6D II buyer will be (certainly more than they should be) and at normal viewing distances, even a stickler like me wouldn’t know the difference.

In summary

Every new generation of cameras brings performance improvements, and after almost five years, it’s no surprise that the 6D Mark II is a considerably more powerful camera than its predecessor. It’s fast, very responsive, impressively easy to use, and offers a good balance of user-friendly ergonomics and customization options (28 in all), which should appeal to its intended user base.

Another tripod-mounted shot, taken at sunset. Although I rarely shoot in anything other than default JPEG Picture Style, I found that applying the Landscape style to Raw files in DPP and then modifying the tones gave a good starting point for sunrise and sunset shots.

EF 16-35mm F4 | 1/5 sec | F16 | ISO 100

Like the original 6D, the 6D Mark II is a solid, predictable, easy to use camera that appears to be capable of excellent image quality. It’s pretty compact, but impressively well built, too, including some degree of weather-sealing. As usual, we don’t know exactly what that means, but I can tell you that during the Yellowstone trip, my 6D II shrugged off a fairly good soaking in an unexpected downpour without any ill-effects.

The 6D Mark II makes an excellent lower-cost alternative for someone considering an EOS 5D Mark IV

The 6D II is unlikely to to be able to rival competitors like the venerable Nikon D750 when it comes to autofocus performance and Raw dynamic range, and I wish there was a dedicated AF positioning joystick, but for a lot of photographers these will count as minor complaints.

On the face of it then, the 6D Mark II makes an excellent lower-cost alternative for someone considering an EOS 5D Mark IV, and a sensible upgrade for 80D users looking to move up to full-frame.

Canon EOS 6D Mark II Samples (pre-production)

$ (document).ready(function() { SampleGalleryV2({“containerId”:”embeddedSampleGallery_1238315273″,”galleryId”:”1238315273″,”isEmbeddedWidget”:true,”standalone”:false,”selectedImageIndex”:0,”startInCommentsView”:false,”isMobile”:false}) });

Please note that the samples in this gallery were shot with a pre-production camera. As such, image quality may not be representative of final shipping cameras (although it is likely to be extremely close), and at Canon’s request, Raw files are not available for download.

Articles: Digital Photography Review (dpreview.com)

 
Comments Off on The same but different: Canon EOS 6D Mark II shooting experience

Posted in Uncategorized


8 Reasons to Revisit the Same Photography Location Again and Again

31 Mar

It’s good to keep moving forward and trying new things all the time. There are times when going back to an old photography location can be a great idea, though. Even if you have a stellar photo from that location it doesn’t mean you can’t get an equally good image that has different characteristics.

The easiest places to make return visits to are of course those local to you, but heading back to that far-off exotic destination is also rewarding. Let’s take a look at those eight reasons to revisit a photography location, and why this will improve your work.

8 Good Reasons to Revisit the Same Photography Location Again and Again

This is a great vantage point in Busan. I returned to this location to take this photo.

1 – Conditions are never the same!

The earth is a constantly changing and dynamic entity, that means you’ll almost certainly get a different image if you go to the exact same spot and photograph it again. There are even projects that show the same location photographed every day, with the intent of showing subtle changes. You don’t need to go every day, of course, but you might take a shot of the location in the snow, and one in the sun.

The following is a list of variables that should ensure you can return to a photography location, and get something different from it each time.

8 Good Reasons to Revisit the Same Photography Location Again and Again

A different angle of the bridge in Busan. This time photographed from the coast.

  • Season –  Provided you live in a temperate area that sees a change of the seasons, you can make the most of this with your photography. Taking shots of the same location in spring, summer, fall and winter is a classic photography idea.
  • The tide  If you’re in a coastal location the change in the tides can alter the scene you photograph dramatically. You can check the state of the tide at this website, and remember to stay safe in coastal areas.
  • The sun position – This is similar to the seasonal change, though the position of the sun could make or break the photo more than if there is snow or not. The position of the sun can be planned before you go back using the suncalc website.
  • Astro-photography – You may have photographed a place by day, but how about photographing it at night? You could try photographing star trails, or even the Milky Way. As with the sun, the position of the Milky Way shifts in the sky throughout the year, so prior planning is needed when shooting the night sky.
8 Good Reasons to Revisit the Same Photography Location Again and Again

Everything looks great with snow! Snow is one of the best weather conditions in which to shoot.

2 – Revisit a photography location with brand new gear!

New photography equipment can really open up other creative angles that you’d never thought of before. One of the best pieces of equipment any new photographer can purchase is a tripod, which will then open up the door to lots of long exposure photography.

The addition of a new lens to your camera equipment will open up yet further possibilities, especially if you’re trying a wide-angle or fisheye lens for the first time. Those who like light painting should look at the pixelstick, a great tool for this type of photography.

8 Good Reasons to Revisit the Same Photography Location Again and Again

New gear is a great reason to revisit a photo location. In this photo I used a glass ball, it’s one of the first photos I took with it.

3 – New photography techniques

New gear often means learning a new technique. There are plenty of techniques you can learn with your existing gear.

As a landscape photographer, you may have photographed a location before using a technique like digital blending. Of course, once you know this new technique you’ll want to revisit a photography location and see if you can improve on your old shots. Equally, if you’re a portrait photographer learning to use

Equally, if you’re a portrait photographer learning to use off-camera flash will really enhance your work. This would give you a good reason to go back and shoot a place again.

8 Good Reasons to Revisit the Same Photography Location Again and Again

A new technique such as steel wool spinning can lead you to revisit a photography location.

4 – A special event is happening

There really is no better reason to revisit a photography location than some kind of event happening there. A big cultural event can give a location much more context and story, enriching your photo. The potential for unique photos that other photographers won’t be able to replicate also exists at these kinds of events.

Photographing an event also presents a good test of your skill, there are no second chances with these type of photos. Lastly, it’s great to experience a place at its vibrant best, which will be the case during a festival or event. It’s always worth running a google search on a particular location to see what yearly festivals they have, this way you can plan to be there during that time.

8 Good Reasons to Revisit the Same Photography Location Again and Again

A fireworks festival will often show a location in a different way.

5 – Improvement as a photographer

The longer the gap between revisiting a photo location, the more your photography will have changed. This can be a great way to gauge your improvement as well.

Lay out your best five photographs from the first trip you made, and then your best five when you return this time. Are there differences? How have you improved as a photographer? Is there something you wanted to improve that you still need to work on? It is typical for a photographer to first improve by making their photos more minimal. After a period of learning the next step is to add story and context to a more minimal scene, this is a step-by-step process.

8 Good Reasons to Revisit the Same Photography Location Again and Again

As you develop as a photographer the angles you use will change. You should be able to look back and see your improvement.

6 – Revisit a photo location until you get the best weather

If you know a good landscape photographer they’ll likely tell you they revisit the same spot until they get the photograph they want. The truth is you never know whether you will get the perfect sky. This can be especially frustrating if you need to travel several hours to reach the location. Weather can change fast, and these days pollution can also be a factor.

The need to make repeat journeys then is important if you wish your photo to be striking. Even once you have that perfect shot going back can be fun. Can you take this scene with different weather conditions and make another striking image?

8 Good Reasons to Revisit the Same Photography Location Again and Again

This is what happened the first time I visited this spot. The day was nice, then dust and smog rolled in.

7 – Previous experience of a location

As a photographer, it’s always a good idea to have some stock locations you know about. These are places you’ve been before, and you will know very well. The big advantage here is you will automatically know the best location and shooting angles.

That means no losing the shot because you’re scrambling around looking for the best perspective. Landscape locations very often work well for portraits as well, and prior knowledge of a place will help you choose a good spot for this. It’s always good to have a killer location in your back pocket.

8 Good Reasons to Revisit the Same Photography Location Again and Again

I’d shot this bridge several times before. I used my prior knowledge of this location to choose a new angle.

8 – Visit with friends

When friends come and visit, and especially if they’re photographers, it’s great to show them a nice place. They’ll appreciate the local knowledge passed on to them. The chances are one day you’ll benefit when someone takes you to a great location that they know about, so sharing is always a good idea.

The other benefit of going with another photographer is they’ll have fresh eyes. They may spot something you missed, and give you further ideas about how you can photograph that location.

8 Good Reasons to Revisit the Same Photography Location Again and Again

Infrared is another photography technique that opens new creative possibilities.

Get out there and play it again!

Do you really need any of the above reasons to revisit a photography location? Those areas of natural beauty or the cool festival you went to the year before are always great to see again.

Let’s see your favorite photography location in the comments below. What draws you back to this place, and do you have more than one favorite photo from there? Is there anywhere you’ve been to that you’d like to visit again? We’re all looking forward to hearing your stories in the comments below!

This was one of the first photos I took at this location. Return visits have meant better photos.

8 Good Reasons to Revisit the Same Photography Location Again and Again

This bridge in Busan is photogenic. It’s fair to say one of my first photos of it isn’t that dynamic.

8 Good Reasons to Revisit the Same Photography Location Again and Again

This bridge at Seonamsa in South Korea was a favorite photo when I took it. I have since photographed this place several more times.

The post 8 Reasons to Revisit the Same Photography Location Again and Again by Simon Bond appeared first on Digital Photography School.


Digital Photography School

 
Comments Off on 8 Reasons to Revisit the Same Photography Location Again and Again

Posted in Photography


Samsung Galaxy S8 likely to come with same camera specs as S7

28 Jan

More than six months ago the upcoming Samsung flagship smartphone Galaxy S8 was rumored to come with a dual-cam setup. Now, that we are much closer to the actual launch of the device, it’s looking more and more like those rumors were unfounded. Today a major leak, via the usually very reliable Evan Blass (a.k.a @evleaks), has revealed that the S8’s camera specification will indeed be very similar to its predecessor S7: a 12MP sensor and F1.7 aperture in the main camera and 8MP with F1.7 at the front. The latter has an iris scanner next to it, like we’ve already seen it on the now discontinued Galaxy Note 7. There is no talk of OIS but we’d be surprised if it would not be included. 

There will be a new visual search function that uses the camera, though. The technology will be able to identify objects and users will then be able to perform searches on shopping sites or search engines. We have seen a similar feature on Amazon’s Fire Phone before. The same tool will also offer OCR functionality. 

Other specs sound interesting as well. There will be a Plus version with a large 6.2″ display alongside the 8-8″ standard model. Both displays will be curved AMOLED variants with an unusual 18.5:9 aspect ratio. Both phones will, depending on region, be powered by the brand new Snapdragon 835 or Samsung’s latest in-house Exynos chipset, combined with 4GB RAM and 64GB of expandable storage. The batteries will have a capacity of 3,500 and 3,000 mAh respectively. Both phones are expected to be announced on March 29. In Europe the Galaxy S8 will set you back €799 (approximately $ 855), the Plus model will be €899 ($ 960).

What do you think about the upcoming S8 from a mobile photography point of view? Will it, despite seemingly unchanged camera specs, be able to keep up with its high-end rivals? Let us know what you think in the comments.

Articles: Digital Photography Review (dpreview.com)

 
Comments Off on Samsung Galaxy S8 likely to come with same camera specs as S7

Posted in Uncategorized


Landscape Photography – Shooting the Same Location Through the Seasons

06 Sep

2-for-1 special

As part of Landscape Photography Week here on dPS, we’re offering TWO for the price of ONE on our best-selling Living & Loving Landscape Photography ebooks!

Click here to take advantage of this offer.


Put up your hand if you like shooting landscape photography, and are always looking for new places – but only photograph them once, maybe twice, and then think you are done with that area.

I am guilty of the same thing. I go looking for places to photograph, take photos of them, and think I will go back but never do. Perhaps this is something we need to rethink.

Consider how the seasons affect landscapes and what changes happen throughout the year. In Australia the traditional owners of the land, or the indigenous people, have different seasons to the European ones, there are six of them. They are very descriptive of what happens, though the usual seasons of autumn, winter, spring, and summer can still provide lots of differences to give the same place different aspects.

Autumn

Put up your hand if you like shooting landscapes, are always looking for new places, but only photograph them once, maybe twice, and then think you are done with that area.  I am guilty of the same thing. I go looking for places to photograph, take photos of them, and think I will go back but never do. Perhaps this is something we need to rethink.  Consider how the seasons affect landscapes and what changes happen throughout the year. In Australia the traditional owners of the land, or the indigenous people, have different seasons to the European ones and there are six of them. They are very descriptive of what happens. Though the usual seasons of autumn, winter, spring and summer can still provide lots of differences to give the same place different aspects.  Autumn  The most obvious thing about autumn is the changing of the leaves. In some parts of the world, this happens a lot more and nearly all trees lose their leaves. In Australia it doesn’t happen so much and many of the native trees are evergreen and retain their leaves all year round. Having said that, there are also many introduced species that do, and in towns and some areas in the country you can find trees that have those beautiful, golden colors associated with autumn.  The changing of the leaves isn’t the only thing to look for. On billabongs, swamps and dams, you will often find low level mist creating wonderful moods. If you go out early in the morning, wait for the sun to rise and you can get some great effects from the sun rays as they hit the water.  There, sunrises are more interesting and sometimes there is a golden light that is associated with that time of morning that you can only see at that time of year. The golden hour that is normally associated with sunsets is there to give your landscape that rich color. It isn’t too cold in the mornings, but the weather is changing as winter approaches.  Before you go to bed check what the forecast will be the following day. What you are looking for is the weather to get worse, such as rain being forecast. In the morning before the sunrise take a look outside at the sky. If the sky is clear and there are no clouds, you won’t get that beautiful color that you get when the sun reflects off the clouds. If the sky is very grey, go back to bed, the change has already happened.  Winter  In winter the sun doesn’t go so high, so you can get long shadows all day. The shadows are softer and have a moist feel to them, especially in the morning when there is dew all over the ground. You can take photos at any time of the day and it is the best time of the year to photograph.  Frosts and fogs can give the landscape a completely different look, and heading out on a foggy morning can be well worth it. It is cold, but the images will make you glad you went. If you know it is going to be foggy or frosty in the morning you need to just head out, as you may not get many mornings with either of these. If you stay out long enough you might also be rewarded with an amazing sunny afternoon.  Stormy skies and rain can give another dimension to your images. Large storm clouds or grey skies can give a landscape a completely different look to when there are blue skies. Look for cloudy skies and breaks in the sun to give the scene in front of you a great effect.  Winter often means bare trees. Once the leaves have been stripped from them there are branches that can give your images interesting shapes and shadows. If you like photos with lots of mood, it is a perfect time to get it, especially if you get a great fog to go with them.  There is an array of colors that you don’t see at other times of the year. The dew in the early mornings makes everything wet which can bring out the colors and give you wonderful naturally saturated images.  Some of the most beautiful landscapes I have ever seen were taken when there is a blanket of snow. Unfortunately, in most places here, it never snows. If you live somewhere where it does, you should use it, brave the cold and just get out there and make the most of it.  Spring  The most obvious aspect of spring is flowers. It might be flowers in the garden, or wildflowers growing in their natural environment. Having them blooming in the landscape leaves no doubt that it is spring.  It is beginning to warm up as summer approaches, and, while the weather is getting better, there is also going to be lots of rain and more stormy skies as spring is often the wettest time of the year. You could try taking photos of your landscapes in the rain, it will give them a different look.  Spring is also the time that many baby animals are born, so you can see new life everywhere you look.  Waterfalls, creeks and rivers run faster and have more water in them as the snow melts. Go to your favorite waterfalls and see how the extra water adds more volume. You will get something quite different than you would if you photographing them at the end or the height of summer.  Summer  This can be the harshest season in Australia. It is dry and hot. Most of the grasses in the landscape die off, leaving brown grass everywhere. There is an absence of color and the landscape is very different to what you find in winter. The hot sun will also leach out all the color in what you see. A beautiful landscape that you get in other times of the year will look desaturated.  The light is harsh and hard. The sun is higher in the sky and the shadows are shorter. Going out to get nice pictures in the middle of the day is too hard, and often too hot. Though it shouldn’t stop you from trying. See what you can get and see if you can show that heat in the images. If you get those extreme days where the temperature is above 100°F then it won’t matter when you go, it will be horrible.  On a positive note, if you know the next day is going to be a scorcher, check for clouds and head out somewhere great for a landscape as you can be fairly certain that you will get the most magnificent sunset. You need clouds to get a great one and the more the better, but you don’t want overcast or you won’t see the setting sun. Don’t forget to hang around for an hour afterwards to get the best of it. Summer is the best time for those amazing sunsets, and over water means you get double.  In Australia it is very hot at that time of the year, but usually after a few days of intense heat it gets broken by a big thunder storm. You can head out, somewhere where you will be protected, and take some photos of the lightning and thunder clouds as they approach.  Using the Seasons for Your Photography  Think of your favorite places that are nearby, places you can get to easily. What are they like at different times of the year? How can you show those differences? It could give your photography a new focus, give it a try. I’ve been doing it for the last couple of years and it is amazing how you can get very different images from the same location.  If you have an area that you love photographing but feel as though you have exhausted it, consider documenting the change throughout the seasons with your camera.

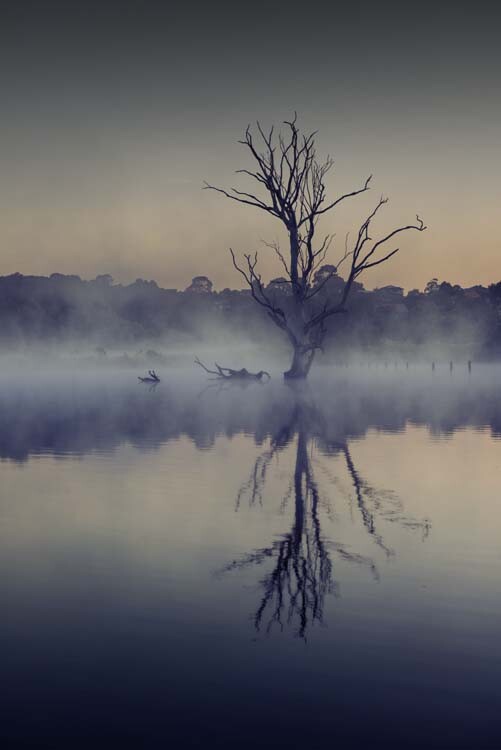
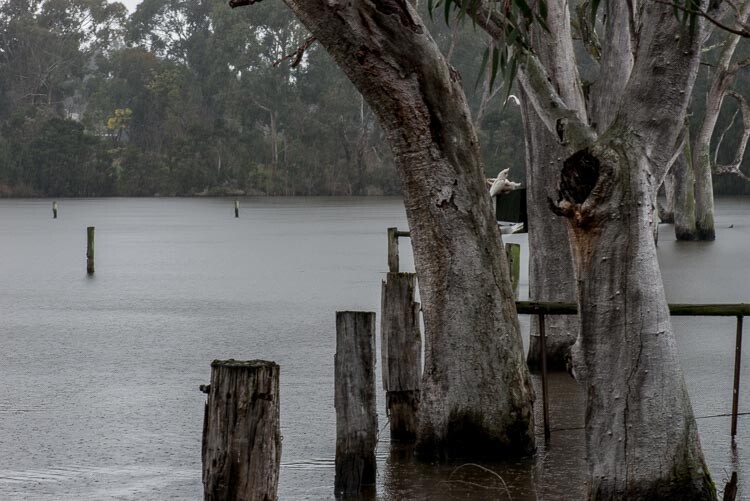
Autumn brings low mist over the water in Banyule Flats.

The most obvious thing about autumn is the changing of the leaves. In some parts of the world, this happens a lot more and nearly all trees lose their leaves. In Australia it doesn’t happen as much, and many of the native trees are evergreen which retain their leaves year round. Having said that, there are also many introduced species that do have color changing leaves, and in some towns and areas in the country you can find trees that have those beautiful, golden colors often associated with autumn.

The changing of the leaves isn’t the only thing to look for. On billabongs, swamps and dams, you will often find low level mist creating wonderful moods. If you go out early in the morning, and wait for the sun to rise, you can get some great effects from the sun rays as they hit the water.

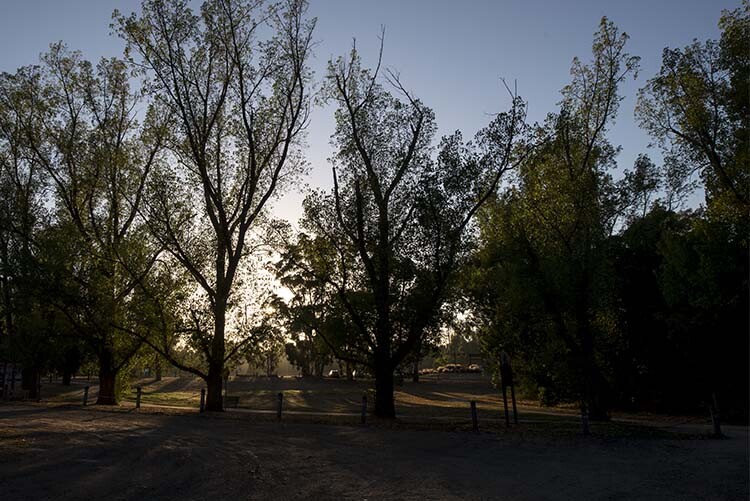
In those types of locations, sunrises are more interesting and sometimes there is a golden light associated with that time of morning, that you can only see at that time of year. The golden hour that is normally associated with sunsets is there to give your landscape that rich color. It isn’t too cold in the mornings, but the weather is changing as winter approaches.

cole-landscape-photography-seasons-0009

Autumn’s early morning golden glow through some trees.

Before you go to bed at night, check what the forecast will be the following day. What you are looking for is the weather to get worse, such as rain in the forecast. In the morning before the sunrise take a look outside at the sky. If the sky is clear and there are no clouds, you won’t get that beautiful color that only happens when the sun reflects off clouds. If the sky is very grey, go back to bed, the change has already happened.

Winter

cole-landscape-photography-seasons-0012

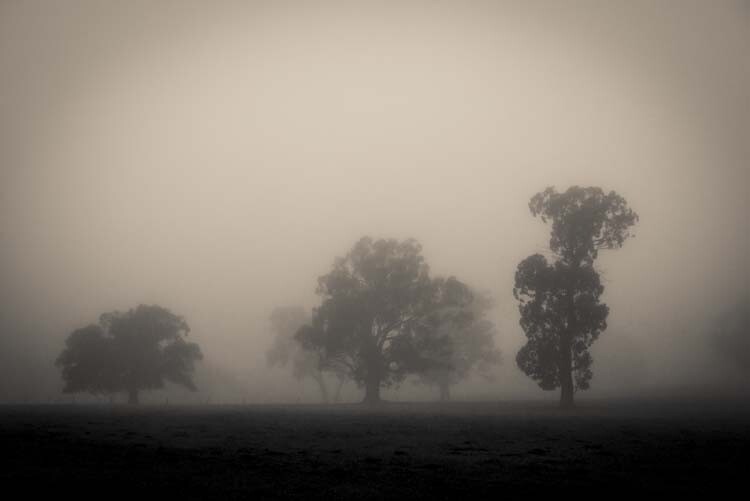
Thick fog in the countryside, in the middle of winter.

In winter the sun doesn’t get as high in the sky, so you can get long shadows all day. The shadows are softer and have a moist feel to them, especially in the morning when there is dew all over the ground. You can take photos at any time of the day, it is the best time of the year to photograph.

Frosts and fogs can give the landscape a completely different look, and heading out on a foggy morning can be well worth it. It is cold, but the images will make you glad you went. If you know it is going to be foggy or frosty in the morning you need to just head out, as you may not get many mornings with either of those conditions. If you stay out long enough you might also be rewarded with an amazing sunny afternoon.

Stormy skies and rain can give another dimension to your images. Large storm clouds or grey skies can give a landscape a completely different look compared to those with blue skies. Look for cloudy skies, and breaks in the sun, to give the scene in front of you a great effect.

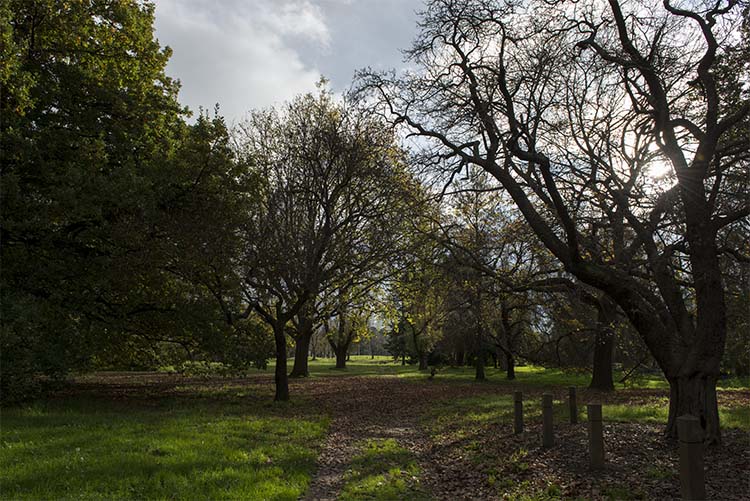
Winter often means bare trees. Once the leaves have been stripped from them, there are branches that can give your images interesting shapes and shadows. If you like photos with lots of mood, it is a perfect time to get that, especially if you get a great fog to go with the bare trees.

cole-landscape-photography-seasons-0010

A typical Australian winter with some bare trees, long shadows and saturated colors.

There is an array of colors that you don’t see at other times of the year. The dew in the early mornings makes everything wet which can bring out the colors and give you wonderful naturally saturated images.

Some of the most beautiful landscapes I have ever seen were taken when there is a blanket of snow. Unfortunately, in most places here, it never snows. If you live somewhere where that it does, use it. Brave the cold and just get out there and make the most of it.

Spring

cole-landscape-photography-seasons-0014

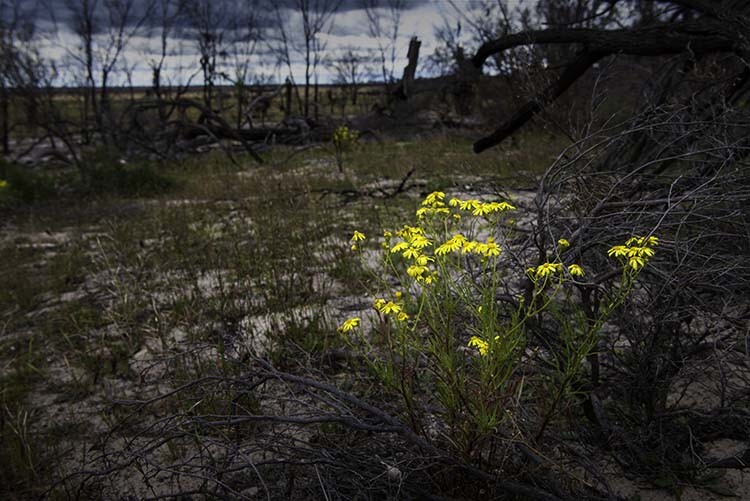
Wildflowers add some color during spring.

The most obvious aspect of spring is flowers. It might be flowers in the garden, or wildflowers growing in their natural environment. Having them blooming in the landscape leaves no doubt that it is spring.

It is beginning to warm up as summer approaches, and, while the weather is getting better, there is also going to be lots of rain and more stormy skies, as spring is often the wettest time of the year. You could try taking photos of your landscapes in the rain, it will give them a different look.

cole-landscape-photography-seasons-0015

A spring rain on Banyule Flats.

Spring is also the time that many baby animals are born, so you can see new life everywhere you look.

Waterfalls, creeks, and rivers run faster, and have more water in them as the snow melts. Go to your favorite waterfall and see how the extra water adds more volume. You will get images that are quite different than you would if you photograph there at the end, or the height, of summer.

Summer

cole-landscape-photography-seasons-0008

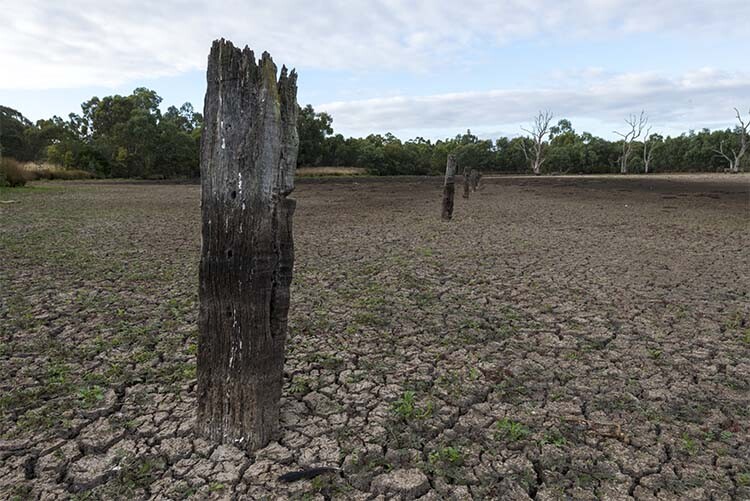
Summer often dries out the swamp in Banyule Flats

This can be the harshest season in Australia. It is dry and hot. Most of the grasses in the landscape die off, leaving brown grass everywhere. There is an absence of color and the landscape is very different to what you find in the winter. The hot sun will also leach out all the color in what you see. A beautiful landscape that you get at other times of the year, will look desaturated.

The light is harsh and hard. The sun is higher in the sky and the shadows are shorter. Going out to get nice pictures in the middle of the day is too hard, and often too hot – though it shouldn’t stop you from trying. See what you can get and if you can show that heat in the images. If you have extreme days where the temperature is above 100°F (37.8°C) then it won’t matter when you go, it will be horrible.

cole-landscape-photography-seasons-0013

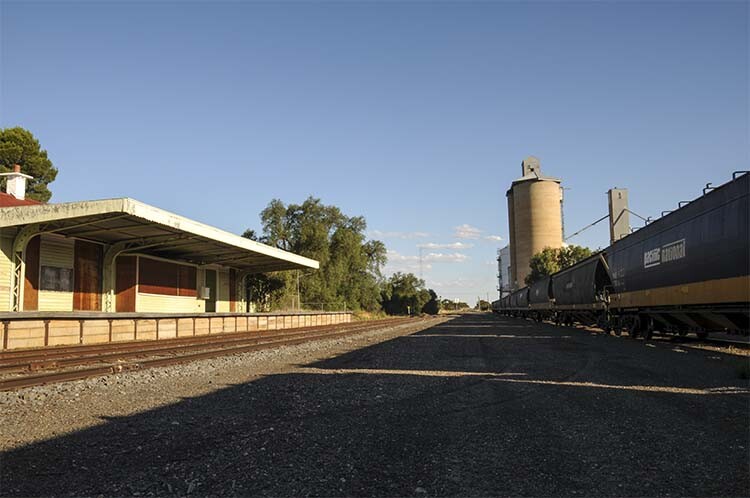
On a very hot summer day in the early evening, the sun is still very strong, and the shadows still harsh.

On a positive note, if you know the next day is going to be a scorcher, check for clouds and head out to a great landscape photography location, as you can be fairly certain that you will get the most magnificent sunset. You need clouds to get a great one and the more the better, but you don’t want overcast or you won’t see the setting sun. Don’t forget to hang around for an hour afterwards to get the best of it. Summer is the best time for amazing sunsets, and over water means you get double.

In Australia it is very hot at that time of the year, but usually after a few days of intense heat it gets broken by a big thunder storm. You can head out, somewhere where you will be protected, and take some photos of the lightning and thunder clouds as they approach.

Using the seasons for your photography

Think of your favorite places that are nearby, places you can get to easily. What are they like at different times of the year? How can you show those differences? It might your photography a new focus, give it a try. I’ve been doing it for the last couple of years and it’s amazing how you can get very different images from the same location.

If you have an area that you love photographing but feel as though you have exhausted it, consider documenting the change throughout the seasons with your camera.


Here on dPS this is landscape week – here is list of what we’ve covered so far. Watch for a new article (or two) on landscape photography daily for the next few days.

  • 6 Tips for Better Low-Light Landscape Photography
  • Landscape Photography and the Human Element
  • 5 Ways a Telephoto Lens Can Improve Your Landscape Photography
  • Landscape Photography from the Side of the Road
  • 32 Majestic Landscape Photos to Inspire Your Wanderlust
  • Weekly Photography Challenge – Landscape

googletag.cmd.push(function() {
tablet_slots.push( googletag.defineSlot( “/1005424/_dPSv4_tab-all-article-bottom_(300×250)”, [300, 250], “pb-ad-78623” ).addService( googletag.pubads() ) ); } );

googletag.cmd.push(function() {
mobile_slots.push( googletag.defineSlot( “/1005424/_dPSv4_mob-all-article-bottom_(300×250)”, [300, 250], “pb-ad-78158” ).addService( googletag.pubads() ) ); } );

The post Landscape Photography – Shooting the Same Location Through the Seasons by Leanne Cole appeared first on Digital Photography School.


Digital Photography School

 
Comments Off on Landscape Photography – Shooting the Same Location Through the Seasons

Posted in Photography


How To Create Two of the Same Person in One Photograph Using Photoshop

12 Jul

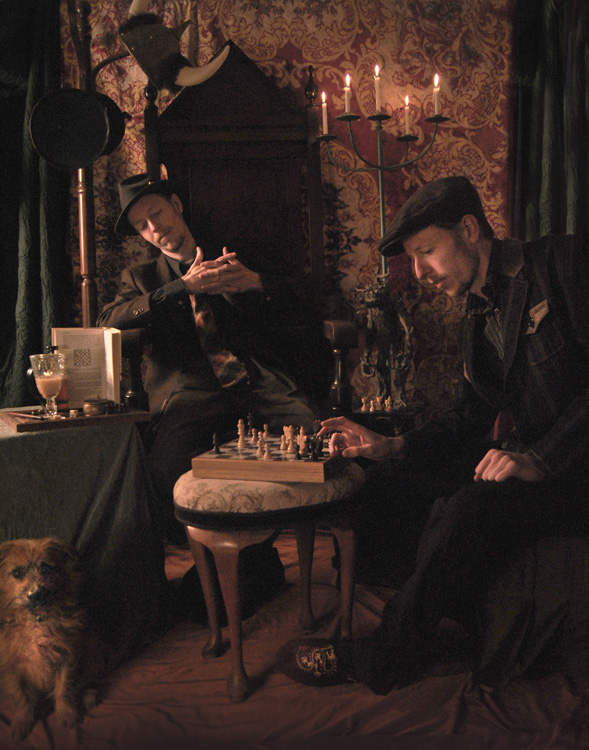
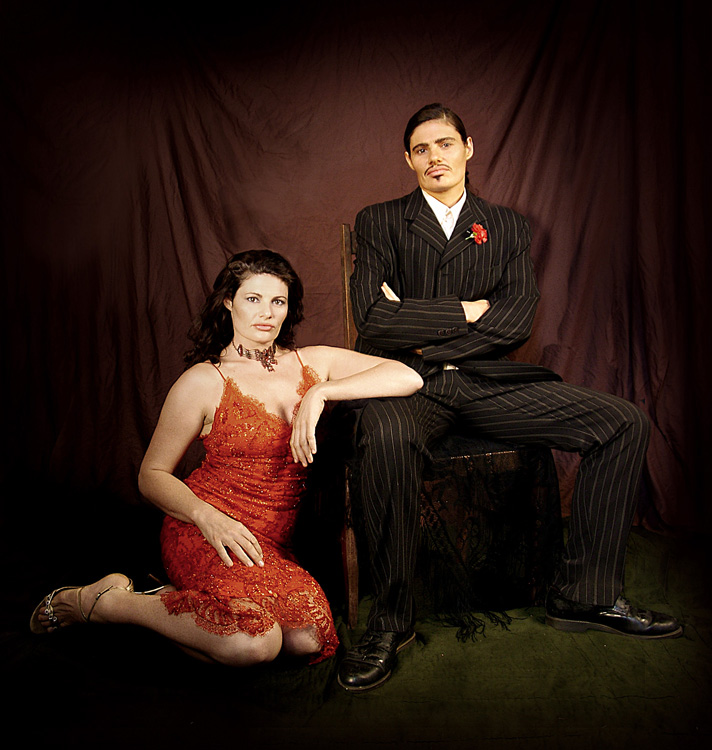
This is a fun twist on portraiture that can often tell a bit more of a story about your subject, by allowing them to reveal two or more sides to their personality. It’s an old photography trick used in the days of the darkroom, and now with modern technology can be done in minutes with a few simple steps in Photoshop.

First you are going to need two or more photographs of your subject, so find yourself a victim to experiment on, or try a self portrait. The main trick to this technique is to get things set up well in the shooting stage so everything goes smoothly when you go to edit.

Getting Set Up to Shoot

You’ll need to put your camera on a tripod. Your tripod position, lighting setup, your camera and its settings, all need to remain the same throughout the shooting session. Once you’re set up don’t move or twiddle anything, otherwise things can get a bit wobbly when you go to blend your final images.

It is possible to do this with natural light, but you’ll have to work fast before the light changes too much. If you don’t have studio lighting you can try light painting or some of the other DIY lighting tips from my article Creating Effective Studio Lighting with Household Items

Start with a simple set such as two chairs. To make it a bit more interesting, add something like a small table in between with a prop or two; your subject could be sharing a cup of tea or a glass of wine with themselves.

portrait-photography-trick02

Positioning your subject

Once you have set your stage and are happy with how it looks through the viewfinder, bring in your subject to test out the lighting on them for both positions. Then you are ready to roll.

Think about how the different versions of your subject will interact with each other. Will they be in conversation, raising a glass congratulating themselves on a portrait sitting job well done perhaps? In such a case it’s important to get their line of site correct to achieve the illusion of the subject looking at themselves.

portrait-photography-trick03

It is a good idea, when first attempting this, to ensure there is no overlap of the two versions of your subject, such as a stray foot, to save you any extra fiddling about in the editing stage. You can help to keep both versions separate by placing a small marker, such as a tiny bit of tape on the floor in the middle of your setup, so your subject knows where that invisible overlap line is located.

For the shot below I had the female version lean on a rolled up towel to imitate the knee of the male version of herself. This gave a natural lean to her pose and helped create the illusion that she is actually leaning on the male version’s lap.

portrait-photography-trick04

Take as many shots as you and your portrait subject have the time and patience for. The more versions you have, the better chance of finding a perfect match in the editing stage. Try different facial expressions and poses for each version of your subject.

Easy editing

We are going to be working with layers here, but if that’s new to you don’t panic! It really is easier than you might think. Just follow the few steps below and you’ll be pulling a photographic rabbit out of a Photoshop hat in no time.

  • Open your favorite image of each version of your subject in Photoshop.
  • Make sure both images are the same size.
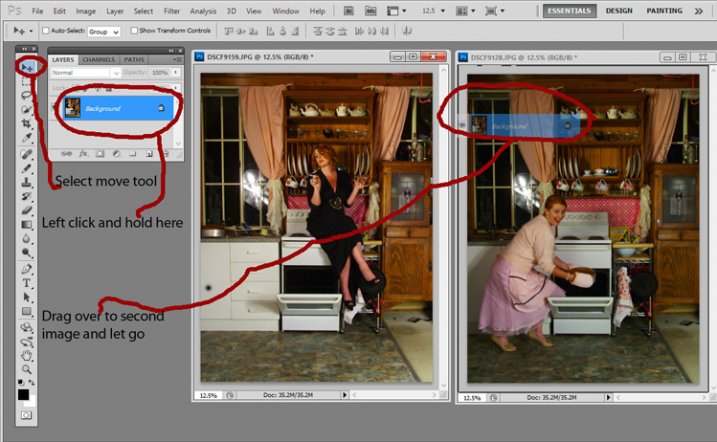
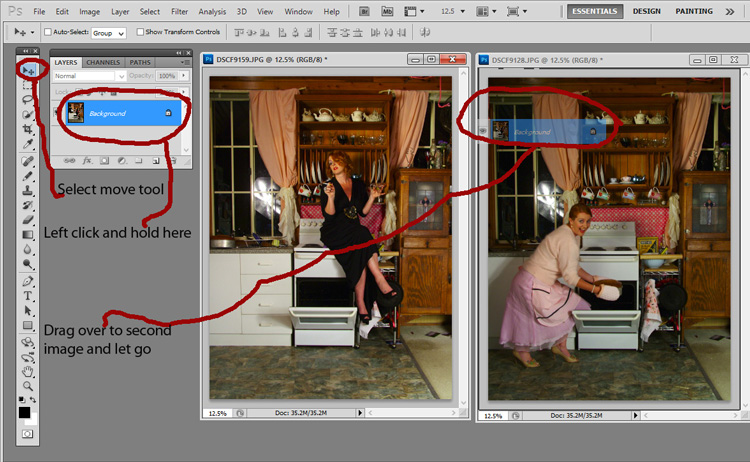
  • Using the Move Tool, click on the thumbnail of the first image in its Layers Palette, drag over the top of the second image and let go.
  • You now have both images on top of each other in the same file, seen as Background and Layer 1 in the Layers Palette (shown below).

portrait-photography-trick05

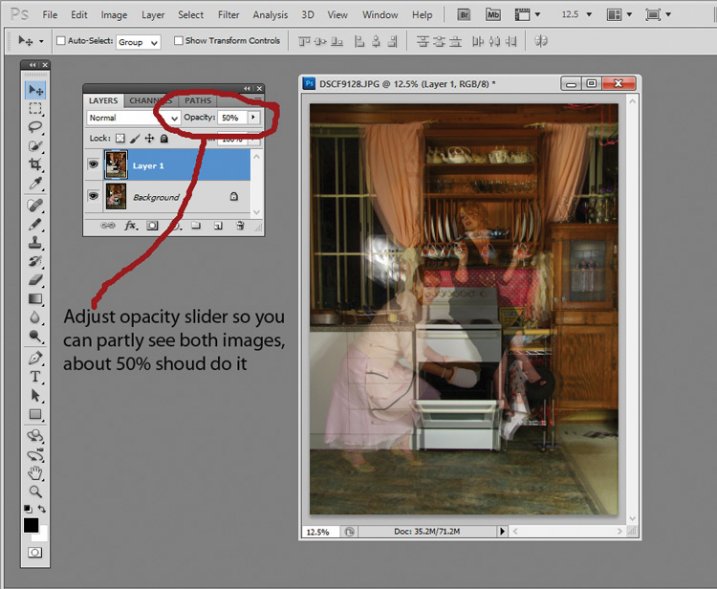
  • You’ll need to see both versions, so go to the Layers Palette and select the Layer 1 thumbnail.
  • Using the Opacity slider just above it, slide it around until you can see both images, about 50% usually works the best.

If you haven’t moved anything about during shooting the images should line up perfectly. In which case, you’ve done the hardest part already, it’s smooth sailing from here.

If your setup got bumped, you can probably still line things up well enough to work. Just use the Move Tool to slide around top image and try and get the best alignment. It helps to zoom in to check accuracy (you can also use Auto-Align Layers” in the edit menu but it may be fooled by the subject – but give it a try).

portrait-photography-trick06

Now the fun part

  • Select Layer 1 in the Layers Palette.
  • At the bottom of the Palette is a little square with a circle in it, commonly known as the Add Layer Mask button, or as I like to call it, the Where the Magic Happens button.
  • Click on it and a Layer Mask white box will appear next to the image thumbnail.

It’s not sounding very magic so far, but hang in there.

  • The Background and Foreground Colour squares at the bottom of your Tools Pallette will need to be black on the top (foreground color).
  • Select a brush, set to zero hardness and get ready to make magic happen.
  • Set both Layer and Brush Opacity sliders to 100%.
  • Make sure that white Layer Mask thumbnail is still selected.
  • Start brushing and watch as the second version of your model magically appears, tada!

portrait-photography-trick07

Don’t worry if you go too far, and erase something more than you intended, if you do, you can just switch those little black and white boxes in the Tools Pallette with the tiny arrows (or press X on your keyboard) so white is on top, then brush back in to reverse the mistake (black conceals, white reveals).

That’s it! All the tricky stuff done and dusted.

Now you simply flatten the image. File> Flatten Image, and all that is left is to edit as you would any other photograph. For this image it was a crop here, a filter and color adjustment there, and erasing the umbrella light reflection in the window.

portrait-photography-trick08

This technique is something you can really play with, from building sets and getting creative with props, or simply using it to get more of a story from your portrait subject. Either way, it is great fun to try. If you do, please share your results in the comments. Happy experimenting.

googletag.cmd.push(function() {
tablet_slots.push( googletag.defineSlot( “/1005424/_dPSv4_tab-all-article-bottom_(300×250)”, [300, 250], “pb-ad-78623” ).addService( googletag.pubads() ) ); } );

googletag.cmd.push(function() {
mobile_slots.push( googletag.defineSlot( “/1005424/_dPSv4_mob-all-article-bottom_(300×250)”, [300, 250], “pb-ad-78158” ).addService( googletag.pubads() ) ); } );

The post How To Create Two of the Same Person in One Photograph Using Photoshop by Lea Hawkins appeared first on Digital Photography School.


Digital Photography School

 
Comments Off on How To Create Two of the Same Person in One Photograph Using Photoshop

Posted in Photography


Photographer creates picture of 100-man orchestra… with the same person playing each instrument

06 Jun

An Oslo musician and photographer has created a photo stitched together using 400 images, showing an entire orchestra with every instrument played by the same person. Violinist Alexander Light created the 200MP picture by shooting percussionist Heming ValebjØrg in every seat on a stage while he played the appropriate instrument for that position. Read more

Articles: Digital Photography Review (dpreview.com)

 
Comments Off on Photographer creates picture of 100-man orchestra… with the same person playing each instrument

Posted in Uncategorized


The same but different: Nikon announces Coolpix P7800 with EVF

05 Sep

P7800_front_on_DB.png

Nikon has announced the Coolpix P7800, which sits at the top of its compact camera lineup, replacing last year’s P7700 as flagship zoom camera. The P7800 is extremely similar to its nominal predecessor, the most notable change being the addition of an electronic viewfinder. Other specifications are more or less unchanged. The camera is built around a 28-200mm (equivalent) F2-4 zoom lens, and features a fully-articulating rear LCD screen, and plenty of manual control and exposure options, at an expected MSRP of $ 549.99. Click through for pictures and Nikon’s press release.

News: Digital Photography Review (dpreview.com)

 
Comments Off on The same but different: Nikon announces Coolpix P7800 with EVF

Posted in Uncategorized


MACKLEMORE & RYAN LEWIS – SAME LOVE feat. MARY LAMBERT (OFFICIAL VIDEO)
18 Oct

Same Love feat. Mary Lambert on iTunes: itunes.apple.com We support civil rights, and hope WA State voters will APPROVE REF 74 and legalize marriage equality. Visit www.music4marriage.org for more info. Support Marriage Equality by ordering the limited edition Same Love vinyl here www.subpop.com Same Love, as featured on the debut album from Macklemore & Ryan Lewis, The Heist, will be available 10/09/2012 The Heist iTunes Pre-Order: itunes.apple.com Amazon: amzn.com Deluxe CD Pre-Order: www.macklemoremerch.com In-Stores 10 Same Love, A Film By: Ryan Lewis Jon Jon Augustavo Tricia Davis Directed by: Ryan Lewis Jon Jon Augustavo Produced by: Tricia Davis Director of Photography: Mego Lin Associate Producer: Honna Kimmerer Starring: Jairemie Alexander William Pontius Shelton Harris Sarita Valdez Jay Sommerville Cast: Jairemie Alexander William Pontius Shelton Harris Sarita Valdez Jay Sommerville Thomas Collins Tina Tsiakalis Kendall Kapsner Rosie Cole Rory King Josue Gonzalez Mia Clapp Perfetti Mary Lambert Robert Braxton Jaida Kimmerer Brooklyn Thornton Crew: Tricia Davis – Producer Mego Lin – Director of Photography Honna Kimmerer – Production Design Miles Johnson – Lead Green Evelyn Brodersen – Lead Green Jennifer Terrana – Lead Green Jennifer Popochock – Makeup Artist David Herberg – Key Grip Wil Drake – Best Boy Grip Mike Dyrland – Best Boy Grip Yu Chen Lin – Gaffer Blueboy Sguiggley – Production Assistant Seth McDonald – Production Assistant Chris Duerkopp – Steadicam
Video Rating: 4 / 5

 
Comments Off on MACKLEMORE & RYAN LEWIS – SAME LOVE feat. MARY LAMBERT (OFFICIAL VIDEO)

Posted in Photography Videos