RSS
 

Posts Tagged ‘room’

You Can Delete These Lightroom Files to Clean Up and Make Room

20 Aug

Every serious photographer has experienced this. You have too many files and too little hard drive space. The result? No space for other data or laggy performance in Lightroom or on your computer as a whole.  Thus begins the search for figuring out Lightroom’s deepest, darkest secrets. Thankfully, this article will tell you everything you need to know to clean Continue Reading
Photodoto

 
Comments Off on You Can Delete These Lightroom Files to Clean Up and Make Room

Posted in Photography


Weekly Photography Challenge – Living Room

11 Apr

The post Weekly Photography Challenge – Living Room appeared first on Digital Photography School. It was authored by Caz Nowaczyk.

Continuing with the indoors theme, this week’s photography challenge topic is the LIVING ROOM!

Weekly Photography Challenge – Living Room
Due to the lockdowns, I’ve had to rent a furnished apartment in a new town. It has a “sea” theme. I took this and made them into a series. In the third image, the shell close-up, I did it using the reverse lens macro technique. I took my nifty fifty off my camera, flipped it around, held it against my camera, and took photos. You get some interesting effects.

You could photograph objects in your living room. Create a still life from them, do interesting things with lamplight or reflections on your TV screen (if you have one). Photograph people sitting in your living room – your pet on your favorite couch (come on, I know many of you let your pets on the furniture!)

Do macro, wide, or do a series that includes all of them to tell a story. They can be color or black and white, moody or bright.

Weekly Photography Challenge – Living Room
These are some quartz crystals that I have found while on my bushwalks just before lockdown. I photographed these in my living room next to the window. I used my iphone with a macro filter. These are quite small, but look rather large in these photos.

Try creating a series that work together too, if you like.

So, check out these pics to give you some ideas, have fun, and I look forward to seeing what you come up with!

Weekly Photography Challenge – Living Room
Continuing with my living room “sea” theme. The close-ups where, again, reverse lens macro. The first image was with my nifty fifty.

Check out some of the articles below that give you tips on this week’s challenge.

Tips for photographing the LIVING ROOM

Reverse Mounting Your Prime Lenses for Affordable Macro Photography

Reverse Lens Macro: How to use it as a Great Learning Tool

How to Turn a Photography Technique into a Series

Reverse Lens Macro – How to Make Macro Photos with “Backward Thinking”

3 Tips for Photographing Mixed Lighting in Interiors

How I Shot and Edited a Series of iPhone Images

6 Helpful Tips for Doing Interior Architecture Photography

The post Weekly Photography Challenge – Living Room appeared first on Digital Photography School. It was authored by Caz Nowaczyk.


Digital Photography School

 
Comments Off on Weekly Photography Challenge – Living Room

Posted in Photography


Video: How to turn any room in your house into a giant camera

26 Mar

Photographer and DIY camera-extraordinaire Brendan Barry has shared a how-to video showing how you can turn a room in your home into a camera, and how to record the images it creates. Throughout the 30-minute video, he shows whole process from finding a suitable room and picking a lens right through to making the exposure and then creating a positive print. Although he shows the process using black and white photographic paper he also explains how pictures can be made using digital cameras.

‘It’s a bit of fun really’ Brendan explained to DPReview, ‘and a fun way to do something creative if you are confined to the house during this Coronavirus outbreak. I love the process as it playfully breaks down how pictures are made and allows us to see photography in a different way.’

In the video Brendan shows the effects of a series of lenses mounted onto a blacked out window, including a lens from a pair of glasses and a magnifying glass, but says if DPR readers want to get the best possible quality they should be picky about what lens they use. ‘In the video I quickly show a process lens. If you have one, this is what will give you the best results. They are designed to make very big prints and will allow you extra clarity and resolution. They don’t have to be expensive, and decent ones can be found on auction sites. If you measure your wall and find it is 2 metres across you’ll need a 2500mm lens, but you don’t have to make prints that big!’

‘If you are going to use a magnifying glass find a good quality one, not one with a cheap plastic lens – and the bigger the better. If it turns out to be too big you can always reduce the aperture by cutting a circular hole in a disc of card and sticking it over the lens. This will control the amount of light passing through it on a bright day. In the video I show a very roughly cut-out hole, but a smooth and even hole will produce better results. You can also buy great meniscus lenses from Amazing Camera Obscura that are ideal for making a room-sized camera.’

The projected image from the window shown from behind on a sheet of diffusing material

The tutorial shows Brendan mounting a sheet of photographic paper to make a paper negative that, once processed, is then contact printed with another sheet to create a final positive print. ‘I really like this process, and making the contact print while the original negative is still wet creates a beautiful soft look that can’t be got back once the negative has dried. However, if you’d rather shoot using a digital camera you can photograph the projected image from behind, as I show in the video, or you can project the image onto a high quality smooth white surface and photograph that from the front. Position your camera right next to the lens mounted on the window. You won’t be able to shoot it absolutely square-on, but you can fix the distortion in software afterward.’

‘Blacking out the window and mounting the lens only takes about an hour, but there are days of entertainment to be had once you get going.’

Making a room into a camera is one of Brendan’s more straight-forward projects; in the past he’s made a camera from a melon, another from a loaf of bread and one from a slab of cheese. He also has a shipping container that serves as camera and darkroom all-in-one.

You can see some of the other cameras Brendan has made, and how he made them, on his web site.

Articles: Digital Photography Review (dpreview.com)

 
Comments Off on Video: How to turn any room in your house into a giant camera

Posted in Uncategorized


How to Turn Your Living Room into a Photo Studio

08 Apr

The post How to Turn Your Living Room into a Photo Studio appeared first on Digital Photography School. It was authored by Jackie Lamas.

Have you ever wished to have a studio space where you could bring clients in and photograph all types of portraits and ideas? You can! Your living room, or any room in your home for that matter, can be quickly converted so that you can photograph your studio ideas in your home!

Setting up backgrounds on a plain wall can help you take great portraits in your own living room.

Finding the right space

Your living room might be the room with the biggest space for you to get the best angles and set up your lights. As long as you have about 10 feet of blank wall space, you can use it for your at-home studio.

Choose a wall where you can mount backgrounds. Put up studio paper, or any background paper. Alternatively, use a painted wall for your photos. It doesn’t have to be anything special, and you could use the existing wall as the main background as well.

A bedroom with big windows can be used as a studio for portraits.

Why 10 feet? The wider your wall space, the more room you’ll have to the sides of your photos. This will enable you to photograph both horizontally and vertically. You will also have room for more than one person.

If you’re photographing headshots or only individuals, a smaller wall space would work. A wall with 5 feet would be sufficient enough for headshots and individuals.

Other spaces in your home that could work

The living room doesn’t have to be the only space that you can use. For example, if you don’t have studio lights, but want to create beautiful portraits with creative direction on backgrounds and don’t want to go on location, your home can still work!

You can photograph in a covered patio with lots of wall space, in your garage, in the bedroom, or on a balcony. All of these spaces work if you have the wall space to place your subject and space to photograph them from a distance.

This makes it much simpler to choose the right location for your at-home studio in the event that you don’t have studio lighting equipment or a special look to your photographs.

Creating the best set up for studio/flash  set up

You don’t necessarily need to use studio lights for your at-home studio, however, if that is what you’re going to use then let’s go through what you’ll need in the space for the best outcome.

Use flash bouncing off the ceiling to light portraits in your living room or in the space you want for your at home studio.

You’ll need to choose a wall space that is in a darker or not-so-brightly-lit room. You can also use shades or curtains to block out light so that your off-camera lighting can correctly light your scene.

Using a flash to light these portraits to simulate the sun. Plain wall background in the bedroom.

Living rooms offer the most space but make sure you can get it dark enough to set up the lights exactly where you want them.  You could also use external flashes to set up your at-home studio.

You can light portraits creatively when you have control of the space and lighting.

Have a lamp nearby so that you can use it as a modeling light. You can also use a light dimmer so that the light doesn’t affect the outcome or interfere with the white balance, exposure, or look and feel that you’re trying to achieve.

Best set up for natural light at-home studio

If your living room or any other room in your home has great natural light, you can definitely set up your studio there. The same tips apply as far as wall space so that you can pose your subject and have enough space in the frame in case cropping is necessary. It also gives you the option to photograph vertical or horizontal.

This was shot with all natural light using a silver reflector with a 3×3 grey background taped to the wall. Edited to bump up the contrast and desaturate the colors.

Choose a room that has great window light or light coming into the space. For example, a garage space with the garage door open is a good option. Another good option is a living room with big sliding doors where light floods the room. Make sure that the sunlight isn’t coming directly into the room or through the window where it casts weird shadows on your subject.

To diffuse the light, you can hang translucent curtains. This will help with harsh lighting, shadows, and the temperature of the room. Of course, you don’t necessarily need the window open unless it adds more light to your scene – if that is the look you’re going for.

If your home has textured walls, you can use them as backgrounds for the portraits as well!

Use a reflector and bounce cards to help bounce light in the direction you want. Black flags  (black boards that help darken the light) and are great for creating shadows and can help to give you more dramatic lighting.

Be aware of the floor

In your home, your floor is already installed and this can present a problem if you’re photographing full-length portraits. Take a look to see if the floor is what you’ll want for your photos. If it isn’t, you can use paper and place it from the wall all the way to the floor. This will create a seamless look to your photos like a real studio.

In the before photo, we covered the floor with a black sheet so we could photoshop the black background in and create a seamless look.

You can also get cheap wood floor-looking laminate flooring and create your portable floor. If the trim base to the floor isn’t distracting, you could even possibly photoshop that out to create a more seamless look with the wall and the floor.

Just be aware of your floor so you know what to do before you start photographing in your new home studio.

Backgrounds for in-home studios

There are a lot of great backgrounds that you can use for a home studio. Given that it’s completely your space and you can get really creative. The simplest one is the one you already have available! Use the existing wall color and texture to create interesting portraits.

You can use existing decor to create beautiful portraits or tape a paper background to the wall for a seamless background.

Other backgrounds you can use can be:

  • A sheet that covers the wall and onto the floor for a seamless fabric background.
  • Paper either rolled onto the floor for seamless or a piece of paper taped to the wall for up-close portraits
  • Any fabric or paper with a print on it
  • Different colored paper for headshots

Pretty much anything you can think of you can create as a background! You can get really creative with balloons, tissue paper, hanging strings, lights, paper flowers, artificial flowers, string or hanging garlands either made by you or already made newspaper or even plants.

The options and ideas are limitless and will give your photos a unique look no matter what your style is.

In conclusion

Your living room can be the perfect space for you to create beautiful studio work. You don’t need fancy equipment just nice wall space and the light you love to photograph with. Add in some music and you’ve got the perfect comfortable studio right in your home!

Do you have other suggestions to make a great living room studio? Share with us and our readers in the comments below.

The post How to Turn Your Living Room into a Photo Studio appeared first on Digital Photography School. It was authored by Jackie Lamas.


Digital Photography School

 
Comments Off on How to Turn Your Living Room into a Photo Studio

Posted in Photography


The Control Room app lets you control Lightroom from your smartphone

10 Oct

Need to spice up your Lightroom editing experience on the desktop? No need to wait for whatever Adobe has waiting for us at AdobeMAX, you can try out the Control Room app instead. Available for both Android and iOS, the app lets you control all of your Lightroom sliders (and more) from your smartphone, allowing you to lean back and edit the photos on your desktop without touching a mouse or keyboard.

The app was created by software engineer and photographer Aaron Vizzini, who only recently decided to share his creation with the general public.

Using Control Room, you can both edit and manage (rate, flag, create rapid collections) your photos using your smartphone as the control pane. Any changes you make on your device will update in real time on the computer through a companion plugin. It’s exactly as seamless as it sounds:

Whether or not this will actually help speed up your Lightroom workflow is entirely dependent on you, but the idea, at least, is pretty neat. To learn more about Control Room or get the $ 4 app for yourself, head over to the iTunes App Store or Google Play, and then visit the Control Room website to download that plugin as well.

Articles: Digital Photography Review (dpreview.com)

 
Comments Off on The Control Room app lets you control Lightroom from your smartphone

Posted in Uncategorized


Photo of the week: An epic dancer shoot in an inverted room

27 Aug

A month ago, I got in touch with my old friends over at Little Boxes Theater—a recreational performance art/photography studio in San Francisco—about shooting a fun personal project. Since I love to fabricate things in my workshop for shoots, I asked if they’d be up for collaborating on something along those lines.

Aaron Simunovich (one of the studio managers), had a lot of experience woodworking, and threw out the idea of an inverted room. Without any doubts, I said something along the lines of, “yes, let’s make this happen right now.” I immediately got to work on a detailed 3D model of what it might look like structurally, and from there, we budgeted what material we’d need in order to get this set done.

I spent the following 5 days commuting over the San Francisco bridge, gradually building the set with Aaron, and us making frequent trips to the hardware stores… and junkyards. This was all a big experiment, but I called my good friend Valentina Reneff-Olson to model, since this trippy composition just called for a flexible dancer. Combine this two-wall set with a bit of intricate posing, and you end up with a series of photos that emulate anti-gravity perfectly.

Generally, the concept was to have the dancer shooting out of what looked like a painting/mirror frame. Oh yeah, and rain. There was rain.

Technical Details

If I told you how long we actually shot for, you’d probably think I was exaggerating. The truth is, once we had everybody at the studio, we only had 2 hours to get something good. Since I had to travel back to LA for an upcoming shoot, and their studio was booked out, there was just no way to do it the following day.

Little Boxes Theater likes to store set designs in-house, but since I don’t live anywhere near San Francisco, I was not going to leave back to Los Angeles without content that was up to my expectations. Two hours to get both photo and video content? No pressure.

*Game face*

Since I wanted to test the stills and slow motion of my new GH5, I used that body with a 25mm f/1.7 lens, and did everything handheld with the 5-axis stabilization turned on. There were two lighting setups being used simultaneously:

One for stills:

  • Two 600w heads
  • Reflector

One for video:

  • LED panel
  • Reflector
  • 1K Arri fresnel

$ (document).ready(function() { SampleGalleryV2({“containerId”:”embeddedSampleGallery_3099455855″,”galleryId”:”3099455855″,”isEmbeddedWidget”:true,”standalone”:false,”selectedImageIndex”:0,”startInCommentsView”:false,”isMobile”:false}) });

Since I was shooting slow motion at a higher shutter speed, I was really pushing the GH5 settings to see how it performed on this test. The power output of the strobes overpowered the constant lights, so for stills we just kept the constant lights on to help with auto-focus.

Together, we all improvised a bunch of choreography and posing for Valentina to follow, and our stylist, Virginie Suos, switched out the clothing after each video sequence in the rain. I got oddly comfortable shooting atop a scaffolding, with my head tilted 90º the whole time.

This shoot ended up being 75% stills and 25% video, so the minute-long short film that I threw together was cut only from about 6 shots only.

To that I’d say: “not too shabby Daniel, not too shabby.”

Check out the full behind the scenes video below:


Daniel DeArco is a Los Angeles-based photographer, filmmaker, and inventor who first picked up a camera in 2011 after he severely broke his neck. Since then, he’s made a name shooting creative portraits and commercial work. You can find more of his work on his website, Instagram, and YouTube.

Articles: Digital Photography Review (dpreview.com)

 
Comments Off on Photo of the week: An epic dancer shoot in an inverted room

Posted in Uncategorized


Secret Studio: Suspended Mobile Room Slides & Hides Under Busy Overpass

25 Aug

[ By WebUrbanist in Design & Fixtures & Interiors. ]

Designer Fernando Abellanas has built a remarkable micro-dwelling in Valencia, Spain, that slides into position under a bridge, suspended safely out of sight from the traffic passing by above.

The clever construction of the room’s frame allows it to roll over tilted sections of beam, making its way between a lofted and secluded position and the top of a slope on the other side for entry and egress.

A hand-crank lets the dweller move the enclosure back and forth without any need for an external power source. Furniture and fixtures, meanwhile, stay put, attached to the vertical span of bridge supports where the room docks.

Embracing a minimalist approach and industrial palette, this urban refuge has flexible walls that can form an enclosure and act as privacy screens, allowing the occupant to hiding completely behind raised plywood surfaces.

A light-touch approach means the structure leaves essentially no footprint – it glides lightly around existing infrastructure. And its built-in mobility mechanism assures castle-like protection, vertical space acting as a natural moat.

Indeed, the designs were based on childhood fantasies and real-worldassociations with hard-to-access spaces like tree houses and table forts easy for children to access but hard for adults.

The dull hum of the road is a bit like the buzz of a family going about its business — the buffer of concrete also dampens some of the noise, making the space less loud than it would be to occupy a space alongside the highway.

Abellanas has long been fascinated with furniture as well as forts, and his work with other artists and architects reflects an ongoing interest in paradigm-challenging designs do-it-yourself guerrilla interventions.

Share on Facebook


[ By WebUrbanist in Design & Fixtures & Interiors. ]

[ WebUrbanist | Archives | Galleries | Privacy | TOS ]


WebUrbanist

 
Comments Off on Secret Studio: Suspended Mobile Room Slides & Hides Under Busy Overpass

Posted in Creativity


This $31 lens will turn any room into a camera obscura

20 Jul

Turning a room into a camera obscura is as easy as blacking out the room and poking a pinhole into one of the window covers. But if you want to take your camera obscura game to brighter, more colorful heights, the Bonfoton Camera Obscura Room Lens is definitely worth a look.

This portable lens was designed to snap onto blackout curtains or into some other window cover. Then, once the room is dark enough and the outside world is bright enough, the lens will project the outside in: plastering a picture of the view from that window onto your walls, upside-down.

Here’s an example from the Bonfoton website:

A hotel room can become something else entirely through the magic of the camera obscura.

The lens was designed by husband and wife team Tommi and Annika, who say they founded the store because of the joy the camera obscura brought to their friends and family.

“We founded the Bonfoton store after we saw what the Camera Obscura room does to people emotionally when they see the effect for the first time,” explains the couple. “From a child only a few years old to a grandpa age 65 the amazement is the same. First a WOW! Or the OMG!? And then the silent stare when they realize that the image is alive and moving.”

The little company is based in southern Finland, where every lens is made more-or-less by hand. To buy one for yourself, head over to their shop and be ready to drop 27 Euro (~$ 31 USD)

Articles: Digital Photography Review (dpreview.com)

 
Comments Off on This $31 lens will turn any room into a camera obscura

Posted in Uncategorized


Learning Zeppelin: Wooden Airship Docked on Museum Roof as a Reading Room

01 Apr

[ By SA Rogers in Architecture & Public & Institutional. ]

airship 1

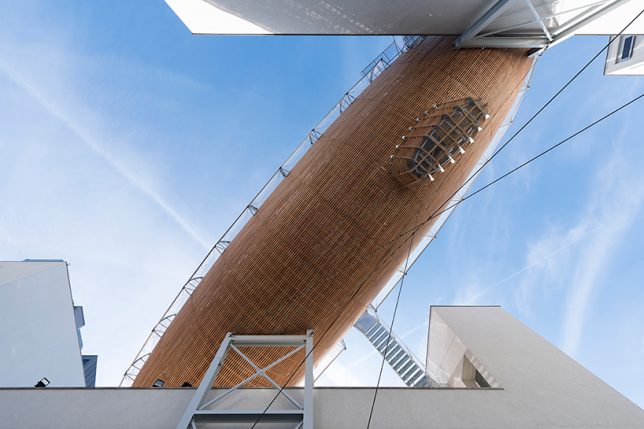
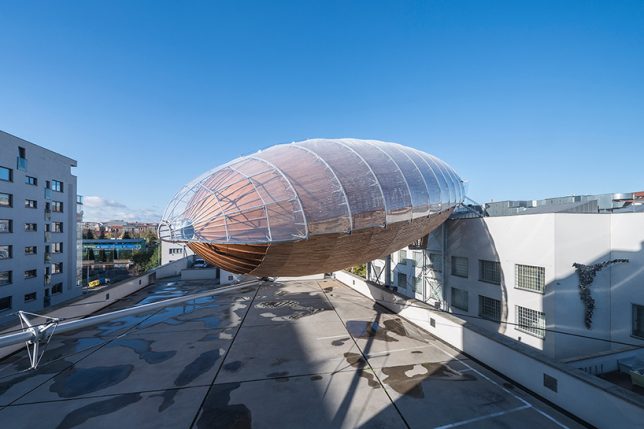
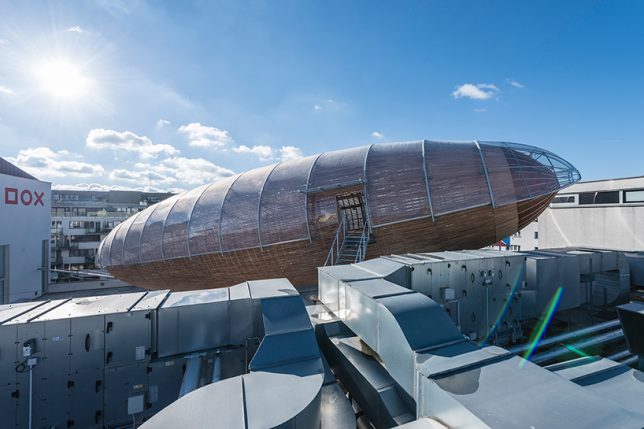
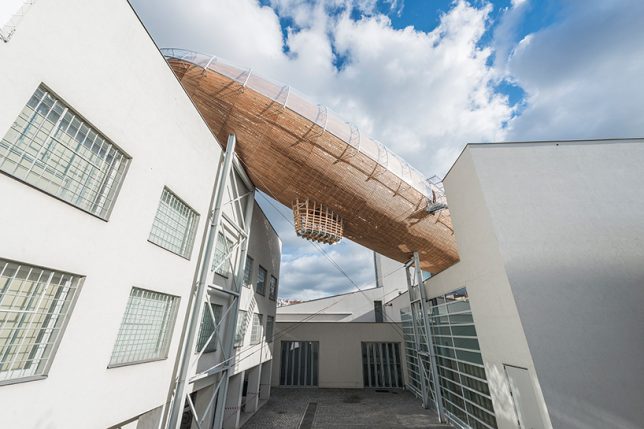
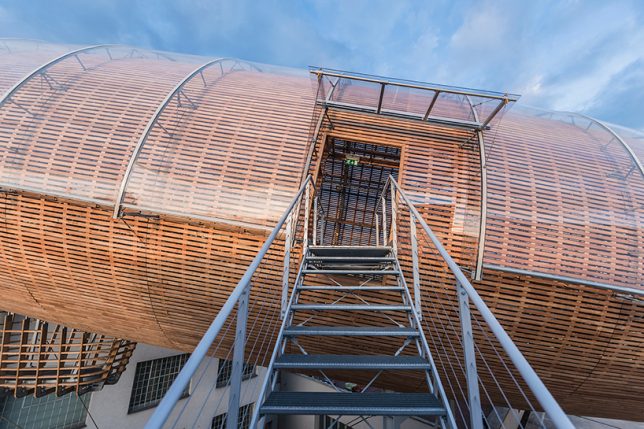
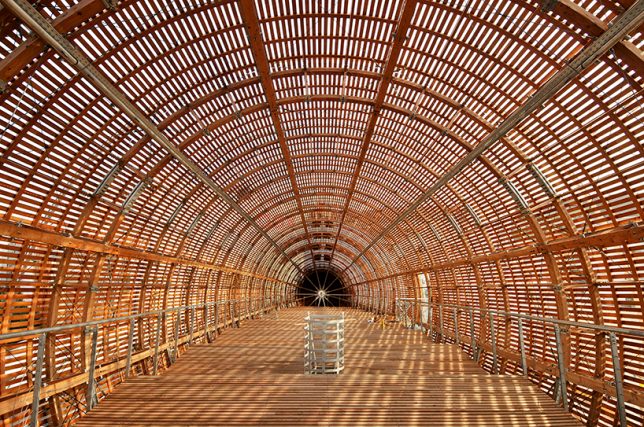
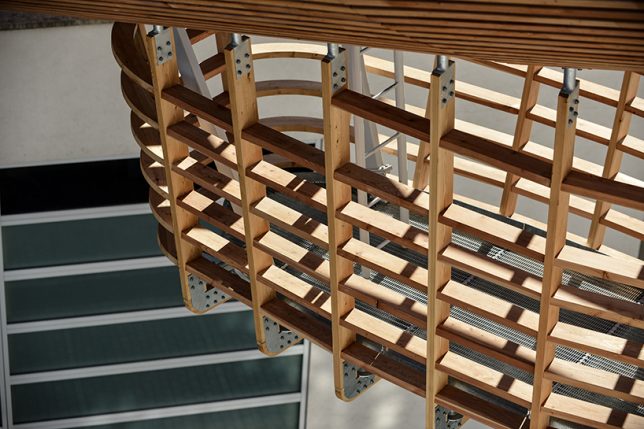
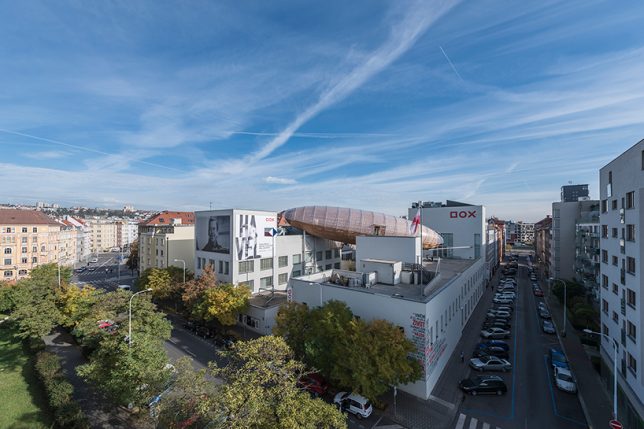
A wooden airship has seemingly crash-landed onto the roof of the DOX Centre for Contemporary Art in Prague, wedged between two white museum buildings for dramatic effect to serve as a new space for literature and reading. Conceived by Leos Valka, director of DOX, and completed by Hut Architektury, the Gulliver Airship measures nearly 138 feet long and features a basketweave-like construction open to the air, protected from the rain by a transparent roof.

airship 2

airship 3

Taking inspiration from the zeppelins of the early 20th century, the airship aims to reflect the optimism, technological advancements and futurism of the era, inciting a sense of wonder when you gaze up at it from the ground level. Valka says he dreamed of “an absurdly fascinating organic shape” that would have a parasitic appearance, alien to the concrete and glass of the museum itself.

airship 4

airship 5

The ‘ship’ is accessible from the museum’s roof, and takes advantage of plentiful natural light for a pleasant reading environment. Adding such an unconventional structure is in line with the museum’s hope to encourage innovative thinking and take risks.

airship 6

airship 7

The DOX facility is a reclaimed factory, its renovation nominated for the prestigious Mies van der Role Award, and its purpose is “to create a space for research, presentation and debate on important social issues, where arts in dialogue with other disciplines encourage a critical view of the so-called reality of today’s world.”

airship 9

airship 10

“The shape of the zeppelin is symbolic,” reads a statement on the DOX website. “The early zeppelins represented the optimistic ideals of a new era of unprecedented technological advancements. With their remarkable monumentality and hypnotic dignity that would continue to fascinate generations to come long after they had vanished from the skies, they have always embodied the eternal human desire to fly, and have represented a certain utopian ideal.”

Share on Facebook


[ By SA Rogers in Architecture & Public & Institutional. ]

[ WebUrbanist | Archives | Galleries | Privacy | TOS ]


WebUrbanist

 
Comments Off on Learning Zeppelin: Wooden Airship Docked on Museum Roof as a Reading Room

Posted in Creativity


Vertigo Wallpaper: Warped 3D Room Illusions Transform Flat Gallery Surfaces

31 Dec

[ By SA Rogers in Art & Installation & Sound. ]

screen-shot-2016-12-30-at-9-51-20-am

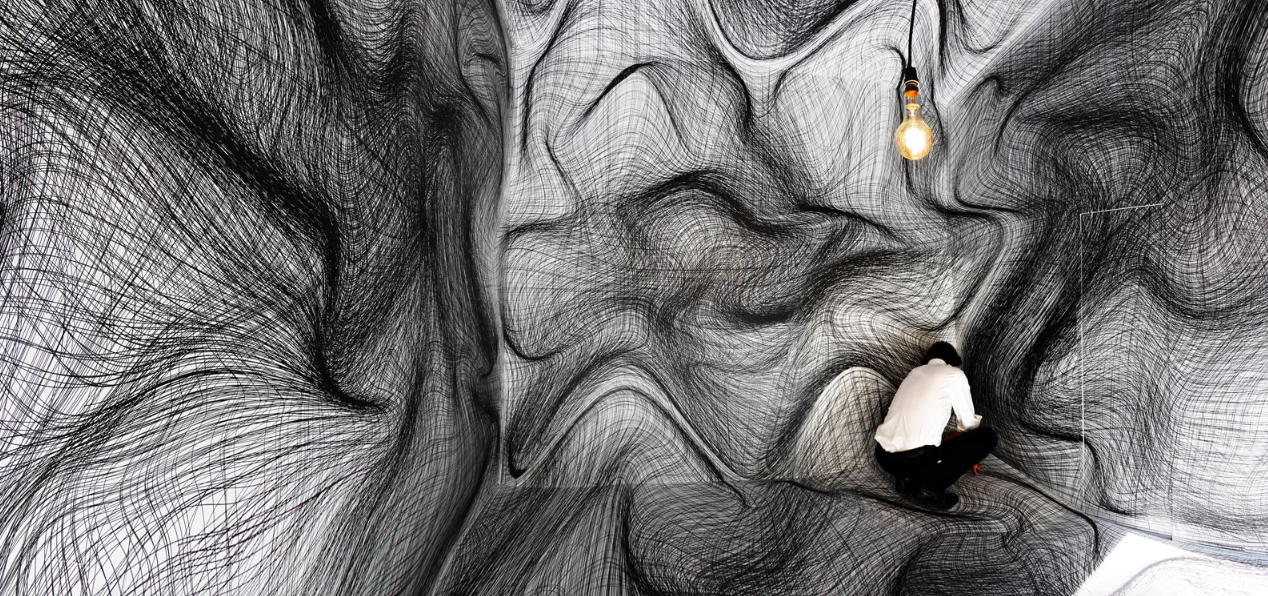
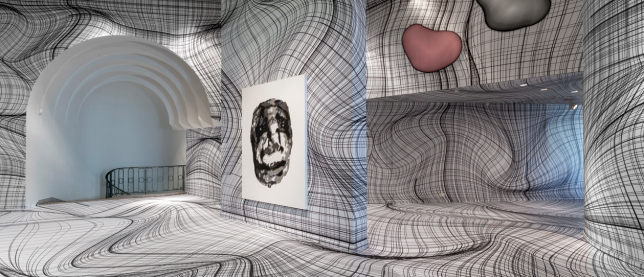
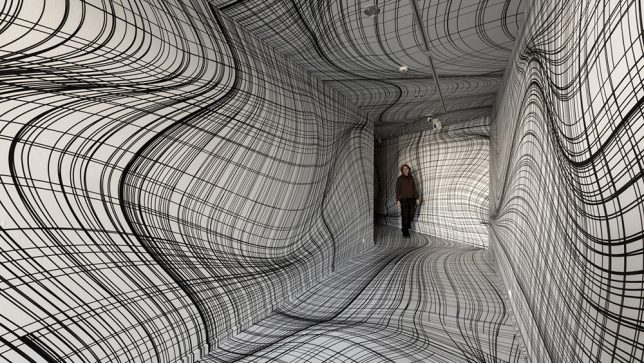
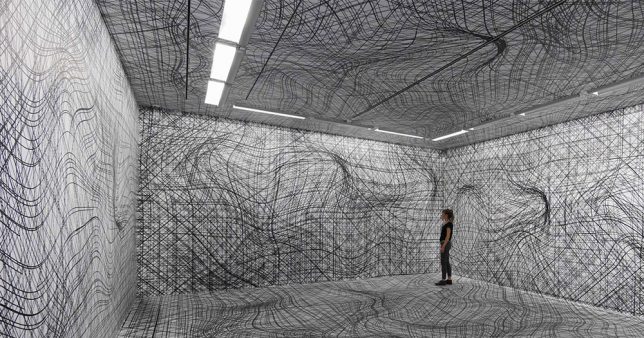
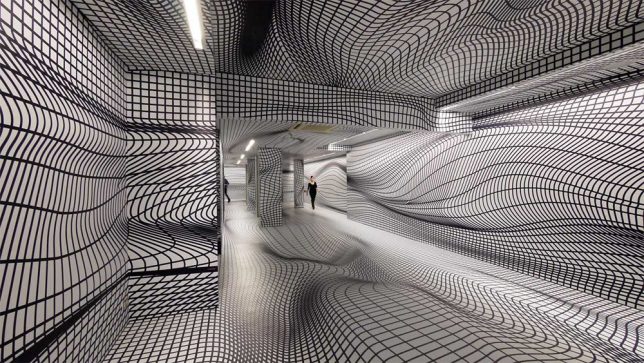
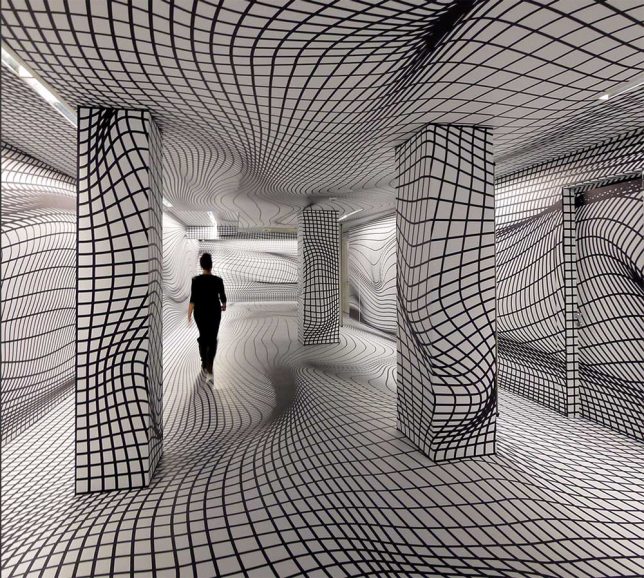
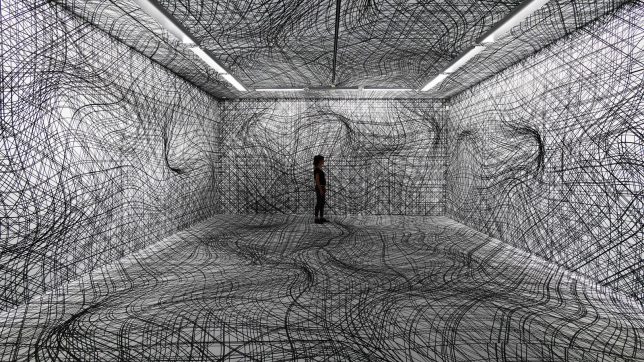
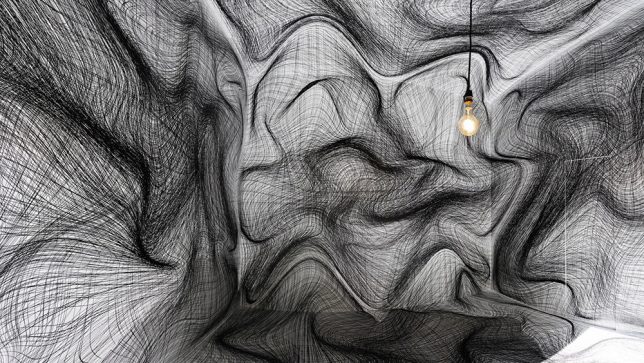
You could be forgiven for cautiously entering one of these rooms full of wavy sketched lines, stepping over obstacles that aren’t really there, uncertain whether parts of the walls are really projecting out toward you. Artist Peter Kogler creates spatial illusions that take over every surface of a gallery, turning it into a ‘virtual maze.’ A master of the large-scale print, he’s spent the last 30 years perfecting his techniques. The ones involving grids of lines pull off the most disorienting effects.

screen-shot-2016-12-30-at-9-50-55-am

vertigo-wallpaper-1

vertigo-wallpaper-2

Pictured here are installations from the last few years, including work displayed at the ING Art Center in Brussels this year, the Sigmund Freud Museum in Vienna in 2015 and the Galerie im Taxiplalais in 2014. His computer-generated works have even adorned the exterior walls of pavilions and museums, and often feature imagery of snakes, ants and pipes.

vertigo-wallpaper-3

vertigo-wallpaper-4

vertigo-wallpaper-6

According to his artist statement, “Kolger has been interested in new, innovative art practices, not only in the field of visual, but also in performative arts, sound and music. He continued his work by shifting the boundaries of artistic expression and developed a very impressive, emotionally and artistically convincing world, whose layered meanings open communication paths to the widest public.”

vertigo-wallpaper-7

vertigo-wallpaper-8

“After several years of research at the beginning of his artistic career, in painting, performance and experimental film, since 1984 Kogler has used computer technology. Heralding the future development of computer-generated art already in the ‘60s, in the spirit of that positivist-optimistic time, Michael Noll wrote: ‘The computer is an active medium the artist can interact with at a new level, liberated from many physical limitations of all former media. The artistic possibilities of this kind of creative medium as the artist’s helping device are truly exciting and challenging.”

Share on Facebook


[ By SA Rogers in Art & Installation & Sound. ]

[ WebUrbanist | Archives | Galleries | Privacy | TOS ]


WebUrbanist

 
Comments Off on Vertigo Wallpaper: Warped 3D Room Illusions Transform Flat Gallery Surfaces

Posted in Creativity