RSS
 

Posts Tagged ‘Removing’

Removing Reflections and Other Unwanted Elements in Photoshop

26 Apr

The post Removing Reflections and Other Unwanted Elements in Photoshop appeared first on Digital Photography School. It was authored by Darina Kopcok.

tips for removing reflections in Photoshop featured image

Photoshop gives you a lot more options for retouching than Lightroom because it’s a pixel editor. This means you can manipulate the individual pixels in your image file to refine your images. It allows you to make complex adjustments, such as removing reflections and other unwanted elements in your photo.

You can do one thing in multiple different ways in Photoshop. For the scope of this article, we will focus on two tools: the Content-Aware Fill and the Clone Stamp tool.

Removing Reflections and Other Unwanted Elements in Photoshop
Shot at f/7.1 at 65mm IS0 200 Shutter Speed 1/160

How to approach retouching

Before you get started with any retouching, it’s important to assess your image and your end goal for it. Every image is different, and therefore requires a unique approach.

How complex is the adjustment you want to make? Is there a lot of pattern or other detail in the area you wish to retouch? How much contrast is there, and how will that influence your decisions? Will one technique be enough, or will you need to layer various techniques or tools to get the end result you are seeking?

Retouching is a process of problem-solving. It’s important to know where you want to get to before you get started.

removing reflections in Photoshop
Shot at f/8 100mm macro lens at 100 IS0 Shutter Speed 1/160

Content-Aware Fill

Content-Aware Fill is an incredibly useful tool in retouching your photography. It works by analyzing the content in your image to provide a seamless blend in the elements or objects you wish to alter. It allows you to remove unwanted objects or move them to other areas of the image.

To use Content-Aware Fill, you must duplicate your layer to access the information contained within the image. It’s also important to work in a way that is non-destructive, so you can simply delete any mistakes or unfavorable results and start again.

I first created a layer called “Clean” to clean up any dust or small blemishes from the image and then went on to remove the seeds.

To duplicate your layer, hit the shortcut Cmd/Ctrl+J.

For simple edits, like removing small objects from your composition, you can do a quick Content-Aware Fill by using a selection tool to select the object, then hit Shift+Delete.

For example, in the pomegranate image below, I wanted to remove some seeds from the surface, as I felt there were too many causing distraction.

removing reflections in Photoshop
Before Content-Aware Fill

I used the Lasso tool to select the seeds I wanted to remove from my image, then hit Shift+Delete. This can often give you great results, but you might have to blend edges with the Clone Stamp tool.

removing reflections in Photoshop
After Content-Aware Fill

The other way to use Content-Aware Fill is a method that allows you to bring up a Preview window so you can see how your adjustment will look before committing to any changes. This is a good way to work on larger objects or areas.

For the image of the raspberries below, I wanted to remove a couple of the raspberries so the client could add text to it.

removing reflections in Photoshop
Shot at f/3.5 with 100mm macro lens at 1S0 100 Shutter Speed 1/160

To use this method, use the appropriate tool to make a selection of the area you wish to adjust.

removing reflections in Photoshop
Use the Lasso tool to make a selection.

Go to Edit->Content-Aware Fill.

Removing Reflections and Other Unwanted Elements in Photoshop

This will bring up the Preview window.

The area in green shows you where Photoshop intends to sample from. However, you may not want it to include all of those areas. So use the brush found in the tool panel in the Preview window to brush out any area you don’t want it to sample from.

Be sure to brush out shadows that may cause your final adjustments to look uneven.

Removing Reflections and Other Unwanted Elements in Photoshop

Set the desired Opacity.

Removing Reflections and Other Unwanted Elements in Photoshop

Keep in mind that when you’re selecting areas for Content-Aware Fill, that you need to account for depth-of-field throughout your frame, or your image can end up looking fake.

Once you are satisfied with the look of your image, choose New Layer to keep the file size small, or Duplicate Layer for a larger file size. I usually choose the latter.

If your final result is good but not perfect, you might want to use the Clone Stamp tool to finesse it further.

removing reflections in Photoshop

The Clone Stamp Tool

removing reflections in Photoshop

With the Clone Stamp Tool, you’re copying pixels to a new location. This is one of the most utilized tools in Photoshop because it’s a great way to touch up the various elements in your image, especially when your object has a defined edge.

The Clone Stamp tool is perfect for removing reflections in Photoshop.

The shortcut for the Clone Stamp tool is Cmd/Ctrl+S.

Use the softest brush in Normal Mode.

10% to 20% Opacity at 100% Flow is generally a good place to start, but see what works for your individual image.

In the image of the chocolate cake below, I used the Clone Stamp tool to remove the hard reflection on the knife at 20% Opacity.

removing reflections in photoshop
Before and After of reflection on knife
Shot at f/5.6 on 100mm macro at 100 ISO Shutter Speed 1/160

When using the Clone Stamp tool, you can flip it if your pattern looks too repetitious.

It’s also great when you want to mirror a reflection to make it look more realistic. This feature is one of the key reasons the Clone Stamp tool is the best tool to remove reflections in Photoshop.

To flip your brush, go to the Toggle Clone Stamp icon.

You can also use “T” to transform the clone stamp collection, to adjust its size and placement.

Removing Reflections and Other Unwanted Elements in Photoshop
Flips the clone source

Conclusion

To sum up, use the Content-Aware Fill tool when you want to remove unwanted objects or elements by using the surrounding areas.

Use the Clone Stamp tool to copy and paste pixels to areas with more defined edges.

Keep in mind when you want to remove reflection in Photoshop, that you want to keep some of the reflection. Our eyes are used to seeing reflections in glass and similarly shiny objects, so removing all of the reflection tends to look fake.

Try this method for removing reflections in photoshop out, and show us your before and after results in the comments section!

The post Removing Reflections and Other Unwanted Elements in Photoshop appeared first on Digital Photography School. It was authored by Darina Kopcok.

Digital Photography School

 
Comments Off on Removing Reflections and Other Unwanted Elements in Photoshop

Posted in Photography


Video: Removing a stuck lens filter… with a band saw

29 Jun

What do you do when your cheap lens filter is so badly stuck on your very expensive Canon 24-70mm F2.8L II USM lens, that even a specially-designed filter wrench won’t get it off? If you are former MythBuster Adam Savage, you take that puppy to your band saw and scare the crap out of the lens owner.

That’s what he did for one of the latest videos on the Tested YouTube channel, when fellow host Norman Chan got yet another filter stuck (the second one in 6 months) on his $ 1,800 lens.

The footage is a bit terrifying for gear lovers, but have no fear: no lenses were hurt in the making of this video. What Savage does is cut two small notches into the rim of the lens filter, one on either side. Then, after expanding those notches with a file, he slots in a solid metal ruler and uses it to torque the filter clean off.

The moment of truth…

Watch the video up top to see the whole cringe-worthy process for yourself, and then send this video to the biggest Canon gear head on your mailing list. Nothing like a mild heart attack to really get you over that Wednesday hump…

Articles: Digital Photography Review (dpreview.com)

 
Comments Off on Video: Removing a stuck lens filter… with a band saw

Posted in Uncategorized


Tips for Removing Digital Noise in Lightroom

17 Feb

One of the most significant advantages that modern cameras have over their film-based counterparts of days gone, by is their ability to change how sensitive they are to light with the touch of a button.

Back in the days of film you had to decide ahead of time whether you wanted to shoot at ISO (then called ASA) 100, 200, 400, or in extreme cases, 800. If you were going to take pictures outdoors, a roll of 24 or 36 exposure, 100 or 200 film would work fine, but woe betide the unsuspecting photographer who wandered inside a dimly-lit building with that same film still in his or her camera. To change sensitivity, and shoot in the new lighting conditions, you had to shoot the rest of the pictures on a given roll of film, remove it from your camera, and hope you brought some ASA 400 or 800 film with you.

Nowadays you just spin a dial on your camera to instantly switch between ISO values like 100 or 200, that work great in broad daylight, to ultra-high values like 6400 or 12,800, that would be positively unthinkable with film. It’s not all sunshine and roses though as one of the biggest issues with high ISO values is that of digital noise. Even the newest cameras produce pictures with noise and grain when shooting at high ISO values, but thankfully Lightroom can help mitigate some of the effects of this noise.

Shot at ISO 5000, the original image was too noisy for practical use. Lightroom enabled me to clean things up significantly.

Shot at ISO 5000, the original image was too noisy for practical use. Lightroom enabled me to clean things up significantly.

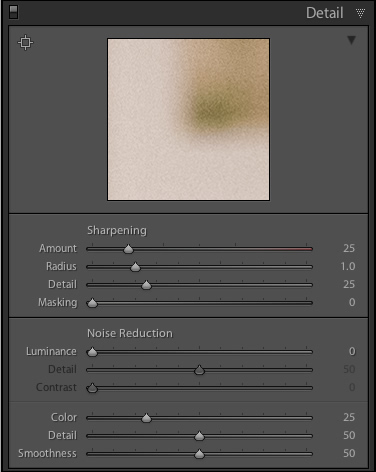
To get started with the noise reduction options click on the Develop module, then find the Detail panel on the right side. Note: this process works best if you shoot in RAW, not JPG.

You will find several options that can seem a bit confusing and overwhelming at first. You can experiment all you want, by just moving the sliders around to see what effects they have on your pictures, but it also helps to examine each one individually, to know precisely what they do. You will also see the Sharpening options, which are related to noise reduction, but I’m not going to focus on them specifically just yet. Before you look at the sliders themselves in the noise reduction area, it’s important to understand the two types of noise that are produced when taking a picture, Luminance and Chroma.

lightroom-noise-reduction-develop-panel

Luminance noise

This kind of noise affects the brightness, but not the color, of individual pixels. If you had a picture of a dark grey piece of paper with a great deal of luminance noise it would appear similar to old-school television static with lots of light and dark fuzz.

Chroma noise

This shows up as oddly-colored pixels, scattered throughout an image, almost like someone has tossed a handful of red, blue, and green grains of sand at it. Lightroom calls this “Color” noise, but it’s just another term for Chroma noise.

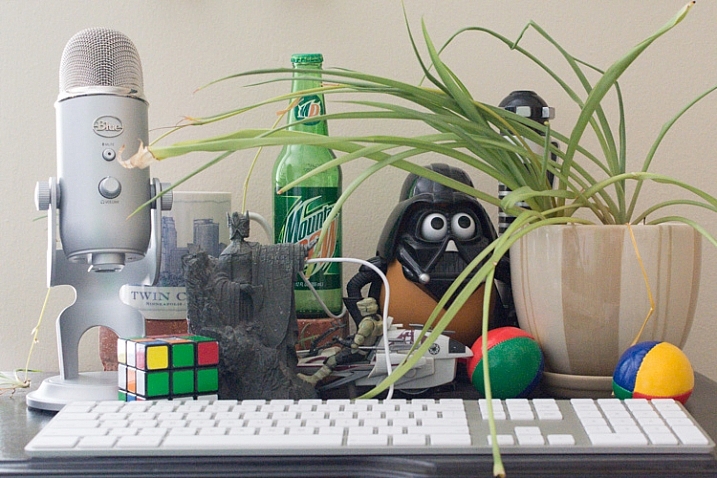
Both types of noise are byproducts of how digital image sensors capture data, and while they can be corrected somewhat in Lightroom and other post-processing software, it’s almost impossible to completely remove noise from a picture while still ending up with a usable image. Lightroom does give you some tools to get your digital noise under control, and if you know what you’re doing you can get some fairly decent results. Using separate controls for luminance and chroma noise, in combination with some sharpening adjustments, can help you salvage what you may think is a useless picture. As an example, here’s a picture that I took at ISO 6400, without any noise reduction applied.

35mm, f/5.6, 1/60 second, ISO 6400

35mm, f/5.6, 1/60 second, ISO 6400

Not bad, right? If this is what ISO 6400 looks like, you might as well shoot like this all day long! Well, before you go and spin your ISO dial all the way up to Ludicrous Mode, you might want to take a look at the same 24-megapixel image zoomed in to 100%.

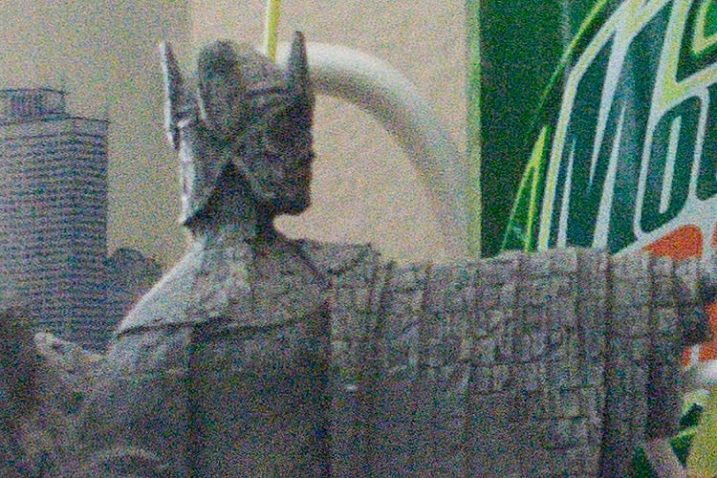
lightroom-noise-reduction-scene-no-noise-reduction-100-percent

Ow, my eyes! The noise, it hurts! Not only is the picture full of color blotches, but shooting at ISO 6400 has resulted in an image that is far less sharp than it could be at a lower ISO. A great deal of color noise is evident on the torso of the figure, as well as the slanted lines on the left side, and you can see lots of luminance noise in the green letters on the right side too.

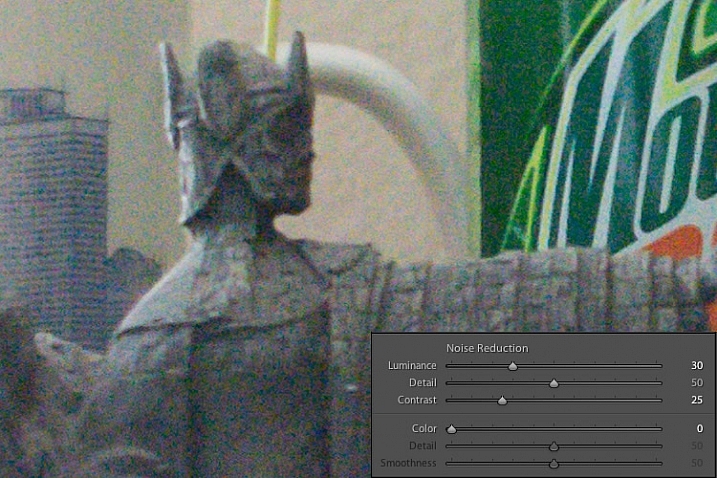
This noise is not always visible when you shrink  your files down to share online, but if I were to print this picture it would look like my cat threw up on the paper. Lightroom can help us fix things, and a good place to start, in this case, is with the luminance slider at a value of 30.

lightroom-noise-reduction-scene-luma-noise-reduction-100-percent

Much of the black and white static has been removed, but there are still splotchy patches of color scattered throughout the image, which can dealt with using the color slider next. Before you start thinking that this is a magical cure-all for your noisy images, take a closer look at the picture. Much of the details have been lost, or blurred, such as the lines on the side, and the patchwork of the figure’s tunic.

You can mitigate these effects somewhat by using the detail and contrast sliders, but again the results are not going to be ideal. Detail acts as sort of a threshold control, allowing you to tell Lightroom what should be treated as noise and what should be left in. I usually leave this slider at 50 but you can experiment with it to get the results you need. The contrast slider helps bring back some of the edges that have gotten blurry, thanks to the noise reduction algorithm, and even though I have set it to 25 in this example, you can clearly see that much of the edge contrast is not as good as the noisy original. Move this slider too far though, and your photo will start looking fake and artificial, so you’ll have to find a good balance depending on your needs.

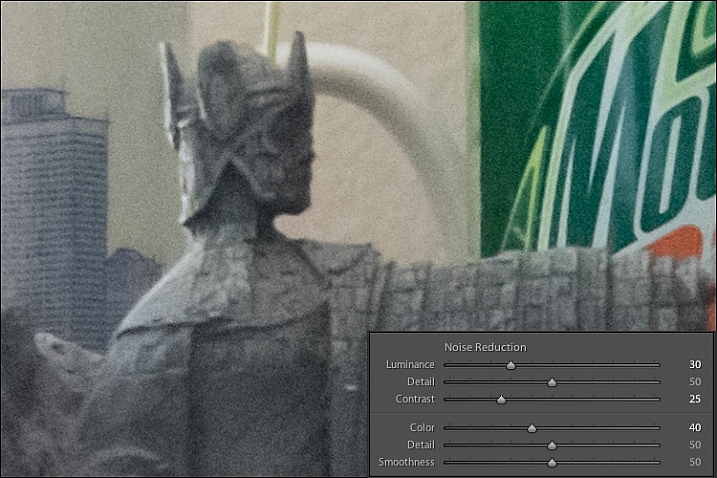
To continue with the noise reduction, the color slider can be used to get rid of the weird splotches of red, green, and blue, but again you are going to see some tradeoffs.

lightroom-noise-reduction-scene-chroma-noise-reduction-100-percent

The results look fine at first, and you may notice that Lightroom automatically applies some degree of Color noise reduction (value 25) to every photo by default. This is because low-grade Color noise reduction is almost always good to have, and generally won’t result in too many tradeoffs for the image as a whole. In this case I used a value of 40, to show the effects a bit more. Even though the result is decent, you might notice something else that’s missing, if you look at the soda bottle label on the right-hand side. Compare it to the original picture and you will see that along with removing some of the color noise Lightroom has actually removed some color from the whole photo.

The Detail slider slider, similar to its counterpart in Luminance noise reduction, acts as somewhat of a threshold so you can tell Lightroom what is, and is not, noise to remove. The Smoothness slider is a fairly recent addition to Lightroom, and can be used to control what’s known as “low-frequency” color noise. Basically, slide it to the right to remove larger splotches of noise or to the left to keep these more intact.

Every time you use Lightroom’s noise reduction tools you will deal with tradeoffs, and one of the most significant of these is the overall sharpness of the image. Photos with more noise reduction will almost always be softer, particularly where there are sharp contrasting edges, and you can bring a bit of this back by using the sharpening tools.

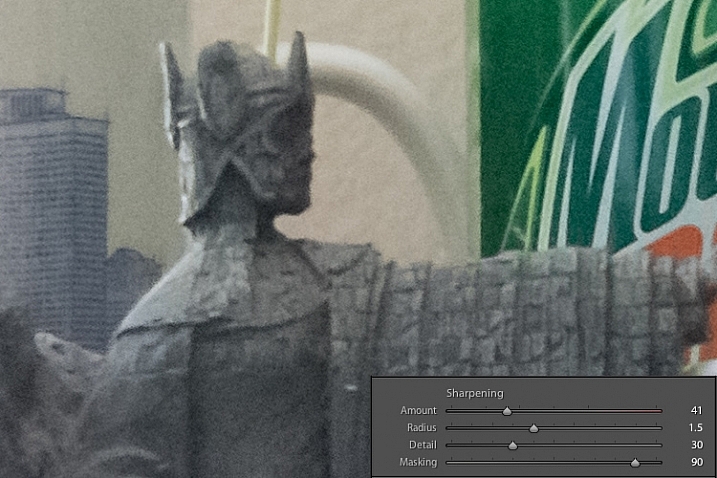
Here’s yet another 100% crop of the image above with the same noise reduction employed in the previous image, but with added sharpening.

lightroom-noise-reduction-scene-sharpened-100-percent

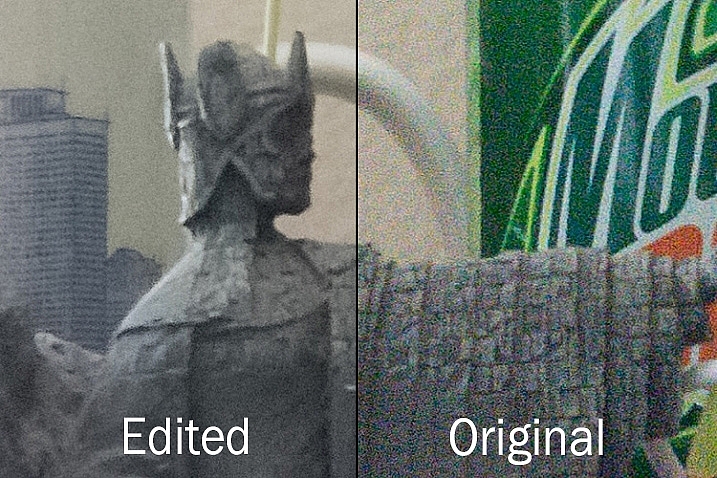
After a bit of sharpening, the detail in the lines on the left side has returned, and so has the texture of the tunic, but the lower-left corner is still a muddy mess of grey, whereas in the original noisy picture it was more defined. Here’s both the original and edited image side-by-side which might help you get a macro view of how these noise reduction and sharpening tools can affect a picture.

lightroom-noise-reduction-scene-both

At first glance you might not notice too many differences, but one of the most glaring problems with the edited picture is the complete lack of texture on the wall behind the scene, as well as a smoothness to the plant that is almost unnatural. Here’s a side-by-side zoomed in to 100%.

lightroom-noise-reduction-scene-no-noise-reduction-100-percent-before-after

Is it worth these tradeoffs to get a photo with less noise? That question can only be answered by you, but one rule of thumb I like to follow, is that a noisy image can be corrected and edited in postproduction, albeit somewhat imperfectly. A blurry image cannot be fixed.

So, if there is a situation in which I find myself having to choose between a faster shutter speed and higher ISO (i.e. more noise), or a slower shutter speed and lower ISO (i.e. less noise) I’ll usually err on the side of noise, if the slower shutter speed would result in an image that is too blurry.

I also make liberal use of my camera’s auto-ISO feature, which allows me to set a minimum shutter speed and a maximum ISO value. That way I can concentrate on adjusting the aperture to get the composition I want, and always know that my pictures will be free of blur, even if does mean there will be a bit of noise I have to clean up in Lightroom.

The light here was quite dim which required a high ISO value. I didn't mind a slightly noisy image that was sharp and in focus, because I was able to get rid of most of the noise in Lightroom.

The light here was quite dim, which required a high ISO value. I didn’t mind a slightly noisy image that was sharp and in focus, because I was able to get rid of most of the noise in Lightroom.

One final note worth mentioning is you can also use Lightroom’s local adjustments like the Radial Filter, Graduated Filter, and Adjustment Brush to apply noise reduction in specific areas of an image only. However, this is a bit limited, in that these adjustments only perform luminance noise reduction, so you might still be left with some ugly colored spots, that can only be removed using the global adjustments in the detail panel of the develop module.

What are some of your favorite tips and tricks for removing noise? I’d be interested to hear any thoughts you have in the comments section below.

googletag.cmd.push(function() {
tablet_slots.push( googletag.defineSlot( “/1005424/_dPSv4_tab-all-article-bottom_(300×250)”, [300, 250], “pb-ad-78623” ).addService( googletag.pubads() ) ); } );

googletag.cmd.push(function() {
mobile_slots.push( googletag.defineSlot( “/1005424/_dPSv4_mob-all-article-bottom_(300×250)”, [300, 250], “pb-ad-78158” ).addService( googletag.pubads() ) ); } );

The post Tips for Removing Digital Noise in Lightroom by Simon Ringsmuth appeared first on Digital Photography School.


Digital Photography School

 
Comments Off on Tips for Removing Digital Noise in Lightroom

Posted in Photography


Removing Noise from Non-Dark Framed Long Exposures

05 Nov

One of the big disadvantages of taking long exposures with DSLR cameras is the introduction of noise especially when higher ISO settings are used. Camera manufacturers have addressed this by using Dark-Frame Subtraction, but taking advantage of Dark-Frame Subtraction (DFS) isn’t always possible.  If you’re shooting a sequence of images either for a night time-lapse or startrail photo DFS will introduce unwanted gaps or breaks. If you’re shooting extremely long exposures then your camera battery might not last long enough to complete your exposure, the dark-frame exposure and record the exposure to your memory card.   In regard to my pursuit of low-light or night photography for extreme long-exposures, star trails and time-lapses I’ve resorted to shooting without Dark-Frame Subtraction / Long Exposure Noise Reduction and addressing the noise in post-production.

The Technique

Here’s the technique I employ to manage the digital noise and hot pixels in my extreme long exposure photographs:

  1. Import & Edit in Lightroom

    After each shoot my photos are imported into Adobe Lightroom where I post-process my image to my personal taste adjusting exposure, black/white levels, vibrance, clarity, curves, etc.  Note: if you’re curious about the file formats I work with read DNG, RAW and JPEG: What I Use & Why 

  2. Lightroom Noise Reduction

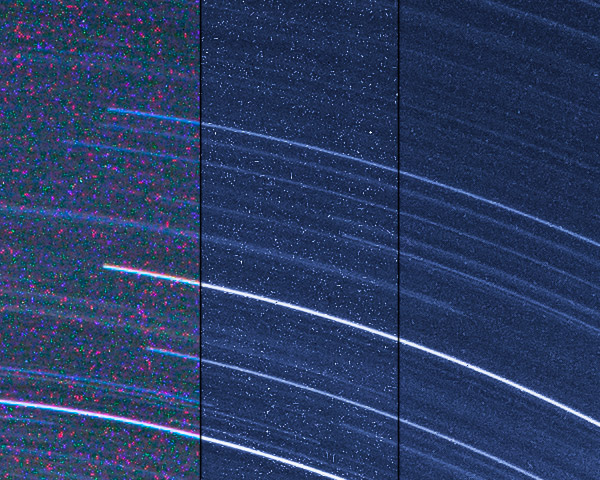
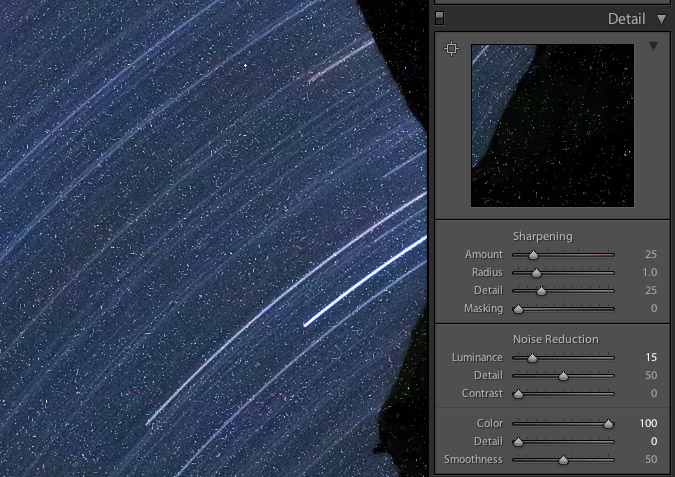
    Toward the end of my post-processing I remove chromatic and luminance noise in Lightroom “Develop > Detail” module. To remove chromatic (color) noise it’s not uncommon that I crank the “Color” adjustment all the way to 100 leaving only dust or grain like noise that is white. (see images below)

  3. Open Image in Photoshop

    In Lightroom I right click on my image and “Edit In > Photoshop”. This opens my file with all my Lightroom edits applied in Photoshop.

  4. Duplicate the “Background” Layer

    When my photo is opened in Photoshop a single layer appears titled “Background”. I duplicate this layer which by default is named “Background copy”.

  5. Dust & Scratches

    To the “Background copy” layer (the top layer) I apply “Filters > Noise > Dust & Scratches”. A dialogue box will open allowing you to specify how drastically or minimally you want to apply the filter. This filter will remove noise by blurring the photo. Ideally you want to keep the Radius as low as possible and the Threshold as high as possible. Once doing this your image will look quite blurry and seemingly useless.

  6. Employing the Blending Mode “Darken”

    To the “Background copy” layer, that has had the “Dust & Scratches” filter applied, I change the blending mode to “Darken”. Magically this will allow the sharper lighter elements of the layer below to show through while keeping the noise free darker elements of the top layer. Once done the last signs of digital noise are removed.

Here’s How It Looks

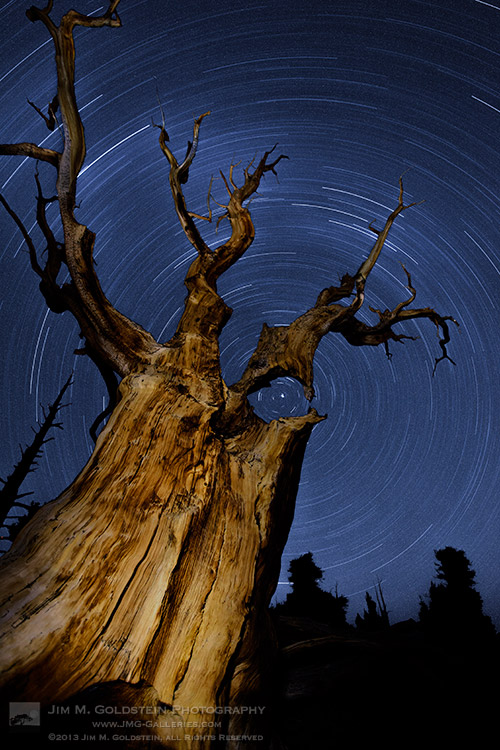
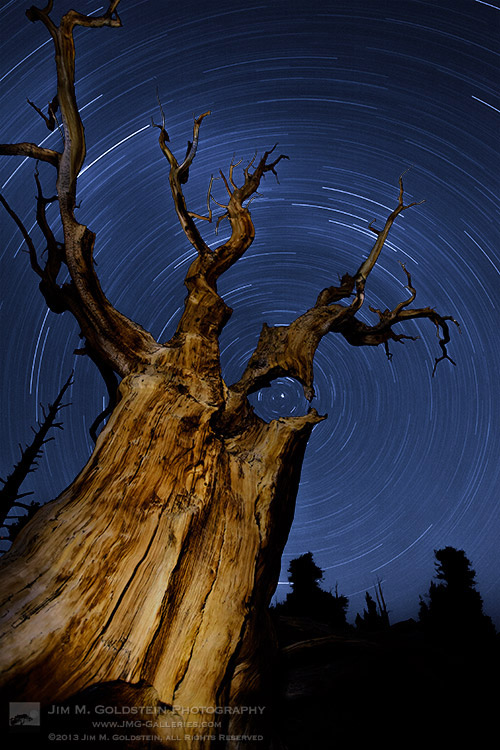
To show an extreme example below are 1 to 1 crops of The Ancients a 91 minute single exposure taken on my Canon 5D Mark II.

1:1 crop in Lightroom straight out of the camera

Note the seemingly horrific amount of chromatic noise appearing as splotchy colors.

1:1 Crop in Lightroom after color noise reduction

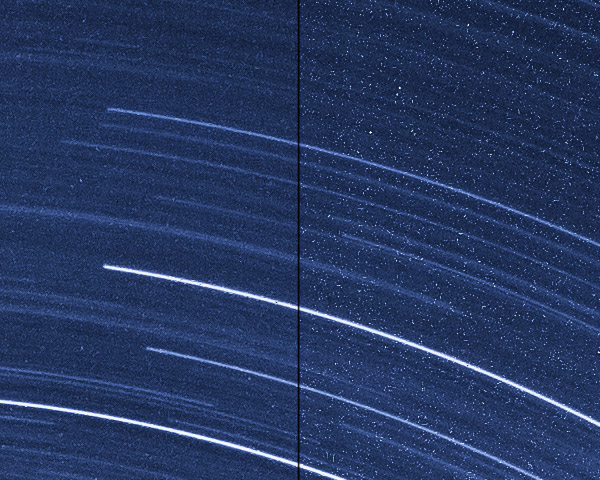
With the Color slider at 100% all that is left are millions of white specks


1:1 crop with noise  

Even with chromatic noise removed it would seem there are too many white specks to make this a useable image

1:1 crop without noise

Applying Dust & Scratches and Blending it with the original image magically removes the white specks.

1:1 crop with comparing final vs noise

The same image showing the before and after to highlight the stark difference

1:1 crop from RAW import to Final


What does the end result look like on a web sized image?

  Web version with noise

Web version without noise

For web display the improvement may be marginal, but for prints this technique will make a notable improvement. My lone disclaimer is that your mileage may vary with this technique depending how much noise your camera produces, how long your exposures are and what ISO setting you use.

For more on long exposures check out my ebook Photographing the 4th Dimension – Time

Copyright Jim M. Goldstein, All Rights Reserved

Removing Noise from Non-Dark Framed Long Exposures

The post Removing Noise from Non-Dark Framed Long Exposures appeared first on JMG-Galleries – Landscape, Nature & Travel Photography.


Related Stories

  • Removing Noise from Non-Dark Framed Long Exposures – Enclosure
  • Photo Term Series #21: Dark-Frame Subtraction
  • Photo Term Series #21: Dark-Frame Subtraction – Enclosure
Feed Ads by FeedBlitz
powered by ad choices


JMG-Galleries

 
Comments Off on Removing Noise from Non-Dark Framed Long Exposures

Posted in Equipment


Removing Background Using Refine Edge [Tagalog] Part 2

04 Nov

in this video you will learn how to use the refine edge and apply it in the real world projects like us on facebook: facebook.com
Video Rating: 3 / 5

 
Comments Off on Removing Background Using Refine Edge [Tagalog] Part 2

Posted in Retouching in Photoshop


photoshop removing wrinkles

03 Nov

photoshop removing wrinkles
Video Rating: 0 / 5

 
Comments Off on photoshop removing wrinkles

Posted in Retouching in Photoshop


Removing facial flaws in a photograph | lynda.com tutorial

25 Oct

This Photoshop tutorial discusses how to clean up the small facial blemishes in a photograph using the Healing tools. Watch more at www.lynda.com This specific tutorial is just a single movie from chapter one of the Photoshop CS5: Athletic Retouching Projects course presented by lynda.com author Chris Orwig. The complete Photoshop CS5: Athletic Retouching Projects course has a total duration of 6 hours and 9 minutes, and covers removing blemishes from the subject and the background, adding motion blur, enhancing muscle tone, making adjustments to photos shot in an outdoor setting, and more. Photoshop CS5: Athletic Retouching Projects table of contents: Introduction 1. Outdoor Portrait 2. Simplicity 3. Strength 4. Speed 5. Gym Workout 6. Energy 7. Pushup 8. Indoor Track Sprint 9. Enhancing Strength 10. Surfer Portrait 11. Underwater Portrait 12. Jump 13. Father and Son Portrait Conclusion

 
Comments Off on Removing facial flaws in a photograph | lynda.com tutorial

Posted in Retouching in Photoshop


Removing Black Spots From Face : Photoshop Beauty Tutorial Part 1

23 Oct

***** Adobe Photoshop Beauty Tutorial Series ****** ****************** Part 1 Removing Black Spots From Face goo.gl ******************* Part 2 Enhancing a Smile and Face Modification goo.gl *********************** Part 3 Coloring a Black & White Photo goo.gl ***************************** Background music “I Dunno” by Grapes dig.ccmixter.org Licensed under Creative Commons creativecommons.org
Video Rating: 5 / 5

In this tutorial AJ shows you how to change the background color using a Hue/Saturation Adjustment Layer. Share this video, Tweet to your friends: bit.ly Join My Facebook Community: ajwood.com Find me on Twitter: twitter.com The NAPP Wants YOU! ajwood.com Use Promo Code “ajwood” for $ Discount & Free DVD Get the iPhone app: ajwood.com Adobe Training by media-cats.com

 
Comments Off on Removing Black Spots From Face : Photoshop Beauty Tutorial Part 1

Posted in Retouching in Photoshop


Removing color Cast out of Flower Using a Portrait Retouching Technique

01 Aug

This video from www.acmeeducational.com shows Vincent Versace showing how to remove color cast from a flower using a retouching technique
Video Rating: 4 / 5

 
Comments Off on Removing color Cast out of Flower Using a Portrait Retouching Technique

Posted in Retouching in Photoshop


Lightroom Quick Tip: Removing Rosacia

22 Feb

This tutorial demonstrates a quick retouching process to remove rosacia using Adobe Photoshop Lightroom. This is invaluable for building quick and economical web galleries for your portrait clients.
Video Rating: 4 / 5