RSS
 

Posts Tagged ‘Reflections’

Skylum shows off new water reflections in Luminar AI’s Sky AI feature

17 Oct
Image credit: Iurie Belegurschi

Last year, Skylum Software added a new feature to Luminar, AI Sky Replacement. The fully automatic feature, powered by artificial intelligence, can almost instantly replace the sky in an image and relight the overall scene. Next year in Luminar AI, Skylum is taking the feature even further with its new Sky AI tool. Sky AI will add a much-requested feature, water reflections.

Skylum has published a new blog post and video, seen further below, showing off how water reflection will work in 2021 when it is added to Luminar AI, which is scheduled to release this year. As is the case with AI Sky Replacement, Sky AI and its water reflections feature will be fully automated.

Sky AI 1.0 (left) versus Sky AI 2.0 (right). Sky AI 2.0 includes the new water reflections functionality. Image credit: Elia Locardi

With Sky AI, when the software detects water in your scene and you replace the sky, Luminar AI will ensure that the new sky is accurately reflected in the water. As Skylum writes, ‘That means no more duplicating your scene, flipping it and applying a bunch of masking to make it look realistic.’ The reflected sky will also adapt on the fly to your selected relight settings and be ‘blurred into the scene without any manual work from you.’

Further, any details in the water in your scene, such as waterbirds, will stay in your scene and not be overwritten by the reflected sky. Sky AI recognizes the objects in your image and works to preserve fine details in a scene. You can check out the upcoming feature in the preview video below.

As you can see in the video above, Sky AI has a similar selection of sliders to what’s currently available in Luminar 4’s AI Sky Replacement tool. However, Skylum has added Water Reflection and Water Ripples sliders. You can control the intensity of the reflection and even add user-adjustable ripples to the reflection by using these new sliders.

Image credit: Daniel Kordan

In addition to the new water reflection capabilities of Sky AI, Skylum is also adding the ability to browse through your library of skies in a thumbnail viewer in 2021. The browser will show you a preview of each sky, whereas in Luminar 4, you have a list of the names of different skies, but no visual preview.

Sky AI is one of many exciting new features coming to Luminar AI. You can discover more about Skylum’s Luminar AI and view preorder options by clicking here.

Articles: Digital Photography Review (dpreview.com)

 
Comments Off on Skylum shows off new water reflections in Luminar AI’s Sky AI feature

Posted in Uncategorized


Removing Reflections and Other Unwanted Elements in Photoshop

26 Apr

The post Removing Reflections and Other Unwanted Elements in Photoshop appeared first on Digital Photography School. It was authored by Darina Kopcok.

tips for removing reflections in Photoshop featured image

Photoshop gives you a lot more options for retouching than Lightroom because it’s a pixel editor. This means you can manipulate the individual pixels in your image file to refine your images. It allows you to make complex adjustments, such as removing reflections and other unwanted elements in your photo.

You can do one thing in multiple different ways in Photoshop. For the scope of this article, we will focus on two tools: the Content-Aware Fill and the Clone Stamp tool.

Removing Reflections and Other Unwanted Elements in Photoshop
Shot at f/7.1 at 65mm IS0 200 Shutter Speed 1/160

How to approach retouching

Before you get started with any retouching, it’s important to assess your image and your end goal for it. Every image is different, and therefore requires a unique approach.

How complex is the adjustment you want to make? Is there a lot of pattern or other detail in the area you wish to retouch? How much contrast is there, and how will that influence your decisions? Will one technique be enough, or will you need to layer various techniques or tools to get the end result you are seeking?

Retouching is a process of problem-solving. It’s important to know where you want to get to before you get started.

removing reflections in Photoshop
Shot at f/8 100mm macro lens at 100 IS0 Shutter Speed 1/160

Content-Aware Fill

Content-Aware Fill is an incredibly useful tool in retouching your photography. It works by analyzing the content in your image to provide a seamless blend in the elements or objects you wish to alter. It allows you to remove unwanted objects or move them to other areas of the image.

To use Content-Aware Fill, you must duplicate your layer to access the information contained within the image. It’s also important to work in a way that is non-destructive, so you can simply delete any mistakes or unfavorable results and start again.

I first created a layer called “Clean” to clean up any dust or small blemishes from the image and then went on to remove the seeds.

To duplicate your layer, hit the shortcut Cmd/Ctrl+J.

For simple edits, like removing small objects from your composition, you can do a quick Content-Aware Fill by using a selection tool to select the object, then hit Shift+Delete.

For example, in the pomegranate image below, I wanted to remove some seeds from the surface, as I felt there were too many causing distraction.

removing reflections in Photoshop
Before Content-Aware Fill

I used the Lasso tool to select the seeds I wanted to remove from my image, then hit Shift+Delete. This can often give you great results, but you might have to blend edges with the Clone Stamp tool.

removing reflections in Photoshop
After Content-Aware Fill

The other way to use Content-Aware Fill is a method that allows you to bring up a Preview window so you can see how your adjustment will look before committing to any changes. This is a good way to work on larger objects or areas.

For the image of the raspberries below, I wanted to remove a couple of the raspberries so the client could add text to it.

removing reflections in Photoshop
Shot at f/3.5 with 100mm macro lens at 1S0 100 Shutter Speed 1/160

To use this method, use the appropriate tool to make a selection of the area you wish to adjust.

removing reflections in Photoshop
Use the Lasso tool to make a selection.

Go to Edit->Content-Aware Fill.

Removing Reflections and Other Unwanted Elements in Photoshop

This will bring up the Preview window.

The area in green shows you where Photoshop intends to sample from. However, you may not want it to include all of those areas. So use the brush found in the tool panel in the Preview window to brush out any area you don’t want it to sample from.

Be sure to brush out shadows that may cause your final adjustments to look uneven.

Removing Reflections and Other Unwanted Elements in Photoshop

Set the desired Opacity.

Removing Reflections and Other Unwanted Elements in Photoshop

Keep in mind that when you’re selecting areas for Content-Aware Fill, that you need to account for depth-of-field throughout your frame, or your image can end up looking fake.

Once you are satisfied with the look of your image, choose New Layer to keep the file size small, or Duplicate Layer for a larger file size. I usually choose the latter.

If your final result is good but not perfect, you might want to use the Clone Stamp tool to finesse it further.

removing reflections in Photoshop

The Clone Stamp Tool

removing reflections in Photoshop

With the Clone Stamp Tool, you’re copying pixels to a new location. This is one of the most utilized tools in Photoshop because it’s a great way to touch up the various elements in your image, especially when your object has a defined edge.

The Clone Stamp tool is perfect for removing reflections in Photoshop.

The shortcut for the Clone Stamp tool is Cmd/Ctrl+S.

Use the softest brush in Normal Mode.

10% to 20% Opacity at 100% Flow is generally a good place to start, but see what works for your individual image.

In the image of the chocolate cake below, I used the Clone Stamp tool to remove the hard reflection on the knife at 20% Opacity.

removing reflections in photoshop
Before and After of reflection on knife
Shot at f/5.6 on 100mm macro at 100 ISO Shutter Speed 1/160

When using the Clone Stamp tool, you can flip it if your pattern looks too repetitious.

It’s also great when you want to mirror a reflection to make it look more realistic. This feature is one of the key reasons the Clone Stamp tool is the best tool to remove reflections in Photoshop.

To flip your brush, go to the Toggle Clone Stamp icon.

You can also use “T” to transform the clone stamp collection, to adjust its size and placement.

Removing Reflections and Other Unwanted Elements in Photoshop
Flips the clone source

Conclusion

To sum up, use the Content-Aware Fill tool when you want to remove unwanted objects or elements by using the surrounding areas.

Use the Clone Stamp tool to copy and paste pixels to areas with more defined edges.

Keep in mind when you want to remove reflection in Photoshop, that you want to keep some of the reflection. Our eyes are used to seeing reflections in glass and similarly shiny objects, so removing all of the reflection tends to look fake.

Try this method for removing reflections in photoshop out, and show us your before and after results in the comments section!

The post Removing Reflections and Other Unwanted Elements in Photoshop appeared first on Digital Photography School. It was authored by Darina Kopcok.


Digital Photography School

 
Comments Off on Removing Reflections and Other Unwanted Elements in Photoshop

Posted in Photography


Create Awesome Reflections in Photoshop with Ease (Step-by-Step Guide)

18 Nov

The post Create Awesome Reflections in Photoshop with Ease (Step-by-Step Guide) appeared first on Digital Photography School. It was authored by Kevin Landwer-Johan.

reflections-in-photoshop

Attractive reflections can be challenging to capture naturally in your photographs. Sometimes it’s easier to create reflections in Photoshop. You will have more control over how the photo looks and you can avoid the difficulties that photographing reflections can bring.

Often you can’t find just the right place to stand to catch the best reflection. Sometimes the light is wrong and a natural reflection will look too dark. Choosing to make reflections in Photoshop gives you much more flexibility to get the look you want.

It’s really not that difficult to do. In this article, I’ll walk you through a series of steps you can use to make a mirror image in Photoshop.

Reflections in Photoshop

© Kevin Landwer-Johan

Step 1: Selecting your photo

When making reflections in Photoshop, it’s important to start out by choosing a photo that’s suitable. Not every photo will look good or natural when you make a mirror image of it.

When you’re looking for a photo to use with this technique, think about how it will look. You ideally want to use a photo where the main subject has a distinct line along where the reflection will appear.

Open your photo in Photoshop. You may need to crop the bottom of the photo to create a clean line where the reflection can be placed.

Step 2: Adjust the canvas size

You need to adjust the canvas size to make room for the reflection you will create.

Go to the top menu and select Image->Canvas Size. In the pop-up that appears in the box next to the Height option, click the drop-down and choose Percent. Make the Height percentage 200.

Click the top center of the Anchor options grid. This will force the new canvas space you are creating to appear underneath your photo.

Click OK.

Create Awesome Reflections in Photoshop with Ease (Step-by-Step Guide)

Step 3: Duplicate the layer

In the Layers panel, unlock the base layer. To do this, click on the padlock icon. Now you can duplicate this layer by going to the top menu and selecting Layer->New->Layer Via Copy.

Convert both the layers to Smart Objects by right-clicking on each of them and selecting Convert To Smart Object. Now rename both layers to make it easier to keep track of which one is which.

Reflections in Photoshop

Step 4: Position the new layer

Drag the new layer to the space you created under your main image.

Now you need to flip the lower layer. This will be your reflection. From the top menu select Edit->Transform->Flip Vertical and press Enter.

Reflections in Photoshop

Step 5: Add blur to the reflection layer

With your reflection layer selected, from the top menu select Filter->Blur->Motion Blur. Set the Angle to 90-degrees and use the Distance slider to add a suitable amount of blur. How much you add is up to you and will vary depending on the resolution of the photo you are working with. In my example, I have set it to 30.

You may need to reposition your reflection layer by nudging it up slightly if a gap has appeared between your two layers.

Create Awesome Reflections in Photoshop with Ease (Step-by-Step Guide)

Step 6: Make a new file

Duplicate your file by going to the top menu and selecting Image->Duplicate. Crop the image so you are left only with the reflection.

Delete one layer so you are left with a blank canvas. Resize the canvas to 30%, otherwise, it will be too big to manage easily. Select the paint bucket and fill the image with black.

This file you have created will be added to the reflection layer to make it look more realistic like water.

Reflections in Photoshop

Step 7: Add blur and noise for texture

From the top menu select Filter->Noise->Add Noise. Make the amount 350% and check the boxes Uniform and Monochromatic. Click OK.

Now add some blur. Select Filter->Blur->Gaussian Blur from the top menu and set the Radius to 1.5 pixels and click OK.

Create Awesome Reflections in Photoshop with Ease (Step-by-Step Guide)

Step 8: Emboss your texture

In the Channels panel click on the Red channel.

Next, go to the top menu again and select Filter->Stylize->Emboss. Set the Angle to 90, the Height to 5, and the Amount to 500. Of course, you can experiment with any of these amounts. Click OK.

Now select the Green channel and Filter->Stylize->Emboss from the top menu. Set the Angle to 0, the Height to 5, and the Amount to 500. Click OK.

Turn on all the channels by clicking RGB. Go back to your Layers Panel, right-click the layer and Convert To Smart Object.

Create Awesome Reflections in Photoshop with Ease (Step-by-Step Guide)

Step 9: Stretch the perspective of the distortion

Select Edit->Free Transform from the top menu. Right-click inside the image and select Perspective. Make sure you are zoomed out a long way so your image is small in the center of your monitor.

Click on one of the bottom corners of the frame and drag it out horizontally. This will stretch and distort the lower part of the texture. Don’t worry if it looks weird, once you incorporate it into your reflection it will make it look more natural.

Zoom back to 100%. Save this image as a .PSD where you can find it easily and name it something recognizable.

Create Awesome Reflections in Photoshop with Ease (Step-by-Step Guide)

Step 10: Make an adjustment layer on your main image

Click on the reflection layer on your main image and duplicate it by pressing Ctrl (Cmd)+j on your keyboard. Name it “Reflection Copy.” With the new layer selected (which should be above the other reflection layer), from the top menu, choose Filter->Distort->Displace. Set the vertical and horizontal scales to about 10.

You may need to alter these if it does not look good, depending on your image size and resolution. Click OK.

From the window that opens, find and select the distortion image you just created and saved. This will use the texture image as a displacement layer. If the ripple effect is too large or too small, undo that step. Redo the step again, but this time choose a higher or lower number for the displacement scale.

Experiment with this until you are satisfied with the way it looks. It’s entirely up to your taste.

Reflections in Photoshop

Step 11: Adjust the reflection

With your Reflection Copy layer selected, click on the layer mask icon, which is at the bottom of the Layers Panel. Select the Brush tool with the color set to Black and a large brush size and Hardness of 0%.

From the options panel above your image, set the brush opacity to 20%. Select your layer mask, not the main reflection layer. Paint from side to side over the top half of your reflection layer, where it meets the top layer until it looks natural.

What you are doing is erasing 20% of the distortion each time you paint. You want to make the reflection look smoother in what appears to be the distance.

Reflections in Photoshop

Step 12: Merge the reflection layers

Select both the reflection layers in the Layers Panel. Right-click on one of them and select Merge Layers. Make sure your main image is not selected. You should now have one reflection layer and your main layer.

Step 13: Darken the reflection

With the reflection layer selected, go to your top menu and choose Image->Adjustments->Curves. Click in the middle of the curves adjustment line and drag it down to darken the reflection. Adjust it until it looks natural. A reflection in water is typically darker than the scene it’s reflecting.

Reflections in Photoshop

Conclusion

Follow through these steps a few times and experiment with the variables. There is no right or wrong way to do this. Your personal preference and the photos you choose will determine the outcome.

You will find reflections in Photoshop look better on some images than on others.

Try out this technique for making reflections in Photoshop, and share your images with us in the comments below!

The post Create Awesome Reflections in Photoshop with Ease (Step-by-Step Guide) appeared first on Digital Photography School. It was authored by Kevin Landwer-Johan.


Digital Photography School

 
Comments Off on Create Awesome Reflections in Photoshop with Ease (Step-by-Step Guide)

Posted in Photography


Report: Stalker used eye reflections in online photos to locate, assault pop star

15 Oct
Screenshot from the NHK World-Japan newscast.

A news report from NHK World-Japan claims a crazed fan used eye reflections in images uploaded to social media, among other things, to track down a famous Japanese pop star’s condominium in Tokyo where he allegedly assaulted her.

The report claims Hibiki Sato admitted to figuring out which train station the star left to walk home by studying the light direction visible in some of her videos, as well as a reflection of the station visible in her eyes in an image she uploaded to social media. Equipped with those details, Sato allegedly waited at the station for the pop start to arrive, followed her to her residence, and assaulted her.

Though the situation is bizarre, the idea of high-resolution images inadvertently revealing information via eye reflections isn’t new. In 2013, for example, a study published in PLOS revealed that it is possible to extract images of identifiable bystanders from eye reflections captured in high-resolution images. The technique was presented as a potential tool for helping law enforcement gather data as part of investigations, but it’s clear the concept can be used by anyone for nefarious reasons as well.

Articles: Digital Photography Review (dpreview.com)

 
Comments Off on Report: Stalker used eye reflections in online photos to locate, assault pop star

Posted in Uncategorized


9 Ways to use Reflections more Creatively for Stunning Photography

20 Sep

The post 9 Ways to use Reflections more Creatively for Stunning Photography appeared first on Digital Photography School. It was authored by Ana Mireles.

Mirrors or windows, ponds or lakes, it really doesn’t matter where you find them, reflections are eye-catching. In this tutorial, I’ll give you some ideas and inspiration on how to use reflections more creatively for stunning photography.

Creative use of reflections for stunning photography tutorial

We’re fascinated by reflections ever since we discover ourselves in a mirror, it’s no wonder we remain captivated by them. If you want to know about the technical aspect of reflections check out Rick Ohnsman’s article Understand Light and Color to Improve your Photography. Here, I’ll tell you nine ways to use them in your photographs.

1. Avoid a dull sky

The first tip to use reflections more creatively is to photograph them during bad weather. After the rain we usually find the sky to be grey and dull. Luckily the rain creates puddles, and water is a great reflector. Next time you find yourself shooting during a rainy day try looking down to the ground instead of up to the sky.

Look for water reflection for bad weather conditions

If you want to take this idea to the next level, you can add a flash to your photo-shoot. To learn how to do it check this article: Using Rain Puddles to Create Unique Reflection Photos.

2. Fill empty spaces

Similar to the dull sky problem, you can have an area that lacks detail or any visual interest. If it’s made of a reflective material the answer is easy, just find the right angle to capture it. What may have been a boring object, is suddenly filled with details that complement your composition.

Search for the right angle to add reflections

3. Create texture

Reflections don’t necessarily have to be mirrored images of reality. The texture of the material or surface will distort the image and you can use that to capture color and shapes. For example, the ripples of water reflecting buildings.

Reflections create textures

Remember that you can also zoom-in and photograph the reflection as a texture to use later in other images.

4. Abstract photography

Speaking of photographing a texture alone, this can give you some inspiration for doing abstract photography. There are many different angles to approach this subject and reflections are definitely a good one. Here’s an example, but if you feel interested in going deeper into it, check out some Abstract Photos to Inspire You.

Textures alone are great for abstract photography

5. Change perspective

Shooting common places or subjects that are not interesting enough is always a challenge. Photographing its reflection can be a great alternative to capture it creatively. This forces you to move, crouch, and generally change your point of view. Also, you’ll be looking at the subject backward, and sometimes just a little shift can make the difference.

Look for the reflection to change perspective

6. Creates symmetric shapes

Symmetry is beautiful and pleasing. On a subconscious level, it gives us a soothing feeling. I don’t mean just placing your subject in the center and make it identical on both sides. Of course, this is an option, but it’s not the only way. Reflections can create symmetric shapes that can help the overall image become more interesting.

Symmetry helps your composition

7. Frame your subject

You can also use reflections as a way to direct the viewer’s attention to your subject. For example, placing your subject as a reflection in a mirror or a window literally frames it. If you want to get more creative you can also use a pair of eyeglasses or a spoon.

Frame your subject

8. Overlapping planes

One of my favorite qualities of reflections is that they show you two, or more scenes on the same plane. When you look at a mirror you are also seeing what is behind you. With a window, you can even add a third plane when you also add the scene from inside the room, and so on. If you compose the subjects from each scene in a harmonic way you can create a surreal or dream-like image.

Compose different scenes in one

9. The reflection IS the subject

Last but not least, a reflection can be a subject in itself. You can make a project or a series just about reflections, it’s just a matter of finding a concept to build upon. If you need some inspiration, I highly advise you to read this Guide to Creating Unique Conceptual Photography.

Use reflections as the main subject

Come up with an idea and just run with it. I hope this article sparked some inspiration so you can use reflections more creatively! Share your reflection photos in the comments section below and, most of all, have fun!


use-reflections-more-creatively

The post 9 Ways to use Reflections more Creatively for Stunning Photography appeared first on Digital Photography School. It was authored by Ana Mireles.


Digital Photography School

 
Comments Off on 9 Ways to use Reflections more Creatively for Stunning Photography

Posted in Photography


10 Ways to Use the Beauty and Complexity of Reflections in Photography

27 Mar

The post 10 Ways to Use the Beauty and Complexity of Reflections in Photography appeared first on Digital Photography School. It was authored by Anthony Epes.

I’m a huge fan of simple ideas that will create immediate effects for your photography.

Photography is a vast subject and learning all the intricacies of your camera, shooting on manual, as well as processing can seem overwhelming.

But there are so many ways to take wonderful photos, using simple ideas you can play with, that will create compelling photos for you right now.

When you take great photos, it inspires you to keep learning and pushing yourself on this intensely fulfilling creative journey.

In this article, you’ll learn how the simple idea of reflections can bring a wonderful complexity, beauty, and depth to your images.

The fantastic thing is reflections are everywhere! In the puddles you pass on your way to work, on shop windows, and on the sun-soaked sea of your holidays. They are on shiny cars, floors, walls, rivers, and streams. They are, of course, wherever you can find a reflective surface.

Reflections are fun to play with – bringing humor, abstraction, and patterns into your images. Here I’ll suggest many different ways to use them in your photography and give you tips to use right now, to create new effects and new looks in your images.

And, by focusing on one technique or one concept and really learning how to use that, you will become incredibly strong in that area.

By picking up one technique at a time, you can build a toolbox of skills that will help you feel confident and able to create magnificent photos.

Let’s get started. Let’s look at all the different aspects of capturing reflections in photography.

1. Reflections create depth

A reflection can create a feeling of depth within an image.

In the photo above taken in the early morning in Venice, the subtle reflection in the puddle on the street creates an image with a strong midground, background, and foreground – so the image isn’t so flat.

Here is another image from Venice, where the rain on the streets creates long reflections from the street lamps. They enhance the journey down the street and help draw you into the scene.

Tip: To get a smoother look for your reflection, use a long exposure, like in the photo above.

2. Reflections create eye-pleasing patterns

The eye finds symmetry and patterns very pleasing. In the photo below, I needed absolutely perfect positioning.

Tip: Finding the best angle for your shot is incredibly important. Many people get so awed by their subject they just start shooting instead of working out where the very best angle for that subject is.

So go up somewhere high, or lie on the ground. Move around until you find the perfect angle for your composition.

Try capturing patterns in the world around you, that when photographed as reflections, become an intriguing abstract image:

3. Reflections can create humor

As well as wicked patterns, reflections can be used to enhance or create humor.

I am not a particular ‘humor’-driven photographer – but occasionally I find something funny I want to capture.

Tip: There are two focal points in most reflections: the surface and the subject of the reflection. Shoot reflections using different shutter speeds and this will blend the colors. This sounds tricky, but with practice, you can nail it.

4. Reflections can create mystery and abstraction

“In photography, there is a reality so subtle that it becomes more real than reality.” – Alfred Stieglitz

I have taken a lot of photos of reflections in shop windows. I love to play with the different shapes you can create, superimposing the outside reflection onto the items in the shop window.


Of course, don’t include yourself in the image – unless you want to! I sometimes do for added interest, but generally, I keep out of my photos.

The photo below has a very intriguing reflection. What is it? Where is it? I know, of course, but I sometimes like to create mystery. To remove reality from reality and play with shapes, textures, color, and reflections.

When I am wandering around, I look everywhere. I look up, look around – and then my favorite – I look down.

I think we get so used to our environments we often don’t look all around us – particularly upwards or downwards. Think of a street you walk down every day. Do you look at the tops of the buildings, the roofs, the upper floors? It’s the same with the world at our feet. There is so much going on down there that we don’t notice.

Colorful, strong light reflecting off the wet pavement.

5. Reflections create texture

In the photo below, whilst walking past a canal, I noticed some strong yellow light that, with the texture of the water, created a sensual reflection and a lovely pattern.

When you see a reflection it’s not always obvious where it is coming from, look for the source, seek the light!

6. Reflections to enhance your photo

I often like to use reflections in quite subtle ways in my photography. It doesn’t have to be a big obvious reflection to be engaging.

One question I always ask my students on my workshops is, what is the light doing here in this situation?

We are all able to see the apparent sources of light, but what about the more subtle ways that the sunlight is bouncing off the glass and into the puddle on the floor?

In the photo above you have reflections in the water which are quite subtle but add a nice complexity and depth to the image.

In the image below the scene is made intriguing by the reflected light of sunrise in the windows of the buildings. Without it, the scene would be flat and boring.

The glint of golden light on a dark morning brings beautiful color as well as a hint of magic and mystery. The scene has turned into something quite compelling.

Tip: Always be looking to see what the light is doing, and how it’s affecting everything around you.

7. Reflections are beautiful, passing moments

I feel that reflections are little pretty moments, bringing an appreciation of the present moment of lovely light:

“Photography is a way of feeling, of touching, of loving. What you have caught on film is captured forever… It remembers little things, long after you have forgotten everything.” – Aaron Siskind

In the photo above of some birds in Istanbul on a foggy day, the reflections are subtle but create some depth to the photo. I think the movement of the birds is brought to life by the reflections.

8. Reflections create an alternative reality

Wherever I have beautiful light and reflective surfaces I am looking for reflections. In the photo above I like that the water is moving just enough to make what would be quite a bland photo a little surreal.

Tip: As you often have a lot of different and contrasting light sources in a reflection, expose for the brightest part of your photo.

9. Reflections of light create exuberance

Here is a simple photo with the sunrise reflected in the sea. Warm, beautiful sunshine is a wonderful thing to photograph. Sometimes it’s the simplest elements in your image that create the most impact.

In the photo below it’s also the sea, but this time the reflection of the moonlight:

What a gorgeous scene, right? And to show the wash of reflected moonlight makes the image stunning.

10. The sheer joy of light reflected on water

Water is involved in so many of my reflection photos. Here we have gorgeous light reflecting off the moody sea with the clouds reflecting the light around them.

I find clouds endlessly fascinating to photograph – they create wonderful texture within an image.

Last, but not least, I love having fun taking my own portrait using reflections. I mean, why not?

I hope this lesson has helped you with new ideas and ways to capture the complexity and beauty of reflections in photography.

What I love about photography is how much it helps us see the world in new, fresh ways. So keep going on your photography journey. There is always more to capture, more to see and more to learn. It’s a wonderfully enriching life pursuit.

“Through this photographic eye you will be able to look out on a new light-world, a world for the most part uncharted and unexplored, a world that lies waiting to be discovered and revealed.” – Edward Weston

I’d love to know what you thought of these ideas – let me know in the comments below.

The post 10 Ways to Use the Beauty and Complexity of Reflections in Photography appeared first on Digital Photography School. It was authored by Anthony Epes.


Digital Photography School

 
Comments Off on 10 Ways to Use the Beauty and Complexity of Reflections in Photography

Posted in Photography


Tips for Photographing Reflections to Create Stunning Images

10 Dec

It can’t be denied. There’s something special about reflections that makes them a unique aspect of photography. Maybe it’s because a reflection just like a photograph is a gateway to another world, parallel but restricted. Also just like photography, reflections are a simplification of our world; they turn a 3D reality into a 2D representation.

In a way, photography can make ”reality” and reflections more equal, by cramming the former into 2D while retaining the natural, 2D state of the latter.

01 reflections photography tips

Before we get into the exciting art of photographing reflections, let’s think a bit more about why they’re so attractive, and how we can find new ways to photograph them. Since you’re definitely going to have your own ideas about this mystery, I’d love it if you shared them in the comments below at the end of the article.

02 reflections photography tips

Why photograph reflections?

Reflections have always had an immediate attraction to me, and I don’t think I’m the only one. They’re like visual illusions dropped into everyday life. They turn the world upside down, add a hint of confusion to a scene, and show us things we can’t immediately see the source of.


For you as a photographer, reflections offer a way to create a certain atmosphere. It can be mystery and confusion, but also vastness, such as sky reflected in a lake, or calmness, as a reflection requires a relatively still surface.

Tips for How to Photograph Reflections

Thanks to their mirroring effect and the interaction with the (unreflected) surroundings, reflections are useful tools if you’re trying to tell a story with your photograph — as you always should!

Tips for How to Photograph Reflections

Where to find reflections

What is your first thought when you think about reflections? Is it a mirror, perhaps, or a beautiful lake on a wind still evening?

One great aspect about photographing reflections is that they can be found in so many places and created by a variety of surfaces. Whether you’re into photographing landscapes, portraits, products, flowers, or street scenes, you can utilize reflections to add something special to your photos.

Tips for How to Photograph Reflections

The most obvious place to find photogenic reflections in nature is in connection with water. And wherever there is life, there is water, so the opportunities are basically endless. It can be anything from large bodies of water and wet sand on a beach to a raindrop on a frog’s head.

Tips for How to Photograph Reflections

For more urban photographers, water is of course still an option (puddles are sometimes great for other things than jumping into), but buildings provide another world of options. Start with shop windows and glass buildings, and go on from there. Reflections are fun and beautiful, and we don’t hesitate to incorporate them into our cityscapes.

Tips for How to Photograph Reflections

If you don’t feel like leaving the house or find yourself at a party, do not despair, you can still exercise your photography skills. Mirrors are the obvious surface to use to add another dimension or an interesting twist to your photograph. But windows and polished tables or counters are also great. And don’t forget the opportunities of a well-placed wine glass!

Tips for How to Photograph Reflections

How to capture reflections

Photographing reflections is pretty easy, but there are a few things to think about before and while you’re doing it. These are just a few tips:

  • Unless intended, make sure you don’t show up in the reflection. Change your angle and move around to find the best place from which to take your photograph so you don’t appear in the image.
  • Framing is essential! Use the elements of the space you’re in to create an interesting composition and experiment to discover what creates the greatest effect.
  • Lighting might be a bit tricky. For instance, in a picture of a natural scene reflected in a lake, the reflection is often quite a lot darker than the reflected scene. Use that to create an effect in your image or use filters to even out the lighting difference. It’s up to you!

Tips for How to Photograph Reflections

Conclusion

Those are some of the basics of one of my favorite types of photography. Do you like photographing reflections, and if so, why? What is it about them you find attractive?

If you have photographs to show or tips to share, I’d love to see them in the comments below!

The post Tips for Photographing Reflections to Create Stunning Images by Hannele Luhtasela-el Showk appeared first on Digital Photography School.


Digital Photography School

 
Comments Off on Tips for Photographing Reflections to Create Stunning Images

Posted in Photography


23 Remarkable Mirror Images of Reflections

08 Jun

Mirrors are not the only things that can provide a good reflection. Look around and see what other things can provide a good mirror image.

These 23 images are great examples of how to photograph a reflective surface and reflections creatively. Enjoy.

By Jacob Surland

By Glenn Simmons

By M.G.N. – Marcel

By Pablo Fernández

By Bruce Irschick

By Elizabeth Haslam

By Rüdiger Stehn

By Jim Choate

By Michael Levine-Clark

By Ken Douglas

By Chris Sorge

By josef.stuefer

By Bernat Casero

By Ramesh SA

By Dianne Lacourciere

By Chrissy Wainwright

By Arild Storaas

By Max Milkovitsch

By Theophilos Papadopoulos

By Mario

By Susanne Nilsson

By Laurent Ribot

By ANDY ARCIGA ( www.arcigaandy.com )

The post 23 Remarkable Mirror Images of Reflections by Darlene Hildebrandt appeared first on Digital Photography School.


Digital Photography School

 
Comments Off on 23 Remarkable Mirror Images of Reflections

Posted in Photography


Weekly Photography Challenge – Reflections

08 Jun

Reflective surfaces can be difficult to photograph – a “challenge” even! Here are a few examples of images of reflections to get you started.

By Theophilos Papadopoulos

Weekly Photography Challenge – Reflections

Your challenge this week is to find some reflective surfaces and photograph them in a creative way. Some sources for reflections might include:

  • Windows
  • Puddles
  • Lakes and rivers
  • Chrome (fenders and car parts)
  • Actual mirrors
  • Sunglasses
  • Roads and sidewalks after the rain
  • Plexiglass or shine countertops

By Jeff Wallace

By Gavin Golden

By Jamie McCaffrey

By Dan Masa

By Vince Young

Share your images below:

Simply upload your shot into the comment field (look for the little camera icon in the Disqus comments section) and they’ll get embedded for us all to see or if you’d prefer, upload them to your favorite photo-sharing site and leave the link to them. Show me your best images in this week’s challenge. Sometimes it takes a while for an image to appear so be patient and try not to post the same image twice.

Share in the dPS Facebook Group

You can also share your images on the dPS Facebook group as the challenge is posted there each week as well.

The post Weekly Photography Challenge – Reflections by Darlene Hildebrandt appeared first on Digital Photography School.


Digital Photography School

 
Comments Off on Weekly Photography Challenge – Reflections

Posted in Photography


Floating in Space: Milky Way Reflections on Mirror-Like Salt Flats

09 Aug

[ By SA Rogers in Art & Photography & Video. ]

milky way 2

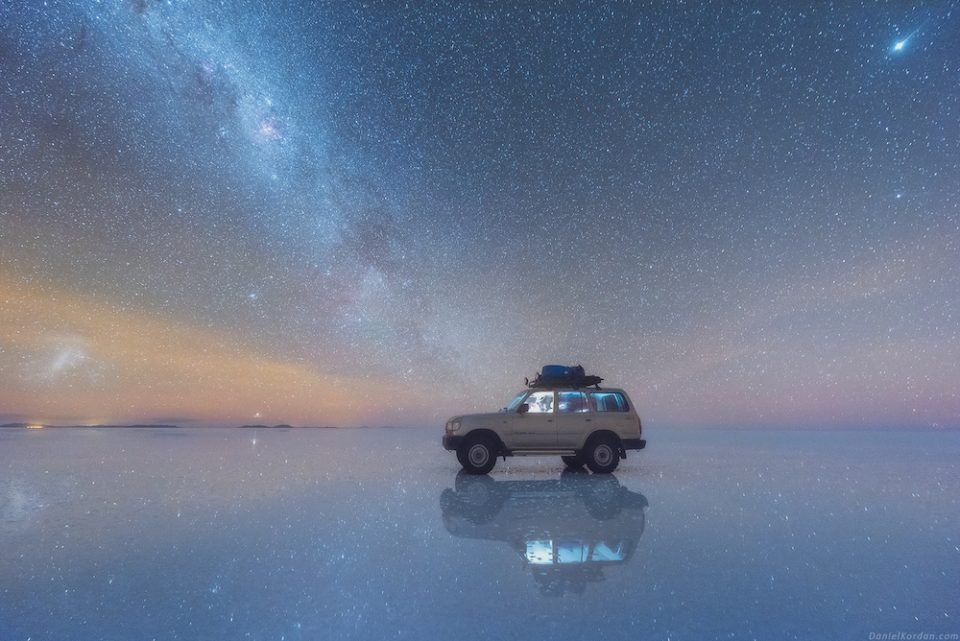
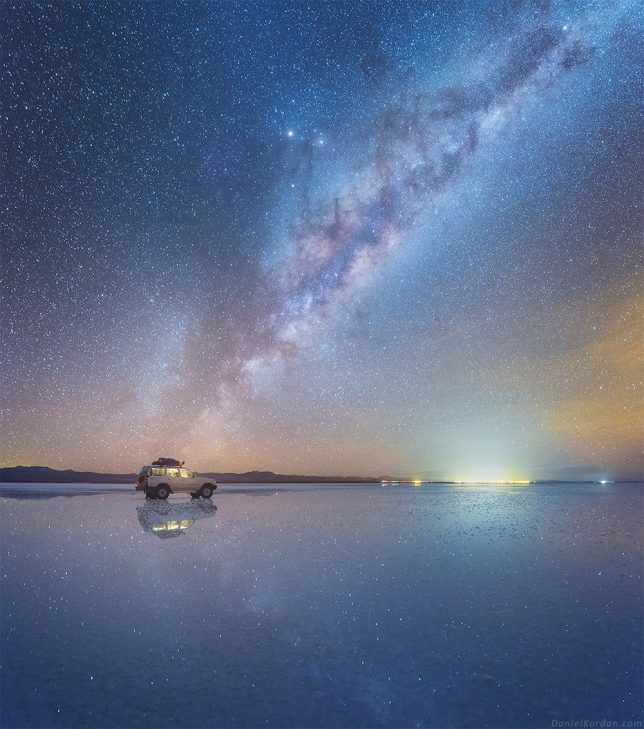
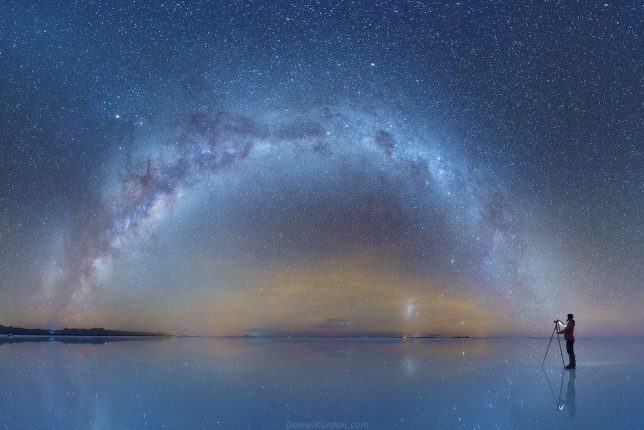
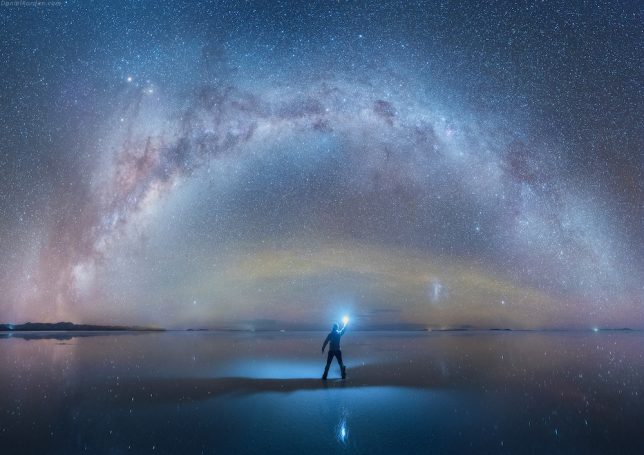
Perhaps nowhere on Earth is there a more beautiful place to take in crystal-clear views of the starlit sky than the pristine Salar de Uyuni in southwest Bolivia, which boasts a mirror-like reflective surface in some spots. The largest salt flat in the world provides an incredible setting for photographer Daniel Kordan, who traveled there in search of the darkest possible sky. Avoiding light pollution can be tough even in rural areas, but not only is this mineral-coated landscape sufficiently far from urban areas, it’s also sort of alien-like in its own right.

milky way 4

milky way 1

In an interview with My Modern Met, Kordan says the salt flats were so dark, he couldn’t see anything at all until his eyes adjusted. Then, suddenly, the stars were underneath him as well as above. “It seemed that we floated in open space. Our spaceship is parked in a distance, and stars are blinking with blue, red and yellow colors.”

milky way 3

A graduate of the Institute of Physics and Technology in Moscow, Kordan travels the world in search of the most photogenic landscapes, and judging by his portfolio as well as his increasingly popular Instagram, he’s had no trouble finding and capturing them. In addition the salt flats, the photographer has taken gorgeous photos of natural settings i Greece, New Zealand, Greenland, Tuscany, Scotland, Patagonia and many other locales. Check out his personal favorite collection of images he’s taken, replete with glaciers, ice caves, dramatic sand dunes and the aurora borealis.

milky way 4

milky way 5

“I have been fascinated by the possibilities of photography since my early childhood,” says Kordon on his website. “I grew up at beautiful lake region under Moscow exploring wild nature, spending most of my free time in nature. I graduated the art painting school when I was a kid. Mix art, nature, constant activities and you’ll receive a summary – art of Landscape photography. Life started swirling me, pushing me into the rush. University, hard work on my quantum physics thesis, family and friends… but there is alway sa pleasure in the pathless woods: places I always returned and always admired. Nature is my inspiration, with all the beauty and variety of colors and compositions.”

Share on Facebook


[ By SA Rogers in Art & Photography & Video. ]

[ WebUrbanist | Archives | Galleries | Privacy | TOS ]


WebUrbanist

 
Comments Off on Floating in Space: Milky Way Reflections on Mirror-Like Salt Flats

Posted in Creativity