RSS
 

Posts Tagged ‘Recover’

Disk Drill 4 makes it easier to recover Raw image, video files from damaged drives and memory cards

08 Oct

The macOS version of disk recovery software Disk Drill has received a major 4.0 update that adds, amongst other features, a dramatically improved ability to recover RAW image formats from drives and memory cards.

Disk Drill for macOS 4.0 is now ready for the latest versions of Apple’s desktop and mobile operating systems, macOS Big Sur and iOS 14. Using ‘state-of-the-art scanning methods and updated recovery algorithms,’ Disk Drill 4 can recover more than 400 different file types from drives with FAT32, NTFS, HFS+, and APFS file systems.

CleverFiles, the team that develops Disk Drill, says it’s ‘invested a lot of resources into researching and implementing unique search and recovery algorithms aiming bring back many raw images.’ Specifically, CleverFiles says it’s dramatically improved the ability to recover Raw image and video formats, including 3FR (Hasselblad), ARW (Sony), CR2 and CR3 (Canon), DNG (multiple mobile devices and cameras), GPR (GoPRO), HEIC (Apple), RLE (QuickTime videos), CVID (Cinepak), H263 and H264, MP4V, BRAW (Blackmagic RAW), CinemaDNG, Canon CRM, multiple MOV-container-based formats and many others.

CleverFiles specifically notes the success rate of being able to reconstruct Raw photo and video files has increased to 99% and 96%, respectively, compared to the respective 68% and 51% success rates with Disk Drill 3.8.

A breakdown of the success rate for recovering Raw image and video files from disks and memory cards compared to its previous version and competing products.

Other benefits of Disk Drill includes the ability to browse recovered files in real-time as they’re reconstructed, rather than having to wait for the entire disk to be scanned, and a secure ‘data shredder’ option for ensuring no data can be recovered from drives you’re looking to get rid of.

You can download Disk Drill 4 for free to try out basic functionality and to get familiarized with all the recovery methods, but if you actually need to recover files from a drive, you can pick up the ‘Pro’ version for $ 89. A single purchase is good for activation on up to three computers. Disk Drill has a great overview of all the new features on its website.

Articles: Digital Photography Review (dpreview.com)

 
Comments Off on Disk Drill 4 makes it easier to recover Raw image, video files from damaged drives and memory cards

Posted in Uncategorized


How to Prevent, Detect, and Recover from Dumb Photographer Mistakes

04 Dec

The post How to Prevent, Detect, and Recover from Dumb Photographer Mistakes appeared first on Digital Photography School. It was authored by Rick Ohnsman.

dumb-photographer-mistakes

I make ’em, you make ’em, all photographers make ’em sooner or later – dumb photographer mistakes.

Today’s cameras are now essentially computers, and the saying about computers is, “They do what you tell them to do, not what you want them to do.”  Leave a switch in the wrong position, forget to restore a setting after taking a prior image, or toggle any myriad of other possible things other than they should be and it’ll happen – the “gotchas will getcha.”

I’ve yet to meet the perfect photographer, the one that never makes dumb photographer mistakes.  The difference is learning to quickly discover a problem, determine what the problem may be, and knowing how to quickly recover.  The intent of this article is to cover some of the more common mistakes and perhaps spare you the pain of learning them the hard way.

“Smart people do stupid things. Stupid people don’t learn from them.”
Frank Sonnenberg

Image: We all make ’em – Dumb Photographer Mistakes. When the gotchas getcha, being able to qu...

We all make ’em – Dumb Photographer Mistakes. When the gotchas getcha, being able to quickly recover is key.

The “Happy Idiot”

The worst mistakes you can make in photography are the ones you don’t detect until later, after the photo session, maybe even back home when you finally sit down to edit your shots.

Before digital, this was the kind where you might happily shoot an entire session, get home, open the back of the camera and see you’d forgotten to load any film.

This might still happen in a digital camera if you have the setting “release shutter without card” turned on and then never “chimp” your shots to see what you’re getting.

Recover-from-Dumb-Photographer-Mistakes

When in a store in demo mode, it might be fine to have the shoot without card mode enabled. In all other cases, it’s a very bad idea.

Some photographers will tell you that chimping your shots (checking them on the LCD after taking them), is a sign of an amateur.  Okay,  you “perfect photographers” might not need to do this.  Me?  I chimp whenever I can.  The times when I’ve been burned most often were when I didn’t check.

One of the best things digital photography gives us is the ability to immediately review our images after taking them. We can do so right there in the field where we can immediately detect and remedy any problems.

I still bow to the wedding photographers who used film. They shot an entire wedding and were so confident in their abilities that they rarely had any nasty surprises when they developed the negatives.

There’s nothing worse than snapping away like a “happy idiot,” clueless that you’re just making those dumb photographer mistakes.

Something’s wrong here

In the medical world, they talk about “early detection.” Catch a problem early, and you can reverse it. You minimize the damage and perhaps even find a cure.

So let’s use that medical terminology; symptomdiagnosis, and cure as we look at some typical dumb photographer mistakes you might make.

Recover-from-Dumb-Photographer-Mistakes

Everyone will make dumb photographer mistakes occasionally. A smart photographer can quickly identify symptoms, diagnose the problem, and affect a cure to recover quickly.

Focus Faux Pas

Flubs, foul-ups, and a few other f-words can describe what happens when you fail to get fine focus in your photos. Worse is that while we can sometimes rescue an exposure issue in editing, to date, there is no cure for a misfocused, unsharp, image. Let’s use our terms to address some of the dumb photographer mistakes you might make.

Symptom – The entire image is fuzzy, nothing sharp in the shot

Diagnosis – If you’re using Autofocus, is the switch “on”? Are you half-pressing/holding/getting focus lock and then squeezing the button the rest of the way to trip the shutter?

I’ve seen many newbies either push the shutter button in one quick motion (both shaking the camera and not allowing it to get focus before making the shot). I’ve also seen them half-pressing, getting focus, releasing, and then pressing the button a second time.

Image: Did you forget to turn on the Autofocus switch? Or used Manual Focus and then forget to turn...

Did you forget to turn on the Autofocus switch? Or used Manual Focus and then forget to turn it back on? When you are having focusing issues, this should be the first check.

Another possibility is that the shutter speed is too low. If you’re handholding the camera, remember the “Reciprocal Rule,” which simply means your shutter speed should be at least the inverse or your focal length. So, with a 50mm lens, that would be 1/50th. Out at 400mm, that would be 1/400 second.

You might get away with a slightly longer shutter speed if your camera or lens has image stabilization. However, it’s better to err on the side of a faster shutter speed when you can.

Of course, if you want to freeze a fast-moving subject, a shorter shutter speed will be required.

If you’re manually focusing, such as when making landscape photos, you can go to live view. Use the magnifying feature to check critical focus on a particular spot, and then make your shot. But here’s the “gotcha” with this one. (Don’t ask me how I know about this.) You use that method to make your photo, then go onto making other shots, but forget you’ve turned off autofocus. The camera may still fire, even if the focus is slightly off. While you might not detect a very slight misfocus while in the field, you’ll cuss later when back in edit, you detect your mistake.

Cure – There is no editing cure for photos where the focus is soft.  Yeah, I know Photoshop and other software has some tools that claim to fix blurry photos.  Some are even using  Artifical Intelligence (AI) to do it now.  It sorta, kinda works, but there is no substitute for getting it sharp in the field.  Learn proper focusing techniques.  Let’s look at some other typical focus flubs.

Recover-from-Dumb-Photographer-Mistakes

Understand and use the autofocus points in your camera. Most cameras will default to the center point, and if your subject is not in the center, you may not get focus on the subject you want.

Symptom – Some things in the image are sharp, just not where you wanted

Diagnosis – Did you use the focus-points in your camera and put them on what you wanted in focus? Beginners often don’t know about focus points, merely using the default center point. Then, when what they wanted in focus wasn’t in the center, they wonder why the subject isn’t focused. Another possibility is too wide an aperture giving too limited a depth of field. A good example is a group photo where people in the front row are in focus, but the second-row people aren’t.

Cure – There’s no cure for the shots you already made that are blurry. However, if detected in the field, check to be sure you are using the focus points properly.

If your subject is moving, perhaps continuous (servo) focus might be appropriate. Be sure your aperture selection gives you adequate depth-of-field too.

Image: When working on a tripod, turn off the image stabilization. It won’t help, and in fact,...

When working on a tripod, turn off the image stabilization. It won’t help, and in fact, might hurt image sharpness.

Symptom – You were on a tripod, but your shots are still slightly soft

Diagnosis – Is the stabilization switch on your camera or lens on?

Cure – When working on a tripod, turn off the auto stabilization.  It won’t help and could possibly hurt your images, attempting to compensate for motion that isn’t there.

Switches and buttons and menus, oh my!

There are so many settings in modern cameras that it can be overwhelming. Many of the auto modes can be lifesavers, relieving the “chores” of photography and letting the photographer instead concentrate on being creative.

They are great when they work.

Where they fail is when the camera is “fooled” by circumstances where an intelligent photographer would choose differently, or when settings are inadvertently left on or off.

Let’s look at some examples.

Recover-from-Dumb-Photographer-Mistakes

Spot metering has its uses, but forget to switch back to something like matrix/evaluative metering when you’re done, and you will puzzle over why your images are wildly exposed.

Symptom – The exposure seems completely out of whack, regardless of the mode you’re using

Diagnosis – Did you go to Spot Metering for a previous shot and forget you left that on?

Cure – Many cameras now warn the user they are in spot metering mode with a “!” mark in the viewfinder.  Spot metering has very specific uses, and in those cases, it’s terrific.  In most other cases, it will wildly mess up your exposure and leave you to wonder why.

Image: Auto Noise Reduction works by taking a second black frame and combining it with your exposure...

Auto Noise Reduction works by taking a second black frame and combining it with your exposure. You get to wait while it does that. Decide if that’s acceptable before engaging the option.

Symptom – You make a shot and it seems to take the camera a long time before it’s ready to make another.

Diagnosis – If you have the Long Exposure Noise Reduction feature turned on and are making longer exposure images, the camera will take a second “black frame” image and then use that to reduce noise.  Sometimes that’s great, but realize it will take twice as long for the camera to process and store the image, sometimes making you wait.

Cure – Use the Low Exposure Noise Reduction feature only in special circumstances (perhaps when doing astrophotography where high ISO and noise might be involved). Otherwise, turn it off.

Image: You might use multi-shot bracketing to make images you’ll combine later. Be sure to tur...

You might use multi-shot bracketing to make images you’ll combine later. Be sure to turn it off when done or you’ll get a surprise when making subsequent shots.

Symptom – You click the shutter, the countdown timer activates and then fires off five shots

Diagnosis – You probably set up the camera with a 2-second timer and also for a 5-shot bracket.

Cure – This is a great feature when you want it, but after you’re done, return the settings to single-shot and turn off the countdown timer setting.  Otherwise, when you only want a quick single shot, you’ll wait while the time counts down and then get several.

Image: You might have an occasion to only want .jpg images, but don’t forget to put it back to...

You might have an occasion to only want .jpg images, but don’t forget to put it back to Raw when you’re done. Your editing options are much more limited with .jpg files. You will be very sad if you intended to make Raw images and only come home with .jpgs.

Symptom – You get home from a session and all of your images are .jpg, no raw images to be found on the card

Diagnosis – You probably did an earlier shoot where you only needed .jpg images. You set the camera to do that, and then forget to put it back.

Cure – You can still work with .jpg images, but you will have greatly reduced editing options.  Chimping will not tell you when this is happening as the image you see on the LCD is always a .jpg. So make it a habit to always put your camera back in Raw Mode after a shoot if you’ve changed it.

Return to a standard

I could go on about all the settings, buttons, and dials you might have in the wrong position, what will tip you off, and how to correct such problems. There are dozens of “gotchas” when this occurs.

The common cure is to always return to your personal defaults if you’ve strayed for a special situation. Make it a habit to check and return your settings to your defaults when you put the camera away. Then, when you’re driving down the road on the way home and Bigfoot (Yowie in Australia, or beasts with a few other names in other parts of the world), suddenly steps out of the forest, you can quickly turn on the camera and have a better chance of getting the shot.

Seriously, for any situation where you don’t have time to fiddle with all your settings, you want a standard that will pretty much give you quick point-and-shoot capability. I can’t tell you what that is for you, but it’s your base settings. It’s the place you most often work from and use for a good majority of your photos.

For me, this is the “P” or Program mode of my camera, Single-point Auto-focus, Auto White Balance, and Auto ISO. Sure, that’s quite automatic and perhaps not where I’ll ultimately go. Maybe I’ll be using Aperture Priority, Continuous Focus, and ISO 100 or even Manual exposure mode, but it’s a great default to work from.

My brain might (hopefully) be better, but the camera is quicker. Plus, the engineers that developed auto modes were no dummies. When seconds count, and Bigfoot appears, I can be ready.

Program in specialized settings

I love that I can also have more sophisticated set-ups stored in the Camera User (C1 and C2) modes on my Canon 6D. Many other cameras have this option too, a way to set-up and store various settings and then recall those so that with a spin of the mode dial, you can use all those settings.

For example, should I want that 5-shot bracket with a 2-second timer, Evaluative metering, ISO 200, Auto ISO, Aperture Priority with a f/11 f-stop, and perhaps a few other things thrown in, I can get there with a turn of the dial to C1 or C2, wherever I have that combination stored. When done, I put the dial back to my standard. Quick to turn on, quick to turn off, no “gotchas.”

Mistakes are lessons inside out.”
Matshona Dhliwayo

Recover-from-Dumb-Photographer-Mistakes

My Canon 6D has two memory storage locations; C1 and C2. They are great for entering more complex camera settings with the ability to turn them on and off with the turn of a dial.

Filter forgetfulness

I wish I didn’t know about this one first hand.

I was shooting earlier in the day with my circular polarizer on. Later that evening, as the light was getting low, I knew I’d have to perhaps raise the ISO a bit, so I did. So why was I still having to use longer shutter speeds and wider apertures than I thought I should? Oh well, I made my shots figuring I could deal with the issue later in post-production.

As I was putting the camera away, I saw my blunder – the polarizer was still on! Arghhh!!

I’d needlessly given up two-stops of light because I hadn’t taken the filter off when I was finished using it. I won’t make that mistake again. The takeaway? Turn your mistakes into lessons so you won’t repeat them.

Recover-from-Dumb-Photographer-Mistakes

Here’s a fun and educational game to play with your photographer friends.

Play “Stump the Chump”

Here’s an exercise I’ve used with photo students to teach them to quickly detect, diagnose, and recover from a camera problem. I take their camera, have them turn their back, and then purposely change a setting, flip a switch, or do something else that will create a problem. I might even swap in a dead battery or a full storage card.

When they turn around, I hand them the camera. They have three minutes and three shots to put things right and make a good image. The fourth shot, when the three minutes are up, must be a good one.

This exercise teaches them the controls of the camera and how to detect and cure camera problems. It’s all too easy to inadvertently bump the wrong button, select the wrong menu item, or leave a setting in the wrong position after a previous shot.

Something else to practice is learning where all your camera controls are in the dark. How many times have you fumbled in a low light or night photo session because you haven’t memorized the basic buttons and settings on your camera? When the situation is fleeting, and you must get the shot now, having to futz around with the camera is the mark of a rookie.

Recover-from-Dumb-Photographer-Mistakes

Take a page out of the Boy Scout Handbook when packing your camera bag for a photo session or trip and Be Prepared! It will head off many dumb photographer mistakes.

Be prepared

It’s the Boy Scout motto – Be Prepared!  You will head off many dumb photographer mistakes by taking the time to check, maintain, properly pack, and re-check your gear before you go.

Here is a checklist that you might want to copy and save:

  • Have the camera bodies and lenses you might use?  Don’t carry more than you need, but also don’t leave home something you might want. Learn how to properly pack for any given photo session or trip.
  • Batteries fully charged?  You wouldn’t start a trip with a half-tank of gas.  Don’t go out with a battery only half-charged.  Don’t be “half-gassed.”  Have extra, fully-charged batteries and charger.
  • Storage cards off-loaded, formatted, and empty before you go?  Always have more storage than you expect to need.  You never want to have to delete photos in the field so you can make more room.  Don’t use your cards for long term storage.  After a session, offload your images to your computer, make a backup elsewhere, and then format your card with the camera.  Deleting images with the card in the camera increases the risk of file corruption.
Image: A smudge on your lens can ruin an entire photo session if it goes undetected. Clean your lens...

A smudge on your lens can ruin an entire photo session if it goes undetected. Clean your lenses before a shoot and then periodically look at them during a session.

  • Lenses cleaned? A big smudge, undetected can ruin an entire session.
  • Have your filters? Digital editing tools have greatly reduced the need for specialized filters, but the one for which there is no substitute is the circular polarizer.  What you want will, of course, depend on what you expect to be photographing.
  • Tripod cleaned, screws tight?  Is your tripod plate or L-Bracket on the camera or attached to the tripod?  Not being able to mount your camera to the tripod, or having something break or fall off, will ruin your day and maybe your camera too.
  • Sensor cleaned?  Yeah, you can remove sensor dust specks in editing, but save yourself the work by checking it before a shoot. Clean it when necessary or have a pro do it if you feel you don’t have the skills.
  • Have your camera strap? When going handheld, the camera strap is your “safety belt.”  Fumbling and dropping an expensive camera has been known to make grown men cry.
  • Have a camera rain cover? Check the forecast, and if in doubt, have a rain cover.  I just keep one in my pack at all times.
  • Have photographer comfort items Hat, gloves, sunscreen, and bug repellant?  When you’re miserable, your photos will suffer.
  • Water and snacks? A happy photographer is a well-fed, well-hydrated photographer.


“Learn from the mistakes of others. You can’t live long enough to make them all yourself.”
Eleanor Roosevelt

Conclusion

It’s been said that if you’re not making mistakes, you’re not trying hard enough. I would add that if you’re not more adventurous and explorative with your photography, always shooting the same subjects with the same camera settings, in the same way, you’re likely in a rut. You might make fewer mistakes, but you will also make fewer unique and exciting photos.

The same goes for learning what you can do with your camera. If you always work in full Auto or Program mode, always use Auto-Focus, always shoot .jpg or rely too much on your camera to do your thinking, you’ll make fewer mistakes, but just average photos. Be adventurous, go full-manual, try new things, and make some mistakes. It’s okay. When you do, think about what went wrong and try it again.

As for the just plain “dumb photographer mistakes,” the kind we covered here, they are a fact of photographic life. You’re gonna make ’em.

Learning to quickly detect, diagnose, and rapidly recover – that’s the mark of a pro. We can also learn from each other, so be a little humble and share your mistakes here with your fellow photographers in the comments section below. We can all have a chuckle and then perhaps not have to make those same mistakes ourselves.

The post How to Prevent, Detect, and Recover from Dumb Photographer Mistakes appeared first on Digital Photography School. It was authored by Rick Ohnsman.


Digital Photography School

 
Comments Off on How to Prevent, Detect, and Recover from Dumb Photographer Mistakes

Posted in Photography


How to Recover Deleted Photos from an SD Card

07 Jul

The post How to Recover Deleted Photos from an SD Card appeared first on Digital Photography School. It was authored by Theodomentis Lucia.

A while back, all the photos stored on my Sony camera’s SD card were wiped off entirely. Needless to say, it was a nightmare as the SD card had pictures of my last vacation. This got me digging into data recovery for SD cards – as I was not ready to let go of my precious memories under any circumstances.

How to Recover Deleted Photos from an SD Card

Thankfully, after some unsuccessful attempts, I was able to get back my lost photos.

I took the assistance of a reliable data recovery tool and followed a stepwise process to recover my lost photos from the convenience of my home.

Is it possible to recover data from SD cards?

Before we get into the details, it is important to answer this million-dollar question.

In a nutshell – yes, you can get back your lost data from an SD card, hard drive, or any other data source.

This is because when you delete data from a source, it isn’t wiped away entirely. Instead, the address allocated to it becomes accessible to be overwritten by something else.

This is where a data recovery tool comes to the rescue. It can help you extract this inaccessible content before it gets overwritten by any other operation.

How to recover deleted photos from SD sards

To get back your lost or deleted data from an SD card, consider using a reliable data recovery tool. Personally, I encountered a few gimmicks and imposters on the web that didn’t yield expected results. Overall, I found Recoverit to be a very good data recovery tool out there. Since it was pretty easy to use Recoverit 8.0, I didn’t have to seek the help of a professional. I downloaded its Windows version. However, you can also get the Mac recovery application as well.

Here’s how I got back my lost photos from my SD card using Recoverit:

Step 1: Download Recoverit on your system

Needless to say, you need to start by downloading the data recovery tool on your computer. Just download Recoverit data recovery software on your Mac or Windows. You can get the free basic version if you wish. Although, to enjoy its unlimited features, you can purchase the pro or ultimate subscriptions too.

Step 2: Install and launch Recoverit

When the setup file is downloaded, simply open it and click on the “Install” button to get things started. Follow a basic click-through process to complete the installation and launch Recoverit on your computer.

How to Recover Deleted Photos from an SD Card - 2

Step 3: Connect your SD card

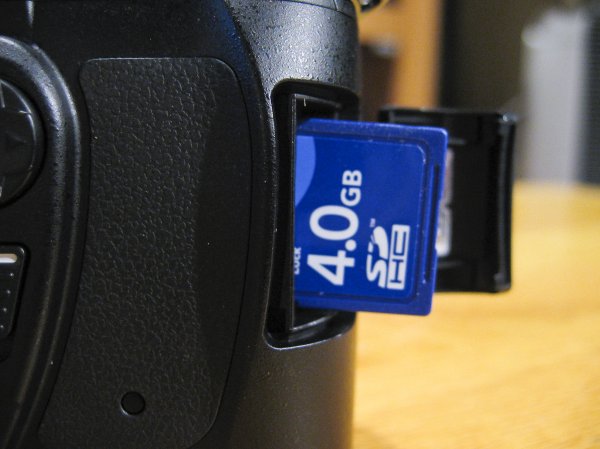
Carefully, unmount your SD card from your digital camera or camcorder and connect it to your system. If your computer doesn’t have an inbuilt card reader, then use a dedicated card reader unit to connect it. As soon as it is detected, you will be notified by the system.

Step 4: Select your SD card as a source location

Once you launch the Recoverit data recovery application on your computer, you can view different location options on its home page. This includes internal drives, partitions, and even connected external devices. You can select the drive of your SD card (under external devices) or browse to a specific folder to scan as well.

How to Recover Deleted Photos from an SD Card - 3

Step 5: Start the scan

After selecting the SD card as a source location, click on the “Start” button to initiate the data recovery process.

Step 6: Wait for the scan to be over

Sit back and wait for a few minutes as Recoverit Data Recovery scans the connected SD card in an extensive manner. Since it might take a while, make sure that your SD card stays connected to the system during the entire process. There is an on-screen indicator to depict the progress of the scan.

Step 7: Preview the extracted data

Upon the completion of the recovery process, the extracted content gets displayed under different categories. Here, you preview your photos, videos, documents, etc., and select the files you wish to save. The search option allows you to look for specific files in no time.

Step 8: Recover and Save your photos

On the native interface of Recoverit, you can select multiple files as per your convenience. In the end, just click on the “Recover” button to save the selected files. A browser window will open, letting you save these files to a secure location of your choice.

How to Recover Deleted Photos from an SD Card - 7


Tips for getting better recovery results

  • Recover the extracted content to a trusted location. Preferably, it should not be your SD card from where you have just recovered your lost photos.
  • After losing your photos, stop using your SD card or digital camera right away. If you restart it a few times, or use it for other reasons, then it might overwrite your old photos. This will make the chances of getting your photos back pretty bleak.
  • If there is no inbuilt card reader slot in your system, consider using a dedicated third-party unit to attach your SD card.
  • Don’t format the SD card or change its file system, hoping to get better results. Simply use a reliable recovery tool as soon as you can get positive results.

Conclusion

That’s it! By following this simple drill, I was able to get back my lost data from my SD card in no time. You can also try the same and perform an SD card recovery from the convenience of your home.

If you have also gone through a similar situation to recover deleted photos and would like to share your experience, feel free to let us know in the comments below.

Download Recoverit Free Version


Recoverit is a dPS paid partner

The post How to Recover Deleted Photos from an SD Card appeared first on Digital Photography School. It was authored by Theodomentis Lucia.


Digital Photography School

 
Comments Off on How to Recover Deleted Photos from an SD Card

Posted in Photography


Researchers recover photos from a USB drive that spent a year frozen in seal poop

09 Feb
Seals at Cape Cross, Namibia — Joachim Huber

A USB flash drive recovered from frozen seal scat has been reunited with its owner, according to New Zealand’s National Institute of Water and Atmospheric Research (NIWA). The organization revealed its findings in a post early this week, when it stated that a functional USB drive with recoverable photos and at least one video had been found in thawed seal poo.

According to the NIWA, seal scat is ‘as good as gold’ for researchers who study the creatures. Volunteers with LeopardSeals.org collect these samples and ship them to the researchers, who then freeze them until they’re ready to analyze the droppings.

In November 2017, the NIWA says marine biologist Dr. Krista Hupman received a sample collected by a local vet. The scat was placed in a freezer, only to be removed last month by volunteers with the organization. The sample was defrosted, rinsed, and then broken apart to study.

Amid the expected findings was one concerning discovery: a USB flash drive. After being left out to dry, the researchers connected the drive and were surprised to recover images of sea lions, as well as a video showing the tip of a blue kayak and a mother and baby sea lion in the water.

NIWA shared the video on its Twitter account on February 4 in an attempt to reunite the USB drive with its owner.

The amusing story went viral, and it only took a day for owner Amanda Nally to claim her property, according to The Project NZ. The hardy USB drive’s make and model remain unknown, but it’s safe to say regardless of official specs the flash drive was indeed weather ‘sealed.’

Articles: Digital Photography Review (dpreview.com)

 
Comments Off on Researchers recover photos from a USB drive that spent a year frozen in seal poop

Posted in Uncategorized


A happy ending: Police recover stolen limited edition Leica from The Camera Store robbery

27 Dec
Shattered glass from the break-in. Photo: The Camera Store

You could look at the story of the recent robbery at beloved Calgary camera shop The Camera Store as a play in three acts. Act 1: the store is robbed of over $ 27,000 USD worth of high-end camera equipment. Act 2: Local and worldwide media attention helps police nab two suspects and recover most of the gear in just 48 hours.

And now, Act 3: The final piece of stolen equipment—a rare, limited edition Leica M-P Edition Safari—is returned to the shop, making this particular theft a complete failure.

Act 3 took place just before Christmas, when the Calgary police executed a search warrant—ostensibly at the home of one of the two suspects arrested previously, 60-year-old Tan Xuan Hung Bui and 36-year-old Justin Ross—where they found the stolen Leica M-P Edition Safari worth $ 13,000 CAD (~$ 10,250 USD).

Posing with the recovered Leica M-P Edition Safari Photo: The Camera Store

The Camera Store announced the recovery on its blog at the same time as the news broke in The Calgary Herald. And, as promised, the tipster who alerted the police to the sketchy online gear sale that led to the two suspects’ arrest will receive a $ 5,000 CAD (~$ 3,800 USD) shopping spree at The Camera Store as a token of thanks.

According to The Calgary Sun, the ‘winner’ is “a gentleman from Edmonton.”

But this happy story is not without its one gray cloud. That rare Leica M-P, a collectors item, was scuffed somewhere between its theft from and return to The Camera Store. Then again, given the amount of attention this particular story has gotten, maybe that’ll make the camera even MORE valuable.

Articles: Digital Photography Review (dpreview.com)

 
Comments Off on A happy ending: Police recover stolen limited edition Leica from The Camera Store robbery

Posted in Uncategorized


Calgary police catch suspected Camera Store thieves, recover most of the stolen gear

22 Dec
Photo: The Camera Store

Earlier this week, we reported on a high-profile burglary at Calgary’s well-known camera shop “The Camera Store”—best known for its popular YouTube channel. Well, thanks to sharp-eyed tipsters and the fast-acting Calgary police, it only took 48 hours from when the store was robbed to catch two suspects and recover most of the stolen gear.

As we reported on Monday, the thieves made away with over $ 27,000 worth of cameras and lenses, including a Hassleblad X1D, three Hasselblad X lenses, and a limited edition Leica M-P Edition Safari. This is the first time The Camera Store has experienced a break-in in over 20 years of business, and owner Julian Ferreira was both upset and determined: offering a $ 3,800 shopping spree “for any information that leads to a conviction.”

Fortunately for Ferreira, he need not have worried too much about the break-in. The same day that the story was spreading like wildfire across the blogosphere, the police were already tracking down the majority of the stolen gear.

Photo: The Camera Store

According to The Calgary Sun and The Camera Store’s own website, once the story went live on local news last weekend, tipsters alerted Calgary police of a Hasselblad X1D and three Hasselblad X lenses that had just been put up for sale on the website Kijiji. Undercover officers responded to the listing, meeting with two men—60-year-old Tan Bui and 36-year-old Justin Ross—at a Calgary mall on Monday afternoon, and taking them both into custody after it was confirmed the camera and lenses ‘for sale’ were the same ones stolen from The Camera Store.

Both men have been charged with possession and trafficking in stolen property, although it is unknown if police believe Bui and Ross are also responsible for the break-in. The $ 10,000 special-edition Leica M-P Edition Safari has not been recovered… at least not yet.

As for that promised shopping spree, The Camera Store writes:

Multiple tips from the public lead Calgary police to the Kijiji listing that helped them recover our equipment and to arrest the two suspects. Once convictions are made, we will contact the person who was first to provide the information to CPS that allowed them to take action quickly, to collect their $ 5000 [CAD] shopping spree reward.

Articles: Digital Photography Review (dpreview.com)

 
Comments Off on Calgary police catch suspected Camera Store thieves, recover most of the stolen gear

Posted in Uncategorized


Unable to recover from failed Kickstarter project, Triggertrap announces it will close shop

01 Feb

Triggertrap, one of the pioneers in the area of smart camera triggers, has today announced that it will cease operations within approximately a month. Triggertrap was founded in 2011, following a successful Kickstarter campaign. The initial product offered a wide range of trigger options, including, sound and motion sensors and an intervalometer.

In 2013 the company launched another Kickstarter campaign, this time for the Triggertrap Ada, a modular and expandable follow-up version to the original product line. Despite the campaign being very successful, raising more than $ 500,000, trouble started when the cost of components was higher than originally quoted by some suppliers and in May 2015 Triggertrap had to admit the project had failed and the Ada could not be delivered. 

The company has never been able to recover from this failure and today one of the founders, CEO Haje Jan Kamps, has posted an article on medium, announcing the closure of the company. 

“Triggertrap, like any startup, had some big highs and lows. At one point, we employed 15 staff; a team of photographers, coders, support, marketing, logistics, and operations. Ever since we announced that our Triggertrap Ada Kickstarter project failed, we’ve been in a downward spiral. For the past 18 months, we’ve been operating with just a few team members, who have been working their asses off to keep the lights on. But ultimately, we weren’t able to claw our way out of the hole, and the company now owes the company’s founders around $ 60k. With no realistic hope of ever paying that money back, and after ten months in a row of struggling to make payroll for our remaining staff members, we decided it was time to give up.”

Technical support for Triggertrap products will end with immediate effect. Apps will remain available for download in the respective app stores but are sooner or later likely to run into incompatibility issues with updated operating system . If you are happy to keep using your current mobile OS and rely just on the Reddit-forum for support, you can still buy a Triggertrap device at a hefty discount in the online store.

Articles: Digital Photography Review (dpreview.com)

 
Comments Off on Unable to recover from failed Kickstarter project, Triggertrap announces it will close shop

Posted in Uncategorized


How to Recover Lost Files from a Memory Card

17 Feb

Whether you’re a novice or veteran photographer, chances are you’ve experienced a moment of dread when you thought all of your precious photos were lost forever. Maybe you damaged a SD or CF card, or accidentally formatted a card before offloading your images. As long as your memory card can still be plugged in to, and recognized by your computer, there’s a good chance you’ll be able to salvage your photos, even if you did an accidental deletion. Sometimes you can achieve this all by yourself, and recover your lost files.

There are many programs and apps that can help you recover data from a memory card, but the one I’m going to introduce you to is SanDisk RescuePRO. Created by the same folks who produce trusty SanDisk memory cards, RescuePRO has in my experienced maintained the same reliability and quality that one can expect from SanDisk products. Their recovery program is straightforward, easy to use, and does a great job at recovering lost photos. So before you make an appointment with an IT professional, give this memory card recovery method a try.

SanDisk Recovery PRO memory card recovery

About SanDisk RescuePRO

RescuePRO is a downloadable, data recovery program available for Mac or Windows. Using proprietary media recovery algorithms, RescuePro will scan your memory card and display previews of any recoverable data such as photos (JPG and most RAW formats), video, and audio. The software will work with most brands of digital cameras and memory card types including; SD, SDHC, CompactFlash, Memory Stick, CDs, and DVDs.

There are two versions of RescuePRO, regular and deluxe, with the main difference other than price being in the extra formats of photos and video/audio that deluxe promises to recover. RescuePRO has a fee of $ 39.99 for the regular version and $ 59.99 for deluxe, but they do offer a free evaluation so you can verify if the program will work with your memory card before you purchase. Payment buys you a one year subscription, which must be renewed annually to continue using the service. But on the bright side, this is a small price to pay if you stand to recover important photos or videos.

How RescuePRO Works

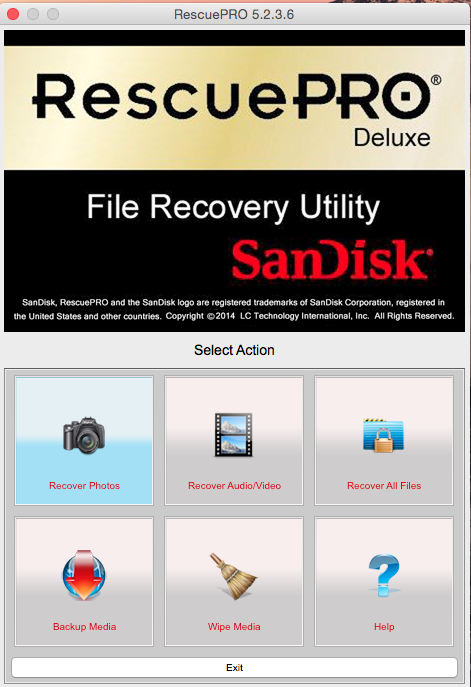
1. After you buy a subscription, download the RescuePRO program to your desktop computer. Insert your memory card into your computer and launch RescuePRO. The below menu will pop up on your screen, and you’ll want to select the option that’s relevant to your needs: either Recover Photos, Recover Video/Audio, or Recover All Files.

SanDisk Recovery PRO memory card recovery

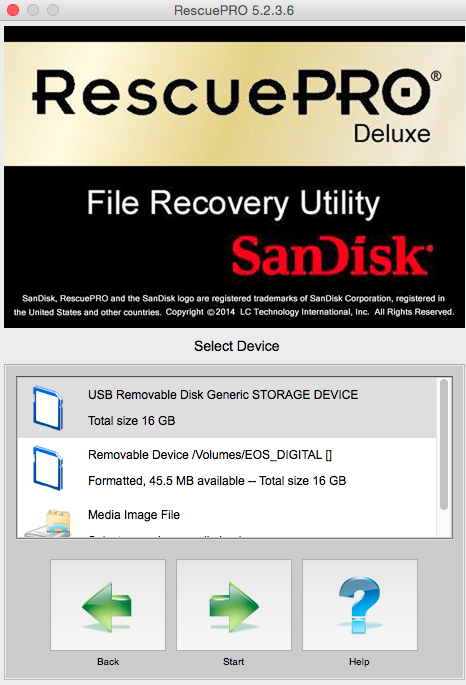
2. After you select your desired outcome, the below screen will prompt you to select the memory card in question. Be sure you have your memory card connected to the computer. Select your card and hit the green Start button.

SanDisk Recovery PRO memory card recovery

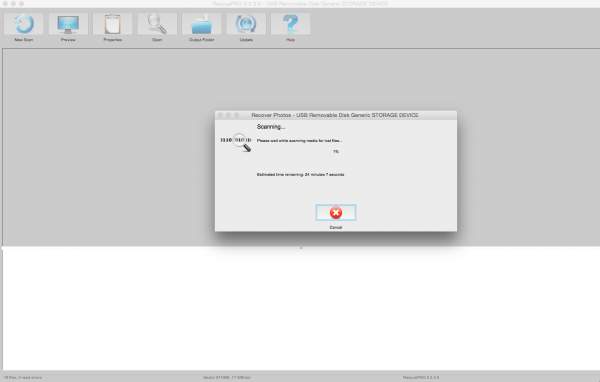
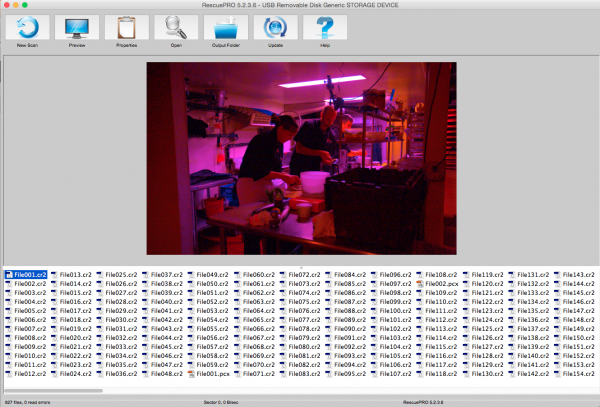
3. Now it’s time to sit tight and let the program do its thing. Feel free to pull up an Internet browser or Photoshop and multitask as you wait. Data recovery from your memory card can take a bit of time depending on how many files there are to be retrieved. In this particular instance, I had 927 files to recover from my CF card and it took about 30 minutes.

SanDisk Recovery PRO memory card recovery

4. When the program is done recovering data, it unfortunately doesn’t do a great job at alerting you. There’s no fanfare, but you’ll know the recovery process is done when you see the bottom portion of the screen filled with recovered files. To verify what content the program has recovered, click on each individual file name and a preview will appear. In this particular instance, the previewed images were showing up tinted in pink, but the actual recovered images were just fine without any distortions.

SanDisk Recovery PRO memory card recovery

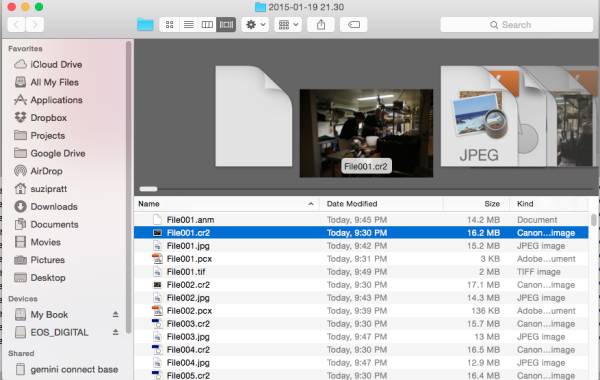
5. Once you verify that your files have indeed been saved, it’s time to locate them on your computer. The great part about RescuePRO’s long recovery process is that it includes saving the files on your device automatically. As a result, all you have to do to find the desktop folder full of your recovered images is click on the giant Output Folder button. The program should then pull up a desktop window like the one below, showing you a folder full of recovered data. Also, notice in the preview below that the recovered image does indeed, not carry over the extra coloring that RescuePRO’s software assigned to it in the preview.

SanDisk Recovery PRO memory card recovery

There you have it; a relatively simple, low cost way, to potentially get back precious photos that you thought were lost. Either way, do yourself a favor and remember to always format your memory card in your camera (not your computer) after every use; doing this will keep your memory card up to speed, and lessen the chance of it becoming corrupt over time.

Since this is one of many options, let me know in the comments below if you have a preferred method or program for recovering lost images.

googletag.cmd.push(function() {
tablet_slots.push( googletag.defineSlot( “/1005424/_dPSv4_tab-all-article-bottom_(300×250)”, [300, 250], “pb-ad-78623” ).addService( googletag.pubads() ) ); } );

googletag.cmd.push(function() {
mobile_slots.push( googletag.defineSlot( “/1005424/_dPSv4_mob-all-article-bottom_(300×250)”, [300, 250], “pb-ad-78158” ).addService( googletag.pubads() ) ); } );

The post How to Recover Lost Files from a Memory Card by Suzi Pratt appeared first on Digital Photography School.


Digital Photography School

 
Comments Off on How to Recover Lost Files from a Memory Card

Posted in Photography


How to Recover Photos After a Data Loss

05 Oct
Frank Grießhammer

By Frank Grießhammer

One of the worst things that can happen to you as a photographer is data loss, but there are ways to resolve it. This guide will talk you through how to recovery those all-important photos easily and quickly.

Whether it’s a quick snap of your pet or a scenic landscape shot, chances are most of the photos you take are precious and important to you. Photos capture memories and moments; losing these would be disastrous. Sadly, photo loss is not an uncommon event. In fact, either it’s already happened to you in the past or it likely will in the future.

Losing your photos can occur for a variety of reasons, one of the most common being simply human error. It could be something simple like accidentally deleting the wrong file or pressing the wrong button. However, as wonderful as technology is, it too is prone to failure. There are many stories of people unloading their memory cards from their cameras, putting it on their computer and then finding their files can’t be opened or are missing altogether.

If you’ve discovered that you’re a victim of data loss then one of the most important steps to take is to stop using the card immediately, and remove it from your camera, just to make sure that no activity takes place on it. It’s crucial that no further data is written to the card.

Jorge Quinteros

By Jorge Quinteros

When a photo is deleted, the data on the card isn’t immediately purged. There are two main types of data on an SD card: information about the files on the card and the data for the files themselves. When you delete a file, it’s that information about the files that is removed. The data for the files remains on the card until the space is needed for another file. As such, a new photo on the card could be assigned to the place where a deleted photo once was, wiping it out permanently.

It’s now time to try and get your data back, so mount your SD card to your computer. Depending on the condition of the card (e.g. if it is corrupted or uses an unrecognizable file system), your system may automatically detect that there’s a fault with it. You might perhaps be suggested to use the manufacturer’s software to try and resolve the problem. Alternatively, a pop-up box could encourage you to format the card. Do not do any of this.

Bridget AMES

By Bridget AMES

Formatting the card is especially dangerous and will lower your chances of successful data recovery to sinking level. It’s a last resort tactic. Your computer means well by suggesting a card format. It’s essentially saying “Hey, I can’t seem to locate any data, shall we wipe everything and start afresh?” However, just because your operating system can’t find the data it doesn’t mean it isn’t there, lurking under the surface.

DO: stop using the card literally the moment you realize there’s a problem; remember to breathe and stay calm!

DONT’T: browse the photos on your camera, take ‘just one more’ snap, or format the card.

The next stage is to download a program that’s going to help you get your data back. For the purposes of this tutorial we’ll be using R-Undelete. There are other programs available, but this one is entirely free for home users and works really well. The only limitation is that it only works for FAT formatted SD cards—fortunately, practically all camera SD cards are FAT formatted. There are also some professional data recovery companies who will charge you to recover data, but frankly, in this circumstance, using something like R-Undelete will do the same job for none of the cost.

Step One

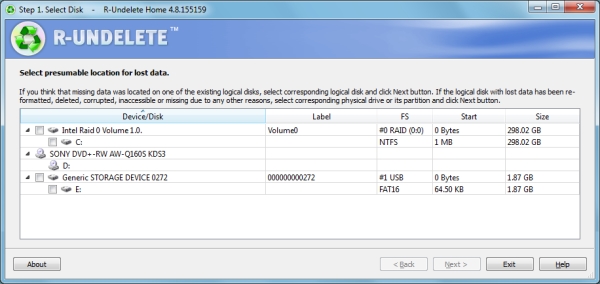
The first screen you’ll be presented with a list of all the drives mounted to your computer. All you need to do is place a tick in the checkbox next to your SD card and click ‘Next’.

Step1JPG

As you can see, the example image above shows an internal drive, a DVD drive and an SD card. The SD card being used is called ‘Generic Storage Device’, but yours might have a more unique name. Refer to this or match up the size of your card to the ones listed (1.87 GB in the example).

Step Two

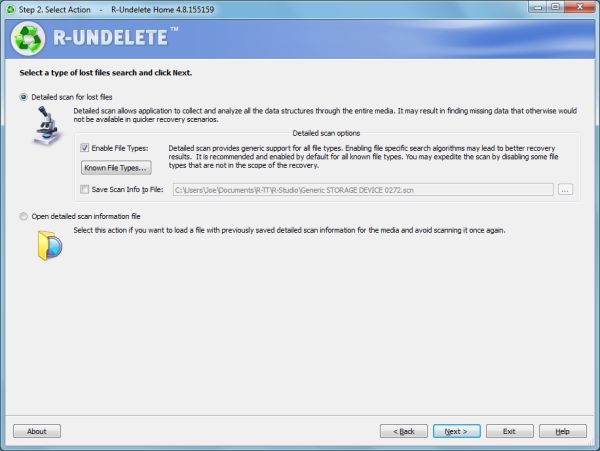
This step is a simple one. The program will automatically select a detailed scan for lost files, which is precisely what you want. You can ask for the program to only search for specific types of files (like videos or pictures) by clicking ‘Known File Types…’, but it’s better to leave it on the default setting to scan everything.

Step2JPG

The scan information is going to be saved to Documents by default, but feel free to change that file path to whatever you wish by checking the box alongside. Remember that you must not save anything to the card that you’re recovering from, so it’s easiest to keep things on your internal drive.

When you’re ready, click ‘Next’ and the scan will begin.

Step Three

Step3JPG

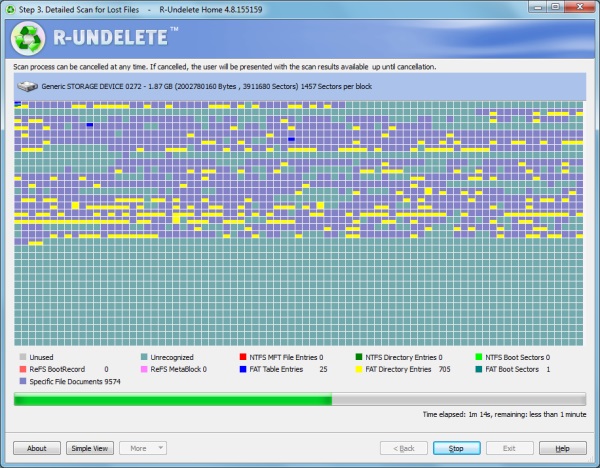
The scan will then begin. This screen might look a bit scary at first, but there’s no need to worry. It’s just a visual representation of the type of data that is being scanned. Just wait for the scan to finish (it’ll be quick, but will vary depending on the size of your card) and click ‘Next’ when that option is available.

Step Four

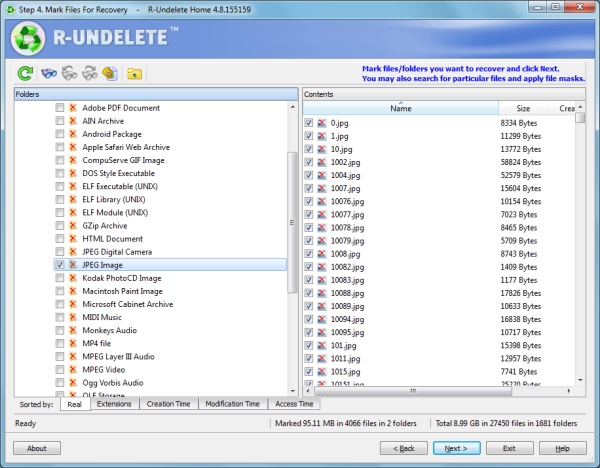
You’ll be presented with a list of all the data that the program has found on the card. On the left are the folders, which show the contents on the right when they are clicked.

Step4JPG

The great thing is that you can sort the results by filters such as the file extension, the time the data was created, or when it was accessed. If you’re trying to hunt down specific files, then there’s also an advanced search tool where you can input variables to search for, like the size of the file or when it was last modified.

One symptom of data loss is that the original file name is often lost, so don’t worry if you don’t recognize any of the file names. If you’re not sure where the data you seek is, go ahead and recover everything the program has found – you can recover as much or as little data as you want without issue.

Once you’ve got the data you want to be recovered selected, click ‘Next’.

Step Five

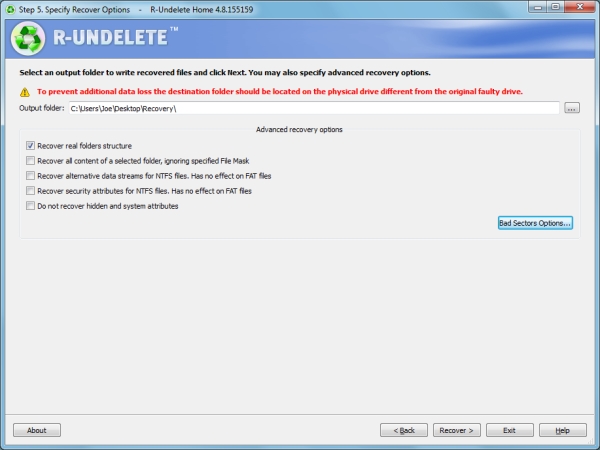
Nearly there! First, select the folder where you want all your recovered data to go. Handily, the program reminds you not to choose anywhere on your SD card – but of course you know that by now!

Step5JPG

There are also some advanced options available. The example above asks the program to try and recover the original folder structures, bear in mind however, this isn’t always possible. Providing you selected all the required files in step four, this should be the only option you might want to select.

Are you ready to get your pictures back? Click ‘Recover’ and the program will begin to work its magic. The time it takes will depend on how much data you’ve asked to be recovered, but the process is relatively quick.

Success!

R-Undelete successfully recovered every image that I asked it to and hopefully it performed the same way for you.

Try and remain calm throughout the whole process. Understandably, that’s probably easier said than done, but data recovery is entirely possible and if you follow the advice given then it should hopefully be pretty effective.

You may aware of how important it is to back up your files, but don’t actually practice it. If possible, ensure your photos are being consistently backed up to another location. Whether you’re just transferring them to your computer at the end of the day, or sending them to cloud storage services like Dropbox or OneDrive, having multiple copies of your photos will mean that it’s less of a problem if data loss does occur.

Best of luck and enjoy those recovered files!

Editor’s note: please be aware the software mentioned only works on a PC. Just do a google search for: photo recovery Mac free and you’ll find a whole bunch that work similarly to the one mentioned in this article.

The post How to Recover Photos After a Data Loss by Joe Keeley appeared first on Digital Photography School.


Digital Photography School

 
Comments Off on How to Recover Photos After a Data Loss

Posted in Photography


How to recover lost photos & videos from memory cards with free software for Windows

02 Jan

blog.danimations.com.au Learn how to recover lost photos & video easily after memory card errors. This video installs and demonstrates the free image recovery tool in Zero Assumption Data Recovery for Windows software, and also shows you how to lock, unlock and format your card media. This process can also undelete files inaccessible due to card formatting or accidental deletion. SD card recovery and repair is demonstrated, but XD, memorystick, compactflash, microSD and other card formats can all utilise the same easy process. This is the first in a series of Danimations Digital Media Tips. To suggest a future episode topic, please leave a comment on our channel page.

Video Rating: 4 / 5