RSS
 

Posts Tagged ‘Radial’

How to Use Radial Composition in Photography to Create Awesome Images!

29 Feb

The post How to Use Radial Composition in Photography to Create Awesome Images! appeared first on Digital Photography School. It was authored by Megan Kennedy.

how-to-use-radial-composition-in-photography

Radial composition (also known as radial balance) is a tool used to influence balance and impact within a photograph. In this article, we’ll look at some of the in’s and out’s of radial composition in photography.

Image: f/2.8 1/1000 ISO 500

f/2.8 1/1000 ISO 500

What is radial composition?

The term radius refers to the distance between the center of a circle and its outer edge. Therefore, radial composition means imagery that radiates outward from a particular point.

One common example of this is the wheel, with spokes radiating away from the central hub.

Another example would be flowers, with petals fanning out from the flower head.

radial composition diagram radius

By using radially orientated lines, shapes and forms, the eye is attracted to a central point within an image, creating emphasis. In this way, radial composition can appeal to our sense of momentum, generating visual movement. Some radial compositions even trick the eye into perceiving actual movement within in a fixed image.

In addition, lines that diverge into a central point also cultivate a greater sense of depth within a photograph. However, keep in mind that not all radial compositions need to be constructed of circles!

In the right context, you can use rectangles, triangles, waves, lines, spirals, or other forms to cultivate radial composition.

radial composition diagram

The history of radial composition

Because of its visual energy, radial compositions have been an enduring presence in visual art and culture. For example, ancient petroglyphs carved into rocks depict spirals and labyrinths as well as lines radiating out from a central focal point.

Rich with symbolism and sacred meaning, the mandala features in numerous religions and beliefs. In Greek mythology, the Sun god Helios was often depicted with a crown of radiating lines. These lines were understood to indicate radiant light, signifying the rays of the sun.

During the Renaissance, radial composition was used to emphasize important figures within a scene. In Assumption of the Virgin by Titian, subjects are seen to radiate away from the main figure (Mary) and a circle of radiant light frames her upper body. In Raphael’s School of Athens, famous philosophers are emphasized by the radial properties of the surrounding architecture.

radial composition smashed glass

f/4.0 1/640 ISO 320

Modern art

Inevitably, radial composition has been a strong compositional feature in modern visual art. A famous example is Kandinsky’s circle paintings that radiate pulses of color. Dada artist Marcel Duchamp’s Bicycle Wheel also takes advantage of the radial structure of the wheel to evoke both a sense of motion and stasis.

In photography, there are countless variations on the use of radial composition. Taken in 1920, Edward Steichen’s Isadora Duncan at the Portal of the Parthenon makes use of radial composition to emphasize the subject within the ancient Parthenon. In Henri Cartier-Bresson’s Children Playing in Ruins, the child subjects are framed by a hole in a wall within the ruins of a city.

How to Use Radial Composition in Photography to Create Awesome Images!

How to cultivate radial compositions

Radial composition relates to visual elements that expand from or center around a central point in an image. Eyes, flowers, snail shells, doorways, fireworks, tree rings…there is an abundance of opportunities to capture radial subject matter.

Fluid radial elements create a harmonious flow throughout the image, whereas sharp, erratic lines generate a scene of energetic movement.

Archways, staircases, reflections, plants…you can find radial features in all genres of photography. You can even create radial imagery through camera movement or abstraction.

radial composition camera tossing2 seconds f/4.0 ISO 100

You can also use radial composition as a tool to emphasize a given subject. Framing an aircraft aligned with the halo of the sun’s rays, or photographing a portrait with the sitter positioned within a window or door frame can seem easy enough. However, incorporating simple radial elements into your composition can add much more depth and impact to your image.

Image: f/6.3 1/400 ISO 100

f/6.3 1/400 ISO 100

Conclusion

From landscapes to architecture and everything in between, radial composition can add impact and depth to your photography.

Keeping an eye out for radial compositional opportunities can lead to engaging material that guides the viewer’s eye around the image more effectively.

Do you make use of radial composition? Share your images in the comments below!

The post How to Use Radial Composition in Photography to Create Awesome Images! appeared first on Digital Photography School. It was authored by Megan Kennedy.


Digital Photography School

 
Comments Off on How to Use Radial Composition in Photography to Create Awesome Images!

Posted in Photography


Lightroom Local Adjustments – Radial Filter Versus the Adjustment Brush

18 Aug

Adobe Lightroom is image editing software that allows you to edit and make color adjustments to your photos. Among many, the Radial Filter and Adjustment Brush are two very useful local adjustment tools in Lightroom.

But often people get confused between both of these tools and are not sure which one to use in which situation. So I thought I’d share a few tips on the basis of which you can easily figure out the importance of each respective tool.

Radial Filter Tool

This tool is a blessing for portrait, event, wedding, and wildlife photographers. The reason why I am pointing to these genres of photography is that such photos usually have a single subject in the frame which needs to be highlighted.

The Radial Filter allows you to select an area using an elliptical mask. Then the shape of the ellipse can be changed by dragging one of the points. Once the area is selected, you can make adjustments inside or outside the shape using the new Brush component depending on your requirements.

radial filter Lightroom local adjustments

Adjustment Brush Tool

The Adjustment Brush is like painting the image canvas with the required adjustments. You can use the mouse pointer, drag and select the area manually where you wish to make desired adjustments. You have the ability to increase or reduce the size of the brush to make a fine and precise selection.

 Lightroom local adjustments - adjustment brush

Radial Filter or Adjustment Brush? How to Decide?

As you saw in the example above, using the Radial Filter allows you to select a particular area using the elliptical mask whereas the Adjustment Brush allows you to manually select the area using the cursor.

As a photographer and a creative person, you have to first visualize the result you want to achieve for your picture. If you believe that using the Radial Filter would suffice for your editing needs, go ahead with it. But if you feel that you need more manual and precise control over the selection of the area where you need desired changes, go with the Adjustment Brush.

It may sound easy but it might be challenging in some situations, so let me help you with this by looking at two examples.

Example 1: When to use the Radial Filter

 Lightroom local adjustments - radial filter image of an Indian boy

In the image above, my intention was to make changes to the area around the face of the boy. Now as the shape of the face is defined, I can easily select the area using the elliptical shape of the Radial Filter tool. Later, if I feel that I need to change the shape of the selection I can easily do that by dragging the points or using the Brush feature.

It does not make any sense to use the Adjustment Brush in this particular scenario as I can save my time by simply using the Radial Filter.

Basically, you should use the Radial Filter when the shape of your subject is defined and you can easily make the selection using the ellipse. Weddings, portraits, wildlife, events, and sports are some of the genres of photography where you can use the Radial filter to make changes faster.

Example 2: When to use the Adjustment Brush Tool

 Lightroom local adjustments - landscape scene sky selected

In this particular image, I wanted to make exposure and highlight changes selectively in the sky region. As you can clearly see, the shape of the sky area in this photo is not defined therefore I can not use the Radial Filter. If I use the Radial Filter I would either select unwanted areas of the mountains or would miss out some parts of the sky.

But by using the Adjustment Tool I can manually select the area I want to make changes in and I was able to do that precisely. Though this approach is a bit time consuming as compared to the Radial Filter, but you surely get an accurate selection. Now whatever changes I make would perfectly be made only on the sky region.

Conclusion

So the conclusion is that you should be using the Adjustment Brush when the shape of the area that you wish to select is not well defined. Landscapes, Cityscapes, or any photo where the shape of the subject is very complex, the Adjustment Tool would give you much accurate selection than the Radial Filter.

If you want to read more about each of these tools check out these dPS articles:

  • Creative Use of the Radial Filter in Lightroom
  • Lightroom’s Secret Weapon: The Radial Filter and How to Use it
  • Lightroom Mastery: The Power of the Adjustment Brush
  • 5 Tips for Using the Lightroom Adjustment Brush Tool
  • How to Use the Local Adjustments Tools Inside Lightroom

The post Lightroom Local Adjustments – Radial Filter Versus the Adjustment Brush appeared first on Digital Photography School.


Digital Photography School

 
Comments Off on Lightroom Local Adjustments – Radial Filter Versus the Adjustment Brush

Posted in Photography


Creative Use of the Radial Filter in Lightroom

21 Mar

Back in 2013, which is about two thousand years as far as digital photography is concerned, the folks at Adobe introduced a brand new tool into the kit of Lightroom 5. That tool is the Radial Filter and it has become not only one of my favorite tools in Lightroom but is one of the most versatile and powerful mechanisms we have for selectively applying edits to our photographs.

The Radial Filter tool has evolved and changed to where we find it becoming more and more useful in the latest version of Lightroom CC. In this tutorial, I will show you just how strong the Radial Filter has become. Most importantly, you will learn some of the great things it can do for you and your work.

What is the Radial Filter?

The term “radial” implies that the tool is circular of course but it goes quite a bit further than that. The Radial Filter is best considered as a virtually infinitely manipulable ellipse; meaning that the user can change the size and shape of the filter up to (and even beyond) the view window of the Develop Module.

Creative Use of the Radial Filter in Lightroom

Access the Radial Filter by clicking it on the toolbar in the Develop Module (is the second from the right, next to the Adjustment Brush). You can also open it by using the keyboard shortcut (shown above) Shift+M or by going to Tools > Radial Filter from the menu at the top of Lightroom.

The edits that can be applied using the Radial Filter with the current version of Lightroom CC include virtually all the develop options from the Basic Panel plus the recent addition of the “dehaze” feature from the Effects Panel. So essentially the Radial Filter allows you to apply edits to specific areas of the frame where you need them. You can set the filter so that the edits are applied to either the inside or outside of the filter margins (more on inversion later.) You can even use multiple Radial Filters together in order to achieve some impressive effects.

Applying and Manipulating the Radial Filter

Of course, the shape and position of the Radial Filter are the largest parts of the usage pie. To apply the filter, drag the cursor while holding down the left mouse button. You will see the filter expanding as you drag. There will be a placement indicator in the form of an opaque circular dot. This dot represents the location of each Radial Filter within your image. You’ll notice that there are also four square shapes around the perimeter of the ellipse. These are points where you can change the shape of the filter as you please.

Creative Use of the Radial Filter in Lightroom

Grab any of these points to expand the Radial Filter in that direction.

The entire filter can also be rotated by placing your cursor around the edge until it turns into a curved double-headed arrow (shown below).

Creative Use of the Radial Filter in Lightroom

You can rotate the Radial Filter around the center point when you see this symbol.

Left click to change the position of the filter.

Seeing Red – the Mask Overlay

One of the great things Adobe has included for you is a way to see where your edits are being applied by its filters and brushes. When using the Radial Filter, hover your cursor over the center dot indicator for about a second and you will see a wonderful bit of magic. Wherever the radial filter has applied its edits will now be highlighted in red.

googletag.cmd.push(function() {var gpt_slot = googletag.defineSlot( “/1005424/_dPSv5in-post-mobile(300×250)”, [300, 250], “pb-ruleset-mobile-ad-0” ).addService( googletag.pubads() );ruleset_mobile_slots.push( gpt_slot );});

googletag.cmd.push(function() {var gpt_slot = googletag.defineSlot( “/1005424/_dPSv5in-post-mobile(300×250)”, [300, 250], “pb-ruleset-desktop-ad-4” ).addService( googletag.pubads() );ruleset_desktop_slots.push( gpt_slot );});

Well, it’s not exactly magic, but it sure is close.

Note: If you want this mask to show all the time just hit O on your keyboard. You can change its color, or you can rotate through white, black, green and red by pressing Shift+O. 

Feathering, Duplication, and Inversion

There are some other tips when it comes to applying the radial filter. The most basic of these is feathering, duplication, and inversion.

Feathering

Feathering determines how hard or soft the border around the radial filter is, and in turn how noticeable the transition will between the edits applied and the rest of the photo.

Here we have a very abrupt transition….

Creative Use of the Radial Filter in Lightroom

Feathering at 0 the transition is harsh and very obvious. There is a definite line where the filter ends, and the unedited images begins.

Now you can see the softening of the border brought about by maximum feathering (+100). Depending on your needs feathering can make all the difference.

Creative Use of the Radial Filter in Lightroom

Feathering at +100 the transition is very gradual and less obvious.

Duplication

Now, let’s say you find yourself in a situation where there is more than one area which needs a similar adjustment to one that you’ve already applied with a Radial Filter. This happens frequently when working with groups of people or in a scene that has multiple elements such as a landscape.

Take this image for example; a shot of two people with similar lighting. I want to brighten both of their faces and add a little sharpness.

Creative Use of the Radial Filter in Lightroom

I created a Radial Filter using some slight exposure and sharpness increases and applied it to the man’s face. Instead of starting from scratch and creating a separate Radial Filter for the woman, I simply duplicated the Radial Filter. To do this, simply right click on the locator dot in the middle of the filter, then select duplicate (as shown below).

Creative Use of the Radial Filter in Lightroom

What this will do is copy all the settings of your current filter into a brand new Radial Filter which you can then move about and change as you see fit. It saves a lot of time and ensures you have a great starting point for your next edit.

Creative Use of the Radial Filter in Lightroom

The duplicated Radial Filter moved into place over the woman’s face.

I also added a third radial filter to add a little more contrast to the couple.

Creative Use of the Radial Filter in Lightroom

googletag.cmd.push(function() {var gpt_slot = googletag.defineSlot( “/1005424/_dPSv5in-post-mobile(300×250)”, [300, 250], “pb-ruleset-mobile-ad-1” ).addService( googletag.pubads() );ruleset_mobile_slots.push( gpt_slot );});

googletag.cmd.push(function() {var gpt_slot = googletag.defineSlot( “/1005424/_dPSv5in-post-mobile(300×250)”, [300, 250], “pb-ruleset-desktop-ad-5” ).addService( googletag.pubads() );ruleset_desktop_slots.push( gpt_slot );});

Inversion

On the other hand, inversion is something very different than duplication because you’re still working with the same filter and the same edits but in a completely different way. You’ll find the Invert Mask checkbox at the bottom of the Radial Filter panel.

Creative Use of the Radial Filter in Lightroom

Click the Invert Mask checkbox to invert the Radial Filter.

When left unchecked, all your edits will be applied OUTSIDE the filter. This is great for applying brightening and sharpening to faces and small areas of a frame as well as creating sunspots. Conversely, when the invert mask box is checked all your edits will be applied INSIDE the filter. This is great for creating custom vignettes and bringing down bright skies or overexposed areas within the image.

Integration of the Brush Tool

A wonderful advancement that is now included with the Radial Filter is the ability to adjust the filter’s edits using the brush tool. While the brush tool has been a standby in Lightroom for some years it has only recently been included as an advanced edit option for the Radial Filter tool. What the brush tool allows you to do with the Radial Filter is to tailor its effects more than ever before. You are now able to use the brush to apply the settings of the Radial Filter free-handed to extend outside or inside of the filter.

Creative Use of the Radial Filter in Lightroom

Here I have painted in the same edit selections with the brush tool that I used in the radial filter.

Creative Use of the Radial Filter in Lightroom

Creative Use of the Radial Filter in Lightroom

You can still hover to better see your edits while in brush mode (or click O on your keyboard to show/hide the Mask Overlay).

Furthermore, the brush has all the functions of the dedicated Adjustment Brush tool which includes the ability to erase edits.  If you’re like me and find yourself saying, “Oops, I went too far with the brush!” all you need to do is select erase and paint over it again.

Creative Use of the Radial Filter in Lightroom

Erase switches the brush into erase mode. Now you can erase the edits you don’t want.

Pretty great!

A Few Tricks

Sunspots

I mentioned sunspots a little earlier. They are a great way to add depth and interest to an image. While creating a sunspot where no sun exists isn’t always a good idea, the Radial Filter tool really helps to enhance the brightness (or darken) and warmth of a preexisting sunrise or sunset.

Here are two examples of using the Radial Filter to increase the impact of sunspots: First without the Radial Filters…

Creative Use of the Radial Filter in Lightroom

Original before adding the Radial Filter.

And now with two radial filters applied for brightness and warmth.

Creative Use of the Radial Filter in Lightroom

One more.

googletag.cmd.push(function() {var gpt_slot = googletag.defineSlot( “/1005424/_dPSv5in-post-mobile(300×250)”, [300, 250], “pb-ruleset-mobile-ad-2” ).addService( googletag.pubads() );ruleset_mobile_slots.push( gpt_slot );});

googletag.cmd.push(function() {var gpt_slot = googletag.defineSlot( “/1005424/_dPSv5in-post-mobile(300×250)”, [300, 250], “pb-ruleset-desktop-ad-6” ).addService( googletag.pubads() );ruleset_desktop_slots.push( gpt_slot );});

Three radial filters were used here to brighten the branches and add warmth to the sun in the background.

Tame the Moon

Another nifty way to use the Radial Filter tool is for toning down an overly bright or dull moon. Here we have a before and after split-view of the moon after some sharpening and clarity was applied with a single Radial Filter.

Creative Use of the Radial Filter in Lightroom

I also brought ought the shadows by darkening the blacks and then cooled the image a bit.

Simulating Depth of Field

It doesn’t stop there. The radial filter can also be used to simulate extremely shallow depth of field. This works great if you want to give an image a very old-time tintype feel. This is the original image:

Here I have used multiple Radial Filters to blur out the background, along with some other edits to give the image an antique feel.

Some Final Thoughts

The Radial Filter tool has come a long way since its introduction. Now you have the power to use the virtually all of the basic edit tools in Lightroom very selectively. The integration of the brush option takes the possibilities even further by adding versatility like never before. With a little creativity, the Radial Filter can do so much more than simply adding vignettes to your images. After some practice, it will likely become your workflow’s best friend.

How do you use this tool with your images? Please share your thoughts and images below.

googletag.cmd.push(function() {var gpt_slot = googletag.defineSlot( “/1005424/_dPSv5in-post-mobile(300×250)”, [300, 250], “pb-ruleset-mobile-ad-3” ).addService( googletag.pubads() );ruleset_mobile_slots.push( gpt_slot );});

googletag.cmd.push(function() {var gpt_slot = googletag.defineSlot( “/1005424/_dPSv5in-post-mobile(300×250)”, [300, 250], “pb-ruleset-desktop-ad-7” ).addService( googletag.pubads() );ruleset_desktop_slots.push( gpt_slot );});

The post Creative Use of the Radial Filter in Lightroom by Adam Welch appeared first on Digital Photography School.


Digital Photography School

 
Comments Off on Creative Use of the Radial Filter in Lightroom

Posted in Photography


Lightroom’s Secret Weapon: The Radial Filter and How to Use it

17 Oct

Back when Lightroom 5 was released, Adobe included an extremely useful tool called the Radial Filter. However, the name wasn’t particularly clear about what it could do, so many people still have yet to find how useful and powerful it can be. Further improvements were added in Lightroom 6, with the ability to further edit the effect of the tool with the Brush function.

LR Radial Filter panel vignette beginning 7

Workflow process

A generally accepted practice when editing images, is that you do your global adjustments first. These are the ones that affect the whole image at once. Some examples of adjustments that you might use are:

  • Exposure
  • White Balance
  • Contrast
  • White or Black Point
  • Sharpness
  • Clarity
  • Shadows and Highlights

Once the global adjustments are done, then the local adjustments can be made. These are changes made to only a small part of the image. They may be to add final polish to the image or to fix some blemishes. These changes should be subtle and layered on with a delicate touch. It should not be obvious that they have been made, but when you are finished and compare the before and after image, there should be some improvement visible.

How the Radial Filter fits in

This is where the Radial Filter can be used, adding in areas of highlight or clarity to the key subject, brightening or darkening areas, or adding a custom vignette. Lots of little touches to take your final image to the next level.

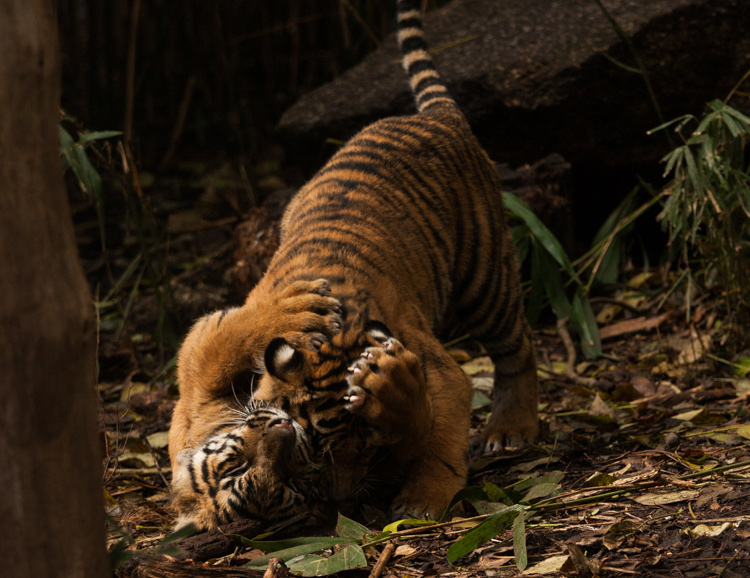
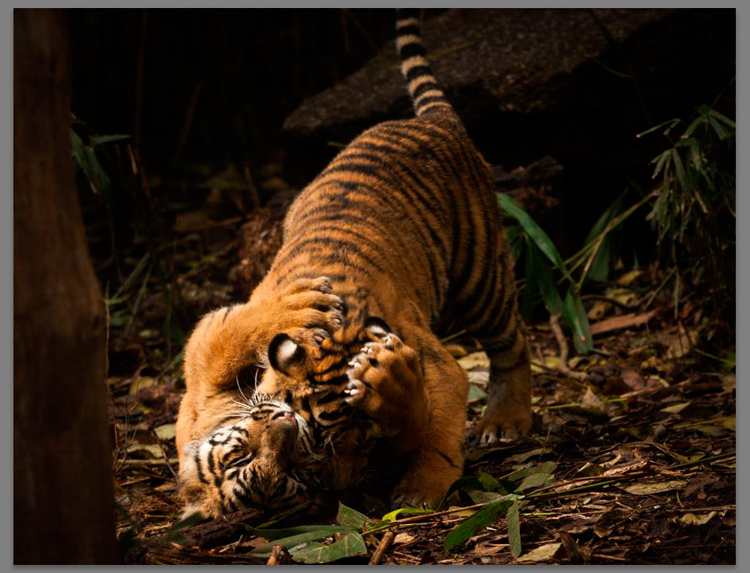
My example image is a shot of a couple tiger cubs taken at Melbourne Zoo in 2010. It was very dark and shaded in their enclosure so the original RAW images are very dark. This image has been edited in Lightroom 6 to apply all the required global adjustments. It is now ready to have some localized tweaks added with the Radial Filter.

LR Radial Filter BASE IMAGE 1

WHERE TO FIND THE RADIAL FILTER AND HOW TO USE IT

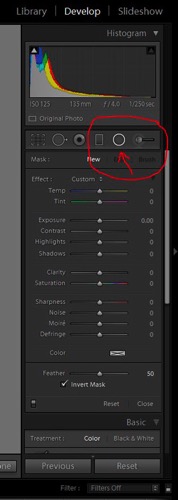
The Radial Filter lives in the right panel of the Develop Module. Under the histogram are six shapes that link to different tools. The round circle with a dot in the centre at the fifth position from the left is the Radial Filter.

LR radial filter panel where to find 2

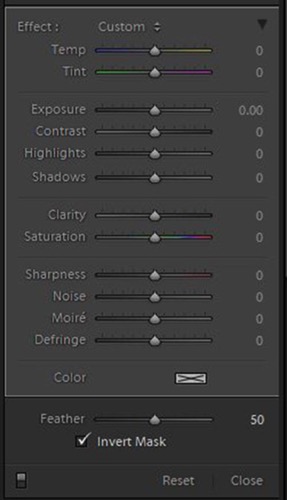
When you click on the button for the Radial Filter (you can also use the keyboard shortcut Shift+M to open the Radial Filter), a panel opens up with all the editing choices available for this tool.

LR radial filter panel editing options 3

Adding and adjusting the filter

If you click on your image and drag the mouse out a bit, a roundish ellipse shape will form with a centre button and four control handles. Let go of the mouse when the shape is roughly the size you want it. The Radial Filter only offers a roundish ellipse shape but it has a lot of flexibility with changing the size and squashing it down to be a narrow oval shape instead of a circle.

LR radial filter panel new one 4

Clicking and dragging on the centre button allows you to move the filter to the part of the image you want to edit. Use the control handles to change the size and also the shape of the ellipse.

LR radial filter panel change tool shape 4a

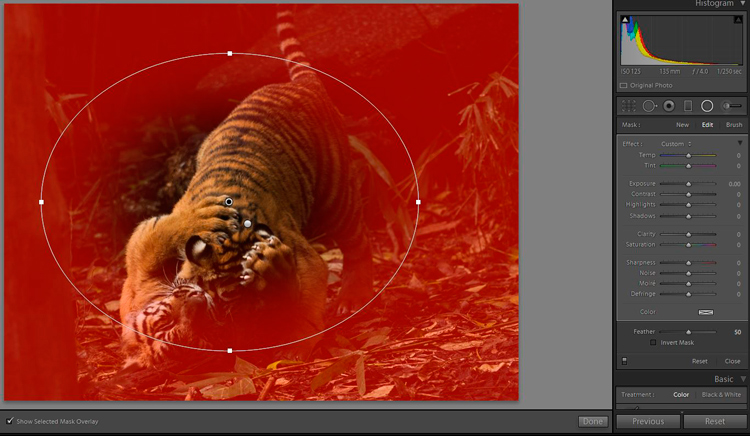
Which area is affected

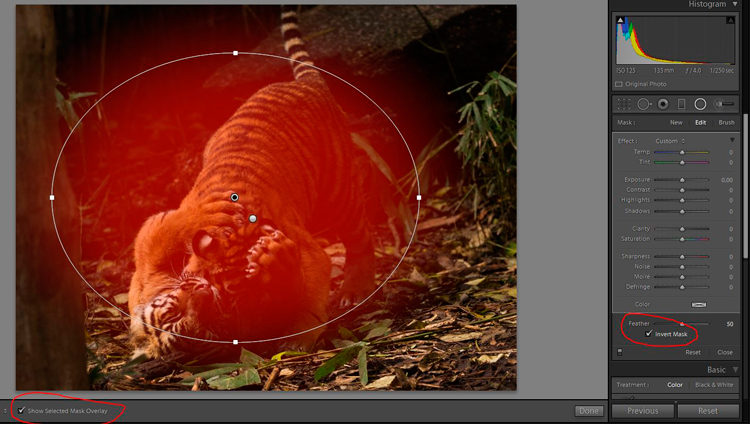
By default, Lightroom sets the editing area to OUTSIDE the ellipse. If you want to edit INSIDE the area, tick the Invert Mask box on the Panel.

LR radial filter panel move change size 5

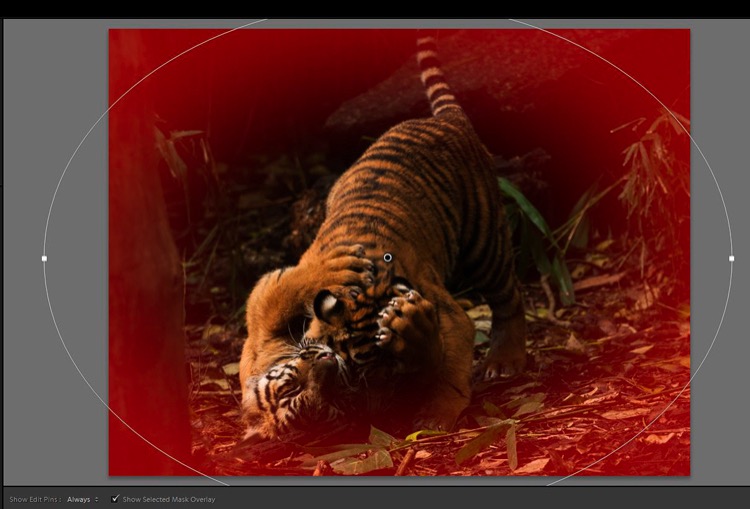
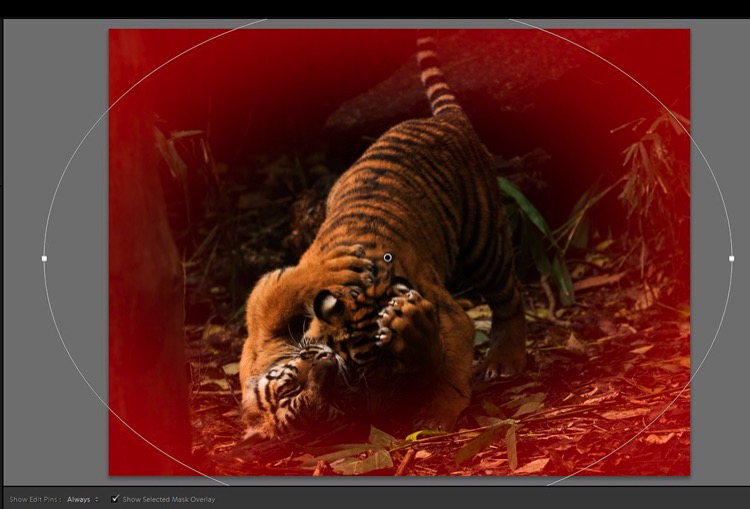
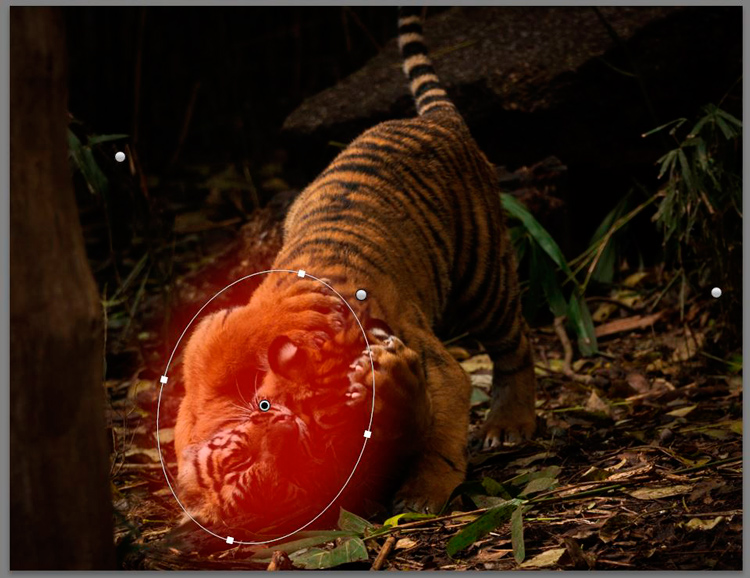
The red colour shows up if you have Show Selected Mask Overlay ticked. It is handy to see where Lightroom will apply the effect and how much feathering you need to use.

NOTE: if you do not see a coloured overlay like the red one shown here, hit the O keyboard shortcut for “overlay”. Holding shift and tapping O will change the color of the overlay.

LR radial filter panel mask controls 6

Note: Always click Close or Done (or the keyboard shortcut Shift+M again) once you are finished editing a particular button so you can see the edited image clearly.

USING THE RADIAL FILTER TO EDIT AN IMAGE

In the example image the aim is to bring attention to the tiger cubs, adding some tweaks around the head and paws area (it’s not 100% sharp due to the low light and the movement while they were wrestling).

Add an off-centre edge vignette

First, we add a vignette to darken the distracting elements on the edge of the frame and bring the focus to the cubs.
Because they are not in the absolute centre of the image, the usual post-crop vignette tool will not work. This is where the Radial Filter is so useful, as you can add a vignette with the focus an off-centre subject rather than being limited to the middle of the frame.

The vignette needs to have Invert Mask NOT ticked, as the effect goes on the outside of the ellipse.

Add the Radial Filter and adjust the shape to be quite large – you can make the ellipse bigger than the actual image if necessary. Invert the mask and bring the exposure down just enough to darken the edges of the frame.

LR radial filter panel vignette beginning 7

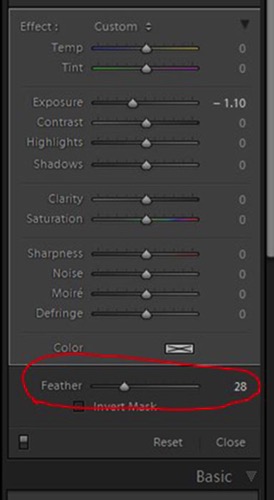
Feather the filter

Lightroom has a default feather setting of 50 which is quite a lot, too much for this image, so adjust the feather down. Be careful not to go too far as a harsh edge will become visible.

LR radial filter panel changfeather 8

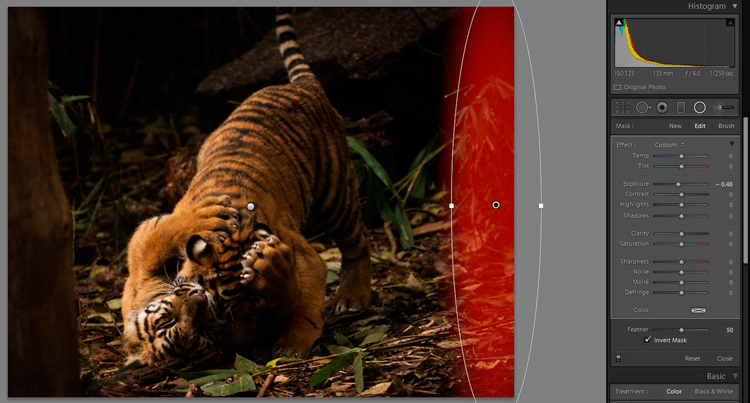
The right-hand edge of the image still has a bright spot of foliage. So add another long Radial Filter and bring the exposure down a little bit.

LR radial filter panel darken hedge 9

There are no set numbers of how much to edit with this tool, you will need to experiment and go with what feels right. The good news is these are all non-destructive edits (the image is not permanently changed) so you can remove them all and start again, or change the settings on one or all of them, as many times as necessary.

Tone control on select areas

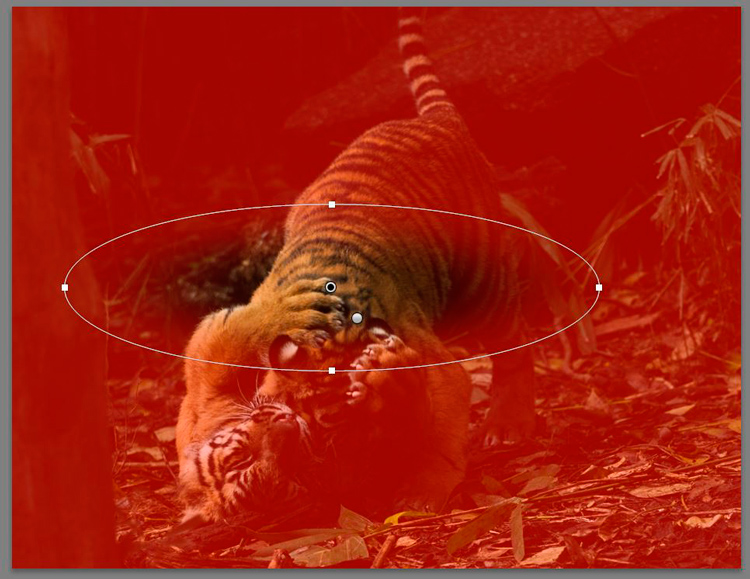
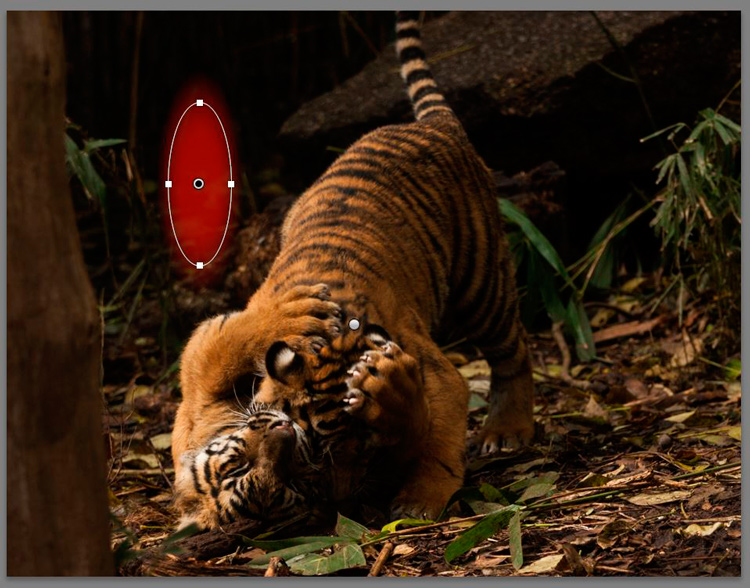
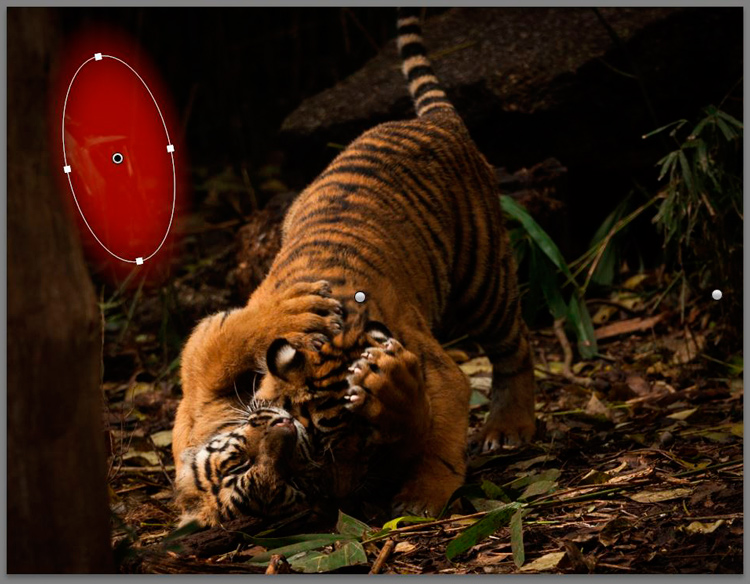
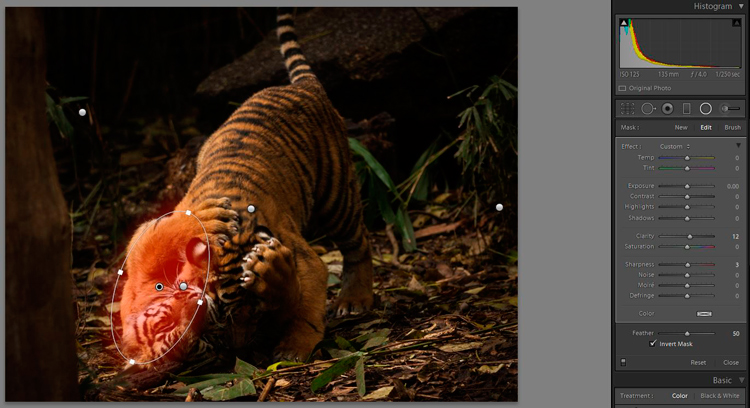
There is a bright spot of foliage on the left-hand side, just sticking out from behind the tree trunk. Create a new Radial Filter just big enough to cover the right area and shape with the control handles.

Invert the mask and bring the exposure down a bit. This time, click and drag on the bottom control handle and drag to the right until the ellipse tilts back to the left a bit and aligns better with the line of the tree trunk.

LR radial filter panel darken foliage tilt 10

Add focus on the subject

Now it is time to add some brightness and focus to the tiger cubs. Add a new Radial Filter to cover the area on the bright side of the head and paws and bring up the exposure a tiny amount. That is where the sunlight is naturally falling, so that is the area that needs brightening. Be careful to add light effects only to the lighter parts of the image as it can look a bit odd if a darker area is unnaturally bright.

LR radial filter panel add brightness 11

Now is a good time to mention that you may have to make LOTS of little adjustments to cover areas with different shapes. It is fiddly and takes time, but you will get a better result if you take the time to edit that way.

Adding some clarity to the side of the face and paw in the sunlight is the next step. Create a new Radial Filter with size, shape and tilt to match the area and invert the mask. Add some clarity, and because this image is not quite sharp, just a little bit of sharpness. Be careful with these tools, as it is easy to go too far and get obvious effects.

LR radial filter panel clarity sharpness 12

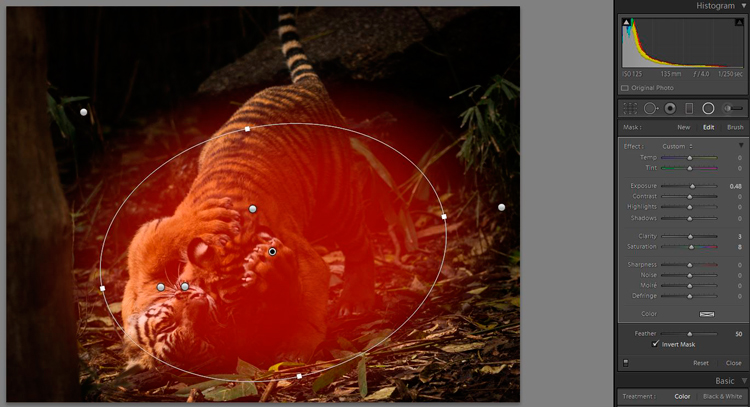
The vignettes have darkened the overall area in the middle a bit much so let’s add some brightness. Add a Radial Filter to cover the area around the cubs and tweak the exposure up a small amount. Also, increase clarity and saturation a very small amount.

LR radial filter panel brightness circle 13

Before and after comparison

Let’s stop there and compare the BEFORE image with global adjustments only to the AFTER image with several specific applications of the Radial Filter.

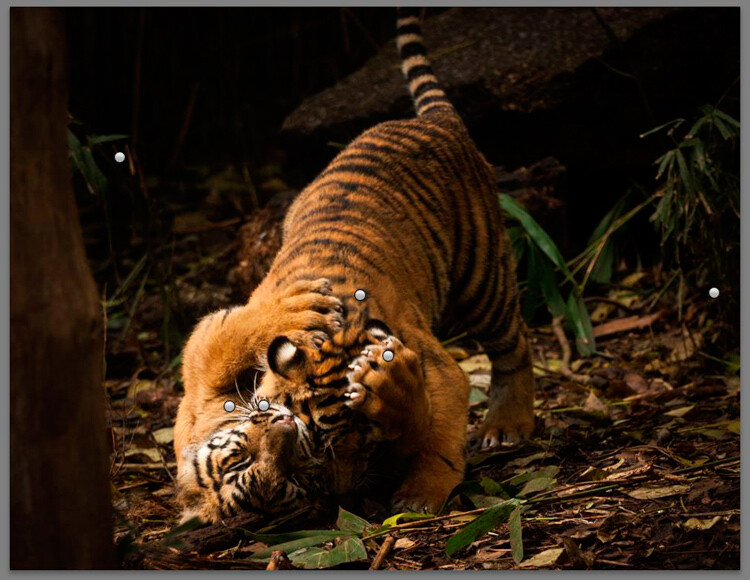
LR radial filter panel finished with dots 14

First, we have the finished image with all the dots for the different individual Radial Filters added.

LR radial filter panel before comparison 15

Then we have the BEFORE image.

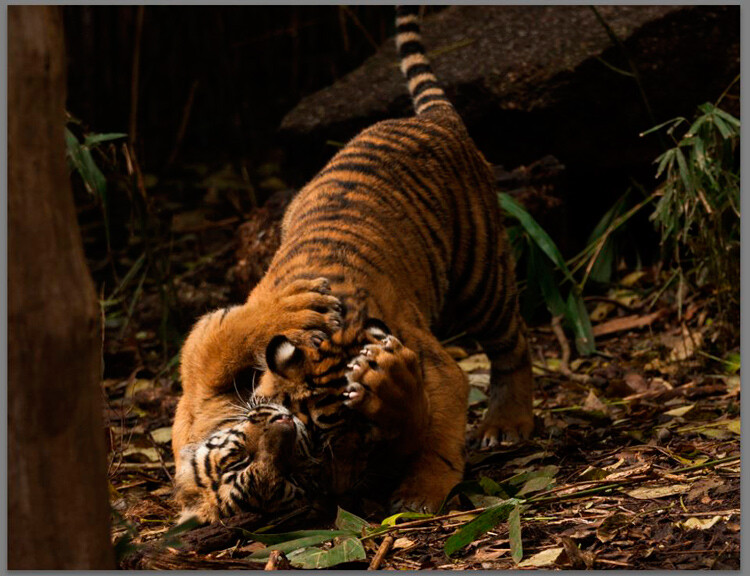
Finally the AFTER image with both global, and local edits applied with the Radial Filter.

LR radial filter panel after no pins comparison 16

CONCLUSION

As you can see, careful use of the Radial Filter can add many small subtle changes to an image, and bring the focus to the subject. It can also be used to further enhance the subject and give it extra punch and vibrancy.

The Radial Filter is a very capable tool that can take a bit of time to get used to. The limited shape has some challenges to learn how to work with it to get the best effect but it gives you a lot of power and control too.

Do you have any other tips for using the Radial Filter? Please share in the comments below.

googletag.cmd.push(function() {
tablet_slots.push( googletag.defineSlot( “/1005424/_dPSv4_tab-all-article-bottom_(300×250)”, [300, 250], “pb-ad-78623” ).addService( googletag.pubads() ) ); } );

googletag.cmd.push(function() {
mobile_slots.push( googletag.defineSlot( “/1005424/_dPSv4_mob-all-article-bottom_(300×250)”, [300, 250], “pb-ad-78158” ).addService( googletag.pubads() ) ); } );

The post Lightroom’s Secret Weapon: The Radial Filter and How to Use it by Stacey Hill appeared first on Digital Photography School.


Digital Photography School

 
Comments Off on Lightroom’s Secret Weapon: The Radial Filter and How to Use it

Posted in Photography


New Graduated and Radial Filter Features in Lightroom 6

30 May

Lightroom 6 graduated radial filter adjustments

Every time a new version of Lightroom comes out the first thing I look for are features that make the Develop module better, or easier to use. The ones I like best in Lightroom 6/CC are the improvements to the Graduated and Radial Filters. Let’s take a look at them.

Addition of mask overlay

In earlier versions of Lightroom you couldn’t tell with any precision which parts of the image were affected by the Graduated and Radial filters.

In Lightroom 6 you can toggle the mask overlay with the O keyboard shortcut, or by ticking the Show Selected Mask Overlay box in the Toolbar. Previously this was only available in the Adjustment Brush, it has now been added to both the Graduated and Radial Filters.

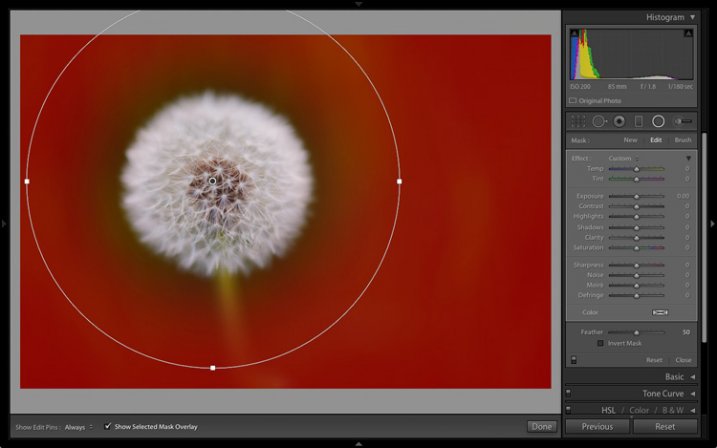
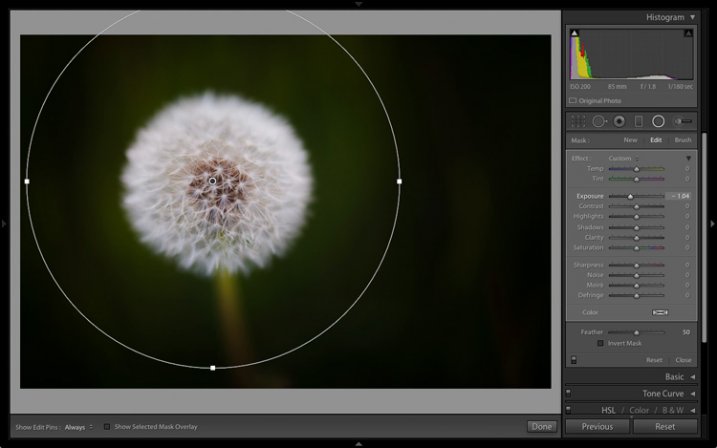
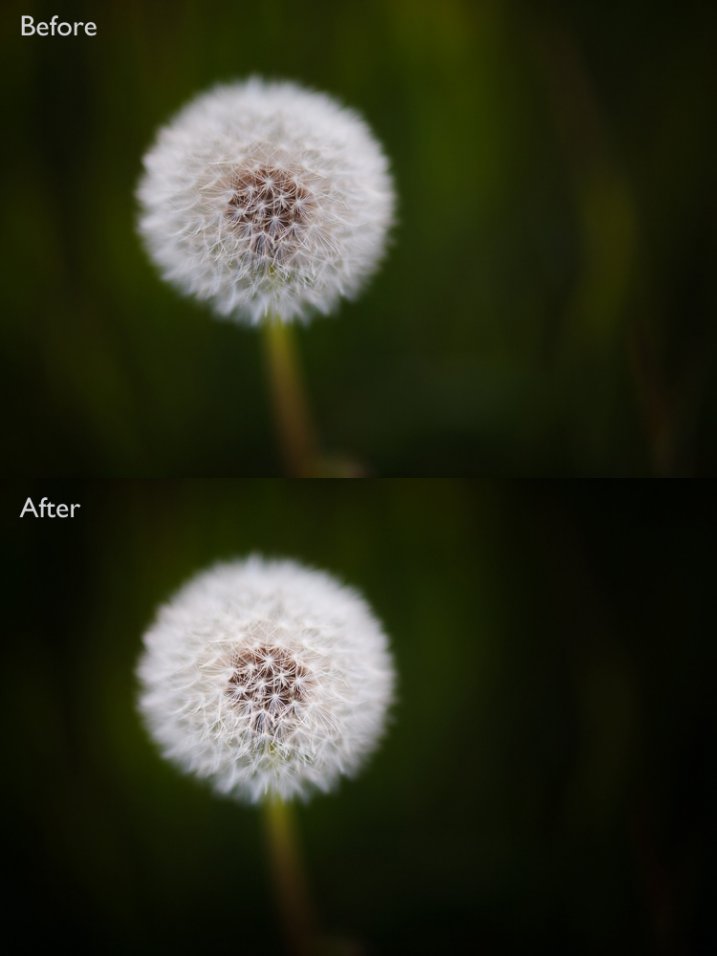
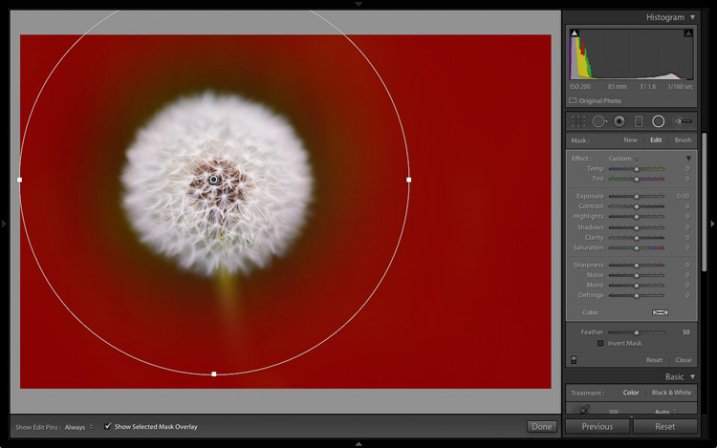
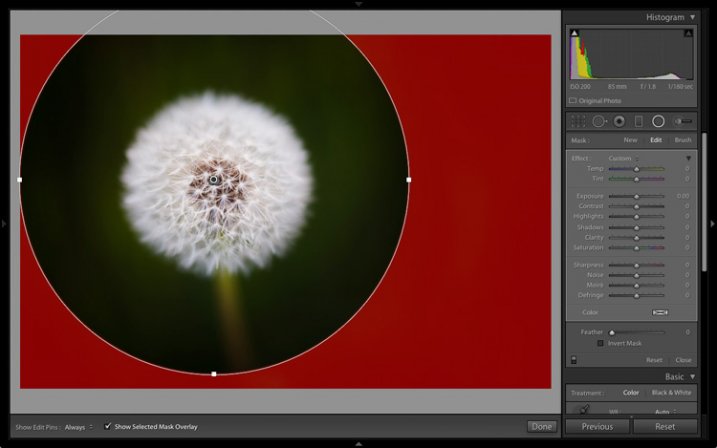
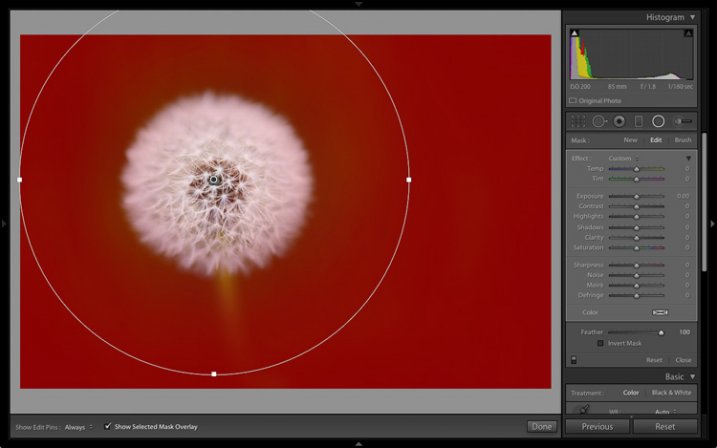
This screenshot below shows how it works. I wanted to make the background darker without affecting the dandelion head. The best tool to use for this is the Radial filter, but you need to be able to place it precisely. The mask overlay makes this easy.

As you can see, the effect of feathering meant that I needed to create a much bigger Radial filter than you might at first think.

Note: The Radial Filter was introduced in Lightroom 5 and is not available in earlier versions.

Lightroom 6 graduated radial filter adjustments

Mask overlay enabled.

Lightroom 6 graduated radial filter adjustments

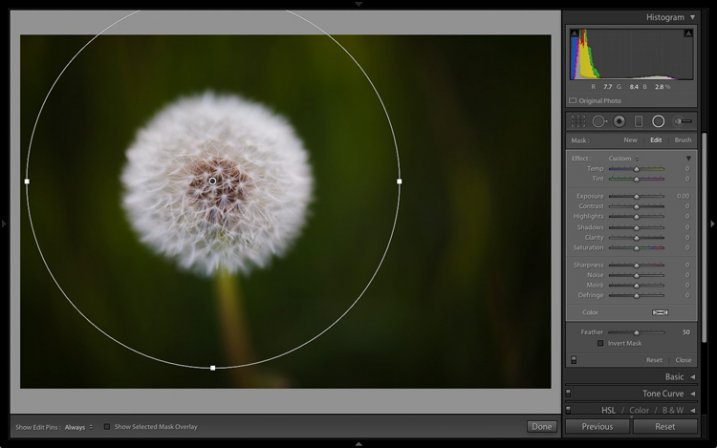
Mask overlay disabled.

With the Radial filter in place, it is easy to make the required local adjustment. I moved the Exposure slider left to make the background darker.

Lightroom 6 graduated radial filter adjustments

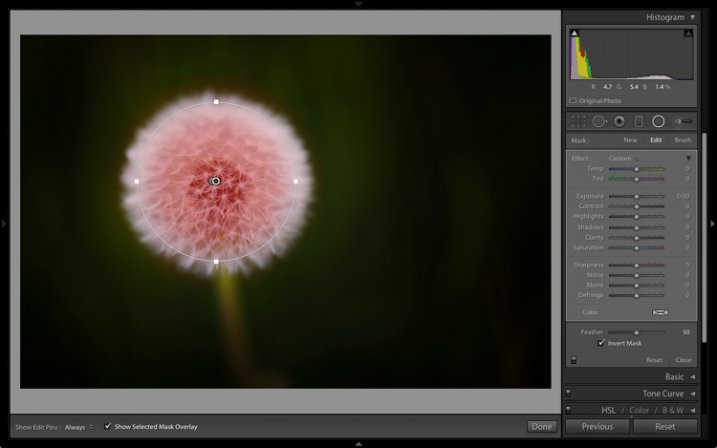
This also works when you tick the Invert Mask box to apply the effect inside the Radial filter. In this situation the effect of feathering means you need to make the filter smaller than the area you want to cover. With the mask overlay enabled it is easy to place it precisely.

Lightroom 6 graduated radial filter adjustments

Then I increased Clarity and Exposure to bring out the texture of the dandelion head and make it brighter.

Lightroom 6 graduated radial filter adjustments

The other benefit of adding the mask overlay to the Radial filter is that it enables you to see the effect of the Feather setting. This was very difficult to judge before.

Lightroom 6 graduated radial filter adjustments

Feather: 50

Lightroom 6 graduated radial filter adjustments

Feather: 0

Lightroom 6 graduated radial filter adjustments

Feather: 100

Note: You can use the Shift+O shortcut to change the colour of the mask overlay.

Addition of Adjustment brush

A problem with the Graduated and Radial filters in earlier versions of Lightroom is that the shape of the mask is fixed. In Lightroom 6/CC Adobe has added the ability to combine the Adjustment brush, with both the Graduated and Radial filters.

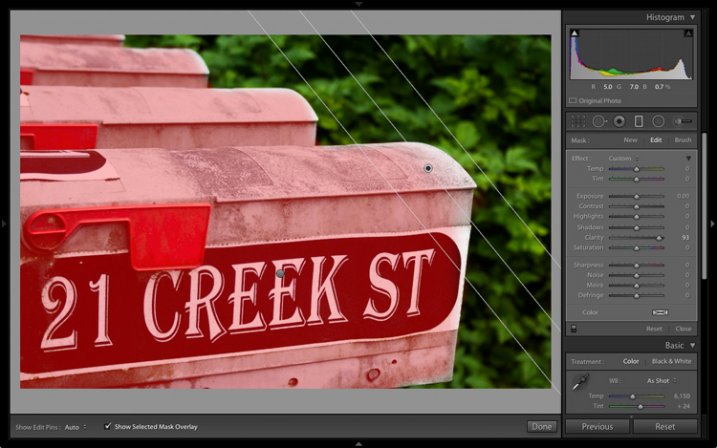
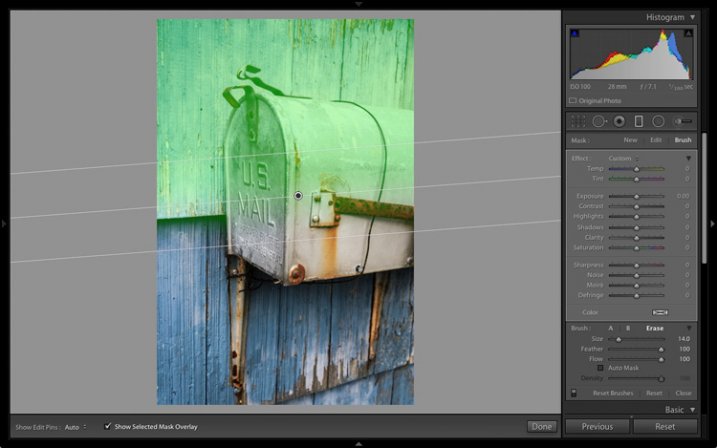
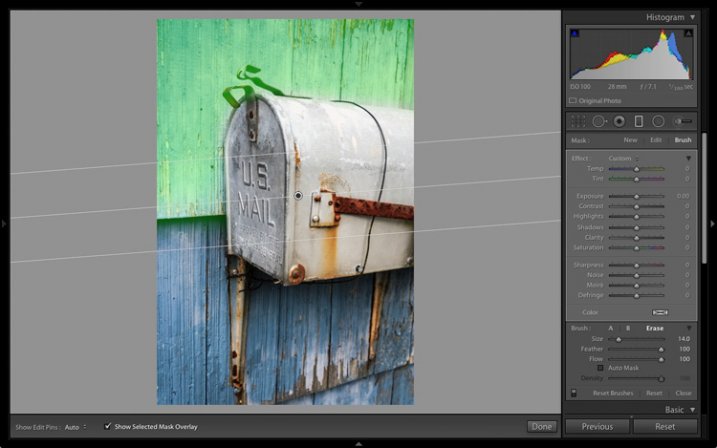
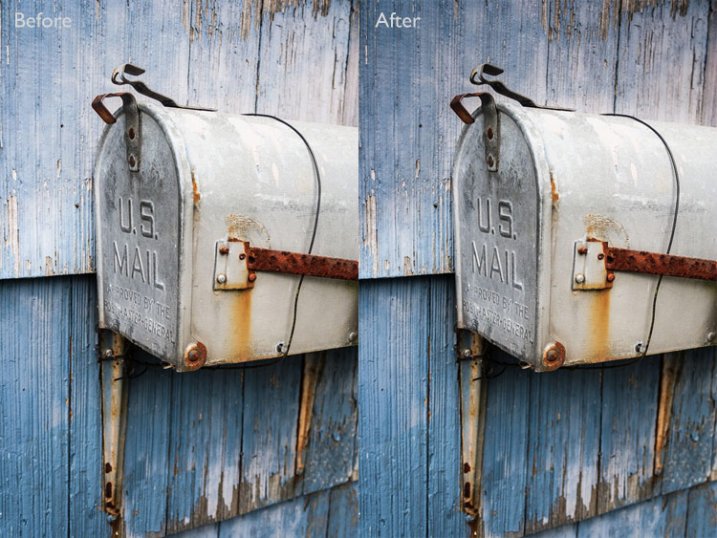
Here’s an example of how it works. In this photo I wanted to make the top half of the wall darker without affecting the mailbox. In previous versions of Lightroom the only option was to use the Adjustment brush to paint in the irregular area. Now you can use the Graduated Filter instead.

This screenshot shows the area affected by the Graduated Filter (I changed the overlay colour to green as it’s easier to see on this image).

Lightroom 6 graduated radial filter adjustments

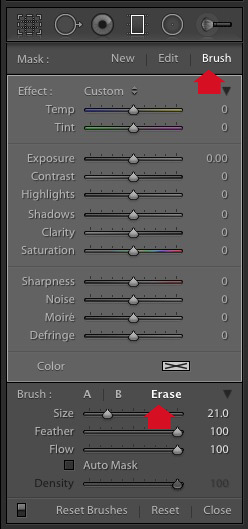
To apply an Adjustment brush, got to the Graduated filter panel and click the Brush option at top right. In this example I also chose the Erase option as I wanted to remove some of the mask overlay.

Lightroom 6 graduated radial filter adjustments

This the amended mask overlay, revealing the mailbox.

Lightroom 6 graduated radial filter adjustments

This is the result.

Lightroom 6 graduated radial filter adjustments

Your turn

These improvements are my favourite as they will make it much easier to process my photos in the Develop module. But what about you? Have you upgraded to Lightroom 6/CC yet? If you have, what are your favourite new features? Please let us know in the comments.


The Mastering Lightroom CollectionMastering Lightroom ebooks

My Mastering Lightroom ebooks will help you get the most out of Lightroom. They cover every aspect of the software from the Library module through to creating beautiful images in the Develop module. Click the link to learn more or buy.

googletag.cmd.push(function() {
tablet_slots.push( googletag.defineSlot( “/1005424/_dPSv4_tab-all-article-bottom_(300×250)”, [300, 250], “pb-ad-78623” ).addService( googletag.pubads() ) ); } );

googletag.cmd.push(function() {
mobile_slots.push( googletag.defineSlot( “/1005424/_dPSv4_mob-all-article-bottom_(300×250)”, [300, 250], “pb-ad-78158” ).addService( googletag.pubads() ) ); } );

The post New Graduated and Radial Filter Features in Lightroom 6 by Andrew S. Gibson appeared first on Digital Photography School.


Digital Photography School

 
Comments Off on New Graduated and Radial Filter Features in Lightroom 6

Posted in Photography


Understanding the Radial Filter in Lightroom

15 Feb

One of the most useful features in Lightroom is one that tends to get overlooked, or at least under-utilized. The Radial Filter, introduced in Lightroom 5, is an incredibly powerful image adjustment tool that can be used to enhance your photos in many ways. From creating vignettes, to enhancing colors, to adjusting the exposure, and white balance, this humble little icon sitting on the right-hand side of the Develop module can unlock a variety of creative possibilities and bring new life to not only your photos, but your photography as a whole.

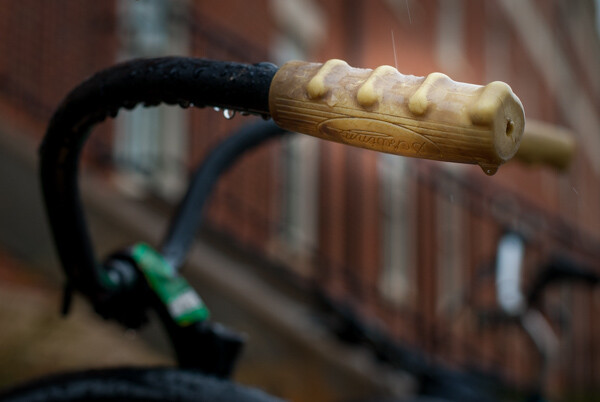
bike-handle-before

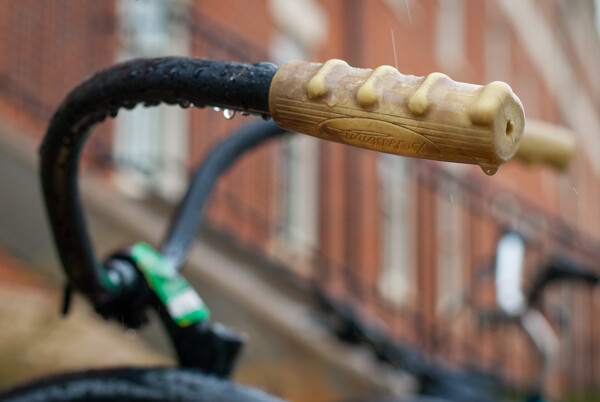
Before you start using the Radial Filter, it’s important to understand just what it does. Similar to the Adjustment Brush and Graduated Filter, you can use the Radial Filter to add one or more specific adjustments to a select area of a photograph, and edit your changes dynamically after they have been implemented. But while the Graduated Filter adds a gradual adjustment in a linear fashion, the Radial Filter adds a similar adjustment in a circular pattern. For example, here’s a picture of a bicycle handle before adding a radial filter (see above image).

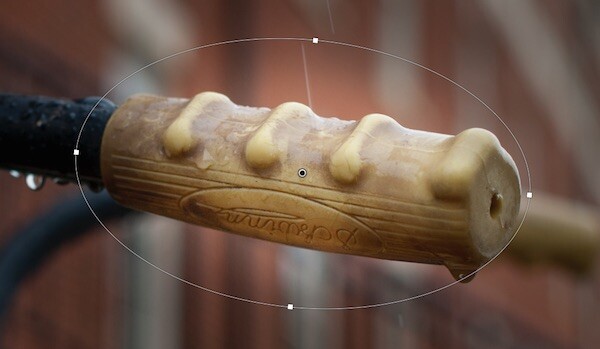
It’s a decent image, but I’d really like to draw the viewer’s eye directly to the yellow handle by adding a Radial Filter. In this image below the filter has been applied a bit too extreme, but I wanted to give you a clear idea of what exactly this tool does.

bike-handle-after

By adding a Radial Filter adjustment and decreasing the exposure, I created a vignette effect to highlight the bicycle handle.

Notice how the effect is centered on the hand grip and gradually fades from light to dark. Various parameters can be adjusted as well, such as the degree to which the filter darkens or lightens the image, how gradually it fades, and even whether to use a custom color for the filter itself. Radial Filter adjustments, like most edits done in post-processing, are better if the effect is subtle and understated. As you can see in the following example, the filter can be rotated to better match your creative vision for the shot.

bike-handle-radial-filter-rotated-closeup

In this image the effect is subtle, but you can see how such flexibility would come in handy in other situations as well. By matching the rotation and size of the radial filter to the bicycle handle, I was able to create the exact type of adjustment that the picture needed.

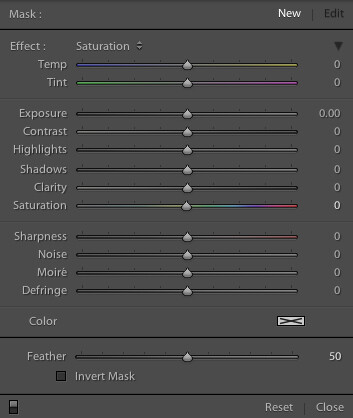
One of the best things about the Radial Filter, though, is that it is not limited to just making things brighter or darker. Lightroom gives you over a dozen parameters to adjust such as White Balance, Tint, Saturation, and even whether to invert the filter so the effects are applied on the inside of the circle, instead of on the outside.

radial-filter-panel

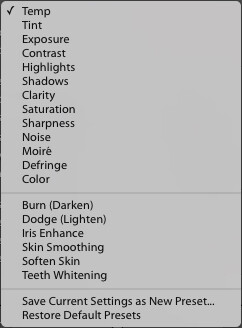
There are several built-in presets as well, so if you’re not quite sure where to start you can pick one of them and use it. You can also create your own presets for repeating a particular effect in the future.radial-filter-panel-presets

Finally, the flexibility of the Radial Filter can hardly be overstated. You are free to edit your adjustments at any time, and once you apply a filter to your image you can go back and change it as much as you like. You can use multiple filters on a single image too, giving you complete creative control over your photos.

For an example of how the filters can be used to adjust color and not just create a vignette, here’s a photo of a girl holding a teddy bear without any radial filter adjustments.

girl-before-filter

The original image, without any adjustments applied.

I was fairly pleased with the original, but wanted to isolate her face and focus the viewer’s attention on her, so I used two Radial Filters: one to increase the saturation and shadows on her face, and another one to de-saturate the entire rest of the photo.

I intentionally went a bit overboard with the changes here, and as with most adjustments a more balanced and subtle approach is probably best, but I wanted to give a clear illustration of how this works so you can start to see the usefulness of the Radial Filter in your own work.

girl-after-filter

Adding two different Radial Filters had a dramatic impact on the image as a whole.

At this point you might be wondering why you would use the Radial Filter, when some of these adjustments can be implemented using the Adjustment Brush tool. The key to remember is that the Radial Filter is graduated, meaning its effects are implemented in terms of increasing value–less at the edge, and more at the center. You can also control how gradual the filter actually works each time you use it, which is a bit different than the brush tool. While the latter does have a feather parameter to give you some control over how gradually a brush adjustment is implemented, it’s not well suited for adjustments that need to change in value over a wide area of the photo. That’s where the Radial Filter really shines.

Regardless of how you choose to implement it, the Radial Filter can be a powerful addition to your photo editing workflow and if you have never looked into it I would encourage you to do so.

What are your favorite uses for the Radial Filter? Do you have any other tips to share? Post them in the comments below!

googletag.cmd.push(function() {
tablet_slots.push( googletag.defineSlot( “/1005424/_dPSv4_tab-all-article-bottom_(300×250)”, [300, 250], “pb-ad-78623” ).addService( googletag.pubads() ) ); } );

googletag.cmd.push(function() {
mobile_slots.push( googletag.defineSlot( “/1005424/_dPSv4_mob-all-article-bottom_(300×250)”, [300, 250], “pb-ad-78158” ).addService( googletag.pubads() ) ); } );

The post Understanding the Radial Filter in Lightroom by Simon Ringsmuth appeared first on Digital Photography School.


Digital Photography School

 
Comments Off on Understanding the Radial Filter in Lightroom

Posted in Photography


3 Uses for the Radial Filter Tool in Lightroom 5

02 Feb

One of the most powerful new tools in Lightroom 5 is the Radial Filter tool. Here are a few examples of how you can use this tool creatively inside your workflow to help draw attention to your subjects. If you don’t have Lightroom5, you can use multiple graduated filters to draw attention, but it’s not as easy, and the results can be hit or miss.

#1 – Off-center vignetting (beginner tip)

Let’s face it, Lightroom’s post-crop vignette leaves a lot to be desired, especially if you want your vignetting effect to be applied a bit off-center, allowing you to draw focus towards your subject.

Let’s look at an example and see how the radial filter tool compares to the post crop vignetting effect of old.

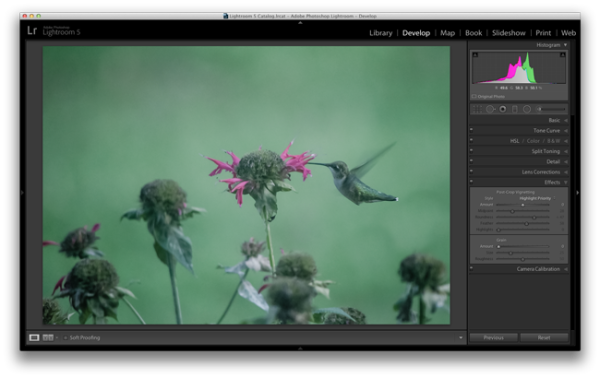
Hummingbird-before

Original photo with no effect

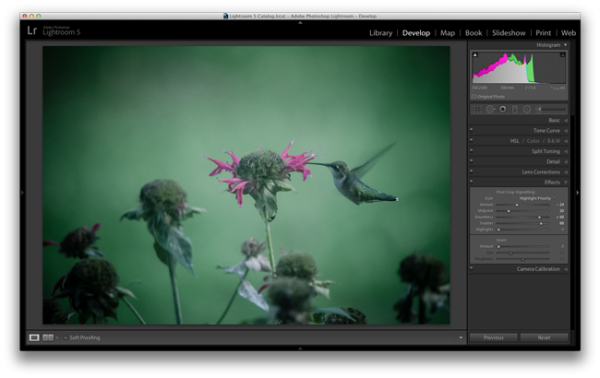
PostCropVignette

Post-crop vignette applied

With the post-crop vignetting tool what you’ll immediately notice is that the effect occurs out from the midpoint of the frame ,and there is no way to off-set this midpoint so that you would be able to have a more customized effect.

Enter the Radial Filter Tool…

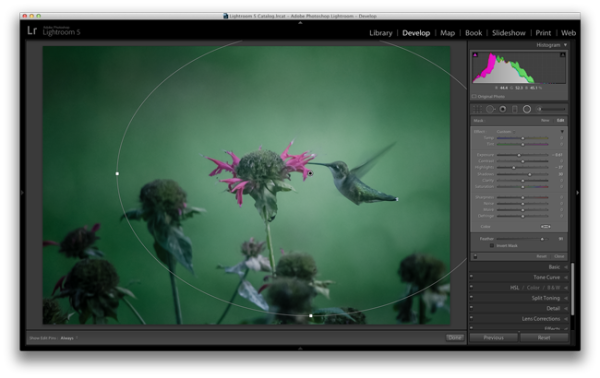
Radial-Filter-Vignetting

To apply a Radial Filter press Shift+M on your keyboard or select the circular icon below the histogram. This will open up a drop down filled with a handful of sliders. If you’re familiar with Lightroom’s other filters this won’t seem all that foreign to you. To add a filter to your image click and drag it into your image. You don’t have to worry about sizing it properly right away as you can always resize, move, and rotate it later within the image.

Applying the vignetting effect is going to depend a lot on your own style and the image you are processing, but the three sliders that you will want to typically play around with are: exposure, highlights and shadows. In the photograph above, a strong vignette was applied by dropping both the exposure and highlight sliders down, but the shadows slider was raised slightly to compensate for the drop in the other two just a bit. With that said, this is something that you’ll want to play around with on your own images and find out what works for them and your own personal taste.

#2 – Adding highlights and brightness to draw attention (mid-level tip)

While adding your standard vignette is all fun and great, there’s more power to this tool than that, so let’s step it up a notch and take a look at another way you can draw attention to your subject with a Radial Filter.

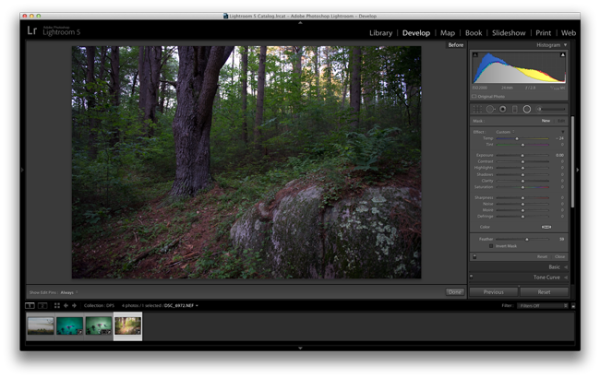
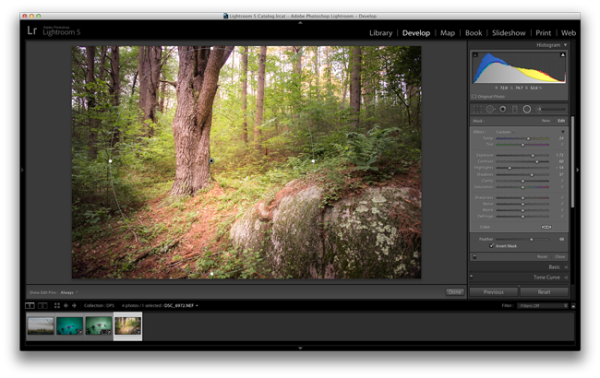
Take this rather boring photograph that I snapped while on a hike through the forest for example.

Invert-Radial-Filter-Before

By applying a Radial Filter and some other Basic Tab modifications I was able to liven the shot up quite a bit and draw attention to the large tree that had caught my eye while on the hike.

invert-radial-filter

To achieve this result you’ll want to once again add a Radial Filter to your image, but this time make sure you check the “Invert Mask” checkbox. This checkbox allows the effect of the filter to be applied from the middle of the filter instead of from the edges of the image.

Again, this is another area where artistic choice is left wide open, but you can see how the tool is more powerful than simply a vignette effect creator. You have the power to control more than just the brightness of the edges of your frame, as seen above, where there are contrast and temperature adjustments happening inside this filter allowing for a more dramatic look.

#3 – Stacking multiple radial filters for more dynamic results (advanced tip)

Finally, once you’ve mastered one radial filter, you might try stacking more than one filter to create even more dynamic results. To add a second filter to an image simply click “New” and then click and drag within your image as you’ve done before. Each filter can be controlled and selected individually by clicking on its respective dot (gray for unselected, black for selected). By having individual control over each radial filter you can really start to draw your viewer’s eye where you want it to go.

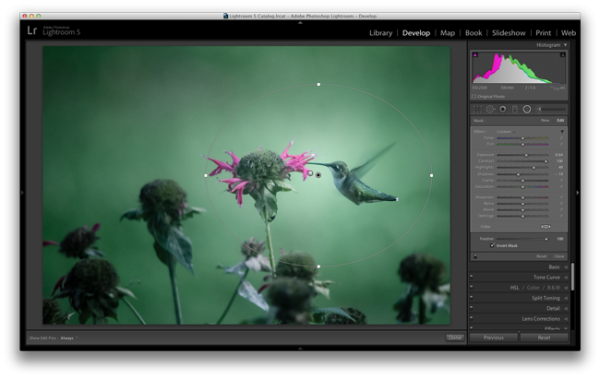
As an example, let’s look at where I left off on the hummingbird photograph from earlier.

Radial-Filter-Vignetting

The original radial filter does a nice job of darkening the sides of the photograph and applying a fairly generic vignetting effect to the photo, but what else can be done?

radial-filter-tool-stacking

By applying a second radial filter to the image and using the invert feature that I talked about above, I’m able to add a small bright point right at the meeting of the bird’s beak and the flower.

What creative ways have you used the Radial Filter Tool?

Have you had time to play around with the new Radial Filter tool yet? What other creative ways can you think of using it? Share below in the comments section.

The post 3 Uses for the Radial Filter Tool in Lightroom 5 by John Davenport appeared first on Digital Photography School.


Digital Photography School

 
Comments Off on 3 Uses for the Radial Filter Tool in Lightroom 5

Posted in Photography


How to use the new Radial Filter Tool in Lightroom 5

14 Jul

Radial Filter Before and After

Adobe PhotoShop Lightroom version 5 was released in June, and I’ve been digging into the new features. In this article I’ll share some tips for selective editing with the new Radial Filter tool.

The Radial Filter allows you to draw an ellipse around an area of an image, and apply edits to the area outside or inside the ellipse. This is a great technique for highlighting portions of an image.

Radial Filter Settings

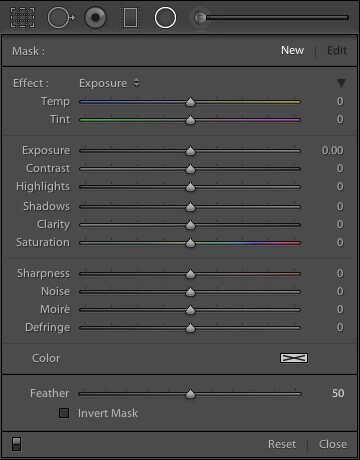
Lightroom 5 Radial Filter SettingsThe Radial Filter tool in Lr 5 gives you the same set of standard adjustments as the Graduated Filter and Adjustment Brush. Note that this screenshot is from an image that is using the 2012 process. Read more about process versions here.

Keyboard Shortcut: Shift M

If you read my article on improving your Lightroom workflow, you’ll remember that I’m nuts about keyboard shortcuts. The shortcut for accessing the Radial Filter tool is Shift M. Just remember that the shortcut for the Graduated Filter is M, so Shift M makes sense for the new Radial Filter. After all, if you took a Graduated Filter, and curled it into a circle, you’d have the new Radial Filter tool.

Using the Radial Filter Tool

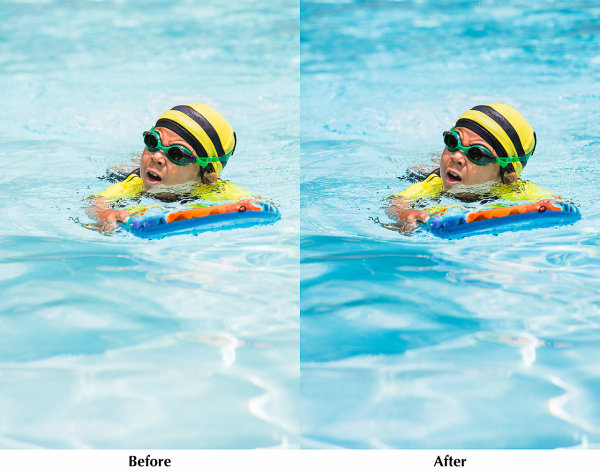
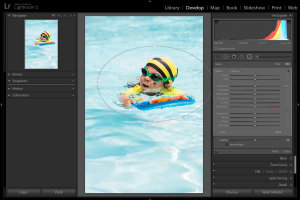
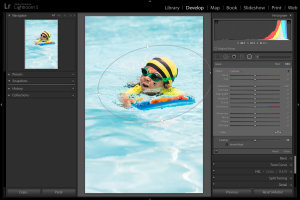
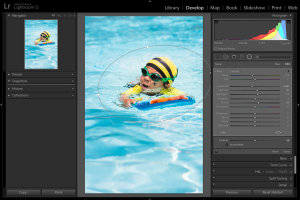
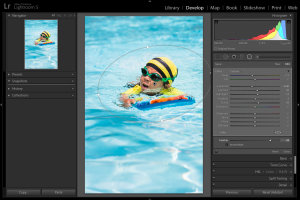
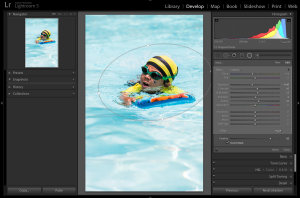
In the above photo of my son enjoying a summer day at the pool, I used the Radial Filter to make the water a little darker, and a little more blue, without changing the exposure or white balance over the subject. This has the effect of emphasizing the subject by making him brighter and warmer than the rest of the image.

Lightroom 5 Radial Filter Usage
1. Select the Radial Filter tool and draw an ellipse around the subject. Start by clicking at the center of the subject, and dragging outwards.

Lightroom 5 Radial Filter Usage
2. If necessary, rotate the ellipse. Hover your mouse just outside the ellipse until the cursor changes to that rotation indicator thingy, then click and drag.

Lightroom 5 Radial Filter Usage
3. Apply the desired settings. In this example, I’m cooling the white balance, reducing exposure, and increasing contrast, highlights, and clarity. Increased clarity often make water look more interesting by bringing out the reflections.

Lightroom 5 Radial Filter Usage
4. Feather the adjustment. Feathering the adjustment is important to ensure your image looks natural, not “Photoshopped.” Feature is 50 by default, I’ve found that for more image, I like it around 85 or so. Note that after increasing the feather, you may need to back and increase the size of the filter.
Inverting the Mask

Lightroom 5 Radial Filter Usage
When the Invert Mask box is not checked, your edits apply to the area outside the ellipse. If you check the Invert Mask box, your edits apply to the area inside the ellipse.

Conclusion

By varying the exposure, contrast, and white balance of the subject, relative to the setting, you can direct the viewer’s gaze and increase the impact of your photo. I hope this simple example has given you some ideas of how to incorporate the new Radial Filter tool into your workflow. I appreciate feedback, please comment below or feel free to connect with me through Facebook or Google+. I’ll do my best to answer questions and reply to comments.

Post originally from: Digital Photography Tips.

Check out our more Photography Tips at Photography Tips for Beginners, Portrait Photography Tips and Wedding Photography Tips.

How to use the new Radial Filter Tool in Lightroom 5


Digital Photography School

 
Comments Off on How to use the new Radial Filter Tool in Lightroom 5

Posted in Photography