RSS
 

Posts Tagged ‘Pushing’

Film Fridays: pushing the functional limits of a cheap point and shoot

03 Apr
Photo: 35mmc.com

The Olympus AF-10 Super is by all stretches of the imagination, a very basic film point and shoot. Features are limited to a flash (with three settings) and a self-timer… and that’s about it. But limitations can inspire creative workarounds, and creative workarounds can lead to really satisfying photos, something 35mmc.com’s Hamish Gill found to be true. Read about his experience with the Olympus AF-10 Super, below.

Read: Olympus AF-10 Super – Pushing the functional limits of a
cheap point and shoot

About Film Fridays: We recently launched an analog forum and in a continuing effort to promote the fun of the medium, we’ll be sharing film-related content on Fridays, including articles from our friends at 35mmc.

Articles: Digital Photography Review (dpreview.com)

 
Comments Off on Film Fridays: pushing the functional limits of a cheap point and shoot

Posted in Uncategorized


Lenovo pushing Moto Mod development through design contest and hackathon

05 Nov

Lenovo’s Moto Z series, which was introduced earlier this year, is compatible with a range of accessory modules called Moto Mods. So far the Moto Mod line includes a speaker, a projector, a battery pack and the Hasselblad True Zoom camera module. When we tested the latter we found the Moto Mod concept to be the by far best modular smartphone system we have seen so far. The modules attach magnetically to the phone and work instantly, without a need to reboot the device, configure wireless connections or adjust any settings.

Nevertheless, since the Hasselblad True Zoom we have not seen any new Moto Mods and in the long run the system can only be a commercial success if customers have a large Moto Mod ecosystem to choose from. Lenovo is aware of this and has launched several initiatives to encourage third party hardware and software developers to work on new Moto Mod modules. The Moto Mods Developer Kit (MDK) has been available since the launch of the first modules, but from now until the end of January 2017 hardware developers can design a Moto Mod and enter a competition to win a Moto Z smartphone. Additionally, Lenovo will be hosting a couple of Moto Mod hackathons, one in New York City in December and another in January in San Francisco.

Winners of both the design contest and the hackathons will have the opportunity to meet the Moto Mod development team at Lenovo’s subdivision Motorola in Chicago and potentially receive investment to turn their idea into a product. Developers who design prototypes will also have the chance to launch a crowdfunding campaign on Indiegogo. Experts from Indiegogo will help run the campaign and Moto and Verizon will help promote the best projects with current Moto Z owners.

We really liked the Moto Mod concept when we tested the Hasselblad True Zoom. However, with the latter targeted at a consumer audience, we would like to see somebody design an enthusiast or even pro level camera Moto Mod. What would your ideal camera mod look like? Let us know in the comments.

Articles: Digital Photography Review (dpreview.com)

 
Comments Off on Lenovo pushing Moto Mod development through design contest and hackathon

Posted in Uncategorized


Pushing your Composition to the Edge

25 Sep

The world is filled with photographs. I did a bit of research and found the following statistic. Researchers estimate that the average individual is now exposed to approximately 250 different images per day. It’s no secret that we are now inundated with visual stimulus. Everyone owns a camera and everyone is shooting images. In 1857 Francis Frith took photographs of the pyramids and the Sphinx. The general public was mesmerized by images of a faraway and exotic location. Today, if I search “Images of the Pyramids” I get 7 million results; everyone knows what the pyramids look like. This whole phenomenon translates into a challenge for photographers. How do you shoot something different and unique when the world uploads 1.8 billion photographs a day?

Image 7

There is no easy answer. I don’t know how many times I have heard someone say, “That’s a beautiful image of the shoreline. You are a really great photographer but take a look at this. I shot the same thing last year on vacation.” Some photographers may become frustrated with this occurrence, but perhaps we should look upon this as a challenge. What can you do to make your photographs more unique?

Live on the edge – of composition

We all want people to view our images and say, “That’s amazing! I’ve never seen that before!” It’s going to be tough but it’s worth a try. It’s time to push your composition skills to their limits. Consider using techniques or viewpoints that are a little unconventional. Try pushing the main subject of your composition towards the edge of your frame. Let’s consider this photograph of a kayaker.

Image 1

In this version, the image is composed using the rule of thirds. The scene has a pretty unique atmosphere as the sun struggles to break through the morning mist. Shouldn’t that be enough to make the viewer stop and take notice? It’s a beautiful image and it was a fantastic morning. I know people will love this image. But what if it was recomposed to push the kayaker to the edge of the frame? Does this make the image even more appealing? Consider the difference.

Image 2

This second image is cropped way down to illustrate a point. What did you look at first? Hopefully, your answer is the red light on the left of the frame and then your eye moved over the image to discover the kayaker. This technique is called “the delay” which means that the viewer is delayed by other details before focusing on the main subject. This means that the viewer notices the details in a much slower and more deliberate manner. You might even create the emotion of surprise when your viewer discovers the full extent of your composition. That’s a good thing. Creating emotions within the viewer ensures they will remember your image.

When the rule of thirds is not the best choice

Let’s take a look at another image. In this case the main subject, the flower bud, has been pushed right to the edge of the frame.

Image 3 Image 4

By placing the main subject closer to the edge of the frame you can create more tension within your image (above left). The image is certainly more dynamic and interesting than this conventional version which focuses on placing the flower bud along the rule of thirds (above right).

In this shot of the boxer and his trainer I was disappointed and considered it a failure because it didn’t follow any of the rules of composition. The autofocus locked onto the training gloves, not the boxer. But after consultation with the magazine editor, he decided to use it because the angle was so unique. The composition told the story in a different way. Notice the trainer’s nose is just in view in the top corner. The editor loved that element and it sealed his choice.

Image 5

Sometimes you will be surprised by what works.

Finding the right balance

Of course, there are times when this technique doesn’t work and the resulting image just feels unbalanced and awkward. This image of a decaying pier in Lake Huron is a good example of when placing the subject close to the edge unbalances the shot.

Image 6

There’s just too much visual weight placed on the right side of the frame and the image is not successful. But that’s okay because at least something was learned about the importance of creating visual balance when pushing the subject matter to the very edge of the frame. Try to balance the weight of the object along the edge with the visual weight of the rest of the space.

Conclusions

Image 9

However, you choose to compose your images the challenge will always be to create something unique that stands out from the crowd. The reality is the crowd of images is only going to get bigger.

Are you up to the challenge? Are you willing to continue experimenting with the methods you use for composing your images? I say push things a little further each time you take a photograph and experiment with how you can use the edge of the image to create interest in your work.

Please share your compose on the edge images and thoughts in the comments below.

googletag.cmd.push(function() {
tablet_slots.push( googletag.defineSlot( “/1005424/_dPSv4_tab-all-article-bottom_(300×250)”, [300, 250], “pb-ad-78623” ).addService( googletag.pubads() ) ); } );

googletag.cmd.push(function() {
mobile_slots.push( googletag.defineSlot( “/1005424/_dPSv4_mob-all-article-bottom_(300×250)”, [300, 250], “pb-ad-78158” ).addService( googletag.pubads() ) ); } );

The post Pushing your Composition to the Edge by Erin Fitzgibbon appeared first on Digital Photography School.


Digital Photography School

 
Comments Off on Pushing your Composition to the Edge

Posted in Photography


Pushing the Limits to Overcome Photography Boredom

04 Dec

By Guest Contributor Matthias Weinberger

Pushing the Limits to Overcome Photography Boredom

In the beginning the most interesting part of photography for me was the element of surprise and discovery. I was never were sure if what I did would turn out to be a great picture. Like an athlete I was always looking for the next adrenaline kick.

Once you’ve been shooting for a couple of years that rush fades – because with the knowledge you have about lighting and composition you pretty much control everything in order for the final product to be perfect. Knowing the end result before a shoot is a must for a professional – but if you are doing it for fun it’s just not enough. That’s why I started to experiment with paint.

Liquids have a mind of their own so to speak – they behave according to rules you cannot control. All you can do is set up your lights, choose the right gear and hope for the best. In the following series of pictures you can see the evolution and the different colours and paints I have tried over the years. As always the end result is a surprise to me – and that keeps it fun and fresh and makes me want to come back for more.

Experimentation is part of the process of learning

I love Portraits. The human face with all it’s features is an endless source of inspiration, wonder and surprise. Faces can express so many different moods and emotions-it’s unbelievable.

Overcoming photography boredom 01

I also love to be surprised during my shoots. What does a face tell you when it’s partially hidden? How does the mood of a picture change when the subject is wearing sunglasses? Or even a gas mask? What does your brain interpret? What goes on inside your head when you look at it?

Ask yourself questions, learn from the answers.
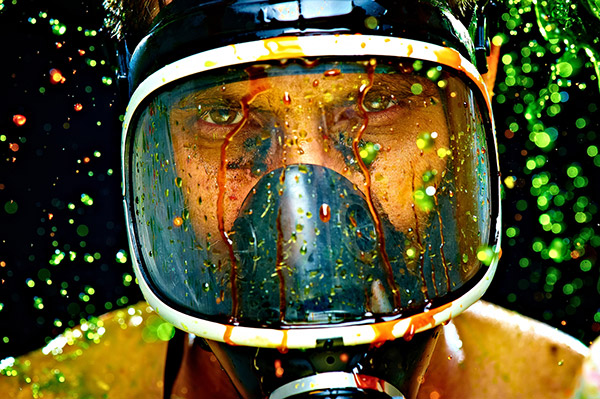
Overcoming photography boredom 02

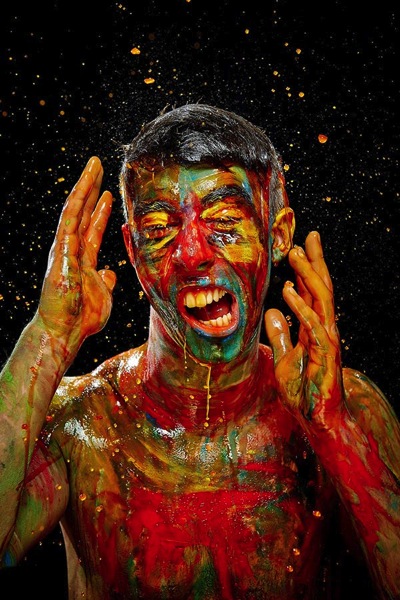
This is why I started to experiment with applying different colours in my portraits. After I found a model who was willing to try anything, I bought some body painting pens – they looked like a set of Crayons in six different colours.

We painted the models face and that was it. In this picture you can see the effect of these pens and sugar applied to his wet face, and a bit of red food colouring poured over his head.
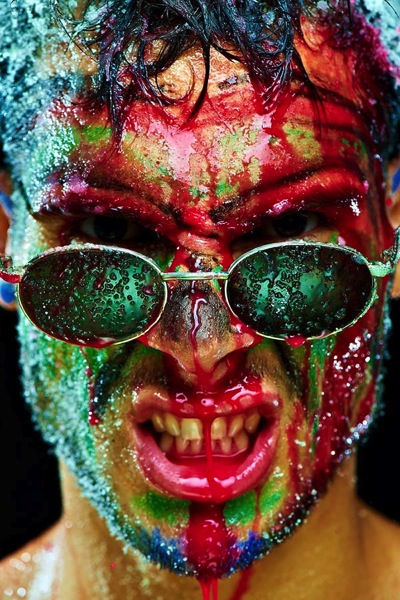
Overcoming photography boredom 03

Take it up a level – get crazy

The next step was to add more “drama” fluids. At first it was milk, again, just observing what would happen. Milk is great: when you pour it on, it runs down the face in completely random patterns-some of them really interesting and fascinating. Sometimes reminds me of a satellite image of a river delta that comes out of the rainforest.
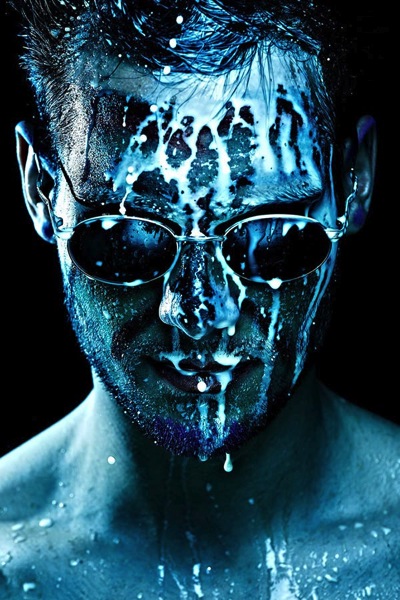
Overcoming photography boredom 04

After that we started to add food colouring-red, green, yellow and orange. Some E-bay sellers made a fortune off my purchases.

I found that food colouring alone didn’t give a good saturated look, the colours looked watered down. So I added tons of sugar and milk, making the mixture almost gel like. The added benefit was it also made it more viscous – so that when it ran down the face and started dripping there werea lot of single drops in the picture and also those long tendrils. Again, this is completely random and different from one picture to the next.
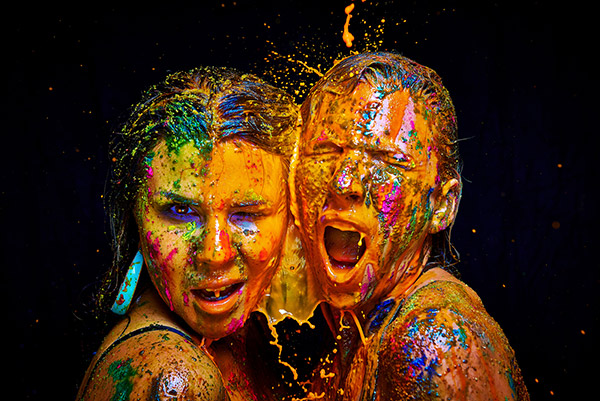
Overcoming photography boredom 06

While experimenting with these different recipes for what to pour on the model, I came upon finger painting colours for toddlers. Awesome stuff! Cheap, available in a great range of different colours, and easy to wash off.

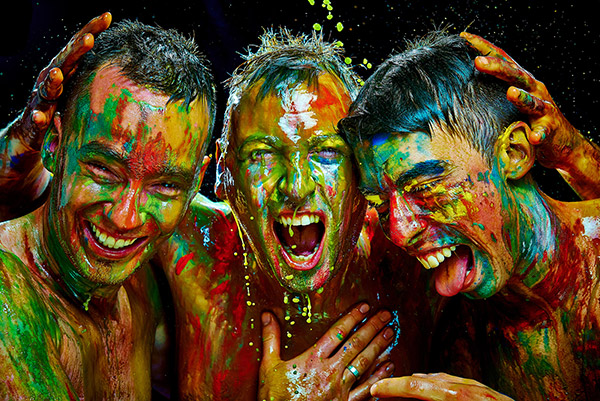
I try to cover as much skin as possible with colour. Normal skin is a distraction in these kinds of pictures.
Overcoming photography boredom 07

I’ve tried a lot of different methods for “delivery” as well: syringes, bowls in different sizes, watering cans, etc. Right now I’m using a big sponge which works really well. I just wring it out above their heads and see what happens.
Overcoming photography boredom 08

Equipment

The equipment I use is:

  • a Nikon D600 (used to be a D700)
  • Lenses: either the 85mm 1.4 or the 24-70mm f/2.8 – both at f/7.1
  • Flashes: usually 3 Speedlights. One from above into a softbox, the other two on either side as rim lights
  • A California Sunbounce Mini Reflector with the Zebra side up. CLS works great indoors-so that’s how I trigger the flashes.

Tips for doing this kind of shoot:

  • Find a warm place, use warm water for mixing the food colouring and the sugar
  • Think about how you can clean up before the shoot!
  • Bring cleaning supplies, and don’t use a syringe to spray red water upwards. There will be hundreds of red dots on the white ceiling!!!

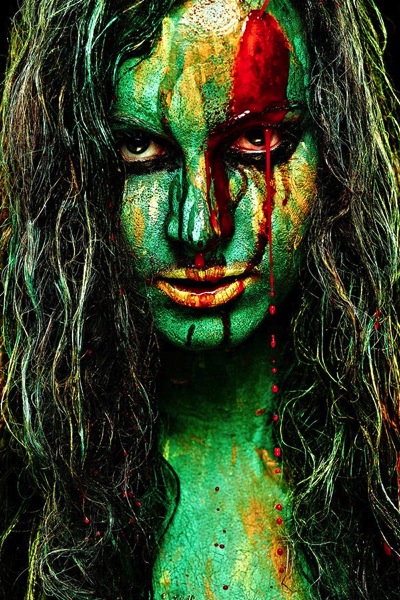
Make sure the Model knows that he or she will be covered in paint, that the “recipe” tastes awful (and yes-at some point it will get in their mouth and their eyes where it will sting quite badly). Have a clean bowl of water at the ready for when it runs into their eyes so that they quickly can wash them out. If you look at her eyes you can see that it got behind her contact lens.
Overcoming photography boredom 09

If you stand in the same spot for an hour or two your back will hurt-so we always stand on pieces of foam, much more comfortable!

Also since it’s very warm in the room we are shooting in, I’m wearing shorts too. And make sure to check your lens every so often, drops of the “recipe” will find their way to the lens also. Have a clean lens cloth ready.

Processing notes

I shoot RAW and post process my shots using Capture One 7. I increase saturation, tweak the levels with the curve tool, add sharpening, and play around with the colour balance and white balance. All in all, it doesn’t take me more than a minute to process a picture.

Summary and words of wisdom

As you can see, always keep pushing the envelope. If you have found a point in your work where you know what’s going to happen, move on. The brain likes novelty. Changing things keeps you on your toes, you learn something new and your photography is going to improve. If it doesn’t work out you can always come back to what you did before and try another approach.

Last and most of all: have fun doing it!


Matthias Weinberger is a “semi-professional button-pusher” according to his Flickr profile.

  • Find more of Matthias’ photos on Flickr
  • Visit his website
  • Find him on Facebook

Post originally from: Digital Photography Tips.

Check out our more Photography Tips at Photography Tips for Beginners, Portrait Photography Tips and Wedding Photography Tips.

Pushing the Limits to Overcome Photography Boredom

The post Pushing the Limits to Overcome Photography Boredom by Guest Contributor appeared first on Digital Photography School.


Digital Photography School

 
Comments Off on Pushing the Limits to Overcome Photography Boredom

Posted in Photography