Have you ever wished you could stretch out the color palette of your picture? Or that you could separate colors that looked too flat or close together?
Well, with Photoshop, you can – by converting your picture to something called LAB colorspace and adjusting the color there. That might sound complicated, but it is actually pretty simple. If you have ever made a levels or curves adjustment, you already know everything you need to know to accomplish this.

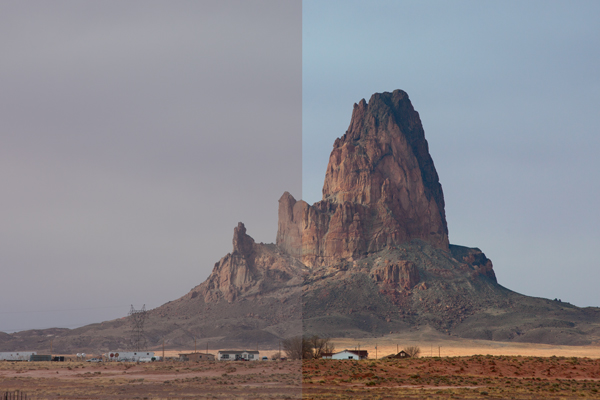
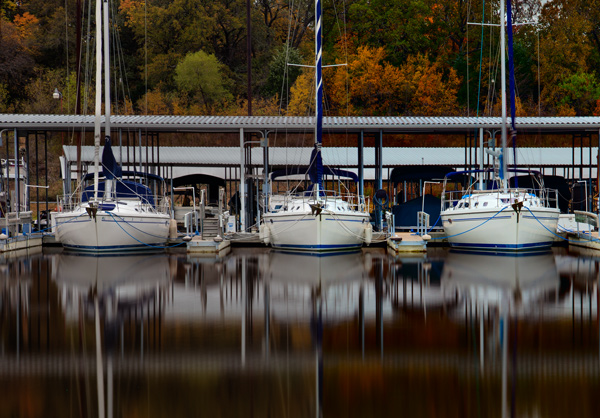
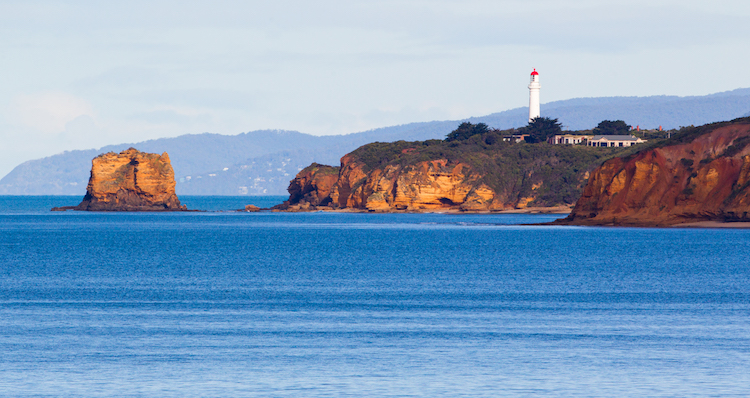
The left side of the picture is an anadjusted Raw file. The right side of the picture is the same except for a curves adjustment layer done in the LAB color space.
In this article, you will learn two things. First, you will learn the five simple steps to achieve color separation using the LAB color move. You can follow these steps without even understanding how any of this works and it will work just fine for you. Second, after walking you through the steps, you will see how this move works. That way, if you want to apply this move to your photos in a more nuanced fashion later it will help you to do so.
The LAB Color Move
So let’s walk through the steps of “the move.” There are five steps in this process, all of which are simple and can be accomplished in 30 seconds or less.
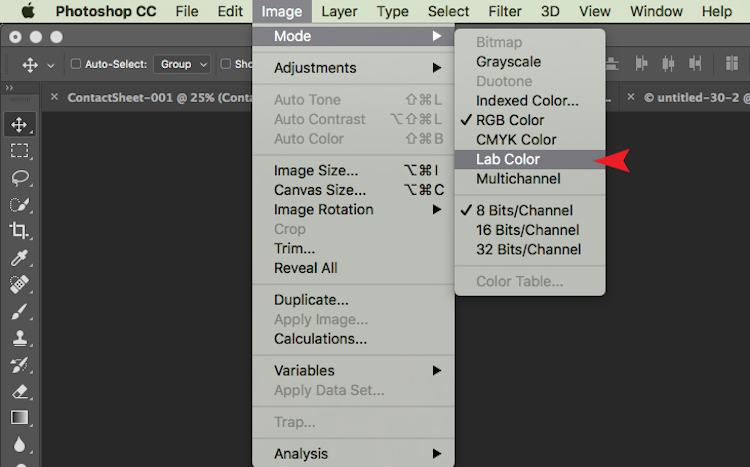
1. Convert to LAB Colorspace
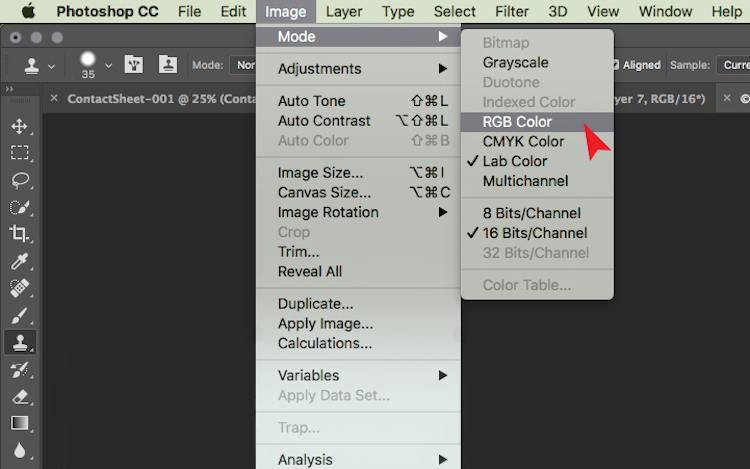
First, you have to convert your picture to the LAB color space. To do that, just click “Edit” on the top menu, then choose “Convert to Profile.” When you do so, a dialogue-box will pop up. From the drop-down, choose “LAB color.” That’s all there is to it.

For now, your picture looks exactly the same. All you have done is changed the way Photoshop renders color in your image (more about this later).
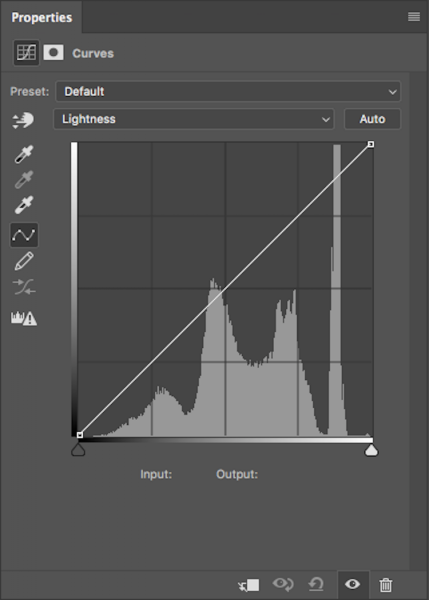
2. Create A Curves Adjustment Layer
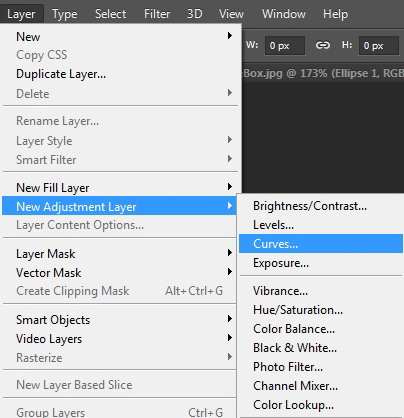
Next, you will need to create a curves adjustment layer. There are a few ways to do this, but if you don’t already have your own way, just click on “Layer” in the top menu, then choose “New Adjustment Layer,” then “Curves.” Click “OK” in the box that pops up.
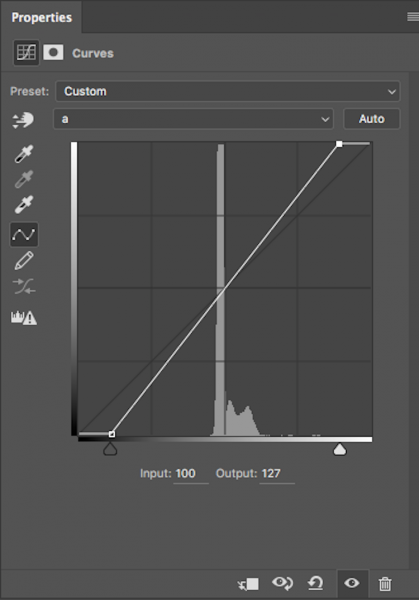
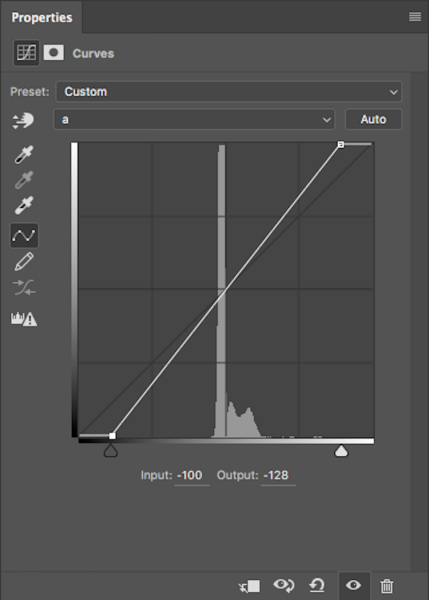
3. Scoot in the Endpoints of the A Channel
Everything so far has been mere prelude to get you to this point, and you haven’t actually changed your picture at all yet. You have converted to the LAB colorspace and created an an adjustment layer to work on. Now the fun begins.
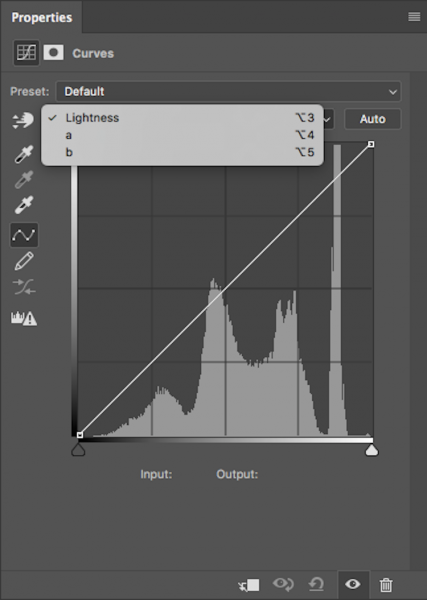
You will see a drop-down menu near the top of your adjustment layer and the current selection will be “Lightness.” Click on it and you will see three choices: the Lightness (or L) channel, the A channel, and the B channel. Select the A channel.
You will immediately notice that your histogram changes dramatically. Most likely, it now looks like a big spike in the middle. Don’t worry about that – that’s the way most histograms look in LAB color.
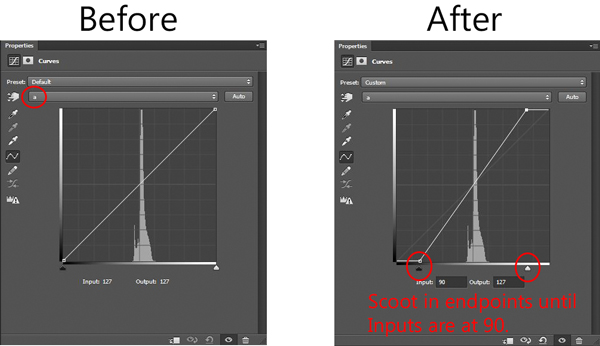
What you are going to do is grab the left (black) endpoint and drag it toward the middle of the histogram a little bit. There is no set amount to move it, but if you are looking for a little guidance drag it until the Input number reads -90. Your picture probably just turned an ugly shade of green but don’t worry about it. Now, grab the right (white) endpoint and pull it to the left. In fact, pull it to the left the exact same amount that you moved the left endpoint to the right. You can use the Input numbers below to make sure you are moving each side in the same amount.
That should fix the green cast. But don’t worry too much about what your picture looks like right now. Let’s go on and perform the second part of the LAB move.
4. Scoot in the Endpoints of the B Channel
What you are going to do here is exactly what you just did in the step above, but this time you are going to do it in the B channel. So, go back to the drop-down that currently reads “A” channel. Click on that and now select the “B” channel.
As you did above, just scoot in your endpoints toward the middle of the histogram. So grab the left (black) endpoint and drag it toward the middle a little bit. Your picture just turned a shade of blue but don’t worry about it. Now, grab the right endpoint and pull it to the left the exact same amount that you moved the left endpoint to the right. Again, input values of about 90 should get you roughly where you want to be.
5. Inspect Your Handiwork
Now it is time to see the “before” and “after” pictures of your image; this is one of the benefits of working with layers. On the right side of your screen where your layer is shown, you will see a little eyeball just to the left of each layer. For the curves adjustment layer you just created, click on the eyeball. When the eyeball disappears, you will see your picture before the adjustments you just made. Click again to see the eyeball with your changes to the image.
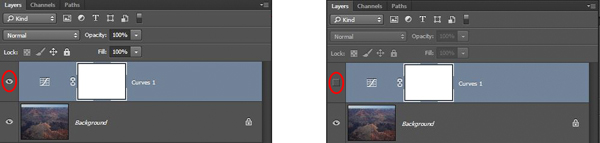
On the left, the eyeball is on, so the changes will be shown. On the right, the eyeball is deselected, so the changes will not be show.
Do you see how your color range has been increased? The colors should also appear more rich and vibrant. If you are not noticing much of an effect, try scooting in the endpoints of the A and B channels a little bit more (say, down to 80 if you are using the input numbers). On the other hand, if the colors look too garish to you, drag the sliders out a little bit (to say, about 110 on each side). Or you can reduce the effect by decreasing the opacity of the curves adjustment layer.
That’s it, you now know the LAB color move. Go ahead and switch back to your original colorspace and perform any other edits you want on your picture. Then, try this move out on a few different pictures. You will probably find that it doesn’t help pictures that already have vibrant colors, but it can perform miracles on certain landscapes you previously found too flat.
How it Works
Upon learning this move, you may have questions about how this works and why you couldn’t just do it without switching to the LAB colorspace. I will explain that in the remainder of this article.
How LAB differs from your usual colorspace
For starters, we need to have a general understanding of how LAB differs from RGB color. So first you should understand how colors are rendered in RGB, and then we will move on to show how LAB differs.
RGB color
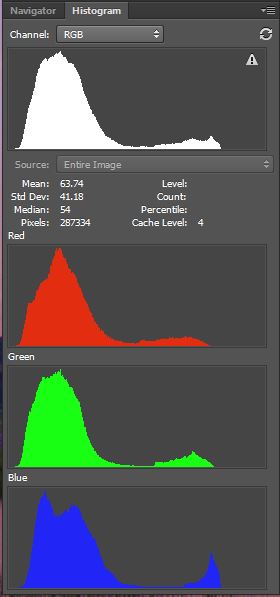
Histograms of the RGB channels
The RGB colorspace is the standard used in digital photography. This is the colorspace that your camera uses, and the one that Photoshop defaults to. RGB simply stands for Red, Green, Blue, and that tells you a bit about how it works. In this scheme, the camera or computer starts with these three colors and then combines them to create a whole host of different colors. Thousands of them, in fact. If you are having trouble getting your head around how really light colors (say, yellow) can be created by combining red, green, and blue, understand that there are many different shades of red, green, and blue, starting with very, very light (bordering on white) shades. In fact, the way that RGB and LAB deal with lightness is a key difference between them, as you will see.
When you look at a histogram for a picture in RGB, you are seeing a combination of the values for each color channel. You can see each of the individual color channels by clicking on the drop-down labeled “RGB” in your curves adjustment layer. When you do so, you will notice that the histogram for each of the channels is different, but not that different.
LAB color

Histograms of the LAB channels
The LAB color space goes about defining colors differently. Whereas RGB defines color by a combination of red, green, and blue values of different shades, LAB uses three different channels. They are: Lightness, something called the A Channel, and the B Channel. Hence, Lightness, A Channel, and B Channel are shortened to L-A-B, LAB.
But what are these channels? Let’s start with Lightness, partially because it is first, but also because it is likely to be the most familiar to you. It represents the relative brightness of the pixels without regard to color. So Lightness is kind of like a greyscale image, where each pixel is defined by how close to white or black it falls on the scale. The Lightness histogram probably looks like something you are used to. The values of a properly exposed picture with good contrast should spread out over most or all of the histogram.
The A and B Channels will likely be unfamiliar to you. Whereas the Lightness Channel defines the lightness of the pixels without regard to color, the A and B channels define color without regard to lightness. Color and lightness are addressed separately in LAB, not together as they are in RGB (more on this in a bit).
Let’s talk about the A Channel first. The “A” doesn’t actually mean anything. They just call the two color channels A and B. The A Channel is just a definition of color values based strictly on how much green on one hand, or magenta on the other, are contained therein. The very middle is actually gray, and the hues get progressively more green to one side and progressively more magenta to the other.
The B Channel works the same way as A, except that it defines color by how much blue on one side, and yellow on the other, it contains.
It might help to think about it like this. Whereas RGB renders color by defining each color as some combination of red, green, and blue, LAB renders color by defining each color as some combination of green, magenta, blue, and yellow, with lightness addressed separately. However, while each color gets its own channel in RGB, colors share channels in LAB (two per channel).
If you are starting from scratch with the LAB colorspace, try playing with it. Load a few of your pictures, go into LAB, then go into the three channels on a curves adjustment layer. Look at the effects of sliding in the endpoints of just one side of the histogram. You should start to see how the A Channel is a measurement of the balance of green or magenta. The B Channel is a measurement of the balance between blue and yellow.
The Power of LAB
Here is the really interesting bit and why LAB is so different, and in many ways superior to RGB. Look at the histogram of the A Channel of your picture. There is, no doubt, a spike in the middle. That is because LAB is such a ridiculously broad color space that all the colors you and I would consider “normal” are bunched up in the middle of the histogram. If you go outside of that bunch in the middle, you would soon get some really psychedelic colors, and beyond that you would get into impossible or imaginary colors that are outside the realm of anything we can actually use.
The impossible colors don’t matter, but what does is the effect on the histogram that all this creates. Having the colors of your image all bunched up in the middle of the histogram means that you have lots of room to scoot in the endpoints of the histogram and effectively stretch the color palate.
This move is not possible in RGB. Typically, in RGB you will not have enough space on the sides of the histogram to scoot in the endpoints. The colors will usually be stretched over most of the histogram. But even if you have room to do so on the histogram, in RGB it will affect the brightness and the color balance of the picture.
The other reason LAB is so powerful is the separation of lightness from color. As a result of this separation, resetting the black point and the white point in the histogram of the A or B channels affects only color. You can stretch out the colors without making them lighter or darker.
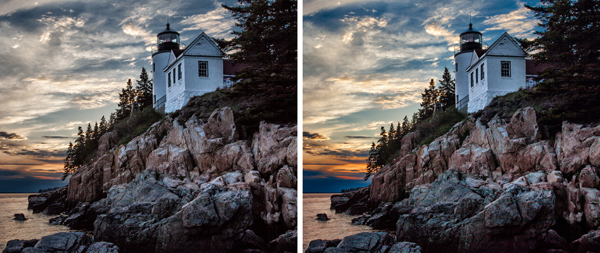
Before and after LAB color enhancements.
Conclusion
Just knowing and using the basic LAB color move will significantly impact your pictures in ways that were not previously possible. It is more than just an increase in saturation – it’s stretching the color palette.
This move is only possible in the LAB colorspace because:
- The LAB colorspace is so broad that there is always room to scoot in your black points and white points on the histogram.
- Separating the lightness values from the color values, and putting the lightness values on its own channel (the L channel) means that you can impact the colors without affecting the brightness or contrast of the image.
The the basic move is just the beginning of what you can do. From here you can make additional adjustments to the A and B channels that will remove color casts by moving in one side more than the other. Or you can apply masks and affect color in specific areas of your image. Start with this basic LAB color move and you’ll see immediate improvement and soon will start seeing other possibilities.
The post How to Use LAB Color in Photoshop to Add Punch to Your Images by Jim Hamel appeared first on Digital Photography School.

Digital Photography School


You must be logged in to post a comment.