RSS
 

Posts Tagged ‘promote’

12 Steps to Successfully Promote Your Photography on Instagram

13 Aug

The post 12 Steps to Successfully Promote Your Photography on Instagram appeared first on Digital Photography School. It was authored by Robin Ryan.

promote your photography on Instagram

Instagram is an excellent way to attract attention, gain followers, engage with likeminded folks, and even improve your photography, but it’s all easier said than done, right? Plenty of photographers post on Instagram and get nothing out of it – no followers, likes, or even views.

So how do you use Instagram the right way? How can you promote your photography on instagram and come away with likes, followers, and comments galore, not to mention a great community?

In this article, I’m going to share my personal secrets for Instagram success. Specifically, I’ll offer techniques to get better exposure for your photography, build a community, and grow as a photographer through Instagram. I assure you, I know what I’m talking about; my personal Instagram account has 15,000 followers (and counting). So you know this advice works.

Let’s get started.

promoting photography on Instagram person on a mountain

1. Only show your best work

What’s the difference between a good artist and a great artist?

Great artists only show their best work. While nobody is expecting you to rival National Geographic photographers right away, you should pay close attention to what you’re sharing. It only takes one bad photo for people to lose interest in your photography.

In short, if a photo doesn’t make you say “Oh, yeah!” when you see it, don’t post it.

Also, don’t post too often. Unless you have a really good reason for spamming your follower’s feeds, don’t do it. I recommend sharing one or two images a week – it’ll keep people interested without getting annoying. So post the great stuff, and leave out the bad, the mediocre, and even the good.

2. Find your niche

This is key to defining your brand and to your growth as a photographer. It’s about determining what makes you different from everyone else and about using that difference to create something unique and interesting.

The amazing thing about Instagram is that it’s composed of people across the world, each of whom have a different interest. I’ve seen fantastic accounts focused on street food in Vietnam, rock climbing in Utah, and architecture in Turkey.

But despite these differences, the best accounts all have one thing in common: a focus around a central theme. And it’s this theme that captures their audience’s attention (and keeps it).

person by a fallen tree

Exploring the ancient #forests of Vancouver island, @kaitross and I found that even these giants succumb to time and the winds.

Don’t forget: the only person who should define your niche is you. Do you love paper maché and dinosaurs? Then become the best photographer making seaside portraits of paper maché Velociraptors.

I love to travel and explore nature, so my account reflects that and only that. You won’t find photos of my food or my family. If you want to share snapshots from your daily life, get a private account for your friends and your family to follow, because they’re the only ones who (might) want to see that stuff.

3. Use a dedicated camera, not just your smartphone

Your shiny new smartphone may take gorgeous snapshots, but constantly relying on a smartphone is like trying to perform a piano recital on a kid’s electronic keyboard.

Yes, smartphone cameras have come a long way in recent years, and yes, there are plenty of outstanding smartphone photographers out there. But unless you’re an experienced photographer with a lot of compositional and lighting knowledge, I highly recommend getting a “real” camera, such as a DSLR or mirrorless model.

Why? For one, it’ll force you to learn key photographic skills, such as exposure, depth of field manipulation, and proper handholding technique. Plus, it’ll give you additional focal lengths to play with, so you can shoot birds in the distance, sweeping landscapes, stunning close-up shots, and more.

snowy church

4. Take the editing process seriously

Instagram may lend itself to a snap-and-post style of photography, but producing excellent photographs doesn’t work that way. Great photographs aren’t taken – they’re created.

This means shooting in RAW, then working in your favorite image editing program (I recommend Adobe Lightroom). Learn how to manipulate light, shadow, and clarity until your final product is something you can be proud of. The Instagram app just isn’t built for this level of sophistication, so ditch all those cheesy filters and effects and do your work on the computer.

person climbing a mountain with buckets

5. Share a story with your photo

Great photography leaves an impression. So do well-written stories. But when you combine strong images with powerful words, you’ll evoke an emotional response in your viewer and help them connect with your work.

It wasn’t until I realized this and started sharing the story behind my photos that my account started getting real interaction – people writing about how the image or words affected them and their own experiences.

Nobody expects the next Hemingway to come out of Instagram, but some carefully chosen words in a thought-provoking caption will do wonders for connecting you to your fans.

beautiful mountaintop in China

After the frenzied atmosphere of Shanghai’s urban jungle, the fresh air of Huangshan’s Yellow Mountains was exhilarating. Still in the low season, March snow clung to the boughs of trees while distant clouds made it feel like the horizon could go forever. One of China’s better-developed tourist attractions, Huangshan has a long history: first recognized in 747 AD, it was said to be the place from which the Yellow Emperor ascended to heaven. This year, over 1.5 million visitors (mostly Chinese) will wander its paths. I caught it on a quiet day, and these peaceful memories linger with me still.

6. Ask questions in your captions

What’s the difference between a story and a question?

A story builds an emotional connection between the viewer and the image; a question builds a personal connection between your viewer and you.

So tell stories, but ask questions, too. Your questions should be open ended and create a space for your fans to contribute some of their own stories to the community. Remember that many Instagram users are new to digital photography and are looking for people to connect with. By asking questions, you can encourage them to engage with the community (you might even make friends along the way!).

7. Use hashtags effectively

I never understood the value of effective hashtagging until I started weaving them into my posts. You should be hashtagging important nouns and verbs – stuff people will be searching for.

And get specific, too. The difference between #fishing and #instagood is huge for obvious reasons: people who might be interested in your photo are much more likely to be searching for their favorite hobby than some meaningless, catch-all term. So don’t add a bunch of generic hashtags that say nothing about your work. Instead, use descriptive hashtags that target certain users.

landscape with green grasses

Speaking of hashtagging, do a bit of digging to find effective hashtags you might be missing. It wasn’t until I came across the hashtag #explorebc that I began connecting with a ton of great local photographers who eventually featured my work on their account (resulting in a huge boost of exposure for my photos!).

8. Post in the morning

The morning is when most Instagram users check their feed, so keep this in mind and set your posting schedule accordingly. I live on the West Coast of North America, so if I post at 8 AM, I’m already late for my East Coast followers. Aim to get your posts out early in the day for the time zone you’re targeting (of course, if your followers are worldwide, this is less useful).

Is there a best day of the week to post? Studies show that Sundays have the greatest number of interactions, which makes sense given that many users spend Sunday relaxing at home. Otherwise, stick to weekday mornings.

9. Build a community

Build a community by actively finding photographers you respect and developing relationships with them. I won’t lie – this is a long process, but it’s necessary and worthwhile.

It’s also pretty simple: Just find a hashtag that speaks to you and your work, then check it whenever you can to see who’s posting. When you find photography you like, leave a thoughtful compliment and follow the user. Chances are, if they like what you’re posting, they’ll check out your account and reciprocate.

Whatever you do, when commenting, don’t ask people to check out your account or follow you back. It’s tacky and makes you look desperate. Instead, be thoughtful, complimentary, and ask for nothing in return.

woman sitting by the sea

10. Cultivate champions

champion is someone who genuinely engages with your work. They comment frequently, and their comments are thoughtful – not just “Nice” or “Love it,” but lengthier, meaningful content explaining what they like about the posted image.

Champions are great for both your community and your popularity, but how do you get them? What makes champions comment on your photos?

Here’s the best way to draw in champions:

Foster relationships with other users.

Of course, this is easier said than done. But if users are leaving you thoughtful comments, return the favor and respond with something more meaningful than “Thanks!” If someone cares enough about your work to awkwardly type out praise on their smartphone, they’re worth their weight in followers. These are the people who are going to follow along through your adventures and refer their friends and followers. Do enough relationship building, and these delightful unicorns will be out there promoting your work for you.

11. Bring others into the conversation

Bring others into the conversation by photographing with them or referencing them in your posts. Two amazing women from Vancouver kicked off @localwanderer several years ago, in which they document their travels around North America and feature the hidden gems in communities.

Where the @localwanderer creators really excel (in addition to their photography and writing) is in their ability to constantly bring local shops, restaurants, and people into the discussion. By doing this, @localwanderer introduces its community to someone new, who in turn will introduce their community to @localwanderer.

So think about who or what you can reference on your account. If you’re a nature photographer, you might try tagging local parks; if you’re an architectural photographer, you might try tagging the owners of local buildings/businesses. The specifics will depend on the photography you do, but as long as you’re creative and you persevere, you’re bound to make some valuable connections.

12. Don’t confuse followers with community

I’d rather have 100 fans who interact with my work than 1,000 followers who never like and comment. Your goal shouldn’t be about quantity of followers – instead, it should be about the quality of your community.

Speaking of numbers, don’t be afraid to clean up (and block) followers, especially those who are clearly inactive or fake. The last thing you need is a bunch of zombie accounts clogging up your Instagram. Also, one danger of having many inactive followers is that your account is less likely to be recommended to other users of Instagram.

How to promote your photography on Instagram: final words

There you have it: 12 tips for success on Instagram. As long as you follow these tips, your account will grow and your engagement will skyrocket.

Now over to you:

What are your tips for promoting photography on Instagram? Do you have any success (or failure) stories you’d like to share? Let’s hear them in the comments section below!

The post 12 Steps to Successfully Promote Your Photography on Instagram appeared first on Digital Photography School. It was authored by Robin Ryan.


Digital Photography School

 
Comments Off on 12 Steps to Successfully Promote Your Photography on Instagram

Posted in Photography


How to Publish a Photography Zine to Promote Your Photography

30 May

The post How to Publish a Photography Zine to Promote Your Photography appeared first on Digital Photography School. It was authored by Matt Murray.

dps-how-to-publish-a-photography-zine

Until a couple of years ago, I’d never considered publishing a photography book or zine. Years ago, the self-publishing options weren’t very attractive to me: they were either expensive and complicated or offered templated cookie-cutter style books that didn’t appeal.

In recent times, new publishers specialising in short-run zines have sprung into the marketplace, making it much easier for photographers to get their work into print. Inspired by other photographers producing zines, I have just published my own. Here is my guide on how to publish a photography zine to promote your photography.

What’s a zine?

A zine is a self-published booklet of images and text, often produced in limited edition print runs. The word zine (pronounced zeen) is derived from both the word magazine and also the word fanzine – unofficial publications produced by fans of a particular movement in popular culture. Zines were usually put together by hand, then photocopied and stapled.

Every Summer photography zine
Copies of my first film photography zine Every Summer. I also had limited edition art print postcards created to celebrate the launch.

These days the term zine is commonly used to refer to any short-run booklet of photography and/or images. There are so many creative choices that you can make when you publish a photography zine. The look and feel of the final product are up to you, and the lines between a zine and a book are often blurred.

For example, my first photography zine Every Summer is perfect bound, meaning the pages are glued together into the spine without a staple. It’s full-color, printed on uncoated paper, and the cover has a smooth laminate finish. It falls somewhere between the extremes of a do-it-yourself stapled zine and a high-end coffee table book.

So now you know what a zine is, your next question might be, why publish a photography zine? I’ve outlined a few reasons below.

Seeing your images in print is magical

One of the most frequently said things about photography in the digital age is that we’ve ended up with tens of thousands of images on devices and hard drives that are hard to access and view. There’s nothing quite like having an image in your hands – whether it’s an instant photo, a print, or your own book or zine.

Every Summer photography zine
Close-up of my first photography zine Every Summer. Holding it in my hands for the first time was magical.

Seeing my first photography zine in print was so much more satisfying than seeing images on a computer screen. Creating a zine also ties together the set of images as a collection, with a single narrative throughout. A zine is a perfect way to showcase your images to others.

Use a zine to promote your photography

Publishing a photography zine is a fantastic way to promote your photography. A zine could be used as an alternative to (or in addition to) your digital offerings.

I recently showed my first zine to a professional photographer friend and he said it was a really interesting concept he’d consider for promoting his wedding photography business.

In this digital age, a zine could be a way of standing out from the crowd by providing something tangible people can hold in their hands that promotes your photography.

Creating a zine as a tool for personal growth

Publishing a zine is such a rewarding project. As a photographer, there are many other skills you’ll potentially need to learn or improve to get your zine into production. Design, editing, writing, printing and marketing: these are just some of the skill sets you’ll use.

Once you create your zine, you can send it to your favorite clients, give it away to leads at events and shows, and, of course, send it as a gift to family and friends. You never know who might end up seeing it.

Publish a photography zine
Blurring the lines between a zine and a book, my first self-published work “Every Summer” is perfect bound.

Creating a zine is also addictive – once you create your first, you’ll no doubt be thinking of your second. So, if you’d like to publish a photography zine, where do you start?

Zine ideas

The concept of most zines or books revolves around an idea. Your zine could be made up of images from a road trip, a wedding, your favorite city, or your neighborhood.

A zine could also show off a photographic style, a personal project, tell a story through images, or be a showcase of your best work. It can also be a combination of all of those things or none of them – it’s up to you.

My first zine is a collection of images that I took on the Isle of Wight in England. When I reviewed the images in the weeks after my holiday, I felt there was a certain magic to them, so I decided to put together a zine.

It’s also becoming increasingly common for photographers to collaborate on zines together, typically with the same subject or style in mind.

Choose your images

Choosing and editing your images is a process in itself.

It’s not necessarily about choosing all the best images but choosing images that work well together and continue a narrative throughout your publication. For example, there were some images that I loved from the Isle of Wight, but there didn’t seem to be a point in the zine where it made sense to include them, so I left them out in favor of other images.

Publish a photography zine
The first 20 pages of my zine Every Summer in a contact sheet view. Choose images that work well together and continue a narrative. Also, note the double-page spread on pages 6-7.

Some people find it beneficial to print out small copies of their images and arrange them on the floor to work out an image order. I tried this approach, but I found that it just left me with a stack of paper to put in the recycling bin. I found it easier to rate images in Lightroom and then drag them onto pages in InDesign, where I could play around with the layout.

To add text or not to add text?

There are two schools of thought around adding words to a photo zine or book. The first is that the photos should do the talking and everything else is a distraction. The second is that well-thought-out text adds context to the images and makes it a more rewarding experience for the reader.

Generally, I fall into the latter school of thought.

I decided to add passages of text to my zine for one simple reason – I wanted to introduce locations by recounting anecdotes from when I visited these places on the Isle of Wight. These passages detailed what attracted me to photograph those locations.

Every Summer film photography zine by Matt Murray
Adding text throughout my zine gave me the opportunity to provide context to the locations I photographed on the Isle of Wight.

Either way, it’s commonplace to write an introduction at the start of your zine or book. This should introduce yourself to the reader and explain your motivation behind producing the zine and your relationship to the images.

For example, in my photography zine Every Summer, I reflected on my relationship with England, my home for over a decade, and how travel photography has influenced the style of images I take. In my introduction, I also added my contact details so readers could send me feedback about the zine.

Zine design

The design of your zine can be as simple or as complex as you like. Some online publishing companies have their own software that makes it as easy as possible for you to choose a layout, drag and drop photos, and add some text.

With other zine publishers, you can create your own design in software programs like Adobe InDesign and then upload them as a PDF for printing. Always make sure you read and understand the instructions your printer gives you about document set-up and exporting your publication – especially with regards to the quality of your images, color space, page bleed, and margins.

Of course, you can also work with the book module in Lightroom too.

Publish a photography zine
Many pages in my zine follow a standard layout. This is broken up by double-page spreads and full-page photos throughout the zine.

Creating your zine in InDesign also gives you the flexibility to produce an electronic PDF version of your zine to distribute to people. You can also do that with the first option, but some online publishing companies charge an extra fee to download a PDF copy of your work. You can also create a PDF version in the Lightroom Book Module too.

Whichever road you go down, remember that simplicity is often at the heart of good design. Try and stick to a standard way of displaying your photos throughout the book, with the occasional breakout from that design for a double-page spread or full-page photograph.

Simplicity should also be front of mind when working out your choice of font. Don’t choose too many fonts to work with and always make sure they’re easy to read. For my photography zine Every Summer, I chose two fonts.

Publish a photography zine
Part of the introduction to my first photography zine. I explained who I was, my motivations for putting the zine together, and my relationship to the subject matter.

For headings, I chose a retro font that captured the spirit of the 1970s. This matched the subject matter of some of my images such as the retro ice-cream van and the seaside pier at Sandown. For body text, I used a typewriter-style font that is easy to read, and also conveys some of that retro charm.

Print vs screen

Looking at images on a screen is not the same as looking at images in print. Digital images are usually in the RGB color space, which has a wider color gamut than the CMYK color space used for printing. Our screens are also back-lit, so often digital images look brighter and more saturated than images exported for print.

At some stage, your publication will be converted to the CMYK format. Some online publishers do this process automatically for you, but if you are uploading a PDF to a printer, they will typically ask you to supply a PDF in the CMYK color space. Always check with your printer on the exact settings to use.

Seeing your images in the CMYK color space for the first time can be a bit of a shock: it has a narrower gamut than RGB, which means that not all colors from the RGB color space can be displayed when printed. This means some colors may look slightly different in the printed version. For example, the vivid blues, yellows, and oranges of the ice-cream van on the front of my zine are not quite that vivid in the print version, but they’re close.

Publish a photography zine
Laying out images and text for my zine in Adobe InDesign. A lot of people shy away from InDesign, but it really isn’t difficult to pick up, especially if you’re familiar with Adobe Photoshop.

Zine format and size

When you publish a photography zine, you will also need to decide on the dimensions of your zine and how many pages it will have. Remember, the more pages your zine has, the more expensive it will be to produce and potentially ship to customers.

For my first zine, I chose a square 210mm by 210mm format (just over 8 inches). I’d seen a friend’s zine using the same dimensions and it felt like a good size to me. Square pages also have an advantage: they suit portrait-orientation images, landscape-orientation images, and square images.

Another consideration is the type and weight of paper you want your zine printed on. There is usually a range of types including satin, gloss, uncoated, and even recycled. Many publishers will send you a sample of their papers for free. This sample pack will also help you decide on the weight (thickness) of different paper stocks.

Publish a photography zine
Many online printers offer a wide range of choices for your publication.

Final review

When you’ve finished your layout and have a zine ready to publish, check everything as many times as you can. After you’ve completed your checks, ask a trusted friend to do the same. I made one small error with my zine and it still annoys me. As it turns out, a couple of people I sold my zine to didn’t even notice it.

If you’ve never printed anything before, you can also get in contact with your printer to ask for their advice on your publication. For example, you could ask them if the images are good enough quality to print, if the layout will work, if you’ve done the page bleed and margins correctly, and if you exported your PDF in the correct color space.

When you’re satisfied that everything is correct, it’s time to print.

If you’re a little nervous about the final product, order the smallest quantity that is financially practical. This will give you the opportunity to check you’re happy with everything before another print run.

After that, it’s time to show your zine to the world! I’ve sold my zine via my website to friends, family, listeners of my podcast, and others in the photography community. For the launch, I even had some art print postcards created featuring three images from the zine as a bonus for my customers.

Every Summer film photography zine by Matt Murray
Exporting my zine from Adobe InDesign. Find out what settings you should be using from your printer for the best results.

Conclusion

I hope this article has been helpful for those wishing to publish a photography zine. Self-publishing can be a lot of work, but ultimately, it’s a very rewarding process. There are so many skills related to photography that you can learn and improve, adding to the creative challenge.

Seeing your images in print for the first time in a publication that you’ve created is very special. I’ve learned so much creating my first photography zine and plan to create another in the coming months.

Whether it’s just for fun, a creative challenge, or to promote your business, learning how to publish a photography zine is a fantastic way to get your images in front of other people and reach a wider audience.

If you have any questions about the zine-making process, please let me know in the comments below.

The post How to Publish a Photography Zine to Promote Your Photography appeared first on Digital Photography School. It was authored by Matt Murray.


Digital Photography School

 
Comments Off on How to Publish a Photography Zine to Promote Your Photography

Posted in Photography


Huawei caught using DSLR images to promote smartphone cameras (again)

21 Apr

Huawei has once again been caught using an image captured with a DSLR to promote its mobile cameras. This issue was discovered on Chinese social media website Weibo, where Huawei published a video that contained multiple images allegedly snapped using its smartphones. According to the South China Morning Post, some of the images were traced back to a 500px user.

The issue was first spotted by photographer Huapeng Zhao, who recognized some of the images and traced them back to a 500px user named Su Tie. Rather than having been captured with a Huawei smartphone as the company’s promotional video claimed, Su Tie’s 500px account indicates the images were captured with a Nikon D850.

In a post on the matter published on Weibo, Huawei said that a ‘negligent editor’ had ‘incorrectly marked that [the DSLR images] were taken with a Huawei smartphone.’ The company thanked Huapeng for spotting the issue and apologized to the community. An updated version of the video without the DSLR images has been posted on Weibo.

This is not, however, the first time Huawei has been caught passing DSLR content off as images captured with its mobile phones.

In early 2019, for example, Huawei used stock images of a volcano captured with a DSLR to promote the zoom lens capabilities of its P30 Pro smartphone. Before that in 2018, the company was caught using an image captured with a DSLR to promote its Nova 3 smartphone. Sadly, this practice isn’t limited to Huawei — Samsung has also been caught passing off DSLR images as mobile images.

In 2018, Samsung Malaysia was caught using an image captured with a DSLR on the website for its Galaxy A8 Star handset, failing to state on the page that the image was not captured using its mobile camera and software. Before that, Samsung Brazil was caught using selfies captured with a DSLR to promote its Galaxy A8 model.

At this point in time, it’s unclear whether Huawei had received permission from Su Tie to use the images in its promotional video. The discovery highlights the importance of taking manufacturer promotional images with a grain of salt, particularly ones that look too good to be true. Though mobile camera technology, including both hardware and software, have improved considerably over recent years, they’re still no match for expensive professional camera systems.

Articles: Digital Photography Review (dpreview.com)

 
Comments Off on Huawei caught using DSLR images to promote smartphone cameras (again)

Posted in Uncategorized


4 Marketing Mistakes – How NOT to Promote Your Photography Business

01 Apr

You can market your photography business in hundreds of different ways — some incredible effective, and some a total waste of your time. Here are four marketing mistakes or wrong ways to promote your photography business and what you should be doing instead.

How To Market Your Photography Business1

Mistake #1 – You’re Too “Professional”

By no means does this mean you should act or present yourself unprofessionally in your photography business — but often we hide behind a front of professionalism. If being a professional means a headshot on your website holding your camera (or no headshot at all) and a story about how you love love, and love photographing weddings, it’s unremarkable. Every other photographer does and believes those things.

Through trying to be perceived as a professional, you’ve becoming boring! Yes, you need to conduct your business professionally – but add some zest to your brand. What makes you unique as a human, and therefore, a photographer?

What 5-10 things could you talk about all day? Which things make you excited? What 5-10 things do you dislike? What are 5-10 ways you could describe your personality and your images?

4 Marketing Mistakes - How NOT to Promote Your Photography Business

Brainstorm the list of you! Get clear on your interests, personality, photography style, brand, and voice and consistently communicate this uniqueness to your clients.

It’s simple to do a brand audit of your website, blog, and social media accounts. Within 30 seconds, would a new client know what makes you different? What facts will they remember? This is the key to non-boring, but still professional marketing.

4 Marketing Mistakes - How NOT to Promote Your Photography Business

Mistake #2 – You’re Advertising Without Intention

In the name of honesty, I have never paid to advertise my photography business. But I’m not against advertising in magazines, wedding shows, or placing Facebook ads. However, advertising without intention is a big marketing mistake many photographers make.

Before you pay hundreds or thousands of dollars for an ad, ask yourself this question, “Is my ideal client hanging out here?”

4 Marketing Mistakes - How NOT to Promote Your Photography Business

If you’re not clear on who your ideal client is, that will be the first step! Think back to some of your favorite clients and scribble a list of describing words about their personalities, wedding day, and photos. After you’ve reviewed at least 10 of your past couples, circle any common themes that occur.

4 Marketing Mistakes - How NOT to Promote Your Photography Business

Testimonials are a gold mine for sketching out your ideal client. If you don’t have one already, start a document with feedback from your clients and look for themes. What are clients most excited about after working with you? A few more details to include in your client profile include their age, location, career, income bracket, and hobbies.

Once you get clear on who your ideal client is, then you can filter every advertising opportunity through your client profile. Would your ideal client be looking for a wedding photographer in that magazine, at the bridal show, through Facebook ads? If so, wonderful but if not, perhaps your marketing efforts and dollars are best spent elsewhere.

4 Marketing Mistakes - How NOT to Promote Your Photography Business

Mistake #3 – You’re EVERYWHERE on Social Media

You have a limited amount of time to market your photography business, and you have to make your moments count. Before you get involved on Google Plus, Pinterest, Facebook, Twitter, YouTube, Tumblr, Instagram, etc. – pause.

Is your ideal client finding their wedding photographer on that platform? If you’re not sure — a good place to start would be surveying your past clients and asking “Where did you find me?”

4 Marketing Mistakes - How NOT to Promote Your Photography Business

Chances are that a few social media platforms (2-3 maximum) are bringing in most of your inquiries. The other platforms are a waste of your time. For photographers, I have found Instagram and Facebook to be front-runners, perhaps with Pinterest as a third. But you’ll have to investigate the stats for your business.

Once you’ve narrowed down the platforms you want to pursue, let go of the ones that aren’t working! On your chosen platforms, engage consistently with a mix of personal and business posts – sharing your face regularly, sharing work you love and calling prospective clients to action.

4 Marketing Mistakes - How NOT to Promote Your Photography Business

Mistake #4 – You’re Sending Cold Emails

One of the best ways to market your photography business is building a strong network within your own industry. By this, I mean connecting with other photographers as well as wedding vendors and venues. However, sending cold impersonal emails is the wrong way to market your business.

If you want to send emails that not only get read but receive a reply back, make sure you do your research. Before you send an email, follow their accounts on social media, leave comments on their blog — so do that at least a week in advance of emailing. When you email, keep it short and to the point. Genuinely compliment their work. Share who you are, what you want and how you can help that person achieve their business goals.

4 Marketing Mistakes - How NOT to Promote Your Photography Business

Practically, this may mean helping a vendor by providing free headshots of their staff, photos of their storefront, or offering to help them improve their website or blog one afternoon. Most industry leaders want to help, they were new once as well – but not at a disadvantage to their own time.

If you want to connect with a fellow photographer, asking them for coffee for “tips” is a terrible way to get an email response. Instead, focus on relationship building, helping them in their business, sending a gift in the mail and asking to take them out to their favorite lunch spot. I guarantee your “cold emailing” success rate will increase if you follow these tips

Conclusion

What other mistakes have you make marketing your photography business, or seen others make? Please share your ideas in the comments below.

All the best to you as you work to market your photography business!

The post 4 Marketing Mistakes – How NOT to Promote Your Photography Business appeared first on Digital Photography School.


Digital Photography School

 
Comments Off on 4 Marketing Mistakes – How NOT to Promote Your Photography Business

Posted in Photography


Diversify Photo launches database of photographers of color to promote diversity

21 Sep

Diversify Photo wants to promote greater ethnic inclusion in the world of photography, and they’re taking concrete steps. Step one: Diversify has just established a database of ‘photographers of color’ that will make it easier for art buyers, creative directors and editors to find photographers from a wide range of cultural backgrounds to hire.

The point of the database, says Diversify Photo, is to, “break with the narrow lens through which history… has been recorded” by equipping those who commission photography with “the resources to discover photographers of color available for assignments.”

The groups says that calling for greater diversity in the media has proved not to be enough, so it took action by creating this online database. The website features a gallery of images taken by individual photographers, and clicking on any of those pictures takes users to the photographer’s website. The site also offers an email service that explains the self-identified ethnicity of its photographers, along with their areas of expertise and languages spoken.

The site was set up by Brent Lewis, a senior editor at ESPN’s The Undefeated, and independent photo editor Andrea Wise. In an interview Brent told Photo District News that the database was created to show photography buyers, “that there are a lot of talented people out there that they may not see, have the time to go looking for, or just don’t know where to begin to find.”

At the moment there are 340 photographers registered on the site covering a wide range of photographic genres. For more information, and to see their work, visit Diversify.Photo.

Articles: Digital Photography Review (dpreview.com)

 
Comments Off on Diversify Photo launches database of photographers of color to promote diversity

Posted in Uncategorized


5 Ways to Promote Your Photography Business

25 Aug

You worked really hard to learn the skills that you need to be a fantastic photographer and you worked even harder to build your business. But, for your business to succeed long-term, you need to have a solid marketing plan in place. Courtesy of Pixabay.com Check out the five tips below for effectively marketing your photography company to the masses. Continue Reading

The post 5 Ways to Promote Your Photography Business appeared first on Photodoto.


Photodoto

 
Comments Off on 5 Ways to Promote Your Photography Business

Posted in Photography


7 Ways Custom Photo Backdrops Can Promote Your Business

13 Apr

How could you photograph a love story in Paris having less than $ 50 at your disposal? Or make local moms stand in line at your photo studio without running an expensive marketing campaign? That’s totally possible if you pay attention to one single element of your studio setup – background. Read on to find out how other photographers are successfully Continue Reading

The post 7 Ways Custom Photo Backdrops Can Promote Your Business appeared first on Photodoto.


Photodoto

 
Comments Off on 7 Ways Custom Photo Backdrops Can Promote Your Business

Posted in Photography


12 Steps to Successly Promote your Photography on Instagram

19 May

If you’re reading this and are interested in digital photography, chances are you’re a user of Instagram, the current goliath of social media in photography. Instagram has become home to over 300 million users in the four years it’s been around, and it seems ready to only get bigger.

post 1 image

300 million is a big, big number. It can seem overwhelming, but it’s a great tool to not only create community, but also to become a better photographer. So how do you create a presence for yourself in all that noise? There are a lot of websites claiming to offer you the fastest way to Instagram success, but most of them offer terrible advice that will get you nowhere. Here are a number of strategies to get better exposure for your photography, build a community, and grow as a photographer through Instagram.

1) Great artists only show great work

The difference between a good artist and a great artist is that great artists only show great work. While nobody is expecting you to rival National Geographic photographers right off the bat, you should pay close attention to what you’re sharing. It only takes one uninteresting photo to for people to lose interest in your work. If a photo doesn’t make you say “OH yeah!” when you see it, don’t post it.

Also, don’t post too often. Unless you have a really good reason for spamming my feed, don’t. I recommend sharing one or two images a week, which is a safe number to keep people interested without getting annoying.

2) Find your niche.

This is as important to your growth as a photographer, as it is in defining your brand: what makes you different from everyone else? The amazing thing with Instagram is that it is composed of people from across the world who each have something in which they’re interested. I’ve seen fantastic accounts focused just on street food in Vietnam, rock climbing in Utah, or architecture in Turkey. What the best accounts have in common is a focus around a central theme that captures their audience’s attention and keeps it.

point 2 image

Exploring the ancient #forests of Vancouver island, @kaitross and I found that even these giants succumb to time and the winds. Afterlife for these trees means giving life to a new world of creatures, from insects and animals to moss and a new generation of trees. When time calls, what will you leave behind? What will I? Will it be enough?

Don’t forget: the only person who should define your niche is you. Do you love paper maché and dinosaurs? Then become the best photographer in the world working on seaside portraits of paper maché Velociraptors. For me, I love to travel and explore nature, so my account reflects that, and only that. You will not find photos of my food, my dog, or my nieces. If you want to share snapshots from your daily life, get a private account for your friends and your mother to follow, because they’re the only ones who (might) want to see that stuff.

3) Use a real camera.

Yes, your shiny new smartphone may take gorgeous snapshots, but relying on it is like trying to perform a piano recital on a kid’s electronic keyboard. Not only does using a dSRL (or a serious mirrorless) give you far more choices of focal length to play with, your opportunities for manipulating depth of field will result in way better photographs than anything coming out of your smartphone. As if that’s not enough, using a dSLR will let you shoot in RAW, allowing you to make those photos really pop in the editing process.

Point 3 image

Turning off the Yellowhead Highway and heading north to Alaska, you’ll quickly find yourself in Kitwanga, traditional lands of the Gitksan and Wetsuwet’en peoples. The massive Skeena River nearby has nurtured civilization and trade routes for over 7,000 years and today is a beloved fishing ground for all people. I stopped in this small reserve community early one morning when there was more dark than light, and a fresh snowfall cast a tranquility over the village.

4) Take the editing process seriously.

Instagram may lend itself to a snap-and-post style of photography, but producing excellent photographs doesn’t. Great photographs aren’t taken – they’re created. This means working in your favourite image editing program (I recommend Adobe Lightroom) to learn how to manipulate light, shadows, and clarity until your final product is something to be proud of. The Instagram app just isn’t built for this level of sophistication, so ditch all those cheesy filters and effects and do your work on the computer.

Point 4 image

Think your Monday is challenging? These porters in Huangshan, China haul 150-200lbs of materials up 2500m vertically each day, supplying the tourism infrastructure of this popular destination with daily necessities like food, toiletries, and building materials. While there is a gondola for tourists to ascend and descend the mountain, this is the raw manpower that runs Huangshan.

5) Share a story with your photo.

Great photography leaves an impression. So do well-written stories. But when you combine strong images with powerful words, you’ll evoke an emotional response in your viewer, and lead them to make a personal connection to your work. It wasn’t until I realized this and started sharing the story behind my photos that my account started getting real interaction – people speaking about how the image or words affected them, their own experiences, and their appreciation for it. Nobody expects the next Hemingway to come out of Instagram, but some carefully-chosen words in a thought-provoking caption will do wonders for connecting you to your fans.

Point 5 image

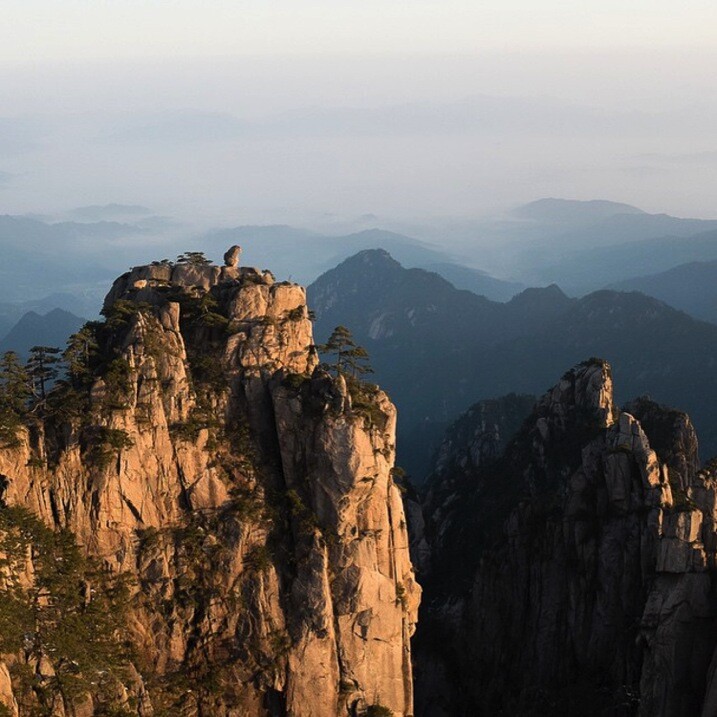
After the frenzied atmosphere of Shanghai’s urban jungle, the fresh air of Huangshan’s Yellow Mountains was exhilarating. Still in the low-season, March snow clung to the boughs of trees while distant clouds made it feel like the horizon could go forever. One of China’s better-developed tourist attractions, Huangshan has a long history: first recognized in 747 AD, it was said to be the place from which the Yellow Emperor ascended to heaven. This year, over 1.5 million visitors (mostly Chinese) will wander its paths. I caught it on a quiet day, and these peaceful memories linger with me still.

6) Ask questions in your captions!

The difference between a story and a caption is that a story builds an emotional connection between the viewer and the image; a question builds a personal connection between your viewer and you. Your questions should be open-ended and create a space for your fans to contribute some of their own story to the community. Never forget, many Instagram users are new to digital photography and are looking for people to connect with, and this gives them the opportunity.

Point 6 image

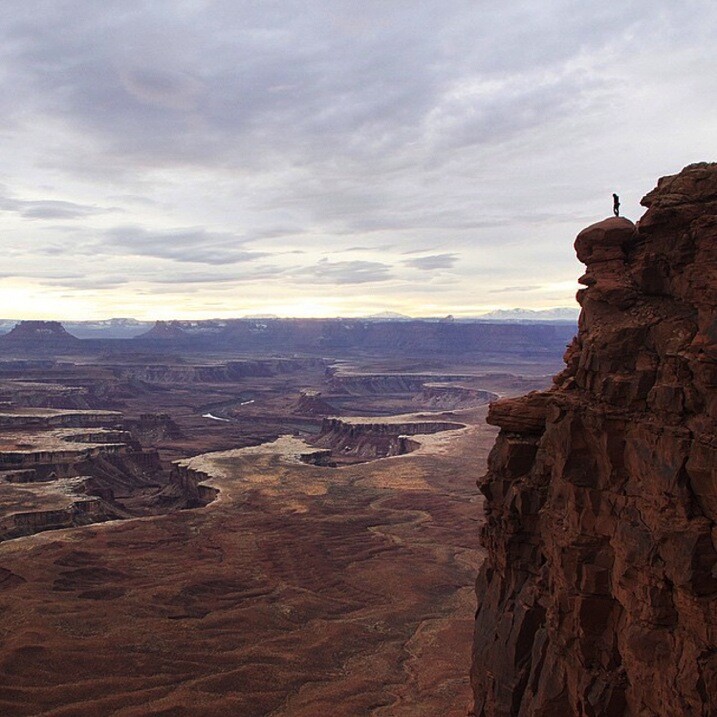
“I mean… All I really need is a pair of wings. Anyone else get the insatiable urge to jump when they get to the edge of something really high? I tried it once when I was little after watching Mary Poppins off the second story of a building with an umbrella.” – Image and caption by @minayounglee

7) Use hashtags effectively.

I never understood the value of effective hashtagging until I started using them interwoven in my posts. You should be hashtagging important nouns and verbs – stuff people will be searching for. The effectiveness of using #fishing compared to #instagood is huge for obvious reasons: people who might be interested in your photo are much more likely to be searching for their favourite hobby or location than some meaningless term.

point 7 image

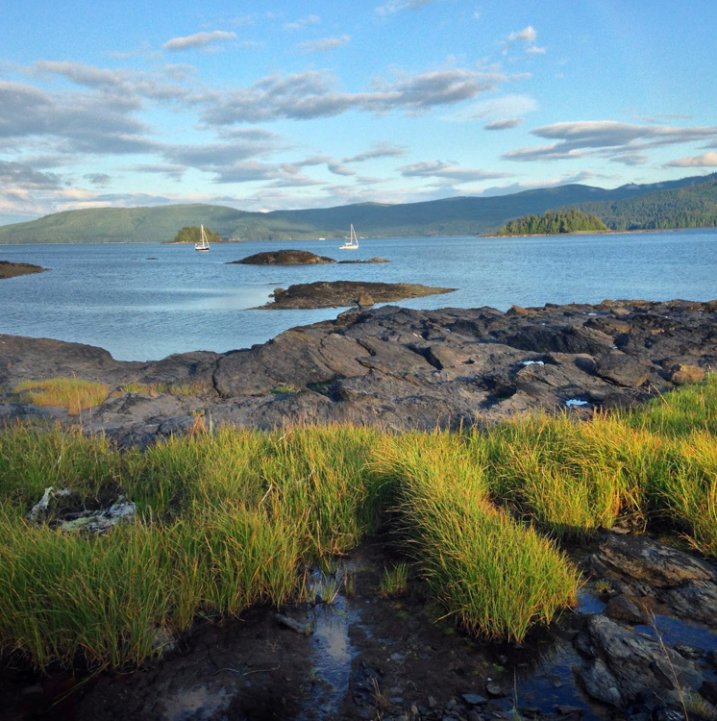
The seed from which the Haida Nation sprang, Haida Gwaii now works to redefine itself from a timber economy into an eco-tourism powerhouse. For an outstanding introduction to the history of these islands known as Canada’s Galapagos, pick up Vaillant’s “The Golden Spruce”. I’ll be exploring the rugged coasts and remote, old growth forests of these islands for the next ten days.

Speaking of hashtagging, do a bit of digging around to see what effective hashtags you might be missing. It wasn’t until I came across the hashtag #explorebc that I began connecting with a ton of great local photographers who eventually featured my work on their account, resulting in a huge boost of exposure for my work.

8) Wake up and post.

Mornings are when most Instagram users login and check their feed, so cater to this. I live on the west coast, so I know I’m already posting late for my east coast followers when I share a photo at 8 a.m. Aim to get your posts out early in the day for whatever time zone you’re targeting (if your followers are worldwide, this is less useful).

Is there a best day of the week to post? Studies are showing that Sundays have the greatest number of interactions, which makes sense given that many of you are trying to crawl out of your hangovers through long hours of cuddling with your phones. Otherwise, stick to weekday mornings.

9) Build a community

Build a community by actively finding photographers you respect and developing relationships with them. I won’t lie – this is a long process, but it’s necessary and worthwhile. Find a hashtag that speaks to you and your work, then check in with it whenever you can to see who’s posting what. When you find work you like, leave a thoughtful compliment and follow them. Chances are, they’ll check out your account and will reciprocate if they like what you’re posting. Whatever you do, don’t ask people to check out your account or follow you back. It’s tacky and makes you look desperate.

point 9 image

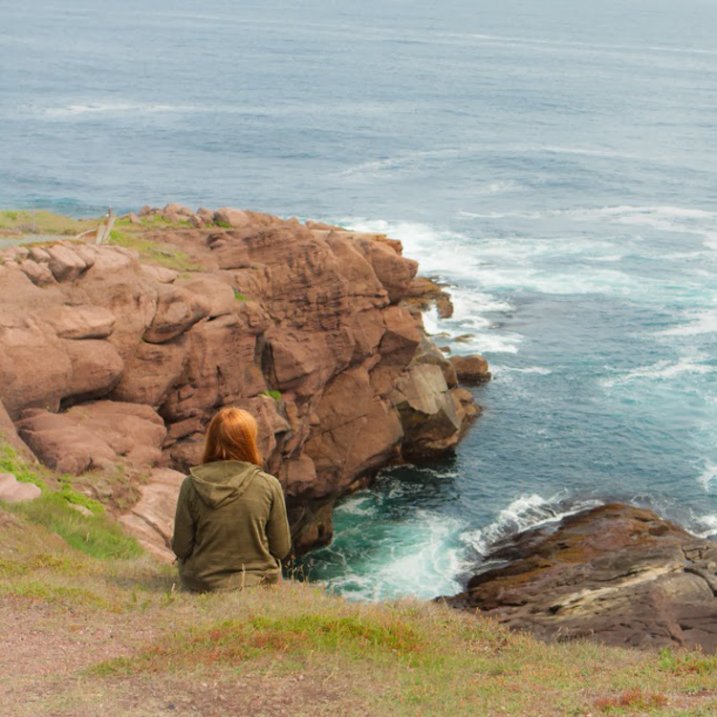
We all know where the roads we walk take us, but do we pause to realize how with the journey we are changed? This is why I love travelling by land… it gives me time to sit and meditate on how the things I’ve done, the people I’ve loved and who have loved me, the hurts I’ve caused and have been caused to me, all of which paint a complex life. At the end of each journey remains one lesson that can always be learned better: to #love with an open and humble heart and to let go of whatever pain has tied one to memories that belong in the past. After days of planes, ferries, hikes, and hitchhiking with the finest people of Newfoundland, @maggiewhoa and I sat at the edge of the Atlantic Ocean and breathed in the salty breeze that was so hard-won.

10) Cultivate champions

Cultivate champions by fostering relationships with other users. Easier said than done, right? If users are leaving you thoughtful comments (as opposed to the ubiquitous thumbs-up nonsense), return the favour and respond with something more meaningful than “thanks!” If someone cares enough about your work to awkwardly type out praise on their smartphone, they’re worth their weight in followers. These are the people who are going to follow along through your adventures and refer their friends and followers, which really is one of the goals of this social network. Do enough of this, and these delightful unicorns will be out there promoting your work for you.

11) Bring other into the conversation

Bring others into the conversation by shooting with them or referencing them in your posts. Two amazing girls from Vancouver kicked off @localwanderer a year ago, in which they travel around North America visiting the hidden gems in communities. Where they really excel (besides their photography and writing skills) is in their ability to constantly bring local shops, restaurants, and people into the discussion. By doing this, they introduce their community to someone new, who in turn will introduce their community to @localwanderer.

Point 11 image

“Hellloooo, San Diego! We are soooo happy to be back in the sunshine state as we make our way around the California coast. Our first stop was the @moderntimesbeer tasting room (a.k.a. the “flavordome”) which combines two of our favourite things: coffee + beer! Also, be sure to check out their wall mural made out of floppy disks!” – Image and quote by @localwanderer

Hellloooo, San Diego! We are soooo happy to be back in the sunshine state as we make our way around the California coast. Our first stop was the @moderntimesbeer tasting room (a.k.a. the “flavordome”) which combines two of our favourite things: coffee + beer! Also, be sure to check out their wall mural made out of floppy disks!

12) Don’t confuse followers with community

I’d rather have 100 fans who interact with my work than 1,000 followers who couldn’t be bothered. Your goal should never be the quantity of followers, but the quality of your community. Speaking of numbers, you’ll find a random assortment of Russian princesses begging for you to come cuddle with them – report them and block them if they add you. The last thing you need is a bunch of zombie accounts clogging up your Instagram. Also, one danger of having lots of inactive followers is that your account is less likely to be recommended to other users of Instagram.

There you have it – the 12 steps to success with Instagram. What are yours? Let’s hear them in the comments section.

See Robin’s Instagram account for more of his images and examples of putting these tips into practice.


googletag.cmd.push(function() {
tablet_slots.push( googletag.defineSlot( “/1005424/_dPSv4_tab-all-article-bottom_(300×250)”, [300, 250], “pb-ad-78623” ).addService( googletag.pubads() ) ); } );

googletag.cmd.push(function() {
mobile_slots.push( googletag.defineSlot( “/1005424/_dPSv4_mob-all-article-bottom_(300×250)”, [300, 250], “pb-ad-78158” ).addService( googletag.pubads() ) ); } );

The post 12 Steps to Successly Promote your Photography on Instagram by Robin Ryan appeared first on Digital Photography School.


Digital Photography School

 
Comments Off on 12 Steps to Successly Promote your Photography on Instagram

Posted in Photography


Promote Control extends support to Pentax 645Z

14 Jan

Thanks to a beta firmware version, Promote Control adds support for the Pentax 645Z. The remote shutter control connects to compatible cameras via USB and offers a variety of shooting features including HDR bracketing of up to 45 images, timelapse and long exposure shooting. Read more

Articles: Digital Photography Review (dpreview.com)

 
Comments Off on Promote Control extends support to Pentax 645Z

Posted in Uncategorized


Review of The Promote Control for Time Lapse and Focus Stacking

20 Aug

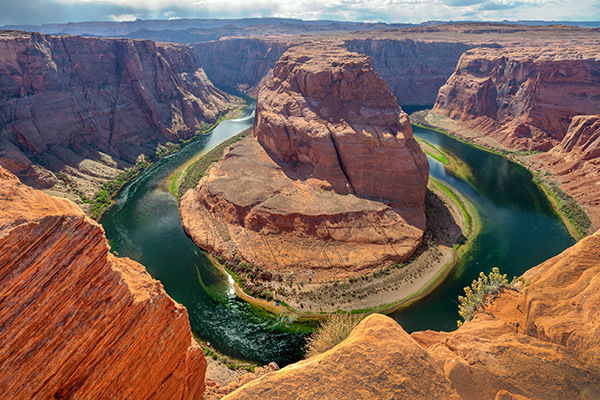
Want to take super sharp “focus stacked” photographs that boast corner to corner sharpness with perfect focus? Want to shoot spectacular ‘holy grail’ time lapse sequences that capture the change from day to night? How about advanced bracketing for HDR shooting? Do you fancy getting shots like this?

Horseshoe Bend Focus Stacked Gavin Hardcastle

The Promote Control from Promote Systems delivers very precise control over DSLR cameras to open up new creative possibilities. Here’s a list of things that the Promote Control can do:

  • Promote Control ReviewHyperfocal Distance Calculator
  • Remote Shutter (One Shot)
  • Time Lapse Intervalometer
  • HDR Bracketing
  • BulB HDR Bracketing
  • Bulb Ramping for Time Lapse
  • Focus Stacking
  • Video Control
  • Manual Shutter for long Bulb Exposures

This device is like a Swiss Army Knife for photographers who want to get the most out of their DSLR cameras. Currently priced at $ 299, it’s an accessory that will appeal to the more hardcore shooters, but for those photographers that regularly need advanced HDR bracketing, focus stacking or bulb ramping, the Promote Control is worth every penny.

Rather than go into every single function of the Promote Control, I’m going to highlight its three most powerful features, which I believe merit the asking price themselves.

Focus Stacking

As a landscape shooter, I mostly want corner to corner sharpness in my images and sometimes I’ll use focus stacking to achieve maximum sharpness throughout the frame. This really only works when your static subjects are perfectly still, with little to no breeze. If you’ve ever tried focus stacking the manual way, you’ll know that there is some margin for error and it can take practice to do it well. The Promote Control takes all the guess work out of focus stacking by incrementally adjusting your focus from start and end points that you specify.

Once you’ve done this a couple of times you’ll never be able to go back to doing it manually. When you see the results of your focus stacked image and the lack of weird looking artifacts that can sometimes result from inaccurate focus adjustments done manually, you’ll be hooked.

Macro and small product photographers will love this feature.

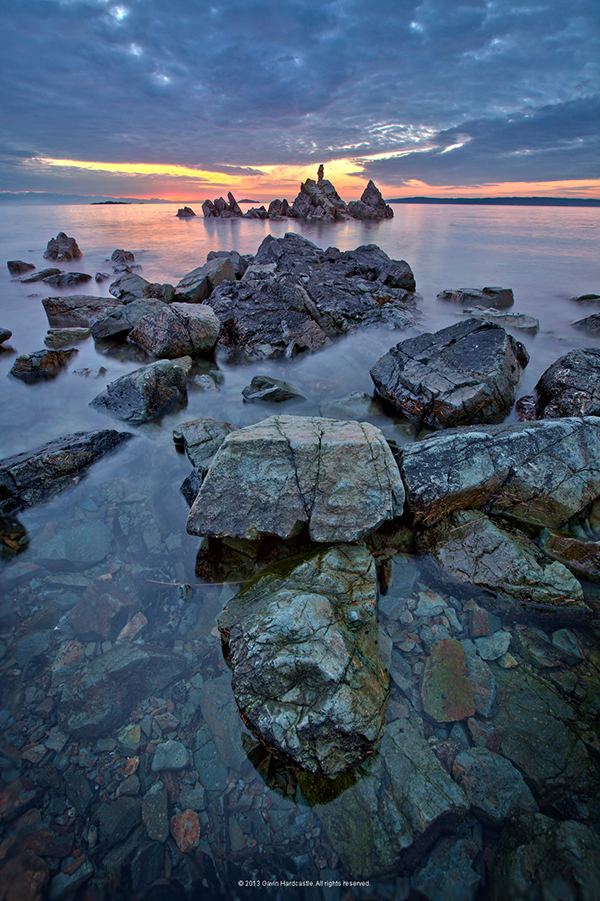
Here’s an example of a focus stacked shot with corner to corner focus using a mid range aperture.

Focus Stacking with the Promote Control

Here’s a video demonstrating how this works with the Promote Control.

Bulb Ramping for day to night Time Lapse

If you’ve ever tried to shoot a time lapse sequence of the setting sun, you’ll know that there are only two ways to capture the correct exposures as the light changes. You either adjust the shutter speed manually while shooting (which introduces terrible flicker) or you use a bulb ramping device that can gradually and smoothly alter your shutter speed over time.

This technique is known as Bulb Ramping, and there really aren’t that many devices out there that do a good job. The Promote Control has become something of a “go to” bulb ramping solution for quite some time now, because it simply does such an excellent job of adjusting your DSLR camera’s shutter speed in tiny increments, over a set period of time. You tell the Promote Control how long you’d like to shoot, and when you’d like it to begin increasing or decreasing the exposure time.

Of course, it can’t know exactly when the changes in light occur, you have to know in advance by casing your location the night before, and making a note of the sunset time. The Promote  Control simply does what you tell it to do, and it does it well. Here’s a video of Joel Schat explaining how to achieve bulb ramping with the Promote Control.

HDR Bracketing

If three or five bracketed exposures simply aren’t enough to capture the dynamic range of your scene, how does 45 exposures sound? Simply tell the Promote Control what shutter speed to use for the middle (or correct) exposure, then tell it how many EV steps to use and the number of total exposures. The Promote Control will do the grunt work while you look around for the next shot.

A jack of all trades

Everything that the Promote Control does, it does well. I expect that most users will only use two to three of this device’s powerful features but at $ 299 it’s worth every penny.

Build quality

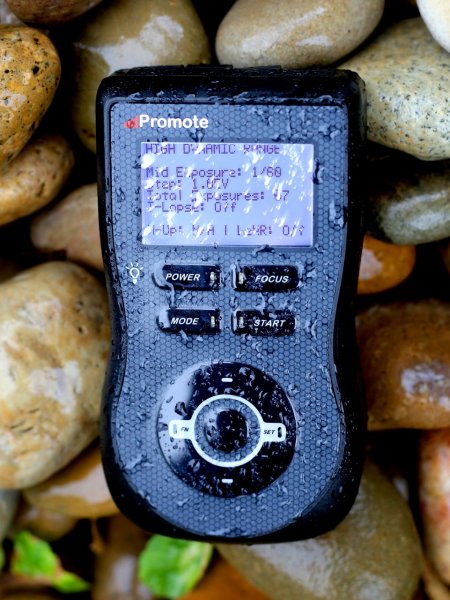
weather sealed promote control

The Promote Control is very well built. It’s a solid little unit that’s about the same size as a Smartphone, but is just under an inch thick. The backlit LCD screen is easy to read and there are only eight buttons on the entire unit. It’s small enough to pack into any mid-sized camera bag, and comes with a tidy little carry case. It even comes with a lifetime warranty for manufacturing and workmanship defects. How often do you see that?

The device is powered by two AA batteries which last a long time. You can also power the Promote Control with an external DC power jack for taking super long exposures, or lengthy time lapse shoots.

What I’d like to see in the next update

To me, there is one glaringly obvious function that is missing from this device. HDR Focus Stacking. Why not combine the advanced HDR bracketing feature and the focus stacking feature? When I focus stack manually, I often have to bracket in order to capture the dynamic range. I can’t imagine why this feature is not available with this device.

My only two complaints

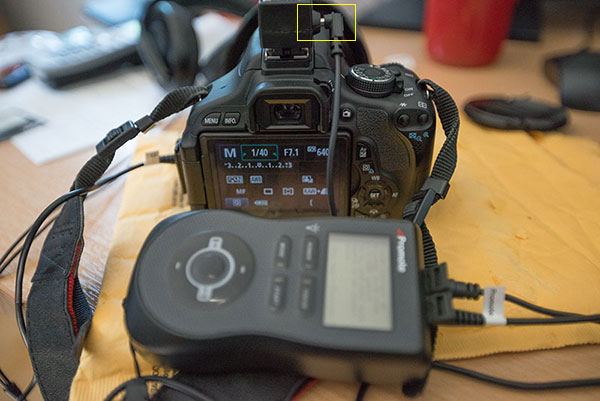
The Promote Control is such a simple little device that there’s not much to complain about, it either works or it doesn’t. My only gripe isn’t with the unit itself, but with the hotshoe attachment, required for bulb ramping when shooting time lapse sequences. I found that the cable fell out of the hotshoe attachment at the slightest nudge, not something I would trust out in the field when shooting a lengthy time lapse.

Hot Shoe Cable

I had problems with the cable that attaches to the hotshoe accessory.

My other complaint is that the Promote Control is not compatible with mirrorless cameras like my Sony A7R. Full compatibility only extends to Nikon and Canon, with limited compatibility for Sony and Sigma cameras. This is the only reason I decided not to buy the Promote Control. But if Promote Systems manages to catch up with the mirrorless movement, I’ll be unleashing the credit card.

I asked Promote Systems about it and this was their response:

We get a lot of requests for compatibility with the A7/A7R and we would love to support the cameras, but unfortunately Sony doesn’t make that possible. They implemented a tethering protocol on A7 cameras, but just as with earlier cameras, it refuses to save images on the card – you MUST pick them up and save them elsewhere, or all subsequent USB image acquisition commands will fail. Until Sony resolves the issues with not saving images on to the in-camera card when tethered, we can’t do much about it, unfortunately.

Why can’t my camera do all this?

When you look at what the Promote Control does and the results that it achieves, there’s obviously a demand for this level of functionality. There’s no reason why digital cameras can’t have all of this functionality built in, and with cameras like the Sony A7R able to run Apps that users install, it’s only a matter of time until all of this can be done in camera. Until then, Promote Systems are filling a gap in the market and they are doing it very well. I’m going to award the Promote Control 4 stars.

Would you buy this clever little device?

The post Review of The Promote Control for Time Lapse and Focus Stacking by Gavin Hardcastle appeared first on Digital Photography School.


Digital Photography School

 
Comments Off on Review of The Promote Control for Time Lapse and Focus Stacking

Posted in Photography