RSS
 

Posts Tagged ‘Practical’

Practical Color Management – How to Set Up Your Printer to Match Your Monitor

27 Sep

The post Practical Color Management – How to Set Up Your Printer to Match Your Monitor appeared first on Digital Photography School. It was authored by Herb Paynter.

practical-color-management

Matching the color you captured with your camera and edited on your computer screen can be a very serious challenge to reproduce on paper. The various technologies involved in the processes differ significantly from one another.

If you’ve ever encountered problems matching the color of your printed pictures to the color you see on your computer screen, there’s a pretty good reason why. Color is not as simple to define as that box of Crayons you played with as a child. Practical color management can be very complex.

Image: Caption: Dealing with color was a whole lot simpler when you were a kid; a box of Crayola cra...

Caption: Dealing with color was a whole lot simpler when you were a kid; a box of Crayola crayons had all the answers. Life got a bit more complicated when digital color came along. Now you really have to think.


Reproducing color

Reproducing color is a complicated issue to deal with, especially when it comes to transferring pixels to paper. Color is very subjective, and matching the results from one system to another can produce some very different looks. The term “color print” can mean many different things, depending on the type of printing technology you’re dealing with. Just because the image on your screen looks great doesn’t mean that what comes out of your printer will faithfully reproduce that same appearance.

practical-color-management

Large format, inkjet, and offset printing are just two of the color reproduction processes.


There are dozens of unique color printing machines and technologies on the market today, and most are inkjets, though occasionally we print pictures on color lasers, dye sublimation printers and several other types of printing devices. This means that four completely different technologies are trying to produce four different translations of a single color image and trying to make them all look the same.

And that’s just the beginning of the challenges because even different models of each of these printers (even from the same manufacturer) will produce slightly different results.

practical-color-management

Dye-sublimation and color laser printers present two more challenges.


Inks from these different technologies get sprayed, baked, fused and pushed into the (usually paper) substrate, each reproducing color using a completely different method. Some inkjet printers utilize up to twelve different colors of liquid ink, while others print only four colors. Laser printers fuse colored powder onto paper in geometric dot clusters called halftone cells. Dye sublimation printers laminate just three (CMY) colors of dyes from plastic sheets onto a substrate, and printing presses transfer four (CMYK) colors of peanut-butter consistency inks at high speeds and under extreme pressure.

Each of these different technologies attempts to reproduce a similar appearance from the same original color image.

Printing papers open up yet another can of worms to deal with. Each paper stock (let alone other textures and surfaces) come in a variety of shades of “white” and varying surface types that absorb ink and reflect light differently. Some inks are absorbed into the paper surfaces while others sit on top of the paper. These dozens of variables result in hundreds of differing results.

Getting all these color technologies to appear consistent makes the proverbial challenge of “herding of cats” sound easy. Is it any wonder why you’ll see slightly different results from different printers?

Image: Colorants is the word that encompasses all color distribution, including solid and liquid ink...

Colorants is the word that encompasses all color distribution, including solid and liquid inks, dyes, and even toner powders.

Dealing with color has always been a major challenge, even for professionals. The first thing you should realize is that accurately matching color between the various technologies is technically an impossibility. If you think otherwise, you simply haven’t been around long enough! I’m not trying to frighten you with all these variables and problems, but the more you recognize the differences, the more prepared you will be to make them work.

Here’s the good news…there is a very workable solution to all this confusion. Recognizing the underlying issues of each is the first step to reaching a workable solution. Each convoluted challenge requires a relatively simple solution; one that the color science community has provided through a process called color management, or CM.

At the heart of color management is an integral step called “profiling.” Profiling in color science is a very good thing. It simply involves identifying each process’ uniqueness and compensating for that uniqueness.

Here’s how the process works.

Image: The all-encompassing color measurement process that defines how human beings see and identify...

The all-encompassing color measurement process that defines how human beings see and identify colors is known as the Visible Spectrum. It’s defined and monitored by this worldwide organization.


The Reference Standard

The International Commission on Illumination, also known as the CIE (the Commission Internationale d’Eclarage), is a worldwide federation of color scientists, researchers, mathematicians, and lithographers who have developed a systematic approach to addressing color issues. They have researched all the colors that the human eye can actually see and identify. While there are scientific instruments that can see even more colors than the human eye can, the standard for all color perception remains limited to what the average human eye can recognize.

Studies were developed that produced the CIE 1931 XYZ color space, a measured collection of about 7 million colors that are recognized by human beings with 20-20 eyesight. This study established what science calls the Visible Spectrum based on these colors. While there are many more “color frequencies” in the Electromagnetic Spectrum, they are beyond the scope of human eyesight. Human eyesight is based then on the Visible Spectrum.

The CIE has mapped this collection of measured colors as an odd-looking horseshoe chart representing all visible colors. The color industry recognizes this system as the basis for evaluating colors recorded, viewed, and printed on cameras, monitors, and printers. The particular intent of this system is to standardize the output of photographic images on various color printers.

Since every color printing technology produces slightly different color results, this single XYZ collection remains THE reference color space. It serves as the holy grail of color reference. The XYZ space is the central reference for judging and evaluating all printed color.

Here’s how the system works…

practical-color-management

Color correction depends on accuracy. That accuracy depends on the confidence that what you are seeing on your monitor is an accurate depiction of what’s contained in the digital image file. Profiling a monitor is the critical first step.

Monitor profiling

Today’s computer monitors produce quite accurate colors right out of the carton. However, if you want to guarantee that the colors you see on your monitor are exactly the same colors that came out of your camera, you need to take this extra step.

The process is simple. Purchase a puck-like device like the X-Rite i1Studio spectrophotometer. Then hang it in front of your monitor and run the provided software that makes your monitor dance with colors while measuring the strength and hue of the colors flashing on the screen. This light show produces a monitor profile that gets stored on your computer and subsequently adjusts and corrects any errant colors. This allows you to see the whole truth of the color file, no muss, no fuss.

Printer/paper profiling

This next process should be equally painless. Most paper manufacturers provide downloadable profiles they’ve developed for their most popular printing papers and a wide variety of popular printers. Should you have to (or choose to) develop your own printer/paper/ink profile, you can do so using that same X-Rite i1 Studio.

Here’s how you do it…

practical-color-management

The next step in reproducing color accurately, is making certain that the colors seen on the monitor are printed faithfully onto specific printing papers. Each paper surface and color (whiteness) affects the way light is reflected, and the color is perceived.

  1. A test chart of carefully defined color patches (based on this CIE XYZ color space) is printed from the software provided with the i1 Studio. The printed patch values are then measured by the i1 Studio comparing the printed patch values produced by the X-Rite reference chart to the known XYZ values established by the CIE. The difference between these patch values is recorded as a “profile” or evaluation. This profile reveals the color personality of each printer and paper tested, making a note of where the colors don’t match the test file.
  2. In the parts of the color spectrum where the printed color values differ from the reference chart values, minor adjustment instructions are made to either boost or diminish colors to more closely match the reference chart.
  3. This profile is then placed in your computer’s printer profile folder where it can be referenced by your printer every time you print a picture. The result of choosing the correct profile from the list of papers offered by your printer driver should result in a print that closely resembles the colors you see on your screen.

While there is a whole lot more detail involved in this profiling process, this basic explanation should give you a general idea of the procedure.

Every time you change the paper type or change the brand of ink, a unique profile should be developed to ensure the printer achieves the most consistent, repeatable results.

Precision profiling is a time-consuming chore, and most mortals have neither the time nor the access to these specialized devices to ensure absolute accuracy. However, printer and paper manufacturers use even more expensive versions of these spectrophotometer devices to test their products and develop very accurate printer/paper profiles. These profiles are freely available for download from each manufacturer’s site.

Setting up the printer

When it comes time to print your picture, there are certain issues you must address and set correctly in the print driver. There are generally two ways to have the color file prepared for output: either the printer driver or Photoshop will handle the chores. The choice is up to you, though I recommend that you allow Photoshop to do the work.

Image: Each profiled paper/ink/printer combination manage the way inks (colorants) are distributed b...

Each profiled paper/ink/printer combination manage the way inks (colorants) are distributed by the printer. Color Management is the discipline of controlling all of the major variables involved in the process.

If you choose to have Photoshop manage the Colors:

  • First, take note of the paper loaded in the printer. Remember, each paper type reacts to the colorant (ink, powder, etc.) differently, and your printer has no way of knowing what paper is in the hopper.
  • Second, choose File -> Print.
  • Third, choose Photoshop Manages Colors.
  • For Printer Profile, select the profile that best matches your output device and paper type.
  • Set the “rendering intent” selection to either Perceptual (which tells the printer to try to preserve the visual relationship between colors, which is what the human eye does) or Relative Colorimetric (this instructs the printer to shift the out-of-gamut colors to the closest reproducible color).
  • When available, always check Black Point Compensation as it adjusts the overall baseline for the deepest shadow point in the image.

If you choose to have the Printer manage the Colors:

  • First, realize that all of the controls for color and range in the image will be controlled by the printer and not by you.
  • Make certain that you pay close attention to all the items in the print dialog that appears after you click “Print” from the Photoshop dialog.
  • Since every printer and print technology differs, little further advice can be offered. This is not to infer that inferior results will occur, just that Photoshop relinquishes control to you and your printer’s manufacturer.

Final thoughts

If good-enough color is good enough for you, then the simple act of noting the general type of paper (coated, glossy, matte, etc.) available will suffice and satisfy your needs. However, if you extensively adjust your images for color fidelity in the editing process and demand absolute color accuracy, then employing accurate monitor and printer profiles is essential for practical color management.

The printer and paper manufacturers have done most of the hard work of producing and honoring accurate profiles. Your job is to make intelligent pull-down menu choices that will seriously affect your printing results.

It may not be rocket science, but it is color science.

Happy printing!


practical-color-management

The post Practical Color Management – How to Set Up Your Printer to Match Your Monitor appeared first on Digital Photography School. It was authored by Herb Paynter.


Digital Photography School

 
Comments Off on Practical Color Management – How to Set Up Your Printer to Match Your Monitor

Posted in Photography


25 Practical Photography Projects for the New Year

02 Jan

The post 25 Practical Photography Projects for the New Year appeared first on Digital Photography School. It was authored by Mat Coker.

So many photographers become stale in their pursuit of photography. Perhaps your hard drive overflows with tens of thousands of photos, yet somehow your photography seems to have become stagnant?

A new year is upon you and with this fresh beginning comes a chance to renew your love of photography. Perhaps there is no better way to do this than with practical photography projects.

Here are 25 practical photography projects to get you started!

Using Lightroom to organize photos - Practical Photography Projects

I use Lightroom to bring the chaos of my overflowing hard drives under control. Photos are sorted into folders waiting to be flagged, tagged, starred, and colored! Once this is done, projects become much easier to accomplish.

Projects based on photos you’ve already taken

Many projects can be accomplished based on photos you have already taken. Photography isn’t merely about snapping more and more photos. Therefore, it’s important to look back at our earlier work and draw it together in some sort of coherent project.

1. Study your old photos

You might be surprised by what you find when you sift through your old photos. It’s the perfect way to measure your improvement and growth as a photographer. Take as long as you wish to work on this project.

When you focus on your current difficulties or look ahead at all the skills you’re struggling to learn, it can seem like you’re never going to get there. But when you look back on where you’ve come from you can see how much you’ve truly grown.

Set goals for the future, but always look back to see how you’ve grown.

2. Create a collection

As you study your old work, you may notice patterns in all those photos. Perhaps you’ll see enough of a pattern to create a collection of photos. As you sort through your old photos, try to create collections based on subjects, themes, people or locations.

Practical Photography Projects

Sifting back through old pictures, I noticed I had quite a collection of photos of my kids playing in the window and curtains.

3. Print your collection

Studying your old work and creating collections are big projects in themselves. Once you’ve completed them, your next project should be taking time to appreciate your work by printing it.

4. Hang your collection

Raise your hand if you’ve already got stacks of photos stored away in albums and boxes? A perfect project for you is to find a place in your home or studio to display your printed collection. Maybe you know a small business owner or hotel manager who would appreciate displaying your collection for a while.

5. Invite other photographers to join you

All of these projects become ten times better when you work on them with other photographers.

Help each other narrow down your collections. Gain insight from others as to what should be printed and why.

You could even host a gallery evening together. Invite other photographers and friends to come and enjoy your photos along with some coffee or wine. Why not approach a local cafe or winery to host your event?

volunteer photography project - Practical Photography Projects

I volunteer as a photographer for Habitat for Humanity. I follow the house build from the first shovel going into the ground to the keys of the finished house being handed to the family. In the midst of running my photography business, I have this exciting photography project throughout the year.

Photos you’ve always dreamed of

So much for all those photos you’ve already taken, how about the photos you’ve always dreamed of taking? Let’s look at 20 more projects that will keep you busy exploring new things.

6. A childhood project you never completed

Maybe you had dreams and ideas for photos when you first got your camera but didn’t have the know-how to pull them off. Now that you’ve developed your creativity and skill, you should tackle one of those old ideas.

7. A half-finished project that needs completion

Look around for a half-finished project. There is nothing more discouraging than half-finished work reminding you how incapable you are. Even if you’ve lost your inspiration for that project; get it done! Sometimes tackling a project and finishing it off will inspire you to something bigger.

8. Learn a new skill

Perhaps your project won’t be a collection of photos or a new body of work but learning a new skill. DPS has plenty of books, courses and tips to help you learn something new. You can even document your learning journey through photos on social media or your website.

New skill photography project - Practical Photography Projects

Many of the volunteers with Habitat for Humanity do not know how to build houses. But by the end of the day, they’ve learned some new skill and feel happy with their accomplishments.

Projects that take all year

It’s worth considering how long you would like your project to be. You may even wish to tackle a number of smaller projects that feed into one larger project over the year. Here are several more projects that can last a week, month, or year!

9. Start a photography website

Whether you want a place to display your photos, write tutorials, or document your journey as a photographer, a website is a great place to get started. Find something with nice templates if you don’t want to fuss over the details, or use a highly customizable website if you want to stretch your creativity.

10. Something uncomfortable

When we talk about getting better as a photographer we often mean learning about technology or refining our technique. Those are important, and why not add growing as a person?

Try a type of photography that will take you out of your comfort zone. If you’re uncomfortable with people then try portrait or street photography. If you’re lazy, get out hiking and try landscape photography.

Introvert photography project - Practical Photography Projects

As a person who is very introverted, I try to take on photography projects that involve people. This helps me break out of my shell and be more social. My wife notices that I’m far less withdrawn than I was a couple of years ago. Photography isn’t just about expanding your portfolio, it’s also about growing as a person.

11. 365 project

A 365 project usually means taking a picture a day for a whole year. You can use it as a way to document your life, explore a theme, or follow a subject.

  • The first 365 days of your child’s life
  • 365 days in the life of your dog/cat
  • 365 unique plant types
  • 365 landscapes, documenting the seasons
  • 365 streets in a big city like New York

Don’t become anxious if you miss a day. The spirit of this project is to establish a collection over the course of a year. 300 photos, or even 100, is better than 0.

12. 52-week project

If the 365 project sounds too much for you, try a less intense version. Take 52 weekly photos over the course of a year.

  • 52 portraits of strangers
  • 52 food dishes
  • 52 photos of roses
  • 52 pasta dishes

13. A theme

Explore a theme on your own time and on your own terms.

It could be something warm and positive such as childhood or love.

It could be something confrontational such as violence or pollution.

This project is perfect for inquisitive explorer types.

Themed photography project - Practical Photography Projects

Expressing a theme in a photograph can be difficult. In this photo, I wanted to capture the idea of the difficult and messy work that volunteers do. I captured the muddy boots climbing up the scaffolding with people working in the background.

14. The seasons

Document the seasons throughout the year. You may consider traveling for this project. Hop on a plane 4 times a year to photograph the seasons in a climate different to yours. This project is perfect for people who travel a lot anyhow.

15. A person a day/week

Photograph a person (family, friend, stranger) daily or weekly. This might mean photographing one person over and over throughout the year or finding a new person each day or week. A perfect project for the social butterfly!

365 photography project - Practical Photography Projects

When I photograph a group of people over a long period of time, I try to mix things up every time I photograph them. Sometimes I’ll limit myself to certain angles, like this low angle photo.

Projects that take a month

16. 30-day project

Similar to the 365 or 52-week project, but this one only lasts a month.

17. A color

Choose a color to photograph for one month. Then choose another color each month and make this project last the whole year.

18. Document a charity

Find a charity that you can volunteer to photograph. You’ll expand your experience, build your portfolio and help them with their photography needs.

Volunteer work photography project - Practical Photography Projects

I began with a desire to photograph a house build. Then I discovered a charity who I could volunteer with. When you volunteer your time as a photographer, make sure it’s something you’re excited to get involved in and a worthy cause.

19. One camera, one lens

Choose one camera body and one lens to use for a month. Don’t touch anything else. Constraints like this can really help your creativity and photography to grow.

20. Camera phone

Perhaps that one camera/one lens is your phone! Treat your phone as a serious camera and you can take great photos with it. Through practice, you can learn to be just as creative with your phone as you are with your DSLR and 70-200mm lens.

21. Black and white for a month

Limit yourself to black and white photography in order to grow your vision and creativity. Set your digital camera to photograph in black and white in order to help train your eye.

Black and white photography project - Practical Photography Projects

In my mind, some moments are made for black and white. I know when I lift the camera to my eye that the photo will be black and white.

22. One subject

Find one subject to photograph for a month. Push yourself to take a different sort of photo than you did the day before. This will exercise your creativity and leave you craving the next month’s project.

23. Teach photography to a newbie

Your own understanding and ability grow when you teach what you know (or think you know) to somebody else. Your ideas and techniques become more deeply ingrained in yourself when you can learn to explain them simply to another person.

You’ll both grow as photographers. They may even push you to learn new things just so that you can explain it to them!

Habitat for humanity photography project - Practical Photography Projects

Projects that take a day

24. Day in the life of…

Photograph a person, place or thing for a whole day. Maybe your kids, the sun, your dog or a garden.

25. Self-portraits

Break out beyond the selfie and take some interesting portraits of yourself.

  • Street photographers can photograph their reflection in buildings
  • Portrait photographer can experience themselves as the subject
  • Landscape photographers can work themselves into the photo

Practical Photography Projects

Choose one

Pick one of these projects that suits where you are on your photography journey. You can easily choose a variety of shorter projects that you can weave together into a larger project over the course of the year.

Please share with me which photography project you plan to work on this year.

The post 25 Practical Photography Projects for the New Year appeared first on Digital Photography School. It was authored by Mat Coker.


Digital Photography School

 
Comments Off on 25 Practical Photography Projects for the New Year

Posted in Photography


3 Practical Tips to Improve Your Blue Hour Photography

21 Dec

The post 3 Practical Tips to Improve Your Blue Hour Photography appeared first on Digital Photography School. It was authored by Nisha Ramroop.

1 - 3 Tips for Blue Hour Photography

Most people are familiar with the term Golden Hour – used to describe that time just after the sun rises or just before it sets. The light is soft, extraordinary and sought out by many. However, if you pack up your gear when the sun drops below the horizon, you are missing out on another magical time!

Also known as twilight, Blue Hour refers to that time of the day just before or after the Golden Hour. Depending on your location, it may be shorter (or longer) than an hour but happens before sunrise or after sunset. If you want to capture images of this amazing time of day, here are a few tips to help you get started.

1. Timing is everything

There is a unique quality of light available at blue hour. The sky has a vivid hue of blue and purple. Perhaps even hints of your fallen sunset, cresting sunrise colors: yellow, orange and red. In either case, the sun is below the horizon, but its light is indirect and still visible. If you are shooting cityscapes after sunset, wait for the lights to come on and for the sky to darken a little, so you can shoot longer exposures.

2 - 3 Tips for Blue Hour Photography

As mentioned above, depending on your location your Blue “Hour” will vary. If you are closer to the equator, both the Golden and Blue “Hours” are shorter. Similarly, you have more shooting time when further away from the equator. Blue Hour times vary by season and, depending on the time of year and location, may not even occur immediately before or after the Golden Hours. There are locations where blue hour happens up to forty-five minutes after sunset!

3 - 3 Tips for Blue Hour Photography

When in an unfamiliar environment (e.g. traveling), one option is to get there early and wait. There are also apps and websites available to help you determine Blue Hour based on location. If you use the latter, scouting your environment beforehand still proves useful.

2. Keep it steady

4 - 3 Tips for Blue Hour Photography

Same location as above, but at a different time of the year

You may get away with shooting sunrises and sunsets without a tripod, but it is non-negotiable for blue hour. This is especially true if you want to shoot cityscapes with a smaller aperture (to get those beautiful starbursts). A tripod is a must for long exposures and allows you to shoot at lower ISOs, thus reducing noise in your images.

You can further reduce camera shake by using a remote shutter release. This useful gadget helps you minimize touching the camera. If you do not have a remote, use your camera’s timer, so that the image is taken a few seconds after you press the shutter button.

Bonus tip: Long exposures use more battery power, so pack a few spares.

3. What settings?

There is some flexibility when it comes to Blue Hour photography, depending on your subject.

If you are shooting a cityscape or skyline, most likely you want to keep your buildings sharp. In an image like this, your depth of field (f-number) will determine your settings. You can start at f/8 and go higher – keeping in mind that a higher f-number means a slower shutter speed.

5 - 3 Tips for Blue Hour Photography

If you are shooting light trails from cars against your blue sky, your shutter speed will determine your settings. This interesting subject comes to life with slower shutter speeds. On the other hand, if you want to freeze action in your Blue Hour, you need faster shutter speeds. Due to the lower light available during Blue Hour, this may mean shooting at lower f-numbers and increasing your ISO.

6 - 3 Tips for Blue Hour Photography

Conclusion

Blue hour is a beautiful part of the day that is often overlooked for the more popular Golden Hour. It is an amazing time to experiment with different captures and challenge yourself to work quickly in your limited “hour”. Plan ahead and envision your outcome, so you can maximize this time of day. Cityscapes and other subjects can come alive due to the unique quality of light available. Experiment, have fun and share some of your Blue Hour photography below.

The post 3 Practical Tips to Improve Your Blue Hour Photography appeared first on Digital Photography School. It was authored by Nisha Ramroop.


Digital Photography School

 
Comments Off on 3 Practical Tips to Improve Your Blue Hour Photography

Posted in Photography


Practical Tips for Doing Commercial Product Photography

17 Jan

If you’re like me, you may be wondering, “What exactly is commercial photography?” Well simply put, it is taking photos for commercial use. Common uses include ad space, websites, product placement, and items for sale. As you can imagine, having a working understanding of the essential elements of product photography can be extremely beneficial. Commercial shots influence consumers immensely. You can spruce up a client’s Etsy store, eBay listing, or even personal website with well done commercial shots.

Practical Tips for Doing Commercial Product Photography

Commercial photography is a great way to sell your prints to businesses as well. Many businesses love to have nice, professional shots of their product hanging in their office space, hallways, or lobbies. Have fun shooting products you enjoy, and you never know if the business will be interested in buying and displaying the print.

Practical Tips for Doing Commercial Product Photography

Practical Tips for Doing Commercial Product Photography

In this article, I’m going to talk about some essential tips for nailing commercial work. We’ll talk about how to set up a lightbox, selecting gear that’s right for the shoot, placing the product in flattering light, and how to touch up the image once it’s shot.

Equipment for commercial photography

First, it is highly beneficial to have a lightbox or light tent to use. The particular model I use folds and snaps together using magnets. You will first assemble your lightbox into its standing shape and then select the backdrop. Commonly used backdrop colors are black and white, and you will see that these are the ones I prefer to shoot against.

Feel free to have fun with the colors though! After all, you are the one behind the camera, so you call the shots. The use of a small stand may also be very beneficial for you. One tip though – be sure to position your camera in a way that the product will obscure the stand in the shot.

Practical Tips for Doing Commercial Product Photography

Lens choice

My all-time favorite lens for commercial work is the Nikon 105mm f/2.8 macro. In fact, all of the images included in this article were shot with this lens. Macro lenses are great, in particular for small objects, to reveal extreme detail in the item.

Remember, that is a core component of shooting product photography – you want to advertise how great the item is to the audience of consumers! All the details matter, and all the resolving power of the lens counts. One thing to be wary of is that exact resolving power.

The magnification of macro lenses can become a heavy problem because they will make things like dust, scratches, and fingerprints appear clearly prevalent. Thankfully, I will share my tips to help edit these things out in Lightroom and Photoshop later.

Practical Tips for Doing Commercial Product Photography

Lighting

Most light boxes, like mine, come equipped with a set of LEDs that are programmable or can be dimmed to various ratios of light. You will want to position the item you’re photographing so that the LEDs can light it in a flattering and dynamic way. Depending on what you’re shooting, you may want softer lighting or something that will really pop.

Be careful to avoid things like glare when positioning the item, as this problem will only become a headache in the touching up part of the job. In terms of positioning, I love to mess around with the shadows that are cast against the backdrop of my lightbox.

Practical Tips for Doing Commercial Product Photography

Get ready to shoot

Now, it’s almost time to shoot! I would recommend canned air to blast some dust and dirt off the subject if it needs it. A tripod is also a MUST for this sort of work.

I generally shoot at small apertures to keep the images as sharp as possible, with as much in focus as possible. However, sometimes it can be nice to shoot wide to create a nice depth of field perspectives with the shots. There is a delicate balance between showing artistic intent and making the shot distracting when advertising a product, so be sure to keep the client’s intent in mind when shooting.

Here you can see a real-world example of what the setup could look like when using a lightbox to shoot a product.

Practical Tips for Doing Commercial Product Photography

A remote trigger is also very helpful, as commercial work necessitates eliminating camera shake. If you don’t have a remote trigger, my advice is to use the delayed-timer on your camera. Simply set the camera (mounted to the tripod) on self-timer for 10 seconds or so, focus the shot, depress the shutter release, and wait. Naturally, this method can add time to the process, so it isn’t a bad idea for you to invest in a remote trigger.

Post-processing

Now that you have the shots you want, it’s time to touch them up. This part can be long and tedious, but it makes a huge difference in the end product. I generally lean toward Lightroom when touching up shots, but for commercial macro work, in particular, I gravitate to Photoshop. I will explain the process for each.

In Lightroom: I normally boost highlights and whites to blow out the backdrop and create a nice glow to the product. You can do this by sliding the adjustment sliders for both highlights and whites to the right. The amount really varies shot to shot, but don’t be afraid to experiment! Exposure can also be adjusted by moving the exposure slider to the right, however, make sure to not clip the highlights! I also may adjust clarity and make slight contrast adjustments. The real work comes in with spot removal on the dust specks, which I generally do in Photoshop.

Here you can see the lightbox shown with unattractive shadows and blacks, which can be boosted as explained above, to white out the background as shown in the image below.

Edits are done in Lighroom showing the effect on the image.

In Photoshop: You should always clean your product before shooting, but some dust will not be avoided. Luckily, with Photoshop, you can select Filter > Noise > Dust and Scratches. From here, you can select the radius in pixels to target the dust specks. You will have a tendency to lose some sharpness since the filter isn’t perfect. It can have a tendency to smooth out sharp edges or features you intended to remain in the shot.

For this reason, I always create new layers of areas I want to filter and then re-stack the layers to show the changes while leaving sharp edges unaffected. Select certain areas to target with the lasso tool, then copy those layers, run the filter, and restack the layers.

Original image showing the dust specks.

The masked image with the dust specks removed.

Restacked layers with the dust removed.

Outside of this dust removal, I generally reopen the image in Lightroom and do any other necessary edits there. Generally the discussed touch ups I talked about for Lightroom in conjunction with the dust/scratch removal in Photoshop is enough for my taste as long as I shot the frame with correct exposure and settings.


Conclusion

While commercial photography can be intimidating at first, I find that it can be extremely rewarding and versatile alongside other ventures. I’ve found it to be on the lucrative end of the photographic spectrum in terms of genres, and I definitely recommend it as a skill set to add to your photographic tool belt.

Be sure to pay attention to details when shooting product work, and also pay attention to how you market these images to organizations and businesses to ensure the highest possible level of success within the genre. Above all else, go out, purchase a small light box and shoot! You may find that you love commercial work as much as I do!

I hope these tips help you with your commercial product photography. Please share your images and thoughts in the comments below.

The post Practical Tips for Doing Commercial Product Photography by Michael Neal appeared first on Digital Photography School.


Digital Photography School

 
Comments Off on Practical Tips for Doing Commercial Product Photography

Posted in Photography


6 Practical Tips to Instantly Make Travel Photography Easier

17 Mar

Documenting exotic places, capturing priceless memories, and recording once-in-a-lifetime experiences are just a few of the pleasures travel photography affords us. But it can also throw up challenges. Time constraints, logistics, and lack of portable storage can make getting the perfect shot far more difficult. Here are a few tried-and-tested tips to help you make those challenges a little more surmountable.

Travel photography tips 01

1. Eliminate the unnecessary

Lack of storage, dubious safety, and the sheer weight of equipment may put the kibosh on your plans of bringing two DSLRs and five lenses to adequately capture your trip. By thinking about how you tend to shoot, you may be able to hone down your kit to just one camera and lens.

Some photographers opt for a fixed focal-length camera like the Fuji X100T. It’s compact, versatile, and good for all-round shooting. But for a photographer who shoots at long focal lengths, it would be a constant source of frustration.

Bridge cameras may provide an alternative, with their versatile zoom ranges in one neat package. Consider your individual needs based on your preferences and narrow down what kit you really need to have with you from what you merely want.

Travel photography tips 02

If you just can’t decide, try this; take one entry-level DSLR with a lens that has a varying zoom length from wide-standard to telephoto and a constant aperture of f/2.8 which is ideal for most situations.

Travel photography tips 03

2. Pick a lens with IS or VR

Each lens manufacturer offers some form of in-built stabilization. Canon has Image Stabilization (IS); Nikon has Vibration Reduction (VR). Choosing a lens that has in-built IS or VR helps when you can only shoot handheld.

When traveling, there are so many times when the perfect shot can only be captured on-the-fly. Unpacking a tripod and fiddling with camera settings may even be entirely out of the question. For moments when the light is low and shooting handheld is all you can do, IS or VR can help reduce shake and potentially save a photo.

Travel photography tips 04

3. Carry a mini-tripod

Slinging a folded down Manfrotto over your back may not be possible, but it also might not be something you’d want to do if you are taking photos in between relaxing moments on your family vacation. Having a portable, mini-tripod in your pocket or bag is a cheap and easy way to get around that issue. A flexible option like the Joby GorillaPod can even help get stable shots from unusual angles without adding too much undue weight to your bag.

Travel photography tips 05

4. Invest in memory and charge those batteries

Don’t come back from your holiday with 700 amazing shots from the first three days and absolutely nothing to show for the remaining week and a half because you ran out of memory. It’s now easier than ever to get lots of data and a fast write speed on one reasonably-priced SD card, so hoard a few of them before you go!

Do the same with batteries. Planning to re-charge every night is a great habit to get into, but don’t rely on that alone. When you end up in a hotel that has no power sources or you realize that you left your adapter in the last place you stayed, you’ll wish you’d invested in a few extra batteries and charged them before you left home.

Travel photography tips 06

5. Shoot for post-processing

We all want great results straight out of the camera. But if you don’t have all the equipment that you need or the time to nail your exposure by toying with intricate histograms, shooting a certain way to enable post-processing can be what helps you get the shot.

Bracketing your exposures and post-processing the final image into HDR when shooting the dimly lit walls of medieval ruins might be the only way to save the deep blue of the hot Mediterranean sky outside the cracked windowpanes. Without that, the blown-out highlights may not be salvageable.

If you don’t have a tilt-shift lens on hand and you can’t sprout wings and fly, shooting wider than usual and then correcting perspective in post-processing may be the only way to save that great shot of the iconic tower you visited.

Travel photography tips 08

6. When in doubt, take the shot

There are many times when you feel that it’s not worth taking the shot. A thousand other photographers may have captured the same view before; you may not have the equipment you need to get the results you want; the weather may have turned sour on the one and only day you got to visit. But regardless of how you feel, take the shot.

If it turns out to be a dud, you just delete it when you get home and you’re in the exact same position as if you hadn’t taken it. But if it turns out to be better than you’d thought, you could have a hidden gem that you hadn’t been expecting. Don’t miss a shot because you feel trapped by circumstance. Just shoot, and the magic will happen.

Travel photography tips 07

Conclusion

I hope these 6 tips have given you some ideas for your travel photography to make your next trip a bit easier.

Do you have any others to add to this list? Please share in the comments below.

The post 6 Practical Tips to Instantly Make Travel Photography Easier by Laura Hexton appeared first on Digital Photography School.


Digital Photography School

 
Comments Off on 6 Practical Tips to Instantly Make Travel Photography Easier

Posted in Photography


5 Practical Lightroom Tips for Newbies

13 Sep

One of Lightroom’s most important assets is also its Achilles Heel. It is such a powerful program that many of its useful features can take a long time to discover, and are often hidden beneath a blanket of keyboard shortcuts and obscure menus.

When I first started learning Lightroom I was already a longtime user of Apple’s image processing program Aperture, and for a while after making the switch I was overwhelmed by the sheer number of options available. With so many menus, buttons, and sliders at my fingertips I thought there was no way I would ever be able to make sense of them all. After much experimenting, online searching, and good old-fashioned trial and error, I have figured out a workflow that suits my needs; the same holds true for most photographers. You may not use every single feature and option available to you in Lightroom, but the key is to find the tools that work for you and learn to master them.

five-lightroom-tips-for-beginners-sunrise

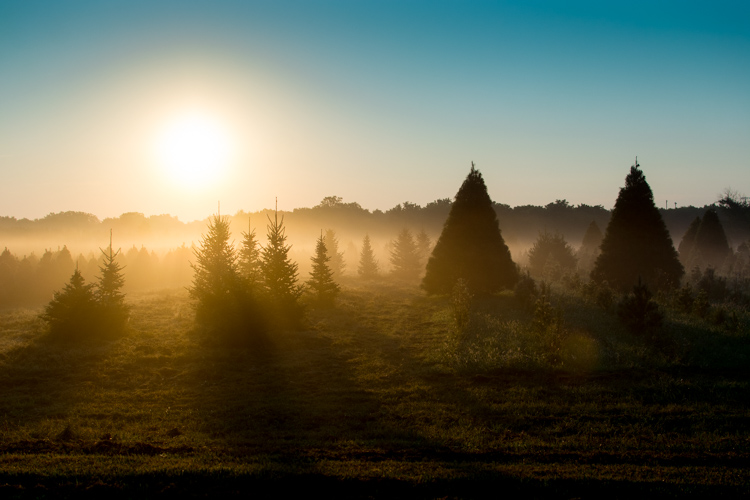
Adjusting the RAW file to arrive at this final image took a while, but was a lot easier thanks to some simple tips and tricks described below.

That being said, here are five of the most practical, useful features that I use on a daily basis. Try them out and they may greatly enhance your own experience with Lightroom as well.

1. Create import presets

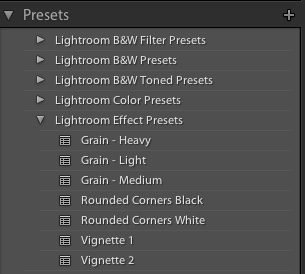
five-lightroom-tips-for-beginners-PresetsYou probably already know that Lightroom contains dozens of presets to get you started when editing your photos, which can be quite handy when you need a quick adjustment or effect such as Aged Photo, Bleach Bypass, or any number of black and white conversions. These presets are not special filters like what you might find in Instagram or other such image-sharing programs, but in fact are pre-made manipulations of the various sliders and controls available to you in the Develop module. The Cold Tone filter, for example, is a collection of saved values for the White Balance, Tone, and Presence adjustments in the Basic Develop pane.
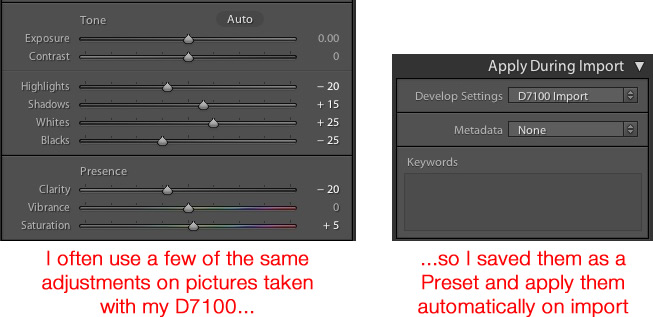
You might also be aware that you can create your own presets by adjusting any of the Develop parameters and then choosing New Preset from the Edit menu. But you can extend this functionality a step further by automatically applying a given preset, even one you create yourself, to all your pictures upon import. This is incredibly useful if you have a given set of values that you like to use as a starting point. Rather than making similar adjustments to things like Highlights, Shadows, and Clarity for every image you can simply apply default values to every picture you import. To do this, use the Apply During Impor” pane in the Import dialog, and select any of Lightroom’s existing Presets or one that you have made on your own.

five-lightroom-tips-for-beginners-D7100-Import-Preset

As an example of how this can be useful, I often found myself applying similar adjustments to every picture that I took with my Nikon D7100 because I was not happy with Lightroom’s interpolation of my RAW files. This became somewhat time-consuming, so I saved my common adjustments as a Preset called, D7100 Import. Now every time I import photos from my D7100 memory card, I apply that Preset. I have a unique Preset saved for each of my cameras, and applying these settings on import has saved me untold hours and a great deal of frustration. It’s a fantastically useful feature that could greatly improve your own workflow as well.

2. Use number keys to fine-tune adjustments in the Develop Module

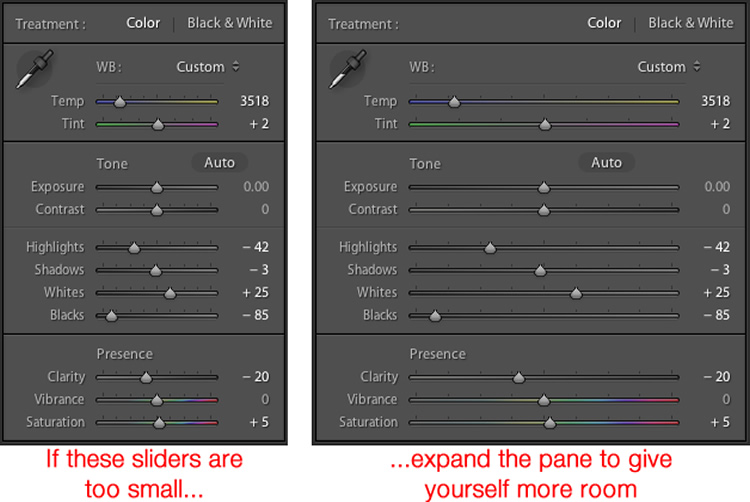
When working in the Develop module it can be a bit tricky to get the exact values you want by manually moving the sliders. One way to fix this is to give yourself a bit more real estate by hovering your cursor over the left side of the panes and dragging until the panels are much wider.

five-lightroom-tips-for-beginners-develop-sliders

Another handy trick is to use the arrow keys to adjust the number values in very small increments. For example, click on the White Balance numerical value, and press the Up or Down arrow keys to change it in increments of 10. Or highlight Clarity and press Up or Down to change it in increments of 1. For greater adjustments, hold down the Shift key while you press Up or Down, which will alter White Balance in increments of 200, Clarity in increments of 10, and so on.

3. Customize the Develop Module

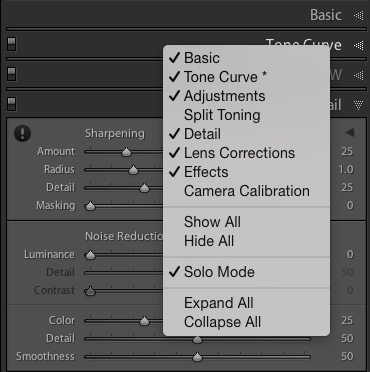
If you’re like me, you may have been overwhelmed at the massive number of options in the Develop module, but thankfully there is a way to tame this beast by right-clicking anywhere in the adjustment panels. Doing so brings up a menu that allows you to disable the adjustments you don’t want so you have a cleaner and less cluttered working environment, and don’t waste time clicking on features you never use.

five-lightroom-tips-for-beginners-hide-panels

One especially useful element of this right-click menu is called Solo Mode, which is a way to de-clutter the Develop module even more by collapsing all the panels except the one you are currently using. I used to waste all sorts of time scrolling up and down through the various open panels, expanding or collapsing them to get to the one I really wanted. But by using Solo mode every time I click on a new panel, the other one I was using is automatically shrunk to just its title. This one little feature has single-handedly saved me not just a lot of time, but a great deal of headache medicine as well.

4. Create Smart Collections to automatically sort photos in the Library Module

Lightroom’s Library module is a great way to help you keep your images organized. You can create virtual folders called Collections (e.g. Ceremony, Reception, and Speeches for a wedding) that can even be placed inside of Collection Sets (e.g. Smith-Miller Wedding).

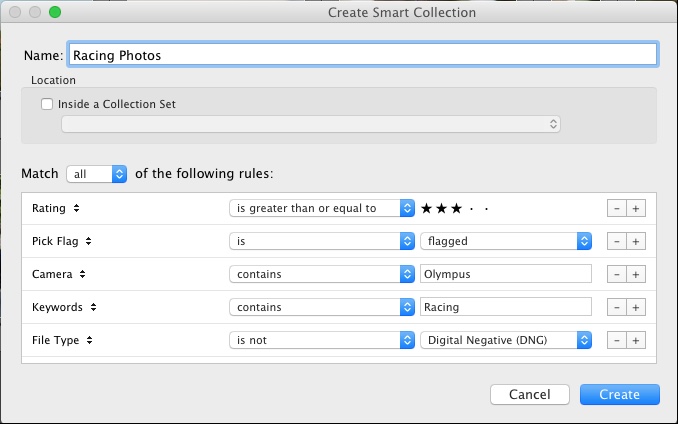
But what I find even more useful is the Smart Collections feature which allows you to dynamically organize your images, based on any number of conditions you specify. To create a Smart Collection, choose New Smart Collection from the Library menu and specify the parameters you want to use. Any picture that meets these criteria, at any point in your editing process, will automatically be placed inside the virtual folder you have just created.

five-lightroom-tips-for-beginners-smart-collection

In the above example I have created a Smart Collection that automatically sorts through all my photos, including any that I import after the Smart Collection is created, that meet specific criteria. Using Smart Collections are a great way to enhance your organization process, and help you sort through your images to focus on the ones you really want to work with.

5. Hold down the Option/Alt key when adjusting Develop sliders

The effects of many of the adjustments in the Develop module are self-evident; increase the Exposure and your image will get lighter. Increase the Saturation and your photo will lose a bit of color. But what about the adjustments that are not so easy to see? One particular set of sliders I use all the time is under Sharpening in the Detail pane, but the exact effects of the Radius, Detail, and Masking are sometimes difficult to see. This problem can be solved by holding down the Alt/Option key when moving almost any slider in the Develop module, which will show you a realtime display of exactly what is happening when you make the adjustment.

five-lightroom-tips-for-beginners-pastry

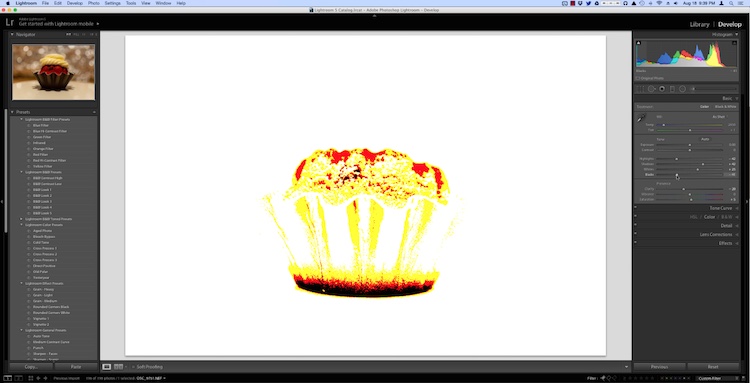
As I was editing this photo I needed to make some adjustments such as dialing down the Black levels, but I didn’t want to go so far so as to make any part of the image completely black. (That is, I did not want to clip anything in the picture.) By holding down the Option key as I adjusted the Black slider I was able to see a realtime display of what areas of the image were being affected:

five-lightroom-tips-for-beginners-pastry-option-key

In the above image the bottom of the pastry has become completely black, which means it cannot get any darker while the red areas will soon become entirely black if I continue to move the slider to the left. The yellow areas are being affected, but not so much just yet that I am losing my color data. This works for almost every adjustment slider in the Develop module, and can greatly assist you in making sure you are doing the edits precisely how you mean to.

These five Lightroom tips and tricks have been a major boon to me as I have worked with the program over the years, what about you? What are your favorite aspects of Lightroom that you find particularly handy? Or do you have any hidden gems that others might not know about? Leave your thoughts in the comments below.

googletag.cmd.push(function() {
tablet_slots.push( googletag.defineSlot( “/1005424/_dPSv4_tab-all-article-bottom_(300×250)”, [300, 250], “pb-ad-78623” ).addService( googletag.pubads() ) ); } );

googletag.cmd.push(function() {
mobile_slots.push( googletag.defineSlot( “/1005424/_dPSv4_mob-all-article-bottom_(300×250)”, [300, 250], “pb-ad-78158” ).addService( googletag.pubads() ) ); } );

The post 5 Practical Lightroom Tips for Newbies by Simon Ringsmuth appeared first on Digital Photography School.


Digital Photography School

 
Comments Off on 5 Practical Lightroom Tips for Newbies

Posted in Photography


27 Images of Powerful and Practical Machinery

22 Aug

If you live in an urban area there is probably some construction and/or machinery around, somewhere. Machines can make interesting photographic subjects. Let’s see what some other photographers found:

Photograph Cog wheels by Jaromír Chalabala on 500px

Cog wheels by Jaromír Chalabala on 500px

Photograph Toronto Distillery District 01 by Brian Carson on 500px

Toronto Distillery District 01 by Brian Carson on 500px

Photograph stopped time by jacek tomczak on 500px

stopped time by jacek tomczak on 500px

Photograph hand by ÖmerCan Can?dar on 500px

hand by ÖmerCan Can?dar on 500px

Photograph Usine S - Contrivance by Maarten Tummers  on 500px

Usine S – Contrivance by Maarten Tummers on 500px

Photograph The Requiem of Machinery by Christian Boss on 500px

The Requiem of Machinery by Christian Boss on 500px

Photograph Old machinery by Luca Gaverina on 500px

Old machinery by Luca Gaverina on 500px

Photograph Building Construction with Cranes in the evening. by SAMART BOONYANG on 500px

Building Construction with Cranes in the evening. by SAMART BOONYANG on 500px

Photograph Constructing landcapes by Luke Chung on 500px

Constructing landcapes by Luke Chung on 500px

Photograph Toronto: City of Cranes by Evgeny Tchebotarev on 500px

Toronto: City of Cranes by Evgeny Tchebotarev on 500px

Photograph Oil worker silhouette by Zoran Orcik on 500px

Oil worker silhouette by Zoran Orcik on 500px

Photograph Clouds Adjustment by trynidada on 500px

Clouds Adjustment by trynidada on 500px

Photograph Construction Workers by Ognian Medarov on 500px

Construction Workers by Ognian Medarov on 500px

Photograph Votecrab II. by Peter Majkut on 500px

Votecrab II. by Peter Majkut on 500px

Photograph The backhoe foot by Phoomin Karagate on 500px

The backhoe foot by Phoomin Karagate on 500px

Photograph The beast on the beach by Morgan Tiphagne on 500px

The beast on the beach by Morgan Tiphagne on 500px

Photograph backhoe/retroexcavadora by sairacaz (Abad Torres) on 500px

backhoe/retroexcavadora by sairacaz (Abad Torres) on 500px

Photograph Edit by Chatrawee Wiratgasem on 500px

Edit by Chatrawee Wiratgasem on 500px

Photograph ABSTRACT YELLOW CRANE by imageaddition on 500px

ABSTRACT YELLOW CRANE by imageaddition on 500px

Photograph Hard Work by Joop Snijder on 500px

Hard Work by Joop Snijder on 500px

Photograph Chain by Faruk Barabhuiya on 500px

Chain by Faruk Barabhuiya on 500px

Photograph (machine) by Gerhard Speck on 500px

(machine) by Gerhard Speck on 500px

Photograph Schwader by Tobias Müller on 500px

Schwader by Tobias Müller on 500px

Photograph Camera Gear by Phoomin Karagate on 500px

Camera Gear by Phoomin Karagate on 500px

Photograph wood & metal by Lucage Photography  on 500px

wood & metal by Lucage Photography on 500px

Photograph IVZN6 by Peter Majkut on 500px

IVZN6 by Peter Majkut on 500px

Photograph Cutter by Jack Daugherty on 500px

Cutter by Jack Daugherty on 500px

googletag.cmd.push(function() {
tablet_slots.push( googletag.defineSlot( “/1005424/_dPSv4_tab-all-article-bottom_(300×250)”, [300, 250], “pb-ad-78623” ).addService( googletag.pubads() ) ); } );

googletag.cmd.push(function() {
mobile_slots.push( googletag.defineSlot( “/1005424/_dPSv4_mob-all-article-bottom_(300×250)”, [300, 250], “pb-ad-78158” ).addService( googletag.pubads() ) ); } );

The post 27 Images of Powerful and Practical Machinery by Darlene Hildebrandt appeared first on Digital Photography School.


Digital Photography School

 
Comments Off on 27 Images of Powerful and Practical Machinery

Posted in Photography


9 January, 2015 – Practical Considerations For Time-Lapse Photography

09 Jan


Time-Lapse Photography is becoming a new interest of many photographers.  With almost every new consumer and pro camera introduced these days there is a time-lapse feature built in.  Even the newer smartphones have time-lapse as a setting.  I remember as a kid in school watching the time-lapse images of a flower growing from a seed or clouds moving across the sky in weather time-lapse movies. 

We are seeing time-lapse videos appear more and more often on You-Tube.  Some of these are quite spectacular and offer a new ways of seeing familiar scenes.  One of the pioneers and experts in this type of photography is German photographer Anna Possberg.  We are happy to publish her very detailed and extensive look into Practical Considerations For Time-Lapse Photography.  Take some time and enjoy this article and view some of the videos in the links.  Then grab your camera and go out and give it a try.


The Luminous Landscape – What’s New

 
Comments Off on 9 January, 2015 – Practical Considerations For Time-Lapse Photography

Posted in News


A Practical Review of the Nikon 24-70mm f/2.8 lens

27 Nov
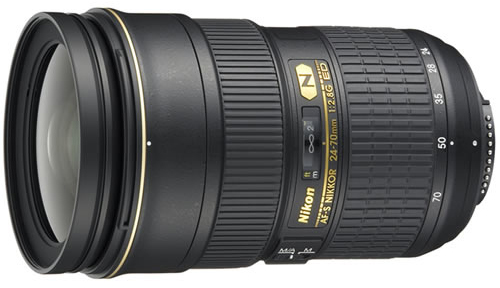
The Nikon 24-70mm F2.8 Lens

The Nikon 24-70mm F2.8 Lens

You will hear this from many photographers – “invest in your lenses”. Camera bodies will come and go, but a good lens can last a very long time. This was the advice that I first received when I started taking my photography seriously. Initially, I thought it was a bit hyped. I bought a cheap 70-300mm lens and used it at the first wedding I shot. I thought the images were fantastic until I bought a better lens a year later. I then realized how much difference a good lens can make.

This review is not going to be a technical review of the lens. You want to know how this lens performs, what the strong points are and what the weak points are – I will cover that. You will see images taken with the lens, many will be edited in Photoshop, some will be straight out of the camera, I will point out to you which are which.

About this lens

This lens is regularly praised as the best midrange zoom lens that Nikon has ever made. That sounds like a crazy statement, but when you look at the image results from this lens you can understand why. The lens is a high spec lens with a maximum aperture of f/2.8 and a minimum of f/22. Here is a quick look at the technical specs:

Focal Length: 24-70mm
Format: Full Frame – 35mm, can be used on a DX body, but will be cropped
Maximum aperture: f/2.8
Minimum aperture: f/22
Dimensions: 83mm (diameter) x 133mm (length)
Weight: 900g
Zoom ratio: 2.9X
Minimum focusing distance: 38cm

This lens is a perfect “all rounder” lens. You may find that you keep the lens on your camera most of the time. It has a really good focal range for everyday photography. It is a good travel lens too. Many photographers have said that this lens was the only lens they went on vacation with and it worked really well.

Photographic Genres that it can be used for:

1. Landscape Photography

This is not considered a super wide angle lens, but at 24mm on a full frame sensor, you will get a viewing angle of of 84 degrees which gives a pretty wide angle of view. This lens can be used for landscape photography for a few reasons. Firstly, it has really good glass elements that handle light beautifully. There is some distortion at 24mm, but this is easily corrected in Photoshop. Secondly the lens is really sharp, it makes an image seem almost too sharp. You may find that you won’t need to sharpen your image as much if you use a tripod and are properly focused. The colour rendition on this lens is really good too, colours are true and vibrant. This lens is good for landscapes, not necessarily as a dedicated landscape photography lens (you may want to look at some wide angle lenses) but it can certainly perform well for this type of photography.

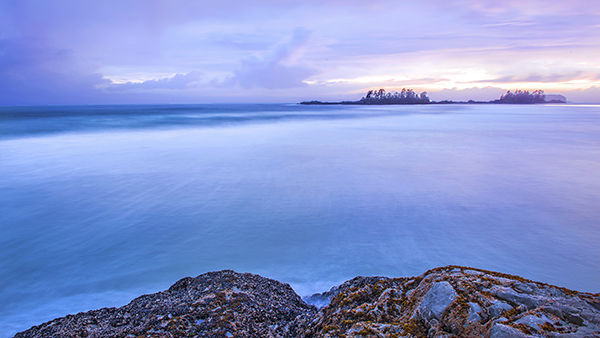
This seascape image was shot at 24mm. The clarity and colour was amazing, this has been edited in Photoshop

This seascape image was shot at 24mm. The clarity and colour was amazing, this has been edited in Photoshop

2. People Photography

This lens can work well for people photography as well which can encompass portraiture, weddings, and even street photography. This lens will do a really good job in any of these genres. In people photography, you will want to have a lens with minimal distortion. If you are using the 24-70mm for people photography, you will want to be shooting at 50mm and upwards. With a wide open aperture at f/2.8 you will be able to isolate your subject easily and have a soft out of focus background. The bokeh on this lens is good, but more on this later.

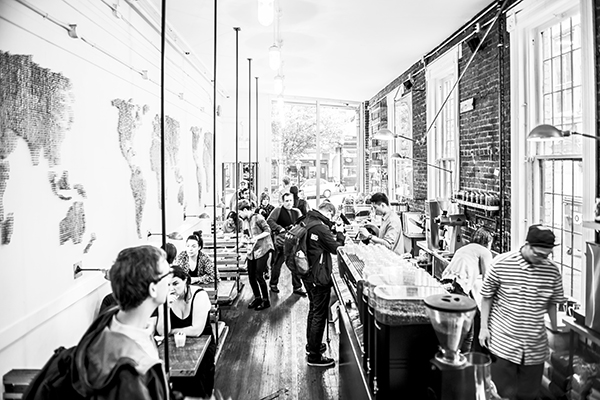
A scene in a coffee shop, taken at 24mm. Converted to B&W and edited in Photoshop

A scene in a coffee shop, taken at 24mm. Converted to B&W and edited in Photoshop

3. Close-up and Macro Photography

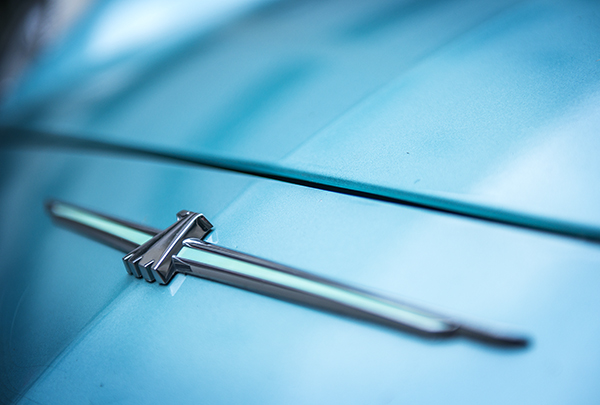
While the 24-70mm is not a macro lens, it has a 37 cm (14.5″) minimum focusing distance. That sounds like a long way, but at 70mm you can get pretty close to your subject. If you are shooting on a high resolution sensor (16 megapixels and above) you will be able to crop in quite a bit and so you will be able to get some good close up images. Bear in mind, this is not a macro lens, but if you want to get in close to a subject, really nice and close, this lens can do that. The sharpness and clarity is amazing, and it is good to have this ability on this lens.

This badge on the hood of a car was taken at 70mm and handheld. The clarity and sharpness is good and the close up shot isolates the badge

This badge on the hood of a car was taken at 70mm and handheld. The clarity and sharpness is good and the close-up shot isolates the badge

4. Street Photography

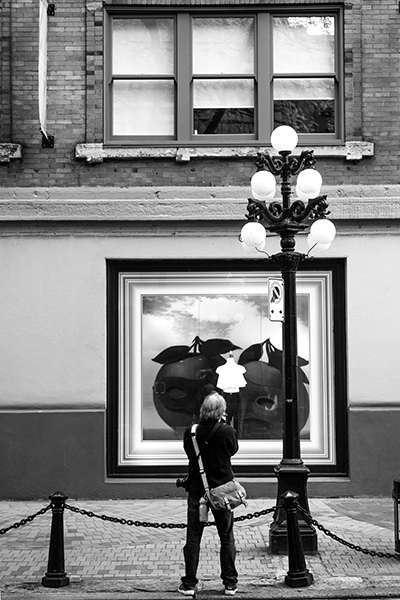
Most street photographers will traditionally use a prime lens for their work. You will often find a 50mm f/1.8 or and 85mm f/2.8 on their cameras. Sometimes though, it is good to have a little more flexibility and the 24-70mm is perfect for this. You can shoot at 35mm, 50mm, or 70mm and you will get great results. Based on your creative desire, you can shoot at f/2.8 or up to f/8 depending on your scene. The beauty of the lens is that it can focus really quickly and easily. It has a SWM (Silent Wave Motor) which means the autofocus is quick and quiet, really useful in street photography. There is some vignetting when the lens is wide open at f/2.8, but this adds some depth and contrast to street photography images.
This lens gives you flexibility when shooting street photography.

This lens gives you flexibility when shooting street photography.

5. Travel Photography

When you are planning to travel, there is always the consideration of what lenses to pack. Weight is always a challenge and of course, space. Many photographers have found that the 24-70mm is a prefect travel lens. At the low end, you can capture some great images of wide open spaces and the interiors of  churches and cathedrals easily. Zoom in and you can get pretty close to your subject, step in closer and you can do some wonderful cameo and detail shots. The 24-70mm is almost designed for travel photography. Yes, it lacks a little in the zoom category, 70mm is not a huge zoom, but you will come home with bright, sharp, colour-filled images.
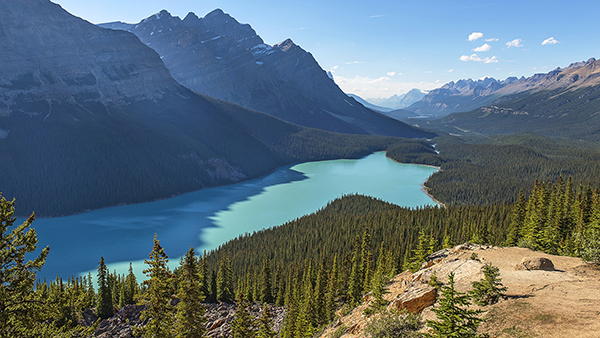
The magnificent Peyto Lake in the Canadian Rockies, made with the 24-70mm lens

The magnificent Peyto Lake in the Canadian Rockies, made with the 24-70mm lens

Performance

The Nikon 24-70mm has amazing optics. It is sharp throughout the zoom range and has a fixed aperture of f/2.8 which means you can get a very shallow depth of field throughout the entire range.

1. Autofocus

This lens focuses quickly and accurately. I use it on a Nikon D800 and it works really well on that camera. You can of course manually focus, but I would only suggest doing that when you are shooting landscapes or close-up photography. If you have a subject that is moving, autofocus is necessary.

2. Colour rendition

The lens produces good colour, which is vibrant and rich.

3. Distortion

If the lens is zoomed out to 24mm you will see some barrel distortion. Once you zoom in though, the distortion goes away, so be aware of the distortion when shooting at 24mm. It is easily fixed in Photoshop or Lightrooom, so don’t be too overly concerned about that.

4. Handling

The lens is quite large and heavy, mostly because the lens has all glass elements and the body of the lens is metal. It is a hardy lens and can take some rough handling, but be careful with it as it is an expensive lens and you wouldn’t want to repair it unnecessarily. When mounted on a Nikon D800 without a battery back, the combined weight of the lens and camera body will be at least 2 kilograms (4.4 pounds). Thats a fair amount of weight to carry around at the end of your hand, so be aware if you plan to buy this lens.

5. Bokeh

Many lenses are judged not only on how sharp they are, but how smooth and creamy are the out of focus areas (bokeh) of the image. In this area, the 24-70mm does okay. The bokeh on this lens is not a wow, but it is smooth and soft. On a lens that offers so much, the bokeh is not perfect, but it is acceptable.

Overall Conclusion

This lens has been praised as one of the best lenses Nikon has ever made. It is a great addition to any photography bag. You will find that you may keep it on your camera most of the time. It really is a sharp lens and is a perfect “all-round” everyday lens. Its specifications make it a “pro-spec” lens which means it’s not cheap (just under $ 2000). Remember though, it is recommended to invest in your lenses. Generally they will outlast your camera bodies and you will have them for many years if you look after them. This is one of those types of lenses, it will last well and produce great images for many years.

The post A Practical Review of the Nikon 24-70mm f/2.8 lens by Barry J Brady appeared first on Digital Photography School.


Digital Photography School

 
Comments Off on A Practical Review of the Nikon 24-70mm f/2.8 lens

Posted in Photography