RSS
 

Posts Tagged ‘postproduction’

Cropping Your Photos In-Camera and in Post-Production: A Guide

25 Dec

The post Cropping Your Photos In-Camera and in Post-Production: A Guide appeared first on Digital Photography School. It was authored by Kevin Landwer-Johan.

Cropping your photos either in-camera or during post-production helps to create more interesting compositions. Capturing a strong composition as you take a photo is always satisfying, but can be difficult. 

Learning to compose well takes time and practice. However, you can often create better compositions by carefully cropping your photos as you are editing them.

woman out standing in a field for cropping photos
© Kevin Landwer-Johan

What is cropping?

Cropping is cutting or trimming parts of your photo. This is most often done to improve the composition or to alter the aspect ratio.

In the past, cropping involved a straight edge and a blade. These days, cropping happens on the computer and is much less aggressive; you can always hit “Undo” and try again if you make a mistake.

Cropping in-camera is a common term that’s not particularly correct. Cropping means a part of a photo is cut off. This alters the aspect ratio. You cannot do this when you are composing your images; you can only do this after you’ve taken them.

In other words:

You can compose your photos to include or exclude whatever you like, but this is not really cropping.

Some purists believe cropping your photos is wrong. They maintain that the image you capture should not be altered by cutting part of it out.

Other photographers are quite happy to leave excessive space around their main subject and crop to compose a better image as they are post-processing. 

I say, “Each to their own.” My preference is to compose well, then crop well when editing if I need to.

But only if I need to.

Cropping photos always reduces the number of pixels in an image. Cutting off a lot of a photo can affect its clarity and the ability to enlarge it (compared to an image that remains full and uncropped).

studio photo of a woman
© Kevin Landwer-Johan

When is it best to crop a photo?

Beginner photographers can benefit from cropping photos for two main reasons:

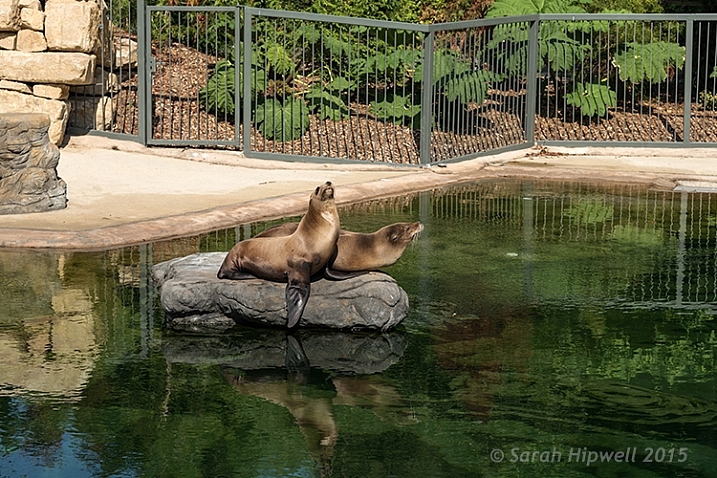
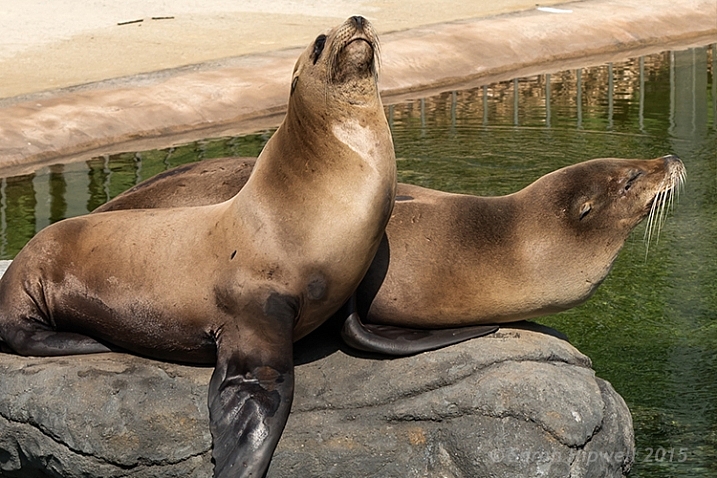
First, cropping your photos well can improve a poor composition. You can rescue a photo by reducing the amount of empty space or taking out distracting elements. When you have not taken the time to compose well, or are not yet sure how to create a good composition, cropping can help draw attention to your main subject.

Second, learning to crop well will help you better understand strong composition. It’s often easier to see how to improve a photo by cropping when you are sitting at your computer than when you’re trying to remember how to set an accurate exposure in the field. 

As you sit and look at a photo you’re editing, think about how it can be improved by trimming off the top or bottom. Or maybe by bringing the left or right edges closer to your main subject. 

farm landscape cropping your photos
© Kevin Landwer-Johan

When there’s no time pressure, you can experiment with how you want your compositions to look. You can make copies of a photo and try different crops to see which one you like best.

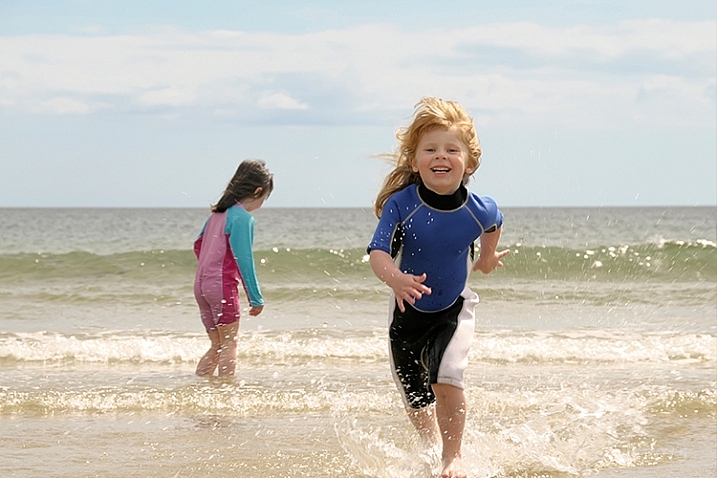
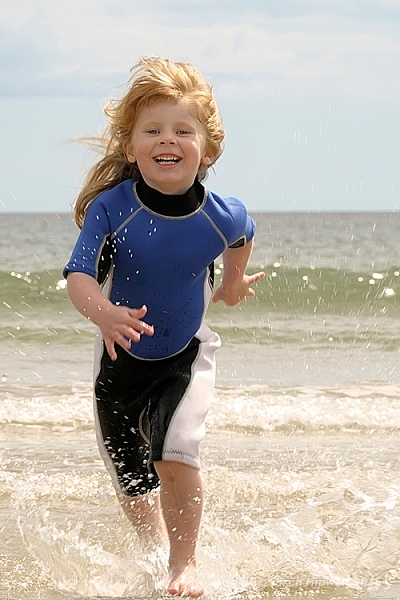
The main rule of composition I follow is to fill the frame. If I find that I have not done this well enough when I am taking a photo, it is my first consideration when I start to crop.

Maybe there’s something in the photo I had not noticed when I was taking it. Someone may have stepped into the edge of the frame as I pressed the shutter release. Sometimes, I’ll trim an edge so my main subject lines up with one of the rule of thirds gridlines, or sits at the intersection of these lines.

studio portrait of a man for cropping your photos
© Kevin Landwer-Johan

How do you know what to crop?

Will your photo look better if you crop it? That is the most important question to answer before trimming a photo. If you think your image will look better, go ahead and crop. But be purposeful about what you do.

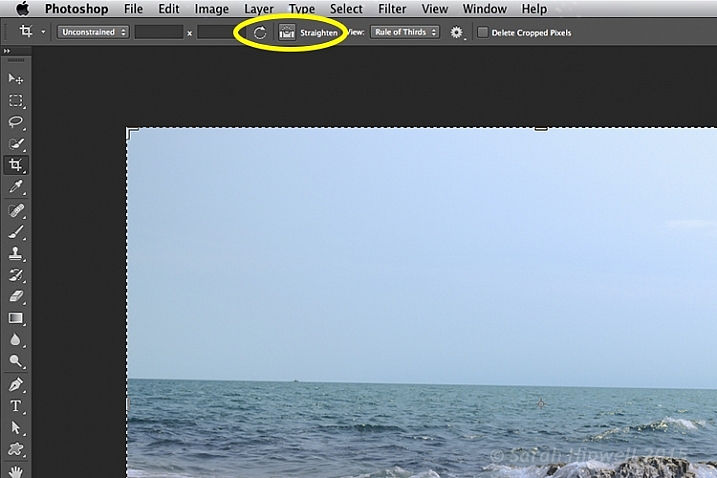
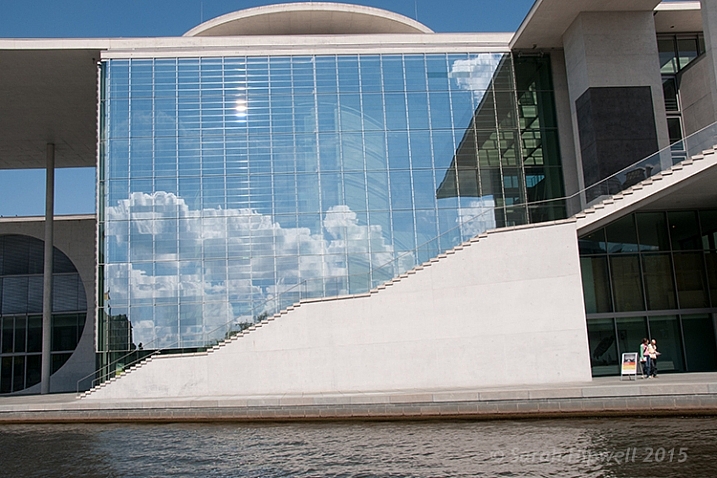
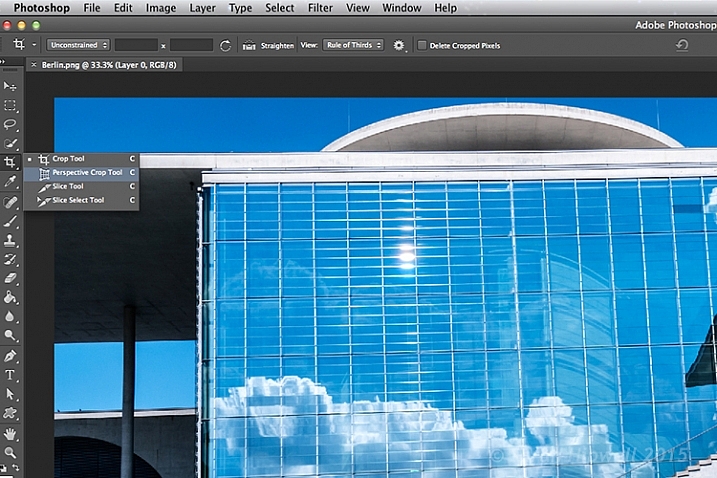
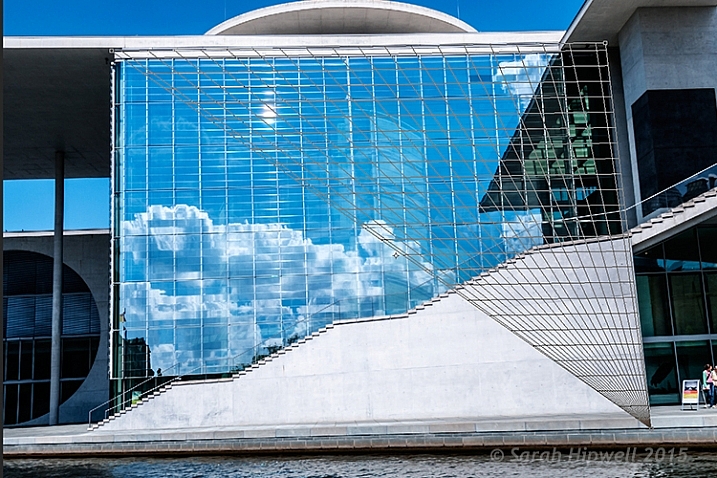
Consider the lines in your photo. Often, lines in a composition will be affected if you crop. Part of the digital cropping process can include rotating your image. This allows you to straighten a crooked horizon or get vertical lines in your photo looking natural.

Think about the rule of thirds. Will cropping help your photo conform to this compositional standard? It can be much easier to apply this rule during post-processing than when you are taking a photo. You can often be much more precise when editing, depending on what your subject is.

forging brass
© Kevin Landwer-Johan

Look for distracting elements. Does everything fill the frame and support the main subject of your photograph? If not, think about how you could crop these elements out. Sometimes, it might be power lines at the top of your photo. Or a power pole or a person at one edge. 

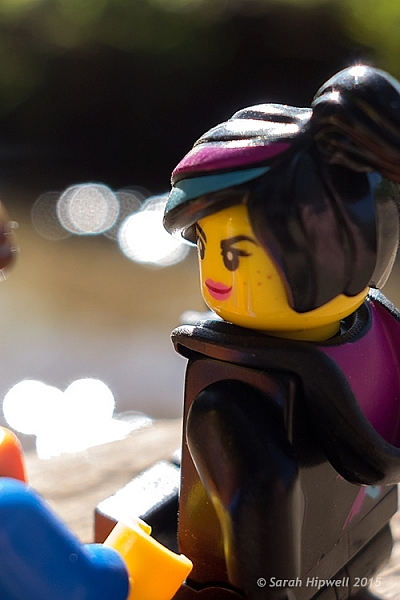
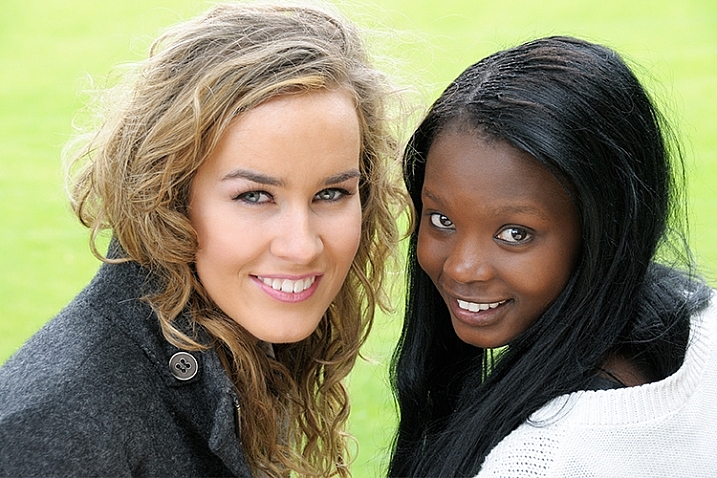
Square framing will transform the composition into something completely different. For some subjects, this will be perfect. Not many of us use square format cameras, so to achieve this look we must crop during the editing process. 

Think about cropping as you compose. Sometimes, you’ll see that a square will frame your subject better than a rectangle. Or that a wide, panoramic style will suit your subject better. I’ll often think about how I will crop an image as I am taking it if my subject does not fit the 3:2 ratio of my camera’s sensor.

white teapot square cropping photo
© Kevin Landwer-Johan

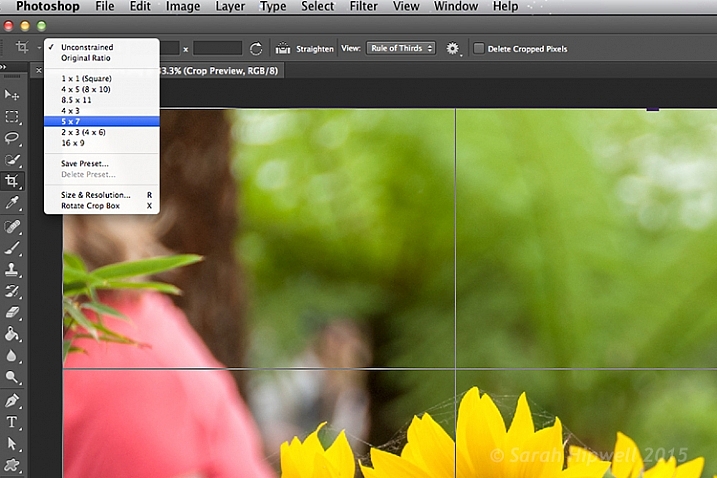
How do you crop your photo to fit a specific aspect ratio?

Sometimes, you may need to fit a photo to a specific aspect ratio, such as when you want to update your Facebook or website banner image. 

Here’s how I do that:

First, I’ll do a quick search to find the current size requirements of the place I want to use the image.

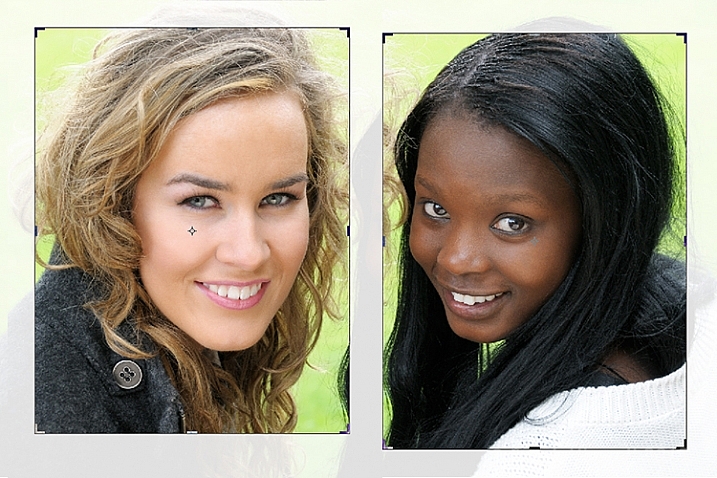
Then I’ll make a new blank canvas in Photoshop or Affinity Photo, one that matches the aspect ratio I need.

Next, I’ll drag and drop the photo I want to use onto that blank canvas.

Then I’ll resize the image and position it to appear the way I want it to look. 

When changing the aspect ratio of a photo, you need to consider how it will look and what you’ll be cropping out. Often, banner images are wider than a 3:2 camera-sensor ratio, so the top and/or bottom of the image will be sacrificed. Profile photos often need to fit a square format.

Placing your photo in a blank frame that fits the correct aspect ratio allows you to move it around within the space to see how it best fits, or if it doesn’t. 

close-up of a woman with a chocolate ice cream
© Kevin Landwer-Johan

Cropping your photos: Conclusion

Cropping your photos can help you learn to create better compositions. When taking your time to ponder an image on your computer monitor, you can often see how you could have framed the shot better.

Aim to fill your frame. Experiment with copies of your photos. Crop each copy differently to see which composition you like best.

And by repeating this process with every image you edit, you’ll soon find that you’re cropping fewer of your photos.

The post Cropping Your Photos In-Camera and in Post-Production: A Guide appeared first on Digital Photography School. It was authored by Kevin Landwer-Johan.


Digital Photography School

 
Comments Off on Cropping Your Photos In-Camera and in Post-Production: A Guide

Posted in Photography


Blackmagic Design will livestream tomorrow’s camera, post-production event

08 Aug

Blackmagic Design has sent out an email announcing that tomorrow, August 8, at 12PM PDT, it will be holding a livestream related to its post production and camera products.

Blackmagic Design CEO and co-founder Grant Petty will be leading the livestream, which will be available to watch on Blackmagic Design’s website, YouTube channel and Facebook page. Below is a list of when the event will go live in various cities around the globe.

No hints were given as to what will be announced, but if past livestreams are anything to go by, it should be fairly straightforward, with Petty discussing current and upcoming products and updates. Any guesses?

Articles: Digital Photography Review (dpreview.com)

 
Comments Off on Blackmagic Design will livestream tomorrow’s camera, post-production event

Posted in Uncategorized


No Filter? No Problem! 3 Simple Methods to Fix Your Sky in Post-Production

01 Jun

The post No Filter? No Problem! 3 Simple Methods to Fix Your Sky in Post-Production appeared first on Digital Photography School. It was authored by Nils Heininger.

What you see is not what you get

Quite often, we look at an amazing scene, take out our camera, make a snap, and become disappointed. We are not able to capture what we saw. Sometimes it depends on the perspective and composition. Other times it is an issue of dynamic range. When we are working under a bright sky, the latter is a problem.

Dynamic range means the range of light, in which we can still see detail. It is everything between pitch-black and dazzling-white. The human eye has a very wide dynamic range. For us, it is not a problem to see all the detail in the sky, while also recognizing every rock on a mountain.

Our camera, however, has to find a compromise. It either gets the detail of the rocks and a blown-out (white) sky in the background, or it gets the detail in the sky, but just the dark silhouette of the mountain. Sometimes you want that effect, and sometimes it is merely disappointing.

If you are really into landscape photography, you might consider getting a graduated neutral-density filter. You can put the filter in front of your lens and darken part of the image while leaving the rest untouched. There are systems for square filters, which you fix on using an adapter in front of your lens. You can also get screw-on filters, which you fix directly onto your lens. Both have advantages and disadvantages, and there are many options for ND-grad filters.

If you are just occasionally shooting landscapes, or you don’t want to invest too much money at the moment, you can fix the images in post-production.

Here are three different ways you can fix your sky in Lightroom or Photoshop.

1. Graduated Filter in Lightroom

Fixing something in post-production does not mean that you can be lazy while shooting. When you take your image, you have to make sure that you get the necessary detail and find a good exposure. I always recommend shooting in RAW format as it saves far more detail than .jpg files do.

Lightroom’s graduated filter changes the exposure of a part of your image. It will never recover lost information. Shoot your image as balanced as possible. Find a compromise of getting some detail in the sky and some in your foreground.

Before you use the graduated filter, you should adjust the image in a way that the darker parts are well exposed, and the sky is blown out. In the example image, I pushed the shadows and the whites, to make the buildings pop. It all depends on your image. Just make everything except your sky look like you want it to be.

Then click on the little rectangle in your toolbox. This is the graduated filter.

Applying the graduated filter is easy. Just left-click somewhere in your image, hold the mouse button, and pull it in the direction you want the graduation to happen.

In landscapes, we usually pull it down, as we want graduation along the horizon.

The tool marks the borders where the filter will affect the image. You can also see the intensity of the filter, by pressing “O.” This marks the area in red to give you a visual of the graduation.

If the selected area of your image somehow gets pitch-black, white, blue, or looks weird in any other way – don’t panic! Just check if the filter adjustments on the right are already active. Reset the filter adjustments by double-clicking on the sliders and the image will look like it did before.

Now you can adjust the sky. Usually, this means that you have to make the highlights darker. Pull the Highlights-slider to the left. I also added a little blue in the white-balance and pushed the whites, to have a little dramatic contrast in the sky. If you are irritated by the filter-marks, press “H” to make them disappear.

Still, there is a big issue with the image. As there is no straight horizon, the graduated filter also affects the buildings. This is not always a problem in landscapes – especially when using images of the sea, where the horizon is straight. If objects are towering above the horizon, there is an easy way to deal with it.

Add the Range Mask

The Range Mask helps us to quickly deal with deselecting some parts of the applied filter. In this case, we click on Range Mask -> Luminance in the filter options on the right. Here we can select which parts of the graduated filter will be affected. It’s a filter in a filter!

Luminance means that we can make the filter affect a certain range of brightness within the selected area. In the example, we want the filter to only affect the brighter parts (i.e., the sky) and not the darker ones (i.e., the skyscrapers). Hence, we will push the left marker of the range-slider to the right until we exclude the buildings from our selection.

That’s it!

Pros and Cons of the graduated filter in Lightroom

The graduated filter in Lightroom basically does the same thing that an ND-grad filter in front of your lens does – it changes a part of the image and leaves the other untouched. In Lightroom, however, you can choose between many different adjustments, while the physical analog ND-graduated filter will just make the image darker. You can also individually set up the area you want to edit and decide about the softness of its edge.

The disadvantage of the digital graduated filter is its limitations. You can’t recreate the information that your sensor did not capture. A filter in front of your lens will influence what your camera captures on its sensor. The digital filter can only work with what you have. You cannot push everything as far as you want and usually, you will lose some detail.

Still, the graduated filter in Lightroom is often a decent way to make your sky pop.

2. Mix different exposures with HDR

HDR is the abbreviation for High-Dynamic-Range. HDR images artificially increase the dynamic range of our camera by summing up the information of different exposures. Hence, you have to plan an HDR-image in advance.

While you are shooting, you have to create different exposures of the same image.

I usually take three images:

  1. A “well-exposed-compromise-picture” like I would take for applying the graduated filter in Lightroom.
  2. A darker image (silhouette with great sky-detail), one or two stops below the first.
  3. A bright one (good detail in the foreground, blown out sky), one or two stops above the first.

Make sure, these shots show the same image, and you don’t move your camera. It’s best if you shoot using a tripod.

If you are not familiar with calculating stops, there is good news – most cameras can do it for you. Your camera will likely call it “bracketing.”

Somewhere in your menu, you can select the bracketing setting. My camera asks me how many different exposures I need and how many stops they should differ from each other. Then I hit the shutter three times and have my three exposures.

Don’t forget to reset the bracketing, because it is more than annoying to have different exposures when you don’t want them.

The next step is quite easy. Upload your three exposures into Lightroom and select them. Right-click on one of them. Choose Photo Merge -> HDR and wait until the calculation is done. This can take a little while, depending on the image size and your computer speed.

A fresh window of photoshop should pop up. I always check the boxes Auto Align and Auto Settings and mostly use medium Deghosting. Deghosting is the process Lightroom uses to deal with small dissimilarities in the three images (e.g., moving people, clouds, waves).
Then you hit the merge button and wait again. Here is your finished HDR-image.

Wasn’t that easy?

Mix methods!

Sometimes, you won’t be happy with the HDR-image. You can still adjust it! Even though the image above looks a little innocent, there is a lot of detail in there. Get it out by applying local adjustments like a grad-filter.

Nonetheless, you have to be careful. HDR is still just a computer calculation, that does not know what you saw on location. If you do hard editing, you will find artifacts on your image. Artifacts are disturbances caused by processing an image.

Look closely at the example below, and you will find a black shade around the top of the highest tower. Artifacts like this often occur around areas of high contrast.

Pros and Cons of HDR

HDR is a quick and effective tool to make your sky pop. While the graduate filter in Lightroom can only work with the available information, HDR increases this information. If you check the file size of the original image, you will also find that the HDR image is often three times as big as each single exposure. If your computer is a little slow in processing images, it will have more issues with HDR images.
Another disadvantage is the preparation involved on location. You will need extra equipment to get a similar composition under different exposures. Movement in the image, as well as high-contrast areas, can also create artifacts.

HDR has often been overused to create an “edgy effect.” Don’t over-do it here. There is an easy rule of thumb – if you see that it’s an HDR, it is too much.

3. Make a composite in Photoshop

Composite means cutting out parts of one image and putting it above another. There have been many debates about this issue in the past and present. Are composites fake?

In our example, I think it is fine to cut out the sky of a good exposure and put it on top of the same scene. At least the sky looked like this some few seconds before. It was there – the camera simply couldn’t capture it.

To make a composite in Photoshop, you should already have adjusted the images in Lightroom. Prepare one image with a great sky and another one with a good foreground. Select both images, right-click, and choose Edit In -> Open as Layers in Photoshop. A Photoshop project with two layers will pop up.

In this example, I chose to treat the image with the blown-out sky as the background and put the blue sky on top of it. That means that we have to arrange the layers accordingly. Photoshop will always display the upper layer of your project. Thus, we need to keep the sky as the upper layer, but make the buildings disappear, so the lower layer is visible.

The best method to do this is to create a Layer Mask. It allows us to hide a part of the lower image without deleting any information. To create a Layer Mask, we select the upper layer and click on the little square-symbol with the circle in it. A white rectangle appears next to your layer.

Every white part of the layer mask will be displayed. The black areas will be invisible, while everything grey will be partly visible. Now, we need to fill the areas we don’t want to see (i.e., the buildings) with black. This process is called masking.

Masking involves skill and experience. A proper guide to masking in photoshop can fill books. In our example, we try the basics. We want to see the sky and hide the buildings. Thus, you have to mark the buildings with the Quick Selection tool (Press “W” on your keyboard). We need to select everything except the sky. For hiding the selection, we choose the layer mask and fill the selected area with black color (Edit -> Fill or press Shift+F5).

Now, you have your first composite. It looks a bit weird and artificial in the example. Usually, you need to make some adjustments after masking. Work on the layer mask for the edges of the building. This can be done manually brushing the parts you do not want to see.

You can also make some adjustments to fit the look of the sky and buildings. By using adjustment layers and pulling the opacity of the sky a little back, you will create a more natural look.

Pros and Cons of Composites

The big advantage of a composite is that you take two independent images and blend them into each other. It does not matter if the clouds or cars in the image move. You can control every part that you want to see. The result is pretty much dependent on your skills.

However, a composite is a lot of work. It takes a while to understand all the options, tools, and shortcuts to edit a layer mask. The amount of works depends on the scene. Editing the horizon of a seascape is easy. A skyline can be challenging. Put a bush in front of it, and it is easy to mess it up. You don’t want your image to look like the one below.

Which technique to use?

There is no right or wrong here. It differs from case to case. How much energy do you want to invest? Are your skills advanced? Did you prepare more than one exposure?

You can also mix methods or even manually create an HDR-image in Photoshop.

One day, I will get myself a bunch of ND-grad filters and work things out on location. Until then, I will continue using HDR or – if possible – get along with the graduated filter in Lightroom. So far, it has worked fine for me.

What do you think?

Is there a method you prefer? Do you work with ND-grad filters, or have another method of dealing with the issues of dynamic range? I would be glad if you share your own experiences and images in the comments below.


The post No Filter? No Problem! 3 Simple Methods to Fix Your Sky in Post-Production appeared first on Digital Photography School. It was authored by Nils Heininger.


Digital Photography School

 
Comments Off on No Filter? No Problem! 3 Simple Methods to Fix Your Sky in Post-Production

Posted in Photography


A Beginner’s Guide to Choosing the Right Post-Production Software

12 Jan

When it comes to choosing your first piece of post-production software you may find yourself spinning in circles. There’s so much to choose from, and the whole idea of learning to do something new can be intimidating. This article will cover a number of the most well known software options available, and hopefully lead you towards the right decision for you.

Adobe Photoshop CC

Over the years no one has truly been able to displace Adobe’s dominance of the photography software market. Both Lightroom and Photoshop are hugely popular pieces of software and regarded as the go to platforms for professionals. Let’s break down both Lightroom and Photoshop individually to see what makes them so popular.

Adobe Lightroom

LR

Lightroom is the most popular tool available for post-processing your images. It can be used as an all-in-one solution for post-processing, image storage, and printing. Due to this all-in-one nature, Lightroom becomes a convenient and powerful option for both new photographers and pros alike.

One of the biggest differentiating factors of Lightroom verses other post-production tools is that it is widely supported by third party developers. What this means is that you can find a number of plugins for Lightroom that will allow you to extend your workflow beyond the core program. You’ll also be able to find a number of Lightroom presets, which can help you speed up your workflow by saving time for tedious edits. On top of that, sites like Smugmug and Zenfolio allow you to hook right into Lightroom, enabling you to share your photographs directly from your Lightroom catalog to your website.

Finally, due to the popularity of Lightroom, there is no shortage of support for you on the web. If you have a question about something related to processing an image with Lightroom look no further than YouTube or the many eBooks written on a number of different aspects of Lightroom’s features (including Loving Landscapes, a dPS ebook about processing your landscape images in Lightroom).

This whole package of features, extendibility, and resources, is why I’d suggest Lightroom as the first program for any new photographer looking to get into post-production. Not only are you getting a very capable program for editing and organizing your images, but you have the ability to extend the core features as your skills develop. You also have an endless supply of help from the many tutorials written on the platform over the years.

Adobe Photoshop

PS

Lightroom may be the best place to start as a new photographer, but Photoshop is a close second. The only reason I place Photoshop second on this list is due to its complexity. You still get the same great community of professional photographers, which enables you to learn more quickly, and you’ll still find a wealth of Photoshop Actions to help you speed up your workflow, but the learning curve for Photoshop is quite a bit more challenging than that of Lightroom, making it harder to recommend to a total beginner.

Adobe’s Creative Cloud platform is a subscription based model, which gives you access to both Photoshop and Lightroom for $ 10/month. The reason to pay the premium for Adobe’s products, over the ones I’ll list below, is not because they will perform better edits, but rather because of the way they integrate with other pieces of software, and the availability of tutorials on the web.

Open Source Options

If you’re not ready to invest money into your post-production workflow just yet, then these open source platforms are where I’d direct your attention.

GIMP

wilber_painterGIMP is the most well known Photoshop alternative out there. It has been around for years, works on both PC and Mac, and will provide you with many of the same tools that Photoshop offers. Being open source it doesn’t have the polish that Photoshop does, and won’t offer nearly as many third party options or tutorials. However, as a budget friendly way of processing your images, this is by far the best way to go.

Darktable

darktableDarktable is what I’d recommend if you’re looking for a RAW developer to substitute for Lightroom. Like GIMP, this is an open source option, which offers a number of features that will give you complete control of your images, and truly does compete with Lightroom in that area. Again where it’ll fall flat is that you’ll have less extendibility, and not as many resources to help you along the way. Note: Darktable does not work on Windows.

Other Tools

When it comes to post-production there are a number of what I’d call, supplemental tools available. These tools are designed to work in conjunction with Photoshop and/or Lightroom, and help you further refine your style as a photographer.

TopazLabs

logo_smallThe TopazLabs line of products includes 17 different pieces of software, each one specifically designed for its own unique purpose. These tools are designed to help you enhance and speed up your post-production workflow, but not necessarily replace Photoshop or Lightroom, although some of Topaz’s programs, like Impression and Texture Effects, do offer some standalone functionality that will let you create very different types of images.

Nik Softwarenik-logo

Like TopazLabs, Google’s Nik collection is a set of tools that will help you enhance and speed up your workflow. There aren’t as many different tools, and Google has a recent track record of killing off products that weren’t working for them without warning. But, the Nik collection is powerful, and will give you some great functionality beyond just Lightroom’s basic toolset.

Photomatix

photomatixPhotomatix has been the leader of the HDR post-production world for quite some time. Their product continues to produce some of the best controlled tone mapped images, and would be a great addition to your set of tools if you wanted to get deep into HDR photography.

Aurora HDR

aurorahdrAs an alternative to Photomatix, Aurora HDR is a newly released product from Macphun, in partnership with Trey Ratcliff. At the moment Aurora HDR is only for Mac and is an early stage product, so there’s bound to be some growing pains. That said, with backing from Trey Ratcliff, who’s made his name on HDR photography, this product could eventually get to where it wants to be – which is an all-in-one HDR tool, that doesn’t require Lightroom or Photoshop to produce images.

Not a beginner? What else would you recommend?

If your favorite piece of software didn’t make this list let us know why you like it, and why you’d recommend it over the others in the comments below.

googletag.cmd.push(function() {
tablet_slots.push( googletag.defineSlot( “/1005424/_dPSv4_tab-all-article-bottom_(300×250)”, [300, 250], “pb-ad-78623” ).addService( googletag.pubads() ) ); } );

googletag.cmd.push(function() {
mobile_slots.push( googletag.defineSlot( “/1005424/_dPSv4_mob-all-article-bottom_(300×250)”, [300, 250], “pb-ad-78158” ).addService( googletag.pubads() ) ); } );

The post A Beginner’s Guide to Choosing the Right Post-Production Software by John Davenport appeared first on Digital Photography School.


Digital Photography School

 
Comments Off on A Beginner’s Guide to Choosing the Right Post-Production Software

Posted in Photography


How Cropping in Post-Production Can Improve Composition

16 Nov

Even though I strive to get the best compositional shot in-camera. I do see ‘cropping’ as essential to my post editing workflow. For such a simple post edit technique, it can really enhance and improve composition of the image. I have also found cropping an image, be it small or in a creative sense can transform an image dramatically.

How Cropping in Post-Production

I like to view cropping as reframing the scene. The initial framing of the scene comes when you look through the viewfinder, then next when you have uploaded your images onto your computer for editing.

You get the chance and time to critically see if your image(s) needs cropping and what type is required. For example, there might be some distracting elements in the foreground that you missed when you looked through the viewfinder, or a horizon line isn’t quite as straight as it should be.

In this article, I’m going to illustrate the following reasons why you might crop your images in post-production:

  • To straighten lines: keep the horizons even and the vertical lines vertical.
  • To move your subject or object: a little more to the left, right, up or down.
  • To trim away distracting elements, especially at the sides or the near foreground.
  • To zoom in to show impact, especially portrait or head-shots.
  • To use the rule of odds – instead of two subjects just use one.
  • For creative cropping – rotate image, use perspective crop.

Let’s take the first example, I took this shot handheld when I should have used a tripod. An uneven horizon line does not make for a good composition. The eye is immediately drawn there, for the wrong reason.

crooked-horizon-line

Seascape with a crooked horizon line.

However, this is easily remedied in most photo editing programs. As Adobe Photoshop CS6 is my go-to photo editing software. I will be referencing it for the rest of this article.

straighten-button

Once you click on the Crop Tool in the Tools panel, there is a dedicated straighten button in the Options Bar.

Click on the Crop Tool in the Tools panel. Go up to the the Options Bar where there is a dedicated Straighten button. Make sure this is selected, click and drag along the crooked horizon line. Release it, and Photoshop straightens the line and crops the image in one action! The same process can equally be applied to vertical lines.

straightened-horizon-line

Horizon lines are easily fixed using the Crop Tool in Photoshop.

The Crop Tool in Photoshop CS6 is impressive. It now works non-destructively. But you must make sure Delete Cropped Pixels isn’t ticked up in the Options Bar (leaving this box unticked keeps cropped portions which can be recovered later if needed).

Delete-cropped-pixels

The Crop Tool in Photoshop CS6 works non-destructively if the Delete Cropped Pixels box is unchecked.

Inside most editing programs there is usually a choice of overlay guides, based on traditional compositional concepts like the Rule of Thirds or the Golden Ratio. You can read more about Composition in this article: Easy Tips to Help Beginners Understand Composition The crop overlays are great visual guides for good compositional techniques and makes it much easier to crop your image. I usually set it to Rule of Thirds.

So in the next image, I wanted the focus of this shot to be entirely on the sunflowers. The background, although blurred, is still too distracting with the color of the garments worn by the passersby.

sunflowers

Although the background is blurred, the colour of the garments worn by the passersby is too distracting.

I started with one of the aspect ratio presets. These can be found under this tab Unconstrained. I selected 5 x 7.

Aspect-ratio-5x7

There are various preset aspect ratios when you click on the Unconstrained tab. You can also save your own presets too.

I dragged the top right corner handle of the crop box down, and in towards the centre, to maintain this aspect ratio. By clicking on the image inside the crop box, I was able to move and reposition the image into place.

sunflowers-cropped

The sunflowers are now the main focus point in this image, and the green blurred background is complimentary, without being a distraction.

I am strong believer in using my feet to get close to the subject, or if you have a nice telephoto lens, then happy days. Unfortunately for my next shot, I didn’t have the option of either of the above.

I was at the zoo on a family outing, so I wasn’t taking dedicated shots for anyone. I was behind a barrier and a good 30 feet (approx.) away from the seals. I didn’t get time to think or compose for this shot. I just wanted to grab a shot of the seals.

seals-at-the-zoo

Seals taken at the zoo.

The day was fantastic weather wise, and these seals were really enjoying the sunshine. I wanted to crop in tightly, just on the seals, but I had the megapixels to play with because I had a 24 megapixel camera with me, which can produce a 20×13” at 300 dpi print. The final crop for this image would give me 5.5×4” at 300 dpi print.

seals-cropped

I cropped in tight to get a close-up of the seals. I didn’t like the railings at the back, but I would have preferred to have kept the reflection of the seals in the water, but there is always a trade off!

In this next shot, cropping in tight on a subject can convey more impact, especially for portrait shots. No two people reveal the same expression. As a photographer, some subjects are easier to capture an expression over others.

Emmet-and-Lucy

Emmet and Lucy enjoying the nice weather and the chat!

I wanted to convey Lucy looking at Emmet in an adoring fashion, I-only-have-eyes-for-you type of expression.

Lucy-cropped

Lucy hanging on to every word that Emmet is saying! The look of I-only-have-eyes-for-you!

Another way to convey impact is to focus on the action. Here, in this shot below, I cropped out my other daughter, so that the focus was on my youngest daughter running to shore.

fun-at-the-beach

Fun at the beach.

fun-at-the-beach-cropped

By cropping out my other daughter, the focus is on the action. It’s also using the Rule of Odds to focus on the single subject.

Cropping an image is a great way to apply the Rule of Odds. A good example of this is in the following shot. The two subjects are side-by-side. By cropping in tight on each subject, I have created two distinct head-shots from one single image.

two-portraits-together

Two subjects shot sitting on a bench side-by-side.

two-separate-portraits

After the image is cropped, I now have two distinct portraits.

Last but by not least, try and experiment with rotating your image to the left or right, and then cropping. This may be particularly useful with photos of tall buildings, where you want the focus to be on the height of the building.

I had taken the following photo in Berlin some years back from a boat on the river Spree. This modern building was quite impressive, but the reflection of the sky and clouds in the glass, caught my eye. It made for a nice abstract composition.

Berlin

A shot of a building while in a boat on the river Spree in Berlin. Compositionally, this by itself is not a good shot.

The Crop Tool in Photoshop has another feature, the Perspective Crop Tool. When you click on the Crop Tool and hold, a fly-out menu appears with four options. The Perspective Crop Tool is directly under the Crop Tool.

perspective-crop-tool

With some editing to highlight the reflection in the glass of this building, I used the Perspective Crop Tool to create an abstract composition.

Starting at one corner, click and drag across to the other corner, and repeat around the lines of the window frame. A grid appears around where you have clicked within the image. Click the commit button at the top in the Options Bar, or press the enter key. Make finer adjustments by clicking back to the regular Crop Tool.

perspective-crop-grid

The perspective Crop Tool in action.

abstract-composition

I created this abstract composition using the Perspective Crop Tool in Photoshop.

Cropping is, after-all, getting an alternative perspective to enhance a better composition.

To crop or not to crop, that is the question? Share your comments and images below please.

This week on dPS we’re featuring a series of articles about composition. Many different elements and ways to compose images for more impact. Check out the ones we’ve done so far:

  • Using Framing for More Effective Compositions
  • 7 Tips to Improve Your Skyline Photos
  • 33 Images that Exemplify Compositional Elements
  • Weekly Photography Challenge – Composition Craziness
  • How to Take Control of Aperture and Create Stronger Photos

googletag.cmd.push(function() {
tablet_slots.push( googletag.defineSlot( “/1005424/_dPSv4_tab-all-article-bottom_(300×250)”, [300, 250], “pb-ad-78623” ).addService( googletag.pubads() ) ); } );

googletag.cmd.push(function() {
mobile_slots.push( googletag.defineSlot( “/1005424/_dPSv4_mob-all-article-bottom_(300×250)”, [300, 250], “pb-ad-78158” ).addService( googletag.pubads() ) ); } );

The post How Cropping in Post-Production Can Improve Composition by Sarah Hipwell appeared first on Digital Photography School.


Digital Photography School

 
Comments Off on How Cropping in Post-Production Can Improve Composition

Posted in Photography


Postproduction – Spatial View Stereo 3D Editor Plug-in for Adobe® After Effects®

08 Aug

Tutorial which shows how to create stereoscopic content with the Postproduction Plug-in using Adobe® After Effects®. The spatial view is created by re-using multi-ocular material in addition with 3D layers (eg for Text or Logo).
Video Rating: 0 / 5

 
1 Comment

Posted in 3D Videos


photo post-production masterclass #1: retouching

14 Mar

The first in our photo post-production masterclass series reveals the various methods of photo retouching. Stanislav Petera guides you through the tools and techniques used to achieve the most exciting, desired effects in fashion and advertising photography. Using only basic Adobe Photoshop® tools (software is not included), you will learn how to create flawless skin, make eyes gleam and hair glow. stanislavpetera.net
Video Rating: 3 / 5