RSS
 

Posts Tagged ‘Plastic’

LEGO Ideas design recreates the iconic Nikon F3 out of plastic bricks

29 Dec

Photographer and LEGO designer Ethan ‘LegoDog0126’ Brossard has recreated the iconic Nikon F3 film camera as a LEGO kit featuring 549 pieces. The design has been submitted to the LEGO Ideas website where it was selected as a Staff Pick on November 25. At this point in time, the submission has nearly 1,400 supporters and 190 days remaining for others to support it.

Brossard detailed his project in a recent post on Emulsive, where he explained that his LEGO recreation of the Nikon F3 is only a bit larger than the actual camera. The render features an impressive degree of detail for something made from small plastic bricks and other components, including almost all of the levers found on the F3, the main dials and a plastic representation of the SLR’s mirror.

Though the renders include a blocky roll of film, Brossard notes that it can’t actually fit in the camera due to the thickness of the LEGO bricks. As well, the recreation features an approximation of the Nikon AI-S prime lens. The shiny chrome featured in the renders isn’t actually a color produced by LEGO, meaning anyone who attempts to build the model will need to use gray or some other color.

Brossard has shared a Google Drive folder containing the Studio and Ldraw model files for anyone to download. As well, the model can be found on Rebrickable. The submission will need to achieve 10,000 supporters on LEGO Ideas in order for its to undergo a LEGO Review, at which point the company will evaluate the design for its potential as an official LEGO kit.

Articles: Digital Photography Review (dpreview.com)

 
Comments Off on LEGO Ideas design recreates the iconic Nikon F3 out of plastic bricks

Posted in Uncategorized


FixIts biodegradable plastic sticks can be used to fix, upgrade your camera gear

04 Apr

Last summer, a Kickstarter campaign raised funds for moldable, eco-friendly plastic sticks called FixIts. The product is billed as a DIY tool that enables anyone to easily mold durable plastic into whatever little gizmo or component they need, similar to Sugru, but more eco-friendly. The FixIts sticks are now available to order in orange, black, and white colors.

FixIts sticks can be used creatively for a number of projects, and that includes potentially being used to create small custom camera gear mounts and accessories. In addition, the biodegradable plastics can be used to fix broken gear, such as creating a replacement tripod foot, repairing a bit of missing plastic or reinforcing a weak cable.

The product is similar to other moldable plastics; users only need to put the stick into a cup of hot water, wait for the plastic to soften, then mold it into whatever shape is desired and let it cool down. These created components can be heated and used again to create different objects.

FixIts are available now in three-stick packs $ 8.53 / £6.50 / €7.62.

Articles: Digital Photography Review (dpreview.com)

 
Comments Off on FixIts biodegradable plastic sticks can be used to fix, upgrade your camera gear

Posted in Uncategorized


How to Use Plastic Wrap to Create Neat Color Special Effects

26 Sep

In this article I’ll show you how to use a common household item, plastic wrap, to make creative images with colored filter special effects.

Plastic wrap (a blanket term for Saran Wrap, Glad Wrap and Cling Wrap) is a clear plastic film typically sold in rolls or boxes with a serrated edge. Usually used for sealing food items like sandwiches to keep them fresh for longer, plastic wrap is an incredibly versatile material. Great for a picnic or practical jokes, it’s also a useful tool for creative photography.

If you’re looking to add something a little different to your portfolio, plastic wrap is a simple, low-cost option. Using a rubber band, a camera, and some markers, you can easily create a colored filter out of plastic wrap – adding an experimental edge to your photographic repertoire.

How to Use Plastic Wrap to Create Neat Color Special Effects

The science

Like many great scientific discoveries, plastic wrap was discovered by accident. Ralph Wiley, a lab worker at The DOW Chemical Company was having trouble washing out a beaker which contained a substance he couldn’t scrub clean. He called the substance “Eonite” named after an indestructible substance created by chemist Eli Eon in the Little Orphan Annie comic book strip. DOW researchers adopted the substance, using it to create a greasy, dark green film they called “Saran” and shared it with the military to spray on fighter jets as a guard against sea spray.

How to Use Plastic Wrap to Create Neat Color special Effects

A very subtle red and blue colored filter adds a little color to this image of a Ferris wheel.

Saran works by polymerizing vinylidene chloride with acrylic esters and unsaturated carboxyl groups to create chains of vinylidene chloride. What does that mean? Simply put, the process results in a film with molecules bound so tightly that very little can penetrate it. The chemists at DOW eventually removed Saran’s green color. They also removed an unpleasant odor the Saran emitted when exposed to oxygen. It was first sold for household use in 1953.

How to Use Plastic Wrap to Create Neat Color special Effects

A surreal green shade created with a plastic wrap filter colored with green marker.

Plastic wrap in art

While handy in the lunchbox or fridge, plastic wrap is also a great material to experiment with creatively. Artists have used plastic wrap in sculpture, painting and as a prop for photography. Many well-known fashion designers have created clothing from layers of plastic cling film for the runway.

Because of its relatively clear composition, plastic wrap is great for forming a barrier between your camera lens and foreign materials. Recently, I applied a layer of Vaseline to plastic wrap stretched over the front of my camera lens. The result was a fine, misty effect without the agony of a greasy camera.

How to Use Plastic Wrap to Create Neat Color special Effects

This image was captured using plastic wrap over the lens with a red section on the upper half and a green colored portion below.

Creating a colored special effects filter

You will need:

  • A piece of plastic wrap at least 30cm in length and width.
  • Camera and lens.
  • Permanent markers.
  • A few rubber bands.

Adding color

To create a colored filter for your camera, first you will need to add some color to your plastic wrap! The easiest way to do this is to stretch the plastic wrap over your lens and color in the plastic within the circle. However, this method is a little risky. If the plastic wrap is pierced, you will end up drawing on your lens or lens protector (cap).

Instead, take your lens cap or lens and place it on the plastic wrap. Trace a circle around the outside. Now you’ll know where you should color your plastic wrap to get full coverage of the lens. To minimize the use of plastic here, you can trace multiple outlines of your lens on the same sheet of plastic wrap as I’ve done below.

How to Use Plastic Wrap to Create Neat Color special Effects

Use the same sheet of plastic wrap to create different effects, making it easier to keep for later and minimizing waste.

Finally, add color to the sectioned-off portion of plastic wrap, make sure you use quality permanent markers. Low-quality texters won’t leave any visible color on the plastic wrap and the ink from non-permanent markers simply slides off the plastic (onto your hands or something worse).

You can color in your circles any way you would like. For a full effect, color in the whole interior of the marked out circle with one or two colors. For a softer gradient, draw a light squiggle. You can color in the center of the circle and leave the perimeter clear, or vice versa. Don’t be afraid to experiment here!

How to Use Plastic Wrap to Create Neat Color special Effects

The effect of a portion of plastic wrap colored entirely green and placed over the front of the lens.

How to Use Plastic Wrap to Create Neat Color Effects

Coloring only the outer perimeter of the plastic wrap filter produces a fish-eye effect.

How to Use Plastic Wrap to Create Neat Color special Effects

Create an eerie atmosphere with a thick layer of red permanent marker.

Time to photograph

When you are happy with the colors of your circles, select one and lay it carefully over the front of your lens. Fix the filter in place with a rubber band, but don’t pull the plastic wrap too tightly or it will split.

When the filter is fixed properly to the lens, it’s time to get photographing. Because your camera will have difficulty focusing with the layer of colored plastic wrap in the frame, you should use manual focus over automatic. Because the filter will cut down the light reaching your sensor, you may also need to increase your exposure time or adjust your aperture accordingly.

Also, be sure to check the rubber band is fitted snugly around your lens. You don’t want it to come flying off, especially when photographing portraits!

How to Use Plastic Wrap to Create Neat Color special Effects

How to Use Plastic Wrap to Create Neat Color Effects

Using colored plastic wrap can add an effect imitating the light leaks produced with partially exposed film.

Finishing up

Once you are happy with your photos, take them back to have a look on your computer. As I mentioned before, the filer may cut down the amount of light reaching your sensor. This could result in photographs that lack contrast. Photoshop is your friend here.

Open your images in Photoshop and adjust the Curves layer to increase contrast. For more intense colors you may also want to adjust the Vibrance and Saturation of the image with the Vibrance and Saturation tool.

How to Use Plastic Wrap to Create Neat Color Effects

Adjust the Curves tool for more contrast in your images.

How to Use Plastic Wrap to Create Neat Color Effects

Adjust the Vibrance and Saturation tool for more intense colors.

Your Turn

Once you’ve got some quirky plastic wrap photos, please share them in the comments below. And remember to keep your filters for later. You never know when you might need them. Fold them down or scrunch them into a loose ball, they last for ages. Have fun.

How to Use Plastic Wrap to Create Neat Color Effects

An apocalyptic scene created with red ink that completely covers the plastic wrap filter.

How to Use Plastic Wrap to Create Neat Color Effects

How to Use Plastic Wrap to Create Neat Color Effects

Loosely fixing colored plastic wrap to the lens, mirrors the view through a window on a rainy day.

Pulling the plastic wrap taut reduces glare.

An image with a slower shutter speed creates light trails as if looking through a window with raindrops on the outside.

The post How to Use Plastic Wrap to Create Neat Color Special Effects by Megan Kennedy appeared first on Digital Photography School.


Digital Photography School

 
Comments Off on How to Use Plastic Wrap to Create Neat Color Special Effects

Posted in Photography


How to Make Funky Colorful Images of Ordinary Plastic Objects Using a Polarizing Filter

27 Jul

A cornerstone in modern manufacturing, plastic is an amazing thing. Look around and you’ll see an abundance of plastic materials used in an endless variety of products. From pens to planes – yep, even modern commercial aircraft are cutting down on weight by introducing plastic composite components – plastic has revolutionized the way we live. And while much of the plastic we encounter is discarded after the first use – this photography tutorial will give you a good reason to hang onto those plastic knives and forks. By using a polarizing filter, some plastic materials and a computer screen, we can reveal a surprisingly beautiful side to the internal stresses of hard plastic material.

How to Make Creative Colorful Images of Plastic Objects Using a Polarizing Filter

Supplies you will need:

  • Polarizing filter or polarized sunglasses
  • Computer screen
  • Camera
  • Clear sticky tape
  • Sheet of glass
  • Tripod (optional)
  • Transparent plastic objects

Setting up

In basic terms, what we’ll be doing is sandwiching a plastic object between a polarized light source and an on-camera polarizing filter. Polarizing filters that screw into the front of a camera are used by photographers to add contrast and reduce glare.

How to Make Funky Colorful Images of Ordinary Plastic Objects Using a Polarizing Filter

Don’t have a polarizing filter? Use your polarized sunglasses in a pinch.

If you don’t have a polarizing filter, a pair of polarized sunglasses will do the trick. Simply position the sunglasses so that one eye sits over the front of the camera lens like a filter. Keep in mind that the shape of the eyepiece will probably prevent complete coverage of the front lens element. If this is the case, some cropping may be required in Photoshop later. You may also need to do some sticky-taping to ensure the glasses sit correctly.

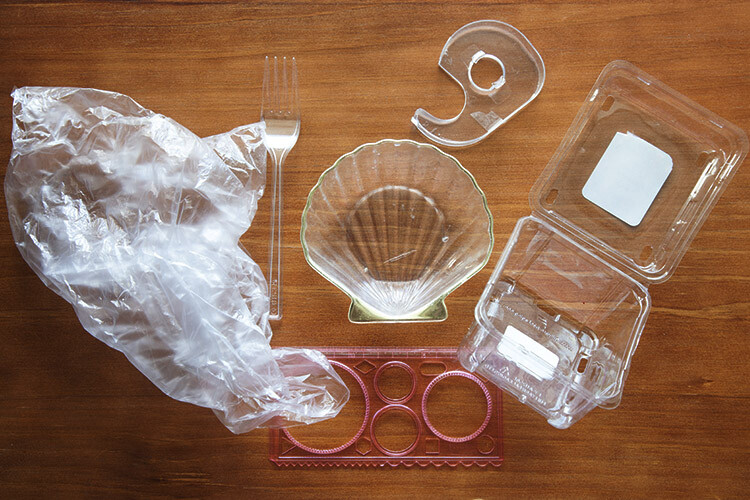
Now gather some clear plastic materials to photograph. Objects like plastic bags, sticky tape dispensers, plastic food containers, clear plastic cutlery and packaging all turn out well. Basically, any cheap, transparent plastic will work to some degree, so have a good scavenge around!

How to Make Creative Colorful Images of Plastic Objects Using a Polarizing Filter

Finding good backlighting

Next, you’ll need a polarized light source to shine through the transparent plastic material. Conveniently, modern desktop and laptop computer screens emit linearly polarized light. First, you need to maximize the white light emitting from our computer screen. To do this, download a plain white background from Google Images. Once downloaded, open the file in a default image viewer and set the image to Full-Screen Mode. This will spread the white backdrop over the entirety of the functional computer screen, providing the backdrop for our polarized objects.

Once downloaded, open the file in a default image viewer and set the image to full-screen mode. This will spread the white backdrop over the entirety of the functional computer screen, providing the backdrop for your polarized objects.

How to Make Creative Colorful Images of Plastic Objects Using a Polarizing Filter

Set the viewing mode of a clean white image to full-screen so that it completely covers the screen.

Arrange the subjects

Once the white background is set, you can start arranging your plastic items on the computer screen. If you have a choice between using a desktop or laptop computer, I recommend going with the laptop. Unlike a desktop computer, you can turn an open laptop upside down, so the screen lays flat on a surface. This turns your laptop into a home-made light box of sorts, perfect for sitting your plastic objects on.

Keep in mind however that laptops with touchscreen capabilities may not work as effectively. From my own experience, these laptop screens deliver far less pronounced results. Note: A large tablet or iPad may work as well.

How to Make Creative Colorful Images of Plastic Objects Using a Polarizing Filter

Viewed through a polarizing filter, this transparent stencil is placed on the top of a touchscreen laptop. While the polarizing effect can still be seen, the finished image falls flat.

Workaround for desktop screens

Because the screen is upright, using a desktop computer for this project can seem a little trickier. Rather than tipping a full sized computer screen on it’s back, I’ve been fixing my plastic materials to a sheet of glass with tiny pieces of clear sticky tape. Easily recovered from old photo frames, the glass sheet means you can avoid sticking tape directly to your computer screen, without blocking out any light. For best coverage, a larger sheet of glass is preferable, just make sure that it’s dust free. Once you are finished taking your photographs, you can remove any evidence of the sticky tape with the “Clone Stamp” in Photoshop.

For best coverage, a larger sheet of glass is preferable, just make sure that it’s dust free. Once you are finished taking your photographs, you can remove any evidence of the sticky tape with the “Clone Stamp” in Photoshop.

How to Make Creative Colorful Images of Plastic Objects Using a Polarizing Filter

I’ve affixed this transparent stencil to a pane of glass to keep it upright against the computer screen. The small amount of tape can be removed easily in Photoshop later.

How to Make Creative Colorful Images of Plastic Objects Using a Polarizing Filter

In this image, a small piece of the clear sticky tape can be seen.

How to Make Creative Colorful Images of Plastic Objects Using a Polarizing Filter

Taking advantage of the solid black background, any trace of the sticky tape can be removed by using the paintbrush tool with a black swatch selected

Getting the shot

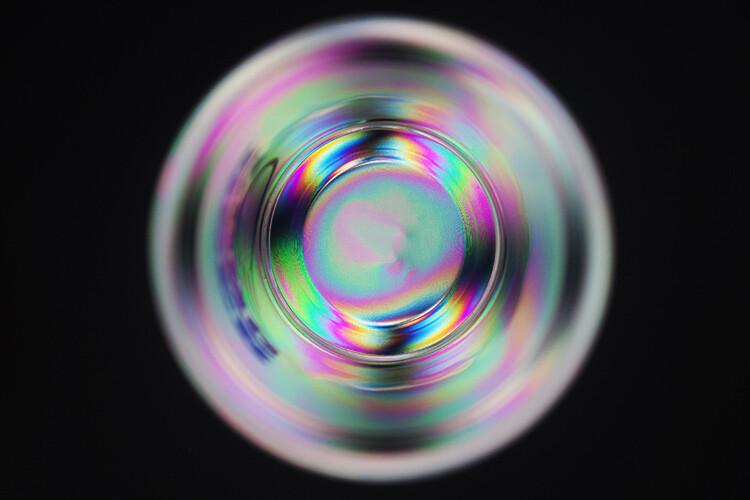
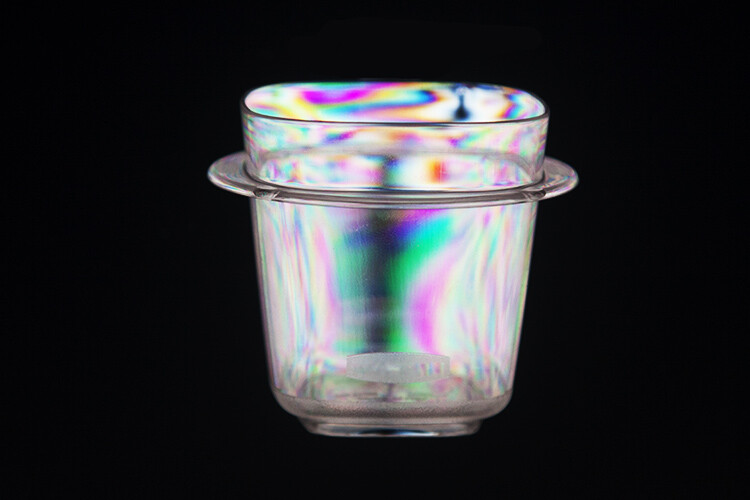
Once you have assembled your objects against the computer screen, it’s time to see some results!  Grab the camera you outfitted earlier with either the polarizing filter or the polarized sunglasses. While looking through the viewfinder (or LiveView Mode) point the camera at your plastic assemblage. Like magic, the boring clear plastic materials are filled with a beautiful array of colors.

Change the angle – change the background

Depending on the angle of the polarizing filter, you’ll notice that the backdrop of your image ranges from the white computer screen to jet black. The degree of polarization you see through the lens is dictated by the angle of the filter in relation to the wavelengths emitted by the computer screen. This means that by changing the angle of the polarizing medium, you can adjust the brightness of the computer screen without impacting the color of the plastic objects.

Simply hold the camera in one hand (or use a tripod) and use the other to slowly rotate the filter around. The same effect can be achieved by manually tilting the polarized sunglasses from side-to-side.

How to Make Creative Colorful Images of Plastic Objects Using a Polarizing Filter

An image of a pretty shell shaped container I had on my dresser. The polarization effect highlights the stresses in a plastic material, rendering them as beautiful arrays of color.

The same shell container, this time with the filter angled so that the white light passes through to the camera sensor, rendering a white background

Your turn!

Now that you’ve got the basics, it’s time to raid the recycling bin! Post your results below and have fun.

How to Make Creative Colorful Images of Plastic Objects Using a Polarizing Filter

How to Make Creative Colorful Images of Plastic Objects Using a Polarizing Filter

How to Make Creative Colorful Images of Plastic Objects Using a Polarizing Filter

The polarizing effect caused this plastic bag to take on a rugged, mountainous appearance.

How to Make Creative Colorful Images of Plastic Objects Using a Polarizing Filter

How to Make Creative Colorful Images of Plastic Objects Using a Polarizing Filter

How to Make Creative Colorful Images of Plastic Objects Using a Polarizing Filter

The post How to Make Funky Colorful Images of Ordinary Plastic Objects Using a Polarizing Filter by Megan Kennedy appeared first on Digital Photography School.


Digital Photography School

 
Comments Off on How to Make Funky Colorful Images of Ordinary Plastic Objects Using a Polarizing Filter

Posted in Photography


Water You Can Eat: Edible Drink Bubbles Aim to Eliminate Plastic Bottle Waste

09 Jul

[ By WebUrbanist in Design & Products & Packaging. ]

So far so good: the creators of these edible water balls have begun deploying them at large-scale festivals, the kinds of places where hundreds of disposable plastic bottles are used and trashed. But while this type of innovation bodes well for the future of biodegradable design, there are still some flaws to be sorted out before it can begin to seriously tackle the big problem: 35 billion plastic water bottles tossed in the garbage every year.

Ooho!’s solution is pretty simple and ingenious: drop frozen balls of water (or other beverages) into a (thankfully) tasteless solution that forms a gelatinous layer around the outside. Once the ice melts, drinkers can pick up and pop a gulp, or if that seems too strange: puncture the membrane (which then biodegrades in weeks) and drink from it. Made of seaweed, the “container” layer can also be colored and flavored.

Between crowdfunders and other backers, they have a lot of funding behind them, and “the team at Skipping Rocks Lab—made up of chemists, engineers, designers and business advisors–are continuing to pioneer the use of seaweed in other packaging uses, with a mission to become the leading global producer of seaweed-based packaging.”

The whole process uses a lot less energy than normal bottles require, but does it serve to replace them? In pop-up settings, like festivals and sporting events, it could — especially if the machinery used to make them can be made mobile. But for ordinary everyday use the problem is trickier — the membranes are delicate and would pop if tossed into bags or pockets.

Still, the science is worth pursuing: the same method could be expanded to make more robust and larger frameworks (better analogs for ordinary bottles). And the technology could be improved to, made to create and dispense water balls on a more mobile and automatic basis in public-event settings (e.g. ball-vending machines). For now, it isn’t the invention to end plastic bottles some might hope, but it is a step in the right direction and — at least in limited contexts — makes for a sustainable drinking alternative.

Share on Facebook


[ By WebUrbanist in Design & Products & Packaging. ]

[ WebUrbanist | Archives | Galleries | Privacy | TOS ]


WebUrbanist

 
Comments Off on Water You Can Eat: Edible Drink Bubbles Aim to Eliminate Plastic Bottle Waste

Posted in Creativity


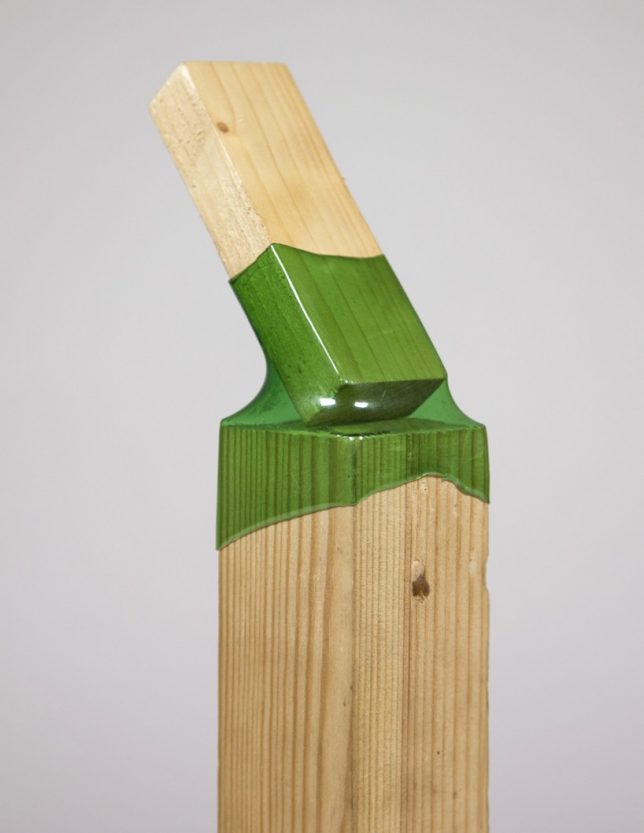
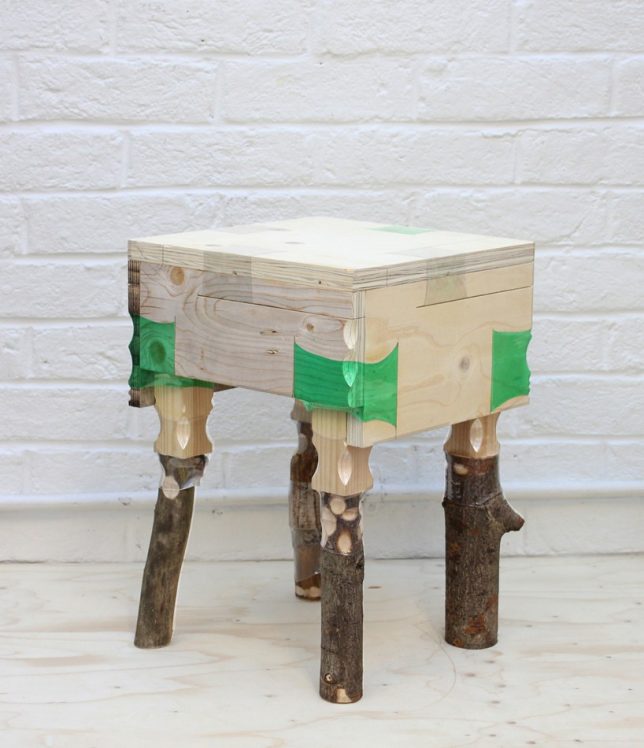
Recycling Genius: Shrunken Plastic Bottles Replace Furniture Joints

28 Jan

[ By SA Rogers in Design & Furniture & Decor. ]

joining-bottles-main

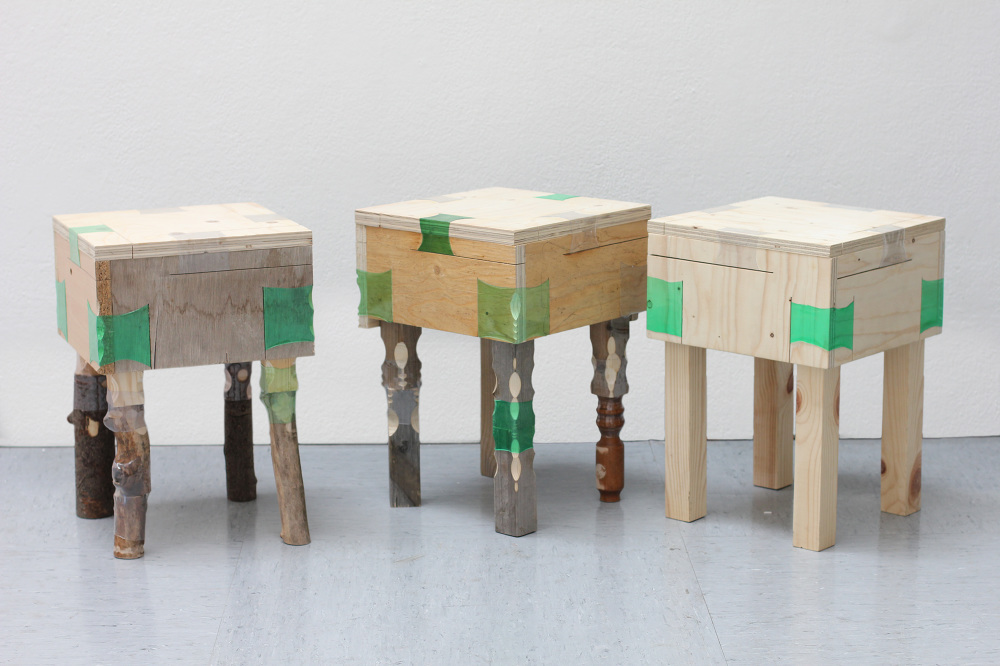
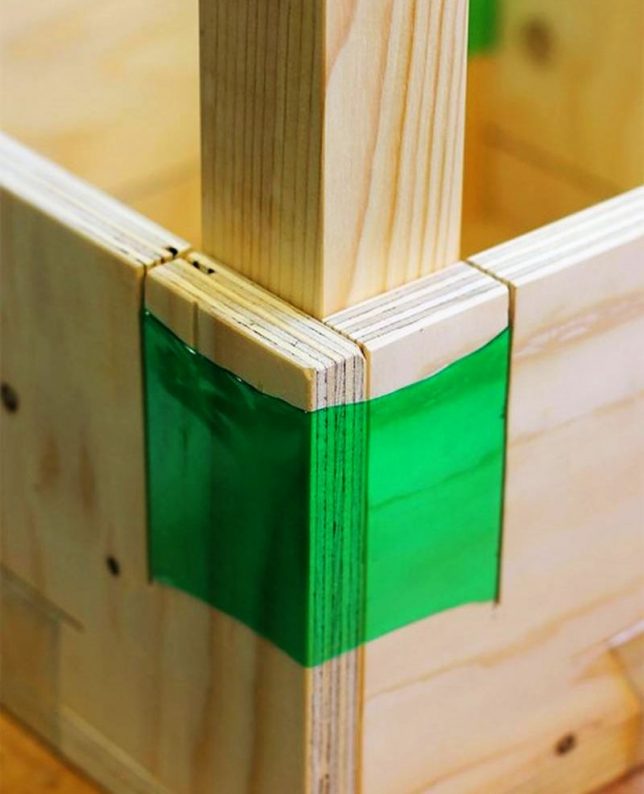
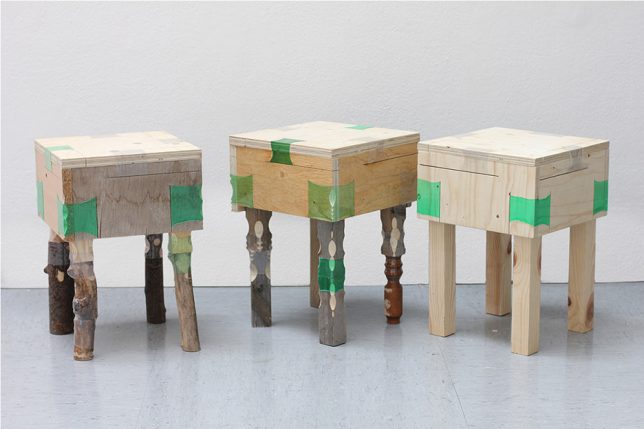
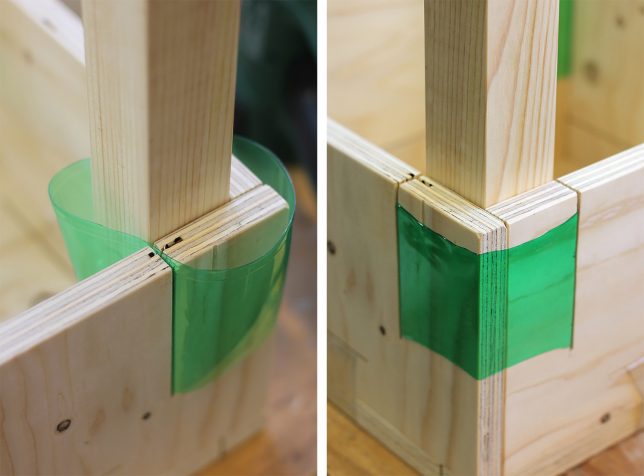
Assembling furniture DIY-style, without the skills, tools or fasteners used to produce conventional joints, becomes remarkably easy with shrink-wrapped pieces of discarded plastic bottles. While joinery is certainly an art – especially the complex forms found in Japanese furniture making – traditional methods aren’t necessarily accessible to anyone. This new project, Joining Bottles, offers a way to assemble functional furniture in minutes with trash and a heat gun.

shrunken-joints-4

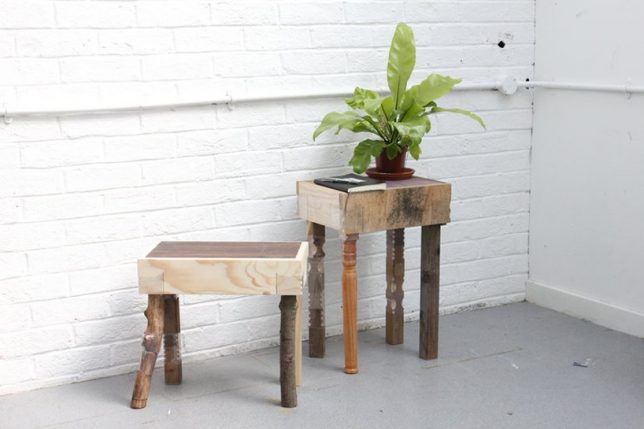
Created by product designer Micaella Pedros, ‘Joining Bottles’ aims to provide a model for producing useful objects using materials that are affordable and widely available. A pile of junk sitting on a curb suddenly becomes valuable in a new way, even if it’s a seemingly irreparable chair and a bin full of materials headed to the recycling plant.

shrunken-joins-2

joining-bottles-4

The individual pieces created for a series show how adaptable the concept can be. Use clear bottles if you want the joints to be unobtrusive, or colored bottles to highlight the ingenuity of the system. Wood waste of all kinds, including fallen branches, is assembled into stools, tables, shelves and other objects.

shrunken-joints-3

“The different types of wood and plastic bottles available are dictating the final aspect and composition of the work,” say the creators. “In that sense, a unique conversation is engaged within each piece. It creates more space for randomness and spontaneity, in other words, for human attributes in the creative process.”

Share on Facebook


[ By SA Rogers in Design & Furniture & Decor. ]

[ WebUrbanist | Archives | Galleries | Privacy | TOS ]


WebUrbanist

 
Comments Off on Recycling Genius: Shrunken Plastic Bottles Replace Furniture Joints

Posted in Creativity


Plastic Village: Tropical Housing Estate Built from 1MM Recycled Bottles

25 Oct

[ By WebUrbanist in Architecture & Houses & Residential. ]

plastic-bottle-architecture

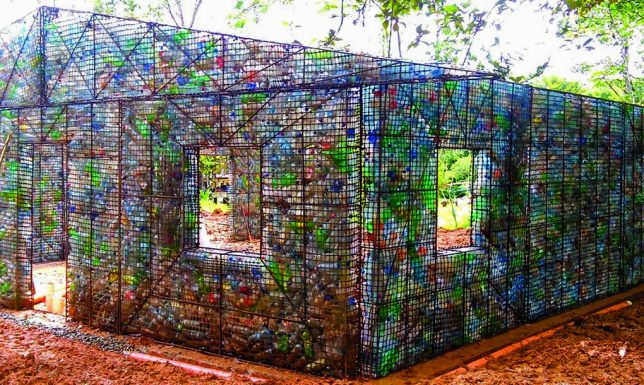
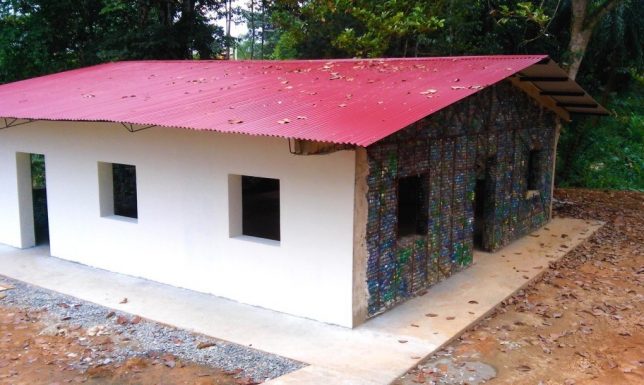
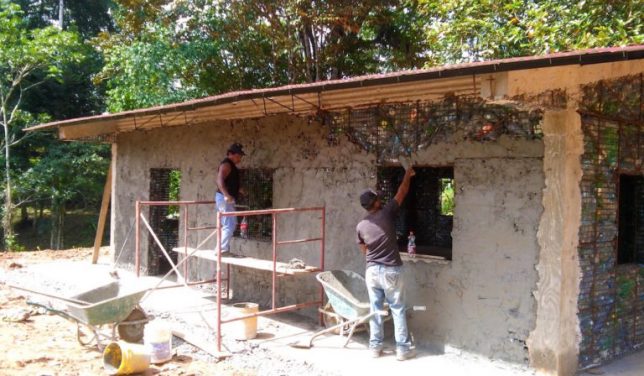
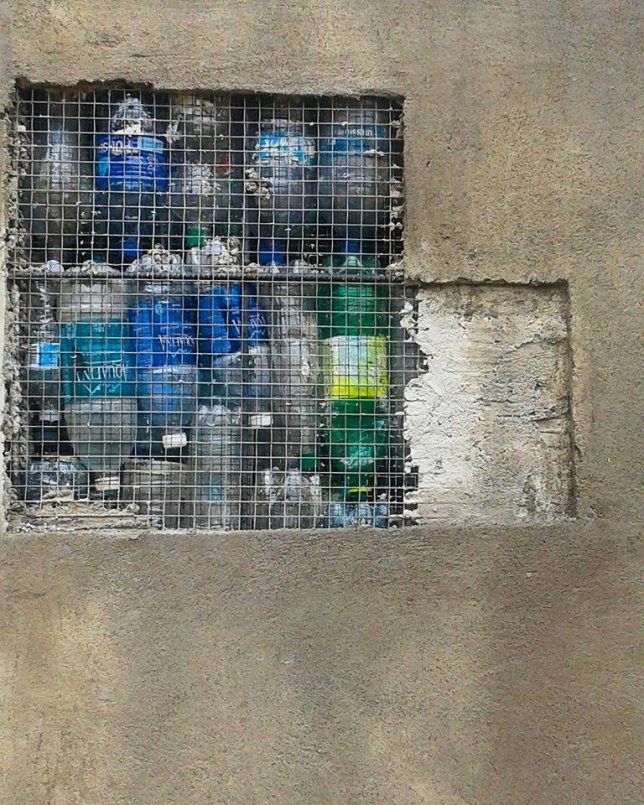
At a glance, it would be impossible to guess that the finished houses in Panama’s Plastic Bottle Village featured walls packed with recycled drinking containers. What started as a recycling initiative by a expat Canadian entrepreneur has become an architectural adventure that will ultimately reuse over a million plastic bottles.

plastic-bottle-finishing

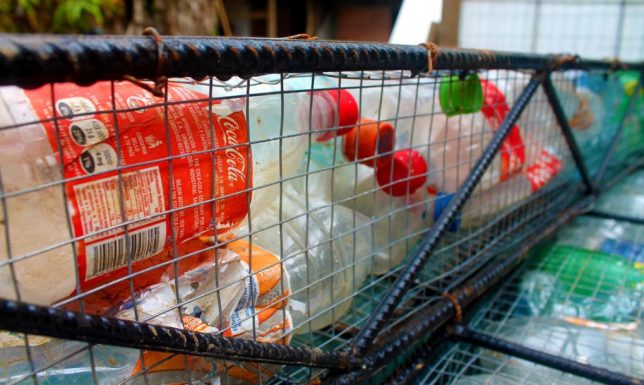
Since 2012, tens of thousands of bottles have been brought to the growing town to make buildings. These are stacked in steel cages with stones to fill in gaps and provide rigidity. Cement plaster covers the structures inside and out, making them appear like solid concrete or finished stucco.

The bottles, meanwhile, provide insulation while allowing airflow, keeping interiors in the hot climate a full 17 degrees cooler than the ambient outdoors.

plastic-bottle-castle

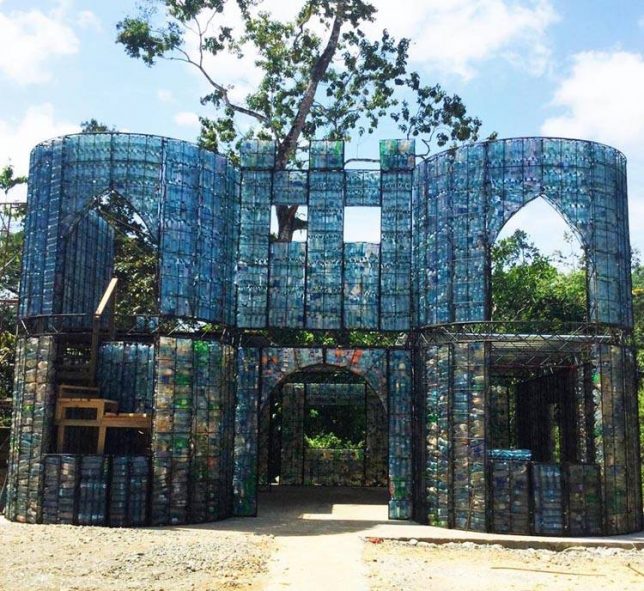
Multiple bottle-based houses already constructed on nearly 100 acres of lush tropical jungle land purchased for the Plastic Bottle Village, which will eventually be home to over 100 such structures. Also in the works: a small public park, retail operation and yoga pavilion.

plastic-bottle-complete

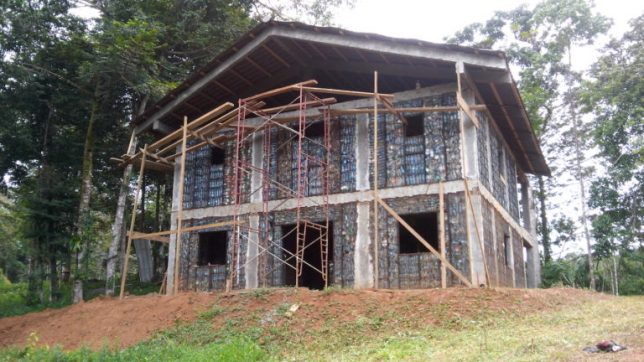
The steel-framed structures provide a balance of strength and flexibility, helping them stand up and support roofs but also to resist earthquakes. The Plastic Bottle Village is about more than just one place, too: its founder is educating others about how to build with this cheap and ubiquitous material that many see simply as waste.

plastic-bottle-cage

caged-bottle-concrete

The project puts consumption in context: “Average humans can consume 15 or more drinks in plastic bottles a month. If you were born after 1978, and live until 80 years old, you will leave behind a minimum of 14,400 plastic bottles on this planet.”

“These bottles take hundreds of years to break down into tiny pieces of plastic, never to completely disappear. Most of the waste is consumed by fish and birds, which has shortened their lifespans greatly.”

plastic-bottle-wall

It also illustrates the potential offsets: “If you live in a two story plastic bottle house of 100 square meters or 1,000 square feet per floor, then your house will be built reusing 14,000 plastic bottles. These recycled bottles could neutralize the negative effect of your passage on this planet,  and move closer to leaving only your footprints.”

Share on Facebook


[ By WebUrbanist in Architecture & Houses & Residential. ]

[ WebUrbanist | Archives | Galleries | Privacy | TOS ]


WebUrbanist

 
Comments Off on Plastic Village: Tropical Housing Estate Built from 1MM Recycled Bottles

Posted in Creativity


Blow-Up Party: Inflatable Black Plastic Dance Club & Bar

28 Sep

[ By SA Rogers in Drawing & Digital. ]

inflatable-club-1

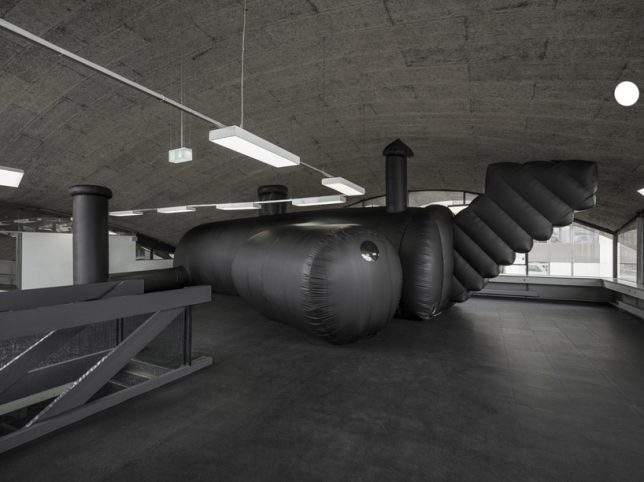
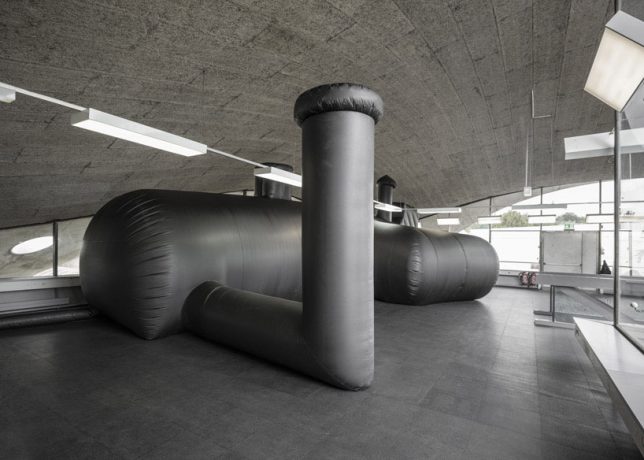
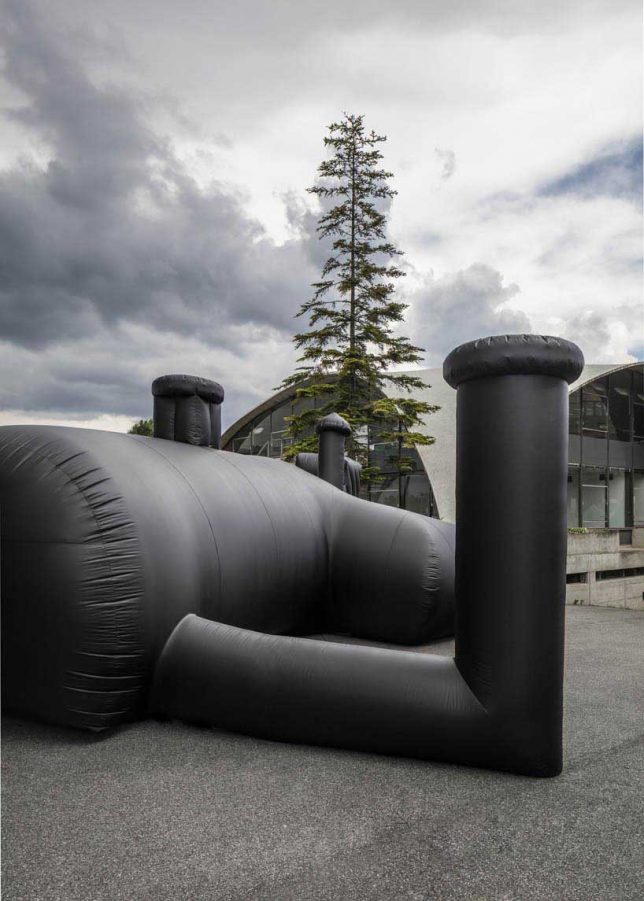
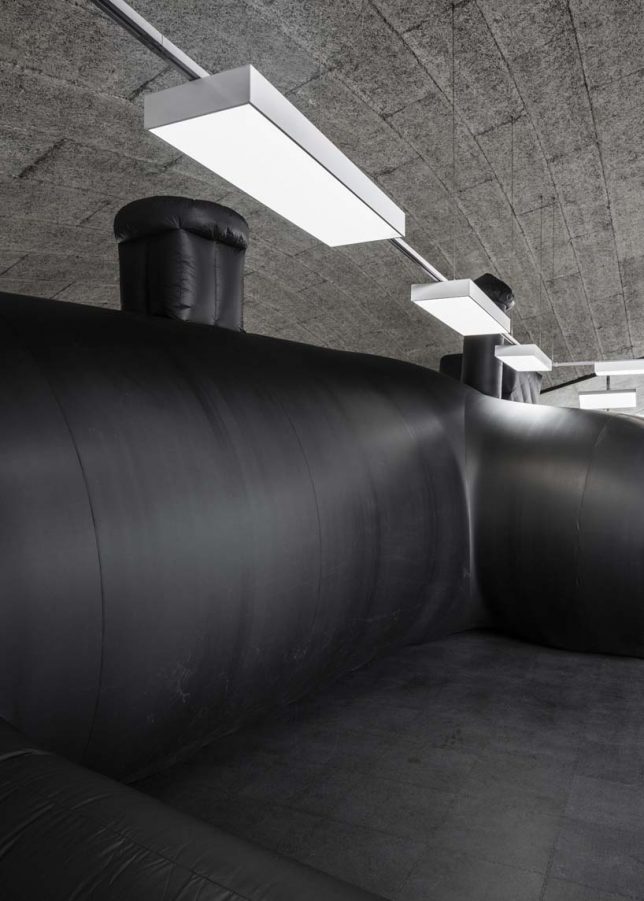
Deliberately dark and pipe-like to recreate the feel of being in a secret subterranean space, this inflatable nightclub and bar by Bureau A comes complete with blow-up benches, tables and a DJ booth. Constructed entirely from black PVC membrane, ‘Shelter’ was commissioned as a party venue for the Federation of Swiss Architects (better known as Bund Schweizer Architekten) and installed inside the cold, concrete Pavillon Sicli in Geneva.

inflatable-club-2

inflatable-club-3

“The underground fascinates and completes the hygienic and pan optical work of the over-ground,” say the architects. “For one night, the black hole of a neat and well-organized society is revealed as a potential for distortion, a potential of let-go and provoke, with a slight smile, the unsaid and the sweat. The mysterious black vessel lands in the modern space of a highly engendered concrete vault; a great spatial condition to explore the corners of what is hidden.”

inflatable-club-4

inflatable-club-6

The space inside is clearly quite limited and dark, so it would have been interesting to see what it looks like with people inside. The concept of inflatables for temporary spaces certainly isn’t new, but it’s still pretty cool to see these structures show up in unusual shapes and configurations, standing tall within mere moments of arrival on-site and then disappearing so quickly, it’s as if they were never there.

Share on Facebook


[ By SA Rogers in Drawing & Digital. ]

[ WebUrbanist | Archives | Galleries | Privacy | TOS ]


WebUrbanist

 
Comments Off on Blow-Up Party: Inflatable Black Plastic Dance Club & Bar

Posted in Creativity


LEGO-Like Architecture: $5,000 Homes from Recycled Plastic Blocks

18 Aug

[ By WebUrbanist in Architecture & Houses & Residential. ]

block house

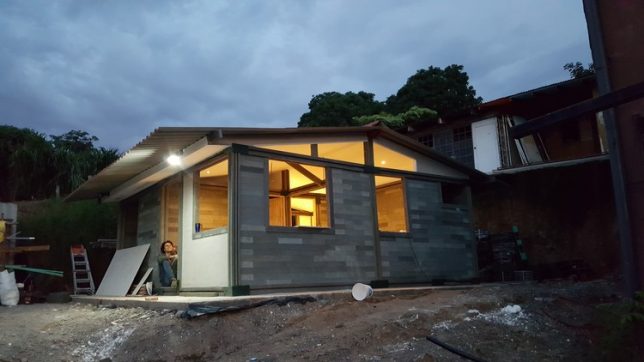
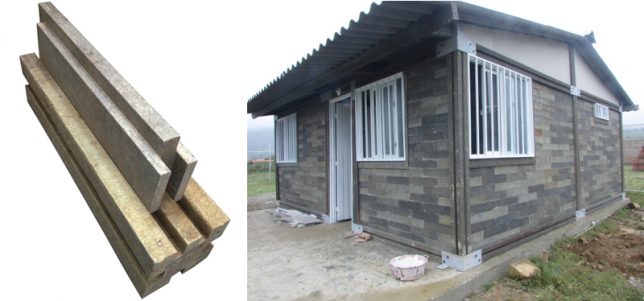
A Columbian company is tackling plastic waste issues and affordable housing with a single ingenious solution: interlocking LEGO-like bricks that can be used to build houses for a few thousand dollars per structure. Walls are formed using a slim slotted brick then framed using a thicker module used for beams and columns, locking the smaller units into place and providing rigid vertical and lateral support.

durable plastic lego blocks

Conceptos Plásticos is addressing their technology to rising populations of urban poor, families with the time but not financial means or materials to construct their own dwellings. The company works with locals to source plastic and create all kinds of spaces, including emergency shelters, community and educational buildings.

modular stacked block houses

The upcycled plastic blocks are easy to use and require no construction experience. They are durable, fire- and earthquake-resistant and much cheaper than other available materials. The company estimates the lifespan of the blocks at 500 years.

plastic block homes

“We hope to create a movement where more and more people get involved,” say the company founders. “We want to develop new products that make better use of the thousands and thousands of tons of plastic that is discarded.”

“There will soon be more plastic in the sea than fish, so we really need to do something big.” Recent projects using this novel material include a hostel for displaced victims of violence in the Columbian countryside.

Share on Facebook


[ By WebUrbanist in Architecture & Houses & Residential. ]

[ WebUrbanist | Archives | Galleries | Privacy | TOS ]


WebUrbanist

 
Comments Off on LEGO-Like Architecture: $5,000 Homes from Recycled Plastic Blocks

Posted in Creativity


Junk Joinery: Heated Plastic Scraps Connect Notched Wooden Furniture

15 Jul

[ By WebUrbanist in Design & Furniture & Decor. ]

wood plastic furniture

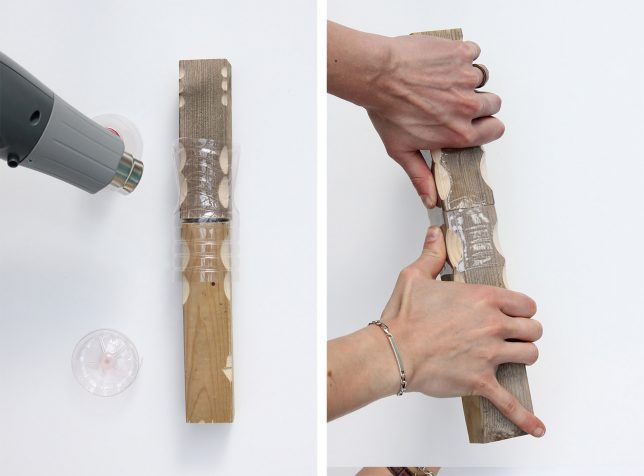
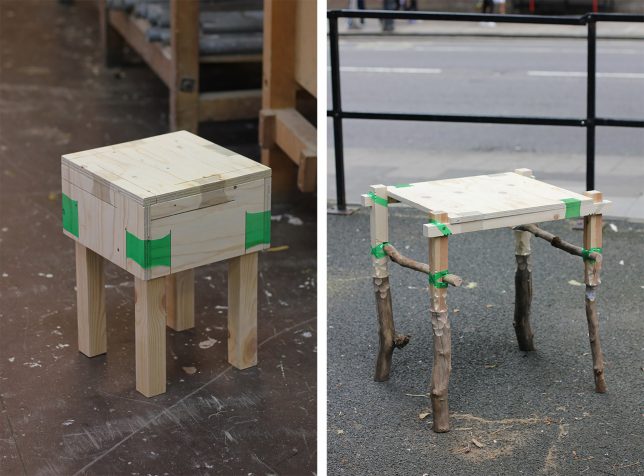
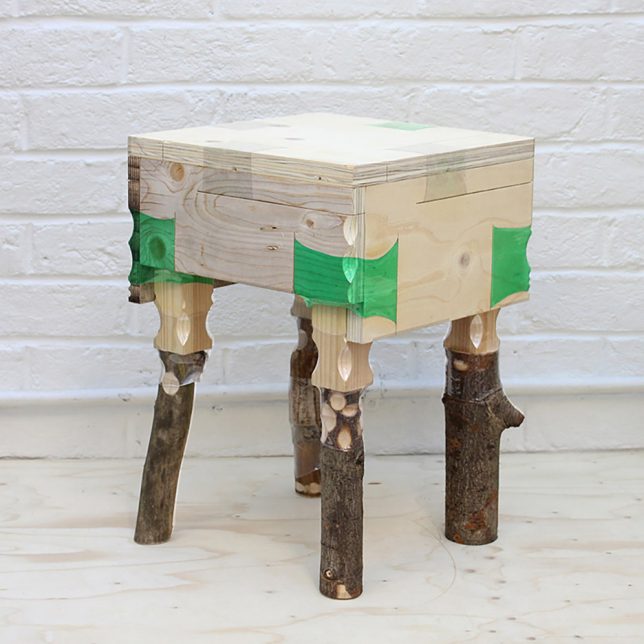
Using scraps from start to finish, this shrink-wrap approach to furniture is not only greener but faster and leaner, requiring less by way of specialized skills or tools and allowing people to build easier do-it-yourself objects. A project of Micaella Pedros for the Royal College of Art, the Joining Bottles project uses heat to shrink plastic around wood joints, collected from around London, locking them together.

wood plastic wrap

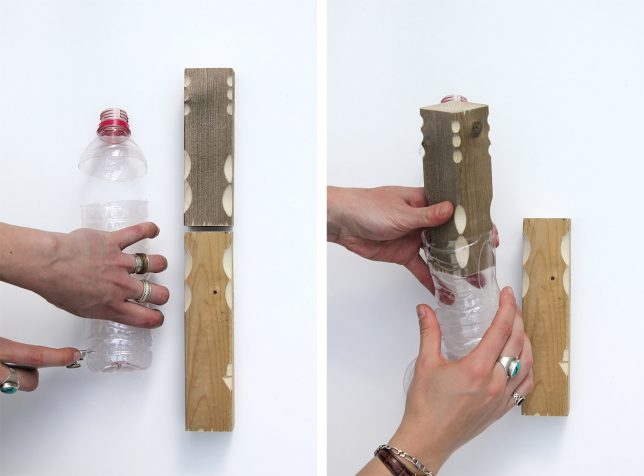
“The idea is about taking a plastic bottle, cutting it, and then putting it around two pieces of wood., Pedros explains. “Then I heat it so it shrinks and creates a joint.” The key part of the process is the notching of the wood, which gives the plastic a way to grip the disparate pieces and lock them firmly into place.

wood joinery plastic

Traditionally, joinery is the most complex, time-consuming and often high-tech part of the furniture-making process, making this innovative approach a welcome alternative for those without the time and resources to spend months building custom pieces.

wood hair heat dryer

On the flip side, cutting and notching tools are commonplace and able to be improvised, meaning: a would-be Joining Bottles-type builder would not need access to a sophisticated wood shop. Scissors, a hair dryer or other heating element and simple carving tools will suffice. They key is in making the connections follow common sense: flat-to-flat helps, and complex angles may fail.

shrink wrap scrap furniture copy

This is not about marketing a new line of garbage chic furniture, but about sharing knowledge about easier ways for ordinary people to upcycle everyday trash. “The core idea of the project is not to sell the products I’m building but more about sharing the principle and sharing the technique.” She is running workshops to show people how to follow her lead, enabling them to walk in with junk and walk out with furniture.

wood joined furniture table

The idea hinges on the global similarity of plastic bottles amid a sea of different types of wood. Basically, anyone in any place can find the same plastics and use them to connect whatever woods are locally available. The aesthetic results are up to the end user (or maker): there are many ways one could refine the look and feel of this general design approach.

Share on Facebook


[ By WebUrbanist in Design & Furniture & Decor. ]

[ WebUrbanist | Archives | Galleries | Privacy | TOS ]


WebUrbanist

 
Comments Off on Junk Joinery: Heated Plastic Scraps Connect Notched Wooden Furniture

Posted in Creativity