RSS
 

Posts Tagged ‘Planning’

Planning A Shoot With A Creative Team

18 Jul

Plan a shoot!


Hey FashionPhotographyBlog.com readers,

Last time we discussed what is a creative team and how to find one. Once you have assembled your creative team, it’s time to plan a shoot together. I’ll be using the experience from one of my previous shoots to talk about this process. 


I’m going to walk you through some of the planning behind my editorial for Kenton Magazine, “Surrealia,” however, the same basic principles apply to planning a test.


Get Inspired! 


Come up with a concept and do your research. The idea behind this shoot started when talking to an illustrator, and good friend, Matt Tedford. (Check out his work, he’s awesome!) We wanted to collaborate on an editorial so took some time to sit down and look at other editorials which incorporate illustration.


These were our two favorites:


– Defragmentation of Beauty by Marcin Tyszka for 25 Magazine

– Abbey Lee Kershaw by Greg Kadel for Numero


One thing we planned on doing was to use seamless and have a simple background. This way nothing detracts from the illustration. This idea of a non-distracting background was apparent in both the editorials we favored and reaffirmed our initial plan.


By dissecting what we saw in our two favorite stories, together we decided on a general direction for where the illustrations should go. From Greg Kadel’s images, we loved the use of bright pops of color and cutouts around the model. From Marcin Tyszka’s shoot, we loved the organic, free feeling the illustrations had and the use of line. I left a lot of the illustration to Matt, without too much guidance, because I trust his aesthetic. Good thing too, it turned out amazing!


marcin-tyszka-25-magazine Marcin Tyszka


abbey_lee_kershaw-numero-magazine-shot-by-greg-kadelGreg Kadel


Find your team


After deciding on what type of style we want for illustration, we decided to keep the clothing simple as to not distract or fight with the artwork to be added later. Being a bit inspired by Givenchy’s Spring 2012 collection and current trends, we decided on high contrast clothing and the use of the peplum. Simple, classic and chic. Hair was to be simple, down with beautiful curls and body. Makeup was decided to be pretty natural with a light smokey eye to define the face a bit, in order to compliment the hair and clothing.


We had our idea, now we had to find our team. Be sure to look for creatives that will compliment your concept. If a hairstylist is fantastic at big, beautiful waves but doesn’t favor doing up-dos (which is what you’re planning on doing), perhaps keep them on hold until you have a shoot that requires that big, beautiful wavy hair that they excel at. If someone is enjoying what they’re doing, it will show.


Styling was easy. Jocelyne, a stylist and all around awesome person that I’ve worked with before was the obvious choice. Her style matched exactly what we were looking for. She is great at keeping it simple and classy without over styling with accessories or trying to do too much at once (which is quite common, especially among stylists just starting out.) Fashion doesn’t have to be about excess! Often, less is more.


For hair and makeup we got lucky and were able to find one artist that is excellent at both! I had seen Mayela’s work around and loved her portfolio. I contacted her with details about our shoot and next thing we knew, she said yes and it was time to shoot!


So now that you have planned your shoot, got inspired and found your team it’s time to get ready to shoot. However, with a team of people on board. How do you communicate your photographic vision effectively with your team. Stay tuned, because next time we will be discussing how to communicate your ideas clearly using mood boards.


IMAGE SOURCE:


Feature image: Defragmentation of Beauty by Marcin Tyszka for 25 Magazine (left) & Abbey Lee Kershaw by Greg Kadel for Numero (right)

Image 1: Defragmentation of Beauty by Marcin Tyszka for 25 Magazine

Image 2: Abbey Lee Kershaw by Greg Kadel for Numero


Fashion Photography Blog

 
Comments Off on Planning A Shoot With A Creative Team

Posted in Uncategorized


Apple planning to open imaging research lab in France

16 Jul

It seems Apple is determined to stay at the forefront of smartphone imaging. According to French newspaper Dauphiné Libéré, the iPhone-maker is planning to open a dedicated imaging research laboratory in Grenoble, France. The focus of the new facility will be on image sensors and technology for iOS devices. 

The reports say that an Apple team has been working on imaging at the Minatec European research center in Grenoble for over a year, but now the company wants to establish its own lab and has recently signed a lease for a building that offers 800 square meters of floor space. This will provide space for a team of approximately 30 engineers and the equipment needed for sensor development.

The Dauphiné Libéré article also says that work on iPhone and iPad sensors will be undertaken in collaboration with STMicroelectronics, which previously has been an Apple supplier. It’s good to see smartphone manufacturers investing in imaging, and we may find that the upcoming iPhone 7 generation will come with some technology that has been, at least partially, developed in France.

Articles: Digital Photography Review (dpreview.com)

 
Comments Off on Apple planning to open imaging research lab in France

Posted in Uncategorized


Planning Your Photoshoot – Review of the App: LightTrac

18 Oct

Getting to know when is the best time of the day, or the best lighting conditions in specific locations, is key for the outdoor photographer. Whether you are shooting landscapes or portraits outside, it is always good to know in advance what to expect in terms of lighting at your desired location. Of course, as the old saying goes, there’s an app for that.

LightTrap-App-Review-3

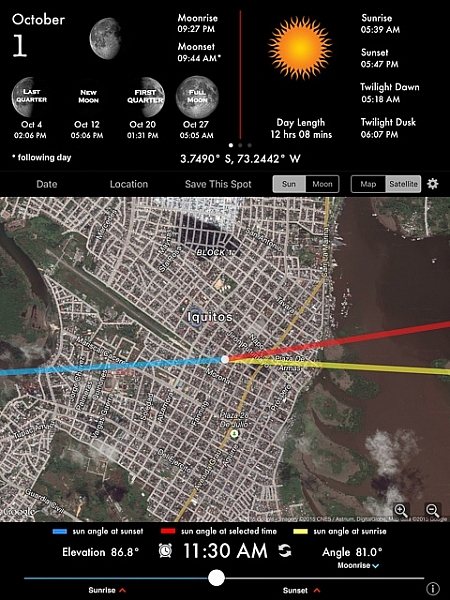
While there is no shortage of similar applications, I find LightTrac easy to use and understand. It basically helps to plan outdoor photo sessions in advance, by finding the right lighting conditions and time, depending on the specific location you want to photograph.

The application calculates the angle of the sun, the moon, and plots the results on top of a map for any location in the world. While using LightTrac you can pick any date and time, at any place, then visualize the position and elevation of the sun and moon. It’s quite handy to be able to know not only what time sunset or sunrise will be, but more importantly, the relative position of the sun.

Here is the list of features for the iPad and iPhone version:

  • Find angle and elevation of sun for any location and time
  • Find angle and elevation of moon for any location and time
  • Find sunrise, sunset and twilight times for any day
  • Find moonrise, moonset and moon phase for any day
  • View when full moon, new moon, first and last quarters occur
  • View elevation chart and azimuth chart for sun and moon
  • Integrated compass view on the iPad
  • Search locations by address, city or zip code
  • Save multiple locations and switch between them easily
  • Use address book to pick locations from your contacts’ addresses
  • Share your saved locations easily with fellow photographers via email
  • Easily export your locations to KML file to view on other apps
  • Does automatic timezone detection
  • Available in English, German and French languages

There is also an Android version with a more limited list of features.

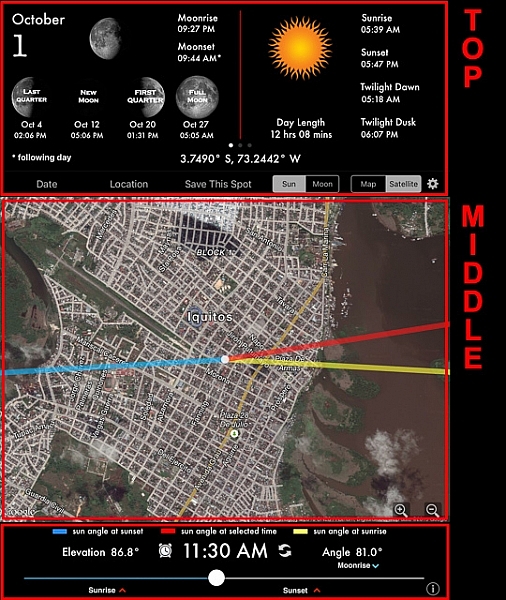
The application is very easy to read and understand. The screen is mainly divided into three sections: top, middle and bottom.

LightTrap-App-Review-2

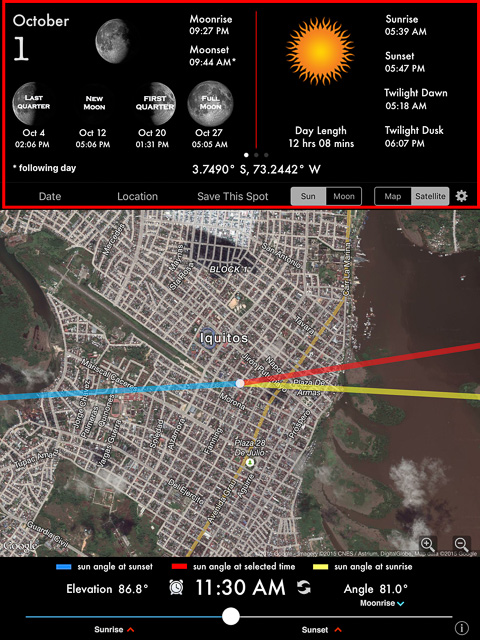
The upper section of the application’s screen shows the date and all information pertaining to moonrise and sunrise with times, including twilight for dawn and dusk. It also display the lunar phases for the month, and GPS coordinates. If you are looking to search information for a specific place, you can tap in “Location” and either enter your own GPS coordinates, or make a search by city name. The same can be done with “Date”; just tap to enter a date in the future.

LightTrap-App-Review-1

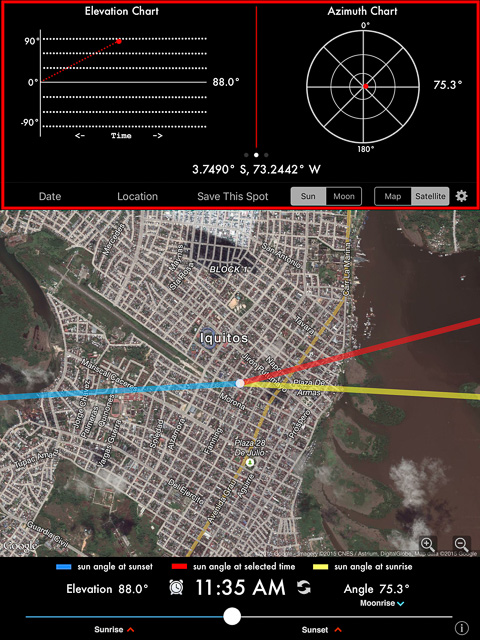
But the upper section provides much more information. Just by sweeping to the left, there are two more screens. The first one will show you an elevation chart and an azimuth chart; these sets of tools basically help you to determine the position of the sun in the sky related to your location at a certain time of the day.

LightTrap-App-Review-5
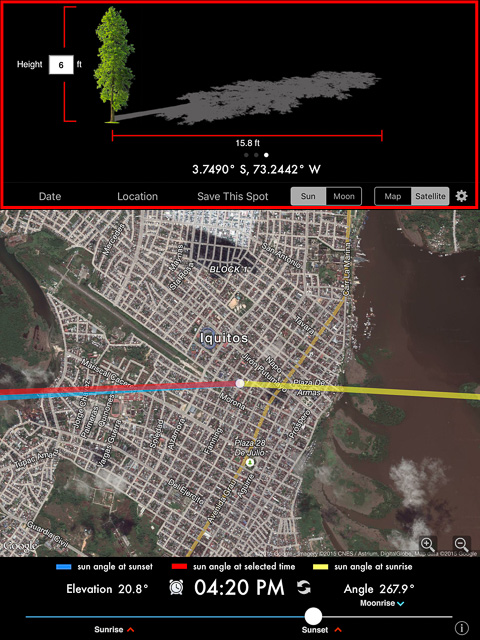
That’s practical information for sure, but it seems a bit geeky to me. I’d rather use the second screen. If you sweep one more time, the following illustration will show you the shadows projections from an object; it’s more practical and easier to understand than the previous screen.

LightTrap-App-Review-4

As you can see in the screen captures above, the middle section shows a map with super-imposed information of the sun’s angle. The sun’s angle at sunrise is marked in yellow, at sunset in blue, and the red line will show the sun’s angle at any time you select. The selection can be easily done by moving the slider of the bottom section, and as you do, the time changes and the red line that represents the sun angle moves accordingly, emulating the position and movement.

There is also a very useful tool in the bottom section. If you tap in the clock besides the time, a window will pop up offering you to set a reminder, an alarm, or even add to your calendar that specific event.

In conclusion, LightTrac is a simple but practical tool that is very useful for the outdoor photographer, because one the best ways to create beautiful photos is to properly plan the best time of the day to shoot. This application allows you to do that very precisely and in advance.

googletag.cmd.push(function() {
tablet_slots.push( googletag.defineSlot( “/1005424/_dPSv4_tab-all-article-bottom_(300×250)”, [300, 250], “pb-ad-78623” ).addService( googletag.pubads() ) ); } );

googletag.cmd.push(function() {
mobile_slots.push( googletag.defineSlot( “/1005424/_dPSv4_mob-all-article-bottom_(300×250)”, [300, 250], “pb-ad-78158” ).addService( googletag.pubads() ) ); } );

The post Planning Your Photoshoot – Review of the App: LightTrac by Daniel Korzeniewski appeared first on Digital Photography School.


Digital Photography School

 
Comments Off on Planning Your Photoshoot – Review of the App: LightTrac

Posted in Photography


5 Tips for Planning a Winter Photography Excursion

04 Dec

If you have seen the recent photos of the record snowfall in Buffalo, NY, you know that for much of the world winter is here and it’s coming fast, whether you like it or not.

While your feet might be cold for the next four months, a reason to get excited is the photographic opportunities that will come from it. I am writing this to convince you to prepare now for photographing that next snowstorm because it will creep up on you, and you want to take full advantage of it.

Tips for planning a winter photography excursion
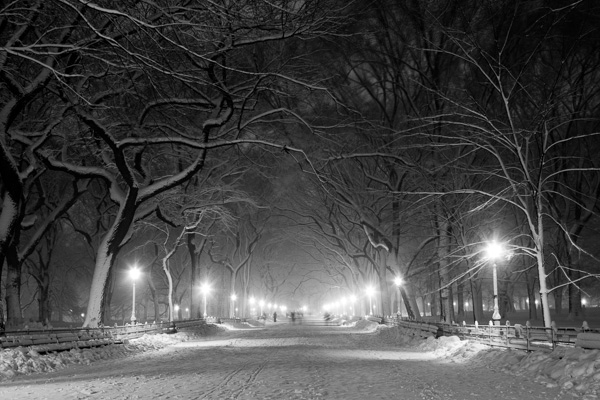
Poets' Walk, Central Park

Poets’ Walk, Central Park, NYC.

1. Plan to go out in the middle of the storm

A lot of photographers choose go out the next morning after the storm has hit, when the weather is clear and the snow is bright and crisp. You should do this as there are some fantastic photographic opportunities, however, in my opinion the best opportunities occur in the middle of the storm, when the weather is fierce and the skies are gray.

If you are going to shoot in the middle of the storm, be careful. Make sure to be safe and that the storm will not have a chance to be severe enough to get you in trouble. Make sure you have a working and fully powered cellphone, the correct clothing, and any supplies that you might need should you get stuck for awhile. It will only be more fun with friends along but always make sure that someone who is not along on your excursion knows exactly where you are going.
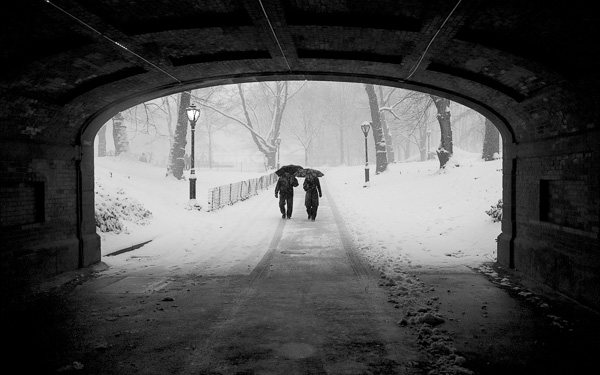
Couple in Snowstorm, Central Park

Couple in Snowstorm, Central Park, NYC.

2. Scout your route

Create your route ahead of time. You can always explore and veer off, but it will help to have a plan of action. The key to photographing snowstorms is that you are not going out to just photograph the snow, you are going out to photograph interesting places in the snow.

Create a route with scenes that you think will look good in the snow. This could be a house, a barn, a lamppost, a main street, a park, or a scenic landscape. In addition, creating this route ahead of time will allow you to share it with someone beforehand should you get stranded.

3. Protect your camera
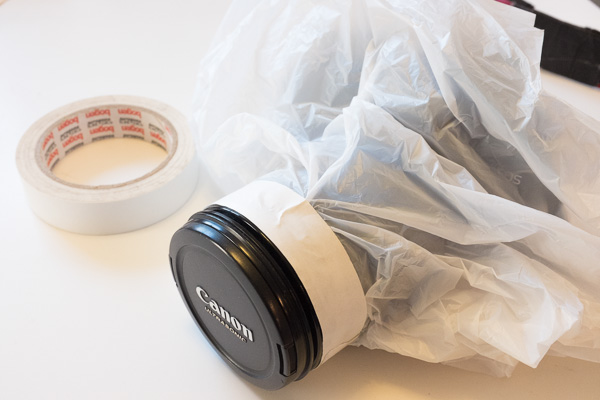
The best camera weather protector, a small plastic bag and some tape.

The best camera weather protection – a small plastic bag and some tape.

Digital cameras are tough, but you still want to treat them carefully. In extremely cold and severe weather conditions you might want to take further precautions, but for most winter situations there are only a few things that you will need to do.

Pick a lens for the day and keep it on your camera. Some people might disagree with this, but in this situation, I personally do not want to risk getting moisture inside the camera, so I will not change the lens. If anything, I will take a second camera with another lens on it, but mostly I will take either my 24-105mm or 70-200mm lens and only use one of them.

I have tried so many rain protection devices for my Canon SLR and I have given up on every single one of them. They have all been too bulky and cumbersome to use with the camera freely in harsh weather. I have yet to find one that works better than a simple plastic bag with a hole in it, and tape to attach it to the lens or lens hood. I use the typical pharmacy plastic bags. Bring multiple bags and the roll of tape because they will have to be replaced a couple times during the day. I use this setup for shooting in the rain as well.
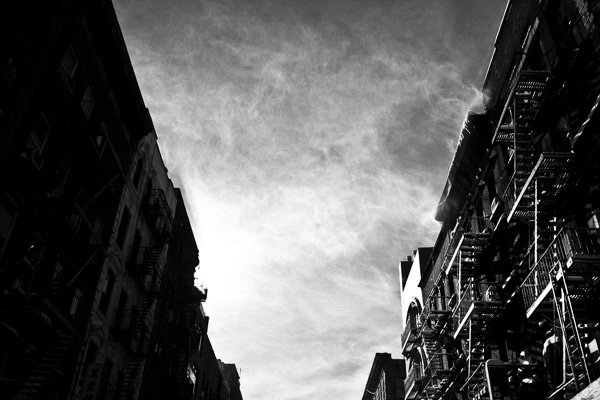
Tenement Rooftops, Lower East Side.

Tenement Rooftops, Lower East Side, NYC. You do not want that getting into your camera while you change lenses.

Bring multiple hand towels and microfiber cloths to dry off the camera, and to keep the front of the lens clear from fog. A lens hood can add further protection. If the snow is light, then I will keep the camera uncovered and will often use a small umbrella, while drying off the camera frequently. When the snow gets stronger then I will use the plastic bag and sometimes I will use it in combination with the umbrella. In between shots I keep the camera covered and I always keep the front of the lens pointed down until I actually take the shot, to keep it clear of snow.

You will also want to bring along extra batteries, since they do not work as well when they are cold.

Finally, be careful about suddenly changing the temperatures on your camera. This is what can really hurt your camera. You do not want to go from shooting in the middle of a snowstorm to putting it by a warm fire right away. Let the camera warm up slowly in your car, garage, or in a cooler area of your house.

Photography gloves.

North Face touch screen gloves with inner linings. Still not as warm as heavy duty gloves, so not ideal for Arctic exploration, but they are much easier to work with when handling a camera.

4. Prepare your clothing and equipment ahead of time

Sense a theme here? Set up everything ahead of time so that when the storm hits all you have to do is get dressed and walk out the door. It is so easy to procrastinate and ultimately decide to stay in with some hot coffee. Planning and packing everything right before the shoot just adds another layer to stop you from doing it. I know this from experience. If everything is set, then the only thing that is standing between you and the outdoors is you.

You might try to tell yourself that there will be another storm but that is never guaranteed. If the weather is perfect, then you need to take advantage of the opportunity while it is there. It could be a once in a lifetime experience.

Use two layers of thinner gloves. Gloves are a huge problem with photography as the warmest ones are too bulky to adjust the fine controls on the camera, and the thin ones are not warm enough. I use a thin inner layer glove combined with a medium strength pair of North Face gloves. This is still not as warm as a heavy duty pair, but the mobility is a big advantage.
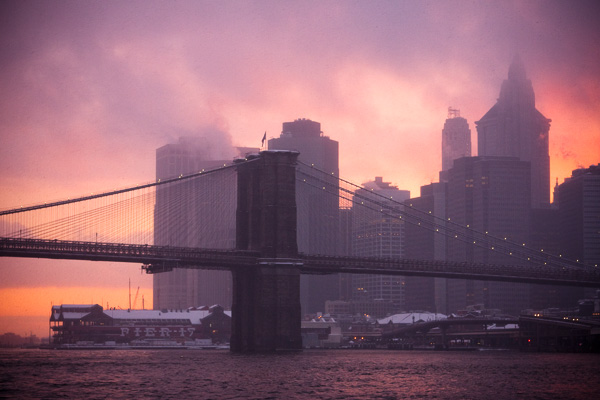
Brooklyn Bridge in Snowstorm, at Sunset

Brooklyn Bridge in Snowstorm, at Sunset, NYC.

5. Plan a sunset into dusk route

The most uncomfortable times to shoot often yield the best results. You may have heard to shoot during the golden hour, or at night, or during a snowstorm, but the real magic happens when all of these come together in one. Plan out exactly where you want to be during the golden hour and after the sun sets. If it is in the middle of a hard storm then the sunset might not shine through the fog, but everything will still get magical as it transitions to night.

Make sure to bring a tripod for dusk. Also a strong flashlight can help for focusing, because it can be tough for the camera to lock onto dark scenes. You can also use manual focusing to select the focus distance that you want.
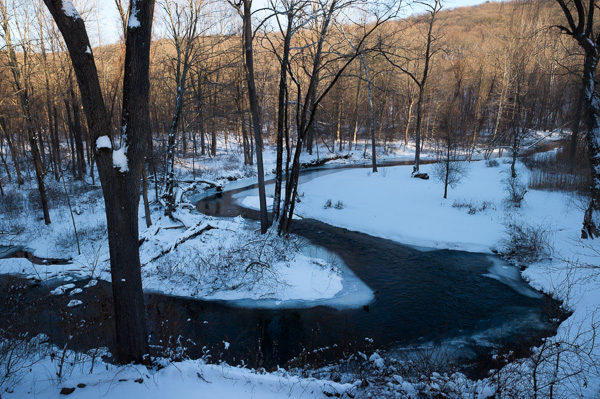
Cold Spring, New York.

Cold Spring, New York. The warm sunset light contrasted with the blue shade adds an interesting aspect of contrasting color.

Bonus: Technical tips

If you are not shooting in full manual, all that white snow is going to trick the camera’s light meter to make the images darker than they need to be. It is common for people to come back from a day shooting in the snow to wonder why the photos all look so gray. Raise your exposure compensation (+/-) to combat this and make the snow whiter, but make sure to not blow out the details completely.

The opposite side of this tip is that a gray snowy scene can be fantastic, so you might not want the snow be very white. You have creative control here and can use the +/- on your camera or manual mode to achieve the exact look that you want. It is better to do this in the camera rather than in post-production.

Also, pay attention to make sure that your focus point is correct and if you are shooting digitally then take a few shots of the same scene. Snowy and harsh conditions can make focusing tough and can make the problem of back-focus even easier to occur. Make sure the focus point is locked onto the area that you want to be the sharpest and not the area behind it.
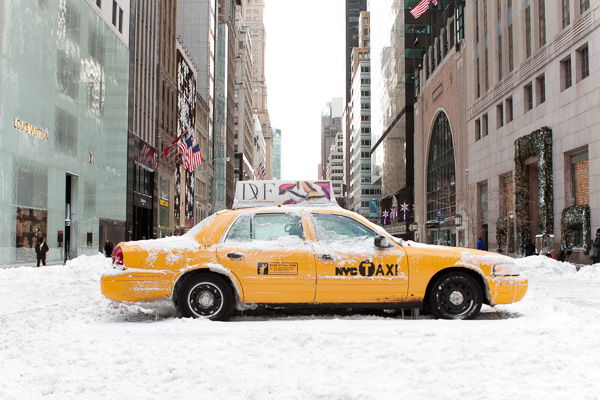
Broken Taxi, 5th Avenue.

Stuck Taxi, 5th Avenue, NYC.

Be adventurous. This is not just about getting that ideal photo, it is about enjoying the process as well. The camera is a wonderful tool to force you out the door to explore gorgeous locations when you might otherwise decide to stay inside in the warmth. A camera is a gift in many ways.

googletag.cmd.push(function() {
mobile_slots.push( googletag.defineSlot( “/1005424/_dPSv4_mob-all-article-bottom_(300×250)”, [300, 250], “pb-ad-78158” ).addService( googletag.pubads() ) );
} );

The post 5 Tips for Planning a Winter Photography Excursion by James Maher appeared first on Digital Photography School.


Digital Photography School

 
Comments Off on 5 Tips for Planning a Winter Photography Excursion

Posted in Photography


How to shoot a wedding – Part 1 – Planning

19 Nov

In this series ThatNikonGuy Matt Granger will show you all you need to know to get started in wedding photography. From planning, to gear, to shooting and editing tips, Matt will walk you through the process and help you avoid common pitfalls. Whether you are going in full time, or have been asked to shoot at a friends wedding – take the time to research and plan – it will avoid a lot of headaches down the track! See the Lowepro S&F gear here: goo.gl Join our facebook and flickr groups to stay up to date with what’s going on: Join our facebook group HERE: www.facebook.com Flickr group HERE: www.flickr.com www.mattgranger.com
Video Rating: 4 / 5

 
Comments Off on How to shoot a wedding – Part 1 – Planning

Posted in Nikon Videos


Dilbert Animated Cartoons – Confidential Information, Retirement Planning and Visionary Leadership

13 Jul

www.dilbert.com by Scott Adams. RingTales presents Dilbert Animated Cartoons. Dilbert has a plan to save millions. The Boss and Catbert conceive an unethical plan. Wally’s retirement plan. The Boss comes up with a plan to increase sales.

Dick Figures Season 1 soundtrack out now – bit.ly Red and Blue are witness to the horrors of ‘Apocalypse Meow.’ Dick Figures was created by Ed Skudder, who wrote, directed and voiced the episode along with Zack Keller. Dick Figures on Facebook tinyurl.com Dick Figures on Twitter twitter.com twitter.com twitter.com twitter.com
Video Rating: 4 / 5