RSS
 

Posts Tagged ‘Planning’

BTS: A look at the incredible planning, camera work and editing that went into the WWI film ‘1917’

22 Jan

Movies Insider has released a ten-minute behind-the-scenes look at the Golden Globe-winning film ‘1917,’ showing the incredible amount of thought, planning, camera work and editing that went into the World War I film that’s made to look as though it was captured in one, continuous shot.

The behind-the-scenes video shows how meticulously Cinematographer Roger Deakins (The Shawshank Redemption, Fargo, A Beautiful Mind, Skyfall and Sicario) and director Sam Mendes (American Beauty, Skyfall, Spectre) worked together to plan each and every shot, down to the second. From creating miniature dioramas to plan out the paths of the actors, cameras and lights to the vast array of gimbal and camera setups used, the video covers it all with great snippets of pre-production footage and interviews with the film’s creators.

Do yourself a favor and set some time aside to see the cinema magic that went into this Oscar-contender film.

Articles: Digital Photography Review (dpreview.com)

 
Comments Off on BTS: A look at the incredible planning, camera work and editing that went into the WWI film ‘1917’

Posted in Uncategorized


Seagate is planning to release 18 and 20TB HDDs in 2020

14 Jan

If you’re the kind of photographer who likes to archive every single Raw file and video clip they’ve ever shot, Seagate’s upcoming new 18 and 20TB hard drives might just be what you’ve been waiting for.

According to a report from AnandTech, drive maker Seagate has confirmed it will release an 18TB hard drive in the first half of 2020 and follow up with a 20TB unit in the second half of the year.

The 18TB drive will come with the same nine-platter design already used in Seagate’s 16TB Exos drive and use conventional magnetic recording (CMR). However, shingled magnetic recording (SMR) will be used for the 20TB drive. This technology increases the storage density, and therefore capacity, of a drive by partly overlapping the magnetic storage tracks. This leaves the previous track narrower but allows more data to fit within the same platter.

Dave Mosley, CEO of Seagate, said the following:

“We are preparing to ship 18 TB drives in the first half of calendar year 2020 to maintain our industry capacity leadership. We are also driving areal density leadership with our revolutionary HAMR technology, which enables Seagate to achieve at least 20% areal density CAGR over the next decade. We remain on track to ship 20TB HAMR drives in late calendar year 2020.

Currently, Seagate’s largest drives offer a 16TB capacity and are aimed at the enterprise and NAS markets. The new 20TB drive will also use heat-assisted magnetic recording (HAMR) technology which temporarily heats the disk material, allowing for data to be written to smaller regions.

This much storage likely won’t come cheap. Seagate’s current 16TB Exos drive will set you back around $ 420, so the new versions will, at least at the time of launch, likely be more expensive than that.

Articles: Digital Photography Review (dpreview.com)

 
Comments Off on Seagate is planning to release 18 and 20TB HDDs in 2020

Posted in Uncategorized


7 Tips For Planning the Perfect Photography Trip

02 Nov

?

Are you planning your next photography trip? This video from Nigel Danson outlines 7 tips for planning the perfect photography trip.

In this awesome video, Nigel covers in some detail the following points:

1. Ensure You Take the Right Gear

Use Adobe Lightroom (or other post-processing applications you may use) to check out your favorite shots so you can see what lens you used. Chances are, you will find a trend towards one or two lenses, helping you to rule out the ‘just-in-case’ lenses. Try to stick to just 2 or 3.

Tripod – something that is lightweight, yet durable is a good choice.

Lens cloth – helpful for drying and cleaning your camera.

Portable hard drive – to download your images from your camera.

USB Battery Charger – If you run out of battery power on-location you can recharge via the USB.

Handwarmers (if in cold locations) – great for warming hands (and batteries) when in cold or icy climates.

2. Be Sure To Test All New Gear.

Check all the settings on any new camera gear to both make sure they work the way you expect, and so you know how to use them!

3. Understand Your Location

Research the location beforehand. Use tools like Google Earth to allow you to visualize a place in 3D. With Google Earth, you can get an idea of the scenic points that you can see from particular positions..

Check maps for routes, trails, and locations to narrow down where you would like to visit.

Make a google map of that area and plot your locations.

4. Focus on Fewer Locations

Plan out the best locations, so you don’t end up with just lots of holiday snaps. The more time you spend in a particular location, the more you can explore the light and angles, and get much better images as a result.

5. Understand the Time of Year in Detail

Understanding the time of year in detail means you have a better understanding of when the sun rises and sets in that place and its position in the sky. Where the sun sits dictates the composition of your shot. A good app for checking these things is Photopills. Also, check the weather forecasts.

6. Research the History and Culture of the Location

You want to tell a story about the location you are visiting. You want to let people know what it was like there (to accompany your photos either via blog or in person). Having a background to your images is excellent for these reasons. It is also great to have conversations with locals about the area.

Employ a local guide while you are there to find out the best spots and to get background information.

7. Explore Social Media and the Web

Take a look at what other people are photographing in that location, and look to take photos in spots that are covered least. That way you aren’t just making the same images as everyone else!

Be sure to follow some of Nigel Danson’s tips for planning the perfect photography trip.

If you have any tips of your own that you would like to share, please let us know in the comments below.

You may also find the following articles on our site useful:

Beginner’s Guide to Natural Light in Landscape Photography

5 Landscape Photography Mistakes That Keep Your Images From Standing Out

Using Layers and Foreground Interest for Better Landscape Photography


The post 7 Tips For Planning the Perfect Photography Trip appeared first on Digital Photography School.


Digital Photography School

 
Comments Off on 7 Tips For Planning the Perfect Photography Trip

Posted in Photography


Why Goal Planning Is the Key to Growing as a Landscape Photographer

09 Oct

“I invest so much time in my landscape photography, but can’t tell how much I’m improving or even where I’ll be in a year. I think I’m getting better, but slowly and haphazardly.”

Do you have a strategy for becoming a better photographer? What areas do you want to improve in over the next few weeks? Most of us learn passively, but what if you could get more out of every shoot and see progress in months instead of years?

It starts with being intentional – something we don’t often practice in the day-to-day.

Taking an active role can double your learning speed. And it starts by setting measurable goals and introspecting your photos – and yourself – often.

Sella Towers, Dolomites, Italy

Brunate Lago Di Como, Italy

A couple of years ago I wasn’t noticing much improvement in my photography. It was definitely there, but it happened slowly and I didn’t have a clear direction of how I wanted to improve in the future.

Fast forward to my last trip to Oregon, where I made a point of applying some goal planning and retrospectives before, during and after the shoot. I learned more in two weeks than I had in two years, and brought back some of my favorite photos to date.

Mt Bachelor, Cascade Lakes Bend, Oregon

Smith Rock Bend, Oregon

Maybe you’ve heard of objectives and key results (OKRs) or ‘being results-oriented’ from managers or personal trainers. They seem like fuzzy topics, but there’s nothing more empowering than charting your own course to improvement.

I couldn’t be happier with the improvement I noticed while peeking at photos from just two years ago. Whether it’s a cursory glance or a deeper artistic critique, I can see measurable improvement that directly correlates with intentional goal planning.

And it’s not just the keeper shots that have improved. I shoot noticeably fewer photos (more of which end up being keepers), and it takes less editing for me to finish them up.

Here’s how you can take an active role in charting your own improvement as a landscape photographer.

1. Document Your Objectives

Have you stopped to ask yourself why you’re a landscape photographer in the first place? Your “Why?” doesn’t have to be etched in stone, but it will guide how you invest your time and money into growing.

Here are some example objectives. “I invest time in my landscape photography because:”

  • “I love to travel.”
  • “I want to make a full-time living.”
  • “I want to capture unique locations.”
  • “I want to grow my local following.”
  • “I want to be the best in my craft.”

You probably have several objectives in mind, so the next step is to prioritize them. Which objective(s) trumps the others in the competition for your time? Objectives are critical because they help us identify conflicts of interest. Once you start formulating goals, you want to ensure they naturally support your objective.

For example, you may be a landscape photographer because you love traveling, but your goal is to sell prints to local condos. These may well clash with each other, as marketing your work to local businesses would mean less freedom to travel. You may need to find another way to support your wanderlust – even if it’s unrelated to photography.

2. Formulate Effective Goals

Setting a goal often has a disheartening tone. We’ve all made goals or resolutions that yielded no results other than self-reproach. “Oh, I didn’t lose 10 pounds.” “I didn’t write half as much as I wanted.”

Self-reproach is often a symptom of a poorly chosen goal. Effective goals aren’t about slapping yourself for missing them. They’re about deliberately deciding how you want to invest your time and resources. It’s about determining the trajectory you want to take instead of floating with the fluctuations of each day.

Here are two of my personal goals:

  1. Capture and produce better photography
  2. Expand my photography audience

But while these goals capture a general direction, they aren’t concrete. So I like to follow them up with more specific formulations for what success looks like.

  1. Expand portfolio with shots that have a compelling foreground, middleground and background.
  2. Write for two new publications.

3. Apply and Adapt Shoot Goals

Along with your general goals and results, set specific goals for each landscape photography trip. I often source my shoot goals from notes I took in the field, or frustrations I faced in post production.

On my last trip to Ireland and the UK, I set some goals that I reread during each shoot:

  • Create a sense of depth with fog and haze
  • Root the image with stronger foregrounds
  • Consciously identify shapes in the composition
  • Capture the energy in water and clouds with long exposures
  • Take 20% fewer photos with a higher ratio of winners
  • Shoot more verticals to emphasize height

Man-O-War Bay, Dorset, England

South Stack Lighthouse, Wales

Referencing these goals when I hit the field bumps me out of my status quo. Over the past two years, I’ve found that most of my measurable growth as an artist came from setting and intentionally applying shoot goals.

4. Break Goals into Results

Objectives give you direction. Goals give you outcomes. But neither tells you how to accomplish them or how much progress you’ve made towards them. That’s where results come in.

How will you accomplish your goals? You can’t. They’re too big, and say nothing about what actions you should take. To reach your goals, they need to be broken down into small, measurable steps called results – small tasks you can complete in no more than a day. A well-formulated result must measurably contribute towards the overall goal.

Results need to be carefully phrased so they reflect tangible outcomes. For example:

  • “Edit for one hour every day.”
  • “Spend 30 minutes writing about photography.”

These results are ineffective because they involve time. Who cares whether you spent 30 minutes editing or three hours? Instead, phrase them in terms of tangible outcomes:

  • “Finish a rough edit of three photos today.”
  • “Finish outlining my upcoming photography post.”

Each of these results produces something of value – edited photos and an outlined post – and can be completed in one sitting. And the faster you complete each result, the sooner you can move on to other things.

Breaking down goals into results is hard to do in any field, whether it’s productivity, photography or software development. And it’s the number one reason we fail to accomplish anything.

Don’t tackle a goal and plan as you go. Planning and execution are two different skills. And when we do them simultaneously we ironically spend the least time on the hardest part: planning. It sounds counterintuitive, but once I break the goal into results, executing them is usually the easiest part.

What about self-imposed deadlines? Personally I’ve had limited success with them because time is a poor measure of progress. I sketch out a rough timeline (“by this time next year”), but I keep those dates with my goals instead of my results. As long as my results are prioritized, deadlines are often arbitrary because I’m always working on the most valuable results.

How are you spending your time so each minute counts? Results are the answer, not time.

5. Do a Retrospective

The learning doesn’t end after a shoot. In fact, I learn the most by reviewing photographs from the shoot that didn’t quite work out. It sounds counterintuitive, but thanks to a cognitive bias called survival bias we tend to:

  • overestimate what we can learn from successful shots
  • underestimate what we can learn from shots that didn’t make the cut.

Consequently, we end up discarding our best source of learning material.

To beat survivorship bias, conduct a retrospective on some of your failed shots to understand why they didn’t work, and what you’ll do differently next time.

Slea Head, Dingle, Ireland

None of my shots from Slea Head on Ireland’s Dingle Peninsula worked out. But later in the trip I applied the lessons I learned about S-curve placement and busy water textures to capture a shot of Loch Garry in the Scottish Highlands.

Loch Garry, Scotland

Retrospectives are incredibly effective at distilling lessons that will set your next shoot up for success. And they often form my shoot goals for the next trip. On this year’s trip to Oregon, my goals changed to reflect the lessons I learned from Ireland and the UK:

  • Capture two stunning images per day for a total of 26 from the trip.
  • Identify the emotion of a scene, then highlight it with composition and light.
  • Spend 30% less time snapping photos, and instead spend it testing compositions.
  • Shoot exclusively at dawn and twilight, and spend the rest of the day trying compositions on my smartphone.
  • Use an ND filter for water without exception.
  • Identify a strong foreground, middleground, and background before snapping.
  • Don’t waste a second on angles filled with busy textures.

I would have forgotten many of these shoot goals if I hadn’t written them down and reviewed them before each shoot. Being intentional paid off. As I said earlier, I learned more in two weeks than I had in two years of shooting, and produced some of my favorite work to date.

Roads End, Oregon

Chart Your Course to Improvement Intentionally

While goal planning comes in many flavors and terminologies, they all share the goal of helping individuals connect desired outcomes with strategic actions. The key to accelerated growth is to learn intentionally, not passively.

Spend a few minutes over coffee today to document why you are a landscape photographer, what you want to become, and how you will accomplish it. Whether you’re in the field, post production, or an office crunching through tangential work, goal planning will ensure you’re investing your time well and learning as much as possible from your efforts.

The post Why Goal Planning Is the Key to Growing as a Landscape Photographer appeared first on Digital Photography School.


Digital Photography School

 
Comments Off on Why Goal Planning Is the Key to Growing as a Landscape Photographer

Posted in Photography


Tips for Planning and Capturing a Creative Portrait

11 Dec

There is saying, in the photography world, that an image can be taken in a hundred different ways. This is especially true, as you have probably already noticed when capturing portraits.

Portrait photography is probably the most popular genre, within the realm of the diverse world that is the art of photography. People take portraits so frequently, snapping selfies or photos of their loved ones, with mobile phones or cameras. In any case, this is pretty much what portrait photography is all about, capturing people’s faces.

However, as photographers, you will always be striving for higher excellence, whatever the style of your photography. It’s a natural cause, this is one of the reasons why photography is artistry. The drive for capturing better images, in the field of portrait photography, will eventually lead you to a higher dimension where you won’t be satisfied with just capturing a face, but rather the soul of your subject.

creative portrait of a woman

Lonely young and beautiful woman seating in a bar, next to a piano and a bottle of champagne, of 1920s time period. The woman is dressed in 1920s black evening dress and Gatsby-style diadem on her hair, there is a large old rusted window in the background where blue evening light invades the scene.

This dimension in photography is where creativity lay hidden. It waits to be unleashed by forces such as knowledge and the inspiration gathered along the way, as you were growing as a photographer. So let’s embark on a quest which will help you harvest the power of creativity in photographing portraits and escape the ordinary.

In the list below, you’ll learn the main ingredients that will help you harvest this creative force and take you to another level with your portrait photography.

Equipment

Know the equipment you work with well. This is the baseline from where you need to start. Technical knowledge may not seem connected to art at first, but let’s examine the image below.

creative self portrait

Self-portrait with creative lighting involving a continuous light and a studio strobe.

This image was captured with a single exposure and there weren’t any alterations applied to it in Photoshop. A second curtain flash technique with slow shutter speed created the effect here. Camera White Balance was set to tungsten and the key light colored with CTO – to balance the colors with gels.

Self portrait lighting diagram

Surely you have noticed how technical knowledge and art correlate. Be it your camera settings, lens, or strobe lights, the more you know about your equipment the more options you’ll end up having to explore in bringing your artwork to realization.

Selecting the right faces, exploring your model’s hidden potential

Most photographers create their best work by working on personal projects. When working on a personal project, you’ll have the full control to choose the model sitting in front of your camera – you are the Art Director.

There are faces full of potential, although they are not faces of professional models (it could be people you see in the public transport or the streets), revealing great characters and features. You need to be able to see this potential and invite such people for a portrait photo session.

Keep in mind that although a person looks great, he or she may not feel comfortable sitting and posing for you at first. This will obviously affect the overall quality and purpose of the photo session.

Remember, as a photographer, it’s your job to bring a good vibe and mood to the set, in order to help your model relax and being able to explore his/her best features.

creative portrait of a man

Low key portrait of a black man wearing glasses and a black leather jacket, having his hands and fingers very close to his face.

In the first image above, is a man who booked a personal creative portrait session. It took four hours of working with him in order to reach a point where he was finally in the right part of his own creative universe, feeling free and exploring himself. He had never had such an experience before and was feeling quite nervous and shy at first.

The second image below is a good representation of working with a great character.

creative portrait of a man

Portrait capturing a model dressed in WWII pilot outfit holding Cuban cigar in his mouth. The creative look of this portrait has been achieved by the use of multiple strobe lights.

Lighting

Light is the very reason why photography exists. Think about light, study light – how it spreads, how it bounces, how it is reflected, its specularity, etc. There is so much to light. Light is what will be rendering the reality in front of you, by reflecting and bouncing back into your camera lens.

Light has a quality which is defined by the source, intensity, size, and color temperature of the light. The best part is that you have full access to controlling any of this. Main sources of light for photographers are:

  • Ambient light
  • Strobe light
  • Continuous light

But as you move on to the next topic, you’ll see that there is much more to light than just being available in some form.

creative portrait setup

Photographic studio setup for a portrait session, the image features Bowens strobes, a white backdrop and light modifiers.

In the image, above, can be seeing a studio strobe lighting setup for a portrait session. Some characters may require really complex lighting in order to capture their personalities. Others just require one or two light sources – it will be up to you as an artist to determine this.

creative portrait of a man

Low key portrait of a man with a ginger beard and leather jacket, the scene features dramatic and creative strobe lighting.

The portrait above was photographed with only two strobe lights – portraying very well how the most appropriate lighting was selected to illuminate and capture the mood and personality of the person. While for the image below involved the use of six strobe lights.

creative portrait of a woman

Portrait of young woman on blue background wearing a purple dress – with a creative, multiple lighting setup and approach.

Shaping the light, light modifiers

All artists use different sort of tools that help them shape the fabric of their own inspirations and bring creative ideas to life. It is the same for us photographers too.

First, there’s the light, ambient or strobe, which is the raw material you work with. But this material needs to be softened or shaped, helping you in the process of reaching deeper dimensions of your subject’s features and character.

Light shaping tools will help you define your own creative realm – the realms of Game of Shadows, Game of Highlights and Game of Midtones, where you are the master controlling and balancing what sort of reality your light will render.

creative portrait of a woman and man

Tattooed rockabilly, demon, barber holding razor blade in his dark and demonic barber shop with pinup model as his evil assistant on the background next to a bottle of Jack Daniels.

For the creation of the image above, several light shaping tools were used and some of them were even further modified in order to produce the quality of light needed in this particular situation (the image was shot at 10 am in the morning but the idea was for dark – Sweeney Todd concept)

Studio, location, and features

Another very important ingredient to the process of building unique and creative portrait images is exploring what is around you. What is available or what you can build, light and create on location or in the studio?

Although portrait images are characterized by very tightly cropped frames, around the subject’s face – attention needs to be given even to the smallest details. Such details will greatly contribute to the overall contrast within the scene you are capturing.

An example of this is when you are shooting in a studio you can use a snoot, or another light modifier, and create a spot of light or perhaps colorize your background, by placing color gels. Do not limit yourself to only thinking of the face you intend to capture, but rather on the grand scene of everything that will be captured in your composition/frame.

Following the same flow of thoughts and principles – you can turn even a simple room into a professional studio like has been done on the image below – photographed in a bedroom.

creative portrait of a man

An image featuring the founder of Vialucci media, Theo X photographed on a white background.

Things even get more challenging and interesting when shooting environmental, wide-angle portraits. A location can reveal so much about the personality of your subject and also contribute greatly to the level of creative quality in your images. All you need to do when you’re at a great location is help stylize the scene, frame well (appealing creative composition), bring the strobes in and work out the best of your models.

Props, makeup, and hair

This is a very challenging step that eventually one day you’ll take, but it is also very rewarding. By reaching the point of employing props, makeup, and a hair stylist – it will be solid evidence that a line was crossed with no option of turning back. This is the stage where you’ll be seeing beyond the ordinary qualities of your subject and looking to reach a deeper dimension – a state of creative vision.

creative portrait of a woman

A conceptual scene of a four-handed Queen seating on a throne receiving scripts from her Demon servant, and pointing at a Victorian style globe. The scene is lit by several light sources with different colors, rendering the whole scene in a very creative and original light.

creative portrait of a man

Creative portrait composite representing WWII pilot in the cockpit of his aircraft engaged in an aerial battle, with the enemy aircraft in the background.

The images above illustrate very well, the level of creativity obtained by employing props, makeup and hair into the photoshoot.

Editing and retouching

Processing or editing images has always been an integral part of the whole creative process. Although having all the advantages and power of digital technology, you shouldn’t abandon the universal rules and laws of aesthetics.

Think of retouching and editing as a process that helps you enhance the high-quality photographs you already capture and bring your creative vision to final realization. This is achieved without overdoing and diminishing the quality of your photographs.

The two images below are good examples of a photograph captured with simple lighting setup and processed just enough to clear and strengthen the subject’s appearance.

Creative portrait photography before

Before processing.

Creative portrait photography after

After processing.

Conclusion

Capturing creative images involves innovative and creative thinking – seeing things differently, thinking differently. That is why you always need to be on your own small quest for creativity, not bound only by what was covered here or elsewhere.

Come up with your own new solutions – in the process of which you only will add and improve your portrait photography.

The post Tips for Planning and Capturing a Creative Portrait by Nikolay Mirchev appeared first on Digital Photography School.


Digital Photography School

 
Comments Off on Tips for Planning and Capturing a Creative Portrait

Posted in Photography


Samsung planning to sell refurbished Galaxy Note 7 units

29 Mar

It’s probably fair to say its Galaxy Note 7 flagship has been an absolute disaster for Samsung. After a number of devices caught fire Samsung eventually made the decision to discontinue the model and, after an internal investigation, announced that the fires had been caused by design and manufacturing errors on the Note 7 batteries. 

In a press release, the South Korean company has now laid out how it will recycle and dispose of the hundreds of thousands of Note 7 units that had already been produced and partly sold. According to the statement, ‘devices shall be considered to be used as refurbished phones or rental phones where applicable.’ This is dependent upon consultations with regulatory authorities and carriers and local demand, which probably means it’s unlikely any refurbished units would make it to Europe or the US.

For remaining devices, reusable components, such as semiconductors and camera modules, ‘shall be detached by companies specializing in such services and used for test sample production purposes.’ For anything that is left after the first two steps, ‘Samsung shall first extract precious metals, such as copper, nickel, gold and silver by utilizing eco-friendly companies specializing in such processes.’

Meanwhile, Samsung’s new high-end phone, the Galaxy S8, is expected to be launched tomorrow at events in New York and London. Hopefully it’ll have more success than its ill-fated cousin.

Articles: Digital Photography Review (dpreview.com)

 
Comments Off on Samsung planning to sell refurbished Galaxy Note 7 units

Posted in Uncategorized


Photo planning app PhotoPills now available for Android

17 Mar

PhotoPills has for long time been one of the most popular photography planning apps for the iPhone. Now finally, after a long wait, the Android version has arrived on the Google Play Store.  Like its iOS-counterpart, PhotoPills for Android will set you back a hefty $ 10 but if you take your photo planning seriously this could be a small price to pay.

Among a host of other functions PhotoPills allows you to find out when and where the sun will set at a particular location, when the moon will rise and where the Milky Way will be visible. The Android version has been one year in the making and on an especially setup Android Version Page the team behind the app explains that it was the goal to offer exactly the same features, attention to detail and reliability as the iOS version. 

It’s worth mentioning that the app is still in public beta stage, with the full release expected by the end of the month. So it’s possible you might still encounter the occasional bug or malfunction. If that doesn’t put you off you can can download PhotoPills now and install it on any device that runs Android 4.1 or newer.

Articles: Digital Photography Review (dpreview.com)

 
Comments Off on Photo planning app PhotoPills now available for Android

Posted in Uncategorized


Facebook is planning to relax censorship rules for newsworthy images

25 Oct
 Image: Nick Ut/The Associated Press

Last month Norway’s largest newspaper, Aftenposten, published an open letter on its front page, accusing Facebook CEO Mark Zuckerberg of ‘abuse of power.’ The letter was published as a response to Facebook removing the famous ‘Napalm Girl’ image, taken by photographer Nick Ut, from the newspaper’s Facebook page on the grounds of a blanket ban on nudity in all images posted on the social network.

The picture had been used in an article about the seven most iconic images in the history of war. After receiving a wave of intense criticism following the incident, Facebook has announced in a blog post that it will be relaxing its photo censorship rules around news events:

‘In the weeks ahead, we’re going to begin allowing more items that people find newsworthy, significant, or important to the public interest — even if they might otherwise violate our standards. We will work with our community and partners to explore exactly how to do this, both through new tools and approaches to enforcement. Our intent is to allow more images and stories without posing safety risks or showing graphic images to minors and others who do not want to see them.’

We will have to wait and see how exactly this will be defined but it’s fair to assume that Nick Ut’s picture would have been considered historically significant and therefore safe under the revised guidelines. 

We should expect any changes to take effect within the next few weeks as Facebook is working on replacing its filter algorithms. The company says it will be working closely with experts, publishers, journalists, photographers, law enforcement officials and safety advocates to achieve this. 

What do you think? Is this a step in the right direction for Facebook? Let us know in the comments.

Articles: Digital Photography Review (dpreview.com)

 
Comments Off on Facebook is planning to relax censorship rules for newsworthy images

Posted in Uncategorized


6 Tips for Planning the Perfect Landscape Photo Shoot

15 Sep

How many times have you shown your pictures to someone and said, ”You should have seen that sunset in person to understand how magic it was!” We can make many excuses as to why the photo doesn’t look the same, complaining about our equipment, settings or post-production, but let’s face reality, maybe there was something wrong with our landscape photo!

Before you open Photoshop, and even before you press the shutter button, you need to plan the kind of image you want to create. Planning plays a key role in landscape photography. Here are some things that are useful to think about if you want to capture the perfect light and transmit some feelings with your images.

Tip 1: Check the weather forecast

landscape photography

Calton Hill – Edinburgh, Scotland

Landscape photography is one of the most difficult genres, or at least among the most unpredictable, as you don’t have any control over the weather at the scene.

What kind of atmosphere do you want to create with your image? The weather can completely transform a landscape, so think carefully about what mood you want to evoke. If you want to create a bright, cheerful image you might already know that a blue sky with fluffy white clouds would be better than a flat blue sky, or even worse a grey one.

So, before you drive for two hours and you arrive to see is a dull landscape, use the only weapon at your disposal: the weather forecast.

Tip 2: Choose the right time of the day and year

The perfect weather condition alone is useless without proper light. In landscape photography, the light is given by the position of the sun in the sky in relation to your subject. Fortunately, this is something more predictable than the weather. Calculate where the sun will be at particular times of day, and it will be easier for you to foresee how the scene will be illuminated. Again, think about the atmosphere you want to create. Light and peaceful? Dark and moody? Are there any particular landmarks you want to highlight? The answer to these questions will inform where you want your light to be, and consequently what time of day to shoot.

landscape photograph Groningen, Netherlands

Groningen, Netherlands

Bear in mind that the sun’s position doesn’t change only during the day, but also throughout the year. As a result, in one year there are many different lighting conditions for the same place. It would be a shame not to use them to your advantage. You can use many websites and apps for this; the one that I use the most is PhotoPills, which is very well outlined in this article.

Tip 3: Be inspired by other photographers

When you plan your holiday, after booking the tickets and the hotel, you may buy a travel guide with detailed information about the location. Like where to go and what to eat, to make sure you won’t miss anything. Or you might just ask some friends who have been there before. In both cases, you’re relying on someone who went there before you, and who therefore knows what’s worthwhile to visit, or what’s a good typical (local) dish to try.

Even if you can’t do exactly the same thing with photography, you can get pretty close, thanks to the multitude of photography websites and social networks full of pictures from all over the world. The ones I personally use most of the time are; Google Images, 500px, Instagram, Flickr, and Pinterest. Obviously, the list doesn’t end here.

Feel free to use whatever sites you want, as long as you do it. It doesn’t matter if the picture isn’t the best quality, after all, you don’t want to copy it, but you’re just looking for some inspiration

landscape photograph Zaanse Schaans, Netherlands

Zaanse Schaans, Netherlands

Tip 4: Enjoy the place and get familiar with it

When arriving somewhere, especially if it’s for the first time, it’s really tempting to take your camera and shoot whatever you see! This isn’t wrong in itself, but remember you’ll probably take dozens of nice pictures and lose the opportunity to take that single outstanding one. Because when the moment comes you’ll be tired of taking other pictures, or even worse, the battery is dead. (By the way, do you have a spare battery, don’t you?)

It’s better to be patient and spend more time exploring your location and the surrounding area. This way you are more likely to discover some interesting spots, hopefully different from the classic ones. You can use your smartphone for your normal tourist pictures, so don’t worry about anything but composition. This way, you can enjoy the place where you are, instead of spending all the time behind your camera. After all, landscape photography should be the happy ending of a good day outside, not the only reason for being there.

landscape photograph Land’s end - Cornwall, England

Land’s end – Cornwall, England

Tip 5: Use both golden and blue hours wisely

I’m sure you already know what the golden hour is: the time of the day around dawn and dusk when the sun gives its best warm light and long soft shadows. Hence the adjective golden. Many photographers, including me for a while, consider it as solely the right moment for obtaining good photos. This is wrong, because there is another one, called blue hour, which occurs just before the golden hour at sunrise, and just after sunset.

As you can imagine from the name, its particularity is in the blue colour of the sky, not warm anymore and not totally dark like in the middle of the night. It is very effective for urban landscapes, because it emphasizes artificial lights that wouldn’t be as visible during the golden hour. Furthermore, since the sky is not totally dark, you’ll have a better contrast with the warmer colours of the city, which will add drama to your picture.

landscape photography Manarola - Liguria, Italy

Manarola – Liguria, Italy

Tip 6: Take location related issues into account

So, you’ve planned your shoot by choosing the right day, with good weather and explored the place properly. Is that all?

Almost… There’s still something to be considered and it depends on the place. For example, in the case that you want to photograph a coastline, you will need to consider tides. It can be useful for composition purposes, but most importantly it’s for your personal safety. Tides in the ocean are really rapid and wide, and in some cases, it could be difficult (if not impossible) to escape from the waves if you decided to shoot from the rocks along the shore, with a rocky wall behind you.

In the case of very famous landmarks, a common issue is that it will be full of other photographers and tourists that want the same shot as you. This can obviously create problems for your composition, or you won’t have enough space for your tripod. So, try to be in that place before it gets too busy. This not only reduces the risk of finding other photographers who have decided to photograph from your same spot, it also permits you to slow down and avoid making mistakes.

landscape photography London, England

London, England

Conclusions

When I started taking pictures several years ago, I didn’t have anything in my mind other than to take pictures of what I liked. But looking at other photographer’s work I realized that I was missing something. In my opinion, proper planning is the most important thing that I could have learned.

Obviously learning new techniques is useful, but it’s the most obvious. Planning is often underestimated, but it can really help you to go somewhere already having a picture in mind. If this isn’t the case, remember again: landscape photography is just the happy ending, you can still enjoy the place!

Do you have any other tips for planning your landscape photography shoots? I’d love if you shared them in the comments below as well as your images.

googletag.cmd.push(function() {
tablet_slots.push( googletag.defineSlot( “/1005424/_dPSv4_tab-all-article-bottom_(300×250)”, [300, 250], “pb-ad-78623” ).addService( googletag.pubads() ) ); } );

googletag.cmd.push(function() {
mobile_slots.push( googletag.defineSlot( “/1005424/_dPSv4_mob-all-article-bottom_(300×250)”, [300, 250], “pb-ad-78158” ).addService( googletag.pubads() ) ); } );

The post 6 Tips for Planning the Perfect Landscape Photo Shoot by Luigi Trevisi appeared first on Digital Photography School.


Digital Photography School

 
Comments Off on 6 Tips for Planning the Perfect Landscape Photo Shoot

Posted in Photography


Getting the Right Timing for Great Outdoor Photographs by Planning Ahead

09 Sep

There is more to taking great outdoor photographs than a pleasing composition and the correct exposure. There is another important aspect. One that is too often overlooked when trying to capture a beautiful scenic subject or vista. The right timing is required to get great photographs.

Often on social media sites, images are posted that show ideal composition and exposure. But they are not photographed at the best time of day to capture the most attractive and interesting image. Some say that taking the most eye-catching photos is only about luck; being in the right place at the right time. But with the proper preparation, the odds of creating an exceptional photo can be increased. Certainly, without any pre-planning, you may be able to create “okay” images on a regular basis, but let’s examine the role timing takes in capturing more stunning images.

Here shooting toward the east in the evening produced some nice light on this image.

Shooting toward the east in the evening produced some detail-revealing light on this image.

Research

Much preparation for an outdoor photo shoot can be done from your computer, before even leaving the house. Listed here are three very effective tools that can help you find great shots. They can show you where you want to be, and when you want to be there:

  • Google Earth: The Google Earth software provides street views of any location on earth. This is very useful, as you can literally see and plan a shot from your computer before leaving to shoot. Google Earth gives you the ability to determine the best location, and its ideal angle to capture before even arriving!
  • GPS: Use GPS devices to help navigate to the exact location where you plan to shoot.
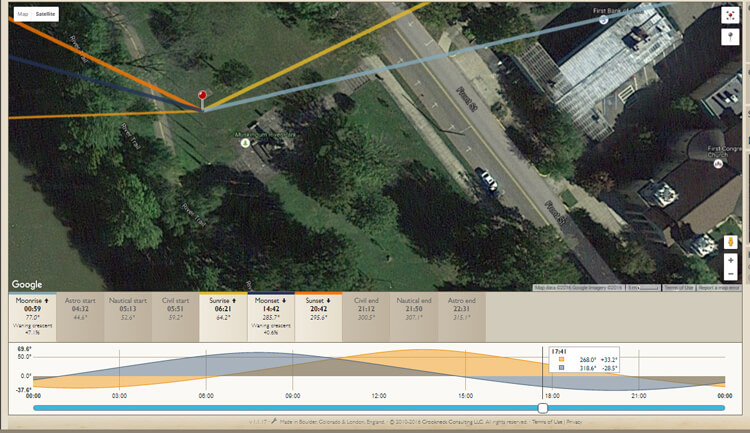
  • The Photographer’s Ephemeris: TPE is a very useful on-line tool to help plan outdoor photography. Its maps show how natural light falls on the earth both day and night for any location on earth, and for any time or day in the future!

    Screen capture from TPE showing the direction of the sun at the time the image of the statue and church was captured.

    A screen capture from TPE shows the direction of the sun when the above image of the statue and church was captured.

Time of day

Photographing at the right time of day is a big factor to getting the right light for a special image. It is a well-known fact among serious art-driven photographers, that some of the best light for making great outdoor images, happens early in the morning and late in the afternoon. These are called the “golden hours”.

But in addition to shooting during those times, notice should be taken as to where the sun is casting its light. Shooting into the light will mean that your subject will be in the shadows, or even silhouetted. Yes, the exposure can be compensated in this situation, but watch what happens to the sky in the image. It will be blown out and colorless. There are times when this shot may work, but the point here is to always be aware of the direction of light.


Same location as above, but this time it was shot in the morning. Notice how the sky is completely blown out when getting the exposure on the statue. Even tho this is nearly the same image as above, it doesn't have near the impact.

Same location as above, but taken facing into the morning sun. Notice how the sky is completely blown out when the exposure is set for the statue. Even though this is almost the same image as above, it doesn’t make near the same visual impact.

Don’t leave this factor to luck. When planning a trip, try to schedule the day around good light. Shoot westward in the morning, and toward the east in the late afternoon and early evening. Midday light in most cases is very harsh, and produces very contrasty images and deep shadows. Again, producing arresting images in this light is possible, but is also definitely more challenging.

So what does one with a camera do in the middle of the day? Rest or travel! The bottom line is, that if you are on vacation, with an open agenda, and are looking to take great photos of the sights, plan around the light to get the best results.

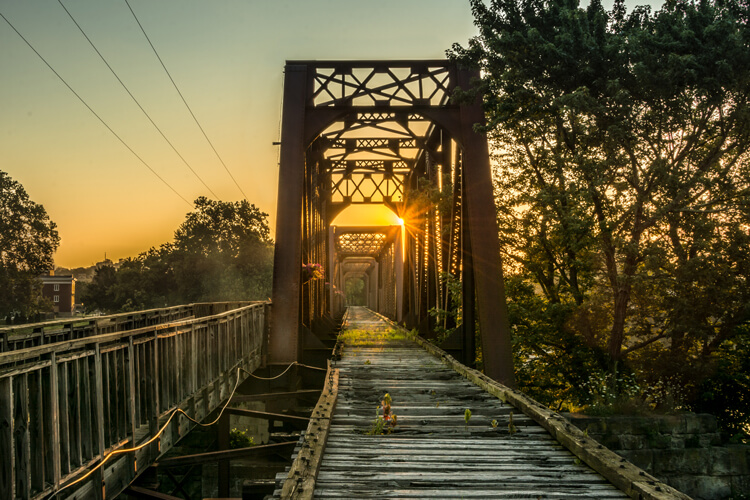
Using TPE I was able to determine the exact day that the sunrise would aline with the bridge to capture a one of a kind image.

Using TPE I was able to determine the exact day that the sunrise would aline with the bridge to capture a one of a kind image.

Season

Considering the season of the year can make a great difference in your photos. The angle of the sun changes from season to season. For instance, photographing a deep canyon in the winter will produce a much different image than one taken in the summer. Because of the lower angle of winter sun, light won’t reach the canyon floor as it would in summer.

Besides the change in light, there is the obvious a variation of foliage colors (or the absence thereof) from one season to the next, that can completely change the image captured at a given location. Sometimes it is fun to capture a four-season image of the same subject and location.

Weather

Weather conditions are a great factor when it comes to capturing the perfect scene. They should always be considered, even though they can’t be planned.

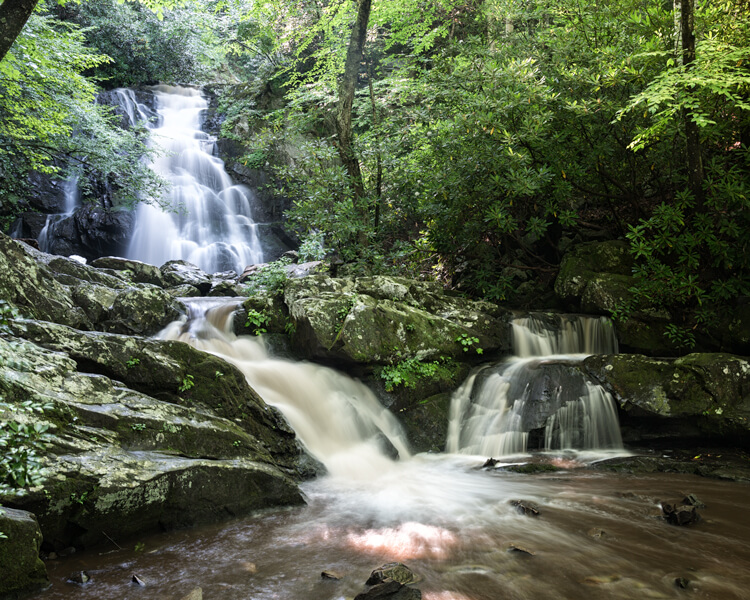
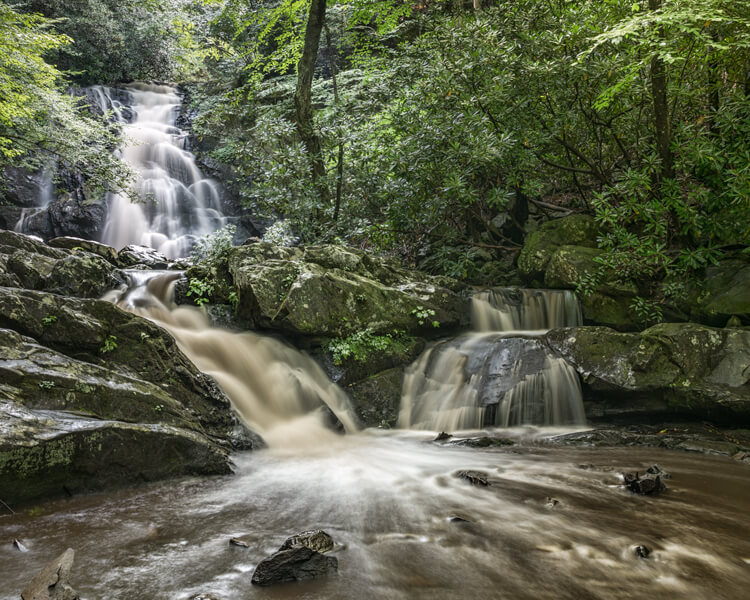
Overcast days, while not great for sky images, often produce very nice even lighting. This is ideal for shooting things like waterfalls. Bright sunlight can make it almost impossible to capture the scene without blowing out the water, and making it necessary to use a Neutral Density filter. Don’t look at dreary weather as always being a negative; rather, turn those negative conditions into a positive result. For instance, a foggy morning may mess with a pre-visualized image in one location, but an alternative location nearby may be perfect for foggy conditions.

This waterfalls was captured while the sun was shining. Notice the hot spots created by the sun on the water.

These waterfalls were captured while the sun was shining. Notice the hot spots created by the sun on the water.

Same waterfalls as above by this time captured in cloudy conditions allowed for a long exposure with out the hot spots or a ND filter.

Cloudy, overcast conditions allowed for a long exposure of the same waterfalls, removing the hot spots or need for an ND filter.

Rainy conditions may also produce pleasing effects on the subjects being photographed, darkening bright rocks and saturating foliage. However, it may be necessary to use a polarizing filter to reduce glare.  Also, when faced with unexpected weather conditions, be patient! Some rather fantastic shooting conditions occur following storms. Watching and waiting for just the right weather-related effects can provide an opportunity to capture a unique image, of even the most commonly photographed locations.

Special Occurrences

You could be out all night. Your tripod and camera all set up to watch the skies to photograph a meteor shower, and not see a single streak of light!  But with a little research you can ascertain when the next large meteor shower will occur. Thus the chance to capture the desired photos will be increased. To take the meteor shower experience one step farther, look for a night without a moon. This will help the stars to appear more vividly in the photographs. Use The Photographer’s Ephemeris to find special occurrences of the moon or sun, or look for times when the sun or moon rise or set may be in line with a special location. This a fun and creative way to produce a fascinating image, instead of an ordinary one.

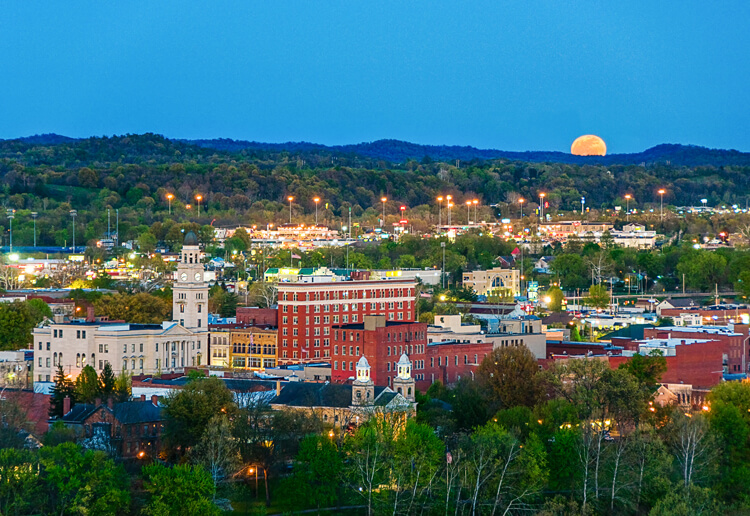
Using TPE to reseach is image I knew the exact time an location of the full moon rising. What really made this image was the sunset at my back that was casting some fantastic light on the city. Knowing this facts allowed me to create a one of a kind image of Marietta Ohio. One that I have sold many times.

Knowing when and where the moon would rise allowed me to plan and be ready to capture a unique image of Marietta, Ohio. Using TPE to research this image, I knew the exact time and location of the full moon rising. The sunset light behind me cast fantastic light on the city, that absolutely defined the shot, prints of which I have successfully marketed.

Day of the week

Every photo event timing factor considered so far has had something to do with light and lighting. But timing also includes the aspect of planning a less stressful, more convenient, and possibly more productive photo shoot. The day of the week is one such factor.

Time off from day-to-day activities often happen for many individuals and families on the weekends. Many are out visiting popular locales en force on those days. High traffic photo sites are best visited mid-week. There will be a better chance of having more room to work, free of other photographers attempting to get the same shot.

Conclusion

To wrap up this article on timing and preparation, remember the five P’s of capturing that great image:

Proper Planning Prevents Poor Photographs

Whether just taking a day trip or a long vacation, planning your photographs around the best available light will increase your chances of capturing a memorable image.

Do you have any tips for planning for the best light? Please leave them in the comments below.

googletag.cmd.push(function() {
tablet_slots.push( googletag.defineSlot( “/1005424/_dPSv4_tab-all-article-bottom_(300×250)”, [300, 250], “pb-ad-78623” ).addService( googletag.pubads() ) ); } );

googletag.cmd.push(function() {
mobile_slots.push( googletag.defineSlot( “/1005424/_dPSv4_mob-all-article-bottom_(300×250)”, [300, 250], “pb-ad-78158” ).addService( googletag.pubads() ) ); } );

The post Getting the Right Timing for Great Outdoor Photographs by Planning Ahead by Bruce Wunderlich appeared first on Digital Photography School.


Digital Photography School

 
Comments Off on Getting the Right Timing for Great Outdoor Photographs by Planning Ahead

Posted in Photography