RSS
 

Posts Tagged ‘Overview’

Earth from a New Perspective: ‘Overview’ Aerial Shots Reveal Hidden Beauty

01 Nov

[ By SA Rogers in Art & Photography & Video. ]

Planned community of Sun Lakes, Arizona

Other than a few brief glimpses near airports, few of us ever get to see the Earth from high up in the sky, taking in all of the complex textures and patterns created by nature and human activity. If we could, we might feel more inclined to do all that we could to protect it. This phenomenon, as experienced by astronauts when viewing our small, fragile planet from space, is called the ‘overview effect,’ and it serves as the inspiration behind a series of stunning aerial photographs by Benjamin Grant.

Tulip fields, Lisse, Netherlands
A highway interchange in Jacksonville, FL
World's largest aircraft storage facility, Tucson, Arizona
World’s largest aircraft storage facility, Tucson, Arizona
Residential communities in Boca Raton, FL

‘Overview: A New Perspective of Earth’ is a new hardcover book full of over 200 aerial images taken of sites all over the world, from industrial areas of South Korea and fields in Ethiopia to planned communities in South Florida. Grant initially started the project as an Instagram series in December 2013, selecting high-resolution satellite photographs that reveal the extent to which we have altered the surface of the planet upon which we live and curating them into a thoughtful, emotional collection.

Port of Singapore
Port of Singapore
Industrial district, Ansan, South Korea
Agricultural development, Addis Ababa, Ethiopia
Residential neighborhood in Delray Beach, FL

“What I’m really trying to get across here is that we’ve entered an important time in human history where our home has been significantly altered,” Grant told Wired in a 2015 interview.

The Gemasolar Thermosolar Plant, Seville, Spain
Olive tree groves in Cordoba, Spain
Mexico City
Mexico City
Burning Man, Black Rock, Nevada

Grant searches aerial shots relating to a specific current event or environmental issue to find the ones that have the biggest impact, striking us as visually beautiful even when the imagery depicts tragedy. Some examples include shots of a refugee camp in Kenya, shrinking ice sheets and the choked streets of the world’s most populated cities. Take a look through the feed on DailyOverview.com, or order the book on Amazon.

Share on Facebook


[ By SA Rogers in Art & Photography & Video. ]

[ WebUrbanist | Archives | Galleries | Privacy | TOS ]


WebUrbanist

 
Comments Off on Earth from a New Perspective: ‘Overview’ Aerial Shots Reveal Hidden Beauty

Posted in Creativity


Overview and Test of the New Cactus V6II Wireless Flash Trigger for High-Speed Sync

28 Oct

Cactus Image recently launched a new version of their radio trigger for speedlights and strobes, the Cactus V6II. In this review, I’ll go over the features of this trigger, how to use it, and do some example photo shoots to test it.

Features of the Cactus V6II Wireless Flash Transceiver

This is a 16 channel system with 4 groups. That means 16 systems can run concurrently, and each photographer could have four sets of flashes of which they can control the power (and zoom for the RF-60/TTL Flashes). It runs off two AA batteries, mini-USB 2.0, or a 5v DC input. Like most modern flash triggers, it runs at 2.4Ghz, which helps it work reliably up to 100 meters. It supports High-Speed Sync up to 1/8000 sec (if your camera goes that high).

The mini-USB port also allows you to update the firmware on the device, giving it a certain amount of future proofing. The main difference between the V6 and the V6II is that the latter allows you to use High-Speed Sync across a range of cameras and flashes, including that of the Fuji X series (which lacks the ability normally). The V6II HSS is based on the use of camera and flash profiles. This allows both Cactus and the photographer to make profiles for flashes they may not already have in the system.

Cactus Wireless Flash Transceiver V6 II - box

The Cactus V6II transceiver box.

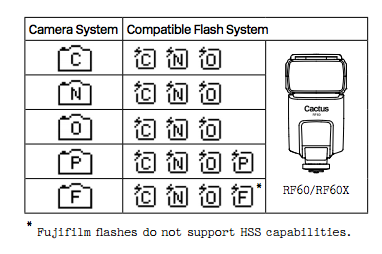
This means there’s practically universal support for any flash you may have. The exception is flashes that have a high sync voltage. The units are cross compatible between systems, so you can use Pentax cameras with Olympus flashes, etc.

Camera and flash compatibility list for the v6II

Camera and flash compatibility list for the v6II

There are two High-Speed Sync modes; Normal and Power. Normal High-Speed Sync works up to 1/8000th of a second and uses a pulsing flash fire. Power Sync uses the full power flash as a normal fire, but allows you to exceed the normal sync-speed of the camera.

Getting started with the Cactus V6II

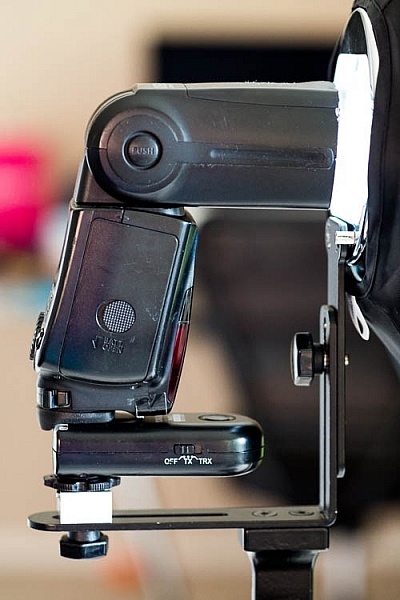
The trigger comes in a nicely designed box, containing the user manual, the trigger, and a hotshoe foot. Unlike other hotshoe feet, this one doesn’t have a screw thread for a lighting stand. It’s not an issue as I wasn’t expecting one anyway. The unit can be configured as either a transmitter or a receiver by selecting Tx or Rx from the power switch.

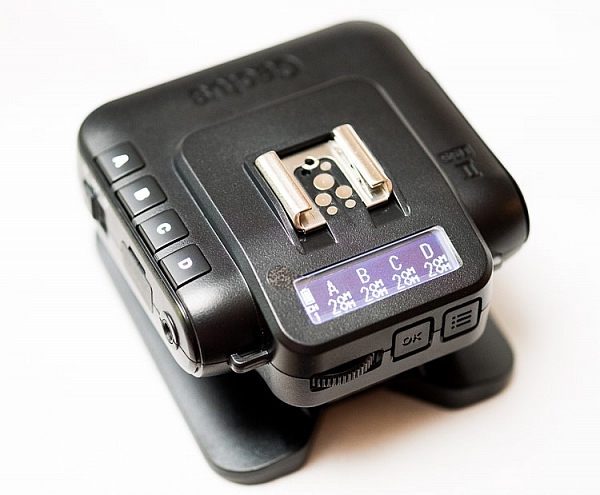
When it is on-camera as a transmitter, you have the four groups visible on the camera left-hand side. Marked A, B, C and D, pressing one toggles it on and off. This way you can select a specific group of flashes to change settings on. This works especially great with Cactus’ own flash, the RF60. Using the dial on the back you can change the power of the flashes on the group, or by pressing in the dial, swap to the lens zoom setting and change that instead.

The unboxed Cactus V6II

The unboxed Cactus V6II

On the right hand side at the front is the test button. You can press it to test that the signal is going to either the RF60, or to another V6II set to receiver mode. One other useful feature is that there’s a hotshoe on the trigger, where you can add your existing trigger system, or another flash. Using your current triggers will allow the High-Speed Sync signal to pass through the V6II and into your flash system.

Setting up

My main portable system is based around Godox v850 flashes (more precisely, the Neweer versions rebranded as the TT850 – it’s the same flash). I also have the more powerful AD360, which responds to the same trigger (the older FT-16), so I find it a really useful system. All of the flashes are High-Speed Sync capable and have profiles in the trigger. I don’t actually use the built-in profiles for High-Speed Sync with Fuji cameras.

The Gear Setup for HSS

Using the older triggers, I set up the flash as normal. Once it’s all working I take the trigger off the camera and put the Cactus V6II on instead (switched to Tx mode). Next I put the old (FT-16) transmitter on top of the hotshoe on the V6II. Finally I set the flash to HSS mode by pressing a two button combination on the back. Each system has its own way of turning on HSS. Yes, this does mean you only need one Cactus V6II trigger with this system to get HSS working.

To get started, press the Menu button on the back right of the V6II unit. Turn the dial to Camera and Flash Setup. Set Camera to Auto, then set Flash to the brand that you use. Next use the Auto Profile for your Flash. For Fuji, you have an additional step, where you make the trigger learn the HSS response of the flash. For the AD360, I set the Flash to Nikon and the Profile to Auto (Nikon).

The Beta Test

So I set it all up, and with my trusty Godox 120cm Octabox on the Ad360, I sweet-talked my son into posing on his bike. That’s roughly three minutes of attention span before boredom hits. I’ve included some behind the scenes shots as well. The exposure was 1/4000th, f/2.8, ISO 200 with a 35mm f/1.4 lens. Even the nearby trees are out of focus. I absolutely love the bokeh in my first shoot with the trigger.

Cactus image v6ii review matt

Test Shoot #1

Testing means dragging out a range of people to shoot with. It also means working around their schedule. So this next shoot happened a little later than I would’ve liked, but I still got some good shots.

Once the trigger is set up, your main issue is dealing with power. Normally with manual flash, only the aperture has an effect on the apparent power of the flash. Below sync-speed, you can change the shutter speed to your heart’s content, and it won’t affect the flash. Not so with High-Speed Sync. Any change of shutter speed changes the flash power. The faster the shutter speed, the more flash power you need. It’s a new experience if you’ve gotten used to normal manual flash. Each stop increase in shutter speed requires about a stop of increase in the flash power.

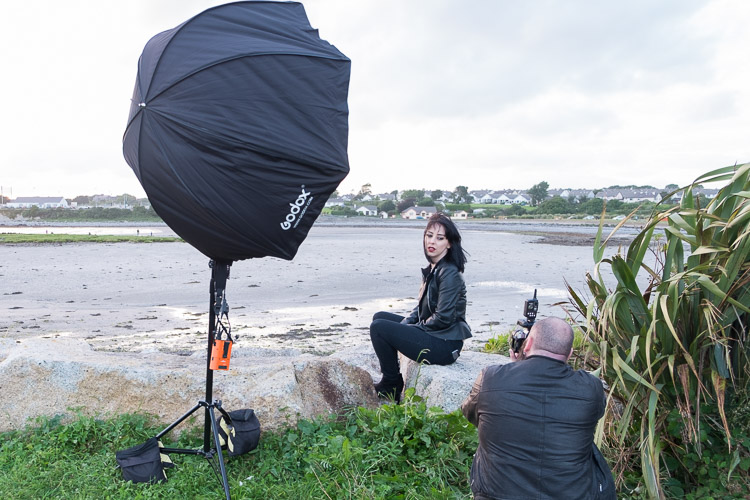
Here’s the first setup and the resulting image.

Cactus image v6ii review sunset 1

Behind the scenes shot showing the Godox AD360 flash with Godox 120cm Octabox. Taken by Ola.

The shot with HSS. The background is beautifully out of focus. ISO200 f1.8 1/4000sec 35mm on Fuji X-T10

The shot with HSS. The background is beautifully out of focus. ISO 200, f/1.8, 1/4000th, 35mm on Fuji X-T10.

I still managed to blow out the sun slightly, but the flash was at full power, so I couldn’t change the aperture to compensate. The octabox was just out of frame too. Normally, I shoot vertical portraits but for articles, horizontal looks better, so I just recovered this highlights in Lightroom.

Test Shoot #2

For the second shoot, I had more time, better planning, and less wind! Due to the model’s availability, it was later than I’d have like, but still had enough light to get shots using HSS (out of want rather than need!).

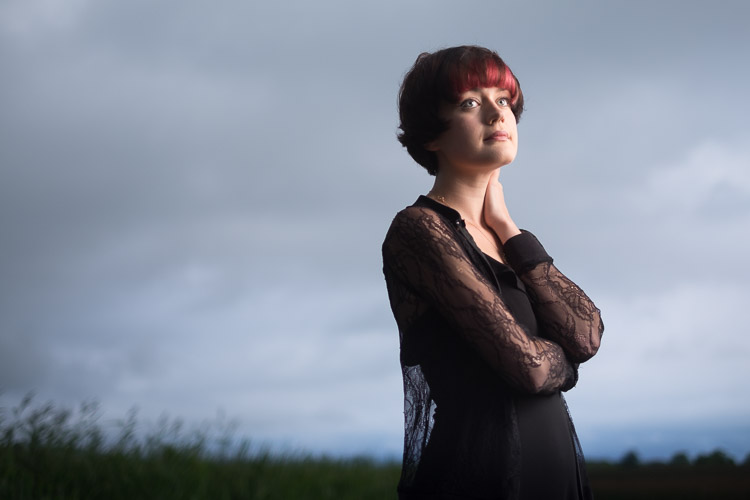
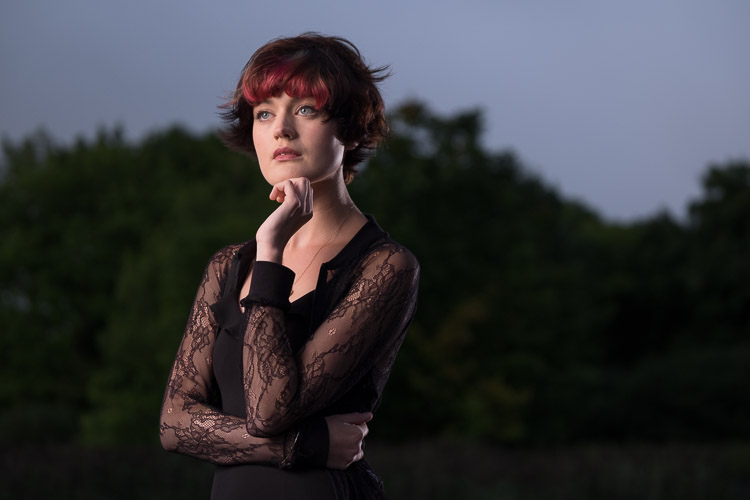
Here I’ve used my typical short lit Godox Octa setup for this using the Fujifilm X-T10 with a 35mm f/1.4 lens. I wanted to create tension and go for a cinematic feel to the image. The grass at the bottom is well out of focus and gives a slightly ethereal feel to the shot. The black clothes and the model peering out of frame seem to reference things in the past as if a loved one has passed.

cactus-v6ii-review-emma-1

ISO 200, f/1.4, 1/1600

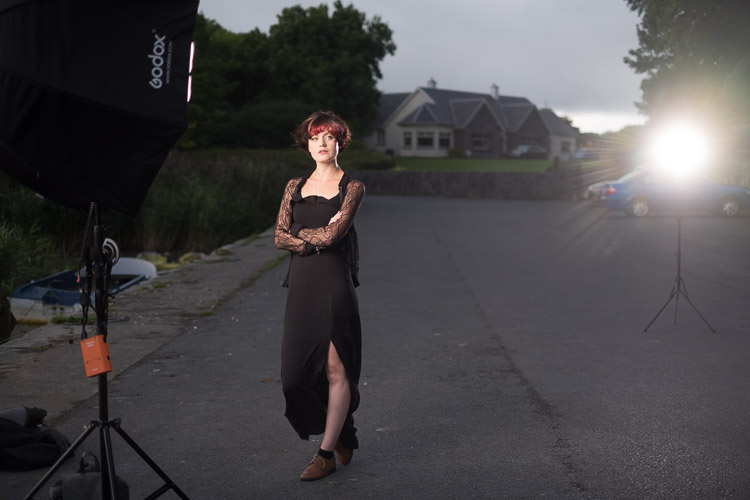
For the second shot, I wanted to bring in an additional element – a back light. I could’ve used one of the 850’s, but instead, I opted for the Cactus RF-60 flash. This has the receiver built-in and communicates directly with the Cactus V6II receiver. I set this to Group B and zoomed the flash to 105mm to allow it to throw the light further. Once in HSS mode, it triggered every time along with the AD360. I also went for the 50-140mm lens to get further back and compress the background more.

ISO200 f2.8 1/500sec. Shot with the 50-1400 f2.8 lens

ISO 200, f/2.8, 1/500th. Shot with the 50-140mm f/2.8 lens.

Here’s how the gear looked behind the scenes:

Cactus image v6ii review emma 3

Headshot variation

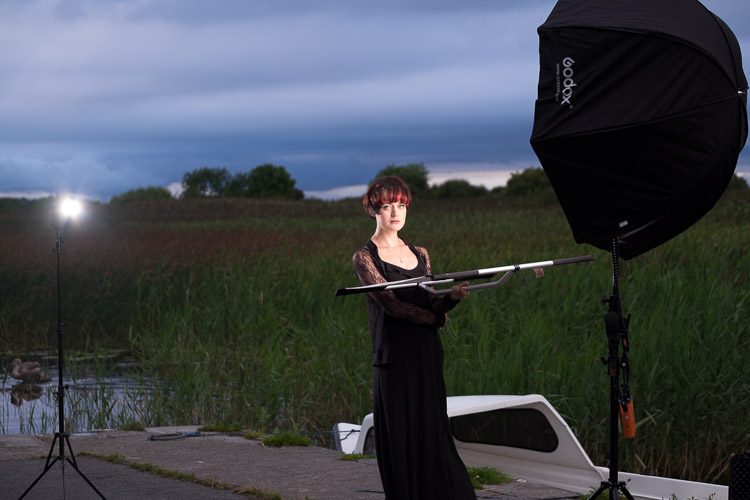
For the final look, I went for a headshot, so the Octa was moved to give her a soft loop light. I got the model to hold a reflector (in this case a California Sunbounce silver-white mini, using the silver side for contrast). It’s very similar to the last setup with the Cactus RF-60 acting as a kicker.

cactus-image-v6ii-review-emma-3

ISO 200, f/2.8, 1/500th.

Here’s the setup shot:

Cactus image v6ii review emma 5

By swapping the side the Octa is on, so the kicker and the key are on the same side, you get a very different look for only a few minutes work.

cactus-image-v6ii-review-emma-5

Cross Platform Test: Fuji Camera – Canon Flashes

Using a second Cactus V6II trigger, I added a Canon 580EXII Speedlite to the setup to use with the Fuji camera. In this case, I set the flash up as Canon with an Auto Canon Flash Profile. Again with the flash set to HSS, I went through the learning process for HSS, and the flash worked perfectly with the Fujifilm in HSS mode. The 580EXII was set to ETTL, and I could control both the flash power and the flash from the V6II transceiver on the camera.

I still have my Canon 5D MarkIII (not for much longer), so I did a quick test with that as a system check. Again I used the Canon 580EXII Speedlite on ETTL, set to HSS. Because both transceivers were set to Auto, switching the units off and back on began a new detection cycle, successfully recognizing both flash and camera as Canon. After one or two test fires, it all worked perfectly. No pretty models for this demo, but something close to my heart instead.

Shooting the X-T2 using a Canon 5DIII. The 580EXII flash was set up off camera, with the trigger set to auto detect camera, and the receiver set to auto detect flash. Set to ETTL mode, both power and zoom can be controlled from the trigger. The flash was bounced into the ceiling. ISO200 1/500sec f1.8.

Shooting the Fuji X-T2 using a Canon 5D MarkIII. The Canon 580EXII flash was set up off-camera, with the trigger set to auto-detect the camera, and the receiver set to auto-detect the flash. Set to ETTL mode, both the power and zoom of the flash can be controlled from the trigger. The flash was bounced into the ceiling. ISO 200, 1/500th, f/1.8.

Firmware Updates for the V6II

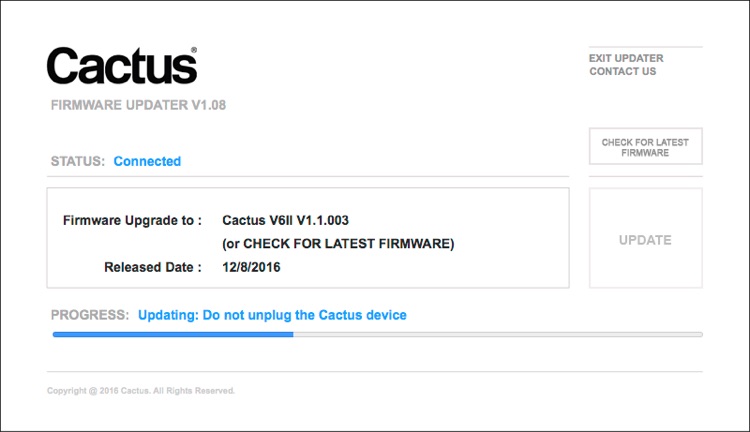
Another feature of this trigger is you can update the firmware as new features and profiles are added. During my testing period, two firmware updates became available. I also had the chance to test a beta version of the new Fuji X-T2, another testament to Cactus’ support for their product. For the public updates, I simply downloaded the updater app, ran it, and followed the instructions.

Cactus Firmware Updater

Cactus Firmware Updater

Pros of the Cactus V6II Triggers

  • Gives you High-Speed Sync ability across a range of camera systems and flashes.
  • Firmware upgradeable.
  • Works directly with the Cactus RF-60 flash.
  • Good range of channels and groups.
  • Power Sync allows additional sync speed options for non-HSS flashes.
  • Can work with only one transmitter and your existing triggers.

Cons of the Cactus V6II Triggers

  • Clunky – the shape isn’t as elegant as many others with a hotshoe passthrough.
  • One of the units I had suffered from a really tight battery clip. It’s more an annoyance than a real con as the batteries last a really long time. The clip on the other unit was perfect.
  • For Fuji users, there’s more work to get it going. For everyone else, no problem.

Verdict

I’m delighted with the Cactus V6II wireless flash trigger. It really works.

During the short time I’ve had the trigger, I’ve used it on a few magazine shoots, as well as the fun shoots I did to test it. It’s been great. Their support has been fabulous, and there’s a lot of information on their community page.

Would I recommend these triggers? Absolutely. They bring a new dimension to shooting portraits outdoors that can change your style completely.

googletag.cmd.push(function() {
tablet_slots.push( googletag.defineSlot( “/1005424/_dPSv4_tab-all-article-bottom_(300×250)”, [300, 250], “pb-ad-78623” ).addService( googletag.pubads() ) ); } );

googletag.cmd.push(function() {
mobile_slots.push( googletag.defineSlot( “/1005424/_dPSv4_mob-all-article-bottom_(300×250)”, [300, 250], “pb-ad-78158” ).addService( googletag.pubads() ) ); } );

The post Overview and Test of the New Cactus V6II Wireless Flash Trigger for High-Speed Sync by Sean McCormack appeared first on Digital Photography School.


Digital Photography School

 
Comments Off on Overview and Test of the New Cactus V6II Wireless Flash Trigger for High-Speed Sync

Posted in Photography


Overview of the Yongnuo RF-603 Wireless Flash Trigger

26 Oct

Off-camera flash is a key technique that can really differentiate your photography style and make you and your imagery appear more professional. The tools needed to achieve off-camera flash are relatively simple, consisting of just a flash unit and a cord or triggers to connect the flash to your camera. While a cord is by far the cheapest and most straightforward option, it’s also inconvenient since it physically binds you to your camera. Wireless triggers are a simpler solution, but they tend to be pricey, especially if you opt for Pocket Wizards. Enter a budget option: the Yongnuo RF-603 wireless flash trigger.

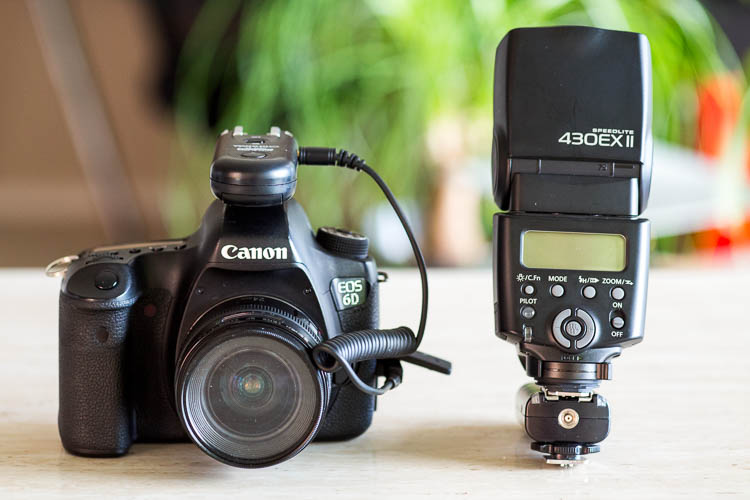
Yongnuo RF-603 wireless flash trigger

Features

Priced at under $ 35 for a set of two, the Yongnuo RF-603 works as both a wireless flash trigger and receiver. It can also function as a remote shutter release for your camera.

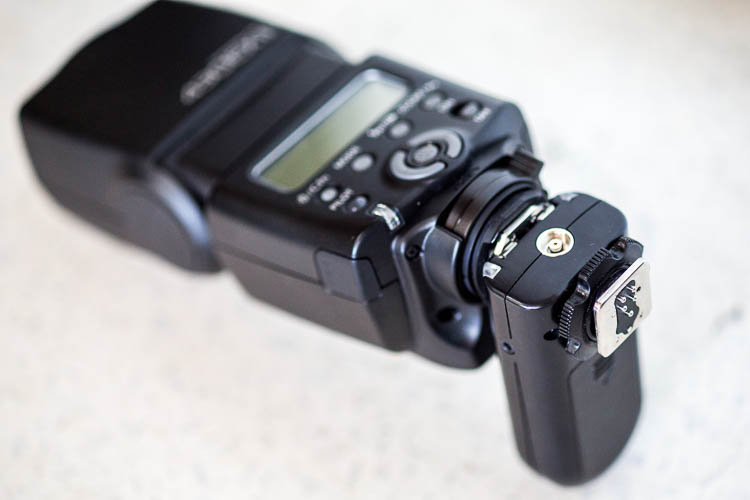
Yongnuo wireless flash triggers

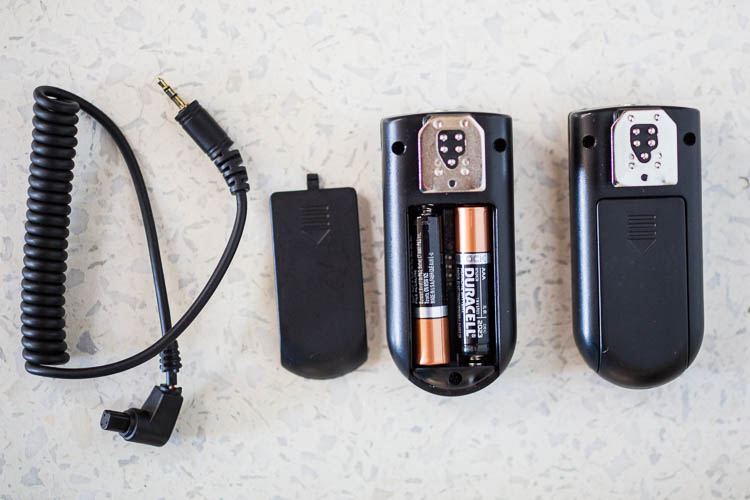
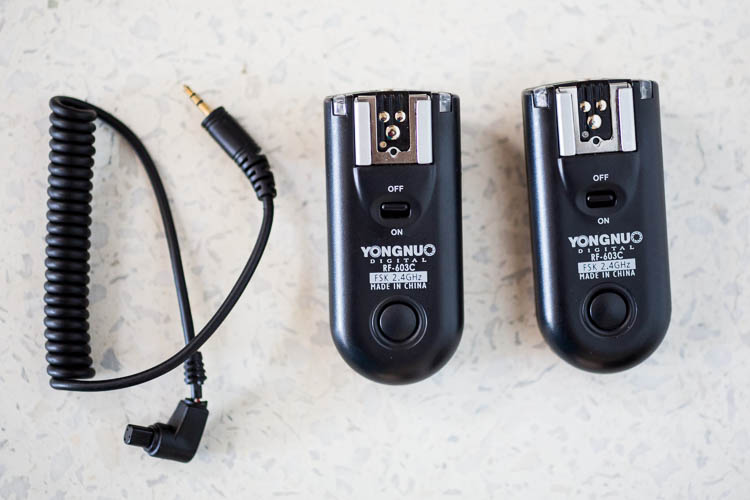
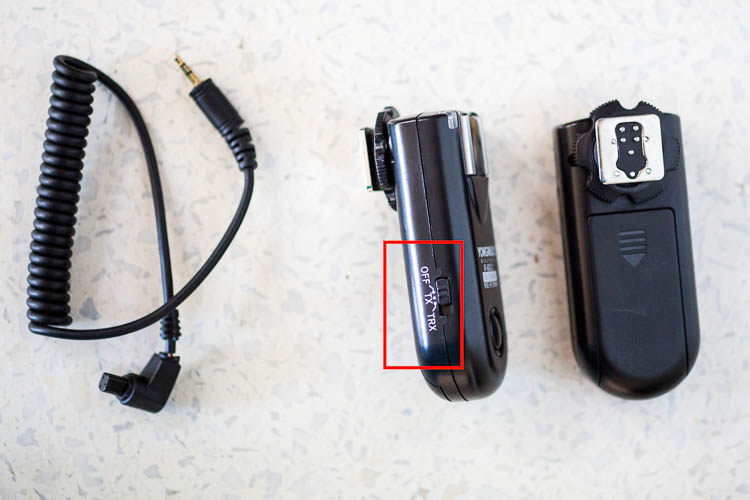
What’s in the box: two (2) flash triggers, one (1) N1 shutter release cable. AAA batteries not included.

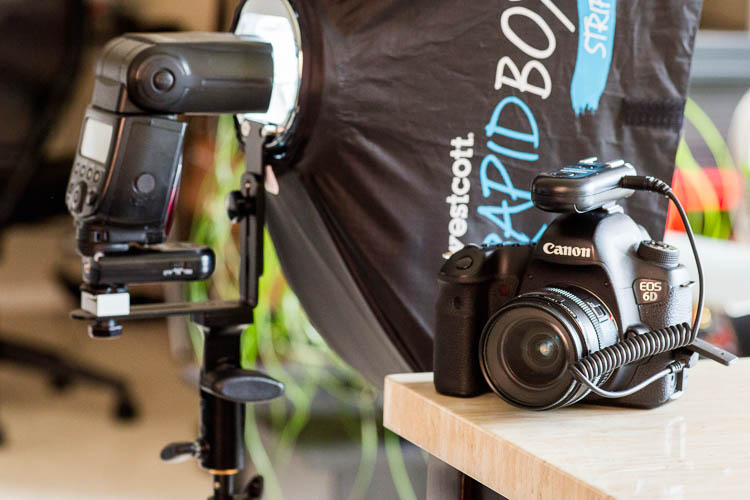
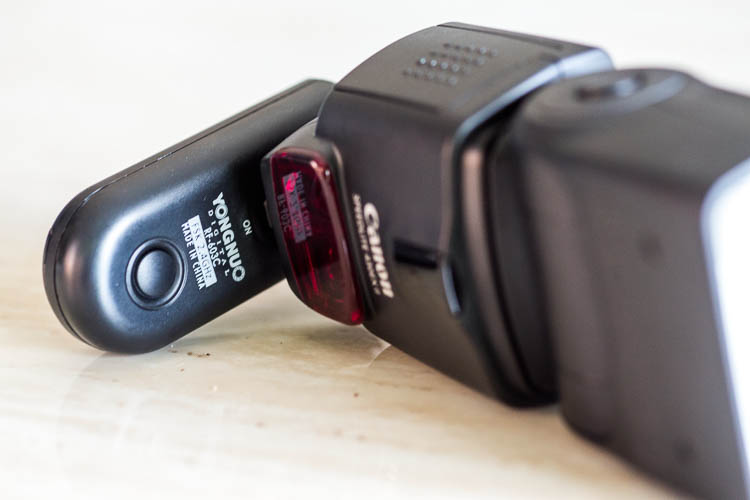
One of the triggers attaches to your off-camera flash unit via the hot shoe mount. Ihe other slides onto your camera’s hot shoe mount and also connects via the included N1 shutter release cable. Then you simply turn the triggers, camera, and flash on and you’re good to start firing away!

You can also purchase additional Yongnuo transceivers to trigger multiple flashes at once. To use the Yongnuo RF-603 as a shutter release, simply attach one unit to your camera’s hot shoe mount, turn both units on, and use the second unit to remotely fire your camera.

Yongnuo wireless flash triggers

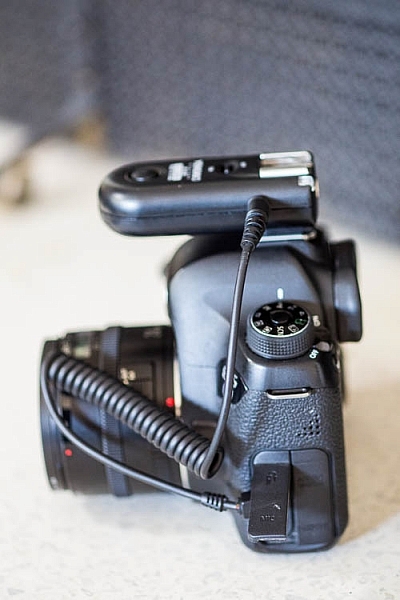
How to Yongnuo RF-603 trigger attaches to your camera.

Yongnuo wireless flash triggers

Batteries

Besides being very reasonably priced, these Yongnuo triggers are powered by two normal AAA batteries. They use the battery power very efficiently, meaning you won’t have to constantly switch out drained ones. The triggers are also very slim and lightweight in size at just three inches long, making them easy to slip into a bag or pocket. These triggers are compatible with most DSLR cameras, but double check to make sure you order the correct model that is compatible with yours.

Yongnuo wireless flash triggers

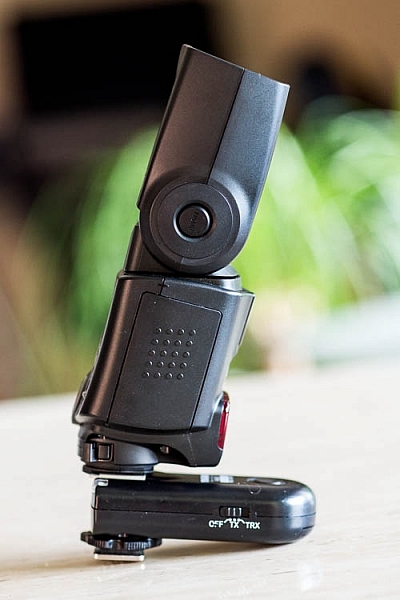
Slim and low-profile, the Yongnuo RF-603 doesn’t add a lot of bulk to your flash unit.

Shooting distance

Another point to note is that these Yongnuo triggers use a 2.4GHz wireless frequency, and the remote control distance is up to approximately 100 meters (328 feet). Synchronization speed can reach 1/320, but may only reach 1/250 depending on the exact scenario you’re shooting in.

Yongnuo wireless flash triggers

Yongnuo RF-603, the original version.

Yongnuo wireless flash triggers

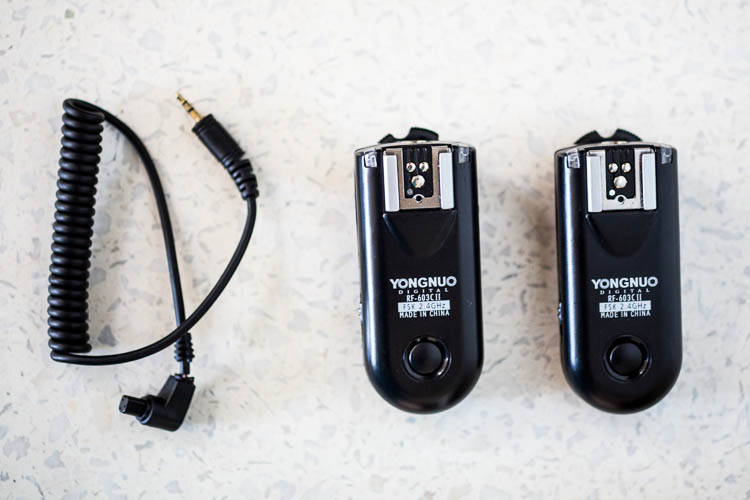
Yongnuo RF-603 II, the latest version.

Why the Newer Version is Better

When shopping around, you might notice that there are two Yongnuo RF-603 models: RF-603 and RF-603 II. The older, original version looks like it has recently been discontinued by the manufacturer, but it is still available for sale. Thus, it’s important to note several key differences between the two models, and why you’ll probably want to opt for the newer version. Also note that the original and newer transceivers are compatible with each other, so you can mix and match if you happen to have both versions.

Yongnuo wireless flash triggers

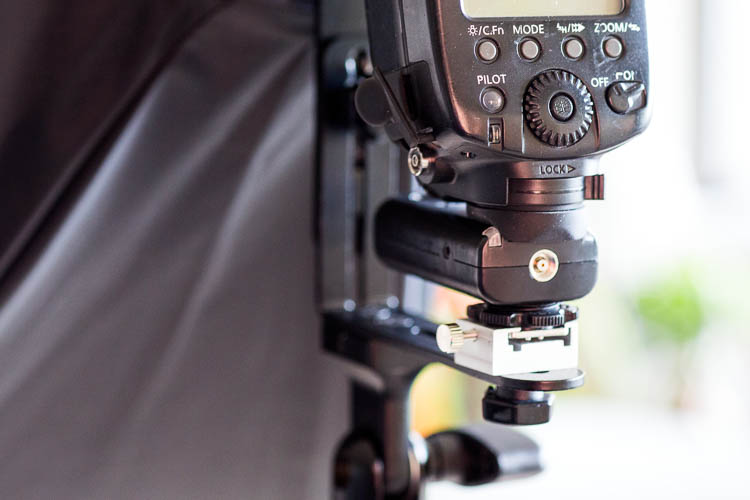
The round locking mechanism above the metal hot shoe of the Yongnuo RF-603 II (the original version does not have this feature).

Yongnuo wireless flash triggers

An example of the locking mechanism being used to attach the flash to a lighting stand.

Enhanced on/off switch is on the side for easier access

The original trigger has the on/off button on the top surface, which means it is completely covered up when attached to your flash. Thankfully, Yongnuo fixed this problem in the second version, and moved the on/off button to the side of the trigger. The newer version also includes the option of designating the trigger as off, in TR mode or TRX mode, rather than simply on or off.

Yongnuo wireless flash triggers

Even before the flash unit is fully attached, the on/off switch of the original Yongnuo RF-603 is already covered and hard to access.

Yongnuo wireless flash triggers

The newer Yongnuo RF-603 II added options to the on/off button and moved it to the side of the trigger.

Yongnuo wireless flash triggers

Having the on/off button on the side of the trigger makes it easier to access with the flash attached.

Who should use Yongnuo RF-603 Triggers

If you’re a photographer looking for a low-cost way to experiment with off-camera flash, Yongnuo triggers and even their own brand name flash units are highly recommended. Based on multiple user reviews and my own experience with Yongnuo products, they are dependable, efficient, and incredibly easy to use despite being considered budget options.

The only downside to these Yongnuo RF-603 triggers lies in their simplicity. Since this base model trigger only has a simple on/off button, you still have to manually adjust your flash settings if you want to tweak the flash power, flash zoom, etc. Upgrading to a more sophisticated trigger system such as the Yongnuo 622N TX ($ 85 for a pair approx.) gives you the full power of adjusting flash settings without having to even touch your flash. However, given the extra cost and complication of the Yongnuo 622N, only opt for this version if you truly need the extra features (in other words, stick with the RF-603 if you’re a beginner or on a budget).

googletag.cmd.push(function() {
tablet_slots.push( googletag.defineSlot( “/1005424/_dPSv4_tab-all-article-bottom_(300×250)”, [300, 250], “pb-ad-78623” ).addService( googletag.pubads() ) ); } );

googletag.cmd.push(function() {
mobile_slots.push( googletag.defineSlot( “/1005424/_dPSv4_mob-all-article-bottom_(300×250)”, [300, 250], “pb-ad-78158” ).addService( googletag.pubads() ) ); } );

The post Overview of the Yongnuo RF-603 Wireless Flash Trigger by Suzi Pratt appeared first on Digital Photography School.


Digital Photography School

 
Comments Off on Overview of the Yongnuo RF-603 Wireless Flash Trigger

Posted in Photography


Photokina 2016: Olympus E-M1 Mark II overview video

23 Sep

With the Mark II version, Olympus’ new flagship comes with some big improvements despite remaining relatively compact. Between its impressive speed, autofocus system and video capabilities, almost every core specification has been bumped up a notch (or three). We sat down with Olympus’ Eric Gensel to go through some of those changes in more detail, from continuous shooting (and what its mechanical shutter sounds like at 15 fps) to just how effective Olympus’ image stabilization has become.

Articles: Digital Photography Review (dpreview.com)

 
Comments Off on Photokina 2016: Olympus E-M1 Mark II overview video

Posted in Uncategorized


Overview of the Lensbaby System – Is it for you?

06 Sep

Are you interested in taking your photography to another level? Do you like the bokeh effect, or images that have a painterly look to them? Then perhaps you might want to give the Lensbaby lenses and optics a try.

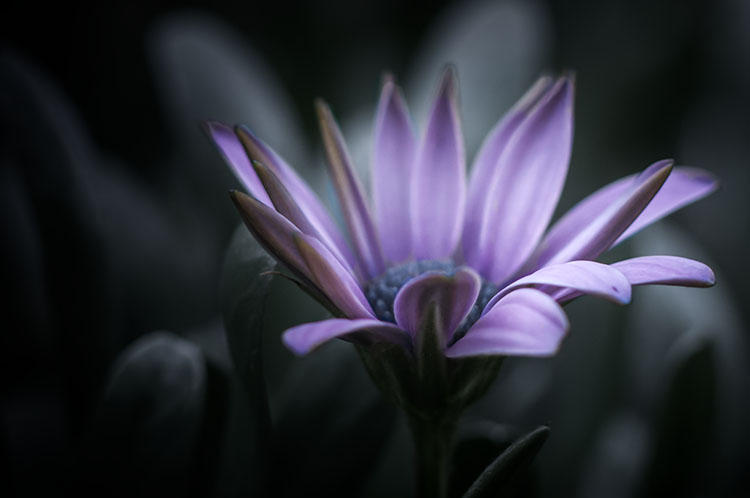
leannecole-lensbaby-macro-flower-colour

Taken in the garden with using the macro converters, giving this image a very soft, painterly look.

Lensbaby is a system that allows you to insert, and use, different optics to a base lens. The most common one is the Composer Pro which has a rotating ball so you can use different angles when taking photos. You can get interesting effects with them by using selective focus, great bokeh, and you can achieve very painterly style images.

The company, Lensbaby, makes the lenses for cameras with interchangeable lenses, like DSLRs and mirrorless bodies. They have been designed to help you photograph the world in a new way. You can achieve some amazing results and can very quickly become addicted.

How long has Lensbaby been around?

Their story began in 2004 when one of their founders, Craig Strong, “joined an old Speed Graphic lens with a short Shop-Vac hose to shoot images otherwise impossible with an DSLR lens, which inspired the original Lensbaby lens.” From there the company has continued to grow and develop the lens swap system.

What is a Lensbaby?

The idea behind Lensbaby is an optic swap system. You get one of the systems that can use various optics, such as the Composer Pro. This is the part that connects directly to your camera, like a lens. There are two components to it, which are joined via a metal ball, that allows the second part to rotate so you can change your point of focus.

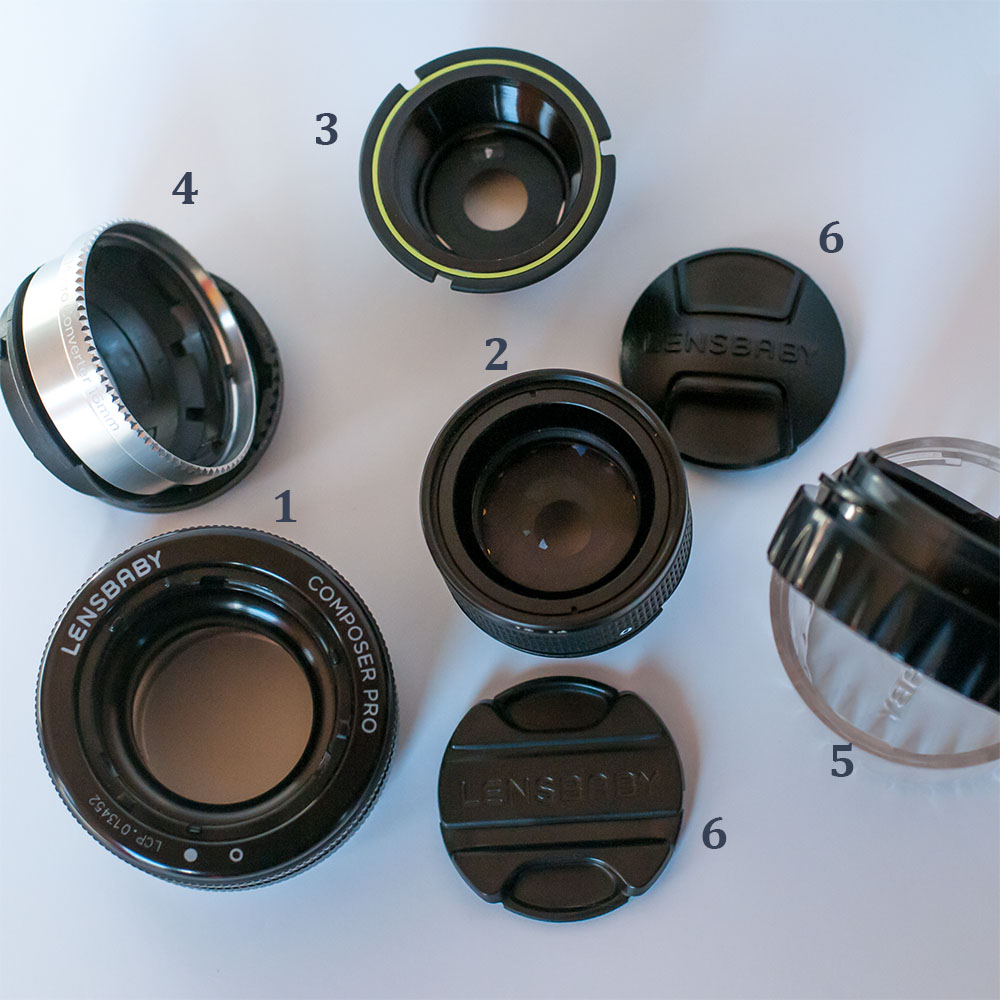
leannecole-lensbaby-lenses-optics

The Lensbaby lenses I have, 1) The Composer Pro, 2) Edge 80 Optic, 3) Double Glass Optic with f/4, 4) Macro Converters, 5) The containers they come in that are also tools, and 6) lens cap.

You put the optics into the Composer Pro. There is a range of options available that allow you to use the lens as a normal lens, a fisheye, a macro lens, etc. Each of the optics give you different effects. For this article the optics used where the Edge 80, Fisheye Optic and the Double Glass optics.

There is also a range of optics available for the iPhone. You can put them on your phone to get similar results.

Lensbaby also has a new lens now, the Velvet series. They look like real lenses, but deliver a soft, glowing effect at larger apertures. They don’t have optics that you swap in and out, however, and are also manually focused.

What do the lenses do and what effects do you get?

With the different optics you can get a lot of different effects. You can create images that have a tilt-shift look, so the subject in the image looks miniature. You can isolate certain areas, or the subject. For example, if you want to photograph a flower that is in amongst many others, you could isolate it so only that one flower is in focus.

One thing it is great for is bokeh. That same flower can have a fantastic blurred background by using a large aperture. The out of focus areas often look like they were painted as well, which, again, depends on the optic and the aperture that you use.

You don’t really get what you expect with normal photography or lenses, meaning really sharp images. You have to take a different approach to using a Lensbaby. If you are the type of photographer who is very technical, where the light and sharp focus is very important, you may not like these. However, if you like to experiment, see what you can achieve, and like dreamy painterly images, then you will love the Lensbaby.

leannecole-lensbaby-old-train-station

The Edge 80 Optic is also good for creating tilt shift images, to make your subject seem miniature.

What do you need to use a Lensbaby?

When compared to normal lenses the price is not too bad. But it does depend on how addicted you become, and how many different ones you want to try. I was given quite a few different optics, but I still went and purchased more.

However when starting with the system, you can begin with something simple, such as the Spark. It comes with one optic, and you can just go out and use it. The Composer Pro can also be purchased with an optic, and is perhaps the easier of the two to use.

To decide which one is for you, take a look at the Lensbaby gallery on their website. See what looks appeal to you, and which products were used to create them. Start there.

leannecole-lensbaby-old-car

Using the Double Glass Optic again, it has given focus to just a small part of the old car.

How easy are they to use?

They take a bit of getting used to, and there is a steep learning curve. You can’t simply put them on your camera and begin. To get the best results you need to do some research and learn how to use them. Once you have a good idea, then it is just a matter of getting out there to try it. You need to experiment a lot, and you will delete many photos, but as you gain experience you will get images that you are proud to show.

The focusing system seems to be the hardest to get used to, at least it was for me. Having to manually focus the lens is a task in itself. For some of the optics it is easy though. Once the focus is sorted at the start, you can just move the composer pro around on the ball, and get it to the point and look that you want.

As with anything new, there is some trial and error. So be prepared to mess up a lot. It isn’t a good idea to take your new Lensbaby somewhere really important the first time you use it, like a wedding. Get to know it first before using it for anything critical.

leannecole-lensbaby-old-shearing-shed

Focusing on just a small part of the shearing shed to emphasis where the viewer should look.

Why are they better than other similar effects?

The results you get with the lenses are quite unique to the system. You can try and emulate the effects in Photoshop, but they don’t quite work the same.

Who would use them?

Anyone who is interested in trying something different, and to test themselves, should give Lensbaby a try. If you are interested in trying new types of photography, then you will love the Lensbaby. The effects are different every time, especially when you use different angles.

Through the lens, you see a whole new world. As you find yourself succeeding at taking photos with them, you will become addicted. The softness of the blur is very different, and being able to concentrate attention exactly where you want in the scene is wonderful.

leannecole-lensbaby-old-windmill

The Double Glass optic has helped to lessen the effect of the distracting foreground so you focus only on the windmill.

Manual focus

All the lenses are manually focused. If you aren’t very good at doing that, then the Lensbaby may not be for you. However, if you don’t have an issue with it, you will have a lot of fun as you experiment.

One problem was the aperture rings. The further you close it down, the darker it gets in the camera viewfinder, and it can be hard to focus. This is especially the case when you are using the Edge 80 optic with the Composer Pro. When the aperture is wide open you can see through your viewfinder quite well. But as you start to close it down to around f/8, the light dims and it is harder to see, and therefore focus.

The farther away the subject is, the easier it is to focus. Anything up close is harder, and requires a lot of practice. If you have trouble focusing and holding the camera still, use a tripod. There is some literature out there that says you can’t use a tripod with a Lensbaby, but that is not true.

Perhaps using the lens straight on will also be of benefit at the beginning. Learn to use them in a basic way first, then you can start to see what is possible as you experiment.

leannecole-lensbaby-macro-flower

A macro flower taken using the Double Glass Optic in the Composer Pro. The camera was on a tripod to ensure sharp focus.

Are they for you?

If you have read this far, then you are probably interested in trying them out. The Lensbaby website has some great resources for helping you to learn about their products. There are also lots of tutorials on YouTube that help you to figure them out.

leannecole-lensbaby-old-silos

The Edge 80 Optic is ideal for doing straight parts of the image. I used it to help highlight the silo in the background.

The Lensbaby lenses and optics are a great addition to any kit bag. The effects that are created from them are unique, and can give your photography a whole new look. They will help the artist in you, achieve the artistic impressionist images that you haven’t been able to get, with regular photography lenses that are available.

Here is a video from Lensbaby to give you a quick overview of some of the options.

Have you tried a Lensbaby before? Please share your thoughts and images in the comments below.

googletag.cmd.push(function() {
tablet_slots.push( googletag.defineSlot( “/1005424/_dPSv4_tab-all-article-bottom_(300×250)”, [300, 250], “pb-ad-78623” ).addService( googletag.pubads() ) ); } );

googletag.cmd.push(function() {
mobile_slots.push( googletag.defineSlot( “/1005424/_dPSv4_mob-all-article-bottom_(300×250)”, [300, 250], “pb-ad-78158” ).addService( googletag.pubads() ) ); } );

The post Overview of the Lensbaby System – Is it for you? by Leanne Cole appeared first on Digital Photography School.


Digital Photography School

 
Comments Off on Overview of the Lensbaby System – Is it for you?

Posted in Photography


Image Editing Software Overview – On1 Photo 10

31 Aug

Since the advent of digital photography there has been one program that has been the penultimate of all image editing – Adobe Photoshop. There is no denying that it is powerful, but many find it confusing and hard to learn. Another aspect that some people aren’t sure about is the new subscription based ownership. So for many, another solution to the predicament is On1 Photo 10. It’s a program that is not that expensive, and can do most of what the majority of photographers want.

leannecole-on1-enhanced003

Image processed with the Enhance Module in On1 Photo 10

Overview of On1 Photo 10

The On1 Photo 10 editing software has been around for some time, and you may know it more as plugins for Lightroom and Photoshop. However, recently it has been given a new look, and it is now also a standalone program. This means you don’t need another program to be able to use it. You can download it and do all your editing within its confines.

When you open On1 Photo 10, it looks a bit like Lightroom, but that is about it. Locating all the tools is different, but not so different that you can’t find things. When you begin using On1, a window pops up with several videos to teach you how to use it. It is advisable that you watch them and learn. They are not very long, but they are packed with useful information.

On the right side of the panel there are a series of modules that you can edit your photos in. Each one is specific and gives you different options.

Browse Module

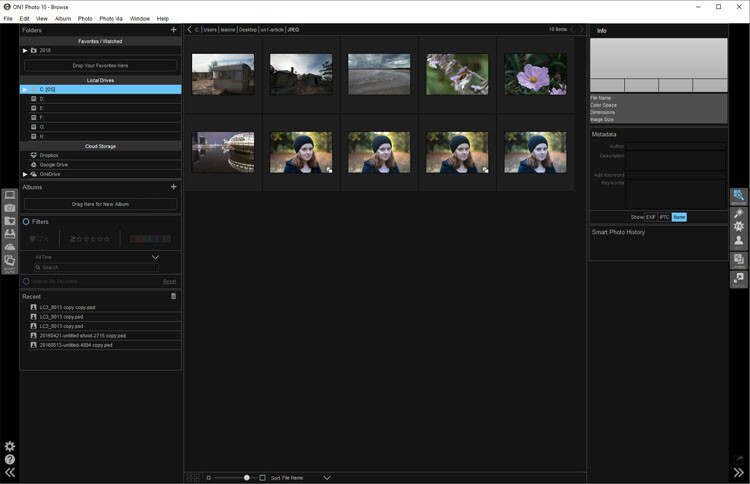
In the Browse section you can look at your photos and catalogue them, decide where you want them, and upload them to Cloud storage facilities like Dropbox, Google Drive, and OneDrive. It is similar to Bridge in Photoshop or the Library Module in Lightroom. You can make the images larger, so you can get a better look at them and decide which ones you want to work on.

When you want to start editing, the other modules are there for you to use.

leannecole-on1-browse-folder

Browse Module, here you can view your photos and move them around.

Enhance Module

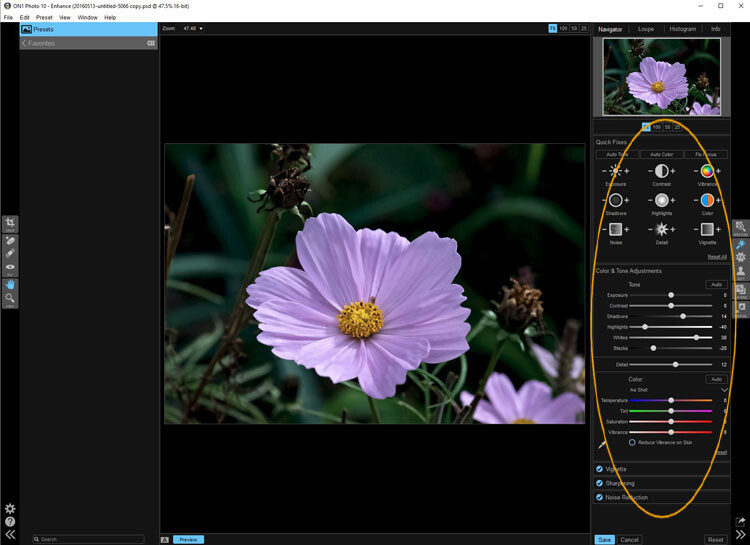
When you open your photo into the Enhance module you can do some basic editing, for example: changing the exposure, adjusting whites, black, shadows, and highlights. It will allow you to fix the white balance and help with noise reduction. This section is where you get your image ready for further work. It is like the preparation area before you go on to do the real work.

Similar to Lightroom, On1 works in a non-destructive manner. If you don’t understand that, it means nothing you do to your image is permanent. If you do something to it and don’t like it, you can go back and reverse the change. When you are just learning photo editing, it is good to work with software that allows you to work this way, without having to worry about ruining your image.

leannecole-on1-enhance-folder

The Enhance Module allows you to do some basic editing to your images.

Effects Module

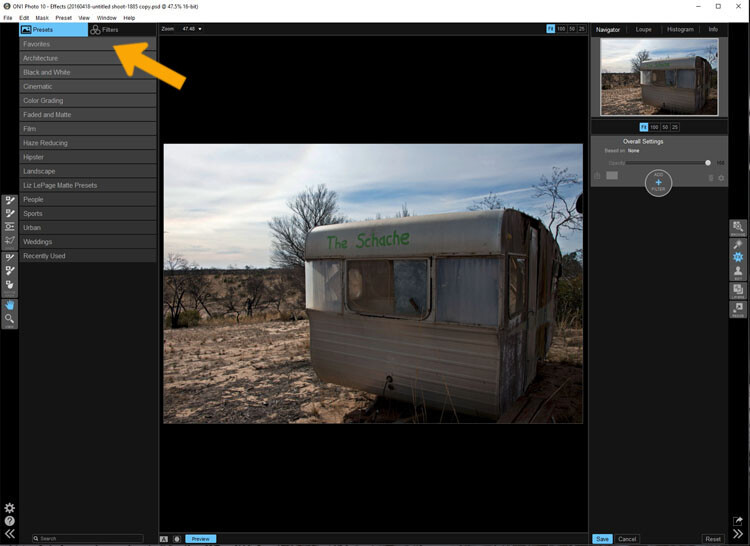
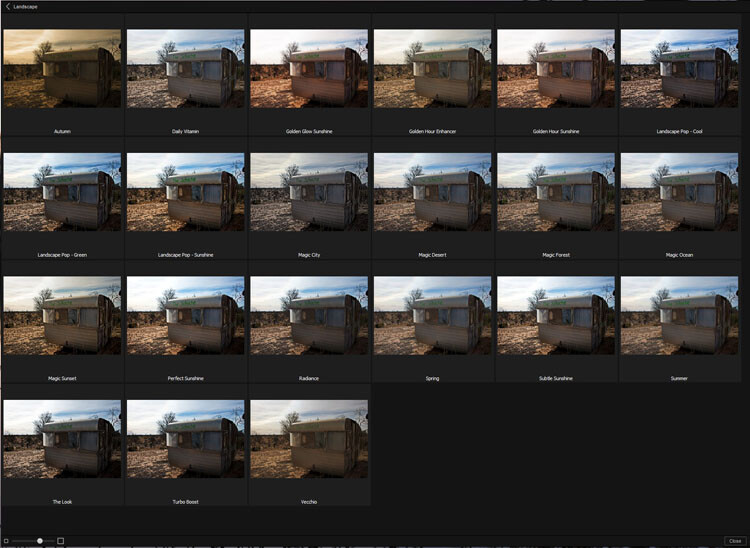
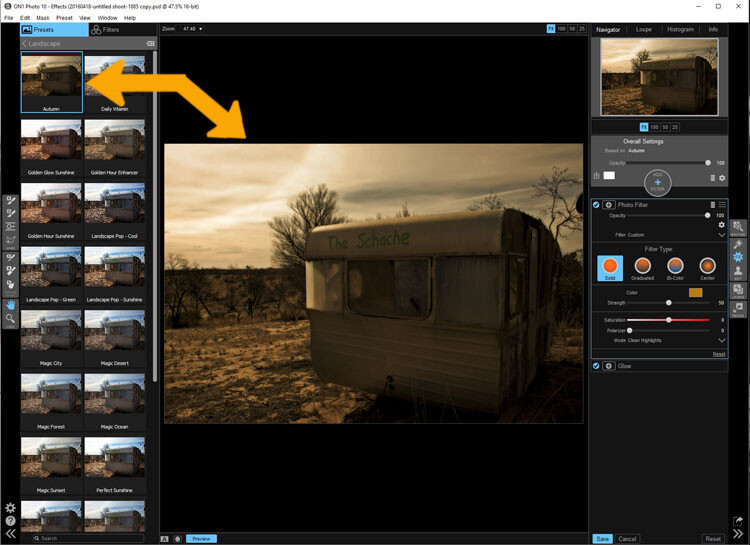
In Effects, you can add filters and presets to your photos. There is a large variety of them, and each one has several options within. You have the option of creating your own and saving them (just as in Lightroom), which is very helpful if you want to use the same one a lot.

There is a difference between presets and filters. On1 explains that presets do multiple effects, while the filters have only one. When using any of them you can make adjustments so it is as strong as you like, or they can be made to have less effect. You get to be the judge of how you want the final result to look.

leannecole-on1-effects-module-1

In the Effects Module you can apply presets and filters to your images.

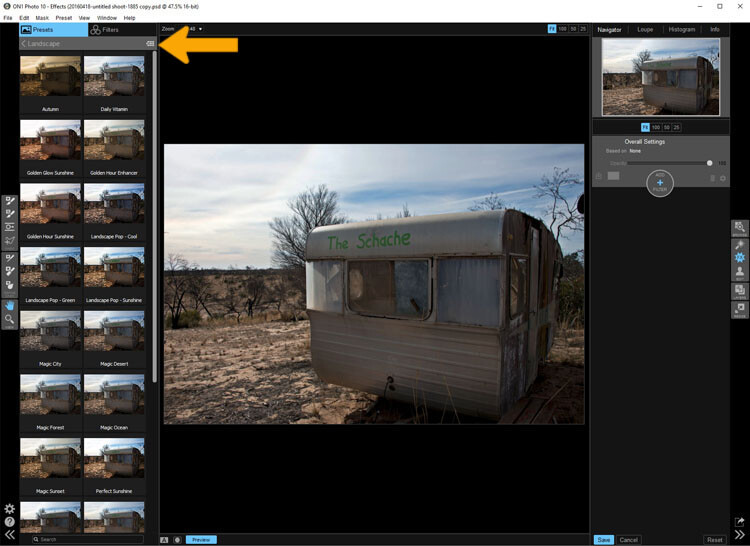
leannecole-on1-effects-module-2

You can see what the presets or filters will do to your image, if you click the grid you will get a larger of view of each option.

leannecole-on1-effects-module-3

You can see what each preset or filter will do and when you decide which one to use, just click on it.

leannecole-on1-effects-module-4

On1 will then apply it to your image.

Portrait Module

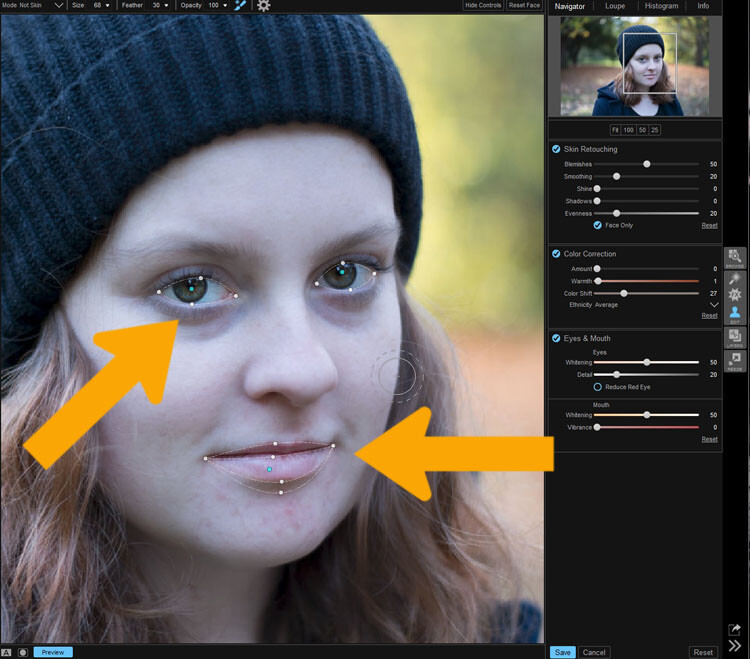
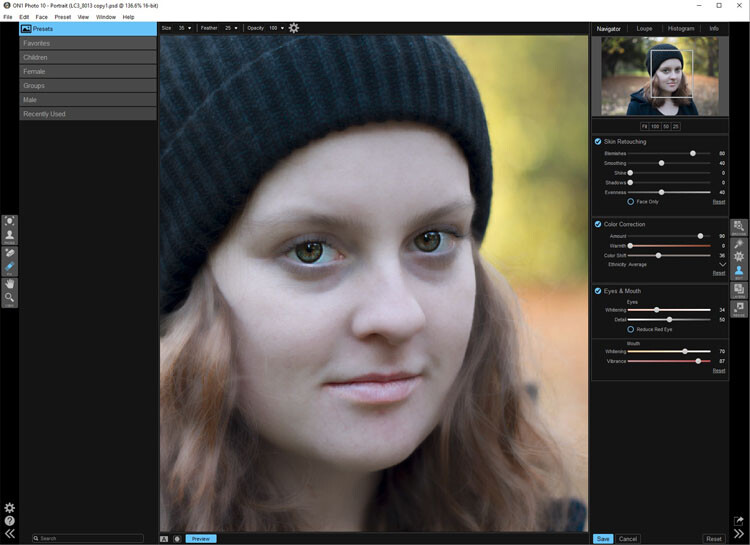
Portrait module is possibly is the hardest one to use. For people who photograph portraits on a regular basis, though, it may seem more intuitive. You have to work out faces, and point out the eyes and mouth to the program. Then it will whiten the eyes, and make the lips lighter. You also have the option of going back over everything and readjusting the settings. While whitening the eyes can be nice, if it is done too much it looks very strange.

leannecole-on1-portrait-module-1

On1 allows you to do specific work to faces, and asks you to highlight the eyes and mouth so it can to its thing.

leannecole-on1-portrait-module-2

You can work on the skin and other parts of the face as well.

Layers Module

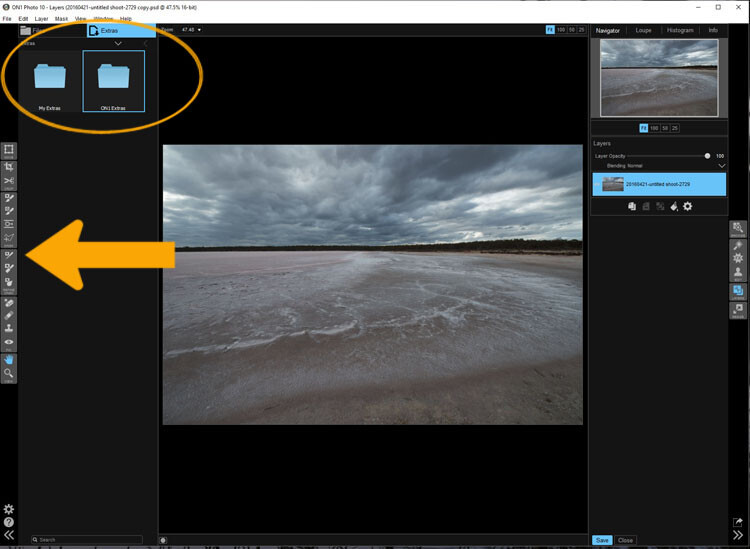
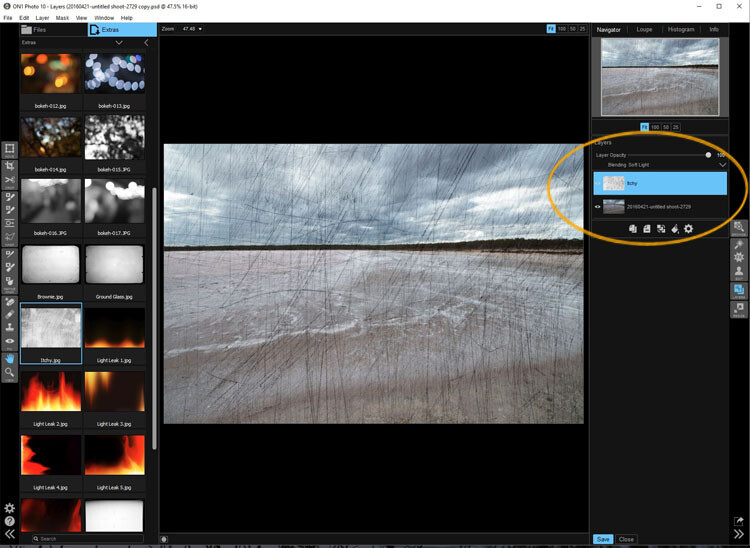
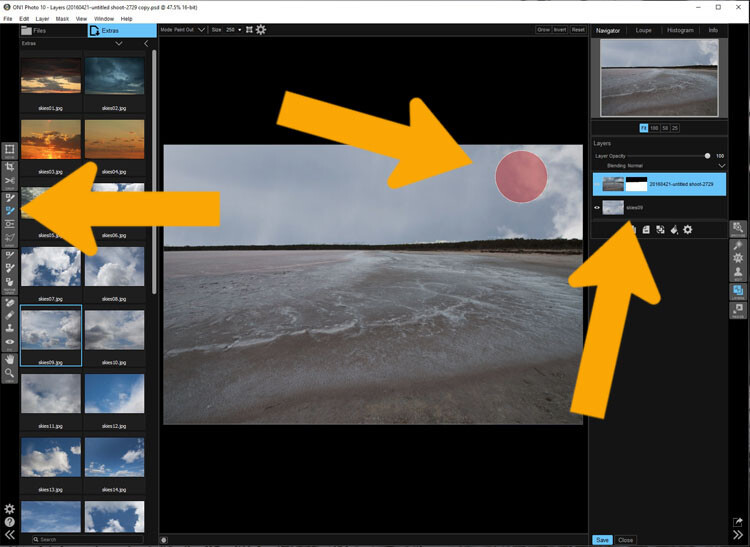
On1 Photo 10 also has the ability to work in layers, so if you like working with texture overlays and replacing skies, you will like this module. It makes these very easy to do, especially the former.

The program comes with a number of textures, backdrops, and borders. You could quite easily just use what it provides, but it also has a section where you can add your own. So, you can upload any textures you have collected and apply them to your images.

As with most sections in On1, you can adjust, and then decide how strong the layer will be. There are blending options and tools are available if you want to remove part of it too.

leannecole-on1-layers-module-1

The Layer Module lets you work in layers, there are also some tools on the left that allow you to do some specific processes.

leannecole-on1-layers-module-2

You can apply textures.

leannecole-on1-layers-module-3

Or you can replace a sky, which is very easy with the masked brush tool.

Resize Module

Figuring out how to resize an image is easy, and fairly straight forward. It is a task that many people usually find difficult. I often see people putting up large images on the internet because they don’t know how to make them smaller. On1 has a separate module where you can make them  the size you want. If you want to resize it for something special, there are options available for that as well. There are no excuses now for loading images that are too big.

Who would use On1 Photo 10?

If you like plugins and seeing the different effects on your images, you will love this software.  It is perfect for someone who is just starting out, and looking for software that is simple and easy to use. Many of the other programs can get you bogged down because of how complicated they are, On1 has great online help and there are a number of videos available to help you work through it.

Experience using On1 Photo 10

I have to admit that while I know how to use many different types of editing software, I had to find some video tutorials to help me find my way around. On1. It is something that you should always do when learning new products, it can help you find the correct way to use them. Fortunately, On1 has a lot of tutorials available to help you learn how to use it.

It could just be my computer, or the size of my files, but I had trouble with the program crashing or freezing. I have a PC and am using Windows 10, so it may not be compatible. I have sent an email to the developers in hope of finding out what keeps causing that. There is however, a 60 day trial version available, which is far more than most other software products. So you can find out if it will work for you or not.

The program does have a tendency to blow out the highlights. In Photoshop you can often fix them, but On1 blows them out even more, and it seems like you are unable to do anything about it. However, it only happens when using RAW images, if you convert them to JPEG it doesn’t appear to happen. Though, it will teach you to be careful with them.

leannecole-on1-highlights-001

You can see with the top image, which was a RAW file how the highlights have been blown out, but it has not happened in the jpeg file.

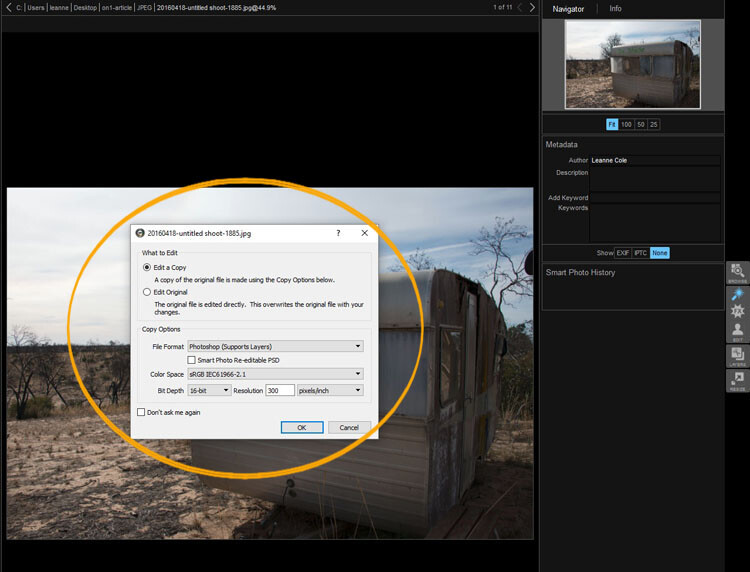
Every time you open an image it asks if you want to edit a copy or the original. When you start you may find that every time you open the image you are creating another copy of it. Take care, and perhaps once you have that first copy, just work on that one.

leannecole-on1-opening-an-image

Read the windows as they open up, and make sure you are aware of what you are doing.

Overall

On1 Photo 10 is a good program, and those interested in doing only basic editing will find it very useful. Those that love the grunge look and adding textures will also enjoy using it. It likely won’t replace Photoshop, but for beginners and people who love using plugins, it’s a great option.

Have you tried it? What are your thoughts?

googletag.cmd.push(function() {
tablet_slots.push( googletag.defineSlot( “/1005424/_dPSv4_tab-all-article-bottom_(300×250)”, [300, 250], “pb-ad-78623” ).addService( googletag.pubads() ) ); } );

googletag.cmd.push(function() {
mobile_slots.push( googletag.defineSlot( “/1005424/_dPSv4_mob-all-article-bottom_(300×250)”, [300, 250], “pb-ad-78158” ).addService( googletag.pubads() ) ); } );

The post Image Editing Software Overview – On1 Photo 10 by Leanne Cole appeared first on Digital Photography School.


Digital Photography School

 
Comments Off on Image Editing Software Overview – On1 Photo 10

Posted in Photography


An Overview of Google’s Nik Collection Filters for Post-Processing

29 May

ArchesPanorama

By now, if you have not downloaded Google’s Nik Collection, at the very least you have heard that this once $ 500 software, was made free for download in March 2016. The Nik Collection, as it has been known for over a decade, is a set of photographic filter plug-ins, and image enhancement tools, that delivers another look and feel to your photo.

The Nik Collection is comprised of Analog Efex Pro, Color Efex Pro, Dfine, HDR Efex Pro, Sharpener Pro, Silver Efex Pro and Viveza. As you see, the suite is quite extensive, thus this overview will just touch on its potential uses, and hopefully encourage you to further explore the collection more in-depth.

The layout in each set is very similar, which translates to ease of use once you get the hang of it. Preset filters are listed down the left side panel of the dashboard. If you click any of them, the chosen filter is immediately applied to your preview, and you then have sub-options for that filter listed on the right panel, which gives you further control over its application.
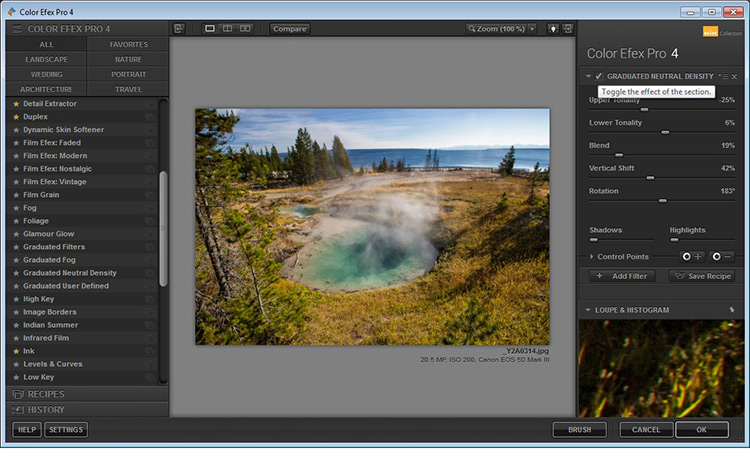
GlacierPrintScreen_NikCollection

An awesome feature that the Nik Collection utilizes is called Control Points, which is available in each plug-in. A control point, as the name implies, is a way to control the application of a filter to selected areas of your choice. Take note of this, as it will be referenced and elaborated on below, as the various plug-ins are discussed.

Analog Efex Pro

If you love the images produced by older cameras, or want to add a vintage look to your photo, Analog Efex Pro may be the set that appeals to you. It strives to pay homage to techniques used by photographers many years ago, and will help transport your image back in time.
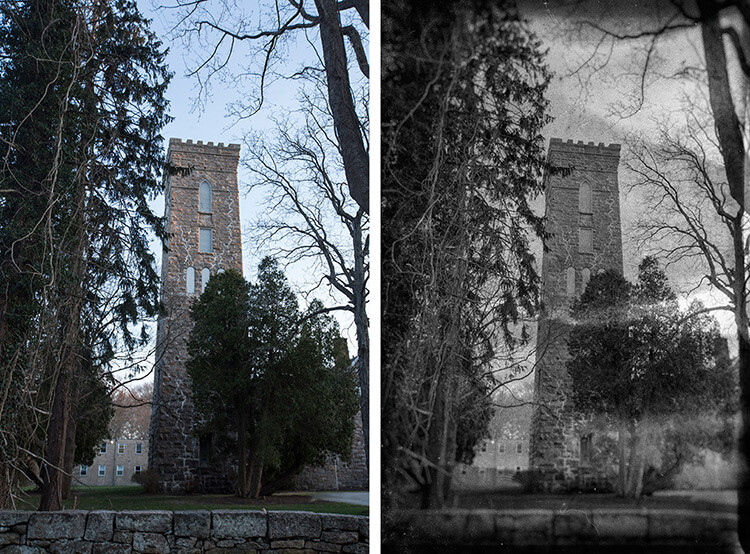
AnalogEfexProCastle_BeforeAfter

Original Image                                                                                                 Analog Efex Pro: Wet Plate preset applied

In the sample image above, the finish is one of the “Wet Plate” preset options available in Analog Efex Pro 2, inspired by an alternative processing technique of yesteryear. Along with Wet Plate, some of the preset filters in the left panel include Classic Camera, Vintage Camera, Toy Camera and the popular Double-Exposure – all of which require little effort to give your image a unique style.

AnalogDoubleExposureHeadstone_BeforeAfter

Original Image edit                                                                              Analog Efex Pro: Double-Exposure preset applied

With a few clicks, the application of this technique attempts to mimic processing techniques established in the darkroom, or in-camera double exposures. Each filter can further be fine-tuned to your desire, using the sliders and curve-adjustments included in the right panel; you can even add Dirt and Scratches to create a sense of age and give your digital photo a film-like feel.

Color Efex Pro

Color Efex Pro is a collection of visual presets that allows you to enhance, or get more creative with your photo. There are 55 filters in this set, but with the ability to stack filters, the possibilities are endless. Customized combinations can also be saved as a preset, so you can easily apply the same processing to other images with a single click.

ColorEfexProLH_BeforeSkylightFilter

Original Image

Color Efex Pro: Skylight Preset Filter applied

Color Efex Pro 4: Skylight preset applied

In the Lighthouse example shown above, the Skylight preset filter was used, which simulates a glass warming filter. It removes some of the blue color casts, and intelligently warms the colors in the photo for a more pleasing effect. You can use your right sub-options to make this as intense as you want, but in some cases less is more.
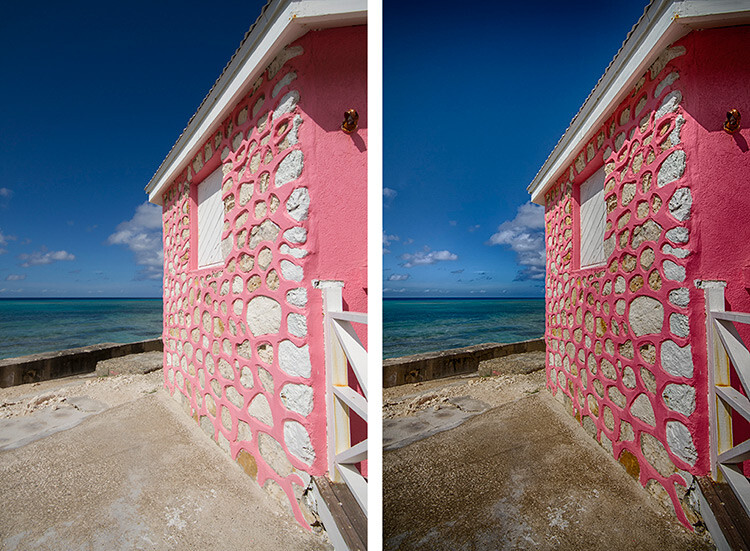
ColorEfexProHut_BeforeAfterTonalContrast

Original Image                                                                                            Color Efex Pro 4: Tonal Contrast preset applied

In the photo above, the Tonal Contrast preset was applied. This preset adjusts contrast and light levels on a small scale, as well as brings out some texture in the image. The sliders enable you to affect how dynamic the final result turns out.

Original Image Color Efex Pro: Wgite Neutralizer Preset Filter applied

Original Image                                                                                            Color Efex Pro 4: White Neutralizer preset applied

Sometimes you need your whites to pop, for example the snow in the photo above. The White Neutralizer filter removes color casts from light objects and can be used to create bright, crisp whites without affecting the other colors of the photo. It is very useful for brides’ dresses and large expanses of white, such as snow or walls.

A very cool feature of Color Efex Pro is the ability to layer multiple filters on an image.
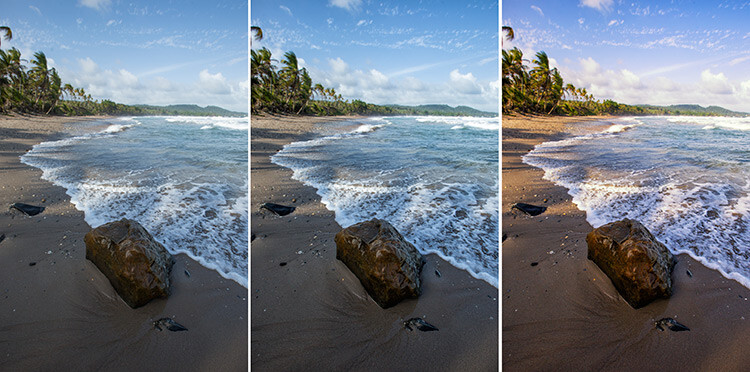
RockBeach_ColorEfex

Original Image                                         Color Efex Pro 4: Tonal Contrast               Color Efex Pro 4: Sunlight filter

In the example shown, the Tonal Contrast preset was applied to the original image, then layered with the Sunlight filter. Layering equates to endless possibilities for your final edit.

Dfine

Dfine is Nik’s answer to noise reduction. Image noise characteristics deviate with exposure length, ISO settings and even temperature based on your camera. Dfine selects areas of your image and generates a “noise profile”. This allows the quick reduction of noise in your photos while retaining the edges, and in one click applies the calculated noise reduction to the image.
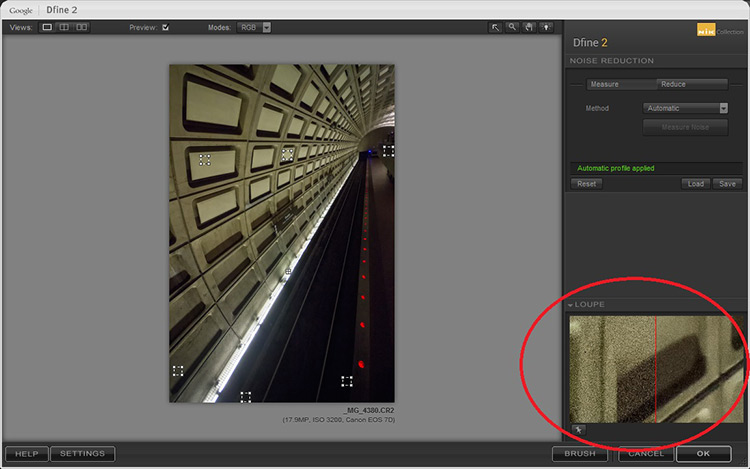
Dfine Dashboard

In the image above, the little squares denote what the software determined were areas requiring noise measurement. The loupe view (circled in red), shows the applied noise reduction on the right side – this view is at 100%.

On the right panel, the “Reduce” sub-option gives you two main methods to take away noise – either via the contrast or color. Both these adjustments affect the image differently, so play around with them and see which one works for your image.
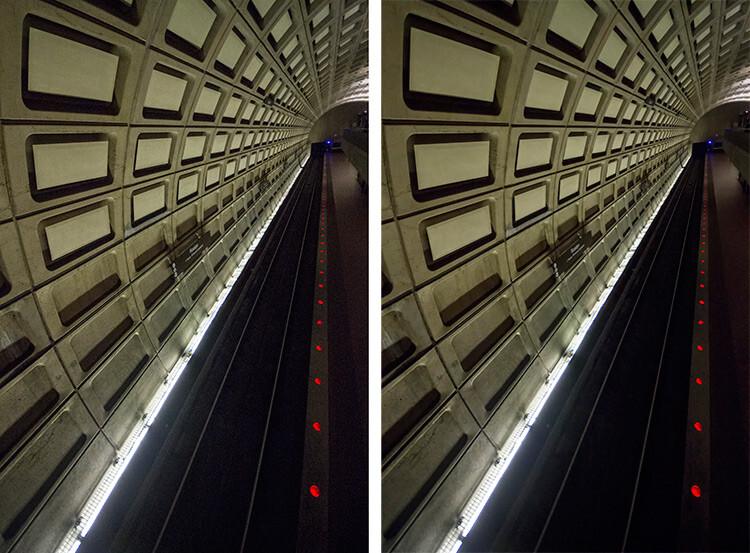
Subway_DfineProEdit

Original Image                                                                                                 Dfine 2: Auto Noise Reduction applied

Also included are some useful global adjustments for further refinement, such as the removal of JPEG compression artefacts and debanding.

Control Points in Dfine allows you to selectively apply noise reduction, which gives you the power to increase or decrease the noise reduction intensity in different areas of your image. So, even though Define auto-calculates the noise reduction needed, you can still maintain control over your noise processing.

HDR Efex Pro

High Dynamic Range (HDR) Imaging is a processing technique that has had mixed responses over the years. It was a trendy technique a few years ago, but has since matured into being used as a tool that extracts all the details of a scene available to the naked eye. HDR can be either overdone, or used subtlety, by exploring the differences between the darkest shadows and the brightest parts of the photo.

HDR Efex Pro is Nik’s contribution to this type of processing; where several images captured at different exposures, are translated into a single image that reflects a more dynamic range than your camera output is capable of creating (although camera advancement is starting to address this).
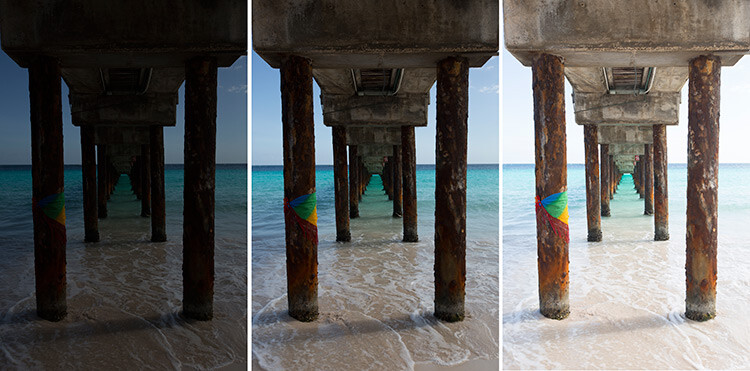
HDR_original

Original Images for HDR edit


HDR_HDREfexPro

Images combined using HDR Efex Pro 2

In the example above, three exposures are combined to bring back the lost highlights and shadows with tonality adjustments. This image can be pushed to look more realistic or even in the opposite direction.

Above its predecessors (such as Photomatix), HDR Efex Pro 2 has promised a simpler process and increased control and fine-tuning over the final image, along with an improved tone-mapping engine that claims to render color better. All tools are subjective, but no harm in trying this HDR tool out, even if just to verify some of Nik’s claims that they have improved Ghosting and Chromatic Aberration reductions.

Silver Efex Pro

Silver Efex Pro focuses on black and white processing. There are many programs quite capable of creating great black and white images, but various built-in tools like Dynamic Brightness, Soft Contrast, Amplify Whites, Amplify Blacks, and the advanced Grain Engine creates excellent diversity.
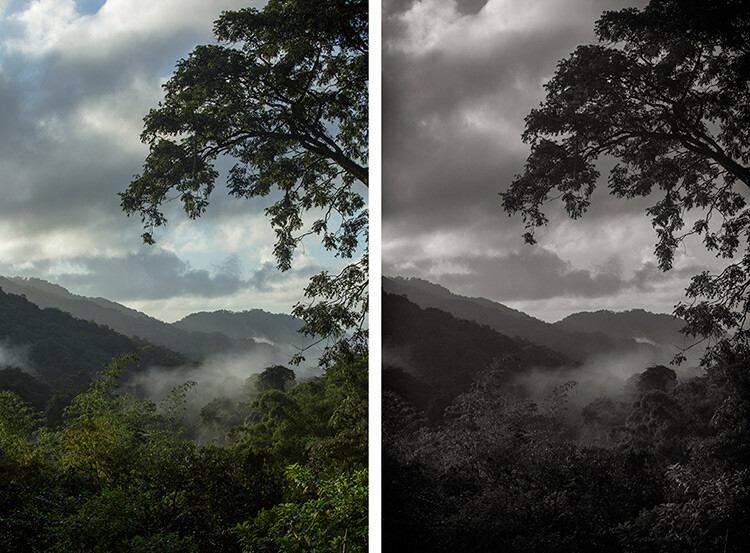
SilverEfexTree_BeforeAfter

Original Image                                                                                      Silver Efex Pro 2: Dark Sepia preset applied

Silver Efex Pro comes with quite a variety of presets, and of course you can also create your own. The easiest way to do this is use an existing preset, customize it by making your adjustments, then save it so you can apply it to other images later on. Saving a preset is especially useful if you are doing an image set, and want the photos to have the same look and finish.
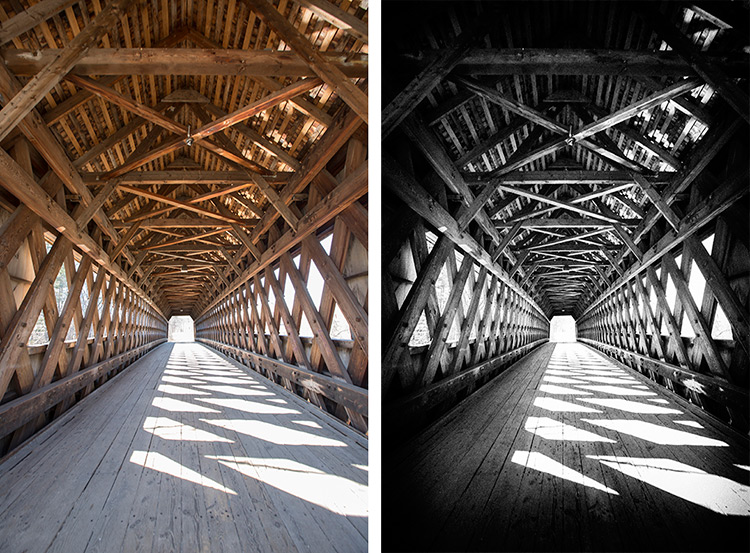
SilverEfexBridge_BeforeAfter

Original Image                                                                                      Silver Efex Pro 2: High Structure preset applied

The structure in this software adds depth to the photo by adding some sharpening. If you are into black and white photography, this is definitely a set you want to play around with.

Viveza

Viveza is an easy way to apply enhancements selectively without creating masks. Yes, you can still do global or image-wide adjustments, but it is very useful to be able to later refine only selected areas. Imagine the possibilities of applying structure, color, exposure changes, or doing shadow recovery to only areas you choose, knowing that the software is going to blend in your changes seamlessly.

You can use Control Points on any part of the image you want to change. As with the other software in the Nik Collection, the top control (on your control point) allows you to change the radius/size of your adjustment area.
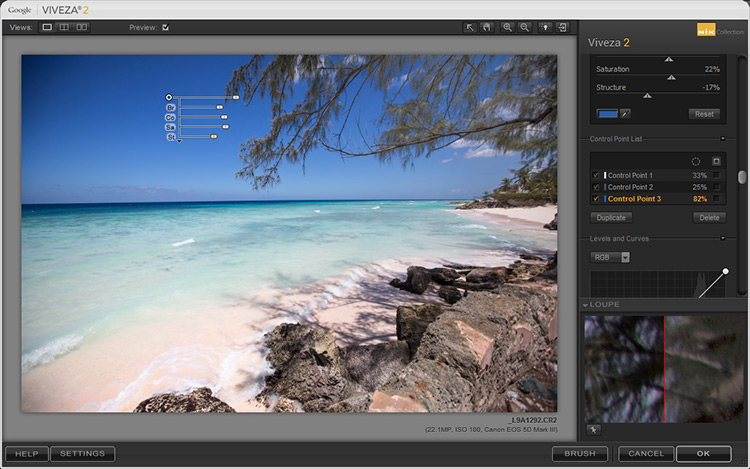
VivezaControlPointBlue

The Control Point shown in this image is on the blue sky. Based on the look you want, the radius of this area can be increased or decreased in size.

If you check the box next to the Control Point on the right (sub-options), all the affected areas will be shown in white, so you can decide if you want to adjust your work area.
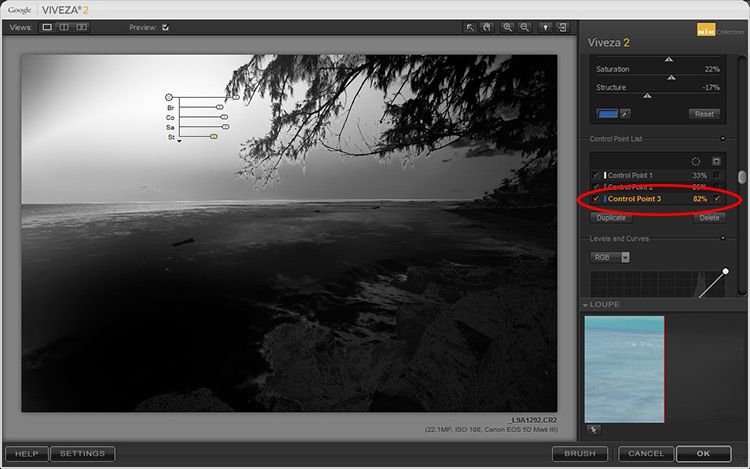
VivezaDashboardHighlight

In this example, the Control Point affects the blue in both the sky and sea, so any adjustments will apply to everything blue in the selected radius (highlighted in white on the image).

Selections, masks or adjustment layers may be your tool of choice to get precisely defined areas, but Viveza’s localized adjustments blend in with the surrounding areas quite well, and in some cases look more natural.

Sharpener Pro

While not everything in your image needs to be razor sharp, the best way to end up with a crisp finish and distinct edges, would be to start out with a properly focused image. Post-capture sharpening increases the contrast between adjacent pixels and significant edges within an image, which attracts your eye. Sharpening is thus used to enhance a focused image, as opposed to rescue elements of photograph that was captured out of focus.
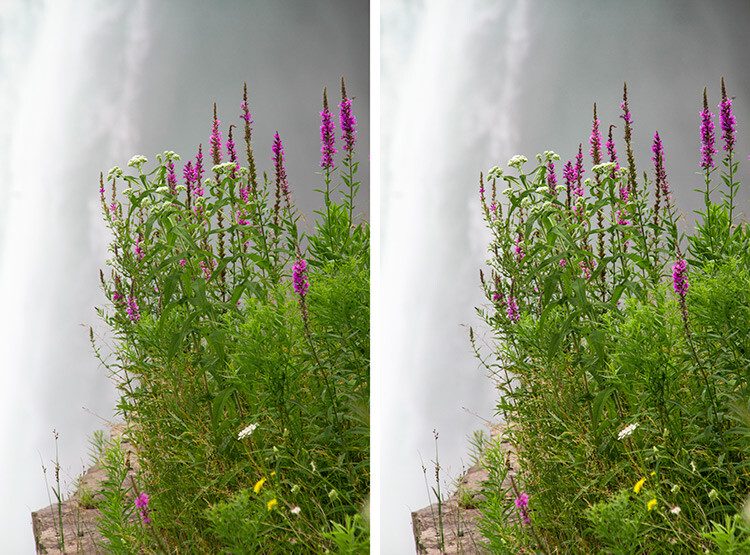
NiagaraFlower_SharpenerProBeforeAfter

Original Image                                                                                     Sharpener Pro 3: applied to show edges

In the sample image above, the sharpening is exaggerated to show the contrast effect that the software applies.

Sharpener Pro takes away some of the guesswork and gives you control over your sharpening, which is typically the last step in image processing. Control Points gives you the ability to selectively sharpen aspects of your image and allows the changes to blend in easily.

Conclusion

A great feature of each set in the Nik Collection is that it applies the effect on a duplicate layer. This is especially helpful if you want to dial back the effect and blend it with your original image, by simply changing the opacity of the layer.

Each plug-in has great potential, so do not be fearful to explore, test your creativity with preset combinations, and experiment with Control Points. It is a user-friendly collection and while this is a plus, it can also make it easy to overdo it.

Do share your thoughts and some of your images processed with Google’s Nik Collection of filters. How have they worked for you? Which is your favorite?

googletag.cmd.push(function() {
tablet_slots.push( googletag.defineSlot( “/1005424/_dPSv4_tab-all-article-bottom_(300×250)”, [300, 250], “pb-ad-78623” ).addService( googletag.pubads() ) ); } );

googletag.cmd.push(function() {
mobile_slots.push( googletag.defineSlot( “/1005424/_dPSv4_mob-all-article-bottom_(300×250)”, [300, 250], “pb-ad-78158” ).addService( googletag.pubads() ) ); } );

The post An Overview of Google’s Nik Collection Filters for Post-Processing by Nisha Ramroop appeared first on Digital Photography School.


Digital Photography School

 
Comments Off on An Overview of Google’s Nik Collection Filters for Post-Processing

Posted in Photography


Keeping the faith: Pentax K-1 video overview

10 May

Pentax shooters have waited a long time to join the full frame club, and with the release of the K-1 DSLR that wait is finally over. But thanks to its 36MP sensor, some innovative features, and a very aggressive price point, the K-1 will likely appeal to photographers outside the Pentax sphere as well. We take a look at what makes this camera unique.

Articles: Digital Photography Review (dpreview.com)

 
Comments Off on Keeping the faith: Pentax K-1 video overview

Posted in Uncategorized


Cyber-shooting: Sony Cyber-shot RX10 III video overview

30 Mar

Sony’s new superzoom may look a lot like its predecessor, but an updated 24-600mm lens makes the Cyber-shot RX10 III a much more versatile camera – in theory. We’ve been able to spend a bit of time getting to know the camera’s new features and putting its long zoom range to work. Take a look at what’s new to the RX10 series in our video overview.

Articles: Digital Photography Review (dpreview.com)

 
Comments Off on Cyber-shooting: Sony Cyber-shot RX10 III video overview

Posted in Uncategorized


Quick Overview of How to do Macro Photography

09 Feb

In the photography domain, macro photography is defined as the art of magnification of subjects. It is a very interesting form of photography, which seems to have an application in almost every genre.

Memorable Jaunts Macro Photography Article for DPS 05

For wedding photographers, it’s a great way to highlight wedding details like rings, the invitation suite, certain aspects of the bridal bouquets, and boutonnières. For nature photographers, it is a great way to get up close and personal with many interesting subjects like bugs, insects, and small animals. For food photographers, a macro lens is one of the ultimate tools to highlight their craft because it’s such a great way to emphasize textures, patterns, and details. Even portrait photographers are known to favor the long focal length macro lens, as it gives them the flexibility of getting close details of their subjects, without invading a client’s personal space, especially when dealing with camera-shy children and adults.

Gear choice

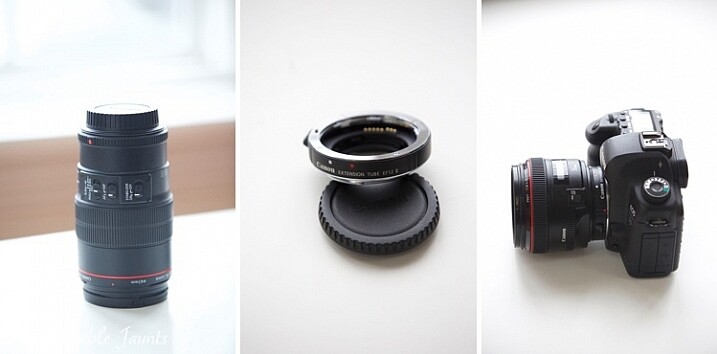
There are several options in the marketplace in terms of gear choices for the macro photographer. Extension tubes, macro (or close-up) filters, as well as specific macro lenses are available for every budget. Based on the macro lens used, you can achieve magnification anywhere from around half to four or five times life-size, of the object being photographed.

Memorable Jaunts Macro Photography Article for DPS

Left image: 100mm f/2.8L IS Macro Lens
Middle: Canon 12mm Extension Tube
Right: Canon 5D MkII with 50mm lens and extension tube attached

  1. Speciality Lens – Macro lenses come in various focal lengths. Short macros are typically lenses in the 30-50mm range. Standard macro lenses are in the 60-105mm focal length range, and tele-macro lenses are in the 150mm-200mm range. These macro lenses tend to perform better than extension tubes and macro filters, since they are build specifically for close-up photography. They work great at short focal lengths as well as longer ones. The main disadvantage with these lenses tends to be the price point. Most of the dedicated macro lenses are upwards of $ 500 (or more) and that can be a limiting factor for someone just getting into macro photography.
  2. Extension tubes are hollow tubes that fit between your lens and your camera mount. They don’t have any glass elements within them, they simply move the actual lens further from the camera, and the front element of the lens closer to the subject, thus offering a certain amount of magnification to the subject. Extension tubes tend to be less expensive than traditional macro lenses and can be mounted on any lens. But they tend to work best with shorter focal lengths. The main disadvantage with extension tubes is that your lens looses the ability to focus on distant objects, since it works only on close-up magnifications. There is also some light loss, which can be compensated by increasing the ISO or by using a slower shutter speed. The camera sensor is also exposed to dust, and the external elements, every time you remove or add the extension tube to the front of your lens.
  3. Macro filters are similar to other types of filters that attach to the front of your lens. They come in different sizes, and different magnification ratios, so if you want to use them on various lenses, then you will need to invest in a variety of filters. They tend to be relatively inexpensive, and can be stacked one on top of one another, in order to get a variety of magnification factors for your subjects. Macro filters also tend to lose light, especially when used as a multiple stack. Hence these cannot be used very effectively with wide apertures. They work best when apertures are stopped down (higher f-stop number).

My initial choice for macro photography was the Canon extension tube EF12 II. As a wedding photographer, I wanted something small and inexpensive for photographing details and ring shots. Since then I have migrated to the Canon 100mm f/2.8 L-series macro lens, and find myself reaching for this beautiful lens more often than not. I have used it for portraits, food photos, as well as still life details.

Technical tips

The key thing to note in macro photography, is that depth of field (DOF) depends primarily on two factors: aperture value and magnification. For any given aperture value, the higher the magnification ratio, the smaller the DOF will be, hence the DOF tends to be very shallow for macro photography (higher f-stop).

Memorable Jaunts Macro Photography Article for DPS 04

Both images were shot at f6.3 – the one on the left is using the 50mm with extension tube, right image is with 100mm macro lens

Memorable Jaunts Macro Photography Article for DPS 02

The left image is a pull back using a 50mm lens
Middle is using the 50mm + extension tube
Right is using the 100mm macro lens (all other settings are fairly standard across all three images)

From an application perspective, focus on the main point of the subject that you want to target. If your camera supports live view, use it to zoom-in and ensure that the image is sharp. Set the aperture around f/11 (feel free to experiment to find the optimal setting for your lens, filter, extension tube combination). If you want a greater depth of field (more of the subject is in focus) use a smaller aperture like f/16 or f/22.

Another thing to note is that when photographing objects that tend to move suddenly, like bugs and insects, a higher shutter speed is advantageous to stop motion and freeze the subject. As a rule of thumb try not to drop below 1/400th or 1/500th shutter speed.

Memorable Jaunts Macro Photography Article for DPS 07

One of the most popular uses of macro lenses is in food photography. Left image using 50mm with extension tube, right image using 100mm macro lens. Both have shallow depth of field because I wanted to blur out the food in the background.

Mirror lock-up

Most DSLR cameras have a mirror inside, which allows you see the image in the viewfinder. The mirror flips out of the way when you press the shutter button, and this action itself can introduce camera shake, and cause your image to be blurry. You can reduce the chances of blurry images by turning “ON” the mirror lockup function (look for it in your camera’s manual). On most cameras that means you will press the shutter button once and it will flip up the mirror, pressing it again takes the exposure. If you have a mirrorless camera then this does not apply to you.

Diffraction

In Photography, diffraction is the bending of light as it passes by the small sharp edged blades, which form the aperture opening. The light gets squeezed together, or blends together. Diffraction is worse with smaller aperture settings like f/16 to f/22. This causes the image to be less sharp, especially at the edges, even more so in macro photography when you are often shooting at smaller apertures. You can avoid diffraction by not dropping below f/16, or by using selective focus over multiple images, and stacking (focus stacking) them together in post-production to get an overall sharp image.

Practical Applications

Contrary to popular belief, macro photography is not restrictive to images of bugs, leaves, flowers and food. They can be an effective tool to highlight any form of detail, texture and pattern. Specific macro lenses also double up as great portrait lenses, extending their use beyond just macro photography.

Memorable Jaunts Macro Photography Article for DPS 06

Memorable Jaunts Macro Photography Article for DPS 03

Left image is pull back of the ring
Middle is with 50mm + extension tube
Right is 100mm macro. F-stop was around f/9 and shutter speed was around 1/50 (I was loosing light very fast and had my ISO up to 2500).

So the next time you want a little boost of creativity, use macro photography to get a fresh, up close perspective on things!

googletag.cmd.push(function() {
tablet_slots.push( googletag.defineSlot( “/1005424/_dPSv4_tab-all-article-bottom_(300×250)”, [300, 250], “pb-ad-78623” ).addService( googletag.pubads() ) ); } );

googletag.cmd.push(function() {
mobile_slots.push( googletag.defineSlot( “/1005424/_dPSv4_mob-all-article-bottom_(300×250)”, [300, 250], “pb-ad-78158” ).addService( googletag.pubads() ) ); } );

The post Quick Overview of How to do Macro Photography by Karthika Gupta appeared first on Digital Photography School.


Digital Photography School

 
Comments Off on Quick Overview of How to do Macro Photography

Posted in Photography