RSS
 

Posts Tagged ‘Noise’

Omnivision introduces new sensors for mobile devices with wider DR and lower noise

11 Nov

Chinese sensor manufacturer OmniVision Technologies has announced four new image sensors for smartphones that feature improved dynamic range and noise performance. The 16MP and 20MP sensors offer higher full-well capacity which allows pixels to collect more charge before clipping: increasing dynamic range.

A new structure allows pixels to convert more of the light captured into electrical charge, resulting in a claimed 12.5% improvement in sensitivity, giving better low light performance. Better separation between pixels also improves noise by helping to prevent color crosstalk, and thus should produce a cleaner image in dim conditions.

The standard versions of each chip allow further improvements in dynamic range using a method that records two different exposures simultaneously called zHDR. The sensor divides the pixels in a zig zag pattern so that some record a long exposure and others a short one, and the two exposures are combined to form an image with a wider range of tones.

These are second generation sensors that already use phase detection AF and which can record 4K video.

‘4C’ variants of both chips include a non-standard color filter array pattern that makes it easier to combine the signal from four pixels, to give less noisy, lower resolution images.

The company says that they will be ready for mass production in the early part of next year. For more information see the OmniVision website.

Press release

OmniVision Debuts Second-Generation PureCel®Plus and PureCel®Plus-S Technology and Product Families

OmniVision’s Newest Pixel Architecture Brings Exceptional Low-Light Performance and Increased Dynamic Range to Advanced Imaging Applications

OmniVision Technologies, Inc., a leading developer of advanced digital imaging solutions, today introduced its latest advancement in leading-edge pixel technologies: second- generation PureCel®Plus and PureCel®Plus-S. In keeping with OmniVision’s tradition of delivering industry-leading image sensors, the second- generation PureCel Plus technology offers significant improvements over the previous generation, such as higher full-well capacity (FWC), better sensitivity, increased signal-to-noise ratio (SNR) and enhanced low-light performance. Though the initial development was focused on supporting small-pixel products for mobile applications, this technology will ultimately benefit many other image sensor applications.

OmniVision’s second-generation PureCelPlus technology showcases various performance improvements, including:

  • 20 percent increase in FWC, enabling higher dynamic range.
  • A newly introduced composite metal grid (CMG) structure, which increases pixel quantum efficiency and enhances sensor low-light performance, leading to a 12.5 percent improvement in sensitivity.
  • Improved deep trench isolation (DTI) structure, which further reduces color crosstalk and improves the SNR10 (low-light performance index) number by 10 lux.

These structure improvements also enable small-pixel sensors to have better tolerance to incident light angles. This in turn allows imaging systems to use lower F-number lenses for better brightness, and to realize lower module heights that are essential for slimmer phone designs.

“Maintaining good image quality and sensor performance for small pixels in low-light conditions has always been a challenge in the digital imaging space. OmniVision has delivered increasing engineering advances over the years to address this market need,” said Dr. Song Xue, senior manager of sensor technology at OmniVision. “Our second-generation PureCelPlus technology enables our end users to capture high-quality, high-resolution photos, even in challenging lighting environments.”

OmniVision’s second-generation PureCel Plus-S technology will empower new families of compact 20-megapixel and 16-megapixel sensors. The 20-megapixel OV20880 and OV20880-4C and the 16-megapixel OV16885 and OV16885-4C are designed to deliver high-resolution images to high-end smartphones across a variety of lighting conditions.

The OV20880, OV20880-4C, OV16885 and the OV16885-4C are currently available for sampling and are expected to enter volume production in the first quarter of 2017.

Articles: Digital Photography Review (dpreview.com)

 
Comments Off on Omnivision introduces new sensors for mobile devices with wider DR and lower noise

Posted in Uncategorized


Review: Neat Image 8 Noise Reduction Software

07 Nov

In the early days of digital cameras, noise was a much bigger problem than it is these days. DSLRs routinely top out at high ISO ratings that film shooters and early DSLR users could only dream of. In those early days (the early 2000s), when ISO 800 was typically the upper usable limit of high ISO, noise reduction software became a must-have for those of us who were post-processing our files and wanted them to look less like sandpaper and more like something we’d be willing to display. Neat Image was one of the first noise reduction applications I used at that time.

Neat Image 8 Review

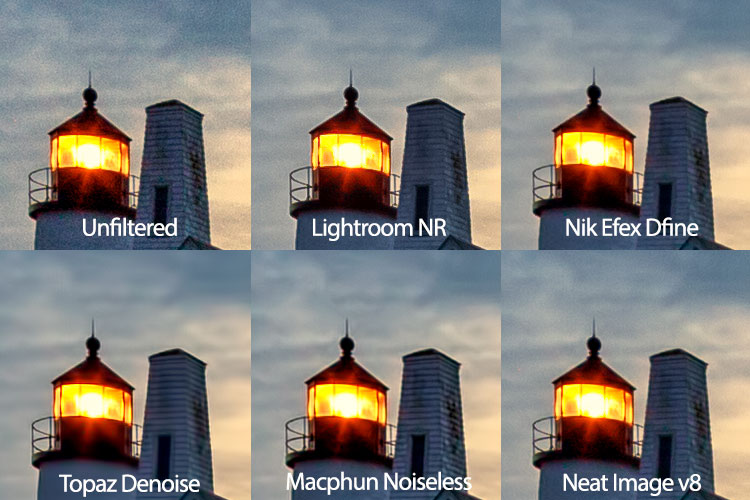
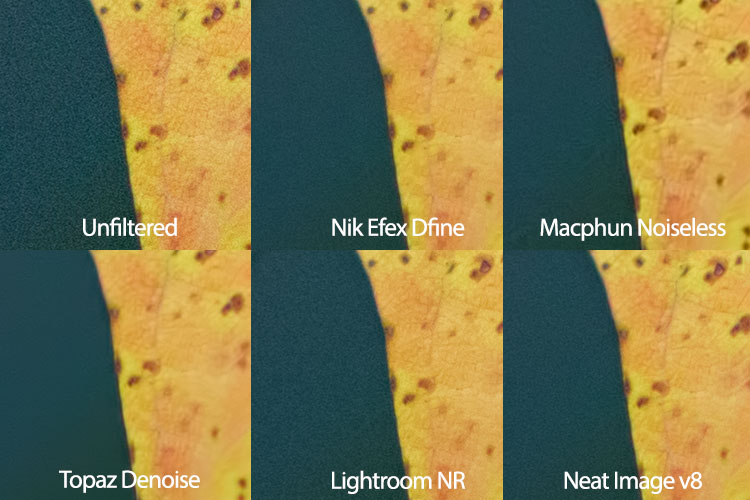
While it did a nice job, at that time, all noise reduction software was problematic in that it tended to give images an overly smooth, almost plastic or painted look that did a lot of damage in the fine details of an image. Neat Image was no exception in this regard, so I used it sparingly. Over the years, I found myself gravitating to other noise reduction plugins and applications, such as Nik DFine, Topaz DeNoise, and more recently, Macphun’s Noiseless. When I saw that Neat Image had recently been updated to version 8, I was excited to give it a try and see how it stacked up against the others. While Neat Image 8 is available as a standalone app or a Photoshop and Lightroom plugin, I will be focusing on the plugin version, as that suits my workflow better.

Overview of Neat Image 8

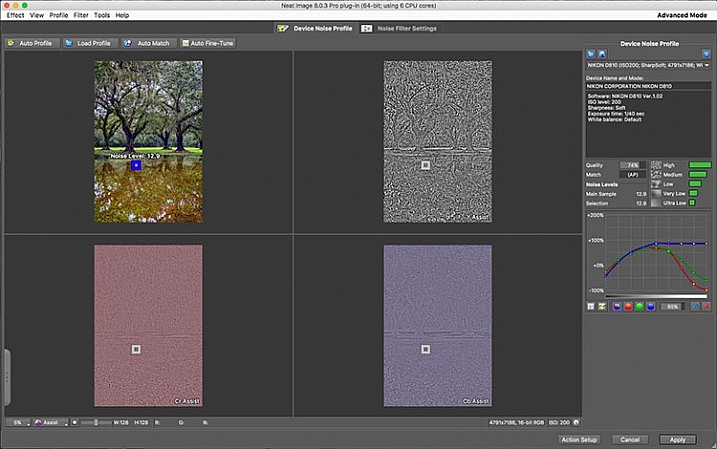
Neat Image Profile Screen

Upon opening Neat Image 8, the Device Noise Profile screen is the first thing you see.

Neat Image 8 is a fairly simple software to use, although upon first opening the plugin it can appear a bit confusing. You will be presented with multiple views of the image you are working on; a full-color preview, and the R, G, and B components of the image. There are four buttons at the top left of the screen; Auto Profile, Load Profile, Auto Match, and Auto Fine Tune. In the center are two tabs, Device Noise Profile, which is the tab the plugin starts in, and Noise Filter Settings.

Analyze image

Once the plugin is open, you’ll see the four different versions of your image. The easiest way to get started is to simply click “Auto Profile” and let Neat Image analyze the image. Once complete, a box will highlight the area that Neat Image has selected to use for noise analysis. Neat Image looks for an area with minimal detail for best results. If you select your own area to analyze, make sure it’s an area that contains minimal detail.

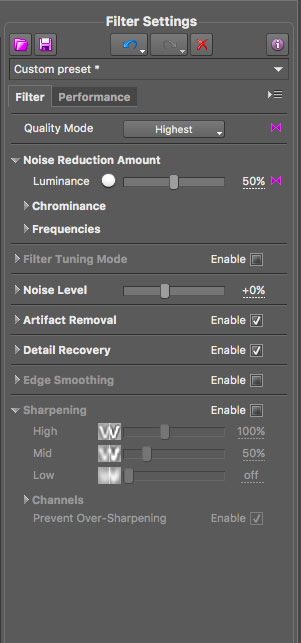
Neat Image 8 Adjustment Sliders

These sliders allow you to tweak the noise reduction to your liking after Neat Image has applied the noise profile to the image.

Filter settings in Neat Image

Now that you’ve analyzed the noise levels in the image, you’ll want to click on the Noise Filter Settings Tab. The preview will switch to the full-color image in the center and the R, G, and B channels will disappear. At the bottom left is a zoom toggle to zoom in or out of the image as desired. You’ll also have the ability to change the preview to various other options, including the RGB preview, a Luminance and Chrominance preview, as well as individual channels. Neat Image will then apply the noise filter settings based on the analysis as done above.

You can tweak the settings using the sliders at the right side of the app window. You’ll have the ability to adjust quality, the noise reduction amount, recover detail, smooth edges, sharpen, and fine tune the filter itself. In addition to the sliders, Neat Image comes with some presets, such as Recover Fine Details, Apply Less Noise Reduction, Apply More Noise Reduction, Reduce Noise and Sharpen, and more. You can also create your own presets for future use. These settings put Neat Image among the most customizable noise reduction applications I’ve used.

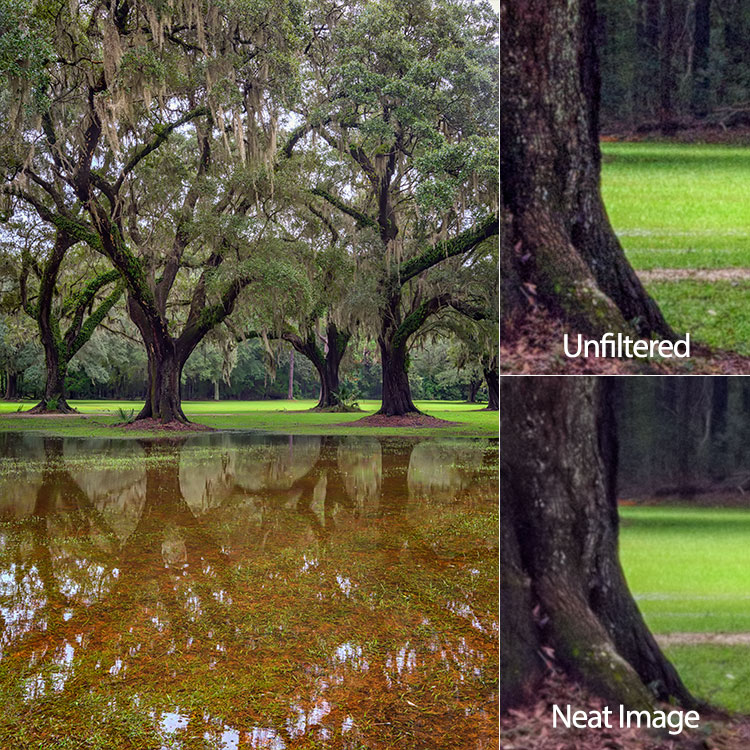
oaks-neat-image

Pros

For me, noise reduction has always been a love-hate relationship, always battling with a balance between preserving detail and reducing unsightly noise. One of my favorite things about Neat Image is the software’s auto profiling ability, customizing the noise reduction to each image as needed. While Nik Collection’s Dfine 2 also does its own image analysis, it doesn’t offer the customizability that Neat Image does. And Neither Topaz’s Denoise 5, nor Macphun’s Noiseless offer any kind of image profiling, with both requiring you to simply select a preset on your own and go from there.

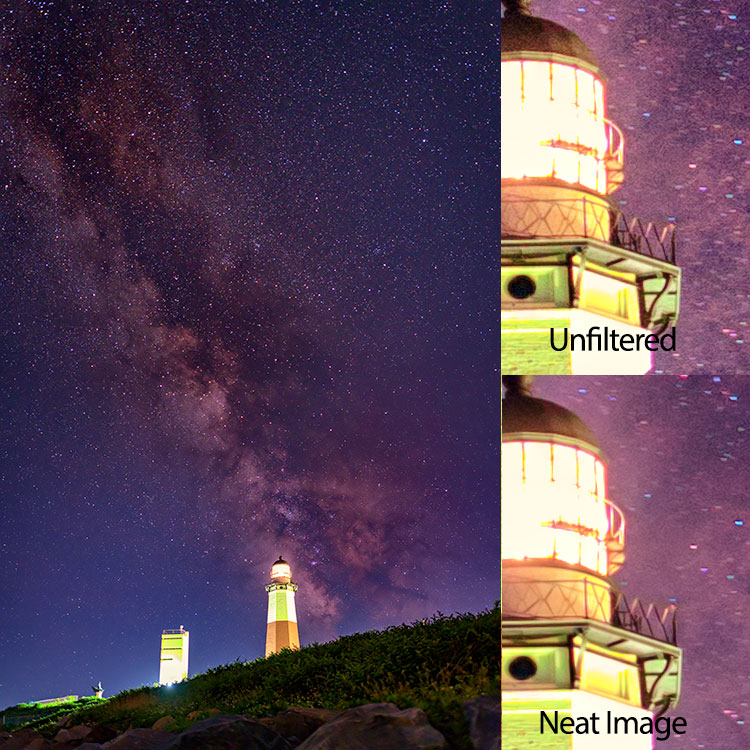
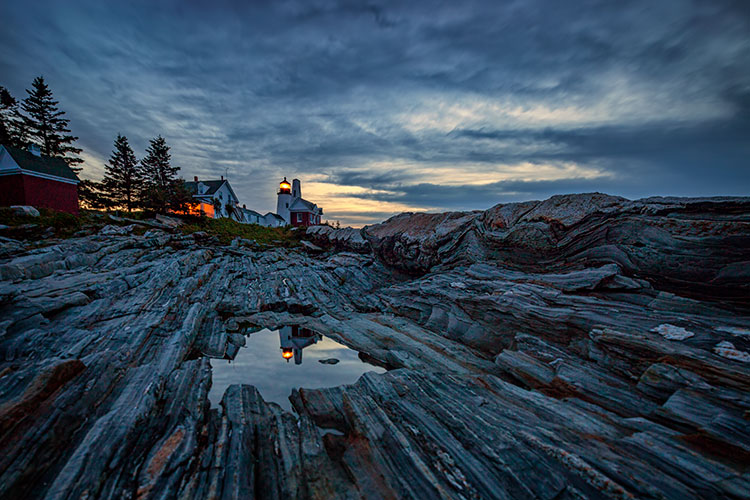
Neat Image 8 does an excellent job of maintaining detail while reducing noise in an area with little or no fine detail, such as skies.

night-sky-neat-image

Cons

With all the customizability, of course, comes a bit of a learning curve in terms of use. Neat Image does offer tutorial videos on their website to help get you started, but for those of us who are less patient and just want to dive in, it can be frustrating. I had one or two false starts when I first downloaded Neat Image 8, before finally going to their video tutorial to give me a jumpstart.

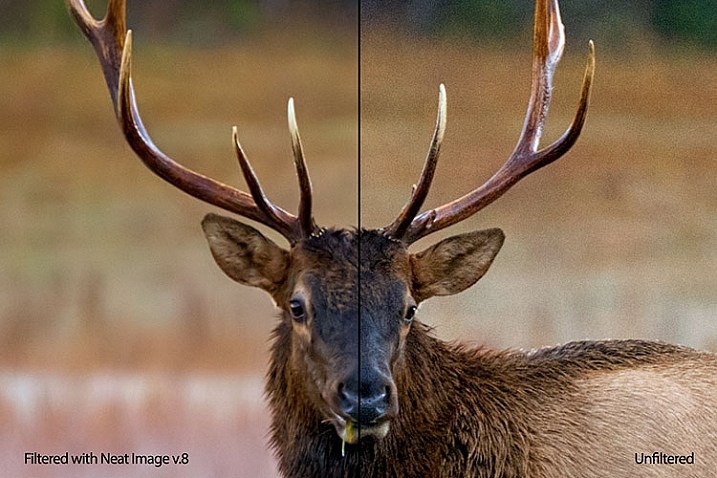
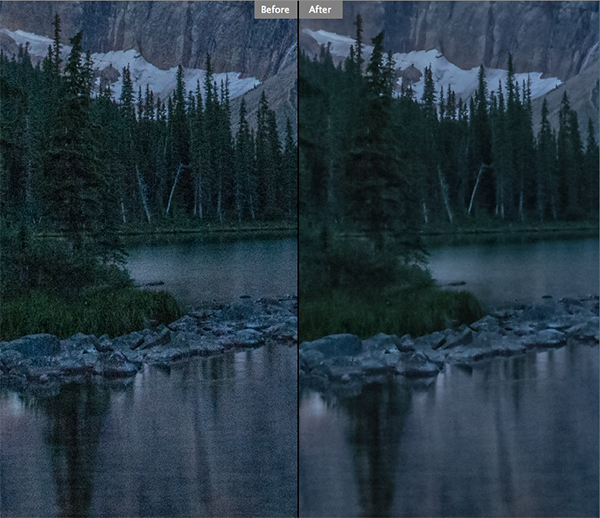
Neat Image 8 side-by-side comparison.

Side by side comparison of an image shot at ISO 2500, before and after Neat Image 8.

Conclusion

Ultimately, the ability to auto profile an image, adjust settings to personal taste, and use presets for repeatability of noise reduction, makes Neat Image an excellent choice for photographers who battle noisy images for any reason, including shooting long exposures, low light photography, or high iso photography such as indoor sports, events, or weddings. Neat Image is available starting at $ 39.90 per license.

lighthouse-neat-image-v8

neat-image-comparison

leaf-neat-image

leaf-neat-image-comparison

googletag.cmd.push(function() {
tablet_slots.push( googletag.defineSlot( “/1005424/_dPSv4_tab-all-article-bottom_(300×250)”, [300, 250], “pb-ad-78623” ).addService( googletag.pubads() ) ); } );

googletag.cmd.push(function() {
mobile_slots.push( googletag.defineSlot( “/1005424/_dPSv4_mob-all-article-bottom_(300×250)”, [300, 250], “pb-ad-78158” ).addService( googletag.pubads() ) ); } );

The post Review: Neat Image 8 Noise Reduction Software by Rick Berk appeared first on Digital Photography School.


Digital Photography School

 
Comments Off on Review: Neat Image 8 Noise Reduction Software

Posted in Photography


DxO OpticsPro 11 brings advanced Raw noise reduction

02 Jun

DxO has updated its OpticsPro software to version 11. OpticsPro 11 brings improvements to one of the last generation’s headline features – ‘PRIME’ noise reduction. DxO promises that PRIME 2016 offers improved bokeh protection and better detail retention, particularly in shadows. Processing times have decreased, and users can expect up to 4X faster performance.

A new spot-weighted option is now offered under ‘DxO Smart Lighting’, limiting the effects of ‘Smart Lighting’ tone-mapping to local areas of the image (that you can define). This helps preserve overall contrast, particularly in detected faces. DxO demoed the feature for us, and it really helped curb the flattening effect of too high a ‘Smart Lighting’ setting.  

The hallmark of DxO OpticsPro is the profile-based automatic corrections the software performs simply reading the metadata of your Raws. On top of that, smart algorithms like ‘Smart Lighting’ really help get you a good starting point, while remaining customizable in their effect. Do you rely on DxO OpticsPro for your images and, if so, what’s your favorite aspect of the software?

Let us know in the comments below the Press Release.


Press Release:

DxO OpticsPro 11 introduces new innovations in advanced RAW image processing

DxO PRIME 2016 noise reduction technology and automated spot weighted corrections are indispensable tools for photographers

Special discounts on all DxO software through June 30, 2016

PARIS & SAN FRANCISCO—June 1, 2016—DxO, a world leader in digital imaging technologies, announces the immediate availability of DxO OpticsPro 11, a major update to its award-winning photo software for Mac and PC. DxO OpticsPro 11 introduces important enhancements to DxO PRIME, the industry-standard for noise reduction, and new automated tools, such as spot weighted correction, auto microcontrast and auto red-eye that leverage face detection to help bring out the subtle nuances in images — all in just a few clicks and regardless of the original shooting conditions.

DxO PRIME 2016, better and faster

DxO OpticsPro 11 features DxO’s proprietary DxO PRIME 2016 noise reduction, which enables photographers to salvage noisy photos thought previously unusable. With DxO OpticsPro 11, photographers can capture new images at an even higher ISO by using a new version of PRIME that is better and faster than ever. DxO PRIME 2016 better preserves bokehs and smooth transitions, retains more details, and more faithfully preserves colors in dark areas, and it does this all automatically by reading each camera’s precise calibration data. And through an intense effort to adapt and optimize this technology, DxO PRIME 2016 is now able to process RAW files up to 4x faster than before — in fact, the higher the ISO, the bigger the benefit of processing time.

“The new DxO PRIME noise reduction is nothing short of amazing,” said professional photographer Mike Mezeul, “it gives me the ability to capture images at incredibly high ISOs and still render out incredibly rich, detailed, and noise-free images.”

Automated Spot Weighted Corrections

The image scientists at DxO have designed a new enhancement to DxO OpticsPro’s Smart Lighting tool that uses face detection to apply an intelligent tone map on the entire image, to better extend the dynamic range, add fill light, and improve contrast while optimizing illumination on faces. The result is genuine spot processing—after capture—with the very same results as spot metering typically provides in camera, but with the added benefit of fine-tuning flexibility.

“The image scientists at DxO have done it again,” said Camilla Ferrari, professional photographer and DxO ambassador, “by using face detection, the new spot weighted correction is able to apply even a very strong level of Smart Lighting, while keeping the people in my images looking much more natural and pleasing to my eye.”

Other enhanced tools, including new full screen mode

DxO OpticsPro 11 also adds a number of other useful tools for photographers, including an auto microcontrast mode that enhances image content while taking care to preserve faces and keep noise under control. The selective tone control produces more natural results, efficiently recovering information in shadows and highlights while avoiding flattening midtones, and there’s also a new tool that uses face and eye detection to automatically apply red eye correction, even as a batch process on multiple photos. In addition, a brand new full screen viewer removes distracting clutter so you can focus more on selecting, rejecting and rating your images, while using new shortcuts designed to help speed up the culling process.

Even more cameras supported

Without any user intervention (apart from simply viewing your image) DxO OpticsPro will read the metadata in your photo, and prompt you to download the appropriate camera/lens module. With that module, OpticsPro automatically and intelligently applies corrections such as distortion, chromatic aberration, vignetting, and lens softness. And with this latest release, DxO OpticsPro 11 adds support for a number of new cameras, including Nikon’s new flagship D5, bringing the total number of supported camera/lens combinations to well over 28,000!

Pricing & Availability

The ESSENTIAL and ELITE editions of DxO OpticsPro 11 for Mac and Windows are immediately available in the DxO online store (shop.dxo.com) and at photo resellers at a special discount through June 30, 2016:

GBP:

• DxO OpticsPro 11 ESSENTIAL Edition : £79 instead of £99
• DxO OpticsPro 11 ELITE Edition : £119 instead of £159

(Suggested retail prices, including VAT)

Photographers who acquired or upgraded a DxO OpticsPro license on or after April 1, 2016, are entitled to a free upgrade to version 11.

A fully-functional trial version of DxO OpticsPro 11, good for one month, is available on the DxO website: http://www.dxo.com/en/photography/download

About DxO

DxO develops the world’s most advanced image processing technologies, which have enabled over 300 million devices to capture the highest quality images achievable. DxO’s award-winning OpticsPro software lets serious photographers quickly and easily make their best photos look even better, and the DxO ONE miniaturized camera has redefined mobile photography with a design that pairs perfectly with iPhone and iPad to capture DSLR quality images that are instantly available to share with family, friends and followers.

Articles: Digital Photography Review (dpreview.com)

 
Comments Off on DxO OpticsPro 11 brings advanced Raw noise reduction

Posted in Uncategorized


Corephotonics launches 5x zoom and low noise smartphone camera modules

04 Mar

Corephotonics, a provider of computational camera solutions based in Israel has launched a new dual-camera module for smartphones called Hawkeye. Hawkeye combines a standard 13MP camera module with a second 13MP module that uses proprietary folded optics. Read more

Articles: Digital Photography Review (dpreview.com)

 
Comments Off on Corephotonics launches 5x zoom and low noise smartphone camera modules

Posted in Uncategorized


Tips for Removing Digital Noise in Lightroom

17 Feb

One of the most significant advantages that modern cameras have over their film-based counterparts of days gone, by is their ability to change how sensitive they are to light with the touch of a button.

Back in the days of film you had to decide ahead of time whether you wanted to shoot at ISO (then called ASA) 100, 200, 400, or in extreme cases, 800. If you were going to take pictures outdoors, a roll of 24 or 36 exposure, 100 or 200 film would work fine, but woe betide the unsuspecting photographer who wandered inside a dimly-lit building with that same film still in his or her camera. To change sensitivity, and shoot in the new lighting conditions, you had to shoot the rest of the pictures on a given roll of film, remove it from your camera, and hope you brought some ASA 400 or 800 film with you.

Nowadays you just spin a dial on your camera to instantly switch between ISO values like 100 or 200, that work great in broad daylight, to ultra-high values like 6400 or 12,800, that would be positively unthinkable with film. It’s not all sunshine and roses though as one of the biggest issues with high ISO values is that of digital noise. Even the newest cameras produce pictures with noise and grain when shooting at high ISO values, but thankfully Lightroom can help mitigate some of the effects of this noise.
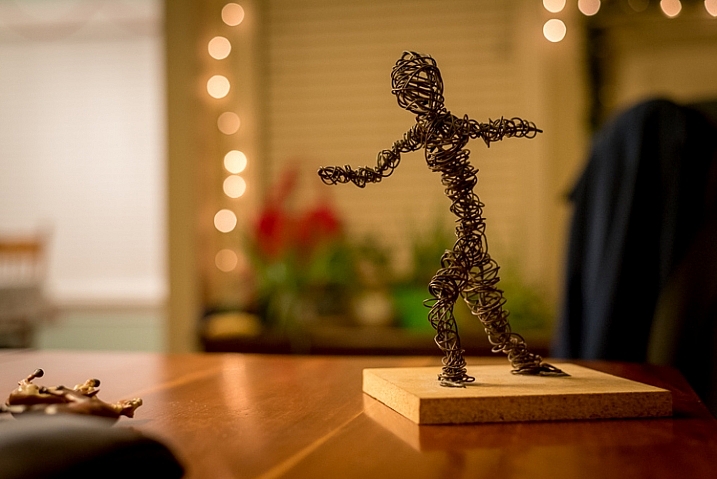
Shot at ISO 5000, the original image was too noisy for practical use. Lightroom enabled me to clean things up significantly.

Shot at ISO 5000, the original image was too noisy for practical use. Lightroom enabled me to clean things up significantly.

To get started with the noise reduction options click on the Develop module, then find the Detail panel on the right side. Note: this process works best if you shoot in RAW, not JPG.

You will find several options that can seem a bit confusing and overwhelming at first. You can experiment all you want, by just moving the sliders around to see what effects they have on your pictures, but it also helps to examine each one individually, to know precisely what they do. You will also see the Sharpening options, which are related to noise reduction, but I’m not going to focus on them specifically just yet. Before you look at the sliders themselves in the noise reduction area, it’s important to understand the two types of noise that are produced when taking a picture, Luminance and Chroma.
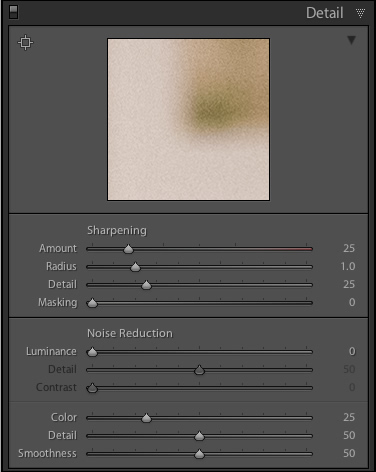
lightroom-noise-reduction-develop-panel

Luminance noise

This kind of noise affects the brightness, but not the color, of individual pixels. If you had a picture of a dark grey piece of paper with a great deal of luminance noise it would appear similar to old-school television static with lots of light and dark fuzz.

Chroma noise

This shows up as oddly-colored pixels, scattered throughout an image, almost like someone has tossed a handful of red, blue, and green grains of sand at it. Lightroom calls this “Color” noise, but it’s just another term for Chroma noise.

Both types of noise are byproducts of how digital image sensors capture data, and while they can be corrected somewhat in Lightroom and other post-processing software, it’s almost impossible to completely remove noise from a picture while still ending up with a usable image. Lightroom does give you some tools to get your digital noise under control, and if you know what you’re doing you can get some fairly decent results. Using separate controls for luminance and chroma noise, in combination with some sharpening adjustments, can help you salvage what you may think is a useless picture. As an example, here’s a picture that I took at ISO 6400, without any noise reduction applied.
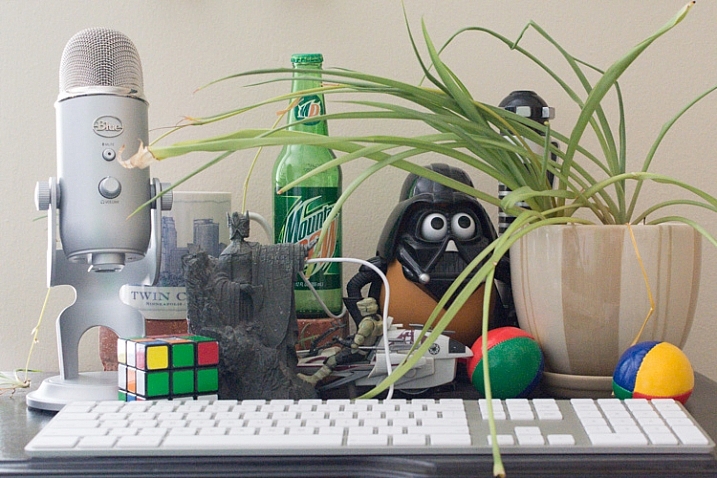
35mm, f/5.6, 1/60 second, ISO 6400

35mm, f/5.6, 1/60 second, ISO 6400

Not bad, right? If this is what ISO 6400 looks like, you might as well shoot like this all day long! Well, before you go and spin your ISO dial all the way up to Ludicrous Mode, you might want to take a look at the same 24-megapixel image zoomed in to 100%.

lightroom-noise-reduction-scene-no-noise-reduction-100-percent

Ow, my eyes! The noise, it hurts! Not only is the picture full of color blotches, but shooting at ISO 6400 has resulted in an image that is far less sharp than it could be at a lower ISO. A great deal of color noise is evident on the torso of the figure, as well as the slanted lines on the left side, and you can see lots of luminance noise in the green letters on the right side too.

This noise is not always visible when you shrink  your files down to share online, but if I were to print this picture it would look like my cat threw up on the paper. Lightroom can help us fix things, and a good place to start, in this case, is with the luminance slider at a value of 30.
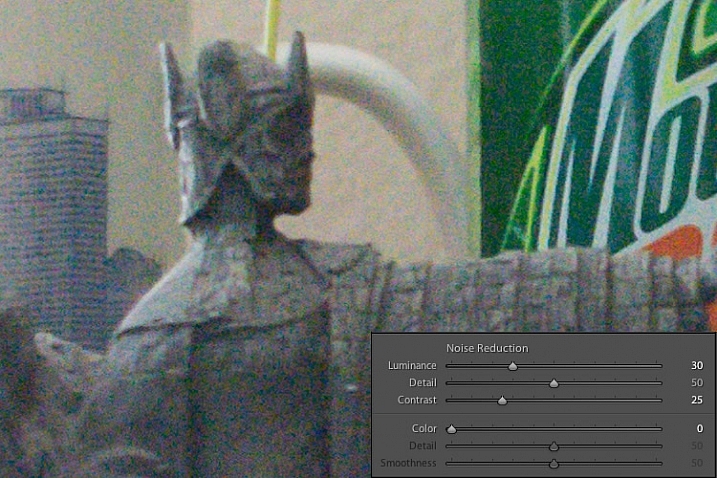
lightroom-noise-reduction-scene-luma-noise-reduction-100-percent

Much of the black and white static has been removed, but there are still splotchy patches of color scattered throughout the image, which can dealt with using the color slider next. Before you start thinking that this is a magical cure-all for your noisy images, take a closer look at the picture. Much of the details have been lost, or blurred, such as the lines on the side, and the patchwork of the figure’s tunic.

You can mitigate these effects somewhat by using the detail and contrast sliders, but again the results are not going to be ideal. Detail acts as sort of a threshold control, allowing you to tell Lightroom what should be treated as noise and what should be left in. I usually leave this slider at 50 but you can experiment with it to get the results you need. The contrast slider helps bring back some of the edges that have gotten blurry, thanks to the noise reduction algorithm, and even though I have set it to 25 in this example, you can clearly see that much of the edge contrast is not as good as the noisy original. Move this slider too far though, and your photo will start looking fake and artificial, so you’ll have to find a good balance depending on your needs.

To continue with the noise reduction, the color slider can be used to get rid of the weird splotches of red, green, and blue, but again you are going to see some tradeoffs.
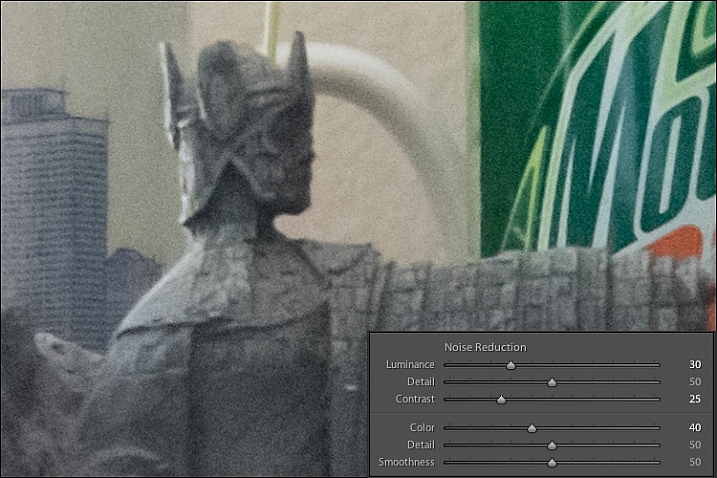
lightroom-noise-reduction-scene-chroma-noise-reduction-100-percent

The results look fine at first, and you may notice that Lightroom automatically applies some degree of Color noise reduction (value 25) to every photo by default. This is because low-grade Color noise reduction is almost always good to have, and generally won’t result in too many tradeoffs for the image as a whole. In this case I used a value of 40, to show the effects a bit more. Even though the result is decent, you might notice something else that’s missing, if you look at the soda bottle label on the right-hand side. Compare it to the original picture and you will see that along with removing some of the color noise Lightroom has actually removed some color from the whole photo.

The Detail slider slider, similar to its counterpart in Luminance noise reduction, acts as somewhat of a threshold so you can tell Lightroom what is, and is not, noise to remove. The Smoothness slider is a fairly recent addition to Lightroom, and can be used to control what’s known as “low-frequency” color noise. Basically, slide it to the right to remove larger splotches of noise or to the left to keep these more intact.

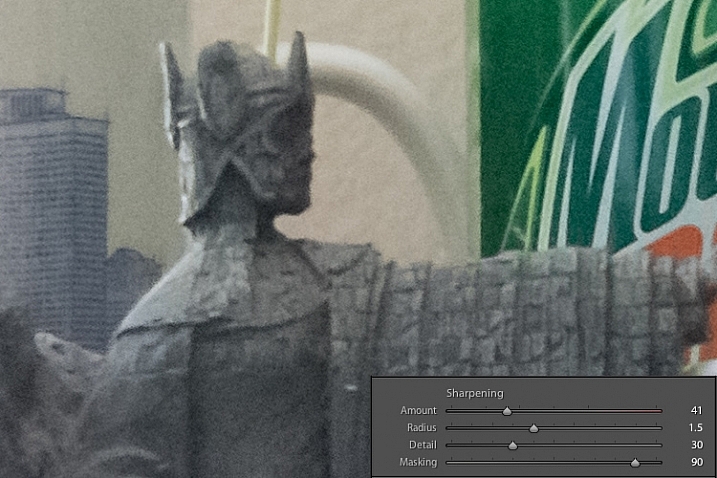
Every time you use Lightroom’s noise reduction tools you will deal with tradeoffs, and one of the most significant of these is the overall sharpness of the image. Photos with more noise reduction will almost always be softer, particularly where there are sharp contrasting edges, and you can bring a bit of this back by using the sharpening tools.

Here’s yet another 100% crop of the image above with the same noise reduction employed in the previous image, but with added sharpening.
lightroom-noise-reduction-scene-sharpened-100-percent

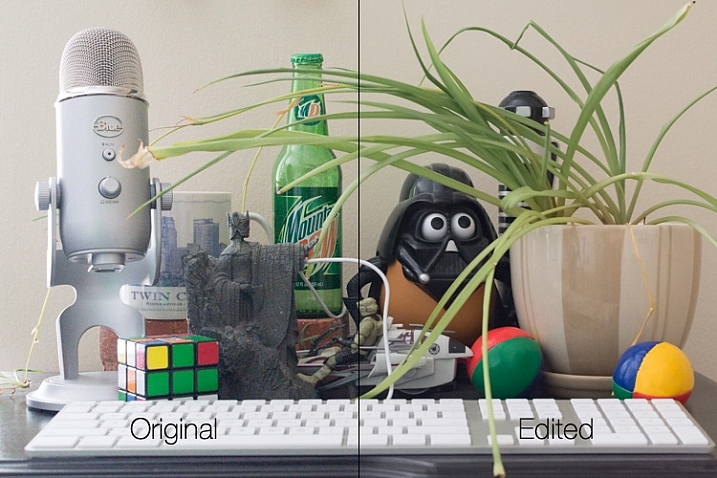
After a bit of sharpening, the detail in the lines on the left side has returned, and so has the texture of the tunic, but the lower-left corner is still a muddy mess of grey, whereas in the original noisy picture it was more defined. Here’s both the original and edited image side-by-side which might help you get a macro view of how these noise reduction and sharpening tools can affect a picture.
lightroom-noise-reduction-scene-both

At first glance you might not notice too many differences, but one of the most glaring problems with the edited picture is the complete lack of texture on the wall behind the scene, as well as a smoothness to the plant that is almost unnatural. Here’s a side-by-side zoomed in to 100%.
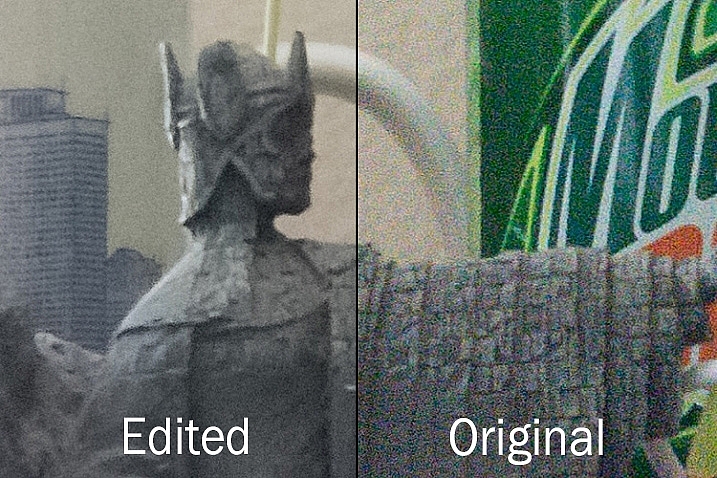
lightroom-noise-reduction-scene-no-noise-reduction-100-percent-before-after

Is it worth these tradeoffs to get a photo with less noise? That question can only be answered by you, but one rule of thumb I like to follow, is that a noisy image can be corrected and edited in postproduction, albeit somewhat imperfectly. A blurry image cannot be fixed.

So, if there is a situation in which I find myself having to choose between a faster shutter speed and higher ISO (i.e. more noise), or a slower shutter speed and lower ISO (i.e. less noise) I’ll usually err on the side of noise, if the slower shutter speed would result in an image that is too blurry.

I also make liberal use of my camera’s auto-ISO feature, which allows me to set a minimum shutter speed and a maximum ISO value. That way I can concentrate on adjusting the aperture to get the composition I want, and always know that my pictures will be free of blur, even if does mean there will be a bit of noise I have to clean up in Lightroom.

The light here was quite dim which required a high ISO value. I didn't mind a slightly noisy image that was sharp and in focus, because I was able to get rid of most of the noise in Lightroom.

The light here was quite dim, which required a high ISO value. I didn’t mind a slightly noisy image that was sharp and in focus, because I was able to get rid of most of the noise in Lightroom.

One final note worth mentioning is you can also use Lightroom’s local adjustments like the Radial Filter, Graduated Filter, and Adjustment Brush to apply noise reduction in specific areas of an image only. However, this is a bit limited, in that these adjustments only perform luminance noise reduction, so you might still be left with some ugly colored spots, that can only be removed using the global adjustments in the detail panel of the develop module.

What are some of your favorite tips and tricks for removing noise? I’d be interested to hear any thoughts you have in the comments section below.

googletag.cmd.push(function() {
tablet_slots.push( googletag.defineSlot( “/1005424/_dPSv4_tab-all-article-bottom_(300×250)”, [300, 250], “pb-ad-78623” ).addService( googletag.pubads() ) ); } );

googletag.cmd.push(function() {
mobile_slots.push( googletag.defineSlot( “/1005424/_dPSv4_mob-all-article-bottom_(300×250)”, [300, 250], “pb-ad-78158” ).addService( googletag.pubads() ) ); } );

The post Tips for Removing Digital Noise in Lightroom by Simon Ringsmuth appeared first on Digital Photography School.


Digital Photography School

 
Comments Off on Tips for Removing Digital Noise in Lightroom

Posted in Photography


Nikon D5200 and D7100 firmware updates removes noise during video capture, fixes bugs

17 Sep

Nikon has released firmware updates for both the D5200 and D7100 cameras,. Bth new versions of the firmware reduce horizontal line noise in videos recorded at 1280×720/60p and 1280×720/50p. In addition, firmware v. 1.03 fixes select bugs affecting both models. Read more

Articles: Digital Photography Review (dpreview.com)

 
Comments Off on Nikon D5200 and D7100 firmware updates removes noise during video capture, fixes bugs

Posted in Uncategorized


Sources of noise part two: Electronic Noise

13 May

Following on our look at the effects of shot noise, our attentions turn to the electronic noise added by your camera. In this second part of the series, we look at read noise and how your sensor’s behavior defines what your camera is capable of and consequently, how you should shoot with it. Read more

Articles: Digital Photography Review (dpreview.com)

 
Comments Off on Sources of noise part two: Electronic Noise

Posted in Uncategorized


What’s that noise? Shedding some light on the sources of noise

27 Apr

How would you react if you were told that the aperture and shutter speed you choose make more difference to image noise than the ISO setting? You might be surprised to discover that a lot of the noise in your images doesn’t come from your camera at all: it comes from the light you’re capturing. Our own Richard Butler explains. Read more

Articles: Digital Photography Review (dpreview.com)

 
Comments Off on What’s that noise? Shedding some light on the sources of noise

Posted in Uncategorized


Mufflers: 10 Artistic Acoustic Highway Noise Barriers

22 Mar

[ By Steve in Architecture & Public & Institutional. ]

Highway Acoustic Walls 1a
These artistic acoustic highway noise barriers combine form with function, neatly blocking the sound of road traffic while looking darned good in the process.

Highway Acoustic Walls 1b

This proposal for an environmentally-friendly acoustic barrier (“Forest Corridor”) in Hong Kong was designed by Bread Studio to meet three strict conditions: masking the sight of the highway from nearby residential buildings, improving the view of the highway’s underside for people in the park below, and relieving drivers from any claustrophobic impressions as they cruise through the de facto tunnel.

Leapin’ Lizards!

Highway Acoustic Walls 2a

Highway Acoustic Walls 2b

Stretching for six miles along both sides of the Pima Freeway’s sound barrier wall in Scottsdale, AZ, “The Path Most Traveled” by artist Carolyn Braaksma evokes the essential nature of the region’s desert ecosystem.

Highway Acoustic Walls 2c

Interspersed among a mix of abstract and Native American-style motifs are prickly pear cacti standing up to 40 feet tall and enormous lizards almost 70 feet long.

Clearly Beautiful

Highway Acoustic Walls 3a

Highway Acoustic Walls 3b

Melbourne’s freeway network is the largest of any Australian city, and without sound barriers the aural impact on residential neighborhoods would be substantial. Cheap and unimaginative acoustic walls would also have a detrimental effect on drivers so a pleasing compromise was achieved that satisfied both.

Highway Acoustic Walls 3c

Tinted acrylic plastic panels set into sound walls along the EastLink Freeway maintain audio insulation while adding visual interest at a reasonable cost. Want to see the world through rose-colored sound barriers? Get your eyes to Australia!

“Sixty Seconds of Architecture”

Highway Acoustic Walls 4a

Highway Acoustic Walls 4b

Louwman Exclusive Cars is a high-end exotic automobile dealer located in Utrecht, the Netherlands, just off the A2 highway between Amsterdam and Maastricht. Instead of making do with a bland and boring sound wall, the dealership opted instead for an acoustic barrier “designed from the perspective of a flow of cars passing by with the speed of 120 km/h.” Fast company indeed.

Highway Acoustic Walls 4e

Highway Acoustic Walls 4d

Highway Acoustic Walls 4f

Highway Acoustic Walls 4c

Stretching 1.5 kilometers in length, the 5,500,000-euro barrier designed by Kas Oosterhuis widens to a 30m “cockpit” that accommodates the auto dealer’s showroom and service bays. No doubt it’s quite quiet inside as well.

Next Page – Click Below to Read More:
Mufflers 10 Artistic Acoustic Highway Noise Barriers

Share on Facebook


[ By Steve in Architecture & Public & Institutional. ]

[ WebUrbanist | Archives | Galleries | Privacy | TOS ]


WebUrbanist

 
Comments Off on Mufflers: 10 Artistic Acoustic Highway Noise Barriers

Posted in Creativity


How to Avoid and Reduce Noise in Your Images

18 Sep
Reducing noise in your images can make a huge difference to their quality

Reducing noise in your images can make a huge difference to their quality

We have all seen it in our images, that uneven grainy look that makes our images look a little unappealing. In the days of film, noise was called grain and it looked better (even the word grain sounded better) but the digital equivalent of noise can often make a good image look bad. The first question we need to answer is:

What is noise?

Generally speaking, noise is defined as aberrant pixels. That means pixels that are not representing the colour, or the exposure of the scene correctly. The next question is:

When does noise happen?

Noise is introduced into your images when you shoot a long exposure image or shoot at a high ISO setting. Does mean you should never go over ISO 100 or do long exposures? No, there are times that you may need, or even want, to shoot in those conditions. Landscape photographers shoot in low light all the time. The important things to know are; how to avoid getting too much noise in your image and, how to deal with it in your post-production.

Let’s deal with how you can get less noise in your images first.

1. Reduce noise in-camera:

Shoot at lower ISO settings

If your camera is three years old or newer, the ISO functionality will be great. You shouldn’t see too much noise creeping into your images, even up to ISO 1000. However, there might still be some noise at the higher ISO numbers, so be aware of your exposure. Shooting at a lower ISO means you will have less noise in your image. Higher ISO settings tell your camera’s sensor to group pixels together to capture more light. This grouping effect can make your image look gritty and noisy.

So, how do you avoid shooting at a high ISO? If possible, open your aperture to its widest setting i.e. f/2.8. If you are shooting in low light, use a tripod if possible, or you could use a flash. If none of these options give you the correct exposure, then you will need to push the ISO up higher. Also, do some test shots to find out at what level the ISO settings on your camera start to degrade image quality. For many years I shot on a Nikon D80 and I knew that anything above ISO 500 was really difficult to use afterwards. This was because the noise became difficult to remove, even in third party software, and if it was removed, the image looked like a watercolour painting as a result of over processing of the noise. So I got to know the limits of my camera and worked within those constraints.

Shoot in RAW format

I know you may feel daunted by shooting in RAW, but you don’t need to be. RAW is a great way to get the best out of your images, so be sure to use it. You don’t have to shoot RAW all the time, but when you notice that the light is becoming a little too dark, switch over to RAW. The reason is that JPEG images already have compression applied to them. This means that there is already some noise, and what is known as JPEG artefacts, in the image. If you are using a high ISO with JPEG files, the noise can become even worse. Also, in post-production, you have much more flexibility removing noise, and increasing exposure, with a RAW file than a JPEG.

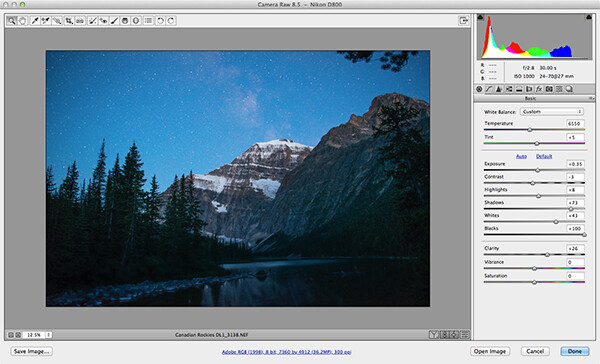
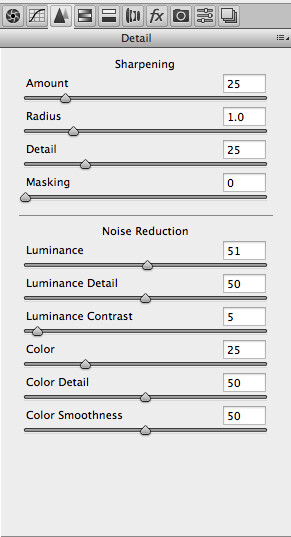
Adobe Photoshop Camera Raw has some powerful noise reduction tools

Adobe Photoshop Camera Raw has some powerful noise reduction tools

Check your exposure

When digital cameras first hit the market, they were really bad at rendering highlights correctly. Many photographers (myself included) would slightly underexpose the images in order to retain detail in the highlights. This meant that the shadow areas were really dark and when you tried to pull them up in Photoshop, the noise would become evident.  This has been largely sorted out now and the new generation of digital sensors does a great job of handling highlights and shadows. As a result, you can expose correctly without fear of having noise in the shadows, or problems in the highlights. In fact, you can now overexpose slightly so that the shadows are a little brighter than normal and then you can pull the highlights down in Photoshop. I have been doing this for a while now and it is amazing how much detail the new sensors can capture in the highlights. Be careful not to overexpose too much, watch that you don’t clip the highlights as the details may then be lost for good.

Be careful when doing long exposures

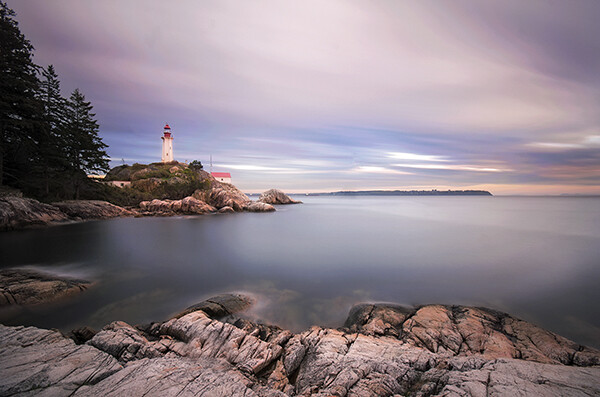
Long exposures make some of the most dramatic images, but if the exposure is too long, the sensor of the camera can begin to heat up and the pixels will render incorrect colours and exposure. You can still do long exposures, but again, be aware of how you camera handles the long exposure time. Does the image look too grainy? Test it out and experiment to see where your camera begins to struggle. Then make sure that you don’t shoot a long exposure for longer than whatever works on your camera. The key point here is to know the limits of your gear and shoot within those limits. This will ensure great images and easy image editing.

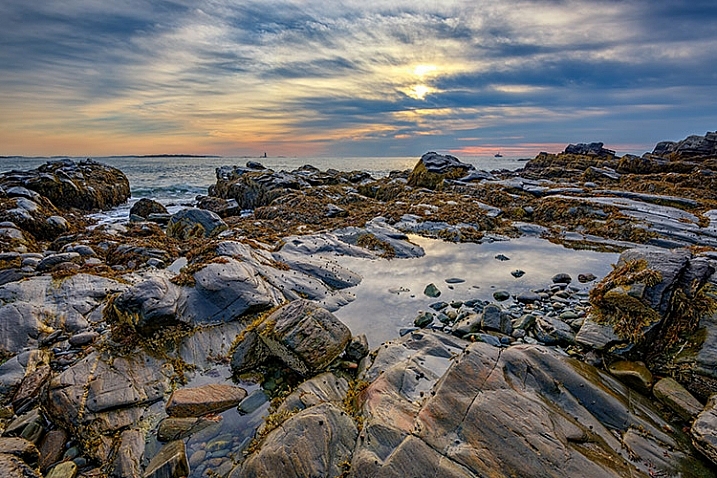
Long exposure images can accentuate noise in a scene

Long exposure images can accentuate noise in a scene

Use in-camera noise reduction

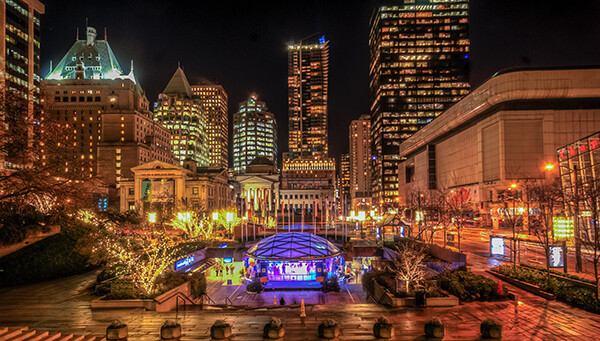
In most cameras there will be a function called High ISO Noise Reduction or Long Exposure Noise Reduction. It’s a good idea to turn this on if you are shooting at a high ISO or doing long exposures. The reason is that after the image has been shot, the camera will analyse the image and look for any pixels that are incorrectly rendered. It will then fix the pixels that are not properly rendered. This takes some time, usually as long as the exposure time. So if you shot an image that was 30 seconds long, the camera will do an analysis and correction that will take up to 30 seconds. This may become impractical if you are doing 10 minute exposures, but it is worth doing on shorter exposures. If you have the time, do it on the very long exposures too, as it can improve the image quality.

Use in camera noise reduction for long exposures and lowlight images

Use in camera noise reduction for long exposures and lowlight images

2. Fixing noise in Lightroom or Photoshop:

Once you have captured your image, you will want to open it up in Lightroom or Photoshop to see how it looks. It is a good idea to zoom your image to 100% to see the actual details of the noise in the image. When you make any adjustments, be sure to zoom in to 100% (1:1 in Lightroom), but also zoom out to see the full image to make sure that the whole thing looks good.

Noise reduction workflow in Lightroom and Photoshop Camera Raw

The controls in Lightroom and Photoshop Camera Raw are pretty much the same, so below is a quick overview of what each slider does and how to use them. In Lightroom you will find the Noise reduction tools in the Develop module and in Camera Raw you will find it as the third tab on right hand side of the screen, it is the Detail tab.

The sliders do the following:

The noise reduction sliders in Photoshop Camera Raw, are identical in Lightroom

The noise reduction sliders in Photoshop Camera Raw, are identical in Lightroom

Luminance

Reduces luminance noise which is noise coming from over or underexposed pixels, this can be quite prevalent in long exposures.

Luminance Detail

Controls the luminance noise threshold. This is good for noisy photos. Higher values preserve more detail but can produce noisier results. Lower values produce cleaner results but also remove some detail.

Luminance Contrast

Controls the luminance contrast; useful for noisy photos. Higher values preserve contrast but can produce noisy blotches or mottling. Lower values produce smoother results but can also have less contrast.

Colour

Reduces color noise. This is often noticed in the underexposed shadow areas of an image.

Colour Detail

Controls the colour noise threshold. Higher values protect thin, detailed color edges but can result in color specking. Lower values remove color speckles but can result in colour bleeding.

Colour Smoothness

This slider controls the smoothness of the colours in the image. This is useful if you still have some unusual colour noise in your image after you have made all your adjustments above. Use this to finish off the noise reduction workflow.

Conclusion

There are no standard settings here that will work for every image. You will need to slide each adjustment around until you find the desired result and see how the changes interact with each other. I tend to slide Luminance and Colour to about 50 and then work from there, I slide each slider up and down, carefully watching how this is affecting the image. Once I am happy with the adjustment, I then move onto the next slider until I am done. I do this while I am zoomed into the image at 100% and after each change, I zoom out to see the effect it is having on the overall image. This may sound a little tedious, but if this is done properly, you will be able to eliminate most of the unsightly noise in just about any image. Practice is also important here, try this on as many images as you can and pretty soon you will be able to predict the effect of each changes.

Do you have any other experiences or tips for noise avoidance and removal? Please share in the comments below.

The post How to Avoid and Reduce Noise in Your Images by Barry J Brady appeared first on Digital Photography School.


Digital Photography School
 
Comments Off on How to Avoid and Reduce Noise in Your Images

Posted in Photography