RSS
 

Posts Tagged ‘needs’

The People’s Fridge: Free Excess Food for Anyone Who Needs It

16 Feb

[ By SA Rogers in Destinations & Sights & Travel. ]

people's fridge

Considering that the United Kingdom leads the European Union in food waste at over 15 million tons per year, spreading the concept of free community refrigerators could make a huge impact. Households in the UK toss out an average of 24 edible meals every month, and those figures are even worse in the United States, where about 40 percent of all food goes to waste. One project in London aims to prove just how powerful diverting that waste could be with ‘The People’s Fridge,’ where anyone can donate food or take what they need.

people's fridge 2

Located in Brixton, South London and open to the public, The People’s Fridge is run by a group of volunteers aiming to help tackle food poverty and cut food waste all at once. The crowdfunded project joins similar campaigns launched in Spain, Germany and India as well as other cities in the UK.

The folks running the project have a few simple rules to keep things fresh and manageable: offer prepared and cooked foods from certified businesses only as well as fruits, vegetables, bread and unopened packaged foods. Homemade foods, raw meat and seafood and opened milk are not allowed to prevent issues with spoilage and ensure that all ingredients are known.

So far, photos of the fridge on the project’s Twitter show the shelves brimming with fresh produce, beverages, sandwiches, cake and other treats. Employees at Pop Brixton, the venue where the fridge is located, clean and organize the contents daily.

“We want more people to be talking about cutting food waste!” says Olivia Haughton, a member of The People’s Fridge team. “In the process of saving food from the bin we provide a source of fresh food for anyone who needs it. The fridge works really simply. People with food to donate can bring it at any time during the day. All they have to do is fill in a quick register of what they’re donating and when, then anyone can come and help themselves. There is no policing of who benefits from the fridge, all we ask is that people don’t take food if they suffer from any food allergies and that they sign the food out of the fridge when they take it.”

Share on Facebook


[ By SA Rogers in Destinations & Sights & Travel. ]

[ WebUrbanist | Archives | Galleries | Privacy | TOS ]


WebUrbanist

 
Comments Off on The People’s Fridge: Free Excess Food for Anyone Who Needs It

Posted in Creativity


This image is why the world needs professional photographers

21 Dec

A gunman assassinated Russia’s ambassador to Turkey yesterday at the opening of a photography exhibit in Ankara. Associated Press photographer, Burhan Ozbilici was covering the event and witnessed the assassination first hand, which occurred while the ambassador was addressing the room of attendees.

In the face of an active gunman meters away, Ozbilici kept on making pictures. And because of his bravery, the world can witness and better contextualize this horrific event. But before you go on calling Ozbilici a hero for being brave, consider for a moment that he did exactly what he is trained to do. He did what any good photojournalist should have done. 

In an interview with the Los Angeles Times today, Ozbilici had this to say about the incident:

“I was, of course, fearful and knew of the danger if the gunman turned toward me. But I advanced a little and photographed the man as he hectored his desperate, captive audience,” Ozbilici tells the LA newspaper. “I was thinking: ‘I’m here. Even if I get hit and injured, or killed, I’m a journalist. I have to do my work. I could run away without making any photos… But I wouldn’t have a proper answer if people later ask me: ‘Why didn’t you take pictures?’”

It’s a stark reminder that the world needs well-trained photojournalist now more than ever. Unfortunately the trend in the newsroom, both in the United States and World-wide has been a constant cycle of slashing staff photography positions. 

There are a lot of reasons why photojournalism jobs are disappearing, the decline of print/classified ads is surely one, but the increase in smartphone image quality is another. Smartphones have come a long way and for many media companies, a multi-talented journalist who can shoot some photos and video with their iPhone is often considered good enough.

So what if instead of a proper photojournalist, the Associated Press has sent just a reporter with a smartphone to cover the event? After all, it’s just a gallery opening right? A quick snap of the ambassador behind the podium and a few shots of the gallery walls to accompany the text should do the trick. 

The point is, there really is no substitute for a professional photojournalist with years of training and field time. In an era when news is increasingly catered toward one’s specific taste, the facts can be elusive. But a good photojournalist can get us closer to the truth. It’s their job.

Articles: Digital Photography Review (dpreview.com)

 
Comments Off on This image is why the world needs professional photographers

Posted in Uncategorized


Sony a6300 versus a6500: what’s changed, and what still needs to change

18 Oct

Sony a6300 versus a6500

That was quick.

Just eight months after Sony introduced the a6300, a higher-end sister model to the a6000, we now have another higher-end sister model in the a6500. The sheer speed of Sony’s product releases lately is somewhat appropriate, given the outright shooting speed these cameras are capable of.

Both cameras feature the same 24MP APS-C CMOS sensor, the same 425-point on-sensor PDAF system, the same viewfinder, the same video specification, and the same 11 fps burst shooting rate (8 fps with Sony’s implementation of ‘live view’). Wait a second – what exactly is new to the a6500?

Turns out, there’s a handful of changes that can have big implications for how photographers will interact with and use these cameras, but are they worth the $ 400 premium on the new model? Let’s take a look.

Continuous shooting

Patrick Murphy-Racey discusses using the a6500 for peak action (like drag races) due to its burst speed and autofocus system.

A deeper buffer combined with a newly developed front-end LSI (which stands for Large Scale Integration – it’s basically an additional chip providing more processing power) promise more responsive performance when shooting bursts – 300 JPEG or 107 Raw images can be captured at 11 fps with full autofocus and autoexposure. Users can also instantly review or check focus on the last image that the camera has written to the card (though that might not necessarily be the last image in that burst), with the added plus of an indicator showing just how many images remain to be written to the card.

Comparatively, the a6300 can still shoot at 11 fps with full autofocus and autoexposure, but only for 44 JPEG or 21 Raws. And while the camera is writing to the card, you can’t enter playback, or magnify the displayed image (if you have image review on). We’re particularly happy to see that last limitation go, as it makes the camera eminently more usable.

In-body 5-axis stabilization

Sony consolidated the shutter charge and shutter mechanisms to one side to make room for the IBIS unit in the a6500.

Without increasing the depth of the camera body, Sony has redesigned the a6500’s shutter mechanism to not only be more durable (tested – though not guaranteed – to 200,000 cycles), but also to incorporate 5-axis stabilization with non-stabilized lenses. What’s more, when you pair an optically stabilized lens with the a6500, the camera knows to pass of pitch and yaw correction to the lens’ stabilization system. This doesn’t increase the effectiveness more than the rated 5 stops, but is likely to help maintain effectiveness when shooting at longer focal lengths.

There’s also the intriguing possibility of shooting full 4K stabilized video with any lens – but we’re withholding our verdict on the resulting image quality until we can test it for ourselves. After all, core video specification and performance hasn’t changed from the a6300 to the a6500, and we’re curious to see if the stabilization system has any effect on the rather lackluster rolling shutter performance of the a6300.

And, of course, the a6300 offers no in-body stabilization.

Touch and see

The a6500’s screen is touch-enabled, whereas the a6300’s isn’t. They share the same resolution (and the touch-panel doesn’t seem to have affected glare or fingerprint-resistance), but on the a6500, you can now use the screen to quickly place an AF point, move your AF point around by acting as a ‘touchpad’ with your eye to the finder, and also double-tap to zoom and swipe around an image in playback.

So while AF performance will likely remain the same on the a6500, you may now find you’re more quickly able to adapt to a scene in front of you by using the touchscreen as opposed to the cumbersome sequence of button presses most Sony cameras require for focus point movement.

That said, in touchpad mode, the control of the AF point is unfortunately always relative, rather than (at least an option for) absolute, so you swipe to move the AF point from its current position, rather than touching exactly where you want it to be. This meant we found ourselves often swiping repeatedly to get the AF point from one side to the other. This could be obviated with absolute positioning in combination with limiting the touchpad area to the upper right quadrant, something we suggested to Sony in-person. Lastly, we found the touchpad performance to be decidedly laggy, especially when compared to competitors’ offerings.

When it comes to video, the a6500’s touchscreen is particularly useful for focus pulls, since you can just tap to change the focus point and initiate a rack focus (and as always, you can control how quickly the camera will rack focus). Less easy is getting the camera – in video – to continue to track your subject around the frame after you’ve tapped on it, since Lock-on AF is unavailable in video (something we continue to request Sony to address).

There appears to be a workaround, though: if you turn the old, vesitigial ‘Center Lock-on AF’ on, then tapping appears to initiate subject tracking. Unfortunately, ‘Center Lock-on AF’ isn’t always the most reliable, and it’s still somewhat cumbersome to work this way as you have to first turn this feature on, which requires either a (Fn/main) menu dive or a dedicated button assigned to it, plus a couple more button presses before you tap.

Controls and usability

Autofocus and video options are among the new ‘groupings’ within the updated Sony menu system.

Besides the touchscreen, the other major control change on the a6500 compared to the a6300 is the addition of C2 | C1 custom buttons on the top plate, a7-style. They’re nicer buttons than the soft-press C1 button of the a6300, providing more haptic feedback. The a6500’s grip has also been redesigned to be ‘chunkier’ and deeper than that on the a6300, again much like the a7 Mark II cameras, which should help when using heavier or longer lenses.

The a6500 also inherits the redesigned menu interface that debuted in the a99 II which is, in our opinion, much more user-friendly than the interface on the a6300 (and a6000, for that matter). The tabs are now color-coded, but more importantly, similar functions like autofocus, image parameters and movie settings are grouped. This makes it much less likely that you’ll miss a moment while rocketing through the menu to find a setting you swear you saw somewhere in there last week. It’s one of our favorite additions to the a6500, and it’s about time.

Unfortunately, you still can’t make a custom ‘My Menu’-like page in this menu system. A shame, as it’s an easy way to group most-used menu items into one section for quicker access, particularly ones – like movie options – that can’t be assigned to the custom Fn menu.

What hasn’t changed (and should have been)

There’s no question that the a6500 is incredibly well-specified camera in an impressively small package. In terms of usability, Sony has made great strides on this new model with the addition of a touchscreen and a revamped menu system. Unfortunately, there’s still a few aspects of the a6500 that we can’t help but wish Sony would have addressed.

Unfortunately, like the a6300, the a6500 lacks a control dial on the front of the camera – an omission that is all the more glaring at its higher position in the market. Unlike the a6300, all of the a6500’s direct peers offer twin control dials, and a front control dial would further aid usability in our opinion (though we’d also happily take the ‘Tri-Navi’ system of the old NEX-7 flagship as a compromise).

The core stills and video specification hasn’t changed at all since the a6300 (although the new front-end LSI is supposed to help with JPEG performance at higher ISO values). Now, the a6300 already produced great results under almost any circumstances with one big exception – rolling shutter in 4K. While the detail level is impressive and the capture aids are extensive (S-Log, zebra patterning, focus peaking, etc.), we would really have liked to see Sony address the rolling shutter issue in this new model. And a headphone monitoring port wouldn’t hurt, either.

Limited battery life is a problem endemic to mirrorless cameras as a whole, and the a6000-series is no exception. Still, probably thanks to the additional processing and touch-screen, the a6500’s battery life rating has actually decreased compared to the a6300 by over 10%. It goes without saying that’s a change in the opposite direction than we would like.

Adding it all up

The a6500’s additions over the a6300 are small in number, but potentially huge for what they offer users. Sure, the new model comes at a $ 400 premium over its mid-range sibling, but the upgrades in the new flagship model have the potential to be significant.

Of course, whether they’re significant to you depends on whether they line up with what you like to shoot. If you don’t shoot long bursts, or don’t find yourself checking focus all that often, the additional buffer performance isn’t likely to matter. If you shoot a lot of video and want more flexibility with lens choice, the in-body stabilization is likely to be very helpful. One thing that we feel will positively impact all users – even those who primarily use the viewfinder – is the touchscreen. That said, its laggy behavior is disappointing considering just how much processing power this camera has.

We generally feel that, given the sheer capability of this camera, the price premium over the a6300 is warranted. The Sony a6500 represents a lot of camera in a very lightweight package, and it’s encouraging to see that Sony is continuing to refine its APS-C offerings.

Articles: Digital Photography Review (dpreview.com)

 
Comments Off on Sony a6300 versus a6500: what’s changed, and what still needs to change

Posted in Uncategorized


Drone footage of aurora over Iceland is just what your weekend needs

27 Aug

Maybe it’s unreasonably hot where you live, like it is here. Maybe you just smashed your phone screen on a sidewalk (and you KNEW you should have paid for that Apple Care). It’s none of our business why, but if your troubled mind needs soothing, we found just the thing for it: this video of the Northern Lights shot from a drone soaring over Iceland. 

The footage comes from OZZO Photography and a Sony a7S II with Sigma 20mm F1.4 strapped to a DJI Matrice 600 (that’s a $ 4600 pro-grade drone, for those keeping score at home). It all adds up to one sweet, nerve-calming minute and a half.

Articles: Digital Photography Review (dpreview.com)

 
Comments Off on Drone footage of aurora over Iceland is just what your weekend needs

Posted in Uncategorized


3 Principles of Light Behaviour Every Photographer Needs to Know

01 Feb

In this short video by Ed Vorosky he covers three rules about the behaviour of light. When you understand these principles you can then use them better in your photography.

  1. Light travels in straight lines
  2. The subject receives less light as the distance to the light source is increased
  3. The larger the light source relative to the subject, the softer the light source

Watch the video for a more detailed description and demonstration of each:

So what does that mean for your photography? How can you use this information in practice?

googletag.cmd.push(function() {
tablet_slots.push( googletag.defineSlot( “/1005424/_dPSv4_tab-all-article-bottom_(300×250)”, [300, 250], “pb-ad-78623” ).addService( googletag.pubads() ) ); } );

googletag.cmd.push(function() {
mobile_slots.push( googletag.defineSlot( “/1005424/_dPSv4_mob-all-article-bottom_(300×250)”, [300, 250], “pb-ad-78158” ).addService( googletag.pubads() ) ); } );

The post 3 Principles of Light Behaviour Every Photographer Needs to Know by Darlene Hildebrandt appeared first on Digital Photography School.


Digital Photography School

 
Comments Off on 3 Principles of Light Behaviour Every Photographer Needs to Know

Posted in Photography


The Q Button – What Every Canon DSLR Photographer Needs to Know

09 Dec

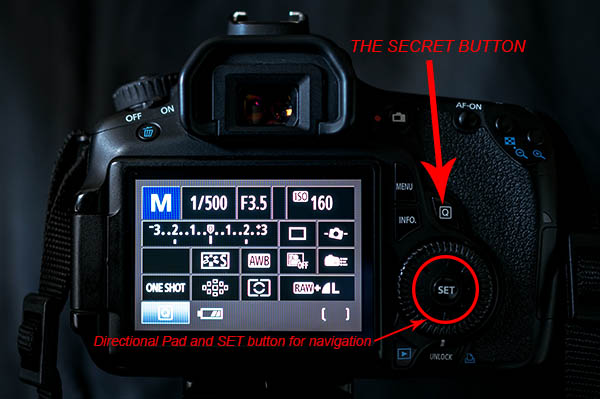
Cameras can be super complex these days. Buttons, knobs and switches are everywhere. How can you remember what all of them do and where to begin? Well, Canon has given you a secret button to use that allows you to access all of those most important functions within your complex machine. Perfect, where is this secret button you ask? It’s right on the back of your camera marked with the letter Q. It’s not really a secret, it’s just under utilized.

COVER IMAGE

The Q Button

What does Q stand for? Quick. The button makes navigating just that. Using the button gives you quick access to all of the major functions that you need. Let’s go through some of those functions so you can see how easy it is use your camera. Grab your Canon and let’s try it out.

How to use it

Go ahead, give the Q button a press while watching the LCD screen on the back of your camera. As you see it highlights one of your current settings. Depending on your Canon model this may light up the current selection in a blue/green color or it may outline it with an orange box. Next you can cycle through your settings by using the directional pad located around your SET button. Simply highlight the setting you want to change and then you have a couple of options.

First, and easiest, is to roll your settings dial while it is highlighted. This will cycle through your options for that particular setting. Your second choice is to push the SET button while a setting is highlighted. This will lead you to a more detailed screen showing all of your options for that setting.

The Secret Button

Canon also made things easy by providing a description of each option at the bottom of the LCD as you scroll through. At first it will be more beneficial to use the second option so you become familiar with what settings are available, and what the symbols mean. Once you get that down, using option one to zip through the settings is a breeze.

As a beginner it can be really helpful using the LCD screen and the Q button so you can see everything about the exposure and settings right in front of you. When you depress the shutter button half way the current exposure reading will be displayed on the meter on your LCD. This makes it really easy to adjust your settings while seeing how each element of exposure (aperture, shutter speed and ISO) is affecting the meter.

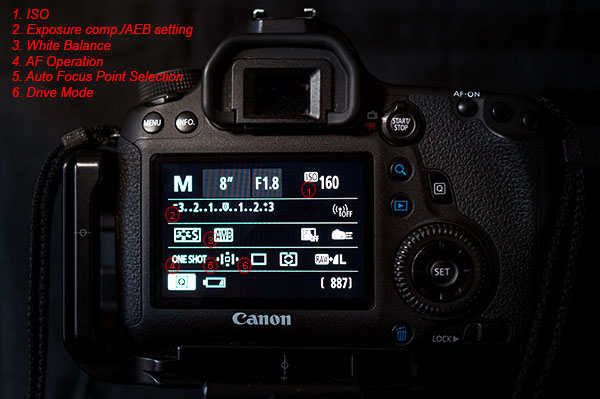
Some of the settings you will adjust most are ISO, exposure bracketing, white balance, focus type, focus point and drive mode. When you use these techniques they each can be adjusted in seconds!

Visual Guide

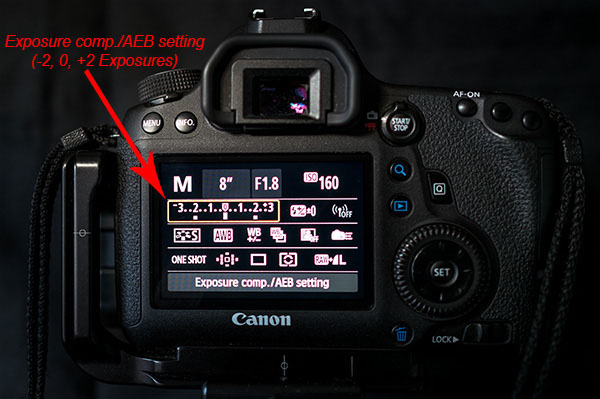
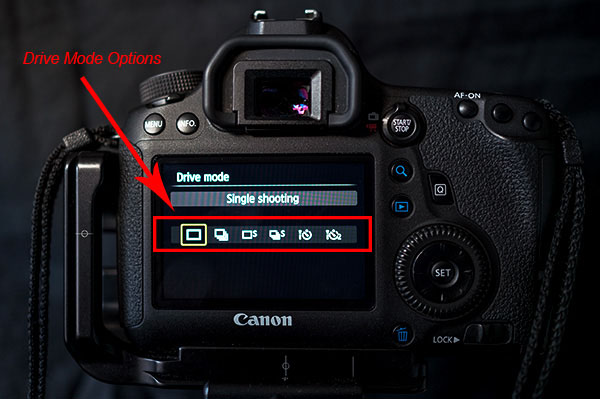
The Q button is particularly useful when you are bracketing exposures for HDR. Press it and highlight the Exposure Compensation/AEB setting. Now spin your settings dial to the right and watch as the light meter changes to three lines in lieu of the typical single line. Set the lines as far apart as you want your bracket to be (i.e. -1, 0, +1 or -2, 0, +2). Last, use the directional pad to highlight the Drive Mode setting. Again scroll to the right until you reach the Self-timer (2 seconds/remote setting). Now, once you fully press the shutter button your camera will wait two seconds and then take all three exposures that you set. It’s as simple as that.

Exposure comp

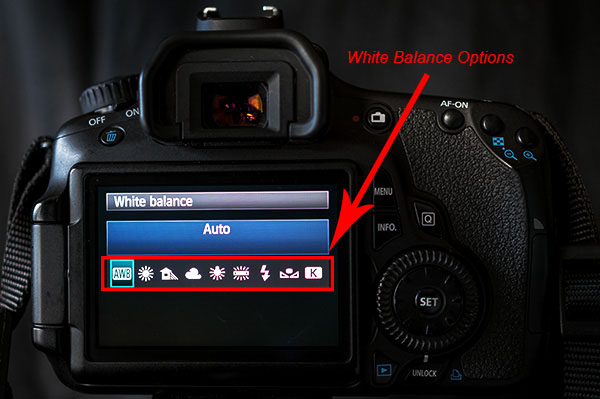
As the light, and your shooting situation, changes your white balance settings need to be adjusted. You typically don’t find a special button for this important setting. Once again the Q button makes your life easy. As you scroll through the options you will see some simple pictures for each WB setting. A sun for sunny, a cloud for cloudy, a lighting bolt for flash, etc. Sometimes it is easier to see what your options are by looking at a picture. If not, Canon still gives you the description of the WB setting.

White Balance

Next up is the Auto Focus Point Selection. This is seriously one of the hardest functions to find on most cameras. Again, made easy by Canon. Press the Q and then use the directional pad to navigate to the AF Point Selection. Spin that dial and watch as the points spiral around to each individual focus point at your will.

Do you switch between shooting action and still subjects often? If so you may find yourself digging through the menu to find your Single and AI Focus options and the Drive Modes. Simply press the Q button and move over to the AF Operation. Roll your dial and you can choose ONE SHOT, AI FOCUS or AI SERVO. Then you can navigate over a couple of settings to the Drive Mode and choose between Single, Continuous Shooting or Timer Mode.

Drive Mode

Some Canon models are equipped with an internal level that is accessible from the Q menu. This is really helpful when you are shooting landscapes on a tripod. When in the menu highlight the Electronic level. Press the set button and a level looking like it belongs in the cockpit of an airplane shows up on the LCD. Tilt your camera from side to side and watch how the level changes. When your camera is horizontally level the line will turn green. This can definitely save you some time and heartache in post-processing when trying to make your horizon lines straight. It takes the guess work out of it for you.

As you can see the Q button is the most powerful and useful button on your camera. Navigating through those complex menus are over. Once you use the secret button you will begin to wonder why any of the other buttons even exist, with the exception of the shutter of course. Go ahead and feel free to start spreading the secret. Have fun!!!

googletag.cmd.push(function() {
all_slots.push( googletag.defineSlot( “/1005424/_dPSv4_mob-all-article-bottom_(300×250)”, [300, 250], “pb-ad-78623” ).addService( googletag.pubads() ) );
} );

googletag.cmd.push(function() {
mobile_slots.push( googletag.defineSlot( “/1005424/_dPSv4_mob-all-article-bottom_(300×250)”, [300, 250], “pb-ad-78158” ).addService( googletag.pubads() ) );
} );

The post The Q Button – What Every Canon DSLR Photographer Needs to Know by Jack Thatcher appeared first on Digital Photography School.


Digital Photography School

 
Comments Off on The Q Button – What Every Canon DSLR Photographer Needs to Know

Posted in Photography


LensRentals.com needs name for massive lens calibration tool

01 Apr

lensrentals.jpg

One of the drawbacks of running a company devoted to renting out photographic equipment is that it’s necessary to evaluate and service equipment just about every time it comes back. That’s why the team at LensRentals.com have just purchased and installed a massive and cumbersome looking lens calibration system. In one of the geekier unboxing articles, they show every step of the assembly of the device. Learn more

News: Digital Photography Review (dpreview.com)

 
Comments Off on LensRentals.com needs name for massive lens calibration tool

Posted in Uncategorized


Stack on Sheets: Minimalist Printer Needs No Paper Tray

30 Aug

[ By WebUrbanist in Gaming & Computing & Technology. ]

stack simple paper printer

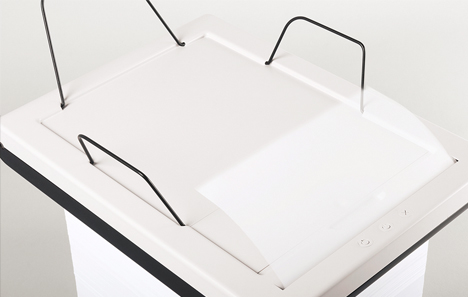
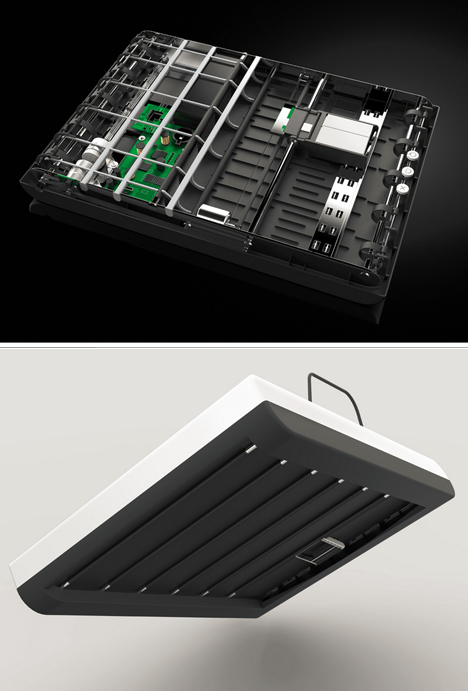
An elegant concept and beautifully executed, this thesis project strips away everything but the essentials from the process of printing, proposing a simple solution to reduce visual clutter in your office.

stack printer design concept

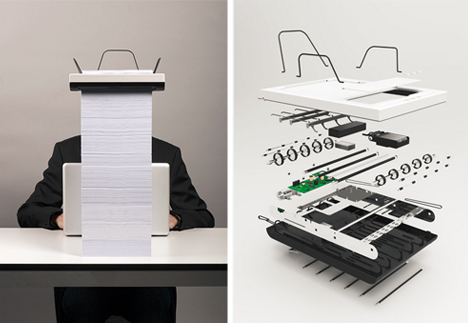
Dubbed Stack, an aptly short title for such a minimal machine, the design represents a thesis solution by Mugi Yamamoto. Aside from its small size and refreshingly spare appearance, its approach also circumvents a classic shortfall of typical printers: the size of the paper tray.

stack minimal printer design

Instead of reloading frequently, you simply set Stack on top of a pile of blank sheets of paper and let it work its own way down, itself a lovely process that also lets you know how far you are through the printing job at hand.

stack printer design details

A few points of concern, though, from a practical standpoint: it is hard to say how well the printer would remain stable as it progresses, or whether shifts in weight along the way would cause jams. It is also not entirely clear whether power cords would pose an problem, or how high the finished paper stack could go before potentially spilling off the sides. Still, as a concept, it is lovely, and at least some of these issues could be corrected by introducing elements like guides that flip down to keep the stack aligned below, or higher supports above to stabilize finished sheets.

Share on Facebook


[ By WebUrbanist in Gaming & Computing & Technology. ]

[ WebUrbanist | Archives | Galleries | Privacy | TOS ]


WebUrbanist

 
Comments Off on Stack on Sheets: Minimalist Printer Needs No Paper Tray

Posted in Creativity


How to Select the Perfect Nikon DSLR for Your Needs

09 Aug

An article by +Sean Ogle

Selecting a new DSLR can be really overwhelming, especially if you’re a first time buyer.

Not only do you have to decide between brands, but then you have to decide between models, lenses, and accessories – all of which can lead to a daunting experience.

That being said, the goal of this post is to help make that decision a little bit easier.
91Ns138GTAL._SL1500_.jpg

Why Nikon?

I’ve been shooting Nikon since I first got into DSLR photography about 5 years ago. When I bought my first camera (a D5000), the decision was a relatively simple one: my dad had some Nikon lenses and I didn’t have much money!

Now a few years later I’m as happy with that decision as ever. Nikon’s consistent lens mount size over the years allows you to use lenses going back to the 70s and 80s on many of Nikon’s newest DSLR bodies – meaning you can get quality used glass, at a relatively inexpensive price.

That’s a conversation for another day, however.

The bottom line is, you’re going to get a great camera with an excellent assortment of lenses with either Nikon or Canon. If you have friends or family members that shoot one or the other, and you’ll be around them often, that’s a good enough reason for me to choose either brand.

But since I shoot Nikon, today’s post is all about how to select the best Nikon camera for you!

Get Past the Hype: Things that Don’t Matter

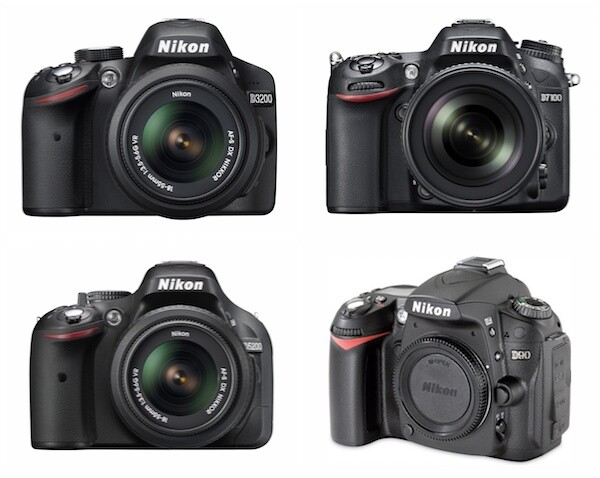
At the time of this writing Nikon has 4 cameras that you may be deciding between: The D3200, D5200, D90 or D7100. These are the most up to date models, and in some cases you may be considering one that’s a generation older in order to save money – we’ll talk about that.

However before we start going into the individual models, I’d rather start out by listing a couple things that you should absolutely stop paying attention to – by doing so, you’ll make your decision a lot easier.

Megapixels

Chances are if you haven’t bought a camera in a while, the very first thing you look at when selecting a camera is the megapixel count.

Stop. Please.

These days any new camera will have more than enough megapixels for what you need. Even one on the lower range that has 10-12 will have enough detail for you to blow up your images to poster size with no major issues, and seriously, how often are you doing that?

It may be nice to have the flexibility, but once you hit 24 megapixels the files sizes are huge. On my D7100, I rarely, if ever, shoot at the highest quality level, simply because it just isn’t practical.

Full Frame Vs. Cropped Frame

New to photography? Then you don’t even look at a full frame sensor. In other words, for a Nikon camera you can immediately stop paying attention to the D600, D800, or D4.

Why?

They’re big. They’re expensive. And unless you’re a professional shooter, they’ll be overkill for what you’re looking for.

So save your money for some new lenses and stop thinking about those altogether.

To help set your mind at ease even more, you should know that Nikon’s cheapest DSLR the D3200 has image quality that in most shooting situations will be close to as good as that on their most expensive camera, the D4. Most of what you’re getting with more expensive cameras is more options, on camera controls, and other things professionals need and you probably don’t.

Video

This may matter for a select few of you, but for most of you, it should be a non-issue.

Bottom line, have you ever actually shot video on a DSLR? Most beginners haven’t. It’s not easy.

The sound is awful, the auto-focus doesn’t work in a usable manner, and it’s nothing like using your phone or a camcorder.

If you want a good camera that does video, check out a pocket camera like the Canon S110 – which shoots excellent video and is easy to use.

If you know what you’re doing and have some extra gear, then a DSLR can be a great way to break into a more professional video setup. But if all you want to do is film your kids, you’d be best looking elsewhere.

Does that all make sense? Great, glad we’ve got that cleared up. Now, let’s get you a camera!

Finding the Best Camera for Your Needs

Rather than regurgitate all the technical specs of each camera for you, I’m going to look at the different type of users of Nikon cameras and then help you find a camera based on what you identify with the most.

Best Photo Quality at the Cheapest Price Possible?

As I mentioned earlier, for most applications, in good light, the quality from an entry level DSLR will rival that of their more expensive counterparts. So if all you really want is good image quality and aren’t wanting to break the bank, then pick up the Nikon D3200.

If you’re really concerned about price, you can probably find refurbished models, or the older D3100 which is still a great camera. If you go with that, you’re sacrificing some build quality from the higher end cameras, and the screen is a much lower resolution than the newer model.

Don’t get the D3000, there was nothing very impressive about it.

NIkon D3200 Krabi, Thailand

NIkon D3200
Krabi, Thailand

Experienced DSLR User Wanting to Upgrade, Without Breaking the Bank?

Let’s face it, price is an issue for most of us. So let’s say you’re ready to move past your D3100 or D5000 you’ve had for a couple years, to something more representative of your experience level. You’ve got a few lenses, but still don’t want to overspend.

Consider a D7000. It’s not the newest camera on the block, but the image quality will be comparable to the D7100, and many of the updates that were made will be negligible to the average user.

I’ve seen body only D7000 going for as low as $ 649, which is almost half the cost of a new D7100.

The D7000 is a big step up in terms of features and build quality from any of the cameras in the 3000 or 5000 line, so don’t shy away from this just because it’s a couple years old.

It’s also worth noting that while it’s 5 years old, the D90 is widely available and is a great camera for the price. It lacks some of the features of the newer D7000 line, but is a great step up from Nikon’s entry level cameras in terms of controls.

Nikon D90 Petra, Jordan

Nikon D90
Petra, Jordan

Beginning HDR Photographer?

You can do HDR with any camera that allows you to set manual controls, however if you’re serious about it, you’re going to want something that has bracketing built in.

This means your camera can automatically take 3 images at varying exposures, usually one at normal exposure, then one underexposed, and finally one over exposed.

You can then use HDR software to create one perfectly exposed image.

The D3200 doesn’t do bracketing, so for the beginning HDR photographer you’ll want to pick up a D5200 or if money is more of a concern a D5100. A few years ago I learned HDR on my D5000 while traveling through Thailand, and it was a great intro camera. It had a menu system that I was used to with a point and shoot, but a customizable function button that let me easily turn on bracketing.

Experienced HDR Photographer?

If you’re a more experienced HDR photographer, then you should just pick up the D7100.

There are a couple key features that make this a better camera for HDR.

First, you can take 5 shot brackets. As you get better at HDR, you’ll learn that 3 brackets often isn’t enough to get the range of light you need. The D7100 makes it easy to add two more shots.

It also shoots at up to 7 frames per second, so if you’re trying to take brackets on the fly and don’t have a tripod – this will get you much better results (although you should still use a tripod).

The plethora of on camera controls and customization abilities suits itself to a more experienced photographer and will make setting up shots much easier.

Worth noting that the D7000 only does 3 exposure brackets, so in this case I think it’s worth checking out the D7100.

Nikon D7100 HDR Sunriver, Oregon

Nikon D7100 HDR
Sunriver, Oregon

Upgrading from Point and Shoot to first DSLR?

If you’ve been using a point and shoot your whole life, upgrading to a DSLR can be a bit of a daunting task. Don’t worry though, it doesn’t have to be!

The great thing about the D3200 for beginners is that it’s very menu based. The camera can do much of what it’s bigger siblings can, but much of it is still in easy to navigate menus – just like in your point and shoot. There’s even a question button that will explain what different features of the camera do if you’re unsure.

If you’re wanting to have a little more control, but still keep the familiarity of a menu based camera, then the D5200 is worth taking a look at. It will definitely give you more room to grow than the D3200.

Nikon D5000 Havana, Cuba

Nikon D5000
Havana, Cuba

Have a Lot of Nikon Lenses from Your Film Days 20+ Years Ago?

For instance my aunt has an old 50mm f/1.2 that I’ve been trying to obtain on “long term loan” for awhile now. This lens wouldn’t have metered on either my old D5000 or D90. With either the D7000 or D7100 however, almost any lens from 1977 or newer will both meter and autofocus.

So if you have a plethora of old lenses, don’t sell them off just yet, you may just need a new camera body.

Want Professional Features, but On a Budget?

Here you have a couple options. You may be tempted to snag a used D300 for less than the price of some of the newer cameras. On the surface this seems like a great idea. You’re getting incredible build quality, more manual features, and a less expensive price – but I’d think twice about doing this.

The D300 is an old camera. Many advancements in camera tech have been made, and you’ll get better photos and many more usable features in a D7100 than one of Nikon’s older cameras.

Stick with the D7100 which is still almost half the price of the cheapest full frame camera the D600 – and they’re essentially the same in terms of features.

Nikon D7100 Sunriver, Oregon

Nikon D7100
Sunriver, Oregon

Looking to Do More Serious Video and Photography?

If you’re really serious about video, I hate to say this, but consider switching to Canon. I’m a Nikon guy through and through, and I also do a lot of video. The video quality on a D7100 or even D5200 is incredible. But there are certain features that become a bit of a deal breaker. Specifically, you can’t change aperture in Live View.

If you’re going to be doing a lot of video with your new camera, this will prove to be a major annoyance. Not to mention there are many more resources out there for Canon DSLR video – believe me, I’ve looked.

The Bottom Line

Nikon makes great cameras, has a huge, supportive community, and there really isn’t a wrong choice. Whatever you decide to buy will take fantastic photos and give you room to hone your skills.

It’s also important to keep in mind that you’ll probably end up buying a new camera body every few years, but it’s the investment in high quality glass that will really help you build out your photography arsenal.

So if you don’t already have a few lenses, consider going one notch lower on the camera and using the extra money to pick up an extra lens or two – your photos will thank you.

+Sean Ogle is an HDR photographer and entrepreneur. He specializes in helping people build small businesses that allow them to do more of the stuff they like to do. He also golfs way more than the average person probably should. DPS readers can grab his book 50 Tips to Improve Your HDR Photography for free here.

Post originally from: Digital Photography Tips.

Check out our more Photography Tips at Photography Tips for Beginners, Portrait Photography Tips and Wedding Photography Tips.

How to Select the Perfect Nikon DSLR for Your Needs


Digital Photography School

 
Comments Off on How to Select the Perfect Nikon DSLR for Your Needs

Posted in Photography


Pinky Dinky Doo – Tyler Dinky Doo’s Sporting News/ Dragon Needs a Sippy Cup

21 Oct

Pinky doesn’t want to be part of the soccer team but still finds a way to fit in. / Pinky invents something to help a dragon stop spilling his drinks.

 
Comments Off on Pinky Dinky Doo – Tyler Dinky Doo’s Sporting News/ Dragon Needs a Sippy Cup

Posted in Animation Videos