RSS
 

Posts Tagged ‘Must’

5 Unforgiving Post-Processing Mistakes Every Bird Photographer Must Avoid

03 Nov

Post-processing is one of the most important steps in the image making process. It is in fact one of the most powerful tools to make your vision come true. The camera does not see the way you see your world and it is your responsibility to translate your vision into reality in post-processing.
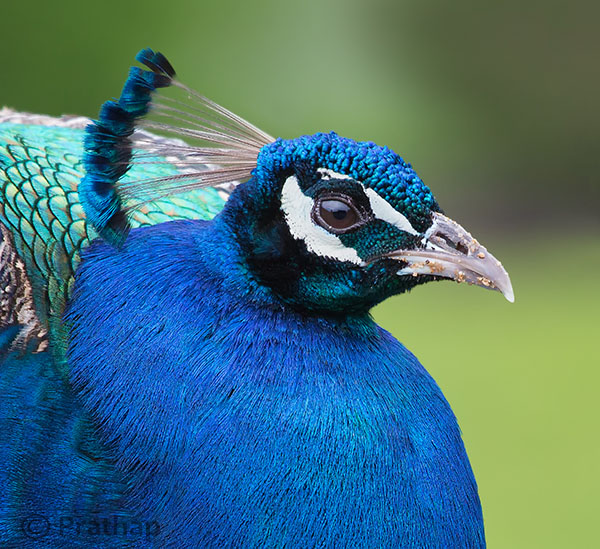
0 Nature Photography Simplified Bird Photography Post Processing Tips Peacock Portrait Featured Image

You can achieve most artistic results in post-processing that are simply not possible in reality. But, being a bird photographer you do not often get a chance to post-process your bird photographs artistically. Why?

Since the viewer would have seen the bird in reality, it is easier to compare to what is presented in a photograph. Bird photography is generally about showing the bird and its natural beauty not enhancing it artistically to achieve something else!
It is very similar to taking photograph of a person. Do you want to show the person as they are, or do you want to make them look someone else?

Does this mean, you have to just keep it real?

Not necessarily. But any enhancement in post-processing to make a bird or its features look beautiful has to be done with lot more care than if it was a landscape photograph for instance.

Remember that the mistakes will be caught easily!

Below I am listing the five post-processing mistakes that you, as a bird photographer, should avoid because they are unforgiving.
Committing any of these mistakes may ruin your bird photograph, and you definitely do not want to ruin your hours and days of effort in getting that one photograph you love. Do you?

Mistake #1: It’s cropped too tight

There is an ongoing debate about whether to crop or to get everything perfect in field. Though it is desirable to compose in the field, cropping in the post becomes necessary many a times in bird photography because of several factors like:

  • Not enough time to compose the fast action that unfolds in split seconds
  • Not enough focal length to fill the frame
  • Not enough time to compose an image especially in case of birds in flight

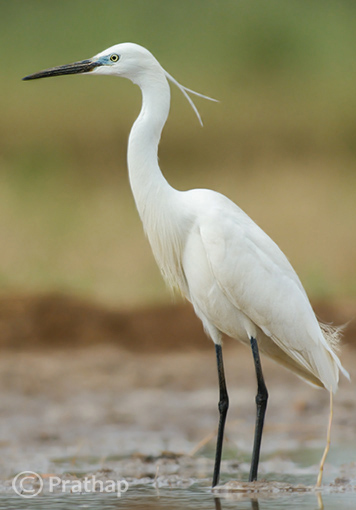
If you can improve the composition, then go ahead and crop the image. But too often, I see lot of bird photographers crop it too tight which makes the bird suffocate in the frame and the image look cramped.
1-Nature-Photography-Simplified-Bird-Photography-Post-Processing-Tips-Too-Tight-Crop

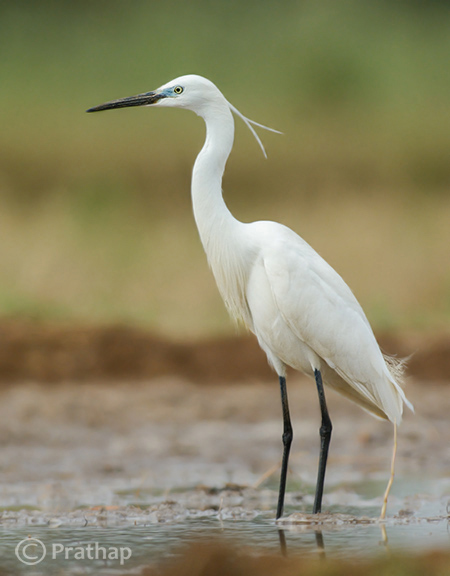
The little Egret in this photograph looks suffocated because there is no breathing space in front to look into, and no space to move which makes it look cramped.

2-Nature-Photography-Simplified-Bird-Photography-Post-Processing-Tips-Little-Egret

Notice how a little bit more space around the bird gives him room to look into and move. It is more pleasing to our eyes also.

Quick Tip: Use the Rule of Thirds as a guideline.

Mistake #2: It’s unrealistic

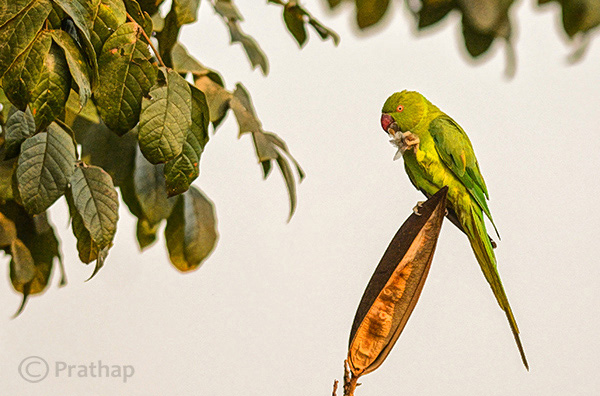
The clarity slider in Adobe Lightroom is such a lethal weapon that is hard to replicate even with Adobe Photoshop. It enhances the local contrast in an image, which is one of the most important aspects of processing. Too much local contrast makes an image looks unrealistic as it tends to sharpen.

The soft and smooth feeling of the smallest details in feathers of the bird starts to look very unrealistic.
3 Nature Photography Simplified Bird Photography Post Processing Tips High Local Contrast

Notice how unrealistic the Parakeet looks in the above image. Even the leaves look like plastic.
4 Nature Photography Simplified Bird Photography Post Processing Tips Rose Ringed Parakeet Female

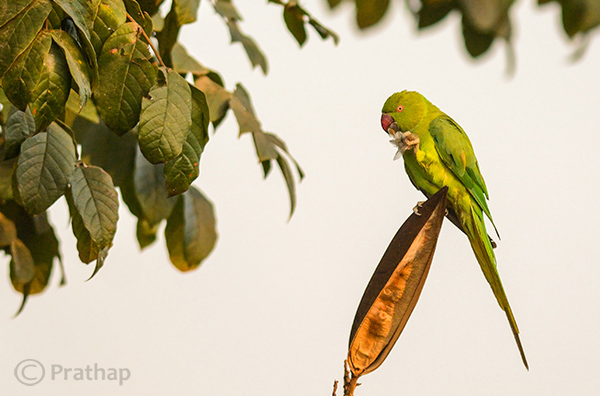
Just enough local contrast (usually Clarity of +20 to +30) will bring out all the details in the bird.

Quick Tip: Instead of using your mouse to pull the Clarity slider, use keyboard arrows and watch the changes as you bump up the clarity. Restrict to the smaller numbers like +10 to +30.

Mistake #3: Everything is overly colorful

Over-saturated images are everywhere!

Birds are definitely colorful subjects and that is the reason we are all attracted to them. But are they so colorful?
Too much saturation looks overcooked. If you try to increase the contrast as a last step in your post-processing workflow (which is usually recommended), then it will also increase the saturation.

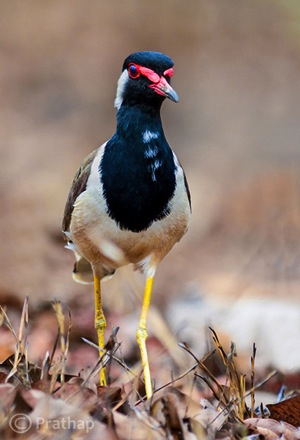
Note that Saturation slider increases the overall saturation of the image making everything in the image colorful. Do you really want everything in the image looking colorful? Do you want to emphasize the bird or the background?
5 Nature Photography Simplified Bird Photography Post Processing Tips Over Saturated

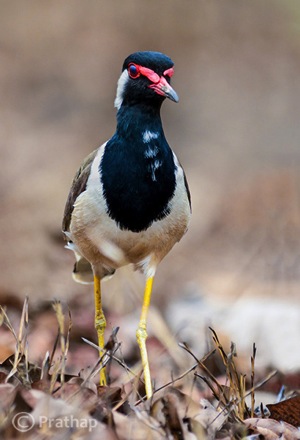
Everything in the above photograph of a Red-Wattled Lapwing is colorful. It is way too colorful.

6 Nature Photography Simplified Bird Photography Post Processing Tips Red Wattled Lapwing

In the above photograph I have selectively increased the Saturation only for the bird in Adobe Photoshop.

Quick Tip: Use selective coloring. Saturate only the colors or object that are very important. Use the HSL panel or the adjustment brush to apply the color.

Mistake #4: The bird looks like a wax statue

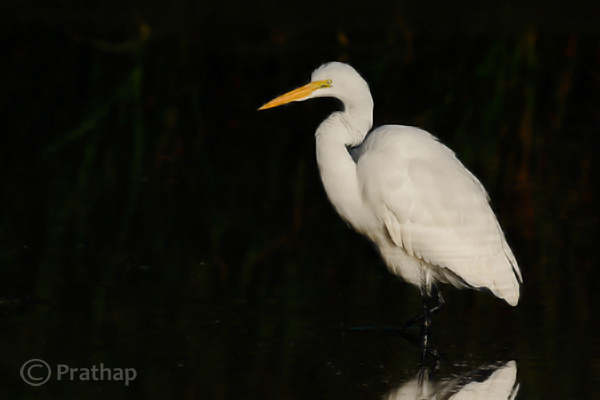
Have you seen a wax statue of a bird in a shop? You can also see them on the web. Excessive noise reduction will give a plastic or wax statue look to your bird photographs.

While it is important to reduce the noise because most often we have to bump up the ISO to 400 or 800 to freeze the action, it is also important to understand what the Noise Reduction filter does. It The smoothes out the edges, by smoothening out the minute and important details of the image and the bird.
7 Nature Photography Simplified Bird Photography Post Processing Tips Waxing

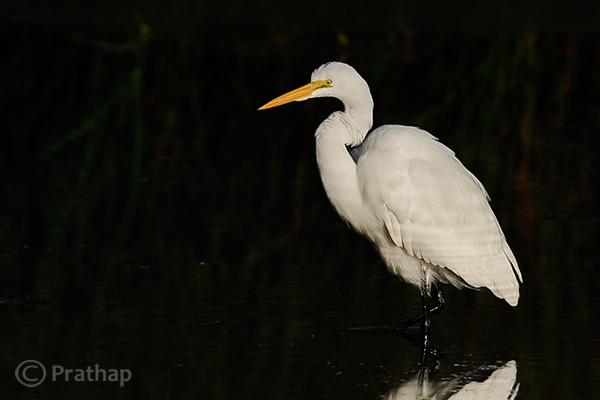
The above image of a Great Egret has a waxy look because of the excessive noise reduction applied to the entire image. Remember that the water looses texture due to excessive noise reduction giving it an artificial look.
8 Nature Photography Simplified Bird Photography Post Processing Tips Great Egret

By reducing the noise only in the out-of-focus or low detailed or shadow regions of the image, it will help to keep the details intact.

Quick Tip: Reduce the noise only in the smooth areas (like the background) since noise is generally not visible in the high detailed areas (like the bird’s body).

Mistake #5: Too much is bad

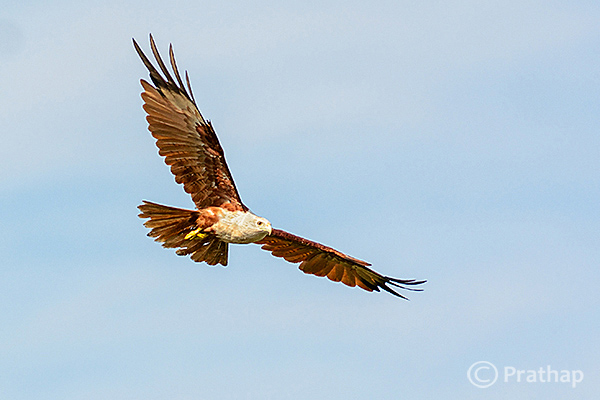
Too much is bad in anything that we do. Pushing any post-processing slider too far will yield a bad image. But the most important one that is noticeable with many bird photographs, is that it is over-sharpened. No matter how good your post processing skills are, if you make this one mistake, there is no way out.

Over-sharpening kills a photograph. Period.

It is better to keep it little less sharp than to go too far and be overly sharp.
9 Nature Photography Simplified Bird Photography Post Processing Tips Over Sharpened

The features of the Brahminy Kite are way sharper than what they should be. Also check out the halo around the bird formed due to sharpening on the overall image.
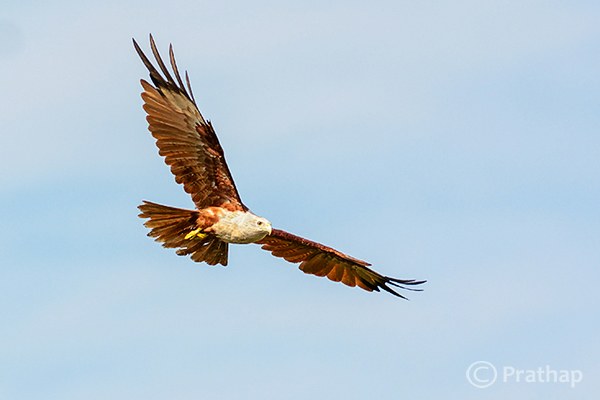
10 Nature Photography Simplified Bird Photography Post Processing Tips Brahminy Kite In Flight

Quick Tip: Apply sharpening only to the bird but not to the background.

Final words

These are some of the major mistakes that should be avoided. Because they are unforgiving and can potentially ruin your best photographs. The best way to avoid these mistakes is to keep a small checklist to see if you have committed any and correct them immediately. With practice, you will easily avoid all of them.

Now, it’s your time to tell me the mistakes that you think should be avoided. What mistakes have you made in post-processing? Feel free to add your opinion on this subject but please make sure it is productive and helpful to all our readers.

The post 5 Unforgiving Post-Processing Mistakes Every Bird Photographer Must Avoid by Prathap DK appeared first on Digital Photography School.

Digital Photography School

 
Comments Off on 5 Unforgiving Post-Processing Mistakes Every Bird Photographer Must Avoid

Posted in Photography


Hit the Road! Must Have Photo Accessories

03 Sep

On a cross country road trip, selfies just won’t cut it. Is that the Lincoln Memorial or Lady Liberty behind you?

So, we’ve packed our shop with camccessories to take on your next trip: a comfy strap, our favorite tripod ever and a bright ring light.

Three Essentials for Travel Photography

(…)
Read the rest of Hit the Road! Must Have Photo Accessories (124 words)


© Britta for Photojojo, 2014. |
Permalink |
No comment |
Add to
del.icio.us

Post tags:


Photojojo

 
Comments Off on Hit the Road! Must Have Photo Accessories

Posted in Equipment


20 More Photography Tips Every Travel Photographer Must Know

21 Aug

Pick up Oded’s new SnapnGuide (a dPS sister company) Snapn Travel here for only $ 7, a lifetime of travel memories in a snap. Traveling is fun and rewarding, but sharing memories of your journeys with friends, family, and the world through your own beautiful images can be even better.

Traveltips Georgia 2

Georgia (the country)

Here are 20 more tips for great travel photography:

(You can read Part One 20 Photography Tips Every Travel Photographer Must Know here)

Before you go:

1. Make the visual decisions

For most of us, deciding where and when to go is based on many decisions, not necessarily related to photography. But there are some small decisions you can make to turn an ordinary trip into a photo-worthy one. For example, let’s say you are going on a business trip. You can squeeze a few hours of photographing between meetings. But a much better option would be to take a day or two off and spend this extra time photographing on location.

Or when planning your next family vacation, add a little visual research before the trip. Is there a nice festival or a market worth visiting at your destination? Is there something unique like an interesting ethnic group or unusual landscape that’s worth documenting? These small visual decisions can make a huge difference in your photographic experience during your trip.

2. Build a shot list

A “shot list” is a term from the movie industry. It’s a list of shots that are planned for a specific day. Want to come back home with better travel photography results? Then the shot list is your tool for the job.

Traveltips thailand 2

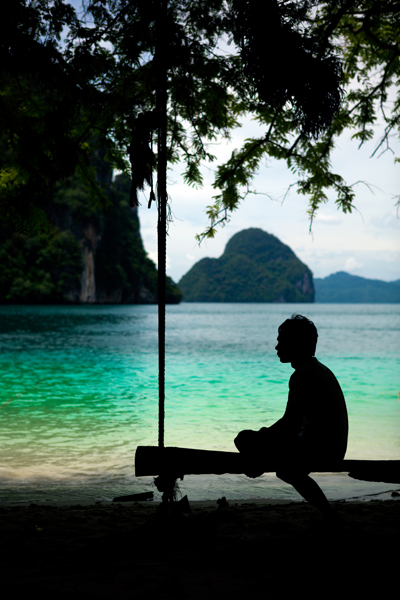
Thailand

First, make a list of visual ideas as your “I won’t come home without” image list. Combine the iconic images with more creative ideas. For example, if you’re going to Paris, don’t skip the Eiffel tower. As a true symbol of Paris, it should be on your list. But make sure to add creative visual ideas, such as boutique wine shops, farmers markets, or anything to your liking. The shot list is there to help you, not restrict you. When you’re on the road, with so many new sights and smells competing for your attention, the shot list will keep you organized and be a continual inspiration for creating the next shot.

3. Smart gear choice

Don’t take all of your equipment with you! Match the gear to the destination. Do you really need that flash on the beaches of Thailand? Or that 50 mm prime lens for the safari trip to Tanzania? Choose wisely and you’ll worry (and carry) a lot less.

4. Photo boot camp

If you’re not making images on a daily basis, it will probably take you a few days on location just to “get in shape”. Get a jump-start by warming up at home by creating a daily photography routine at least one week before departure. This will make sure you’re at your best as soon as you step off the plane.

Traveltips thailand 1

Thailand

5. Coordinate expectations

Apart from our photographer’s “hat”, we all wear other hats, such as “father,” “spouse,” or “friend”. When traveling with others, we must wear many other “hats”. You must coordinate expectations with your travel partners to make sure the importance you’re placing on your photography during the trip won’t cause problems. Think and plan together about places you all can visit that would be great for even those who don’t take pictures: vantage points with scenic views, colorful markets, religious centers, etc.

When you get there

6. Location scouting

This is another movie industry term. It means that before even taking out your camera, it is wise to get familiar with your surroundings. Take at least a few hours to learn the area. Understand if there are any interesting places around your hotel, visit one or two places that are on your shot list and adjust it accordingly.

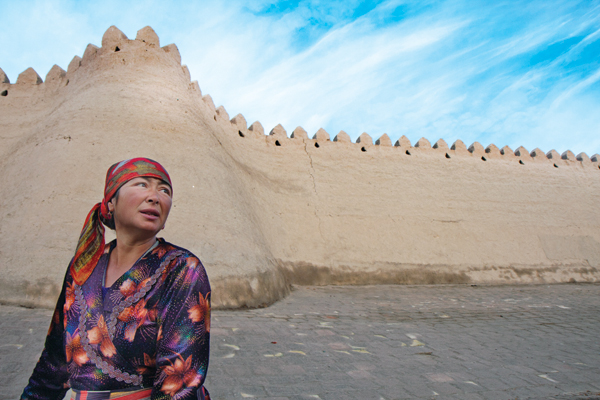
Traveltips Uzbekistan

Uzbekistan

7. Get up early

Yes I know, this one is a crazy ratings downgrade. But hey, travel photography is not for the lazy! The most precious thing on a trip is your time. Do not waste the hours of golden light of morning (or afternoon) on sleeping. Especially if you are traveling with non-photographers, it’s your time to do your best shots. You can save sleeping in for weekends at home.

8. Markets first!

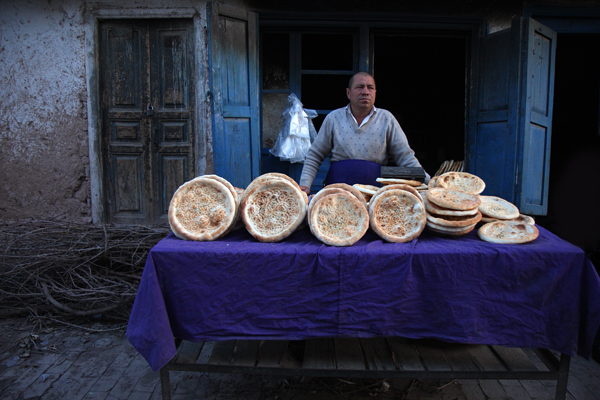
Colors, food, local people, culture; markets are a photographer’s paradise. It’s always better to visit open markets (for the daylight) rather than covered ones. Some of the best markets I visited happen only once a week, be sure to be there.

Traveltips china

China

9. Diversify your shoots

You took a landscape photo with a wide lens? Excellent, now do it again with a telephoto lens.

You’ve got the main square in daylight? Wonderful! Come back at night with a tripod and shoot long exposures. Make the most out of your once-in-a-lifetime trip as your diversify your shoots and portfolio.

10. Get out of your comfort zone

We all have places that are less comfortable for us, but visiting a new place is an excellent opportunity to get out of your comfort zone. Do you not have the courage to approach strangers in the street in order to take their portrait? This is an excellent opportunity. You might be surprise how easy and fun it is to do this with strangers.

Traveltips thailand 3

Thaliand

11. Go iconic – but from a different point of view

We all know how Times Square, The Taj Mahal, and the Eiffel tower look. Don’t come back with the same, “we’ve seen it all before” images. You don’t have to skip those iconic places, they usually are truly worth the visit. But think of new and fresh ways to feature them. Try using a fish-eye lens, creative editing process, or reflections – the sky is the limit.

Traveltips Uzbekistan 2

Uzbekistan

12. Get inspired!

When I’m on a photography assignment, I always try to pay a short visit to a local gallery. Yeah, it sounds bit snobbish, but seeing the photography, paintings, or any other local art forms acts as a huge inspiration for my travel photography. We all want to create different and unique images. This is great way to do just that.

13. Setting a trap

I love this technique. Instead of jumping from place to place, looking for interesting subjects to photograph, I suggest to stay put and start building your frame with the background. Find an interesting vantage point on the street. You can even do this sitting at a sidewalk café. Establish your frame by determining the composition and exposure setting. Then wait for something interesting to enter your frame.

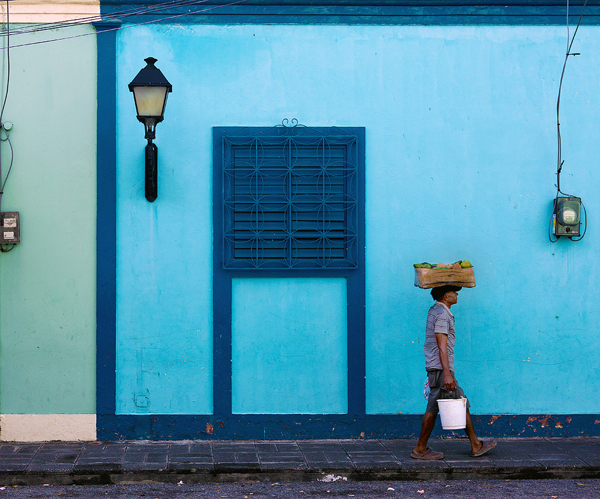
Traveltips Dominican Republic 4

Dominican Republic

14. Join forces with a local

From experience, in travel photography, there is nothing like working with a local photographer. Use a social platform (Facebook, Flickr, couchsurfing) and find a local photo enthusiast like yourself, who can show you all the best places to photograph. Of course, there are always risks when meeting strangers from the internet. Use your common sense and don’t meet them somewhere secluded at first.

Coming back home

15. Backup

I cannot stress how important this tip is. Don’t wait until it’s too late. Laptop, hard drive, cloud storage, you name it. Backup your images on more than one source.

16. Clean your gear

Before you store your stuff, you should clean it. Sea salt, sand, or even just fingerprints on the lens, can damage your gear. Keep your equipment in good shape and you will enjoy it for many years.

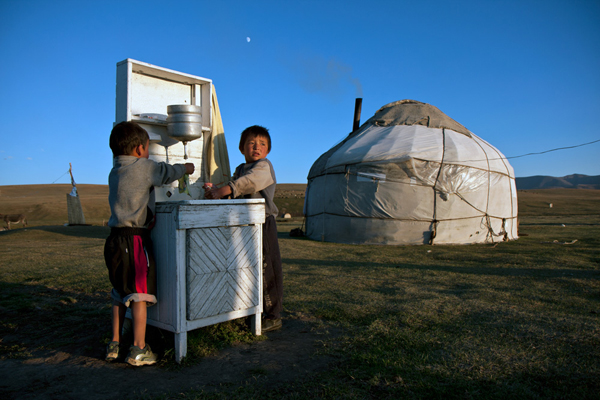
Traveltips Kyrgyzstan 3

Kyrgyzstan

17. Have a successes and misses notebook

In the past, I was recording a notebook of all my “almost got it” frames. Those fuzzy, overly bright, and “what the heck is this thing in the background” images.

I kept this notebook in order to learn how to not repeat my mistakes (and because we photographers like to be angry at ourselves from time to time). Then, I realized that it is just as important to understand why I failed as it is to understand why I succeeded. So, even today, after every assignment, I write ten things to keep and ten things to work on until the next trip.

18. Rest from it

I know it’s tempting, but resist the urge to filter, edit, and post-process your images the minute you get home. Give yourself at least a week before you do so. We tend to emotionally connect to our images, usually by the degree of investment and hard work we put into creating them. Give yourself time to disengage yourself from the experiences of your journey. This will help you see your images with less bias.

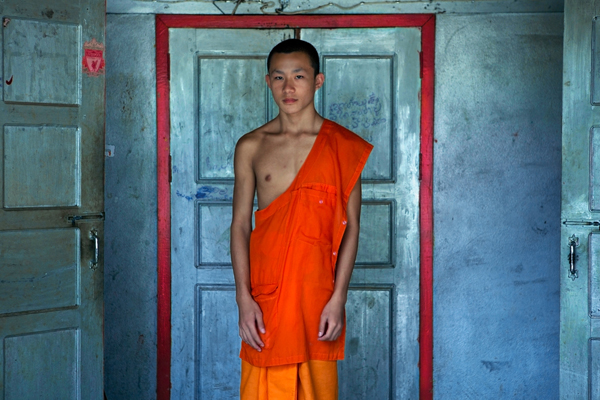
Traveltips laos 2

Laos

19. Get feedback

After learning from your successes and mistakes by yourself, use the help of someone else. Choose a friend, (preferably one with tact) and get his/her opinion on the images. It doesn’t matter if they’re a photographer or not. They should be honest, sincere and non-competitive with you.

20. Get it out to the world

Now, after resting from it, seeing it again with a new perspective, and hearing someone else’s advice, it’s time to get your art out to the world.

Choose up to 15 photos (not more). It is important to pay careful attention to the opening and closing images. Each image must stand on its own and together as a set. Add some text and post it to the world.

Note: the author would like to thank Nicholas Orloff for his help in writing this article.

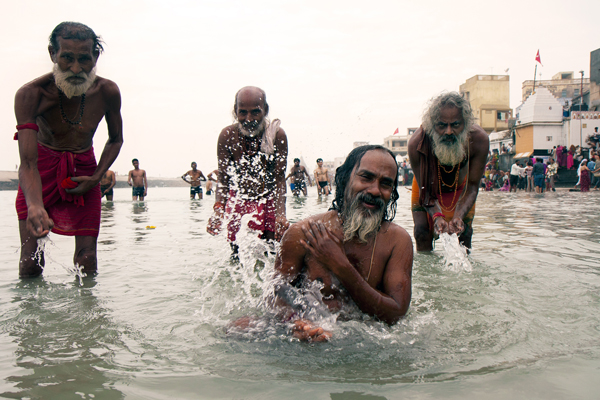
Traveltips India

India

The post 20 More Photography Tips Every Travel Photographer Must Know by Oded Wagenstein appeared first on Digital Photography School.

Digital Photography School

 
Comments Off on 20 More Photography Tips Every Travel Photographer Must Know

Posted in Photography


Top 10 Blogs Wedding Photographers Must Follow in 2014

13 Jun

There are a lot of wedding photographers, or just amateurs who shoot weddings, but there are also many who would like to brush up their photography skills. Along with skills and photography level, that would be awesome if a photographer may give some tips their clients on floral arrangements, invitation designs, wedding dress ideas, wedding color palettes, poses, and more. Continue Reading

The post Top 10 Blogs Wedding Photographers Must Follow in 2014 appeared first on Photodoto.


Photodoto

 
Comments Off on Top 10 Blogs Wedding Photographers Must Follow in 2014

Posted in Photography


Why You MUST Have a Polarizer

14 Jan

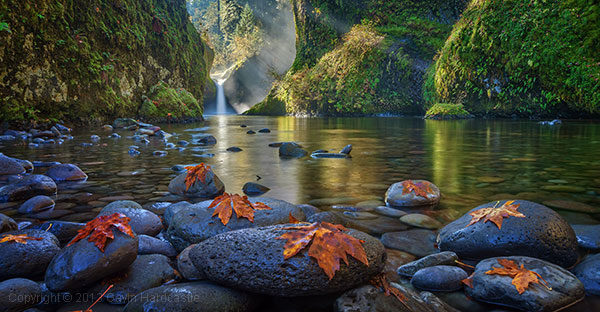
Gavin hardcastle polarizer featured

Ever wondered how professional photographers achieve such lush, vibrant colours and that magical “atmosphere” in their images? BAM – they use a polarizing filter or “polarizer”! I could never have achieved the shot above without a polarizer.

hoya-polarizer.jpgWho would have thought that just one slice of wafer thin glass slapped on the front of your lens could transform your photographs from “meh” to “woah” with just a quick turn of the hand?

You MUST Have a Polarizer!

As a landscape photographer I won’t go anywhere without at least a couple of polarizers in my bag of goodies. My wife loves them too because she never has to ask me what I want for Christmas, the answer is always “a polarizer please”.

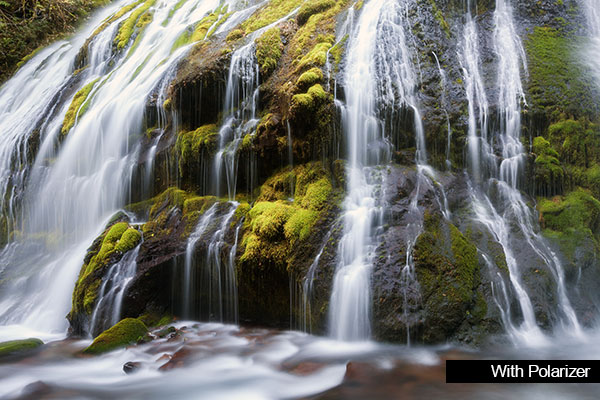
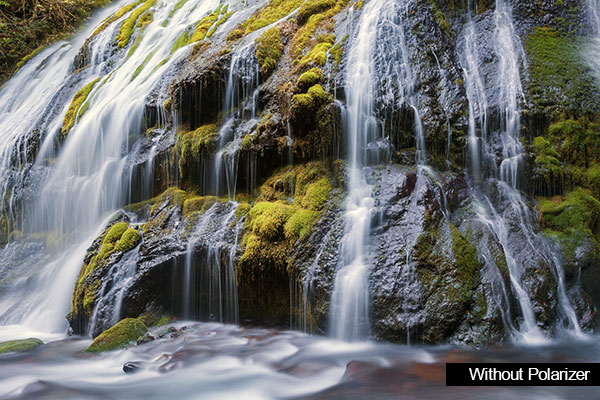
Can you spot the difference between the two shots below?

Gavin hardcastle with polarizer

Gavin hardcastle without polarizer

The effect is pretty dramatic in terms of how the polarizer removes all of the white glare from the wet rocks. It also allowed for a longer exposure so that I could capture more movement in the water.

So what does a polarizer do?

In a nutshell, your polarizer allows you to control the reflected light that you didn’t even realize is messing up your shot. It’s like putting a pair of shades on your camera (or monacle I guess). Here are just a few reasons you’ll love a polarizer:

  1. Allows you to see through shallow water by excluding light reflecting from the surface.
  2. Gives you deeply saturated colours by excluding reflected light, for example, wet rocks or leaves.
  3. Allows you to control which light reflections you want to keep. Lets say you’re shooting a shiny surface like a wet car, a polarizer will allow you to change the angles of the reflected light on the curves of the bodywork. See video below.
  4. Brings back definition to blown out clouds that may appear too bright without your polarizer.
  5. Allows you to use slower shutter speeds for milky water shots. You’ll never shoot another waterfall without one.
  6. Allows you to shoot through glass that would otherwise show obscuring reflections.
  7. It protects your lens from impact and the elements. It’s easier to replace a $ 100 filter than a $ 2000 lens.

Video of a polarizer in action to manipulate the reflections on paintwork.

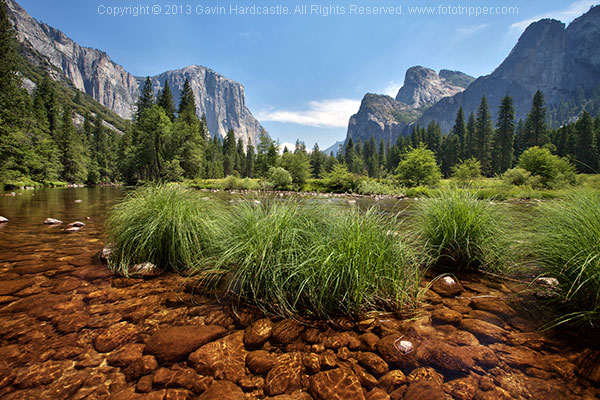
Here’s another example of the way a polarizer allows us to see right through shallow water.

Gavin hardcastle polarizer yosemite

When NOT to use a polarizer

A polarizer reduces the amount of light that enters your lens. If you need to shoot fast, like in a dark canyon or a night time rock concert, ditch the polarizer. Low light situations won’t benefit from a polarizer because you’ll need all the light you can get for fast shooting.

If you want reflections, like in a lake scene, use a circular polarizer so that you can take a shot WITH the polarizer engaged and another shot WITHOUT the polarizer engaged. That way you can decide which you like best during editing and maybe blend the two for the ideal look.

Like to shoot rainbows? Ditch the polarizer or the rainbow will be invisible, it’s reflected light remember.

Which brand to choose

In all honesty I’ve used them all and I can’t recommend one brand over the other. Your challenge is to find one that fits the diameter of your lens. Try finding an 82mm at short notice and you’ll know my pain. Shop online for the best deals.

Invest in the most effective camera accessory money can buy, treat yourself to a polarizer then go create some awesome images.

What’s your recommendation for an absolute “MUST HAVE” in the camera bag?


Here are a few filters to check out:

  • B+W 77mm Kaesemann Circular Polarizer with Multi-Resistant Coating
  • Hoya PRO1 Digital CIRCULAR PL – Filter – circular polarizer – 67 mm
  • Hoya 58mm HRT Circular PL Polarizer Multi-Coated Glass Filter
  • Tiffen 72mm Circular Polarizer

Further reading on using filters:

  • Polarizing and Neutral Density Filters: Essentials for Landscape Photography
  • Getting It Right In Camera: Using Filters To Accurately Capture the Scene
  • ND Filters: Everything You Need to Know
  • Neutral Density Filters
  • Introduction to Filters for DSLRs

The post Why You MUST Have a Polarizer by Gavin Hardcastle appeared first on Digital Photography School.

Digital Photography School

 
Comments Off on Why You MUST Have a Polarizer

Posted in Photography


23 July, 2013 – A Must Have APP For Every Photographer

23 Jul

Every now and then a new app is published that gets our attention. Photopills is just that kind of app. This is not just another app where you can add effects and retouch your photo. This app is a tool that does a lot and does it well. Imagine taking your iPhone out and aiming it at a location and seeing where the sun and moon will be as well as what time they will be in certain positions in the sky. Our Article and Review A Pill To Get Hooked On will introduce you to such an app.

Don’t forget our 2015 Antarctica By Air workshops. This is the finest Antarctica Expedition for photographers and their spouses (and children 18 years and over). Fly over the turbulent Drake Passgae by jet, instead of 2 days by sea. Join an all star cast of 7 of the world’s leading photographic instructors. You’ll return from this trip with some amazing images.


The Luminous Landscape – What’s New

 
Comments Off on 23 July, 2013 – A Must Have APP For Every Photographer

Posted in News


20 Photography Tips Every Travel Photographer Must Know

17 May

1

1. Get up Early

The best light to capture most kinds of subjects is in the golden hours- one hour after sunrise and one hour before sunset (depend off course on where you are on the glove). So get up early to get that amazing photo opportunities, while all the other tourists are still asleep.

2. Do your research

Don’t leave it to chance and learn as much as you can about the place you are about to travel. The more you know, the more “intelligent” your images will be.

2

3. Learn your Craft

Don’t waste your expensive traveling time on learning how to operate that new camera, lens or flash. Do your homework at home.

4. Choice the Right Lodging

Staying on the center of town, or having a room with wonderful views can create a lot of great photo opportunities.

3

5. Say Hello

Learn how to say “Hello” in the local Language, and greet the locals when taking their photo.

6. Get Inspired

Watch the portfolio of other photographers in order to get new ideas and get inspiration. You can read the interview I did with Steve McCurry, the photographer of the “Afghan girl”, to get few great tips for a true master.Also, If you perceive yourself as an artist, you must acknowledge the work of other artists. Do not underestimate inspiration: visit art galleries, attend some photography lectures, listen to classical music, read good books.

4

7. Feel the Place

Photography is not only about visual inspiration. Try the local food, smell local markets and hear local music, this will help you to better understand the story of the place.

8. Find a Fixer

Talk to locals and seek their advice on great photo opportunities in their own country.

5

9. Travel Light

Don’t take your entire house with you. When I travel I take with me only two lenses: One zoom and one prime lens. This is extremely important tip if you plan to do some hiking or trekking.

10. Get off the Beaten Path

Yes I know that in Cuba they smoke cigars and that in Thailand they have monks. Tell your viewers something fresh and new. Share your own point of view of the place. You will be able to do so, only after following tip number 2 and 6.

6

11. Don’t try to get it all in once

Don’t try to see everything on your limited time. It is much smarter to get a better understanding about each place you visit on your journey. Slow things down, and your images will get better.

12. Travel Slow

If time allows you, always choice to travel by train or bus over flying. As it will allow you to have better Interactions with the locals.

7

13. Leave the Camera Behind Sometimes

Don’t spend your entire trip looking through the lens. Enjoy your time just traveling and enjoying the ride.

14. Keep it Natural

One of the most important and influential photographers of all time, Henri Cartier Bresson- Never ever used flash in his photography. A practice he saw as “impolite…like going to a concert with a pistol in your hand.” Try to learn how to use and enjoy the benefits of natural light before you buy that expensive flash or reflector.

15. Get Higher

Every good travel photo series must have at list is one bird’s eye view of the place (Being referred sometimes as the “establish shot”). Find yourself a vintage point overlooking the entire city or town.

8

16. Stop with the Excuses

“Well, if I had an expensive camera and lenses like you have” or “If someone would pay me to travel”, or “but, you have so much time on each destination”.

All of those, are excuses I often hear from my travel photography students. Excuses they tell themselves to answer the question of “Why cant I get Strong images?”
So, A. My first newspaper published cover image, was taken using a pocket camera.
yes, equipment is important and it certainly makes life easier. But don’t forget the camera is just an instrument. A “pipe” which captures your vision and thoughts. Do not cry over the equipment you don’t own. spend the time and money to learn photography, reading books about it and travel as much as you can.

And B. For my first 8 journeys, no one paid me anything. I worked very-very hard at my day job for a whole year, and then I spend my money on traveling. I slept in some shitty places got bus rides from hell. This lifestyle requires commitment. And today, even as I get paid for traveling somtimes. The lengths are usually one to two weeks per assignment. Two weeks to come back with an amazing results. Not excuses like “but it was raining and I was sick” are accepted.

So, stop the excuses, and get back to work.

17. Find Yourself a Master

: the best way to learn (anything) is by watching a master working on his craft. Try to find a photographer which you can accompany as his assistant. It is true that most travel photographers like to travel alone. But it doesn’t have to be a travel photographer. Most of my knowledge about using light, I learned from a great fashion photographer, which I served him as an assistant for a while.

18. Stop Using Excuses

“Well, if I had the time \ money to travel the world or if I had the money to buy that new camera \ new lens … I’d probably be an excellent photographer”. Excuses are just our way to explain ourselves why our photography doesn’t get any better. No matter where you live in the world: New York, the Middle East or a small village in France. Try to see the beauty of the place you live in. if you will find the beauty of that place and bring within your images, people will follow.

9

19. Don’t stop Traveling

A good travel photographer must keep is portfolio alive. Keep on traveling, and as the last tip mentioned: you don’t have to travel to far and exotic places to do so. As it is very easy to travel to India and get “good” travel photography. Try to bring the beauty of your own local town. Travel to the nearest market or attend the next festival as a way to keep your craft improving.

20. Be Human

Treat your subject as well as you can. Don’t shoot people for a far distance, don’t shot people who don’t want to get snapped. If you promise to send their photos, please do so. This will ensure that the photographer that will come after you will be received with a smile. And don’t forget, sometimes it is best to just leave the camera behind and enjoy the ride.

Oded Wagenstein is a Travel photographer and writer. He is a regular contributor to the National Geographic Traveler magazine (Israeli Edition) and his images have appeared in many national and international publications and websites.
He is known for his intimate culture portraits. In his works he put the emphasis on understanding the culture and achieving good relationship with the person being photographed pre-shooting.

You can join his Travel photography group on Travel photography group on Facebook and continue to discuss on travel and people photography.

Post originally from: Digital Photography Tips.

Check out our more Photography Tips at Photography Tips for Beginners, Portrait Photography Tips and Wedding Photography Tips.

20 Photography Tips Every Travel Photographer Must Know


Digital Photography School

 
Comments Off on 20 Photography Tips Every Travel Photographer Must Know

Posted in Photography


The Photographic 100: One Hundred Places You Must Shoot Before You Die

06 May

They say that imitation is the sincerest form of flattery. And that is true of our subject today, a list to end all lists, and what I like to call the Photographic 100. Admittedly, I’m a bit of a foodie, and regularly read a few coffee and food blogs to get my fill of the subject. Recently, a post by Continue Reading

The post The Photographic 100: One Hundred Places You Must Shoot Before You Die appeared first on Photodoto.


Photodoto

 
Comments Off on The Photographic 100: One Hundred Places You Must Shoot Before You Die

Posted in Photography


Kodak z990 Best HD Gadget review opening.A must own Camera

26 Jan

I have 10 other cameras,This tops ALL ….. A MUST HAVE !
Video Rating: 5 / 5


What is HDR and Aperture and Stuff? 30 Photo Terms You Must Know Letter-Perfect

29 Nov

Falling in love with photography is easy. Being scared away by the highbrow photo terms is even easier. Crop-factor, aperture, depth of field… What the heck?! Come on, it is not that complicated, you just need a minute to settle it all down, step by step. Here’s a rundown in plain English of the most common terms you’ll hear or Continue Reading

The post What is HDR and Aperture and Stuff? 30 Photo Terms You Must Know Letter-Perfect appeared first on Photodoto.


Photodoto

 
Comments Off on What is HDR and Aperture and Stuff? 30 Photo Terms You Must Know Letter-Perfect

Posted in Photography