RSS
 

Posts Tagged ‘Move’

Japan offers $2.2B to help domestic companies move production from China, but will it help the imaging industry?

14 Apr
Fujifilm X-Pro2 cameras being moved along the production process inside Fujifilm’s Sendai, Japan factory.

Last week, South China Morning Post (SCMP) reported that Japan is planning to set aside $ 2.2 billion of its $ 993 billion emergency COVID-19 stimulus package to help Japanese companies move production out of China, a move with potential ramifications for numerous Japanese camera and lens manufacturers.

According to the report, the $ 2.2 billion would be split into two different funds. Roughly $ 2 billion will go towards assisting Japanese companies move operations back to Japan, while the remaining $ 200M will help companies move production into other countries, in what is likely an effort to help diversify supply chains that aren’t domestic.

Rather than purely speculating on the matters, we decided to contact executives at a few Japanese camera and lens manufacturers to find out what their thoughts are on this facet of the emergency stimulus package.

General Manager of Fujifilm’s Optical Device and Electronic Imaging Products Division, Toshihisa Iida, had the following to say when asked about the SCMP article and its potential impact on Fujifilm’s operations:

‘Manufacturing in China has changed a lot over the years. It faces many challenges such as parts and labor availability, increase in overall cost, [the] US-China trade issue, and most recently, COVID-19. We still depend heavily on China to source electronic and mechanical components, but we started sourcing from alternative vendors from outside China as well.

[Business continuity planning] is always a very important agenda in our business strategy. We learned from disasters such as earthquakes and floods in the past, and keep our eyes open to prepare for any situations to secure the supply chain. COVID-19 is no exception.’

As for its current production operations, Mr. Iida says ‘Fujifilm already owns factories outside China (e.g. Japan and the Philippines)’ and has also subcontracted factories. ‘Production quality in all of the factories [is] being monitored to achieve the same standard,’ he says. ‘We look at all the important elements for production, such as capacity, cost, lead time, and [allocation of] the products to the aforementioned factories in order to deliver the products efficiently.’

Here, finished X-Pro2 bodies manufactured inside its Sendai, Japan factory await final checks before being boxed up for shipping.

Despite the Japanese government’s record stimulus package, Mr. Iida remains unsure of its impact on Fujifilm’s production, saying ‘It’s too early to say whether we will move our production from China, and if we do, how much will be shifted to Japan or elsewhere, but we will continue to monitor the situation and take action if and when necessary.’

All in all, it seems the production shift initiative might not have as much of an impact on the photography industry as some might’ve hoped. Aside from not being heavily publicized, the state of the industry even before the COVID-19 pandemic wasn’t great and investing in a contracting market isn’t exactly assuring, even with a convincing stimulus opportunity to make use of.

Articles: Digital Photography Review (dpreview.com)

 
Comments Off on Japan offers $2.2B to help domestic companies move production from China, but will it help the imaging industry?

Posted in Uncategorized


Nikon Dropping 1/3rd of Its DSLR Lineup in Move to Mirrorless

04 Jul

The post Nikon Dropping 1/3rd of Its DSLR Lineup in Move to Mirrorless appeared first on Digital Photography School. It was authored by Jaymes Dempsey.

As of July 2019, Nikon has eight active DSLR models.

And of these eight models, three of them are rumored to be the end of their camera lineup. In other words, there will be no replacement for these bodies; they’ll be the last of their kind.

Now, Nikon will come out with followup models for the Nikon D5, the Nikon D850, the Nikon D750, and the Nikon D7500.

But for the Nikon D3500, the Nikon D5600, and the Nikon D500, it’s the end of the line. According to Nikon Rumors, these camera models will “likely be replaced by mirrorless models.”

(There is no information on the Nikon Df, which came out in 2013 and hasn’t seen an update since.)

Is this a surprise? Or is it what we’ve come to expect in an increasingly mirrorless world?

As for the mirrorless replacements, we know of two new Nikon mirrorless bodies in the works: a 900 dollar mirrorless body and a D5 equivalent. It’s unlikely that the D5 equivalent will be replacing any DSLR, but is instead meant to expand the appeal of Nikon mirrorless cameras to professional photographers. Whether the 900-dollar mirrorless body is a replacement for the D3500, the D5600, or the D500 remains to be seen.

Notice that two of the three DSLRs slated to be dropped are entry-level – in fact, the D5600 and the D3500 are Nikon’s only entry-level DSLR lines.

What does it say that Nikon plans to end both of them?

Clearly, Nikon wants to keep their advanced and professional-level DSLRs going for at least a few more years. This suits serious photographers who are attached to their DSLR kit and plan to hang on for a while longer.

But beginner photographers won’t have much of a choice, as far as Nikon is concerned. Either they can choose what quickly becomes outdated technology, or they can go mirrorless. And if Nikon’s making this move, Canon may not be far behind.

So for beginner photographers, mirrorless cameras are coming for you…

…whether you like it or not.

Now, I’d love to hear your thoughts.

If you’re a beginner or enthusiast photographer, how do you feel about this move to mirrorless?

And if you’re an advanced photographer or a professional, how will you (or other photographers in your field) handle this shift? Is this the end of DSLRs?

Let me know in the comments right now!

The post Nikon Dropping 1/3rd of Its DSLR Lineup in Move to Mirrorless appeared first on Digital Photography School. It was authored by Jaymes Dempsey.


Digital Photography School

 
Comments Off on Nikon Dropping 1/3rd of Its DSLR Lineup in Move to Mirrorless

Posted in Photography


How to Move Your Lightroom Library to an External Drive

19 Feb

The post How to Move Your Lightroom Library to an External Drive appeared first on Digital Photography School. It was authored by Simon Ringsmuth.

Many photographers put their pictures on their computer’s internal hard drive. This can be a great solution since even laptops now have fairly generous storage options compared to their counterparts in days gone by. It may take you a while to fill up a 1TB or larger internal drive even if you shoot in RAW, but at some point, you’re going to run out of space, and you’ll have to address this problem. Cloud storage is a good solution but often involves a monthly or yearly fee, and upgrading your internal drive can be expensive and time-consuming. One perfect solution is to migrate your entire Lightroom library to an external drive. While this might sound difficult and intimidating, it’s quite simple and is something that anyone can easily do.

Choosing your storage

Storage space is fairly inexpensive, but not infinite. There are always going to be physical limitations when it comes to how many images you can store on a single piece of media. This is true whether it’s a traditional hard drive, a solid-state drive, or a mix of both such as Apple’s Fusion Drives.

Thankfully, external drives can offer vast amounts of storage space for relatively little money. With the fast transfer speeds of USB-3, which is common on most computers today, you won’t lose anything in terms of editing efficiency by having your pictures stored externally.

The first step in migrating your pictures to an external drive is to buy an external drive, and you have several options:

Traditional hard drive made with spinning platters. If you take this route, I recommend one with a transfer rate of 150mb/sec (megabytes per second) and an RPM speed of 7200. As I write this in early 2019, a four-terabyte drive, which can hold around 200,000 RAW files or half a million JPG files without breaking a sweat, can be found for US$ 100 to US$ 150.

Storage is inexpensive and prices are falling all the time. This 4 terabyte hard drive was only $ 90 when I bought it in the spring of 2019. (Guitar pick shown for scale.)

Solid-state drive with no moving parts. These aren’t as cheap as traditional drives, and they don’t hold quite as much data. However, with prices falling all the time, it won’t be long until solid-state drives are the norm and traditional spinning platters become redundant. Transfer rates on these drives are going to be plenty fast enough for any photo editing.

RAID array or Drobo. These are much more expensive than traditional storage options but offer redundancy in case of data failures, but they might be overkill for non-professional photographers. Besides, no matter what external storage solution you use, you should always have at least one off-site backup even if you do use a RAID array.

For most people, I recommend a simple USB-3 external drive, as it’s the most cost-effective solution and easy to backup onto another drive as well.

Once you have an external drive, there are two methods for getting your photos in Lightroom copied over to it. I’ll walk you through each of these methods as well as the positive and negative aspects of each so you can decide which is right for you.

Method 1: Use Lightroom

This process works well if you don’t have a large photo library. It doesn’t involve a lot of heavy lifting on your part because you can do everything within Lightroom. If you have a lot of images (a few thousand or more), I’d recommend against this because I’ve read reports that it can become a little unreliable when working with that many files. Your mileage may vary though, but know that you ought to proceed with a bit of caution when using this method.

First, locate your Folders pane on the left side of the Library module of Lightroom. Then click the + button in the top-right corner and choose “Add Folder…” This is going to let you create a new folder for storing your images. In this case, navigate to your external drive and create a new folder at that location.

Navigate to your external drive and create a folder on it that you can use to store your pictures. In the screenshot below my external drive is called “Untitled” and my folder is called “Lightroom Pictures.”

Once done, you should see the new folder show up in Lightroom, but it will be empty. This action also creates a new folder on your external drive, which you can see if you navigate to the external drive using Finder or Windows Explorer.

The final step in moving your images from the internal drive to an external drive is to drag-and-drop them from Lightroom. From the Folders panel, click on a folder that you want to put on the external drive and drag it from your internal drive to the new folder you just created.

Click the Move button and Lightroom transfers everything over to the external drive, with no extra effort required on your part. If you have thousands of pictures, this could take a while. So be patient. In the end, your images will be on the external drive and also removed from your internal drive.

Method 2: Copy files manually

If you don’t mind doing a little bit of work yourself using Windows File Explorer or the Macintosh Finder, this is the option I generally recommend. That’s because it not only gives you the most control over the copying operation but helps you understand exactly where to locate your pictures. This method also lets you decide when to delete the original images on your internal drive because you copy them to your external drive instead of moving them. The first thing you need to do is navigate to your Library module within Lightroom and look for the Folders pane. This module tells you where to locate your image files on your computer.

I’ve got images in Lightroom going back to 2013, and each year’s pictures are stored in a separate folder on my hard drive.

Right-click, or control-click on a Mac, on the name of one of the folders in your Folders pane and choose the option that says “Show in Finder.” If you are using Windows, this says “Show in Explorer.” This takes you to the location on your computer where your images are stored.

If you have multiple folders with images in them, do this operation one at a time for each folder. In this example, I started with the 2013 folder in Lightroom, and selected “Show in Finder.” Then it brought up the actual folder on my computer labeled 2013 that contains my images from that year.

When you get to this step, right-click (or control-click) the folder and choose Copy. Then navigate to your external drive and choose Paste. This makes an exact duplicate of the folder on your external drive which might seem redundant, but this is only temporary. A bit later in the process, you can delete the original folder on your internal hard drive once you are sure that everything worked with the copy operation.

Repeat this copy/paste process for every folder listed in your Lightroom Folders pane. After you are finished copying everything to your external drive, rename the original folders by giving them a suffix such as “2013-Original” or “2013-Old.” Again, this is only temporary, and you end up just deleting these folders entirely. But for now, you don’t want to get ahead of yourself and start deleting folders before you are confident that everything has worked properly.

Locating your missing folders

After you rename the original folders, Lightroom may have a bit of a fit because it suddenly won’t be able to locate all your images! With the folder names changed, it won’t know where to look for your pictures even though they are all still intact. The next step is to tell Lightroom where to find your images on the external hard drive instead of looking on your original internal hard drive. As soon as you rename the original folder, the icon in Lightroom changes to a question mark since it no longer knows where to locate your pictures.

Right-click on the folder with a question mark and choose “Find Missing Folder” to rectify the situation.

In the screen that pops up next, navigate to the folder on your external hard drive where your pictures are. This is the folder you copied over at the start of this whole process, and its name should be unchanged. Select it, to make it show up in Lightroom. All your photos should be fully intact.

Repeat this process with all your folders. When finished, your images will have successfully migrated to the external drive. You can verify this by scrolling through your Lightroom library and looking for any images with a question mark. If you don’t see any, then everything is fine. If you do, then Lightroom is having trouble locating the original image, and you might need to double check that all your pictures have copied to the external drive successfully.

When you are satisfied that you have completed the operation without error, you are free to delete the original images on your internal drive. However, I’d recommend keeping a backup of them just in case. When it comes to photos, you can never have too many backups!

Catalog vs. Photos

It’s important to know that your Lightroom pictures are not the same as your Lightroom Catalog. The latter is a reference file which keeps track of all your edits to your pictures, leaving the originals fully intact and unchanged. I recommend keeping your Catalog on your internal hard drive since Lightroom uses this for all your editing operations and internal drives are likely to be faster than external drives. However, it’s up to you. If you’re not sure what to do, just don’t even think about it, since moving your Catalog to an external drive is an entirely separate operation altogether.

The Catalog stores all the changes to your images and only takes up a few gigabytes of space. Your actual images can take up hundreds or even thousands of gigabytes.

Remember to Backup

A final step in moving your pictures to an external drive is to make sure you have a good backup plan in place. If you are on a Mac and have your computer backed up via Time Machine, it will not automatically back up your external hard drives, and you might also find yourself quickly running out of space on your Time Machine backup drive. I recommend keeping a separate backup of your external hard drive and using a program like Carbon Copy Cloner to make sure you sync everything correctly.

Windows has options available as well, but the bottom line here is that you can never be too safe when it comes to backing up your images. Hopefully, this tutorial helps you understand how to go about reclaiming some of the space on your internal drive and setting yourself up for success in the long run when it comes to external storage options. However, all will be for naught if your images aren’t properly backed up and your computer fails.

Once you have all these pieces in place, it’s time to get off your computer, start shooting photos, and know that you’ve got plenty of storage space for years to come!

The post How to Move Your Lightroom Library to an External Drive appeared first on Digital Photography School. It was authored by Simon Ringsmuth.


Digital Photography School

 
Comments Off on How to Move Your Lightroom Library to an External Drive

Posted in Photography


How to Move from Auto to Manual Modes Using Camera Semi-Automatic Modes

06 Feb

The post How to Move from Auto to Manual Modes Using Camera Semi-Automatic Modes appeared first on Digital Photography School. It was authored by Ana Mireles.

Are you tired of the auto mode of your camera but don’t feel confident enough to go full manual? In this tutorial, you’ll learn how exposure works and how to use your camera semi-automatic modes to make the transition easy and smooth.

William Bayreuther


The Exposure Triangle

The first thing you need to know is that you control exposure by three factors: aperture, shutter speed, and ISO. They are all interconnected, meaning when you move one of them, you have to adjust the others to compensate. This connection is known as the exposure triangle.

So, if the correct exposure can be achieved with many different values, as long as it’s compensated, what’s the problem with letting the camera choose those values? Because they control more than just the exposure. Let me show you with a visual explanation. Below is the same photo shot with different settings:

This photo was shot in Auto Mode meaning the camera decided what shutter speed to use, what aperture and what ISO. I had no control whatsoever about which would take priority:

Here I decided the shutter speed so I could control how long the light would come into the camera, which translates into freezing moving objects or capturing movement. The aperture and ISO were then automatically decided by the camera.

Left image – SHUTTER PRIORITY:1/250, f/3.5, ISO 800 = Freeze Subject. Right image – SHUTTER PRIORITY:1/30, f/10, ISO 800 = Motion Blur.

In this case, I chose the aperture because this controls how much of your photo is in focus. This technique is called Depth of Field. Shutter speed and ISO were then automatically decided by the camera.

Left image – APERTURE PRIORITY:1/200, f/2.8, ISO 800 = Shallow depth of field. Right image – APERTURE PRIORITY:1/6, f/22, ISO 800 = Deep depth of field.

In this last one, I changed the ISO, and the result gets reflected in the amount of noise you find in your photo, especially in the darkest areas. I’ll show you a zoomed in comparison for you.

Left image – AUTO ISO:1/200, f/16, ISO 6400 = Much noise. Right image – AUTO ISO:30, f/2.8, ISO 200 = No noise.

Now, if you go from Auto Mode into Manual Mode, suddenly you’re changing from no control into full control, and that can be difficult at first. Especially if you’re shooting scenes where you might lose the perfect shot if you take a long time figuring out the correct exposure. Fortunately, camera manufacturers know this, and they’ve created different semi-automatic programs for you to choose from.

Aperture Priority Mode

Aperture Priority Mode is marked as A or Av. It’s the same thing, but it changes according to the brand. With this setting, you can manually choose your ISO and your aperture number, which leaves the shutter speed up to the camera. This setting is handy when you are photographing still objects or landscapes. Just make sure to use a tripod if there’s low light because with a low shutter speed even your own movement can be recorded. However, if you don’t have a tripod, you can increase the ISO. But be mindful that the higher the number, the more noise you’ll have. Why would you want to control the aperture? Because it controls the depth of field.

Left image – APERTURE PRIORITY:1/60, f/2.8, ISO 200. Right image – APERTURE PRIORITY:1/50, f/22, ISO 4000.

The smaller the aperture number is, the wider the plane of focus becomes. However, most lenses have a sweet spot around f/8 that gives you the sharpest image of all. You can use this Aperture Priority Mode to experiment with your lens.

Shutter Speed Priority Mode

Shutter Speed Priority Mode can be marked as S or Tv, again depending on the brand. You control the shutter speed and ISO, while the camera takes care of the aperture. You’ll want to use this setting when there’s movement involved in your shoot, such as sports photography. In this case, you need a high-speed value if you want to freeze the moving object, or a slower speed if you want the moving object to leave a trail. Another situation in which this is useful is night or dark scenes, and you don’t have a tripod. In this case, you need to make sure to put your shutter speed fast enough so that the natural movement of your body doesn’t register with the camera.

Top image – SHUTTER PRIORITY:1/8, f/2.8, ISO 200. Lower image – SHUTTER PRIORITY:1/30, f/2.8, ISO 800.

Auto ISO

Finally, automatize the third factor of the exposure triangle, Auto ISO. There’s no program mode on the mode dial as such, but there is a setting. While being in Manual Mode, adjust your ISO sensitivity to AUTO so that you can decide the other two factors (aperture and shutter speed). However, you can also pair Auto ISO with any of the semi-automatic modes listed before, and then you only have to think about one factor. What you have to consider in this case is that the higher the ISO, the more noise you’ll have in your photo.

*A couple of extra considerations:

-Always check the results as your camera may misread the scene, especially in scenes with high contrast.

-When using the priority modes, the settings values start to flash if you’re out of reach (if it doesn’t have a way to compensate what you’re adjusting.) In this case, depending on what your shoot requires, you may have to solve it by adding a flash, raising the ISO or adding a filter.

Have fun using the semi-automated modes and remember to switch to full manual once you feel more comfortable with the entire exposure triangle. That way you’ll always keep learning!

The post How to Move from Auto to Manual Modes Using Camera Semi-Automatic Modes appeared first on Digital Photography School. It was authored by Ana Mireles.


Digital Photography School

 
Comments Off on How to Move from Auto to Manual Modes Using Camera Semi-Automatic Modes

Posted in Photography


Why Limiting Free Users to 1,000 Photos on Flickr is a Smart Move

02 Nov

Tim O'Reilly

Yesterday Flickr made their first big restructuring announcement since recently being purchased by SmugMug. Beginning next year on January 8th, Flickr will limit free accounts to 1,000 photos. The previously offered free 1 terabyte of storage goes away. At the same time Flickr is returning their paid pro account to unlimited storage which had been their original offer before capping new Pro accounts at 1 terabyte back in 2013. If you were Pro before 2013 you were considered “old school” Pro and kept your unlimited storage, but new accounts were limited. Now all Pro accounts are back to being unlimited.

In 1973 the artists Richard Serra and Carlota Fay Schoolman broadcast a short video titled “Television Delivers People”. In that video a simple assertion was made: the product of television. commercial television. is the audience. Television delivers people to an advertiser. Since then, various influential individuals from Tim O’Reilly to Steve Wozniak to Apple CEO Tim Cook have all repeated the mantra: “if you’re not paying for it, you’re not the customer, you’re the product being sold.”

To put things more simply, there are two viable business models on the internet today to deliver service. There is a paid subscription model and there is a “free” model where business sell your data and make money on advertising everything from Butterfinger candy bars on Instagram to “brain force” pills via Alex Jones.

Personally I prefer to pay for an ad-free online experience which is one of the reasons why I’ve enjoyed Flickr so much where I’ve had an opportunity to pay annually since I joined the service back in 2003. Flickr delivers a clean user interface, full high res photos, a compelling app for my iPhone, unlimited storage, kick ass organizational tools, a social community to engage with, search tools, stats, and much more.

At $ 50/year (well technically $ 49.99 but I like to round up) I think Flickr delivers tremendous value. I have spent thousands of hours of my life on the site — thousands of ad-free hours not just for me, but for any of my friends or even strangers who happen to land on my photo page too. I am more than happy to pay this every year and will continue to do so until I die most likely. Hopefully I will figure out a way to even continue paying after I die as my personal life goal is to publish 1,000,000 photos before I die and then let that archive of work stand in all perpetuity after I am gone.

So obviously Flickr works for me, but what about all those people who don’t/haven’t paid and just want to use the service for “free.”

I believe that one of the reasons why Flickr was sold by Oath (who had purchased Yahoo’s content businesses) to Smugmug was because Oath realized that a hybrid subscription/free service doesn’t really work. It’s the same reason why Facebook is so resistant to offering a paid ad-free option to customers.

Oath is basically an advertising company and when you are advertising at people you need to be able to advertise to your most profitable customers to make the service work. When you give your most profitable customers (i.e. the ones with money) the option to pay to opt out of ads they do and will. What you are left with is a bunch of accounts by heavy users who are either poor Americans or more likely poor overseas accounts or very light users who can put up with ads but won’t see very many because they are only on your site 2 minutes a week. Whatever the case, you are basically providing a terabyte of enterprise storage, bandwidth, support, etc., to customers who cannot economically be supported by advertising.

In order for Flickr to survive it has to be a long-term profitable business. SmugMug knows a thing or two about how to do this as their primary model for over a decade has been entirely subscription based. As someone who wants to be able to host my photos on Flickr for the 50 remaining years I likely have left on this planet (and even after my death) in order to publish 1,000,000 photos, it’s important to me that Flickr has a long-term viable business model. This means that strongly encouraging free users (who are not currently paying their way) to migrate to paid Pro is important.

I do think it is important for Flickr to offer a free account in order to give people an opportunity to try out the service to see if it is for them. 1,000 photos gives you plenty of opportunity to do just that. It gives you hundreds, even thousands, of hours to explore and enjoy the service without paying — but if you are a heavy user of the site and are using over 1,000 photos of space, at some point you ought to pay.

By the way, Flickr’s original deal when I started with them was that they would only show your most recent 100 photos if you were a free account and the Pro account cost $ 60 (or $ 59.99) per year. So you might say the current account that gives you 10x that or 1,000 is 10x more generous than the original Flickr from way back.

Besides the obvious business model reasons why this is a smart decision for Flickr and their users, there are other important reasons this makes Flickr better as well. One of the things I noticed after Flickr began offering 1 terabyte for free to users was that many users simply began using Flickr as a backup site for all of their photos. Instead of sharing their best photos with a community, they simply dumped everything on their hard drive to Flickr and left and went away. These photos were then indexed for search and populated the service littering it with low quality content (screengrabs, 1,000 bad photos in a row of fireworks, 3,000 poorly composed photos in a row of somebody’s sister’s wedding, etc.). By focusing Flickr’s vision on photo sharing and community rather than simply another online photo backup dump this makes the visual experience better for those of us who are actually there to share photos and engage with each other.

Also, if people are willing to pay for something they tend to put more effort into it. If you are paying for something and perceive it’s value you’ll care more, contribute more and be a part of something. These are the accounts that I value on Flickr the most.

Yesterday morning I had an opportunity to talk to Don MacAskill (SmugMug/Flickr CEO) about this most recent decision that Flickr is making on the phone. Don is someone who cares deeply about Flickr and its community. How many CEOs do you know that spend an entire day interacting with users in an online forum about a big change like this?

I truly believe that yesterday’s decision not only paves the way to make Flickr viable for many years ahead, but that it paves the way for Don and his team to continue to spend money growing and building out the site for the community that is there and loves the service so much.

There are still so many great things that can be done with Flickr going forward. Groups need work. Search needs work. Community needs work. The app needs work. All of these things do cost money though and by getting rid of the massive storage/bandwidth demands of 1 terabyte free accounts and gaining more paid subscribers, this will allow Flickr to do this important work to continue making Flickr the best photo sharing site on the internet for all of us who are a part of the Flickr community and love the site so much.

I do understand that people don’t always want to pay for things, but I think that the right people will pay for Flickr because it provides them tremendous value. I pay for my Adobe Lightroom subscription. I pay for my Netflix account. I pay for these things because they provide me value. This is also why I pay for Flickr and will continue doing so many years into the future.

Unfortunately as we have seen with services like Friendfeed (purchased by Facebook) or even Google+ (in the process of being killed by Google) social networks oftentimes get shut down. It is very important to me that Flickr remains profitable for the long-term so that I can count on it being there many, many years from now. I think yesterday’s decision helps make Flickr more economically viable and sustainable many years into the future.

You can find me on Flickr here.

[disclosure, I know people and have friends that work at both Flickr and SmugMug]


Thomas Hawk Digital Connection

 
Comments Off on Why Limiting Free Users to 1,000 Photos on Flickr is a Smart Move

Posted in Photography


Move over Nikon: Gitzo celebrates 100 years with pricey, limited-edition tripods

20 Jun

Gitzo is celebrating 100 years since the founding of its brand by Arsène Gitzhoven, and to commemorate the occasion they’ve released two special edition tripods. The 100 Year Anniversary Edition Tripod features a ‘new high-appeal look and feel’ as well as features standard on the Traveler Series tripods: Carbon tubing, 180-degree leg folding and the company’s G-lock mechanism. Only 1917 of them will be sold, but if that’s not exclusive enough for you, there are only 100 Arsène Gitzhoven Traveler Tripods to be had.

The Arsène Gitzhoven Traveler features an all-carbon fiber construction. Each one will be laser engraved with its production number from 1/100 to 100/100 as well as an engraving of its owner’s signature. It’ll set you back $ 3000; the 100 Year Anniversary Edition will sell for $ 1500. Each will be available from ‘select dealers.’

$ (document).ready(function() { SampleGalleryV2({“containerId”:”embeddedSampleGallery_1432857610″,”galleryId”:”1432857610″,”isEmbeddedWidget”:true,”standalone”:false,”selectedImageIndex”:0,”startInCommentsView”:false,”isMobile”:false}) });
Articles: Digital Photography Review (dpreview.com)

 
Comments Off on Move over Nikon: Gitzo celebrates 100 years with pricey, limited-edition tripods

Posted in Uncategorized


4 times when a Hail Mary might be the right move

10 Jun

4 times when a Hail Mary might be the right move

A bee hops between blackberry flowers on a sunny day in North Tacoma. By holding the stem of the flower in one hand and camera (with a full-frame fisheye) in the other, I could adjust the composition quickly and blast frames whenever the bee appeared close. My slow noggin just couldn’t keep up. July 2014. Photo and caption by Peter Haley.

More often than not, the ‘decisive moment’ doesn’t happen exactly where you want it. Sometimes the best angle is one that’s impossible to achieve with the camera to your eye – players huddling on a field, a crowd on a dance floor. For such occasions, there’s what’s known as a Hail Mary.

The Hail Mary takes its name from a long shot pass in American football, a low-percentage shot when there are no other options. It’s a last ditch effort, but you don’t have much to lose by trying. In photography, the Hail Mary is most often thought of as holding your DSLR far above your head and pointing it down toward your subject, but the term can apply to any shot you take with the camera away from your body, pressing the shutter button and hoping for the best.

Sure, cameras with tilting LCDs can give you an advantage nailing the shot, but especially when time is of the essence, sometimes the best you can do is point your lens in the right direction and pray.

Photojournalist Peter Haley has found himself in more than one situation that called for a shot from a tricky angle. Whether it’s for an unexpected angle of a familiar subject, or an effort to keep your distance, here are a few occasions that call for a long shot.

1. When body language would tip-off the subject

I had seen her umbrella blow backward once, and thought it might happen again. I didn’t want her to see that I was focusing on her, so I walked in front of her, glancing over my shoulder, with the camera held down at my side and already pointed back toward her. When the umbrella blew, my camera was shooting even before I finished turning my own body around. January 2007. Photo and caption by Peter Haley.

Says Haley, ‘If you don’t want a subject to notice that you’re taking photos, not pulling your camera up to your eye is helpful.’

1. When body language would tip-off the subject

The photojournalism didn’t stop even during a break in a cramped bathroom at the King County Fair. July 1989. Photo and caption by Peter Haley

2. When your body would be in the way

A largemouth bass is tossed back. For an interesting composition the camera needed to be against the stomach of the fisherman. No room for my body there. May 2008. Photo and caption by Peter Haley.

‘A good angle is often from the point-of-view of the subject, so sometimes I hold the camera against the person’s chest where there’s no room for my body. Or the camera needs to move farther back, but I’m up against a wall, so I hold the camera flat against the wall.’

2. When your body would be in the way

The Washington DOT avalanche crew at Snoqualmie Pass fires a 105mm recoilless rifle. Everyone must huddle close to the center of the length of the barrel to minimize the concussion. But the camera needed to be farther away, so I held it up in classic ‘Hail Mary’ position. February 1999. Photo and caption by Peter Haley.

3. When you need to get lower, closer, or farther away

The camera needed to be forward of the gun, but my own body didn’t. I suppose my hand took a slight risk. Note the usefulness of the dimly-lit pistol range and a slow shutter speed. January 2013. Photo and caption by Peter Haley.

‘I don’t like to lay down on a wet beach if I don’t have to. I prefer to keep my body away from snarling dogs, even if the camera needs to be close with a wide angle lens. Or I don’t want to put my whole body close to the line of fire, so I’ll risk only a hand.’

3. When you need to get lower, closer, or farther away

The teeth look better from close up with a wide angle, but I didn’t want to risk getting cut. So I held the camera at arm’s length. April 2010. Photo and caption by Peter Haley.

4. When you need to move quickly

I was standing below a cornice, off of which I expected some young skiers to jump, but I didn’t know exactly where. I was sure that it would be very close to where I was, so I was able to use a very wide lens. I needed all my peripheral vision in order to see as soon as possible where they were going to pop into view. I had only a fraction of a second to point the camera that way– not enough time to acquire sight through a viewfinder. November 2012. Photo and caption by Peter Haley.

‘Sometimes the camera needs to bob, weave and dip quickly to stay close to a moving subject. Keeping my eye attached to the viewfinder – which would necessitate my whole upper body to move with it – slows the camera’s movements too much, so I just move the camera at the end of my arm.’


Peter Haley grew up in Tacoma, studied science at UC Berkeley, but forged his career from a passion for photography. He’s shot for The News Tribune (Tacoma) since 1986.

Like all photographers, he’s won plenty of awards (photographers love contests), and his work has appeared in coffee-table photo books (A Day in the Life of…, etc). He has been embedded with the army in Iraq three times and Afghanistan once.

His favorite things to shoot: Live events. People doing ordinary things. No posed photos! Outside of family, his passions include skiing, and… well… more skiing.

Articles: Digital Photography Review (dpreview.com)

 
Comments Off on 4 times when a Hail Mary might be the right move

Posted in Uncategorized


Meyer-Optik announces move into high-end lenses for mirrorless cameras with Primagon 24

07 Apr

German lens manufacturer Meyer-Optik-Gorlitz has announced it is to produce a new premium 24mm lens that will come in mounts for all mirrorless camera systems. The Primagon 24 will feature a maximum aperture of F2.8 and will use seven elements including one aspheric. The company says that although the lens uses the Primagon name, it isn’t a recreation of a vintage model, but is a completely new design.

Meyer goes to some length to emphasize that the lens will be made in Germany from German-constructed parts and glass. It is said to be the first in a new series aimed at compact system users that will incorporate popular focal lengths and which aims at ‘best in class’ optical performance.

The information released by the company makes no mention of autofocus, so we should assume this will be another manual lens like the brand’s other optics. Meyer says it will allow 30 photographers the chance to buy the lens at half price before general production begins so they can give feedback to the lens designers so it can be improved or altered before it goes on general sale. We’d guess that those 30 will also receive a full-production model once they become available. To qualify for this opportunity, you need to already be a backer of the company’s Kickstarter campaign for the Trioplan 35+ lens, announced earlier.

The Primagon 24 is expected to be ready at the beginning of 2018, and will retail for approximately €4.999/$ 5,499 . For more information visit the Meyer-Optik-Gorlitz website.

Press release

Meyer-Optik Takes Quantum Leap with New High-End Primagon 24mm

Lens Maker Seeking Photographers to ‘Test’ Lens

With its latest Kickstarter campaign for the historic Trioplan 35+ successfully underway, Meyer-Optik is moving boldly into the world of high-end, high-performance photography with the newest addition to its lineup of hand-crafted lenses. Today, Meyer-Optik announced the new Primagon 24 mm f 2.8, which will have 7 individual lenses, including one aspheric lens. It will have an 84 degree angle of view and will impress with its image quality, compact size and weight of less than 9 ounces (about 250g). It will be available for practically all mirrorless cameras.

Even though the Primagon takes its name from a famous line of historic Meyer-Optik lenses, the new Primagon 24 is a totally new development. With this lens, the young Meyer-Optik brand strives for the highest image quality achievable, sticking to its guiding principles and guarantees that practically all mechanical and optical parts are made in Germany and the lenses will also be hand assembled as individual pieces of craftsmanship in Germany. With the help of world famous development engineers, the Meyer-Optik team has been working on the Primagon 24 for more than a year. The team is also working on several more lenses for this new series to cover the full range of the most needed and popular focal lengths. These lenses are all developed under the premise that they will provide the best in class high-performance tools for the ambitious photographer.

Even though photographers will have to wait until early 2018 to get a look at this lens, as one of the rewards for backing its Kickstarter for the Trioplan 35+, Meyer-Optik is allowing 30 photographers to receive the Primagon 24 for about half of its expected retail cost. The photographers will get a chance to use the lens months before it heads into serial production, allowing them to give Meyer-Optik feedback that the company could use to make final refinements. The “testing” promotion is a unique way to reward a select group of Kickstarter backers, while giving the company a chance to receive some feedback on how the lens performs in the “real world.”

“Even though the new lenses are already high performers, we want to listen and learn from the feedback of our users,” said Dr. Stefan Immes, founder of the revived Meyer-Optik brand.

“The opinion of the Kickstarter community and the direct feedback is very important to us. We are striving for technical perfection with this lens – but we will not make any compromises when it comes to the creative part of photography. Personality and character are the most important features of all our lenses. This starts right at the beginning of the development process and we are proud that some of the best engineers nationally and internationally are supporting our team in Goerlitz,” Immes said.

The new lens will be available at the beginning of 2018. It will be available for all mirrorless mounts. The suggested retail price will be 4.999,–€/5,499 US $ .

Articles: Digital Photography Review (dpreview.com)

 
Comments Off on Meyer-Optik announces move into high-end lenses for mirrorless cameras with Primagon 24

Posted in Uncategorized


Change of scenery: How a photographer’s trip to Idaho inspired a big move

27 Mar

$ (document).ready(function() { SampleGalleryV2({“containerId”:”embeddedSampleGallery_8112216034″,”galleryId”:”8112216034″,”isEmbeddedWidget”:true,”standalone”:false,”selectedImageIndex”:0,”startInCommentsView”:false,”isMobile”:false}) });

What could convince a California native to leave the state’s famously beautiful coasts and sunshine behind? For photographer and Resource Travel editor Michael Bonocore, a visit to Idaho’s pristine wilderness and towering mountains was enough. He recently spent some time traveling and photographing the state, from bustling Boise to the untouched powder of the Selkirk Mountains.

The photographic opportunities were so rich and the possibilities for outdoor adventure so abundant, Bonocore decided to make a full-time move to the Gem State. See some of his photos here and read the full account of his trip on Resource Travel.

Articles: Digital Photography Review (dpreview.com)

 
Comments Off on Change of scenery: How a photographer’s trip to Idaho inspired a big move

Posted in Uncategorized


Smart Move: Domino Loft Maximizes Space in Micro Apartments

27 Feb

[ By Steph in Design & Fixtures & Interiors. ]

domino loft 1

A 500-square-foot condo feels a lot larger when you can manage to fit a bedroom, guest bed, dining area, work space and closet in one tiny room without cluttering every possible surface. To prove that it’s possible, the designers at ICOSA teamed up with Peter Suen to make the most of a very modestly sized residence in San Francisco’s Financial District, creating a clean, contemporary, adaptable solution that translates to other small spaces.

domino loft 2

domino loft 3

The Domino Loft is the result of testing a wide variety of space-saving features within the limited apartment, which has high ceilings, but only one room to work with aside from the kitchen and bathroom. The designers tried drop-down ceilings, movable walls and other more complex ideas, but ultimately settled on the tried-and-true loft concept as the simplest and most effective way to maximize every inch of available space.

domino loft 4

domino loft 5

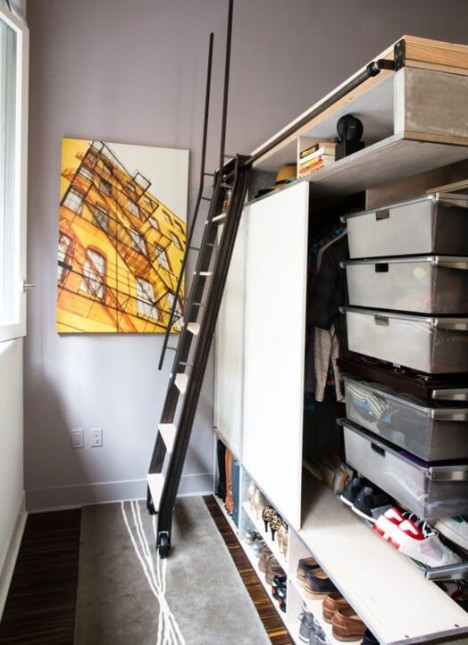
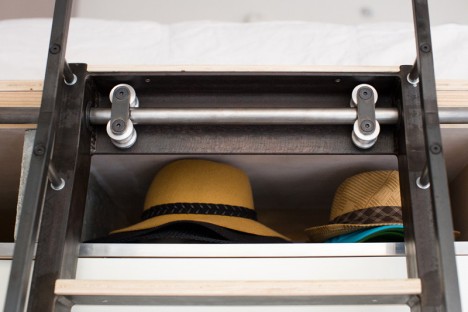
The room-within-a-room features a partially enclosed space topped with a sleeping loft, which is accessible via sliding library ladder from the closet area. Inside, a thin and light bed comes down from the wall, and its bottoms surface acts as a whiteboard when stowed away. There’s a built-in bench next to a fold-down dining table, a standing desk and lots of storage. The closet fits an impressive number of shoes and offers drawers as well as space for hanging garments.

domino loft 6

domino loft 7

Made of concrete panels, wood slats, metalwork and custom cabinets, the components were fabricated off-site in an Oakland workshop before assembly within the apartment.

Share on Facebook


[ By Steph in Design & Fixtures & Interiors. ]

[ WebUrbanist | Archives | Galleries | Privacy | TOS ]


WebUrbanist

 
Comments Off on Smart Move: Domino Loft Maximizes Space in Micro Apartments

Posted in Creativity