RSS
 

Posts Tagged ‘Modes’

CP+ 2016: Sigma MC-11 adapter allows DSLR Sigma lenses full range of AF modes on Sony bodies

02 Mar

While photographing and filming our way through Sigma’s booth this year at CP+ 2016 in Yokohama, one rather understated product may have just stolen the show for a number of Sony shooters, as well as our Technical Editor Rishi Sanyal.

Put simply, the Sigma MC-11 adapter allows the use of Sigma-mount and Canon-mount Sigma lenses, such as the excellent Sigma Art 35mm F1.4, to be adapted to Sony bodies with no autofocus compromises whatsoever. That means Sigma is the first brand of DSLR lenses to support Eye AF and Lock-On AF modes on Sony cameras, as well as smooth phase-detection in video. What’s more, they work really well.

Don’t believe us? We didn’t believe it at first either. Watch the video and see for yourself why this is a huge step forward in realizing truly hybrid camera systems: where you can pair the best lens with the best camera body – for you – without severe compromises.

Pricing and availability of the Sigma MC-11 adapter has yet to be announced.

Articles: Digital Photography Review (dpreview.com)

 
Comments Off on CP+ 2016: Sigma MC-11 adapter allows DSLR Sigma lenses full range of AF modes on Sony bodies

Posted in Uncategorized


Camera Modes Explained for Newbies

12 Jan

Okay, so for one reason or another you’ve decided to step up to a new, more capable camera. Maybe you’ve moved up from a point and shoot, or maybe your phone just doesn’t cut it for you anymore. But now what? There are all these buttons and dials to make sense of – where do you even start? Not to worry, read on!
Your Mode Dial Explained

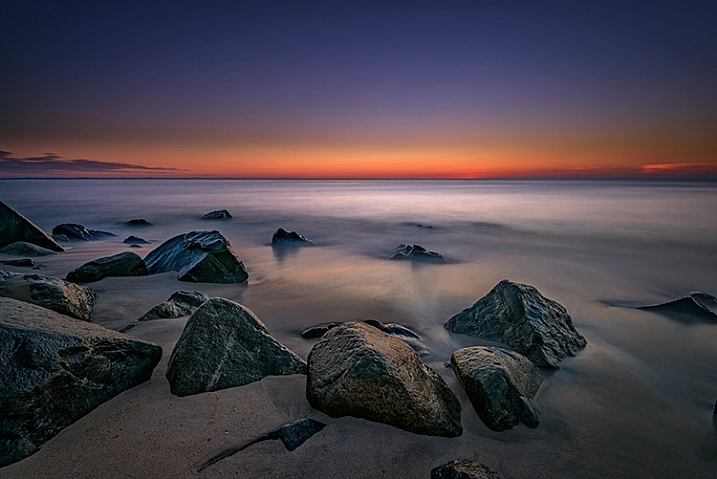
Manual Mode is used to capture long exposure images such as this.

The Camera Mode Dial

Well, the first place to start, is by learning about camera modes. This is where you’ll tell the camera how you want to capture an image. Very likely, you’re looking at this dial, or it may be a display on the screen, and you’re wondering what all those different camera modes are.  I’ll explain all of that in a moment, but first I’ll need to go over a few definitions:

Aperture

This is the opening in the lens, that determines how much light enters the camera. The aperture also affects depth of field, which is the range of objects that are in focus – from those that are closest to you, to those farthest away. A smaller aperture setting will give you greater depth of field, while a larger aperture setting gives you shallower depth of field. Aperture settings work a bit backwards, in that the higher the number, the smaller the opening. For instance, f/4 is a larger aperture than f/11. Of those two, a setting of f/11 will give you greater depth of field. For more on how the aperture works, see How to Take Control of Aperture and Create Stronger Photos.
Shallow-DOF

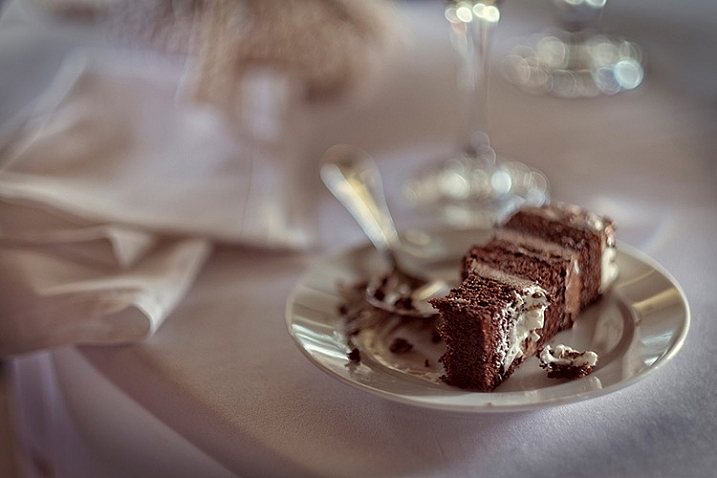
Use of a large aperture creates a shallow depth of field as in this image, where only a small portion is in sharp focus.

Shutter Speed

The shutter speed determines the amount of time that light is allowed to enter the camera. It also determines how movement is recorded in an image. A faster shutter speed will freeze motion, while a slower one will blur motion. Faster shutter speeds are often referred to in fractions of a second, such as: 1/125th, 1/60th, 1/500th and so on – while longer shutter speeds can be one second, 5 seconds, or even 30 seconds long. For more on shutter speed, check out Demystifying Shutter Speed.

ISO

Your camera’s ISO determines how sensitive it is to light. Lower numbers, such as ISO 100 or 200, mean your camera is less sensitive, and are used in bright situations, such as outdoors on a sunny day. Higher numbers, such as ISO 800 or 1600, make your camera more sensitive to light, and are used when there is less available light, such as outdoors on a cloudy day, or indoors when you can’t use flash. Read 6 Tips for Using ISO Effectively With Your Camera for more on setting your camera’s ISO.

Every camera’s mode dial is a bit different. The major manufacturers all tend to have the same, or similar basic modes, but each may have their own spin on things, or even throw in a few of their own special modes. In this article I’ll deal with the basic modes that are common to pretty much everyone.

The Basic Modes
Mode Dial

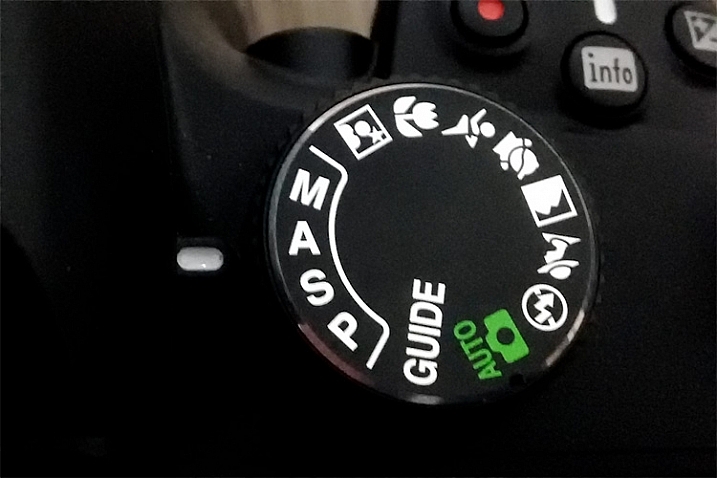
The Mode Dial (a Nikon dial is shown here)

Your camera will have a few basic modes, where the camera takes control of everything, and all you have to do is push the shutter button to take the picture. These modes can be a good place to start if you’re unsure of how to get a specific type of picture.  Keep in mind that when using these modes, the camera is controlling everything, including: color, contrast, white balance, shutter speed, aperture, and ISO. The most common of the basic modes are:

Auto Mode

Depending on your camera’s brand, this will be indicated in one of several different ways. Sony uses a green camera icon, Canon uses a green box, and Nikon uses a camera with the word Auto above it. What you need to know about this mode, is that the camera is making all exposure decisions for you. If the camera is a recent release, it may also be using a type of Intelligent Auto mode, where it analyzes the scene you are taking a picture of to determine the best settings. The flash may pop up if needed. The camera will set an appropriate aperture, ISO, and shutter speed to allow you to hold the camera and get a good exposure.

Portrait Mode

Portrait Mode is usually indicated by a head icon of some kind. When this mode is selected, the camera optimizes your settings for taking pictures of people. It will select color settings, choose a fairly shallow depth of field, and a fairly fast shutter speed, to ensure that your subject is not blurry. The camera may decide that flash is necessary, and fire if it is needed for exposure. Want to learn more about shooting portraits? See 10 Crucial Things You Need To Think About for Portrait Photography.

Portrait Mode

Portrait mode is great for capturing images of people. Be aware your camera’s flash might fire if there’s not enough light!

Landscape Mode

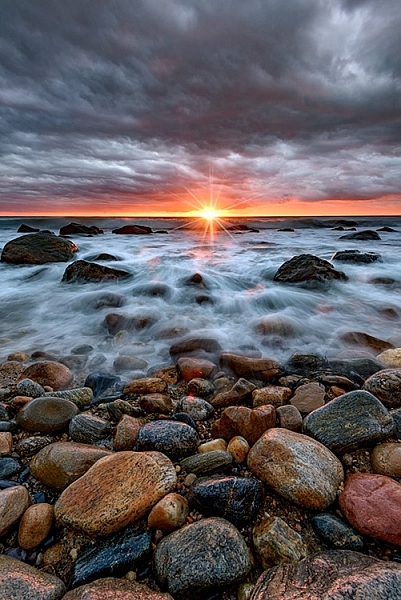
This mode is generally indicated by an icon containing mountains. When you select Landscape Mode, you are telling the camera you’re shooting scenery. The camera will record vivid colors, and set a small aperture for maximum depth of field. You may also need a tripod, as the shutter speed may be too slow to handhold the camera without blurring the image. The flash will not pop up in this mode. For more on photographing landscapes, take a look at 7 Landscape Photography Mistakes That Could be Ruining Your Photos.
Landscape mode is used for scenes like this where you want a lot of depth of field.

Landscape mode is used for scenes like this where you want a lot of depth of field.

Sports Mode

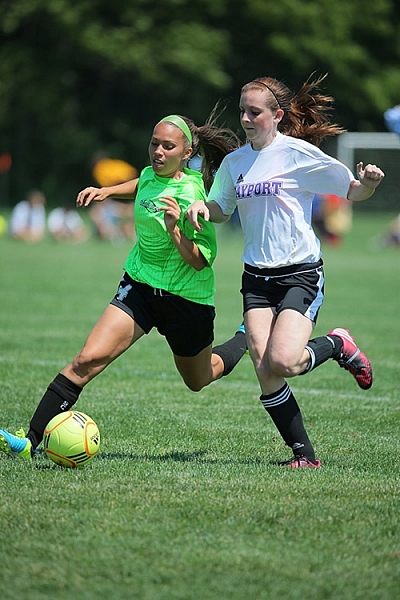
An icon of a running man indicates Sports Mode. This setting is best for capturing subjects that are moving, such as children playing, or a sporting event. The camera uses a faster shutter speed to freeze the motion of the subjects, and will use a wider aperture for shallower depth of field. The ISO may be raised to accommodate the faster shutter speed, and the flash will not fire. If catching action is your thing, Catching the Action: Photographing Youth Sports has some tips for getting started.
Sports Mode

Sports mode will set a shallow depth of field and a fast shutter speed to stop action.

Night Portrait Mode

That picture of the person with a star or moon behind them? That’s night portrait mode. This mode is used to capture pictures of people at night, usually firing the camera’s flash to illuminate them. However, the camera will also use a slightly slower shutter speed, and a higher ISO, to allow any ambient light to record in the image as well. Think of it this way – if you want to take a picture of someone at night in front of a neon sign, and you want the glow of the neon to show up in the image, this is the mode to use.

Close-up Mode

Almost invariably, an icon featuring a flower indicates Close-up Mode. Many people incorrectly call this Macro Mode. I say incorrectly, because macro generally means you are recording the objects you are photographing at life size, or larger. Close-up mode is used when you are photographing an object very close to the camera. Each manufacturer uses this mode a bit differently. While Nikon states that the camera will use a small aperture to maximize depth of field, Canon states that it will use a wide aperture to blur the background. The camera will also attempt to focus on the nearest subject to the camera. In each case a tripod may be necessary to work with a slower shutter speed.
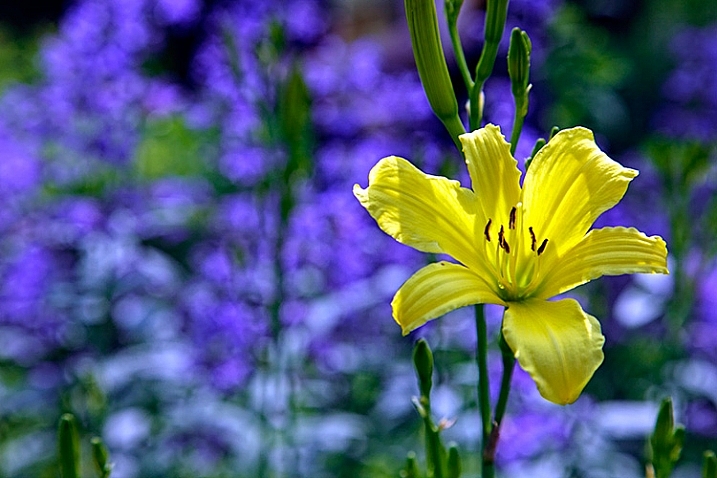
Close-up Mode

Advanced Modes

The advanced modes on your camera’s mode dial grant you more control over exposure choices to some degree, depending on which mode you select. In addition, you’ll have the flexibility to choose picture styles, white balance, and other settings as well. Let’s start with the more basic of the advanced modes, and move on from there.

Program Mode

Contrary to popular belief, the “P” on the mode dial does not stand for “Perfect”. It stands for Program, and is Auto Mode’s big brother. Program mode is a good general use option. The camera will select the ISO, aperture, and shutter speed for you. Sounds like Auto Mode, right? It’s similar, but in Program mode, you have the ability to choose the white balance you want, the picture style you want, and you have the ability to shift the exposure, so if the camera selects a shutter speed or aperture you don’t want, you can shift that setting, and the camera will adjust the others accordingly. Your Guide to Understanding Program Mode on Your Camera can provide further insight into this setting.

Aperture Priority Mode

Aperture-Priority

Once you know how the advanced modes work, an image like this can be done a number of ways. Either Aperture Priority with a small aperture, or Manual mode with full control, could be used.

On Canon or Pentax cameras, this mode is indicated by an Av on the dial, while other manufacturers simply use an A. This mode is exactly what it says – you choose the aperture setting you want, usually deciding on such a setting to achieve a specific depth of field, the camera will then set the appropriate shutter speed to achieve proper exposure. You will also be responsible for choosing an ISO setting. Many cameras now feature an AUTO ISO setting, which lets the camera choose the ISO, if you’d rather not be bothered with selecting it yourself.

Aperture priority is best used when you know you want a specific depth of field for your image. For instance, if you’re shooting a landscape or grand vista, you’ll likely want the entire scene in focus, so you’ll want to choose a smaller aperture, such as f/16, to achieve that. The camera will then set the appropriate shutter speed for proper exposure. You’ll need to be aware of the shutter speed the camera selects, as you may need a tripod to keep the camera still if a slower shutter speed is necessary.

Shutter Priority Mode

The S on your mode dial (Tv if you have Canon or Pentax) stands for Shutter Priority mode. The Tv stands for Time Value, or the length of time the shutter remains open for exposure. This mode is the opposite of Aperture Priority. You’ll choose the shutter speed, and the camera will set the appropriate aperture, to give you the proper exposure. Remember, you’ll also need to set the ISO to ensure your exposure is correct, or set AUTO ISO so the camera can do it for you.
Shutter-Priority-Panning

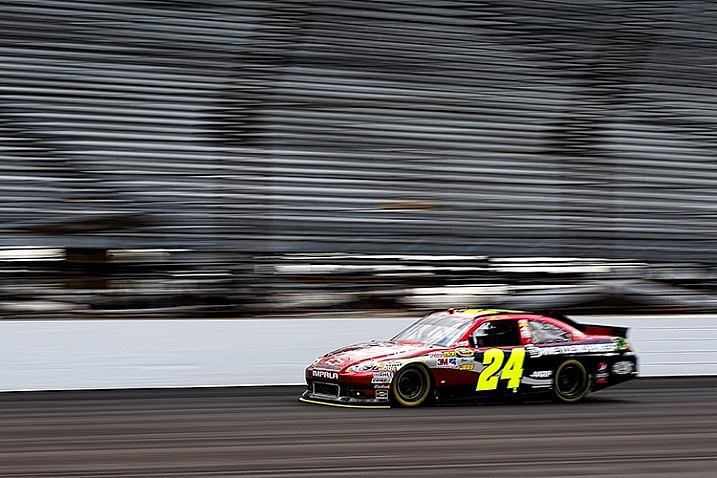
Use of shutter priority allows you to select the shutter speed for panning shots like this one.

Shutter priority is useful when you know you want to use a certain shutter speed to capture motion in a specific way. For instance, if you are photographing sports, you know you want a faster shutter speed to freeze the action. You’ll likely set a shutter speed of 1/500th (or faster) to ensure you’re doing that, and let the camera set the aperture for the appropriate exposure. For more information on both Aperture Priority and Shutter Priority modes, see Getting off Auto – Manual, Aperture and Shutter Priority modes explained.

Manual Mode

Universally indicated by an M on your mode dial, in Manual Mode you are truly flying solo. You are responsible for setting your aperture, shutter speed, and the ISO, to achieve the proper exposure. This gives you the ultimate freedom in creating images, as all camera settings are available for you to set, and change as you see fit. You’ll want to keep an eye on your camera’s meter to be sure you aren’t over or underexposing the image. How to Learn Your Camera’s Light Meter and Master Manual Mode is a great primer if you’re ready to take the plunge and learn to shoot manually.

If you’re still not sure where to start, have a look at A Beginner’s Guide to Choosing Shooting Mode for further clarification.

googletag.cmd.push(function() {
tablet_slots.push( googletag.defineSlot( “/1005424/_dPSv4_tab-all-article-bottom_(300×250)”, [300, 250], “pb-ad-78623” ).addService( googletag.pubads() ) ); } );

googletag.cmd.push(function() {
mobile_slots.push( googletag.defineSlot( “/1005424/_dPSv4_mob-all-article-bottom_(300×250)”, [300, 250], “pb-ad-78158” ).addService( googletag.pubads() ) ); } );

The post Camera Modes Explained for Newbies by Rick Berk appeared first on Digital Photography School.


Digital Photography School

 
Comments Off on Camera Modes Explained for Newbies

Posted in Photography


The First 3 Photoshop Blend Modes You Need to Understand

07 Jul

Photoshop can be extremely intimidating to learn, but once you start to get a grasp on some of the tools it has to offer, you’ll wonder how you ever processed photographs without it. If there’s one area of Photoshop that is both extremely confusing, and yet, extremely powerful when harnessed properly, it’s got to be the collection of blend modes. While this article won’t cover all of the options available within Photoshop, it should give you a good place to start your journey into using Photoshop blend modes.

Photoshop blend modes: a few basics to get you startedphotoshopblendmodes

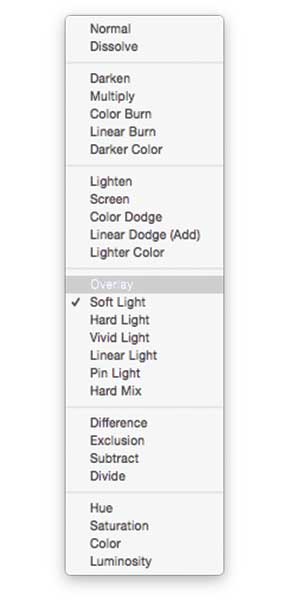
  • Photoshop blend modes are found in a drop down menu at the top of the layers panel (it defaults to “Normal”)
  • There are 27 different options to choose from, including the default “Normal” blend mode.
  • Adobe has organized these 27 blend modes into six different categories
    • Normal – Contains blend modes that don’t actually blend the layer being selected. (Normal shows the layer, and the dissolve layer essentially just removes pixels from the top layer as you reduce the opacity this effect is increased).
    • Darken – These blend modes use 100% white as a neutral, they have an overall darkening effect on images.
    • Lighten – Here Photoshop is using 100% black as a neutral, they have an overall lightening effect on images.
    • Overlay – In the Overlay mode Photoshop is blending the top layer and bottom layer together in a way that adds contrast. The effect of this changes based on the opacity of the layer, and the type of blend mode selected.
    • Difference – The difference set can be referred to as the inversion group, as these blend mode options are often used to either cancel colors of the layer below it, or to invert them.
    • Hue – Here Photoshop allows you to get very creative with the HSL of the layers in question.
  • When you apply a blend mode to a layer, it takes the effect of the given blend mode and it is applied to the layer directly below it within Photoshop.

To simplify the process of trying to learn all 27 blend modes at once below, let’s learn about the three most versatile blend modes Photoshop has to offer.

The first three Blend Modes you need to learn

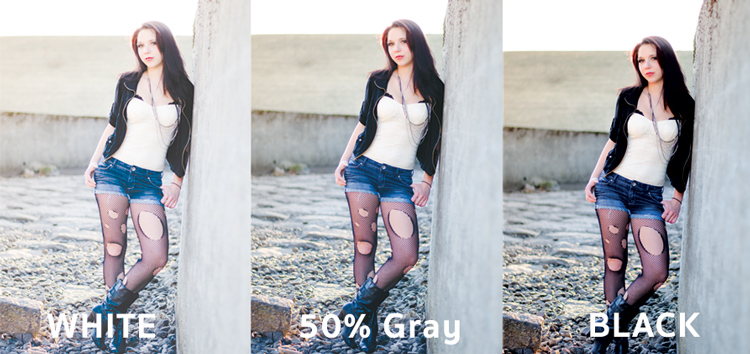
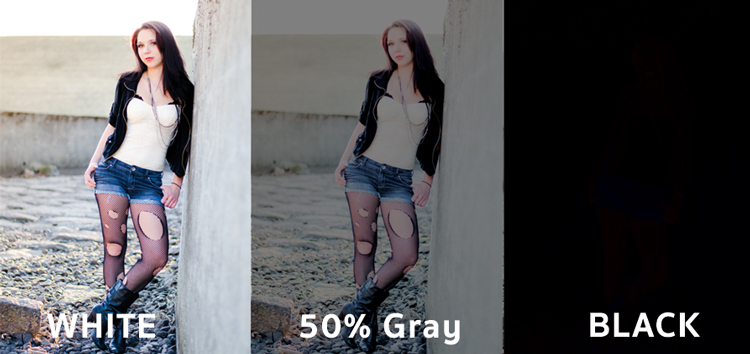
In all the example photographs below I’ll be using two layers to demonstrate the different effects of each of the three blend modes. The top layer is simply a white, gray, black layer and the bottom layer is the same image placed under those three colors.

3-tones

White, gray, black layer.

Multiply Blend Mode

This blend mode falls within the “Darken” group and therefore it is considering 100% white a neutral. The basic math behind how this blend mode works is that the dark pixels of the background layer are multiplied with those of the foreground layer and combined. Therefore the result you end up with is an overall darkening of the image, as the dark pixels within both layers become more significant while the light pixels are essentially removed.

blend-modes-multiply


As you can see in the 50% gray layer, the darker pixels from the gray foreground layer are helping to darken the layer below it.

This blend mode is great for creating shadows or removing bright pixels from an underlying layer. It can be used in conjunction with a curves adjustment layer to add additional darkness to a layer. By effecting the dark end of the curve this can become really handy when trying to emphasize shadows, or darken an image.

Screen Blend Mode

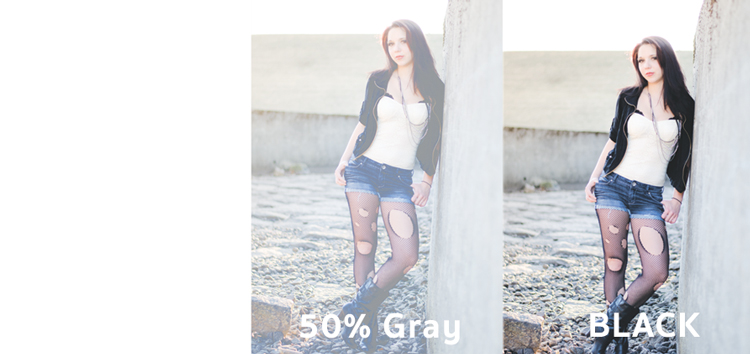
As mentioned above, the lighten group sets black as neutral and therefore when we use the screen blend mode the black layer has no effect, 100% white stays as white and the 50% gray is somewhere in the middle.

blend-modes-screen


In a similar mathematical method to the Multiply blend mode the screen blend mode is multiplying the light pixels of both the foreground and background layers to achieve the final blend. As you can see in the above example, at 50% gray the light pixels are made even lighter as the bright pixels of the gray layer are multiplied with those of the layer below it.

The Screen blend mode is therefore great for removing darkness from an image or can even be used to create soft glow effects around a subject.

Soft Light Blend Mode

Here the formula used by Photoshop is essentially both that of the Multiply and Screen blend modes, then that effect is divided by two. What this means is that you’ll be darkening the dark pixels and lightening the light pixels, and then dividing the end result by two (or 50% of full strength). What ends up happening is an overall increase in contrast of the image

As a result, the Soft Light blend mode, is a great way to add a bit of contrast to an image. For an even stronger effect – use the Overlay blend mode.

blend-modes-softlight


One of the best techniques for using this technique is to duplicate your layer and apply the Soft Light blend mode to that layer. You’ll se an instant increase in contrast which can then be fine tuned with the opacity slider of your duplicated layer.

An example of Photoshop blend modes in action

photoshopblendmodes1

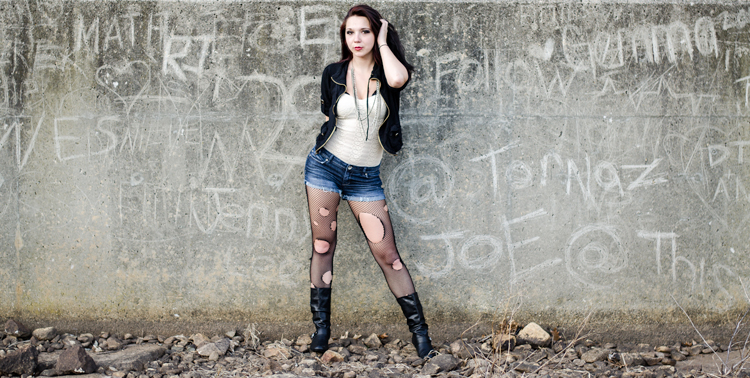
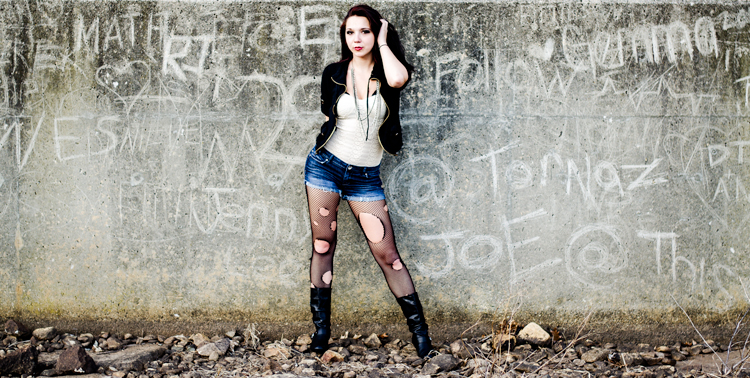
Original – (placed as Full Size 750 x 378)

The original image was a bit on the flat side, so by duplicating this layer, and changing it Soft Light blend mode, you’ll notice an increase in contrast. This higher contrast look works well with the rocks, and graffiti wall behind the model.

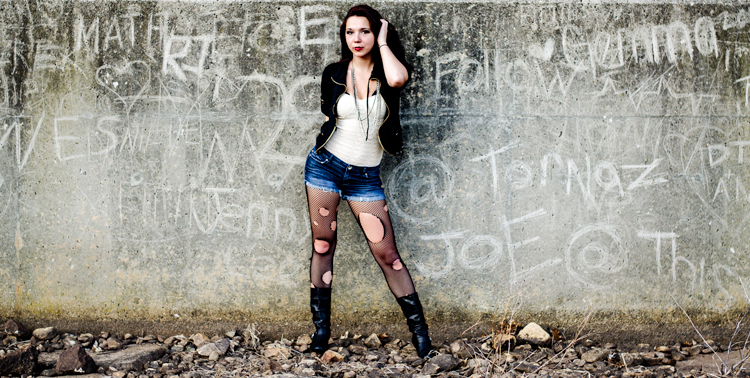
photoshopblendmodes2

Duplicated with Soft Light blend mode

To take it a step further, a Curves Adjustment Layer was added above the duplicate layer and the blend mode was set to multiply. A layer mask was then applied to this Curves layer to reveal it only over the model’s upper body and face. By applying this small adjustment you’ll notice a bit more definition in the face and shadows.

photoshopblendmodes3

Curves adjustment + Multiply blend mode added to model’s face and upper torso to add definition and shadow detail.

These three Photoshop Blend modes are just the beginning, but the key to learning a program the size and depth of Photoshop, is to take it in bite sized pieces or you’ll get frustrated and give up quickly. I hope that by focusing your attention to just these three blend modes you’ll be able to digest the program a bit easier.

googletag.cmd.push(function() {
tablet_slots.push( googletag.defineSlot( “/1005424/_dPSv4_tab-all-article-bottom_(300×250)”, [300, 250], “pb-ad-78623” ).addService( googletag.pubads() ) ); } );

googletag.cmd.push(function() {
mobile_slots.push( googletag.defineSlot( “/1005424/_dPSv4_mob-all-article-bottom_(300×250)”, [300, 250], “pb-ad-78158” ).addService( googletag.pubads() ) ); } );

The post The First 3 Photoshop Blend Modes You Need to Understand by John Davenport appeared first on Digital Photography School.


Digital Photography School

 
Comments Off on The First 3 Photoshop Blend Modes You Need to Understand

Posted in Photography


Nokia announces Lumia 830 with OIS and innovative camera modes

05 Sep

At an event in Berlin, Nokia has today announced the Lumia 830. Dubbed an ‘affordable flagship,’ the device’s camera module offers a 10MP 1/3.4-inch CMOS sensor and F2.2 maximum aperture. What sets the 830 apart from many competitors is the optical image stabilization system which, according to Nokia, is the thinnest in any of its devices, allowing for the 830’s slim physique. Read more

Articles: Digital Photography Review (dpreview.com)

 
Comments Off on Nokia announces Lumia 830 with OIS and innovative camera modes

Posted in Uncategorized


Getting Sharper Images – an Understanding of Focus Modes

14 May

The longer you shoot, the larger the repertoire of subjects and assignments you photograph becomes. You start off photographing flowers in the garden, your neighbour’s dog, your sister’s kids, your friend’s wedding and then before you know it you’re doing product shots for your friend’s new company. All this happens over time and there is one pretty fundamental skill that must remain paramount throughout out your process, properly focused images. Sure we’ve all been there, we’ve all taken that shot once in while which is slightly soft (a polite photographer’s term to describe out-of-focus images). But, it’s a great shot so we keep it anyway, even tho we would still have preferred it to be tack sharp.

MG 3504flat

In focus images have been one of the most fundamental rules of photography right from the dawn of the craft. In the early 1900s it was a craft in its own right, but in the 1960s Leica introduced a rudimentary autofocus system that changed everything. Since then, autofocus has developed dramatically and it’s no longer a feature on cameras, it’s a given.

So, bringing autofocus up-to-date you have a few options to choose from in your modern DSLR. Those are some of the features I will cover in this article, along with when to use them. Both Canon and Nikon have very similar settings, albeit incorporating different technologies the results are very similar. There are also other brands like Sony and Olympus etc., that also follow suit, but here I will be discussing the four main focus modes in Canon and Nikon.

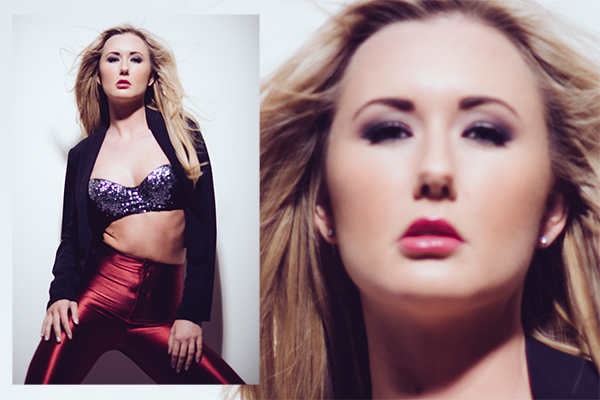
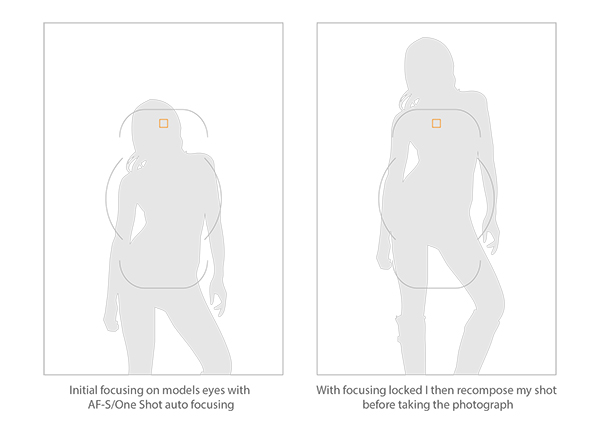
This image above was shot utilizing the AF-S (Nikon) or One Shot (Canon) autofocus mode on the camera. Here I focused on the models eyes and then recomposed my image so that she was over to the left of the frame, allowing for more space in the image in the direction she is looking.

Single Shot Mode

First off, you have the mode that’s probably been around the longest – Canon’s One Shot and Nikon’s AF-S. Both of these will do pretty much the same thing. This mode is predominantly used for stationary objects like model shoots (most of the time – more on when not to use it for model shoots later) and anything that doesn’t require your subject to move around too much in the frame. You half press the shutter in this mode, and then you can recompose the image. For example, you focus on the model’s eyes, then recompose to put her on the left hand side of the image. This autofocus mode will get you through most situations.

Active or Continuous Focus Modes

Next we have the step up from the single focus to Canon’s AI Servo, and Nikon’s AF-C modes. Essentially what this setting does is to continuously track your initial focus point and readjust the focus accordingly. This setting is ideal for moving subjects like active children, and pets that are constantly on the move.

Auto Modes

Finally out of the autofocus settings we have Canon’s AI Focus, and Nikon’s AF-A. Both of these settings actually leave it up to the camera to decide which is best out of the other two focusing modes to use. In this mode it will either choose to continuously track your chosen subject should it decide to move, or focus lock if you would like to recompose. In theory, then I needn’t of bothered explaining the other two settings as surely this is the best of both worlds? Not quite. I personally have tested this mode a fair amount with stop-start subjects and although the camera does a good job of keeping up with them it’s always more accurate to use continuous focus mode. The same also goes for its ability to determine when a subject has stopped and when to focus lock for recomposing. Personally I never use this mode as although it has the best of both, it also has the worst of both.

Infocus600px

Image above taken with an 85mm f/1.8 prime lens using manual focus. Shooting in manual focus negates the need to recompose and loose focus in autofocus modes.

So, although I have just covered the three basic settings here very briefly, there is, of course, a whole of host other technological advancements in autofocus that I haven’t covered. I know Nikon has extensive, matrix and 3D autofocusing features. As well most modern DSLR have incorporated the “back button autofocus” which also helps with focus locking. But going over all of that is not the purpose of this article.

Manual Focus Mode

The last focus mode I wanted to cover and one that is rarely used is the Manual focus mode. This mode strikes fear into the heart of nearly all modern photographers and that’s simply because they’ve probably never used it. Do you ever need to use it? That is something that only you can decide and is probably based on the type of photographs you take. If you only ever take portraits of energetic kids or fast paced sports, then autofocus is probably always your go-to mode. If however you shoot still life, architecture, landscapes and other detailed, relatively motionless subjects, then manual focus is probably a good way to go.

There are a few reasons for this. Landscape photographers will want to find the hyperfocal distance of their scene to maximize the amount of in-focus points (depth of field) in the image. This is based on an equation so autofocusing on a specific object is not always the way to go. Still life photographers will usually have their camera locked-down on a tripod so they will not want to focus and recompose once they’ve set up the shot, so it’s just far easier to focus manually. There is also another reason to want to use manual mode on some cameras and certain situations, and that was the catalyst for this article.

Outoffocus600px

This version of the image was shot using the autofocus mode AF-S/One Shot, and meant that after I had focused and recomposed the shot, the model’s eyes were left out of focus.

I recently purchased an 85mm f/1.8 prime lens, and I wanted to test the lens out and see what the sharpness was like at f/1.8. I predominately only photograph models so I set up my test and went about taking some shots at f/1.8 using my usual AF-S/One Shot autofocusing mode. When I got my shots back to the computer to take a look, I was surprised to see that most of them were very soft. It took a few minutes to realize my error and since then I’ve adjusted how I shoot with these parameters.

Recompose600px

Here you can see that the selected focal node is still situated in the middle of the viewfinder even though I have elected the outer most one when shooting in the portrait format.

I haven’t done a lot of very shallow depth of field shots up until this point so I hadn’t seen the now exaggerated results of my
poor focusing technique previously. At f/1.8 you have a very, very shallow amount in focus (depth of field). For example, a head shot with the eyes in focus, the tip of the subject’s nose will be out of focus. For the test I was photographing the model at 3/4 length and shooting up at her so my camera height was probably about her waist height. I was about 6 feet (2 meters) away from her and I was focusing on her eyes with my focal point in camera then recomposing my shot to capture the 3/4 length crop. The problem with most cameras is that although they have a lot of focusing points, they’re all clustered in the centre of the viewfinder so even though I chose the outer most focal point I still have a dramatic amount of recomposing to do.

Focusstack600px

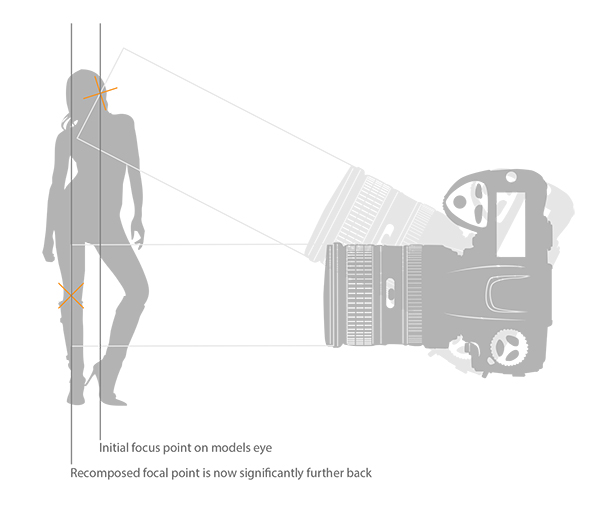
The diagram above clearly illustrates what’s actually going on when you recompose an image after focusing in AF-S/One Shot autofocus mode. The actual part of the image that was in focus, is now out of focus.

This isn’t normally a noticeable problem when recomposing at f/16, but at f/1.8 that dramatic shift in the focal plane means the resulting image is very soft around the model’s eyes. As I recomposed it actually repositioned my focal point further back behind the model, meaning the back of her head and hair were in focus but not her eyes.

There aren’t too many ways around this pesky little issue, especially as you may not notice it on the back of the camera’s little screen. One thing that did resolve it though was by switching to manual focus. I could then compose my shot and manually focus on the model’s eyes, resulting in a fantastically sharp image where I wanted it to be sharp.

Granted there were a few things conspiring together here to really exaggerate the issue. Firstly, I was shooting at f/1.8, that’s always going to rely on critical sharpness. Secondly, I was down low shooting up. This always exaggerates the focal plane shift when recomposing and lastly I was stuck with limited focal nodes. There are many technical reasons why modern DSLRs don’t allow focal nodes towards the edges. A lot of smaller frame cameras like the mirrorless, APS-C and micro 4/3 cameras all have selectable focal nodes covering the viewfinder, but alas, DSLR technology isn’t there yet. Until it is, it’s a good idea to be aware of what’s going on in autofocus modes on your camera, and be prepared and ready to switch to manual focus when required.

Good Luck!

The post Getting Sharper Images – an Understanding of Focus Modes by Jake Hicks appeared first on Digital Photography School.


Digital Photography School

 
Comments Off on Getting Sharper Images – an Understanding of Focus Modes

Posted in Photography


Understanding Flash Metering Modes

19 Mar

flash-metering-modes

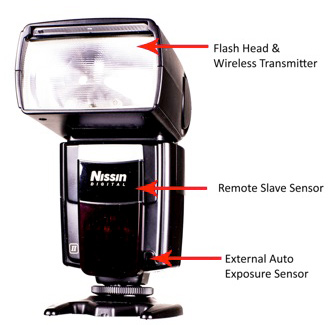
Flash Metering Systems TTL, A-TTL,  E-TTL and E-TTL II

Terms used in this article are Canon specific but there are the same or similar terms for Nikon, Sony, Olympus and other camera manufacturers. _J6L0002-Edit-Edit

When you use your camera’s metering system, the meter will measure the reflected light from your subject (see Metering Modes and How Your Camera Meter Works).  This is not the case when you use your camera with a flash, either a pop-up or mounted on your camera’s hot shoe and set to one of the TTL modes. (TTL is an acronym for Through The Lens) Irrespective of which TTL flash mode you choose, the exposure is not based on reading the ambient light,  (see: Balancing Flash and Ambient Light with a Light Meter)  it is based on the flash output. Measuring flash output can be achieved by either measuring a fixed output pre-flash and evaluating the exposure, or by measuring the flash output as it is fired. This data is then used to calculate the flash output required to expose the scene correctly.

So on to understanding flash metering modes . . .

There are three flash metering modes

TTL or through the lens metering

This is the standard metering mode, typically used when your camera has a pop-up flash or a dedicated external flash heads. The exposure is based on the flash firing. The quantity of the flash output is monitored through the lens by a flash sensor that is mounted below the mirror.

Keep in mind, that when you use a flash the maximum (fastest) shutter speed is the sync speed of your camera (check your manual to check what your camera sync speed is, most are 1/200 or 1/250th). You must never attempt to use faster shutter speeds unless your flash supports “High Speed Sync”.  Since the shutter speed is fixed at the sync speed or slower (in Aperture priority mode: Av on Canon, A on Nikon) the camera will automatically set it at the sync speed.  In Manual (M) mode you must set the shutter speed to the sync speed or slower otherwise you will get black bands in your image.  This is because the shutter starts closing before the flash has had a chance to fully expose the sensor.

In TTL mode the flash will read the exposure from the light bouncing off your subject and the flash sensor will turn off the flash when it believes the image has been exposed correctly. In this TTL mode changes to the aperture setting will typically affect the exposure of the areas of your image that is lit with just the ambient light.

TTL Flash in modes other than Aperture Priority or Manual:

flash-metering-modes

P – is the Program mode  or Program auto mode.  In this mode the camera manages all the settings. Some cameras have an “A” or full Auto mode. Canon cameras may also have a “CA” setting for Creative Auto mode. In these modes the camera sets shutter speed at the sync speed, and the aperture based on the ambient light. When using TTL the flash fires and turns off when the auxiliary sensor tells it to based on the evaluated exposure of the flash.

For TTL the flash power and duration is based on the ISO and the aperture setting. In most cameras the ”through the lens“ flash exposure reading is taken from the same area as your focus point. For TTL flash metering there is no pre flash.

A-TTL (Advanced through the lens)

This metering mode performs in the same basic manner as TTL. It will read the exposure through the lens, from the area of focus and trigger the flash to turn off when the appropriate exposure is achieved. The main difference is that this method uses a pre-flash. This pre-flash is used to determine f-stop based on the distance to the subject that reflects the flash output. The pre-flash is fired when the camera’s shutter is half depressed, the camera evaluates the readings and sets the aperture. Now when the shutter is fully depressed the flash fires to correctly expose for the subject. Based on the model of your flash, the pre-flash can be an actual white light flash or an infrared flash.

nikon-flash

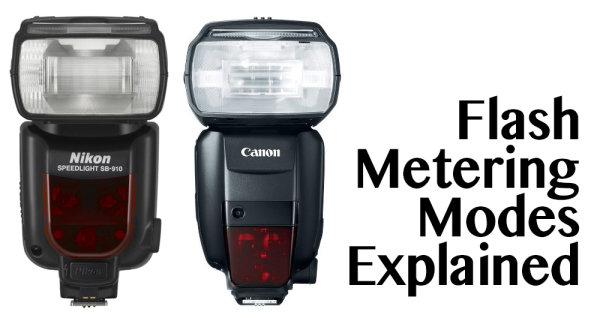
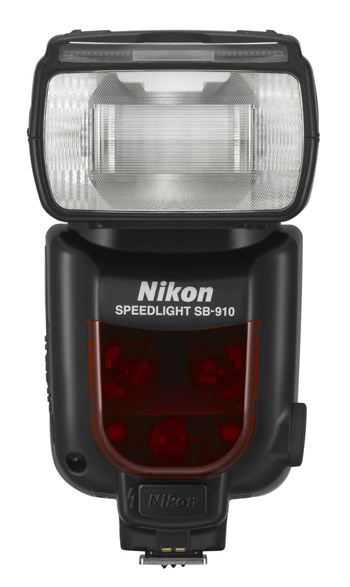
Nikon’s latest, the SB910

In all cases the main flash is fired as a pre-flash if the flash head is oriented in any position other than directly at the subject. This pre-flash can be an annoyance. The pre-flash is measured by the flash unit and the evaluated data is communicated back to the camera. If you use your camera in Program or Automatic mode with A-TTL, ambient light exposure and flash based exposure are collectively evaluated and the camera attempts to resolve the lighting to establish the f/stop (aperture) for the best exposure. Since the sensor that evaluates the pre-flash is located on the flash unit instead of the camera’s sensor, using a filter on the camera lens will cause inaccurate readings.  This is because the sensor on the flash is not covered with an equivalent filter.

E-TTL (evaluative through the lens)

As with A-TTL, E-TTL also uses a pre-flash. However, the flash exposure is not measured by the dedicated flash sensor but the main sensor that is used for ambient light exposure readings. This is similar to the exposure calculations and focus locking that occurs before the shutter opens.  This is true for images captured in ambient light when your camera is in Aperture, Shutter Priority or Program mode. E-TTL has far greater exposure accuracy than TTL or A-TTL modes. The pre-flash in E-TTL mode is not triggered when the shutter is half depressed but when the shutter is fully depressed. Since flash durations are very short the pre-flash is not visible to the naked eye. The pre-flash measures the distance and reflectivity, and calculates the appropriate flash output. All this is accomplished just before the shutter actually opens.  The pre-flash is fired immediately before the main flash except when your camera is set for 2nd curtain sync. In addition, if FEL (flash exposure lock) is used, the pre-flash is fired only when FEL is established.

41Dl+k0z0pL

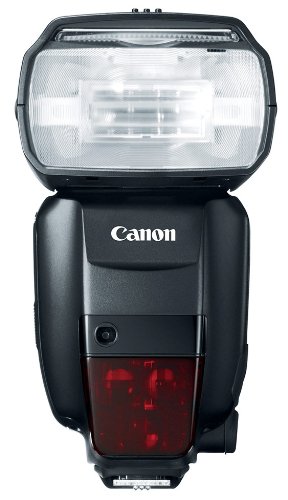
Canon’s newest speedlite the Canon 600EX-RT

E-TTL II

This is the new standard in Canon EOS systems.  It is a firmware enhancement that uses the camera and not the flash to do all the evaluation. Fortunately it is compatible with older E-TTL flash units.  E-TTL II uses the camera’s evaluative metering zones before and after the pre-flash. In this process, areas with small changes in brightness are then averaged for flash metering. This method prevents the issue where highly reflective materials result in specular highlights. With ETT-L II the  flash metering system is not linked to the selected focus area. This allows focus and recomposition without affecting correct flash exposure. Overall the E-TTL II system allows for much more natural exposures with out the harsh appearance typical of direct flash photography.

The post Understanding Flash Metering Modes by Shiv Verma appeared first on Digital Photography School.


Digital Photography School

 
Comments Off on Understanding Flash Metering Modes

Posted in Photography


Metering Modes and How Your Camera Meter Works

20 Jan
Proper Exposure vs. How the Camera Exposes

Proper Exposure vs. How the Camera Exposes

Exposure is a complex beast. Mastering it is of the utmost importance. Exposure and composition are the two most critical components towards making a great image. Exposure is based on three components:

  1. The ISO or sensitivity to light
  2. Aperture or the size of the opening that will let in light, and
  3. Shutter Speed which defines the duration the light will have to pass through the aperture

Whether you shoot in Manual, Aperture Priority or Shutter Priority; there is no difference in how the meter evaluates the scene.

Measuring the light, or brightness of the scene you are trying to capture, is a critical component in determining the perfect exposure. To establish this you need a meter that can read the levels of brightness.

Exposure is measured using light meters.  There are two types: one measures the light falling on the subject or scene, called an incident light meter; the other measures the light reflected off the scene or your subject, and is called a reflected light meter. All meters that are built into digital cameras are reflected light meters, and we will be addressing that type in this article. The more you understand these meters and how they work, the better you will be at understanding and interpreting what they are telling you. Keep in mind that incident light meters are far more accurate than reflected light meters.

How does your camera determine exposure?

Reflected light meters attempt to read the amount of light in the scene you are trying to capture. Unfortunately, those readings are guesses. You may have had the misfortune of photographing a very dark or black subject and have it come out looking over exposed, or a snow scene where the snow looks grey or under exposed. The reason for this behavior is that the camera’s light meter believes that most scenes should average to a mid-grey, also referred to as 18% grey. This middle grey is a mid-point between the darkest shadows and the brightest highlight. Since the camera meter has no idea about white or black, you need to help it using some form of exposure compensation based on the tonality of your subject or scene.

Metering Modes

To help with exposure, and determining how much to compensate, cameras have various metering modes. Typically, the three basic modes are Matrix (also called Evaluative), Center-weighted and Spot metering. Each of these is applicable in particular situations, but do not rely on just one of these modes to do it all for you.

Evaluative Metering

Evaluative Metering

Evaluative Metering

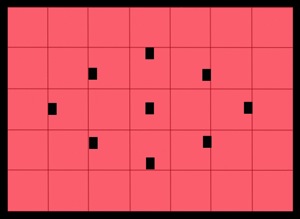
In this metering mode, the meter divides the scene up into a grid and analyzes each segment for highlight and shadow (bright and dark) information. Once that data is collected, it calculates the average value and bases the exposure on that average. Keep in mind that all cameras do not have the same number of areas within the frame. Also, they don’t all calculate the average value for exposure the same way. Manufacturers use complex formulas to arrive at exposure values.  Therefore, it is important that you understand how your camera behaves in various situations and learn when to trust it, and when not to trust it.

Many of the newer DSLR’s not only average the grid, but place additional emphasis on the focusing points that are in use during that particular image capture.

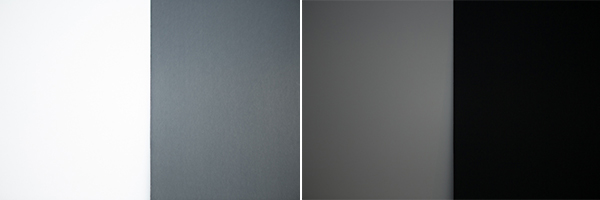
In the next series of images, matrix metering was used to set the exposure. Two foam-core boards, one white and the other black, were placed side by side in the same light.

For the first image, the camera read the exposure while it was pointed in the middle of the white and black boards.  The camera read all the white and the black and came to a reasonable conclusion by averaging the exposure.

S5A9661.jpg

Evaluative Metering – centered between the white and black boards

S5A9658.jpg

Metered off of the white board


The next image was shot with the camera meter reading taken from the white board.  The white was captured as grey and the black a darker grey.  This is because the camera tries to make everything neutral grey or 18%.


Metered on the Black Board

Metered off of the black board


In the third image, the camera read the exposure from the black board.  The resulting image is overexposed making the whites too bright, and a dark grey where it should have been black.


Center-Weighted Metering

center-weighted.jpg

Center-Weighted metering

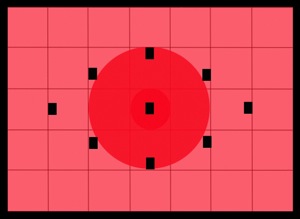
This method of metering lays the most importance on the central portion of the frame, which can be as much as 75% or more, while little or no importance is given to the corners of the frame. Many pro DSLR’s will allow you to adjust the diameter of the center weight area.

This mode of metering is preferred by many photographers and has a reasonable level of accuracy. Also keep in mind that most subjects tend to be centrally placed when framing. You then obtain the exposure and recompose before capturing the image.

Spot Metering

spot.jpg

Spot metering

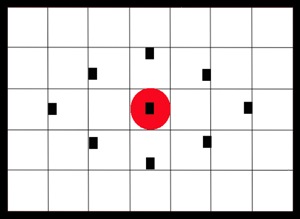
This mode measures the light from a very small part of the scene only.  The area measured is typically the center of the image, using approximately a 3 to 7 degree range of measurement.  It is usually less than 5% of the area of the frame. With most of the mid to upper end DSLR’s, you can arrange the placement of the spot within the frame so as to identify where you want the reading captured (usually it follows where you focus).

This is a very accurate metering mode. It will provide precise readings from small areas of your scene and is most effective in high contrast situations.

The same white and blackboards were photographed once again using spot metering. As you can see in the images below, the same problem exists. Even the spot meter was fooled.

_S5A9659A

Spot metered on the black (left image) and then Spot metered on the white board (right image)

To obtain a correct exposure so the camera is not fooled, a spot meter reading was taken using a grey card placed in the same light as the black and white boards.  This exposure setting based on the grey card was used to photograph the two boards.  The image below shows good exposure.

S5A9661.jpg

Exposure reading using a grey card

How do you switch metering modes?

The Metering icon is represented by an eye-shaped graphic within a rectangle. Your camera’s metering system may have three or more metering modes and the display will change based on which mode is selected.

Which Metering Mode should you use and when?

Matrix metering

Matrix metering works well for scenes that are evenly lit.  It can be used as a go-to method for grab shots. Even though the camera meter may fail you, these meters are highly sophisticated, computer controlled devices and can be relied upon for general photography. You can leave your camera on this mode and use it as a means of exposure education.

Center-Weighted metering

Use this for any scene where you want the primary subject to be correctly exposed while the rest of the image can be generally ignored for proper exposure. This is ideal for people and pet portrait photography, Still life and some product photography.

Center-Weighted is much more consistent and predictable compared to matrix metering. Use it wisely to control where the camera will be measuring the scene and those areas where the lighting does not play a key role in your composition.

Use this mode for outdoor portraits, high contrast scenes, product and food photography to name a few.

Spot metering

Spot metering gives the maximum accuracy and exposure control. This is ideal for back-lit subjects, close-up and macro photography. It can be used to read the brightest and darkest zones for landscapes. You could not do lunar photography without this mode.  Remember to use this mode any time it is important to correctly expose for a subject that does not fill the frame.

Spot metering mode works exceptionally well in situations where your primary subject is much lighter or much darker than its surroundings.

Exposure compensation

In a number of situations, you will need exposure compensation to get the right exposure, irrespective of the metering mode you select. Scenics with a lot of snow cover will be under exposed and will require an increment of +1 or more stops of exposure to make the snow look white.

Conversely, a black furry bear or a person wearing very dark clothing will be overexposed and will require negative exposure compensation of -1 or more stops.

So which mode should you use?

The answer is – it depends on the subject, the light direction, etc. Choose matrix or evaluative metering for evenly lit scenes. Use Center-weighted for scenes that have high contrast and where you want the primary subject to be properly exposed. Use Spot metering for back-lit subjects until you get very familiar with metering, use the spot meter for back lit subjects.

In conclusion, for exposure accuracy an incident light meter can be helpful as your camera’s light meter is easily fooled. But learning how your camera meter works will help you get better, more accurate exposures as well.

The post Metering Modes and How Your Camera Meter Works by Shiv Verma appeared first on Digital Photography School.


Digital Photography School

 
Comments Off on Metering Modes and How Your Camera Meter Works

Posted in Photography


An Introduction to Blend Modes in Photoshop

30 Sep

This week I had a number of readers email to ask about the topic of ‘blend modes’ in Photoshop. So I thought I’d see what our friends at Phlearn have on the topic with their great videos. Here’s a great introduction to the different types of blend modes in Photoshop:

Enjoy this video? Check out the tutorials Phlearn have created on their website.

Post originally from: Digital Photography Tips.

Check out our more Photography Tips at Photography Tips for Beginners, Portrait Photography Tips and Wedding Photography Tips.

An Introduction to Blend Modes in Photoshop


Digital Photography School
 
Comments Off on An Introduction to Blend Modes in Photoshop

Posted in Photography


Blending modes: Tools for post-processing

26 Jul

thomas-park--ari--originalhands.jpg

In this article, Seattle-based photographer Thomas Park shows how you can use Photoshop’s layer ‘blending modes’ to remove stains and blemishes from scanned images, sharpen up your photographs and even warm up cold hands! (sort of). Click through for a link to the full article, ‘Blending modes: Tools for post-processing’.

News: Digital Photography Review (dpreview.com)

 
Comments Off on Blending modes: Tools for post-processing

Posted in Uncategorized


Ultimate Guide To Blending Modes in Photoshop

26 Apr

The blending modes feature is one of Photoshop’s most undervalued tools for Photographers. Blending modes can be used to alter the ways in which each layer interacts with the layers below it, allowing for endless possibilities when it comes to setting the right tone or adding artificial lighting. Graphic designers and digital illustrators use blending modes all the time to Continue Reading

The post Ultimate Guide To Blending Modes in Photoshop appeared first on Photodoto.


Photodoto

 
Comments Off on Ultimate Guide To Blending Modes in Photoshop

Posted in Photography