RSS
 

Posts Tagged ‘Meter’

Take the 10 Meter Photography Challenge Now

25 Sep

The post Take the 10 Meter Photography Challenge Now appeared first on Digital Photography School. It was authored by Darren Rowse.

Update: Chase is still doing his thing and we’re still doing ours! We thought it might be FUN to make this week’s challenge a re-do of this one from a good while ago – because it’s fun, and we all need fun right now!

Below for details! Tag them #dPSYourTen if you post on social

We can’t wait to see what you come up with!

  • The dPS Team.

Today on Twitter (follow DPS here) I was looking at some of the most recent Tweets from a few photographers and came across this one from @chasejarvis:

“There are at least 10 great pictures within 10 meters of you right now.”

He then linked to one he took on his iPhone to prove the point.

OK – so this seemed like a challenge that I thought might be worth sharing here on DPS.

Your challenge is to grab your nearest camera (could be the one on your phone) and to take up to 10 shots with it within 10 meters of where you are right now.

Once you’ve done that – upload it to your favorite photo-sharing site and share a link to it in comments below.

Update: Here are some of the first submissions to our 10 Meter challenge:

10-meter-photography-challenge.jpg

Images by Chris Parker (sunset) – Out of Kontrol (light) – Jenyu (Dog) – RedLeader (couch) – Foxor (leaf) – randy adamcyk (guitar) – Jamie (Flower)

I’m looking forward to seeing everyone elses images. Please consider passing on news about this challenge to friends and your network.

The post Take the 10 Meter Photography Challenge Now appeared first on Digital Photography School. It was authored by Darren Rowse.


Digital Photography School

 
Comments Off on Take the 10 Meter Photography Challenge Now

Posted in Photography


Kickstarter: Compact Reveni Labs Spot Meter uses unique two-eye aiming method

08 Feb

While digital photography is popular, film photography still has a dedicated following and beginner film photographers are popping up regularly. New products for analog photographers are popping up regularly to meet experienced and novice film photographers’ needs. Reveni Labs has launched a new Kickstarter campaign, which was funded within two hours, to deliver an extremely compact spot meter to film photographers.

A spot meter is a light meter designed to precisely measure only a small portion of the image area. Photographers can use a spot meter to check metering in different areas of the frame, especially one with a wide range of brightness, and make an informed decision about the exposure.

The Reveni Labs Spot Meter being used by creator Matt Bechberger. An electronics engineer, inventor and self-professed film camera nerd, Bechberger started Reveni Labs in March 2020 when launching the Reveni Labs Light Meter on Kickstarter. A few months later, he quit his job to run Reveni Labs full time.

Vintage spot meters can be challenging to find, and new spot meters can be expensive. Reveni Labs hopes to ‘find the middle ground with its spot meter to provide a spot meter that meets the needs of modern film camera users, with a lower price point and relevant feature set.’ To Reveni Labs, there are three major issues with the currently-available spot meters: They’re large and heavy, they’re complex, and they are expensive.

To help solve these issues, the Reveni Labs Spot Meter is very small and lightweight. It weighs 1.25 oz. (about 35g). The Spot Meter is 2.8″ (71mm) long, 1.2″ (30.5mm) wide, and 1.5″ (38mm) in height.

The Reveni Labs Spot Meter is also designed to be easy to use. It has a two-eye aiming method, features simple controls and an easy-to-use menu, and offers straightforward modes, including aperture or shutter priority modes. Further, the Spot Meter includes a bright internal OLED display.

The external design (left) of the Reveni Labs Spot Meter. On the right, you can see the internal display. Image credit: Reveni Labs on Kickstarter

The Spot Meter has a shutter speed range of 1 hour to 1/8,000s in one-stop increments. The aperture range is F0.7 to F1024, also in one-stop increments. The ISO range is 1-12,800. Reveni Labs states that the EV range is 2-20 in 0.1EV increments (at ISO 100). The spot meter is about a 1.5° (6″/15cm) circle at 20′ (6m).

On the top of the Reveni Labs Spot Meter are four buttons: right and left directional buttons, a menu/compare button, and the power/sample button. Beneath the sensing lens on the front of the spot meter is the battery compartment, which holds a pair of LR44 alkaline batteries to power the device. Through the viewing lens at the back, you see the OLED display, which shows shutter speed, current state, EV value, ISO, rounding remainder, aperture, and driving value arrow surrounding the central aiming reticle.

Reveni Labs Spot Meter optical design. Image credit: Reveni Labs on Kickstarter

The Reveni Labs Spot Meter utilizes a two-eye aiming method. One eye views the data in the spot meter while the other eye surveys the subject area. There is a close-focus rear lens in front of the OLED display inside the meter to allow the user to focus on the scene and display simultaneously. The internal components are aligned on a central axis.

This design is significantly different from a more typical spot meter. A traditional spot meter uses a viewing lens and requires the user to view the scene solely through the spot meter, closing their second eye. The Reveni Labs Spot Meter doesn’t have a viewing lens; the inside is just a dark screen, which is why it’s a binocular vision spot meter and why it’s possible for it to be so compact. You can see how the Reveni Labs Spot Meter varies from a typical spot meter in the hands-on video below, published by Mat Marrash.

You can see another review of the device from Todd Korol in his video below.

The Reveni Labs Spot Meter looks like an exciting product for film photographers. If you would like to back the project, you can do so for $ 225 CAD, which is a little under $ 180 USD at current currency conversion rates. The Reveni Labs Spot Meter comes with the meter, a neck lanyard, storage pouch and four LR44 batteries. Shipping is expected to commence in August. For more information and to back the project, visit Kickstarter.


Disclaimer: Remember to do your research with any crowdfunding project. DPReview does its best to share only the projects that look legitimate and come from reliable creators. Still, as with any crowdfunded campaign, there’s always the risk of the product or service never coming to fruition.

Articles: Digital Photography Review (dpreview.com)

 
Comments Off on Kickstarter: Compact Reveni Labs Spot Meter uses unique two-eye aiming method

Posted in Uncategorized


Hasselblad firmware update adds Distance Meter, improved Interval Timer features to its X1D II 50C, 907X 50C cameras

30 Oct

Hasselblad has released a pair of firmware updates for its X1D II 50C and 907X 50C medium format cameras that adds, amongst other improvements, an on-screen distance scale for measuring focus and improved intervalometer features.

Firmware version 1.4.0 for both the X1D II 50C and 907X 50C adds a new Distance Scale feature that effectively recreates the distance scale that’s traditionally on the lens and overlays it on the liveview display. It can be set to metric or imperial units and will work with any XCD lens updated to the latest firmware.

Hasselblad has also improved the Interval Timer feature, adding the option to capture up to 1,000 frames (previously, the limit was 99 frames or ‘No Limit.’ When shooting between 2 and 25 frames you can select any number; from 25–100 you can select intervals of five; and from 100–1,000 you can select intervals of 50. The ‘No Limit’ option also remains.

Hasselblad has also added the ability to meter the exposure for every shot. Previously, the first image captured served as the baseline by which all subsequent images’ exposure settings were shot at. Now, the cameras will be able to meter for each individual frame, which should help when capturing timelapses in varying lighting conditions.

The firmware updated also improves compataibility with Hasselblad’s Phocus Mobile 2 app, improving live view quality and addressing a bug that prevented the camera from changing its white balance settings when changed inside the app. Other changes include an array of unspecified bug fixes.

You can download firmware version 1.4.0 for the X1D II 50C and 907X 50C on Hasselblad’s website (at the bottom of the page — note you will need to be logged into your Hasselblad account).

Articles: Digital Photography Review (dpreview.com)

 
Comments Off on Hasselblad firmware update adds Distance Meter, improved Interval Timer features to its X1D II 50C, 907X 50C cameras

Posted in Uncategorized


Lime One is a compact, easy to use light meter you attach to your camera’s shoe mount

07 Oct

German mechatronics engineer Johannes Heberlein has launched a new photo accessory on Kickstarter, the Lime One compact hot shoe light meter. The meter has been designed to be very easy to use, and even updates its readings in real-time.

In 2018, Heberlein started using film cameras, and he immediately found his light meter options somewhat lacking. He started using a smartphone-based solution but became frustrated with needing to constantly take his phone out of his pocket, get an exposure value and then put his phone away. In late 2018, Heberlein started sketching out ideas for a compact, easy to use light meter. His first prototype was ready a few months later and final hardware revisions took place over the next year.

Lime One works with all cameras that have manual exposure control, including analog cameras that do not feature a built-in light meter. Heberlein hopes that Lime One, which has a funding goal just shy of $ 30,000 USD, will help photographers who have been frustrated by external meters and smartphone light meter applications. He designed Lime One to be compact enough that you can leave it attached to your camera indefinitely, even when packing your camera away in a bag.

Lime One promises fast operation and start-up, plus the ability to store previous settings. It has four modes: aperture priority, shutter priority, manual mode, and exposure value. The control wheel has a knurled edge for grip and when holding the Lime One’s button while rotating the wheel, you can change secondary parameters.

The hot shoe light meter is constructed using anodized aluminum for both the body and wheel and attaches to a standard accessory shoe mount. The device is battery powered and uses a CR2032 battery.

The Lime One appears very simple to operate. For example, when using aperture priority, you set the desired aperture on the Lime One using the control wheel, frame your shot, and then the light meter shows you on its top display the required shutter speed. You can also use exposure compensation by holding down the button while rotating the control wheel. By double-tapping this same button, you access the menu where you can perform actions such as adjusting operational mode and ISO.

Hedeco Lime One on 6×6 folding medium format camera. Image credit: Hedeco, Kickstarter

For those who pledge €99 or more, which is roughly $ 115 USD, you will receive one Lime One in silver in April 2021. If you pledge €149 (about $ 175 USD), you have a choice of silver or black for Lime One, plus you receive an accessory pack. If you have access to a 3D printer, you can download the files to print your own accessories and instead purchase just the standard pack.

To learn more about the Lime One compact light meter, head to the Kickstarter page.


Disclaimer: Remember to do your research with any crowdfunding project. DPReview does its best to share only the projects that look legitimate and come from reliable creators, but as with any crowdfunded campaign, there’s always the risk of the product or service never coming to fruition.

Articles: Digital Photography Review (dpreview.com)

 
Comments Off on Lime One is a compact, easy to use light meter you attach to your camera’s shoe mount

Posted in Uncategorized


Why I’ve Become a Light Meter Convert

05 Sep

Light meters

sekonic light meter - Why I've Become a Light Meter Convert

Light meters can be an invaluable tool for photographers; especially those who use off-camera flash.

Mention a light meter in photography circles and you’re certain to get some fierce responses. Sure, some photographers will be indifferent and fewer will be in favor, but most will be adamant that you don’t need one. I used to be somewhere in the middle.

I could definitely see their utility, but I just never thought I needed one. Before a few months ago, I had picked up a light meter once in 14 years. It turns out that I was just making excuses to not spend the money on something that may be one of the most powerful tools you can buy if you use off-camera flash lighting.

Excuses

There are a lot of motives and reasons that you might avoid using a light meter in the digital era. For example:

  • You can just chimp the LCD screen.
  • It’s easy to fix it in raw processing.
  • They’re too expensive for what they do.
  • The histogram is enough for testing exposure.

I get it. All of these sentiments came out of my mouth over and over again.

Chimping and the Histogram

photographer checking settings - Why I've Become a Light Meter Convert

While you can chimp your exposures to get them right, this can take both time and guesswork. A light meter takes away both of those things.

Sure, you can look at the back of your camera after each test shot (chimping) while you’re setting up your lights. This works fine for one or two lights, but what happens when you need to create a precise lighting ratio?

How do you ensure that your fill light is exactly three stops below your key light? How do you ensure the rim lights are an even exposure with your fill? It’s possible, but all of that takes time and guesswork.

I remember doing a basic four light setup a few years back and it took the better part of an hour to get the ratios exactly how I had planned them.

Since starting to use a light meter, I set up an even more complicated five light setups, mixing really hard light with very soft light. It took me only 10 minutes to get right. I don’t know about you, but I could do with a lot more instances of saving nearly an hour of shooting time.

b/w portraits of a man in a suit - Why I've Become a Light Meter Convert

These images use five lights at a very precise contrast ratio. Using a light meter meant that the setup time was only 10 minutes.

Fix it in Raw Processing

raw processing in Lightroom - Why I've Become a Light Meter Convert

Fixing your exposures at the raw stage is a viable option, but it can take some time that might be better spent elsewhere.

Yes, you can fix the image later in raw processing. As long as your highlights and shadows aren’t clipped, raw processing is a viable tool here. However, wouldn’t it be much nicer to get it right in camera?

Think about it this way: with a light meter, you press the test button on your strobe, check the reading and dial it into your camera. The whole process takes about 20 seconds. Unless you move the light or your subject moves, every subsequent photo is now properly exposed.

Presume it takes about two minutes of fiddling to adjust the exposure of an image in Lightroom or ACR. If you’re working on 20 photos from a set, you’ve just lost 40 minutes of time to a task that could have been negated in twenty seconds.

Too Expensive

I get it, I really do. This was the main reason I avoided getting a light meter for so long. A couple hundred dollars for a decent light meter is a hard pill to swallow when there are so many things that you can buy for your photography at a much lower price. Why spend that kind of money on something you use so briefly when you can spend that money on lights, modifiers, trips, studio time, props, etc, etc.

It’s all a matter of how much you value your time and convenience. A light meter will save you time and it will make a good chunk of the set-up process easier. In the end, I’ve found that the price tag has been worth it.

Changing My Mind

model using a light meter - Why I've Become a Light Meter Convert

I had a shoot where I only had 10 minutes to set up. I borrowed a light meter from another photographer just to make my life easier. That one time completely changed how I felt about using light meters. In minutes, all of the potential benefits and values of having a light meter in my bag became apparent.

Time

As you may have guessed from my previous points, it comes down mostly to time. Faster set-ups mean you get more time actually shooting, which makes it more likely that you’ll get the shot that you’re after. Less time processing means you have more time to work on other things, like planning and arranging your next shoot.

Also, in terms of portraits, a light meter will help you minimize the time that your subjects are waiting on you between sets. Nobody, absolutely nobody (especially paying clients), wants to wait around for huge chunks of time while their photographer is messing with the lights.

Complexity

model with long hair - Why I've Become a Light Meter Convert

In this image, I wanted to experiment with a gridded stripbox as the key light and a giant octabox as fill. Using a light meter made getting the exact ratio between the key and fill lights that I wanted a breeze.

On top of time, the multiple light techniques that a light meter opens up makes it more than worth the value. With a light meter, you can dream up any number of lighting configurations, plan them down to the exact contrast ratio and set it up with no fuss.

You want a hard light source as a key at f/8, with two giant modifiers providing exactly two stops of fill at f/4 and two background lights at f/22? That’s a set-up that popped into my head one night shortly after buying my light meter. I went into the studio the next day and set it up.

I wouldn’t have bothered before, as trying to get the ratios right between those light sources would have been a major headache.

metering the light - Why I've Become a Light Meter Convert

Metering for each light individually and adjusting their exposure took about a minute or two. This only has to be done once.

behind the scenes lighting setup - Why I've Become a Light Meter Convert

If the exposure from the octabox was off, it would have destroyed the effect of the lighting from the much smaller striplight.


lighting diagram - Why I've Become a Light Meter Convert

Imagine that you’ve just had a week where you’ve saved several hours at both setting up and post-processing. If you used just a bit of that time to start drawing out and planning new light set-ups, how many do you think you could come up with?

Getting it right in-camera

Why I've Become a Light Meter Convert

When dealing with difficult subjects, like white shirts on dark backgrounds, a light meter can be an absolute blessing in terms of getting it right in the camera.

As I already mentioned, the ability to get your exposure perfect every single time is a huge benefit. In fact, when working with flash, I would posit that using a light meter might be the single most valuable step you can take to ensure perfect exposures and making your workload that much easier.

I’m a Total Convert

sekonic light meter - Why I've Become a Light Meter Convert

Over the time I’ve had it, my light meter has become indispensable. As it fits in my pocket, it now comes everywhere with me.

In the end, I regret that I put off and continually excused myself from buying a light meter for as long as I did. In the few months since I bought it, I have saved a ton of time in the studio not messing about with lights while people were waiting on me. My post-processing workload has lightened quite a bit as fixing contrast ratios in post-production is all too time to consume.

Both of these factors together mean that I now have more time for planning shoots and lighting set-ups than I had before. Those set-ups are also getting more and more complex as time goes on and most of them would have been next to impossible for me to put into use without a light meter to ensure the precise exposure ratios.

If you’re like me, and you’ve convinced yourself that a light meter is a superfluous bit of kit, I can only encourage you to challenge your own assertions. Could a light meter save you time as it has for me? Could it open new possibilities?

It’s possible that the answer is no. I can’t presume to know or understand your situation. All I can suggest is to at least ask yourself the question. It may very well be that light meter could be as valuable a tool to your photography as it is becoming to mine.

The post Why I’ve Become a Light Meter Convert appeared first on Digital Photography School.


Digital Photography School

 
Comments Off on Why I’ve Become a Light Meter Convert

Posted in Photography


Humor: Sports reporter tries to pass off iPhone calculator as ‘light meter’

30 Aug

You can’t make this stuff up… the website Deadspin stumbled across this on-field report from a cricket commentator, who tries to pass off his iPhone calculator as a “light meter.”

The question he’s trying to answer is whether or not it’s getting too dark to continue the test match between New Zealand and South Africa. According to his “light meter” there’s only 6.5 EV of light left to work with, which in his words is, “getting a little dodgy.”

Don’t worry though, the refs will take their own reading before they stop the match…

Articles: Digital Photography Review (dpreview.com)

 
Comments Off on Humor: Sports reporter tries to pass off iPhone calculator as ‘light meter’

Posted in Uncategorized


How to Understand Your Camera’s Light Meter and Get the Exposure You Want

26 May

Regardless of how you shoot, and whichever shooting mode you prefer to use, there is one item that remains constant – the light meter. Somehow, either you or your camera has to know how much light in on your scene in order to determine the optimal combination of aperture size, shutter speed, and ISO sensitivity to get the photo you want. This tool, which may not seem all that relevant to new photographers, is called a light meter.

Understanding what your camera’s light meter does and how it works is critical to advancing your skills and helping you get the shots you really want. Hopefully, this article will help you get a grip on it.

How to Understand Your Camera's Light Meter and Get the Exposures You Want

An analogy to help you understand the light meter

Before I get into a discussion about how the light meter works, think about the last time you cooked some meat on the grill. Whether it was a steak, some pork chops, or even just a couple hamburgers – you likely had a vision in your mind of what the finished product would be.

For backyard chefs like me who aren’t very good at this sort of thing, we have to use a meat thermometer to make sure our food is properly cooked. There’s always the question of where to put the thermometer to check and see if the meat is done. Or, in photography terms, check to see if the meat is properly exposed. You can touch it to the surface, poke it through to the middle, or insert the thermometer at various points around your dinner in order to get a good overall reading.

Each method would work for a different scenario, but it all depends on what you are cooking and how you want the finished food to turn out.

How to Understand Your Camera's Light Meter and Get the Exposures You Want

Your camera’s light meter is like measuring the temperature using a meat thermometer. Placement is crucial for an accurate reading.

How the camera light meter works

When you point your camera at a scene you also need a way of measuring the incoming light so you know how much of it there is and what settings you (or your camera) need to control in order to get the shot you want. It’s just like measuring the temperature of your food with a thermometer to make sure it’s done properly.

Most cameras today use a process called TTL Metering, which stands for through-the-lens. It means that your camera examines the light coming in through the lens and evaluates the brightness of the scene. Then you, or your camera, can adjust the settings in order to make sure your photo is exposed how you want. You may not ever notice the light meter at work or even see that it’s there at all unless you shoot in Manual Mode. But trust me, it’s constantly monitoring the light whether you know it’s working or not.

View the metering scale in Manual Mode

To see the light meter doing its thing, put your camera in Manual Mode and look for a series of dots or vertical lines at the bottom of your camera’s viewfinder.

How to Understand Your Camera's Light Meter and Get the Exposures You Want

In Manual Mode, look at the bottom of the screen in your viewfinder. Notice the scale with zero in the middle. That is the light meter at work.

The number scale at the bottom of the image above is an example of a camera’s light meter, and the tiny little triangle shows whether the picture is properly exposed or not. In this case, the triangle is at 0, which means the image is neither under or overexposed, but changing the aperture, shutter speed or ISO would make the triangle move up or down the line accordingly and result in a picture that is either a little too bright or a little too dark.

What part of the scene is the camera measuring the light from?

While that is all well and good, it’s only part of the story because it doesn’t explain how your light meter actually functions. Is it looking at all the incoming light or just some of it? Where in the frame is it looking as it measures the light? Understanding the answers to these questions is the key to unlocking the power of your camera’s light meter, and it all has to do with what’s known as metering modes.

How to Understand Your Camera's Light Meter and Get the Exposures You Want

Measuring the Light

Most cameras today have a few basic ways of measuring the incoming light:

  1. Matrix or Evaluative Metering – the camera looks at the light in the entire scene and averages it, (Nikon puts a bigger emphasis on the area where your lens is focused as well). Nikon calls this Matrix Metering, Canon calls it Evaluative.
  2. Center-Weighted Average Metering – looks at the light of the entire scene and averages it, but with emphasis on the center of the frame. Nikon and Canon both call this Center-Weighted Average Metering.
  3. Partial Metering – this measures the light only in a small portion of the center of the frame (about 8-12% of the scene). This is a Canon metering mode, Nikon does not have one similar.
  4. Spot Metering – measures the light only in a small area around the central autofocus point (about 1.5-3% of the frame). Nikon and Canon both call this Spot Metering.

Other camera manufacturers have different names for these modes, but suffice it to say the way in which your camera measures incoming light can have a huge impact on whether your photo is properly exposed. As an example, here are three shots that were taken with different metering modes.

Image #1, taken with Matrix (Nikon) or Evaluative (Canon) Metering.

Image #2, taken with Center-Weighted Metering.


Image #3, taken with Spot Metering.


Reflective versus incident metering

There’s another aspect of light metering that comes into play when setting up a shot. It has to do with how TTL metering works as opposed to a handheld light meter.

Reflective metering

The former, (the type of metering used in DSLRs), works by measuring the amount of light that comes through the lens. But the problem with that is that unless you are pointing your camera directly at the light source, the light being measured is actually bouncing off your subject first.

All the colors we see in the world around us get their hues and tonal values by absorbing every color of light except for what is bounced off of them. As many of us learned in grade school, light is made up of a spectrum of colors including red, orange, yellow, green, blue, indigo, and violet. A green tree leaf absorbs every color of light except for green. A red car absorbs every color except for red, and so on.

reflective metering - camera light meter

When your camera measures incoming light, it’s looking at the amount of light being bounced off your subject, not the amount of light actually hitting your subject. This has huge implications and can dramatically affect your exposure. In the illustration above, the subject is wearing clothes that absorb most colors of light except for blue, which means there is still a great deal of light being bounced off him and sent to the camera. However if the child changes clothes things can change a great deal.

reflective metering dark subject - camera light meter

In the illustration above, even though the amount of light hitting the boy has not changed, the camera will read the scene much differently because he is now wearing a dark shirt and pants. The camera will think it needs more exposure to compensate for what it thinks is less light on the scene, and the overall image will be overexposed as a result.

Here’s a real-world example of how this works:

reflective metering - camera light meter

Nikon D7100, 200mm, f/2.8, 1/8000th of a second.

In the photo above, so much light was being reflected off the girl’s white shirt that my camera had a hard time metering the scene properly. Much of the sunlight was bouncing off the shirt and coming directly back to my camera, so it responded by using a very fast shutter speed and low ISO value in an effort to make sure the shirt was properly exposed. Unfortunately, the rest of the scene was underexposed as a result.

Nikon D7100, 200mm, f/2.8, 1/1500th.

This was a few seconds later in the exact same spot, and all I did was have her put on a brown shirt. With much of the light from the sun being absorbed by the dark color of her outfit, my camera created a much brighter exposure by using a slower shutter speed. Not as much light was being captured by the TTL metering system so the camera thought more light was required for a good exposure.

Incident metering

This phenomenon can be particularly troublesome if you are shooting a wedding; grooms often wear dark tuxedoes whereas brides will usually be dressed in dazzling whites, which can really throw off your camera’s TTL metering system. The solution is to use an external handheld light meter, such as the Sekonic L-308S-U, which actually measures the amount of light falling on the subject.

Handheld light meter for incident light metering (light falling on the subject).

In the image above you can see that the meter shows you need an aperture value of f/16, shutter speed of 1/125th of a second, and ISO 100 in order to get a properly exposed scene. These numbers will likely be different from what the camera’s TTL system measures because some light will invariably be absorbed by the subject, which is why an external system like this can be so useful.

Here’s how the diagram from earlier would look if the setup involved an external handheld incident light meter.

incident metering - handheld light meter

You will often see wedding photographers using a light meter such as this in order to get a more accurate reading of how much light is hitting the wedding party during formal photos. This is especially true if they’re using a system of flashes or external speedlights because they need to know how much extra light the scene will require or tolerate.

When shooting a wedding it is quite common for the bride to wear a white dress, which reflects a great deal of light, and the groom to wear a dark tuxedo which absorbs almost all light. This can wreak havoc with a TTL metering system, and an external light meter is a great way to address the problem.

light metering - camera light meter

Conclusion

The overall goal here is to understand how the light meter in your camera functions. This, in turn, will help you know how you will need to alter the exposure settings to get the shot you want.

I hope this article has been helpful in explaining how the light meter works, how light is reflected off your subjects, and why your camera may not see a given scene quite like you expect it to. Ultimately it’s important to remember that there is no one correct way of metering a scene. Any of the metering modes and methods will work as long as you know what you are shooting and what type of results you are trying to achieve.

Knowing the difference between the various metering modes and types, and understanding how light is measured as it hits your camera can help you get the shots you want. None of these methods are any better or worse than the other, but each one has its own strengths and weaknesses. The more you know about how all of this works the better equipped you will be to get precisely the photographs you want.

The post How to Understand Your Camera’s Light Meter and Get the Exposure You Want by Simon Ringsmuth appeared first on Digital Photography School.


Digital Photography School

 
Comments Off on How to Understand Your Camera’s Light Meter and Get the Exposure You Want

Posted in Photography


Sekonic announces price and availability of ‘groundbreaking’ L-858D-U light meter

28 Apr

Light meter manufacturer Sekonic has announced that its new L-858D-U light meter is now available and priced at $ 599/£599.

This new meter offers a number of firsts, including the ability to measure flash duration and to work in HSS mode. It can read out the duration of a burst of light as short as 1/55500 sec and work with shutter speeds as short as 1/16000s ec, both of which will be useful for those working with high-speed photography or trying to balance bright daylight with flash.

Designed for moviemakers as well as still photographers, the meter can display frame rates or shutter speeds under continuous lighting, and with more sensitivity than previous models it can now measure down to 0.1 lx of illuminance for low-light scenes and night photography.

The L-858D-U is also compatible with the radio triggering and control systems of a range of studio and hotshoe flash units via drop-in modules for the PocketWizard, Elinchrom’s Skyport and Phottix Ares ll and Strato ll environments. This 2.7″ touchscreen meter offers reflected 1-degree spot metering as well as built-in filter factor modes, an ISO range of 3 – 13,107,200 and a shutter speed range for ambient light that runs from 30 minutes to 1/64000 sec. The wireless modules cost $ 159/£159 each – the Skyport and Phottix functionalities are combined into a single module.

For more information see the Sekonic website.

Press release:

Now Available: The Sekonic L-858D-U Speedmaster

The next generation of light measurement control

Sekonic is proud to announce their ground breaking L-858D-U Speedmaster Light Meter is now available for purchase.

As previewed at last year’s Photokina, the L-858D-U Speedmaster is the combination of Sekonic’s cutting-edge light measurement technology and 60 years of experience in the photographic and filmmaking industries. The meter has undergone significant design changes from previous models and has a feature set sure to meet and exceed the demands of today’s image-making professionals.

The First of Its Kind
The Sekonic L-858D-U Speedmaster is the first fully featured light meter to offer flash duration measurement from 1/40 to 1/55,500 sec. at t0.1 through t0.9, which can be changed in 0.1 steps. A long-held secret of some of the world’s most talented photographers, the key to freezing action consistently is found in being able to measure flash duration. Photographers are now able to do this easily for the first time, demystifying one of photography’s most challenging techniques.

Wireless Freedom
Having pioneered wireless exposure measurement, Sekonic has expanded upon this groundbreaking innovation by creating hot-swappable radio control modules for the L-858D-U Speedmaster. With the PocketWizard module, photographers can easily trigger any PocketWizard wirelessly and control the power of their lights with any Control TL compatible unit. With the combined Elinchrom & Phottix module, Phottix users have Strato II and Ares II triggering capabilities, while Elinchrom users have access to wireless triggering and Skyport’s full range of power-control capabilities.

“The Sekonic L-858D-U Speedmaster has all the touchscreen features I love about my L-478D, with the added benefit of replacing my old spot meter. Now I only have to carry one meter, and have gained a lot of speed and convenience while on set.”
Timur Civan, Director of Photography

A Low Light Monster
Increased ISO capabilities in today’s cameras have created a need for light meters to increase their ability to measure light in the dimmest of settings. With an additional 3-stops of light sensitivity for incident light, 2-stops of light sensitivity for reflected light (spot), and an ability to capture a reading down to 0.1 lx of illuminance, accurately metering candle-lit scenes or getting the right measurement for long-exposure night photography is now a possibility.

Master High Speed Sync
Like its name implies, the Sekonic L-858D-U Speedmaster is optimized for photographers looking to exceed the maximum sync speed of their camera. For the first time, a light meter can measure the stroboscopic pulses fired from strobes when they are used for High Speed Sync. Finally, photographers now have an accurate way of measuring their lights when they want to overpower the sun or achieve a very shallow depth of field through using HSS.

Multifaceted
The L-858D-U Speedmaster is an invaluable tool for image-makers of every kind. A HD Cine Mode for DSLRs and CINE Mode for Motion Picture Cameras gives filmmakers the ability to set the meter to collect the information relevant to the camera being utilized. Users can set frame rates from 1 to 1000 fps and choose to adjust either their shutter speed or change their shutter angle to acquire an accurate reading. Custom frame rates and shutter angles can also be set for an unprecedented amount of versatility. Now, a content creator can accurately measure their light regardless of the camera, or combination of cameras, they are using.

Pricing and Availability:
The Sekonic L-858D-U Speedmaster is now available for purchase at photographic retailers across the United States.
Sekonic L-858D-U Speedmaster (Cat# 401-858) – $ 599
RT-EL/PX Elinchrom & Phottix Transmitter Module (Cat# 401-626) – $ 159.95
RT-20PW PocketWizard Transmitter Module (Cat# 401-627) – $ 159.95

Additional Features:
Full Information Spot Viewfinder

The 1-degree spot meter has a broad reading range from EV 1 to EV 24.4 for ambient light and measures flash down to an amazing f/2.0

Expanded Shutter Speed Range for Ambient Light
Measure ambient light for shutter speeds between 30 min. to 1/64,000s

Expanded Shutter Speed Range for Strobe
Measure strobes for shutter speeds between 30 min. to 1/16,000s

Extended ISO Range
Additional ISO range from ISO 3 to ISO 13,107,200, with ISO 850 for cinema cameras

Filter Compensation Mode
Photographers and filmmakers using high-density ND filters now have a filter factor of up to 12EV. Save up to 30 “favorites,” to instantly know what exposure compensation needs to be considered.

2.7” Color dot-matrix touch screen
Allows users to quickly and easily change settings and read important information
Connectivity with MAC/PC DTS Software

Upgrade firmware, apply custom settings, and utilize exposure profiling
All-Weather Design

Dust-proof and Splash proof (JIS Standard Water Resistance Class 4, Splash-Proof Type) for continued reliability and durability on-set, in any location.

For a full list of specs and features please visit sekonic.com

Articles: Digital Photography Review (dpreview.com)

 
Comments Off on Sekonic announces price and availability of ‘groundbreaking’ L-858D-U light meter

Posted in Uncategorized


Labyrinthine Loophole: Bar Entry Maze Beats 500 Meter Minimum Distance Law

17 Apr

[ By WebUrbanist in Architecture & Offices & Commercial. ]

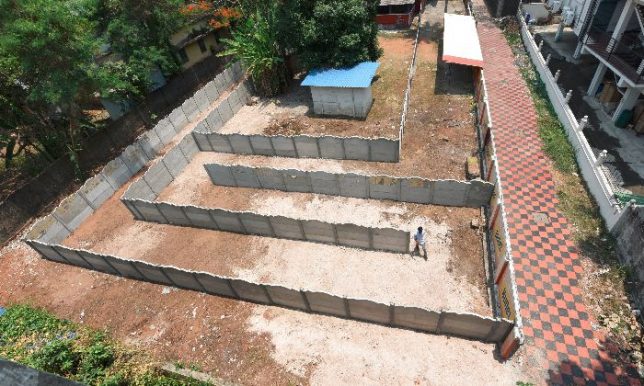
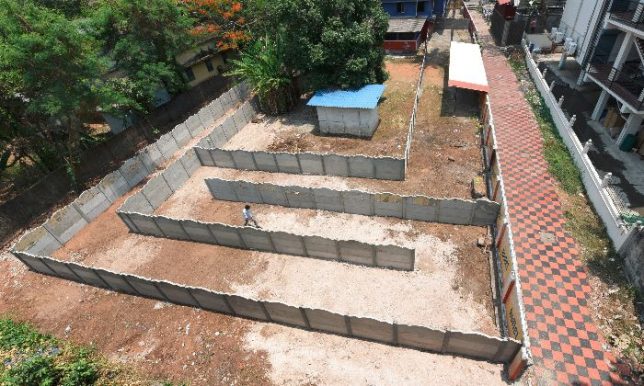
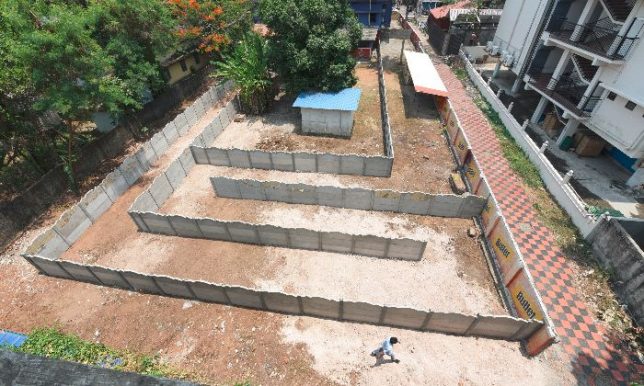
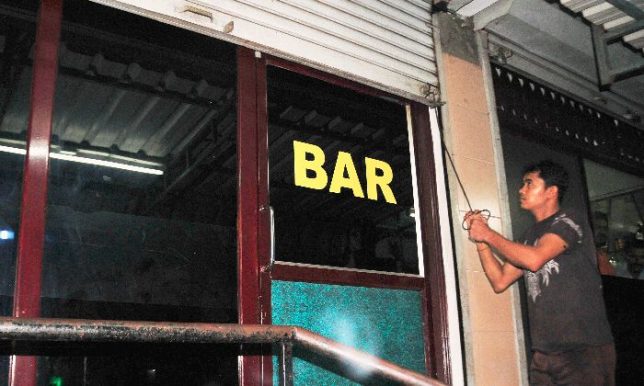
Following a Supreme Court of India ruling that bars must be a minimum of 500 meters away from highways, one intrepid watering hole wrapped itself in a 250-meter maze to effectively circumvent the law. Handed down earlier this month, the ruling has closed down liquor-serving establishments across the country prompting some to get creative.

Owners of the Aishwarya Bar in North Paravoor, a Kochi suburb, maintain: “We have done nothing illegal. The plot behind the bar also belongs to the owner and we have constructed an extended way to reach the bar. Now it is 520 meters from the highway. We are set to approach the circle inspector of excise with the new route map to authorize the reopening of the bar.”

Perhaps most remarkably: since the purpose of the law relates to walking distance (rather than linear), officials have given their blessing to this unusual solution — he intent of the legislation, after all, is to reduce intoxicated driving accidents. With that potential code violation remedied, the only accusation left leveled against the establishment related to changing around the property without a building permit, resulting in a small fine.

The solid-walled fence shaping the labyrinth was installed at minimal cost in a matter of days, expanding into adjacent property also owned by the bar’s manager. Pub crawlers, meanwhile, may find themselves somewhat lost when loaded, but at least there are no dead ends. However, bars like this one may still find themselves with fewer customers since the federal ruling also prohibits roadside signage directing drinkers to pubs. Other specific exceptions have been granted on a case-by-case basis, but this particular solution may lead to a series of similar approaches.

Share on Facebook


[ By WebUrbanist in Architecture & Offices & Commercial. ]

[ WebUrbanist | Archives | Galleries | Privacy | TOS ]


WebUrbanist

 
Comments Off on Labyrinthine Loophole: Bar Entry Maze Beats 500 Meter Minimum Distance Law

Posted in Creativity


Lumulabs Lumu Power adds a light and color meter to your iPhone

22 Sep

Lumulabs is showing off its new Lumu Power light and color temperature meter add-on for smartphones that was successfully funded through a Kickstarter campaign earlier this year. Attached to an iPhone, the Lumu Power can measure ambient light and flash output, as well as color temperature. It uses two sensors, one on each side of the half-dome design. A photodiode with CIE spectral luminous efficiency measures the light levels and a True Color sensor, which is compliant with the CIE 1931/DIN 5033 color standard, analyzes the color temperature. 

The electronics are protected by a stainless steel housing and the device attaches to your Apple device via the Lighting connector. An Android version that uses a USB Type-C port is planned for next year.

The diffusers are made from polycarbonate lexan, and like the original Lumu, the Lumu Power is controlled via a dedicated app. The latter is still in development but Lumulabs says new functions are added almost on a daily basis. Color temperature, illuminance flash output curve, flash duration and flash versus ambient light ratio are some of the functions that have already been implemented. You can pre-order now on the Lumu website for $ 229. Shipping is planned to start by the end of the month.

Articles: Digital Photography Review (dpreview.com)

 
Comments Off on Lumulabs Lumu Power adds a light and color meter to your iPhone

Posted in Uncategorized