RSS
 

Posts Tagged ‘Masking’

ON1 Photo RAW 2019.2 brings AI-powered masking improved performance and more

30 Jan

ON1 has released an update to its ON1 Photo RAW 2019 photo editing and management software. Version 2019.2 comes with a new AI-powered masking tool, general performance enhancements and support for new camera models.

ON1 says the Quick Mask Tool lets you create high-quality masks with very little user guidance and uses color, tone, and textures to identify boundaries. You can see a demo in the video below.

To speed up your workflow the software now taps into the GPU for frequently used processes, such as returning to Browse, copy/pasting layers and masks as well as some exporting and plug-in tasks. In addition the ON1 Photo RAW now supports the Leica D-Lux 7 and Panasonic DMC-TZ101 cameras, offers tethered shooting support for the Nikon Z 6, Z 7 and D850 and comes with bunch of new lens correction profiles.

ON1 Photo RAW 2019.2 is available now for $ 99.99. Owners of any ON1 product can upgrade for $ 79.99. Alternatively the new software is available as part of an ON1 Plus Pro membership ($ 129.99/year) which includes a perpetual license of ON1 Photo RAW plus a post-processing and photography education package.

You can try ON1 Photo RAW 2019.2 for 30 days free of charge by signing up on the website.

Articles: Digital Photography Review (dpreview.com)

 
Comments Off on ON1 Photo RAW 2019.2 brings AI-powered masking improved performance and more

Posted in Uncategorized


On1 Photo RAW 2018 announced: Adds HDR processing, advanced masking and more

06 Oct

$ (document).ready(function() { SampleGalleryV2({“containerId”:”embeddedSampleGallery_1486583421″,”galleryId”:”1486583421″,”isEmbeddedWidget”:true,”standalone”:false,”selectedImageIndex”:0,”startInCommentsView”:false,”isMobile”:false}) });

On1 just released the newest version of its stand-alone RAW photo manager and non-destructive editor: On1 Photo RAW 2018. Put another way, there’s now yet another alternative to Lightroom out there, and with this new update the program is more capable than ever, adding features like HDR merge and panorama stitching, advanced masking capabilities, and more.

You can get a decent overview of the new features in the 2018 version in the video below:

The main additions to this version of On1 Photo RAW are On1 HDR, panorama stitching, new advanced masking options like Feather and Density that allow you to alter a mask globally, Color range masking, versioning, selective noise reduction, and an updated UI that On1 characterizes as “clean and modern.” There’s also a new “Paint with Color Brush” that allows you to either paint with a solid color or leave the luminosity of the underlying layer intact to change things like eye or hair color.

You can get a full breakdown of these and other new features on the On1 blog.

The app is being released as a free Beta on Friday, with an official release slated for the end of October. The full app—which promises ‘much more’ when it arrives after the beta period—will cost $ 120 for new users, while current On1 users will have the option to upgrade for a discounted price of just $ 80 (usually $ 100). Both the full version and upgrade package are already available for pre-order.

To learn more about the app or pre-order your copy, head over to the On1 blog by clicking here.

Articles: Digital Photography Review (dpreview.com)

 
Comments Off on On1 Photo RAW 2018 announced: Adds HDR processing, advanced masking and more

Posted in Uncategorized


On1 Photo RAW 2018 announced: Adds HRD processing, advanced masking and more

04 Oct

$ (document).ready(function() { SampleGalleryV2({“containerId”:”embeddedSampleGallery_1486583421″,”galleryId”:”1486583421″,”isEmbeddedWidget”:true,”standalone”:false,”selectedImageIndex”:0,”startInCommentsView”:false,”isMobile”:false}) });

On1 just released the newest version of its stand-alone RAW photo manager and non-destructive editor: On1 Photo RAW 2018. Put another way, there’s now yet another alternative to Lightroom out there, and with this new update the program is more capable than ever, adding features like HDR merge and panorama stitching, advanced masking capabilities, and more.

You can get a decent overview of the new features in the 2018 version in the video below:

The main additions to this version of On1 Photo RAW are On1 HDR, panorama stitching, new advanced masking options like Feather and Density that allow you to alter a mask globally, Color range masking, versioning, selective noise reduction, and an updated UI that On1 characterizes as “clean and modern.” There’s also a new “Paint with Color Brush” that allows you to either paint with a solid color or leave the luminosity of the underlying layer intact to change things like eye or hair color.

You can get a full breakdown of these and other new features on the On1 blog.

The app is being released as a free Beta on Friday, with an official release slated for the end of October. The full app—which promises ‘much more’ when it arrives after the beta period—will cost $ 120 for new users, while current On1 users will have the option to upgrade for a discounted price of just $ 80 (usually $ 100). Both the full version and upgrade package are already available for pre-order.

To learn more about the app or pre-order your copy, head over to the On1 blog by clicking here.

Articles: Digital Photography Review (dpreview.com)

 
Comments Off on On1 Photo RAW 2018 announced: Adds HRD processing, advanced masking and more

Posted in Uncategorized


How to Blend in Adjustments Using Layer Masking in Photoshop

26 Apr

In a recent article called: Getting Started with Layer Masks in Photoshop – a Beginners Tutorial, I showed you the basics of layer masks and why they are such powerful tools. Layer masks are essentially what gives Photoshop layers much of their power. They allow you to tell Photoshop exactly where you want your changes applied, and to what degree.

In that article, I also showed you how to use layer masks in pictures where you had a defined edge to the areas you wanted to change. Photoshop has a lot of great tools that allow you to make selections, which you can then use to define the mask.

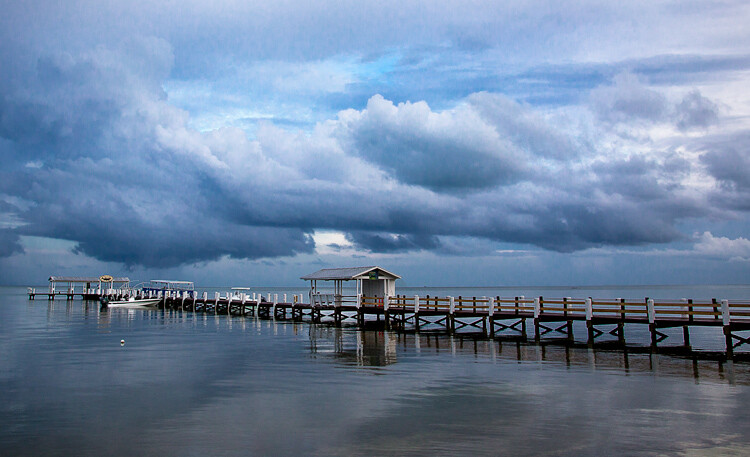
Here is a picture I took in Florida where I used layer masks and to accentuate parts of the image without changing other parts.

Here is a picture I took in Florida where I used layer masks and blending, to accentuate parts of the image without changing other parts.

But what about pictures where you have a soft edge? Or where you want to blend in the effect gradually? That’s what I will cover in this article. It will pick up where the prior article left off, so if you haven’t seen that one yet, check it out. Once you have reviewed the basics of layer masks in that article, come back here and we will get started.

Step 1: Create an Adjustment Layer

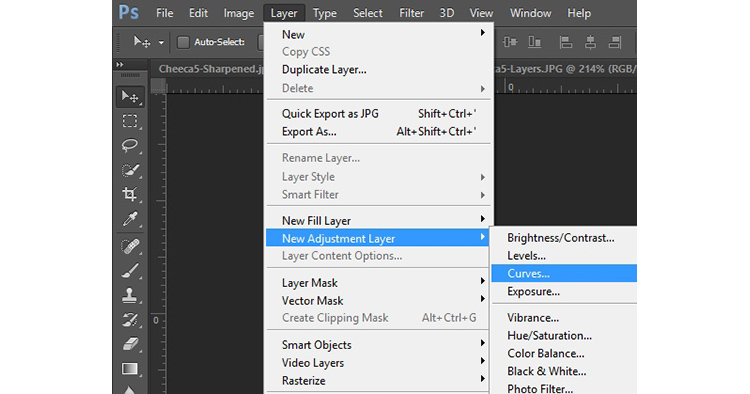
The first thing to do is make the changes you want to the image, which will then be blended into the selected areas later. To make those changes, I am going to create a Curves adjustment layer. As mentioned in the prior article, Curves adjustment layers are one of the most powerful tools in Photoshop. They allow you to selectively effect brightness, contrast, and/or color. To create one, just select Layer > New Adjustment Layer > Curves. You can also click on the Curves icon in the adjustment layer panel. Don’t worry though – we are not going to do anything complicated with the Curves Adjustment layer.

Graphic9-NewAdjustmentLayer

Of course, you don’t have to use a Curves adjustment layer to make adjustments to your picture, you can use any of the adjustment layers offered by Photoshop. If you are more comfortable with Levels, use that. If you want to change the brightness levels, there are Exposure and Brightness/Contrast adjustment layers. If you want to make changes to color, you can use the Hue/Saturation or Vibrance adjustment layers. I consider Curves to be one of the most powerful tools in Photoshop, so that is what I use, but you can use whichever one you want, or you are most comfortable using.

Step 2: Add in the Effect

Once your Curves adjustment layer is created, just add the effect that you want. Remember that a white mask is automatically applied to all adjustment layers – so it reveals everything – but we will change that in a second.

I want to add contrast, therefore I will just scoot in the endpoints of my curves adjustment layer. You can also drag the line up or down in places. The idea is to steepen the curve where you have a lot of pixels. Doing so adds contrast, which is what we want.

You don’t need to do anything fancy here. Go ahead and add the effect to a greater extent than you will want it in your picture. In other words, overdo it. Don’t worry if the picture doesn’t look quite right.

Graphic1-Curves

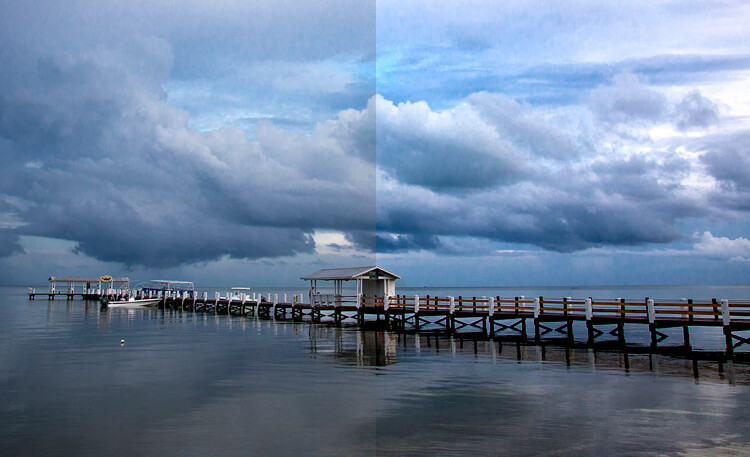
In addition, don’t worry that the effect is occurring across the entire picture at this point. We will make the changes apply selectively in just a second. For now, just look at the area of the picture where you want the effect to be applied and add it in accordingly. For example, in this picture below, my change is added to the entire picture, even though it results in effects I don’t want (like blowing out the sky on the right). We will fix that in the next step.

Graphic2-InitialChanges

The left side of this image shows the original image, the right side shows it after the application of the curves adjustment layer. Notice the far right portion of the sky is blown out, but we’ll remedy that by limiting where the effect applies in the next step.

Step 3: Brush it in

Now comes the part when you limit the areas where your changes apply to the image.

Start by masking off the entire image, just press CTRL/CMD+I to do so. You will notice that two things happen. First, the effect you just added to your picture is hidden, it’s as if you never made any changes (don’t worry, the changes are still there, they’re just hidden). Second, the box next to the adjustment layer you created turned black. The box represents the layer mask. As we discussed in the last article, a white layer mask means the changes show through to the image (which is why you saw the effect of the changes when the layer mask was white). A black layer mask means the effect does not show up on the picture. Since our layer mask is now black, the effect does not apply anywhere in the picture.

Graphic3-BlackLayerMask

Now we can begin the process of adding the effect in gradually. To do so, we will use the Brush tool. You can select it from the list of tools on the left side of your screen (tool panel), or you can just press B to call it up. While you are at it, go ahead and press the D key on your keyboard. This will ensure that the brush is set to its default foreground color, which is white, which is what you want since you will be adding the effect to the picture.

If you just left the brush as is, when you used it to paint in your picture, it would add the effect 100%. That is not what you want here. You want to add the effect in gradually, so it blends in. Therefore, go to the top of your screen and find Opacity. Pull the Opacity to the left until it is in the range of 5% to 15%. In my case I will use 10% (you can also just type 15 on your keyboard and it will apply to the opacity of the brush while that tool is selected). The lower the opacity, the less the effect gets added with each brush stroke – and the more gradual the change. If you have the patience to keep the Opacity very low (some people go as low as 2-3%), you will be rewarded with very gradual changes.

Graphic4-BrushTool

Now you will just paint in the effect. Before you do so, also make sure that the hardness of your brush is set to 0%. You want as soft a transition as possible. In addition, use as large a brush as your picture allows. The larger the brush, the softer the transition. The easiest way to change the size of your brush is with the square bracket keys. The left bracket [ makes the brush smaller while the right bracket ] makes it larger.

Now just click in the areas where you want the effect applied. You will have to do this multiple times because you have the opacity set very low. That is okay though, be patient. By doing it this way you are ensuring that it’s blended in gradually. You can also add the effect more in some places and less in others. Just click a few more times where you want the effect to be the most visible.

Graphic5-BrushingIn

Step 4: Check Your Work and Adjust

You can check your work by clicking the eyeball next to the layer. When you turn off the layer, Photoshop will show your image without your effect added. Click the eyeball again to see your progress and turn the layer back on.

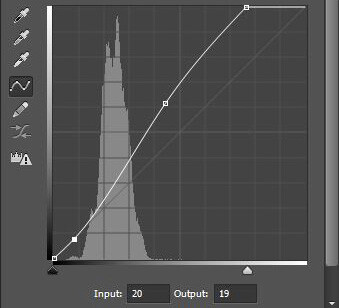
Here is the histogram after using the brush tool to paint in white. It shows only the pixels that were selected via the brush.

Here is the histogram after using the brush tool to paint in white. It shows only the pixels that were selected via the brush.

If you found you overdid the effect, you can always back it off. You do so by turning the color of your brush from white to black. Remember that white reveals the adjustments, black hides them. You could undo the effect by stepping backward (Edit > Step Backward), but the easiest way to do so is just press the X key (that switches the foreground and background colors so you now have black on top). Now when you use your brush it will be removing the adjustment you created. Remember that your opacity percentage applies whether your brush is painting with white or black. When you are done removing the adjustment, press the X key to go back to a white brush and continue adding the effect where you want it.

You can also go back and adjust your Curve after you have brushed it in. In fact, you should get in the habit of checking the curve your originally set. Once you have used your brush tool, the histogram will show only those pixels within the selected area (where you painted white). In general, you will want to make sure that the steepest part of the curve corresponds with the part of the histogram where you have the most pixels. Make a tweak to your curve to make sure it looks how you want.

Step 5: Repeat

Another great thing about this technique is that you can do it over and over again. It’s not uncommon to see photographers with a long list of layers, where they have made adjustments to specific parts of the image. You can use this technique to change the brightness values of the picture, making parts lighter or darker. You can also change the contrast, as we did above. You can even change the colors by going into the individual color channels of the Curves adjustment layer. Of course you could also use the brushing techniques above on a Hue/Saturation adjustment layer.

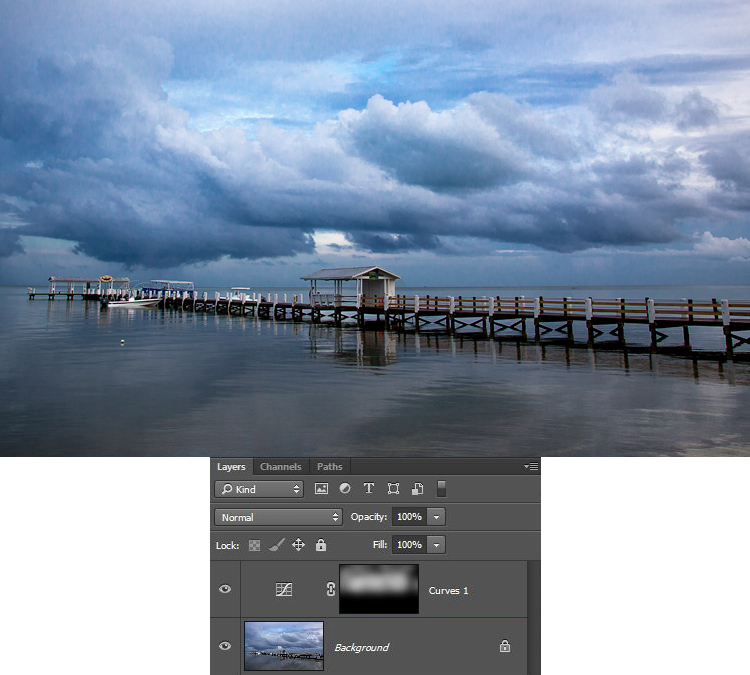
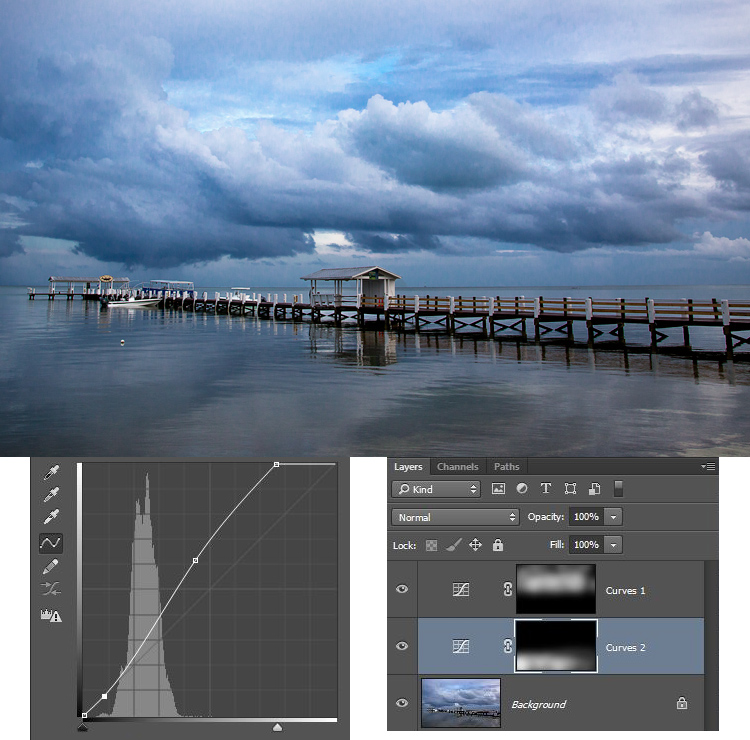
Here I used the same process that was set forth above to brighten the water. I created another Curves adjustment layer, turned the layer mask black, and then brushed in the effect with brush set to white at low opacity.

Graphic7-WaterAdjustmentToo

Other Changes to Your Image

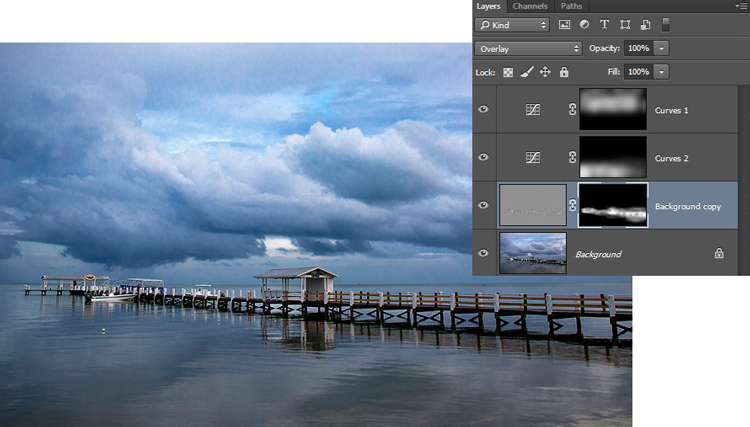
In this particular image, I also wanted to sharpen the pier without sharpening the rest of the image. To do this, I will use the High Pass Filter (which is a remarkably powerful sharpening tool) and apply a layer mask to limit the effect to the pier. This will demonstrate the use of this layer masking technique outside the context of adjustment layers, which we have been using so far.

First, let’s quickly walk through the use of the High Pass filter. To sharpen with the High Pass filter, first duplicate the layer (CTRL + J). Then change the blending mode to Overlay (don’t worry about how this makes your image look). After that, call up the High Pass filter (Filter > Other > High Pass). This will result in a small dialog box where you set the amount. Here I will go with an amount of about 4, which I find is pretty typical. Press ok and the effect will be applied to the entire image. This is a pretty handy sharpening technique, but we’ll make it better by applying it only to a specific area (the pier).

To do this, we’ll add a layer mask and use the same brushing technique. Since we are not starting with an adjustment layer, we will need to add a layer mask. Just click on Layer > Layer Mask > Hide All, which will create a black layer mask. After that, select your brush (press B), set the color to white (press D for default), and set your opacity. Whereas you had been using a very low opacity earlier, in this case you can use a much higher Opacity. Brush in the effect just on the pier and watch it become sharper.

Graphic8-Sharpening

Conclusion

Although this technique is fairly simple, it is a pro move. I know photographers that edit their photos with nothing but a series of Curves adjustment layers where they blend in the effect in this manner. Give it a shot on some of your photos and I believe you will like the results.

googletag.cmd.push(function() {
tablet_slots.push( googletag.defineSlot( “/1005424/_dPSv4_tab-all-article-bottom_(300×250)”, [300, 250], “pb-ad-78623” ).addService( googletag.pubads() ) ); } );

googletag.cmd.push(function() {
mobile_slots.push( googletag.defineSlot( “/1005424/_dPSv4_mob-all-article-bottom_(300×250)”, [300, 250], “pb-ad-78158” ).addService( googletag.pubads() ) ); } );

The post How to Blend in Adjustments Using Layer Masking in Photoshop by Jim Hamel appeared first on Digital Photography School.


Digital Photography School

 
Comments Off on How to Blend in Adjustments Using Layer Masking in Photoshop

Posted in Photography


PhotoshopUser TV: Masking Text Effect and Cyborg – Episode 423

16 Sep

This week on PSUTV, Corey shows a masking text effect and Pete has a cool tip on making a cyborg.

This Week’s Sponsors:

Wacom | mpix | B&H Photo | Kelby Training | NAPP | onOne Software | Peachpit | Squarespace | Expo Imaging | Intel | Athentech

Photoshop User TV Episode 423 is now playing!

Download Episode 423
(In order to download this file directly to your computer, right-click (Control-click on Mac) on the Download link and choose the Save As option.)

Photoshop User TV

 
Comments Off on PhotoshopUser TV: Masking Text Effect and Cyborg – Episode 423

Posted in Photography


Architectural Photography Using Layer Masking to Correct Contrast and White Balance

17 Dec
Dps 2

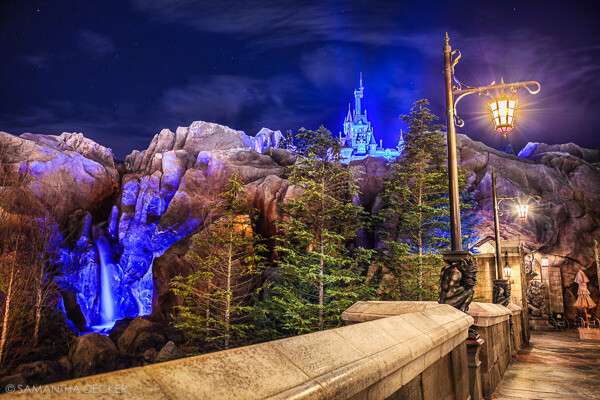
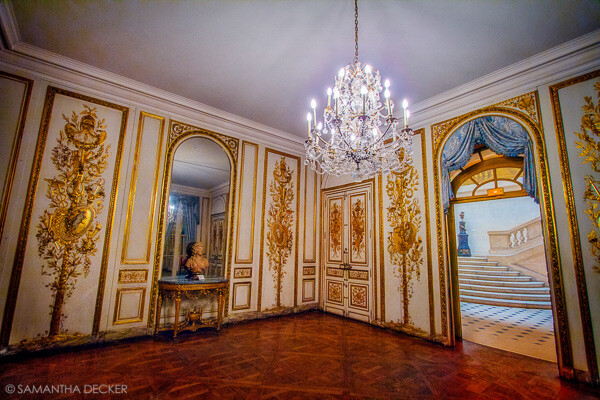
A challenging nighttime scene was overcome with multiple exposures and layer masking.

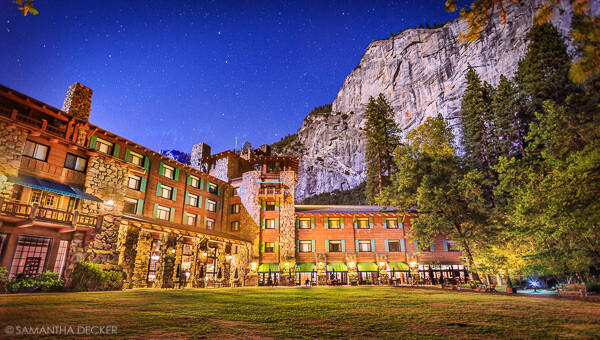
Blending indoors and outdoors in architectural photography can often create a compelling image. Unfortunately, however, it is often fraught with exposure and white balance issues. These issues are compounded at night, when artificial lights inside buildings coupled with the darkness of the night sky create an especially contrasty image with an unattractive colorcast created by the different light sources. Luckily, with multiple exposures and layer masking in Photoshop, you can create a photo that looks a lot like what you saw with your own eyes.

This method is a little different than HDR, which involves taking three or more photos at different exposures, then using automated software to combine them into one image that captures the range of light in the scene. Here, you’ll be taking three or more photos and blending them manually, since HDR software often creates unpleasant artifacts and odd color blending when used in the type of situations presented in this tutorial. You can always try HDR software first, and if the colors don’t seem to bleed, you can skip down to the later part of the tutorial for dealing with the colorcasts.

Dps 1

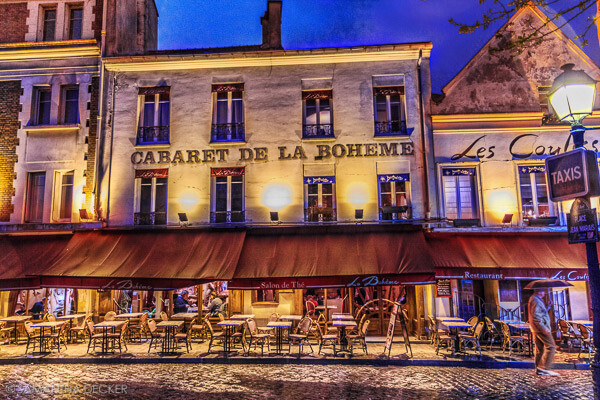
An image that required three exposures and had a color cast from the lamps.

Shoot three or more exposures on a tripod

You need to shoot as many photos as it takes to capture the dynamic range (the range from light to dark) in the scene. It is really important to shoot in RAW, to get as much mileage out of each photo as possible. A tripod is also necessary, since you’ll probably be taking these at night, and also because you won’t be using HDR software which aligns the images. You can use auto exposure bracketing to capture three images, but at night, exposures on the high end can often exceed 30 seconds, the longest shutter speed most cameras will let you shoot manually. It’s probably easiest to use manual mode, set your ISO to 100 or 200, stop down your aperture to f/7.1 or f/8 (if it’s really dark out, you can open it up wider), and then take a series of shots at increasingly slower shutter speeds until you’ve captured the range of light in the scene. If you need to go past 30 seconds, go into bulb mode (consult your camera’s manual for how to find it), and use a remote trigger release, holding the shutter open as long as you want. Don’t worry about white balance yet.

Dps 3

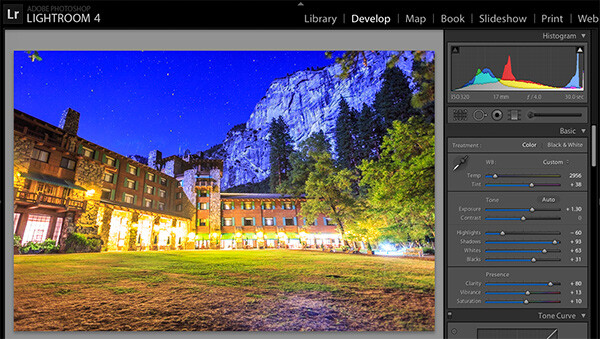
Processing one of the RAW files in Lightroom. Here you can see where just processing one RAW file wouldn’t be sufficient.

Process each exposure in Lightroom or Camera Raw, then open as layers in Photoshop

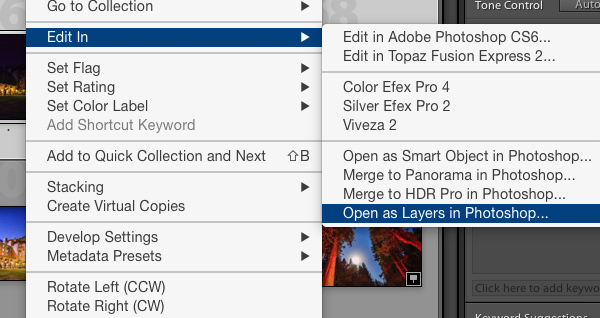
First, you are going to process the photos for exposure only, ignoring white balance. If you don’t have Lightroom, you can do this in Adobe Camera Raw. Since you have multiple exposures, you don’t need to go crazy trying to recover lost highlights (overblown bright spots) and shadows (dark parts that look black), but you want to recover them a little bit to give you more leverage later on in the process. There’s no magical formula for processing here. I usually apply lens profile correction, remove chromatic aberration, and do a little noise reduction before bringing down the highlights a little bit and bringing up the shadows and whites a little bit. Once you’re done processing each exposure, select them all, right click, and select “open as layers in Photoshop. Now you’ve got an image with three or more layers all ready to go, but we’re no quite ready to do the layer masking yet.

Dps 4

Go back and reprocess for white balance

White balance is a setting that keeps the whites in the image white, removing any colorcasts. Different light sources have different white balance settings though, so if you have a photo with two or more different light sources (such as the night sky and an artificial light), no matter how you adjust your settings, you’ll always have a color cast somewhere on your photo. What you’re going to do here is reprocess each photo so that you’ve corrected any colorcasts. If you’re lucky, you’ll have no more than two light sources in the photo. Unfortunately, though, there can often be more.

It’s important to note that you only have to correct for colorcasts that are in properly exposed parts of each photo. For instance, in one of your overexposed photos, don’t worry about the white balance for the overblown highlights. You’ll be discarding that part of the photo later. For one of your underexposed photos, don’t worry about correcting for the shadows, since you’ll also be discarding that. Start with your most properly exposed photo, and correct for any colorcast you see (for instance, the lights inside a building have a yellow cast).

All you have to do to correct the white balance is slide those two sliders (one goes from blue to yellow, and the other goes from green to magenta) until the part of the photo with the colorcast looks normal. When you’re done, open that photo in Photoshop, and make it a layer in the other image you have open. Do this by hitting Ctrl-A on Windows, or Command-A on a Mac to select the photo you just opened, then Ctrl-C or Command-C to copy it. Then click on the image with the three layers, and hit Ctrl-V or Command-V to paste it in as a layer. Repeat the processing until you have corrected all colorcasts in the photo. Then, move on to the other exposures, and correct any color casts there (remember, only the properly exposed parts need to be corrected).

Dps 5

Mask in one layer at a time

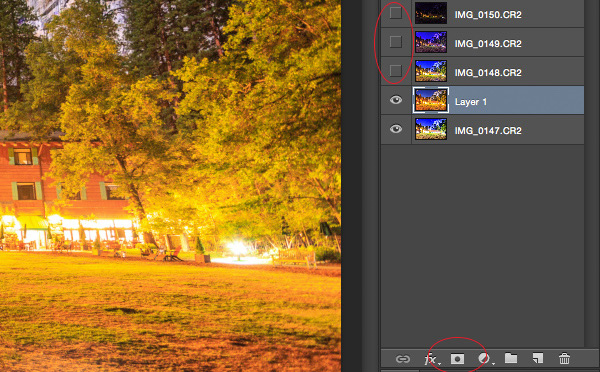
Once you’ve finally got every exposure and every colorcast accounted for as separate layers, you’re going to mask them in one by one. I start by making all but the bottom two layers invisible and masking in one layer at a time (by the way, the order of the layers does not matter, but having the most properly exposed image on the bottom will probably make things easier). Do this by clicking the little eye to the left of each layer except the bottom two. Then, with the layer one up from the bottom selected, click the layer mask icon (it’s a rectangle with a dot in the middle, found at the bottom of the layer panel). Make sure the paintbrush icon is selected as well (this can usually be found on the left hand side). You may need to adjust your brush size as you go through.

When painting with black on the layer mask, you will cover up the parts of the layer you don’t want appearing (the improperly exposed or color cast parts of the image are what you want to cover up). When you want to go back and reveal parts because you’ve made a mistake, paint with white on the layer mask. Click X on your keyboard to toggle back and forth between black and white.

When you’ve masked out all the parts of the layer you don’t want shown, select the layer on top of that and make it visible (click the space where the eye used to be). Then create another mask and start masking that layer. Keep revealing layers and masking them in until you’re done. In some cases, one part of the photo may be properly exposed in more than one image. In this case, keep the one that looks better to you. Once you’ve finished this process, save the photo as you would normally. If you think you might come back to this photo later and edit it, make sure to save a copy as a PSD.

Dps 6

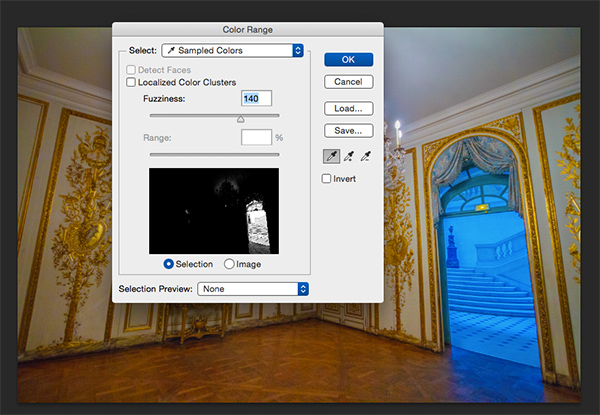
Sometimes you get lucky, and the part of the image that’s colorcast has a very strong hue to it. If you have a colorcast that’s almost all one color, you can automate the masking process a bit for that layer. In the top pane, go to Select –> color range, then click somewhere in the colorcast. Look at the preview. You want the part of the image that’s your colorcast to be almost completely white, and the rest to look almost completely black. Adjust the fuzziness slider until this is the case, and then click ok. You actually want to select the inverse of that, so go to Select –> inverse. Now click the layer mask icon, and you’ll have a mask that hopefully masks out the colorcast. If it doesn’t look right, undo it and try it again with a different fuzziness setting. This is not a perfect fix. You will still need to do some fine-tuning, but it really helps move things along quicker.

Dps 7

A simple “select color range” layer mask got rid of most of the colorcast in this photo.

Conclusion

This is just one method of conquering the challenges brought on by nighttime architectural photography. As you start working with photos of this nature, you may find a different method that you prefer. Luckily, many photos only require some of the steps detailed in this tutorial. Sometimes you only need one exposure, but you need to process for colorcasts. Other times, the white balance is even, but you need to mask for exposure. It takes practice to master these intricate masking techniques, so don’t give up if you’re unhappy with your results at first. Start with simpler photos with fewer colorcasts and exposures needed before diving into a really complex one. In time you’ll be creating photos that look as natural as they appeared when you saw them in person.

Dps 8

A single exposure that required layer masking to correct colorcasts.

Have you got any tips for doing architectural photography or using layer masking? Please share in the comments below.

googletag.cmd.push(function() {
tablet_slots.push( googletag.defineSlot( “/1005424/_dPSv4_tab-all-article-bottom_(300×250)”, [300, 250], “pb-ad-78623” ).addService( googletag.pubads() ) ); } );

googletag.cmd.push(function() {
mobile_slots.push( googletag.defineSlot( “/1005424/_dPSv4_mob-all-article-bottom_(300×250)”, [300, 250], “pb-ad-78158” ).addService( googletag.pubads() ) ); } );

The post Architectural Photography Using Layer Masking to Correct Contrast and White Balance by Samantha Decker appeared first on Digital Photography School.


Digital Photography School

 
Comments Off on Architectural Photography Using Layer Masking to Correct Contrast and White Balance

Posted in Photography


Understanding Masking in Photoshop

31 Aug

Header

Masking is one of those techniques that will change the way you use Photoshop. Understanding this technique can help you to jump from being a beginner level Photoshop user, to a more advanced one. In this article, I will explain how masking really works in Photoshop, its few key concepts, and how Masking helps you to perform non-destructive editing.

The skills you need to get started masking in Photoshop are being able to use the brush tool to paint color, understand two colors black and white, and knowledge of how layers work in Photoshop, which I assume you have very sound knowledge on.

What is masking what does it do in Photoshop?

If you can relate the word masking with the mask, it may make some sense. Why do we use a mask, to cover the face, right? So why would we use masking on a layer, to cover or uncover the content of any layer. With a mask you can control the transparency of a layer. But that is what opacity and fill is for, right? Yes, opacity and fill do control the transparency, but it works for whole layer. What if you would like to have only the right part to be transparent and the left part to be completely visible? That’s when masking comes into play.

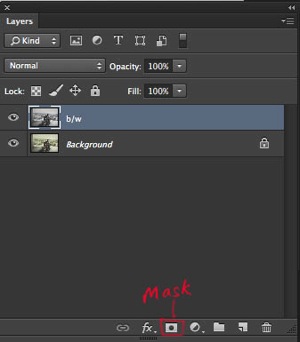
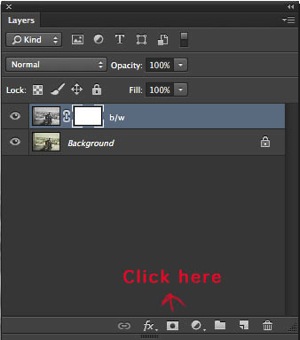
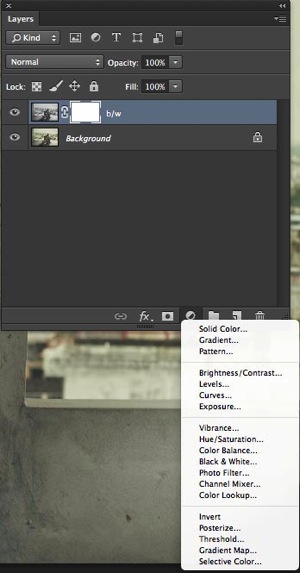
Masking works in two ways. First, you simply add a mask on any layer by clicking the third option on the bottom of layer palette. The other way is by using adjustment layers, which always comes with a mask.

Background without mask

This image shows a layer with no mask applied. I have highlighted the third option on the layer palette. That is where you add a mask.

Adding mask white

Clicking on the mask option will create a white layer mask on the layer selected.

Adjustment layer

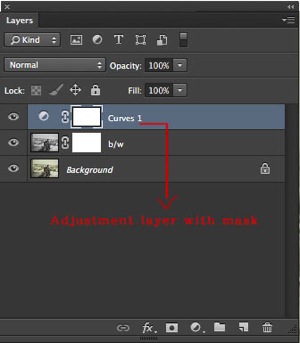
This image shows an adjustment layer. They help you to perform non-destructive editing, and every adjustment layer created this way, comes with a white mask.

Adjustment layer with white mask

This shows that a new curve adjustment layer has been applied with the white mask.

While working with masking please remember that white shows the content where as black hides. If your mask is white, the mask is transparent and the layer is fully revealed, whereas if the mask is black it is opaque and the layer below will show through. Below are a few examples that will help you to understand masking better.

A handy saying to help you remember: white reveals, black conceals

White mask

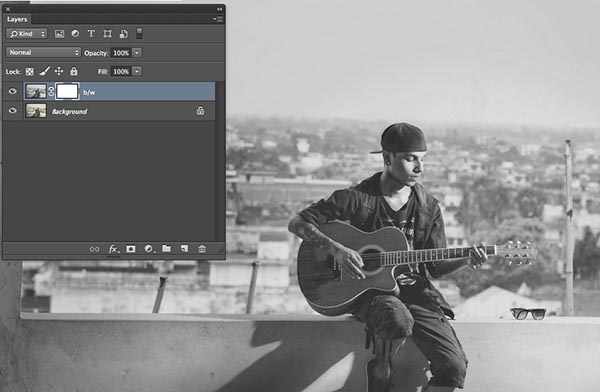
The image above shows, that the white mask reveals the content of the layer it is affecting. I duplicated the background layer and desaturated it with Shift+Command+U on a Mac (Shift+Control+U on PC).

Black mask

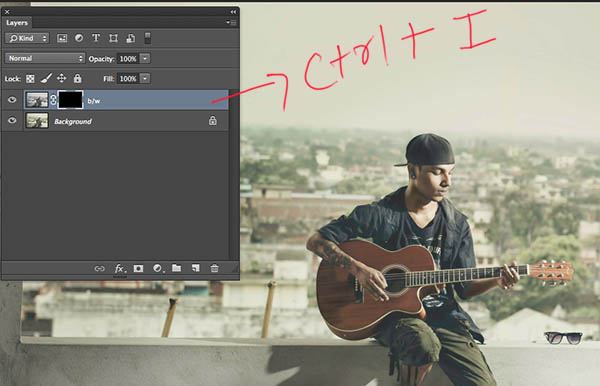
With Ctrl/Cmd+I, you can invert the white mask into a black one. Since black hides the effects, the image has now been changed from back and white to color, from its original state (the layer below is now visible)

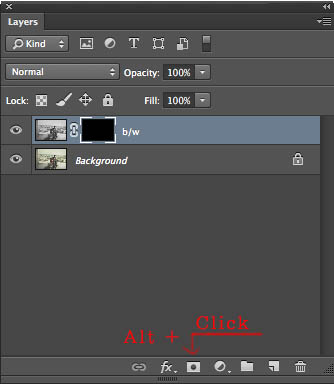
When you first add a mask it will initially be white, but you can change it into black either by inverting the mask, Cmd/Ctrl+I, or you can fill with black or white. Alternately, by simply pressing Alt while clicking to create the mask would also result in a black mask.

Creating black mask

Additional tip

  • Step 1. First click D on your keyboard (default), which will fill your background color with white, and foreground color with black.
  • Step 2 Select the mask
  • Step 3 Press ALT+Backspace to fill with the foreground color (black) and Ctrl+Backspace for to fill with the background colour (white). You can use X to swap the foreground and background colors.

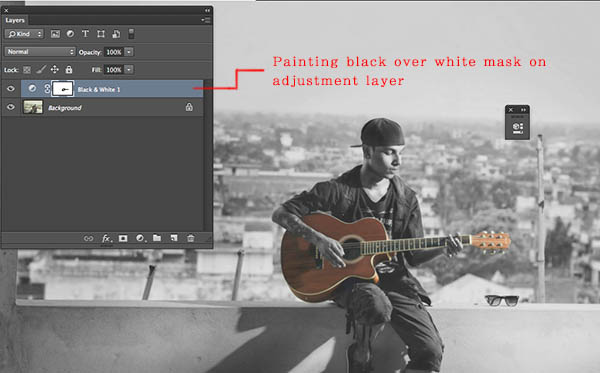
You can now paint on the mask with the brush key selected. Make sure your foreground color is opposite to the color of the mask. If you are painting with black on a white mask, the content of that part of layer is becoming transparent while the white parts remain as is. If you are painting white over a black mask, then that part would be back to its original form. You can play around with the percentage of fill and opacity to get more control over your workflow.

Painting with black on mask

Here I painted the guitar with a black brush over the white mask, resulting in the visibility of color from the layer below.

Additional tip

Simply press your number on the number pad and your opacity will change as per. If you press shift plus the number, then its fill will change.

  • 4=40%
  • 4+9= 49%
  • 0+4 = 4 %

Do you have any other masking tips and tricks? Please share in the comments below if you do, or if you have any questions.

The post Understanding Masking in Photoshop by Anup Ghimire appeared first on Digital Photography School.


Digital Photography School

 
Comments Off on Understanding Masking in Photoshop

Posted in Photography


tadaa: Bokeh und Masking für’s iPhone

18 May

Ein Beitrag von: Anne Koch

Für mich ist mein iPhone eine gute Immerdabei-Kamera geworden. Ich fotografiere damit wieder mehr einfach so und zwischendurch ganz ohne Druck. Das ist für mich von großem Wert, da ich beruflich auch fotografiere (da natürlich nicht mit dem iPhone).

Das iPhone hat meine Fotografie ein gutes Stück wieder befreit. Wenn das gemachte Bild etwas kann – super! Wenn nicht – auch nicht tragisch, ich hatte ja kaum Aufwand. Ich probiere wieder mehr aus, einfach so, ohne den Anspruch, dass da jetzt unbedingt Großartiges entstehen muss.

tadaa © Anne Koch

Unverzichtbar ist für mich dabei die App tadaa geworden. Das deutsche Start-up sitzt in der Hamburger Speicherstadt und auch wenn die Funktionen auf den ersten Blick denen von Instagram sehr ähnlich sind, so gibt es doch einige Besonderheiten und ganz klare qualitative Unterschiede. (Ganz abgesehen davon, dass Instagram inzwischen Facebook gehört und damit immer ein komisches Bauchgefühl bleibt, wenn man Bilder teilt.)

Was jetzt kommt, ist eine absolute Premiere, denn normalerweise zeige ich keine Vorher-Nachher-Bilder. Ich bemerke aber bei mir selbst, dass ich immer wieder zwischen Original und Bearbeitung hin- und herwechsle. tadaa kann einfach Dinge aus einem iPhone zaubern, von denen ich nie dachte, dass mein Telefon das kann.

Ich will hier jetzt gar nicht alle Funktionen ausführlich schildern, sondern mich vor allem auf Masking und Bokeh-Tilt-Shift konzentrieren, da das unscheinbar daherkommende, aber unglaublich mächtige Tools sind.

Aber mal von Anfang an, eine kleine Anleitung:

tadaa © Anne Koch

Die Bearbeitungstools von tadaa: Filter

tadaa hat insgesamt 35 unterschiedliche Filter (auch im Liveview, falls man mag), immer wieder kommen neue Filter dazu, kostenlos für alle registrierten User. Die Registrierung kostet auch nichts und lohnt sich sowieso. Wer Filter verpasst hat: Soweit ich weiß, kann man eine Mail an tadaa schreiben und nett danach fragen. Überhaupt ist der Support freundlich, schnell und zuverlässig.

tadaa © Anne Koch

Alle Filter kann man in der Intensität anpassen, was ich sehr gern mag, da sie mir bei 100% oft zu stark sind.

Der unscheinbare Apply-Button unten rechts speichert alle bisherigen Einstellungen zwischen und danach könnt Ihr weiterbearbeiten. Ich benutze bei fast all meinen Bildern nicht nur einen Filter, sondern lege mit Apply mehrere Filter mit geringer Intensität darüber.

Für die Grundierung nehme ich zum Beispiel sehr gern Souvenir oder Laika bei etwa 50-60%, insbesondere Souvenir ist nett zu Hauttönen. Danach swipe/wische ich weiter durch meine Lieblingsfilter, bis ich die perfekte Mischung habe.

Für die grauen Tage bietet sich Campfire an, Doku macht schöne Kontraste und schönes Schwarzweiß, Kino ist auch gut für Haut und macht schöne leicht blaue Schatten bei einer feinen Körnung. In letzter Zeit mag ich es, über die Bilder noch ein kleines bisschen Persico zu legen. Aber all das ist natürlich Geschmacksache. Bei der großen Auswahl findet sicher jeder seine Lieblingskombination.

tadaa © Anne Koch

Bokeh und Tilt-Shift

Jeder kennt diese runden, leuchtenden Kreise auf Bildern, die mit Offenblende fotografiert wurden – wir reden von Bokeh. Durch die Unschärfe wird die Aufmerksamkeit auf das eigentliche Motiv gelenkt.

Nun gibt es viele Apps, die mit dem Tilt-Shift-Effekt spielen und so störenden, unruhigen und ablenkenden Hintergrund entfernen sollen. Doch die Unschärfe ist oft platt und langweilig. Auch der Gaußsche Weichzeichner in Photoshop wirkt wenig überzeugend.

Nun – tadaa hat einen Weg gefunden, Bokeh unglaublich realistisch und schön zu berechnen. Es simuliert die echte Physik eines Tessars, jeder einzelne Pixel fällt wie ein Lichtstrahl durch den Algorithmus, in Fast-Echtzeit.

tadaa © Anne Koch

Man kann über die verschiedenen Regler einstellen, wie groß und wie intensiv das Bokeh und die Unschärfe sein sollen.

Es gibt verschiedene Tilt-Shift-Modi bei tadaa: Linear, rund, oval oder auf das ganze Bild bezogen (das wird nachher für das Masking noch relevant). So handhabt man das Tilt-Shift von tadaa:

Mit zwei Fingern bewegt, vergrößert und verkleinert man den Ausschnitt – die zwei inneren Linien sind ganz scharf, der Zwischenraum zwischen inneren und äußeren Linien reguliert den Übergang, dieser kann über „Radius“ geregelt werden. Je nachdem, wie hart der Übergang sein soll.

Über den Blur-Regler kann man die Intensität der Unschärfe einstellen. Wenn Highlights im Bild vorhanden sind, die zu Bokeh werden sollen, macht mehr Unschärfe (mehr Blur) die Kreise größer, wenig Unschärfe macht die Kreise kleiner.

„Highlights“ regelt die Intensität der Bokehkreise, also wie stark sie leuchten sollen. Natürlich müssen für Bokeh irgendwo im Bild Highlights vorhanden sein – einfach Leuchtkreise auf das Bild zu klatschen, hat noch nie überzeugt.

tadaa © Anne Koch

Ich muss gestehen, ich hatte bis auf wenige Ausnahmen immer Schwierigkeiten, mich mit dem Tilt-Shift-Effekt anzufreunden – ganz gleich von welchem Anbieter. Denn man hat nicht richtig in der Hand, was jetzt scharf ist und was nicht, die Dinge sind nun mal nicht immer nur oval, rund oder in einer Linie.

Um glaubhafte Tiefe zu erschaffen, reicht das selten und genau hier kommt bei tadaa das Masking ins Spiel.

Masking

Mit Masking kann man genau bestimmen, wo die Schärfe liegt, ohne Kompromisse. Man markiert einfach mit dem Finger alles grün, was scharf sein soll. Mit zwei Fingern kann man zoomen und das Bild hin- und herschieben, um noch detaillierter zu arbeiten.

tadaa © Anne Koch

Hier alle Schritte der Bildbearbeitung: Original, Maskieren, Bokeh-Tilt-Shift anpassen, Filter (hier „Kino“) auswählen, fertig.

Wie genau und penibel man dabei ist, ist letztlich jedem selbst überlassen. Nur so viel: Wer Perfektionist ist, wird hier auch voll auf seine Kosten kommen. Mit der Bestätigung der Maskierung landet man direkt im Bokeh-Tilt-Shift Modus. Hier kann man wieder anpassen, wie intensiv die Unschärfe sein soll.

tadaa © Anne Koch

Ein nächtliches Bild mit vielen Lichtern. Im Original … naja. Ein rundes Tilt-Shift in den Vordergrund für einen schöneren Verlauf. Maskiert habe ich dann nur die Person.

Wie man hier sieht, bietet es sich oft an, ein lineares oder rundes Tilt-Shift-Feld in den Vordergrund zu legen, damit das maskierte Objekt nicht so ganz frei in der Unschärfe schwebt.

Grundsätzlich versuche ich auch, es so realistisch wie möglich zu halten. Also Dinge auf gleicher Ebene gleich scharf bzw. unscharf zu machen.

tadaa © Anne Koch

Maskiert habe ich hier die Hand, die Blume (ich gebe zu, die war ein bisschen Gefrickel) und das Mädchen. Filter: Helligkeit, etwas Souvenir und ein bisschen Charleston. Hat man eine gleichmäßige Fläche – wie hier den Himmel – muss an dieser Stelle nicht so sorgfältig maskiert werden.

tadaa © Anne Koch

Maskiert habe ich die beiden Fußgänger mit Regenschirmen, im Vordergrund liegt ein lineares Tilt-Shift, das bis zum Bordstein reicht und da ausläuft.

Ein lustiger Anblick, wie sich die beiden durch Wind und Regen kämpfen. Durch das Masking wird der störende Hintergrund ausgeblendet und der Fokus auf die beiden gelenkt. Der Filter Doku hat echtes analoges Korn. Er bietet sich für Masking oft auch an, da er die Übergänge etwas weicher macht.

tadaa © Anne Koch

Maskiert habe ich das Paar, ein rundes Tilt-Shift liegt im Vordergrund. Filter: Campfire, etwas Helligkeit, etwas Persico. Ganz realistisch ist das hier mit der Schärfe natürlich bei dem Pfosten nicht, aber ich habe ihn zugunsten des Fokus auf den Menschen nicht auch maskiert.

Dieses Bild ist ein Beispiel dafür, dass mein Gefühl von einer Situation und einem Bild nicht unbedingt dem entspricht, was die Kamera im „Original“ ausspuckt. So habe ich die Situation nicht gesehen.

Übrigens finde ich nicht, dass „no filter“ oder „out of cam“ ein Prädikat für ein Bild ist, denn die Kamera und die Voreinstellungen interpretieren ja auch schon immer die Wirklichkeit. Und was ist schon Wirklichkeit? Wie wir eine Situation empfinden, beeinflusst doch auch, wie wir sehen. Aber das nur eine kleine Bemerkung am Rande.

12_masking

Maskiert habe ich hier lediglich die tolle Frau, kein zusätzliches Tilt-Shift. Filter: Helligkeit, Souvenir und ein kleines bisschen Woodstock.

Hier ein Tipp für Haare: Fusselhaare zu maskieren, kann sehr … haarig sein. Hier hilft oft auch ein kleiner Tilt-Shift-Kreis um den Kopf.

tadaa © Anne Koch

Maskiert hier: Mein kleiner Neffe und die Schaukelketten, ein rundes Tilt-Shift liegt auf dem Boden für den Verlauf. Filter: Helligkeit und Souvenir. Für mich ist das Maskieren zu einer Art Meditation geworden; ich muss zwar dabei immer die Luft anhalten, aber es lohnt sich.

tadaa © Anne Koch

Maskiert habe ich die Seifenblasen, die Stäbe und Seile und das Mädchen, wieder liegt ein rundes Tilt-Shift auf dem Boden. Filter: Laika, Kontrast und ein bisschen Persico.

Seifenblasen haben ja per se Potential, aber ohne das Maskieren wären die Seifenblase hier in dem Gewirr untergegangen.

Durch das Masking wurden einige Bilder, die sonst achtlos im Müll gelandet wären zu Lieblingsbildern. Die neueste tadaa-Version (4.6) verfügt außerdem über eine patentierte automatische Kantenerkennung – dadurch wird das Maskieren noch mal deutlich vereinfacht.

Und ja, ich weiß, Instagram ist vielleicht einfacher, aber ich benutze am Computer ja auch lieber Photoshop als Paint.

Die Bilder wurden übrigens alle mit einem iPhone 4 gemacht und ausnahmslos mit tadaa bearbeitet.


kwerfeldein – Fotografie Magazin

 
Comments Off on tadaa: Bokeh und Masking für’s iPhone

Posted in Equipment


Photoshop Elements Masking A Blue Sky

29 Oct

In this video I will show you how to replace a gray looking sky with a really nice bright blue sky. If you enjoy this video please check out my DVD collection at: www.jackstechcorner.com
Video Rating: 4 / 5

 
Comments Off on Photoshop Elements Masking A Blue Sky

Posted in Retouching in Photoshop


VTC Photoshop Tutorial – Masking Techniques pt. 1

06 Mar

For the full sized video visit www.vtc.com. Adobe Photoshop Advanced Artistry II, is a course designed for professional designers and photographers who use Adobe Photoshop CS2. The course is designed to showcase cutting-edge creative techniques in many artistic disciplines such as digital imaging, color correction and manipulation, photo retouching, advanced production techniques and other popular graphic effects. This practical step-by-step tutorial by certified Photoshop Trainer Rita Amladi, is guaranteed to raise your knowledge level, and it will inspire you to apply these successful techniques in your own projects right away. In addition, several “Mini-Tutorials” shed light on key concepts and tools covered in each section. An entire section is devoted to teaching you about color management, which will ensure that you get the best possible results on screen and when printed. Work files are provided.