RSS
 

Posts Tagged ‘Manipulating’

Understanding Imaging Techniques: the Difference Between Retouching, Manipulating, and Optimizing Images

09 Mar

The post Understanding Imaging Techniques: the Difference Between Retouching, Manipulating, and Optimizing Images appeared first on Digital Photography School. It was authored by Herb Paynter.

Understanding Imaging Techniques

Three distinct post-production processes alter the appearance of digital photographs: Retouching, Manipulating, and Optimizing. These terms may sound similar enough to be synonymous at first glance, but they are entirely different operations. Once you understand the difference between these three processes, your image editing will take on new meaning, and your images will deliver powerful results.

Image retouching

Photo retouching is image alteration that intends to correct elements of the photograph that the photographer doesn’t want to appear in the final product. This includes removing clutter from the foreground or background and correcting the color of specific areas or items (clothing, skies, etc.). Retouching operations make full use of cloning and “healing” tools in an attempt to idealize real life. Unfortunately, most retouching becomes necessary because we don’t have (or take) the time to plan out our shots.

Our brain tends to dismiss glare from our eyes, but the camera sees it all. A slight change of elevation and a little forethought can save a lot of editing time.

Planning a shot in advance will alleviate much of these damage control measures but involves a certain amount of pre-viewing; scouting out the area and cleaning up items before the camera captures them. This includes “policing” of the area… cleaning mirrors and windows of fingerprints, dusting off surfaces, and general housekeeping chores. This also includes putting things away (or in place), previewing and arranging the lighting available and supplementing the lighting with flash units and reflectors where required, checking for reflections, etc.

Benjamin Franklin coined the phrase “an ounce of prevention is worth a pound of cure,” which pretty much sums up the cleanup chores. We also use the phrase “preventative maintenance;” fixing things before they break and need repair.

Admittedly, we don’t often have the luxury of time required to primp and polish a scene before we capture it, and retouching is our only option. However, sometimes all we need to do is evaluate the scene, move around and see the scene from another angle, or wait for the distraction to move out of the scene.

Sometimes a small reposition can lessen the amount of touchup and repair needed.

We can’t always avoid chaos, but we could limit the retouching chore with a little forethought. It takes just a fraction of a second to capture an image, but it can take minutes-to-hours to correct problems captured.

Image manipulation

Manipulation is a bit different, though it occasionally is a compounded chore with retouching. When we manipulate a photo, we truly step out of reality and into fantasyland. When we manipulate an image we override reality and get creative; moving, adding elements to a scene or changing the size and dimension. When we manipulate an image, we become a “creator” rather than simply an observer of a scene. This is quite appropriate when creating “art” from a captured image, and is ideal for illustrations but perhaps shouldn’t be used as a regular post-capture routine.

Photo-illustration is an excellent use of serious manipulation, and can be quite effective for conveying abstract concepts and illustrations.

Earlier in my career, I worked as a photoengraver in a large trade shop in Nashville Tennessee during the early days of digital image manipulation. The shop handled the pre-press chores for many national accounts and international publications. On one occasion in 1979, we were producing a cover for one of these magazines. On the cover was a picture of Egypt’s President Anwar Sadat set against one of the great pyramids. Unfortunately, the pyramid was in a position that interfered with the titles on the magazine’s cover.

While this is not the exact picture used in the magazine, you see the challenge.

The Art Director for the magazine sent instructions for us to shift the pyramid in the picture so that the titles would not interfere with it. Moving that thing was an amazing feat back then. Normal airbrushing would have left obvious evidence of visual trickery, but digital manipulation opened a whole new potential for near-perfect deception. We were amazed at the potential but a bit nervous about the moral implications of using this power.

This venture was accomplished (over a decade before Photoshop) on an editing machine called a SciTex Response, a workstation supported by a very powerful minicomputer. Nobody outside that small building knew that from Nashville, we pushed an Egyptian pyramid across the desert floor until revealed years later. Shortly thereafter, digitally altered images were prohibited from use as evidence in a court of law by the Supreme Court of the United States. Today, this level of manipulation lets you routinely alter reality and play god on a laptop, sitting on a park bench.

Manipulation is powerful stuff and should be used with serious restraint; not so much for legal reasons, but because of diminishing regard for nature and reality. Fantasyland is fun, but reality is where we live. We quite regularly mask skies and replace boring clouds with blue skies and dramatic clouds, and even sunsets – all without hesitation. We can move people around a scene and clone them with ease using popular photo editing software. Reality has become anything but reality. Photo contests prohibit photo manipulation in certain categories, though a skillful operator can cover their digital tracks and fool the general public. However, savvy judges can always tell the difference.

Typical manipulation consisting of a clouded sky to replay lost detail.

Personal recommendation: keep the tricks and photo optics to a minimum. Incorporating someone else’s pre-set formulas and interpretation into your photos usually compromises your personal artistic abilities. Don’t define your style by filtering your image through someone else’s interpretation. Be the artist, not the template. Take your images off the assembly line and deal with them individually.

Image optimization

Photo optimization is an entirely different kind of editing altogether and the one that I use in my professional career. I optimize photos for several City Magazines in South Florida. Preparing images for the printed page isn’t the same as preparing them for inkjet printing. Printing technology uses totally different inks, transfer systems, papers, and production speeds than inkjet printers. Each process requires a different distribution of tones and colors.

Since my early days in photoengraving, I’ve sought to squeeze every pixel for all the clarity and definition it can deliver. The first rule (of my personal discipline) is to perform only global tonal and color adjustments. Rarely should you have to rely on pixel editing to reveal the beauty and dynamic of a scene. Digital photography is all about light. Think of light as your paintbrush and the camera as nothing more than the canvas that your image is painted on. Learn to control light during the capture and your post-production chores will diminish significantly. Dodging, burning and other local editing should be required rarely, if at all.

Both internal contrast and color intensity (saturation) were adjusted to uncover lost detail.

Even the very best digital camera image sensors cannot discern what is “important” information within each image’s tonal range. The camera’s sensors capture an amazing range of light from the lightest and the darkest areas of an image, but all cameras lack the critical element of artistic judgment concerning the internal contrast of that light range.

If you capture your images in RAW format, all that amazing range packed into each 12-bit image (68,000,000,000 shade values between the darkest pixel and the lightest) can be interpreted, articulated, and distributed to unveil the critical detail hiding between the shadows and the highlights. I’ve edited tens of thousands of images over my career, and very few cannot reveal additional detail with just a little investigation. There are five distinct tonal zones (highlight, quarter-tones, middle-tones, three-quarter-tones, and shadows) in every image, and each can be individually pushed, pulled, and contorted to reveal the detail contained therein. While a printed image is always distilled down to 256 tones per color, this editing process lets you, the artist, decide how the image is interpreted.

Shadow (dark) tones quite easily lose their detail and print too dark if not lightened selectively by internal contrast adjustment. The Shadows slider (Camera Raw and Lightroom) was lightened.

The real artistry of editing images is not accomplished by the imagination, but rather by investigation and discernment. No amount of image embellishment can come close to the beauty that is revealed by merely uncovering reality. The reason most photos don’t show the full dynamic of natural light is that the human eye can interpret detail in a scene while the camera can only record the overall dynamic range. Only when we (photographers/editors/image-optimizers) take the time to uncover the power and beauty woven into each image can we come close to producing what our eyes and our brain’s visual cortex experience all day, every day.

Personal Challenge

Strive to extract the existing detail in your images more than you paint over and repair the initial appearance. There is usually amazing detail hiding there just below the surface. After you capture all the potential range with your camera capture (balancing your camera’s exposure between the navigational beacons of your camera’s histogram), you must then go on an expedition to explore everything that your camera has captured. Your job is to discover the detail, distribute the detail, and display that detail to the rest of us.

Happy hunting.

The post Understanding Imaging Techniques: the Difference Between Retouching, Manipulating, and Optimizing Images appeared first on Digital Photography School. It was authored by Herb Paynter.


Digital Photography School

 
Comments Off on Understanding Imaging Techniques: the Difference Between Retouching, Manipulating, and Optimizing Images

Posted in Photography


How to Control Your Background Tones by Manipulating Light Fall-Off

04 May

In this article, I’ll show you how to control your background by manipulating light fall-off.

When using studio lighting, one of the most frustrating things to deal with can be backgrounds. Sure, if you have space, time and the money, you can just stock up on seamless backgrounds covering white, black and everything in between. But if you are on a budget, or are already taxing the limits of your storage space, that’s often not a viable option.

The good news is that it’s entirely possible to take a white or grey background, whether it’s a wall or a seamless backdrop, and manipulate your light so that the background appears black or any shade of grey you can imagine.

The method discussed in this article is quite easy.

How to Control Your Background by Manipulating Light Fall-Off - portrait with black background

Understanding how the rate of fall-off effects your lighting will grant you great control over how your background appears in your photos.

Move the light

To control your background, all that you have to do is move your light. It’s counterintuitive though. To get a darker background, you will move the light closer to your subject. For a lighter background, you would move the light further away.

This approach has the effect of changing the background; however, it also completely alters the quality of light falling on your subject.

For this demonstration, I used a small softbox (around 3×4′) placed directly in front of and above the subject. In the sequence of images below, you can clearly see that the light source is simply moved backward in increments of two feet. Also, you’ll see that the softbox was angled upwards slightly as it moves back so that it points toward the subject and not the floor.

How to Control Your Background by Manipulating Light Fall-Off

The light source is two feet away from the subject and angled down at forty-five degrees.

How to Control Your Background by Manipulating Light Fall-Off

At four feet, the light had to be angled upwards slightly so that it remained pointed at the subject.

How to Control Your Background by Manipulating Light Fall-Off

At six feet, the light on the subject gets noticeably harder, but the background appears as it is in life (its actual shade).

How to Control Your Background by Manipulating Light Fall-Off

The light source as seen 10 feet from the subject.

In terms of the background, the way this works is through light fall-off. As the light source gets closer to your subject, the rate of light fall-off increases.

In the simplest terms possible, this means that as you move your light closer to your correctly exposed subject (remember to recalculate your exposure everytime you move your light), the light reaching your background loses intensity at a higher rate, making the background appear darker.

In this progression (starting left to right) the light begins two feet away from the subject and is moved back in two-foot increments until it is 10 feet away in the right-hand frame.

For these examples, I used a middle grey background to better illustrate the dramatic changes in tonality as the light is moved.

In the first image on the left, the light is two feet away from the subject, rendering the grey backdrop nearly black. At four feet away, in the second image, the background gets noticeably lighter. By the fifth image, at 10 feet away, the grey tone of the background almost matches the subject’s light grey shirt.

Because the light was moving away from the subject in each frame, the exposure had to be metered for each change. The image on the left was shot at f/11, while the one on the right was shot at f/2.8, which is a total of four stops of difference in exposure.

Left: soft light with the light source two feet away. Right: hard light then it’s 10 feet away. Here you can clearly see the difference in the quality of light. Pay close attention to the tonal transition between the shadow and highlight areas of both images.

It’s important to note that moving the light closer, or further away, will also have a dramatic effect on how the light appears on your subject. As the quality of light is altered on the background, it also changes on your subject. Bringing it in close will change both the softness and intensity of the light on your subject, making it both brighter in terms of exposure and softer (quality of light is directly related to the size of the light source and distance from the subject).

Moving the light away from your subject will result in a lighter backdrop. Aside from that, this will also result in harder light on your subject. Just be aware that a lot of subjects won’t suit being lit with hard light and be careful with how far you go, and you should be fine.

Move the light too far back, however, and you may as well be using a small flash from a closer distance. For example, the softbox used here from 10 feet away is only barely distinguishable from a bare speedlight at a closer distance.

The end

That’s it. This technique is easy to put into practice even if you don’t yet understand the technicalities of the Inverse Square Law that makes it work. It isn’t foolproof, however, and you may want to have other tricks up your sleeve if you’re in a position where you don’t have enough space to work with.

Background lights and flags can both go a long way to helping you solve exposing your background the way you want as well. This method is just one other option to add to your skillset, hopefully bringing you one step closer to getting things right in camera.

The post How to Control Your Background Tones by Manipulating Light Fall-Off appeared first on Digital Photography School.


Digital Photography School

 
Comments Off on How to Control Your Background Tones by Manipulating Light Fall-Off

Posted in Photography


Manipulating Natural Light in Wildlife Photography

08 Jan


back-light-wildlife-photography-1-edit

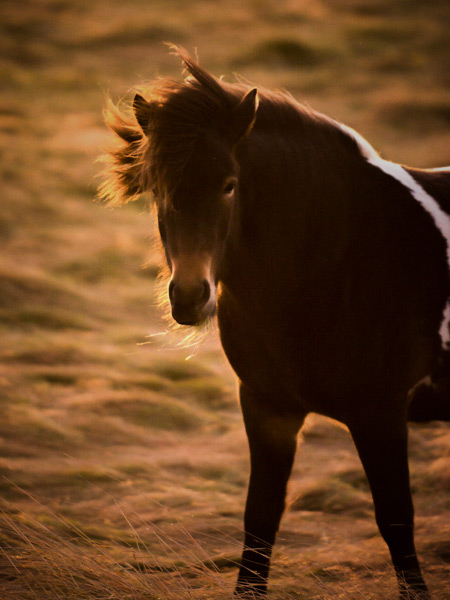
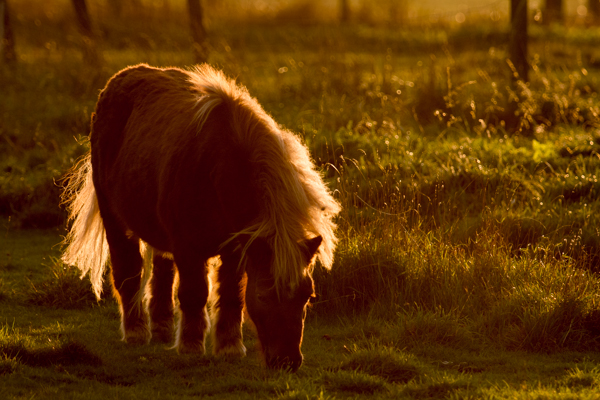
An Icelandic pony, shot against a setting sun

When photographing wildlife, the sun is one of the most useful tools that enables you to create something different or add impact to your images.  By taking control of your position relative to your subject, and to the sun, you can manipulate the available light to your advantage.

Favourable times of day for wildlife photography are at the beginning and end of the day when the sun is low in the sky.  This often coincides with periods of heightened activity of many animals, but also with a warmer directional light from the sun being lower in the sky.  When the sun is low in this way, it lends itself to a number of key natural lighting techniques.

side lighting wildlife photography

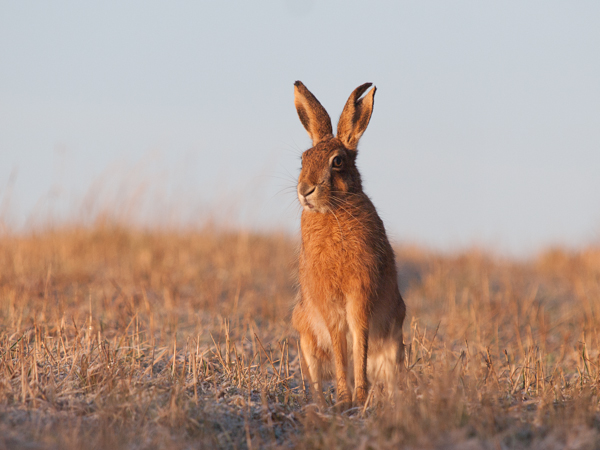
A side lit brown hare (Lepus europaeus)

Side lighting

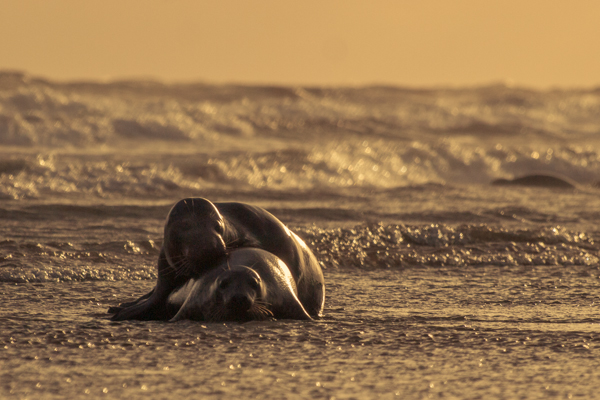
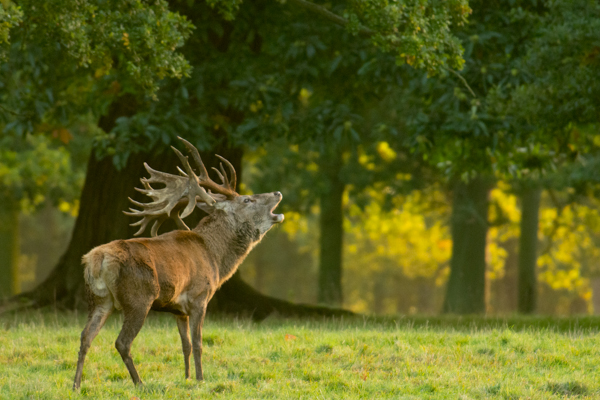
You can naturally side light your subject by keeping the sun at approximately 90 degrees to the direction that you are facing.  The sunlight will then be lighting your subject from the side which can result in a greater sense of shape, form, and texture from the contrast between the soft light and shadows across the subject.

side lighting wildlife photography

Side lit grey seals (Halichoerus grypus) courting at sunrise

It can add a sense of three dimensionality that full-on front lighting cannot do, and because of the soft nature of the light, the highlights and shadows are not too intense and can be easily captured.

side lighting wildlife photography

A bellowing red deer stag (Cervus elaphus) with light from the side

Back lighting

One of the first tips you often hear when starting in photography is not to shoot into the sun. However, by doing just that you can create striking images.  By positioning yourself so that your subject is directly between you and the sun, you can capture a strong backlit outline of your subject that is almost like a halo of light.  This works best when there are fur or feathers to capture the light, and it is preferable that the outline of your subject is easily recognizable.

back lighting wildlife photography

The hair of this pony create a golden outline when backlit by the low sun

Exposing for backlit subjects can be difficult, as you will be dealing with areas of extreme brightness and shadow. It is best to ensure you retain detail in the highlights (as that will be forming the main detail of the image) by manually underexposing.

Silhouettes

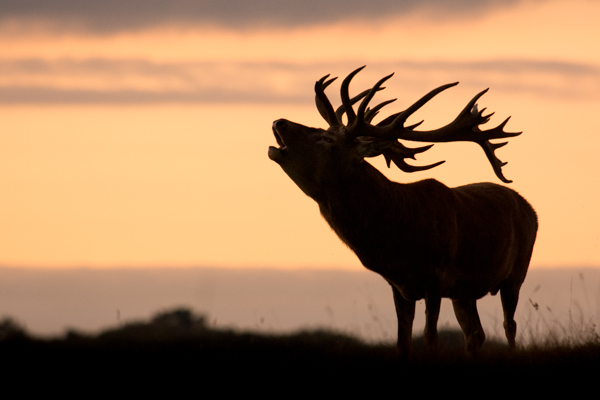
Silhouettes are another way of capturing the strong outline of your subject, but in this instance it is achieved by shooting your subject against a bright background, often the sky.  Just after the sun has gone down is a great time for this technique.  There can often be far more colour in the sky once the sun is below the horizon, and the sky will still be bright enough to easily cast your subject into silhouette.

One tip for shooting wildlife silhouettes is that sometimes it can be good to ensure you retain some detail in the shadows, for example an eye. This can help retain some interest in the large area of black, and to keep a connection between the subject and the viewer.  If you want to do this, you will need to ensure that you do not underexpose the subject too far, such that the shadow detail is lost, to give you flexibility during post-processing.

silhouette wildlife photography

A silhouette of a red deer stag (Cervus elaphus) is an instantly identifiable form against a sunset sky

To conclude

It can be difficult to motivate yourself to get up for sunrise or to be out photographing at sunset, but those times of day give you much more flexibility to use the natural light as a powerful tool in your wildlife photography.  By understanding how the position of the sun relative to you or your subject will influence the final image, you can create images that aren’t possible at other times of day.

So get out there and see how you can use natural light to make you images stand out!

Further reading on wildlife photography:

  • How Low Can you Go? An Illustration of Camera Angle for Wildlife Photography
  • Making Sharper Wildlife Photographs – [Part 1 of 2]
  • Making Sharper Wildlife Photographs – [Part 2 of 2]
  • 5  Big Tips to add Impact and Variety to your Wildlife Images

The post Manipulating Natural Light in Wildlife Photography by Elliot Hook appeared first on Digital Photography School.


Digital Photography School

 
Comments Off on Manipulating Natural Light in Wildlife Photography

Posted in Photography


Aesthetics versus truth: DW Akademie examines ethics of manipulating documentary images

10 May

beforeafter2.jpg

How do you balance the demands of aesthetics and documentary truth? Image manipulation of documentary photographs is nothing new, but it is certainly much easier now than ever before. DW Akadamie has published a feature examining the challenges faced by photojournalists and picture editors in creating attractive and atmospheric images, without compromising their authenticity. Click through for extracts from the article, images and a link to the full feature at www.dw.de.com.

News: Digital Photography Review (dpreview.com)

 
Comments Off on Aesthetics versus truth: DW Akademie examines ethics of manipulating documentary images

Posted in Uncategorized


Stunning Portraits: Manipulating White Balance

17 Jan

I am always looking for more interesting and unique ways to take interesting and beautiful portraits. It is a personal challenge for me to push my own creative envelope as much as possible so that I am constantly broadening my own bold and colorful style. There are so many ways to take a portrait the possibilities are almost endless and the range of emotional and psychological expressions that can be achieved are truly spectacular. Portraits can be editorial, lifestyle, fashion, glamour or extremely creative in style and the true wonderment of any portrait is the amazingly, maddening ability of the human face to portray expression in so many captivating ways. So let’s look at a more creative way to take a portrait that I think gives the final photo a simply stunning look.
Before we get into the details of shooting, I think a little review of white balance is in order as this technique involves a basic understanding of the topic. Every light that we take photographs in, whether it be an incandescent light bulb indoors or the bright shining sun outdoors, is made of of a different spectrum of colors. Now when we look at objects under these light sources with our own eyes, we take it for granted that our vision compensates for all the different color casts of these lights amazingly well and we get a pretty standard representation of all colors in the scene. Basically, when we look at something that is supposed to be white in varying light conditions, our brain interprets the situation and our eye sees it as white. The camera works a little bit different.

The camera sees color in a much different way and has a less sophisticated way to interpret colors under different lighting situations. This is where the white balance setting helps us out. Many photographers that I know tend to keep there cameras white balance on the automatic setting. With the automatic white balance setting, your camera searches for a white reference point in the scene you are shooting. Then all of the other colors are set to this reference point. Therefore, your camera tries to make an educated guess to ensure the colors are represented correctly in your photo. The problem is that sometimes the camera is wrong and we have to bypass the automatic settings and go to that very scary place of setting the white balance in a more manual way, either by using the preset settings that the camera contains or even, heaven forbid, we might have to use some sort of white balancing device to help set our colors. There is a wealth of knowledge on this subject and I encourage you to pursue this topic at your leisure. You can also click on the following links for a decent explanation and breakdown of white balance (DPS-Intro to White Balance and White Balance in Digital Photography). The take home message is simply that we have to be conscious of how our camera views color and understand that we might have to give it some help by changing our camera’s white balance setting.

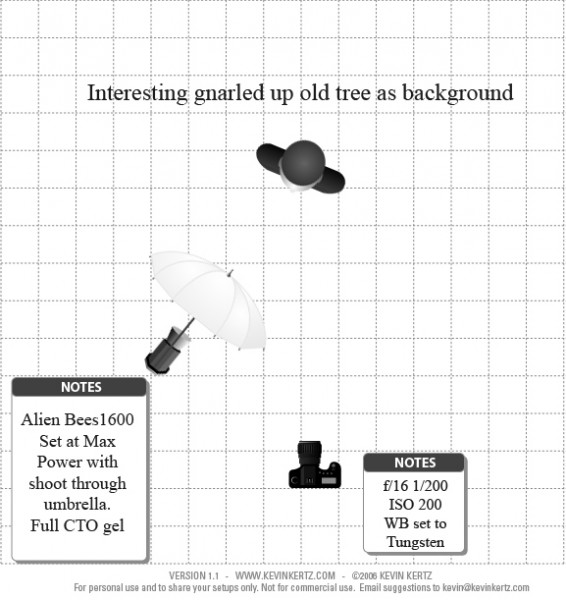
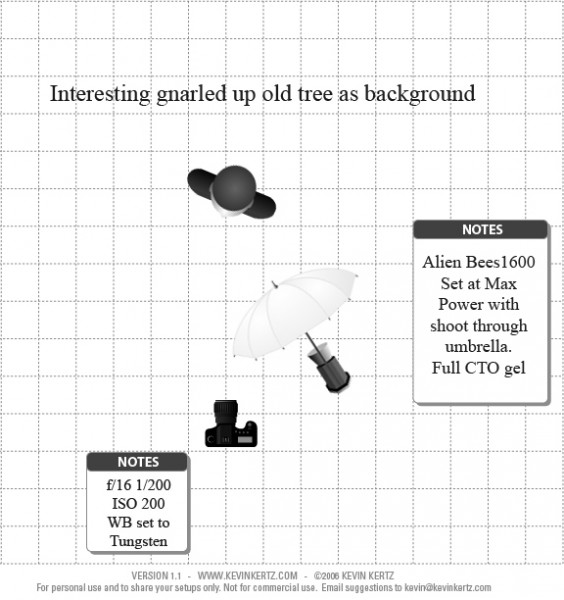
Now that we have introduced the concept of white balance let’s turn the tables on this subject and manipulate it to create some drama and eloquence in a portrait. The lighting setups for these portraits can be seen in the following diagrams:

Essentially, both diagrams are the same with the only difference being the placement of the light with the shoot through umbrella. I switched it from one side to the other just to see what sort of difference it made and concluded that both light placements worked just fine.

The overall concept for the shot was to contrast the old, decayed tree with the young beautiful model (Brittney) and to highlight each with some warm and cool tones for effect. So where does one start with getting the camera settings and flash setup properly?

First, lets talk about the manipulation of the white balance. I used an Alien Bees 1600 flash unit set at full power, covered with a full CTO (color temperature orange) gel, and modified with a shoot through umbrella. The CTO gel is commonly used to balance the color of light from the flash to that of a tungsten light bulb. Thus, when one is shooting flash in an indoor setting, the color of the flash matches the color of the light bulbs in the room and a camera white balance setting switched to tungsten will create a wonderfully balanced color palette in the photo. When used outdoors, a CTO gelled flash, combined with a white balance setting to tungsten, will balance the colors for anything upon which the flash falls. However, this tungsten white balance setting will also cause the sky and anything not receiving light from the flash to take on a majestic deep blue color cast that can be captivating. Compositionally, this simple white balance manipulation creates a mix of cool blue tones with warm orange tones that works fantastically well and makes the image pop.

Now, if you find yourself a little anxious about using flash outdoors you should go ahead and relax cause you can definitely pull off this shot. Before you start shooting with any flash at all, the very first thing you want to do is meter the scene and reduce your exposure about 2 stops so that the background is underexposed. Doing this in full daylight requires a few considerations and I recommend shooting either in the morning or the evening so that the sun is not too high in the sky, otherwise you will have a hard time getting your flash to overpower the sun. Camera settings are pretty easy to figure out. First, the white balance needs to be set to tungsten to get the desired effect. You are shooting in daylight and want the background underexposed so low ISO is a must which in my case was 200. The shutter speed cannot be too fast as it can only be that of your flashes sync speed which in my case was 1/200 seconds. What does this mean exactly? If you set your shutter speed faster than your flash can fire, the shutter will open and close before any light from the flash can be seen by the camera and you will never capture your flash in the image. So the only real variable was the aperture in this case which in order to get 2 stops underexposed for the background had to be at f/16. Basically, the environment for the shoot had already dictated my camera settings.

Since my camera settings were already determined, the only thing I needed to do was to turn on my CTO covered flash and adjust the power until I could see the effect in the image. Since I am shooting in daylight and trying to overpower the sun I knew I would need a lot of power from my flash and actually had brought a second flash unit just in case I needed more power then one flash head had to offer. I started with one flash about 5 feet from the subject at full power and took a few sample shots and it was just a little shy on power. I moved the flash as close to the subject as I could without it being in the frame (about 2.5 feet) and took a few more shots and it looked great. A few outfit changes and a serendipitous bit of sun flare from behind the tree and I had the makings for a stunning set of portraits. I hope this post encourages you to not only push your creative boundaries, but also to take a small step further into the excitingly surprising realm of flash photography.

Post originally from: Digital Photography Tips.

Check out our more Photography Tips at Photography Tips for Beginners, Portrait Photography Tips and Wedding Photography Tips.

Stunning Portraits: Manipulating White Balance


Digital Photography School

 
Comments Off on Stunning Portraits: Manipulating White Balance

Posted in Photography