 I am always looking for more interesting and unique ways to take interesting and beautiful portraits. It is a personal challenge for me to push my own creative envelope as much as possible so that I am constantly broadening my own bold and colorful style. There are so many ways to take a portrait the possibilities are almost endless and the range of emotional and psychological expressions that can be achieved are truly spectacular. Portraits can be editorial, lifestyle, fashion, glamour or extremely creative in style and the true wonderment of any portrait is the amazingly, maddening ability of the human face to portray expression in so many captivating ways. So let’s look at a more creative way to take a portrait that I think gives the final photo a simply stunning look.
Before we get into the details of shooting, I think a little review of white balance is in order as this technique involves a basic understanding of the topic. Every light that we take photographs in, whether it be an incandescent light bulb indoors or the bright shining sun outdoors, is made of of a different spectrum of colors. Now when we look at objects under these light sources with our own eyes, we take it for granted that our vision compensates for all the different color casts of these lights amazingly well and we get a pretty standard representation of all colors in the scene. Basically, when we look at something that is supposed to be white in varying light conditions, our brain interprets the situation and our eye sees it as white. The camera works a little bit different.
The camera sees color in a much different way and has a less sophisticated way to interpret colors under different lighting situations. This is where the white balance setting helps us out. Many photographers that I know tend to keep there cameras white balance on the automatic setting. With the automatic white balance setting, your camera searches for a white reference point in the scene you are shooting. Then all of the other colors are set to this reference point. Therefore, your camera tries to make an educated guess to ensure the colors are represented correctly in your photo. The problem is that sometimes the camera is wrong and we have to bypass the automatic settings and go to that very scary place of setting the white balance in a more manual way, either by using the preset settings that the camera contains or even, heaven forbid, we might have to use some sort of white balancing device to help set our colors. There is a wealth of knowledge on this subject and I encourage you to pursue this topic at your leisure. You can also click on the following links for a decent explanation and breakdown of white balance (DPS-Intro to White Balance and White Balance in Digital Photography). The take home message is simply that we have to be conscious of how our camera views color and understand that we might have to give it some help by changing our camera’s white balance setting.
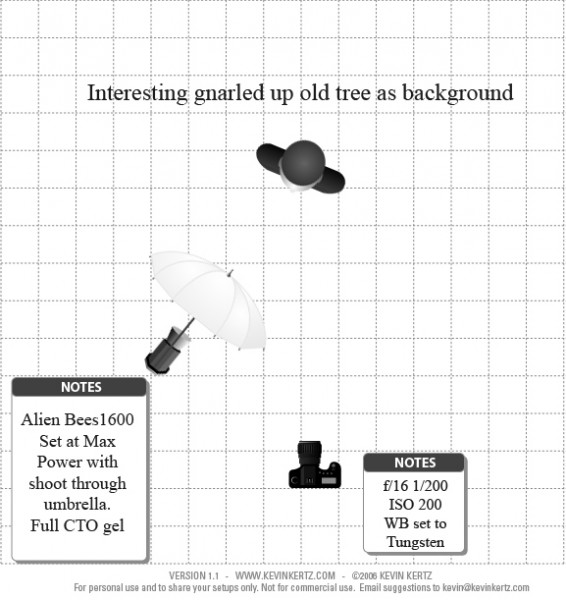
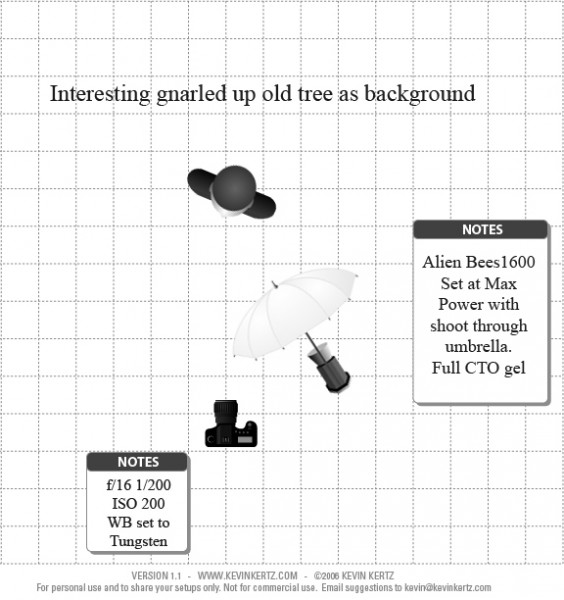
Now that we have introduced the concept of white balance let’s turn the tables on this subject and manipulate it to create some drama and eloquence in a portrait. The lighting setups for these portraits can be seen in the following diagrams:


Essentially, both diagrams are the same with the only difference being the placement of the light with the shoot through umbrella. I switched it from one side to the other just to see what sort of difference it made and concluded that both light placements worked just fine.
The overall concept for the shot was to contrast the old, decayed tree with the young beautiful model (Brittney) and to highlight each with some warm and cool tones for effect. So where does one start with getting the camera settings and flash setup properly?
First, lets talk about the manipulation of the white balance. I used an Alien Bees 1600 flash unit set at full power, covered with a full CTO (color temperature orange) gel, and modified with a shoot through umbrella. The CTO gel is commonly used to balance the color of light from the flash to that of a tungsten light bulb. Thus, when one is shooting flash in an indoor setting, the color of the flash matches the color of the light bulbs in the room and a camera white balance setting switched to tungsten will create a wonderfully balanced color palette in the photo. When used outdoors, a CTO gelled flash, combined with a white balance setting to tungsten, will balance the colors for anything upon which the flash falls. However, this tungsten white balance setting will also cause the sky and anything not receiving light from the flash to take on a majestic deep blue color cast that can be captivating. Compositionally, this simple white balance manipulation creates a mix of cool blue tones with warm orange tones that works fantastically well and makes the image pop.

Now, if you find yourself a little anxious about using flash outdoors you should go ahead and relax cause you can definitely pull off this shot. Before you start shooting with any flash at all, the very first thing you want to do is meter the scene and reduce your exposure about 2 stops so that the background is underexposed. Doing this in full daylight requires a few considerations and I recommend shooting either in the morning or the evening so that the sun is not too high in the sky, otherwise you will have a hard time getting your flash to overpower the sun. Camera settings are pretty easy to figure out. First, the white balance needs to be set to tungsten to get the desired effect. You are shooting in daylight and want the background underexposed so low ISO is a must which in my case was 200. The shutter speed cannot be too fast as it can only be that of your flashes sync speed which in my case was 1/200 seconds. What does this mean exactly? If you set your shutter speed faster than your flash can fire, the shutter will open and close before any light from the flash can be seen by the camera and you will never capture your flash in the image. So the only real variable was the aperture in this case which in order to get 2 stops underexposed for the background had to be at f/16. Basically, the environment for the shoot had already dictated my camera settings.
Since my camera settings were already determined, the only thing I needed to do was to turn on my CTO covered flash and adjust the power until I could see the effect in the image. Since I am shooting in daylight and trying to overpower the sun I knew I would need a lot of power from my flash and actually had brought a second flash unit just in case I needed more power then one flash head had to offer. I started with one flash about 5 feet from the subject at full power and took a few sample shots and it was just a little shy on power. I moved the flash as close to the subject as I could without it being in the frame (about 2.5 feet) and took a few more shots and it looked great. A few outfit changes and a serendipitous bit of sun flare from behind the tree and I had the makings for a stunning set of portraits. I hope this post encourages you to not only push your creative boundaries, but also to take a small step further into the excitingly surprising realm of flash photography.

Post originally from: Digital Photography Tips.
Check out our more Photography Tips at Photography Tips for Beginners, Portrait Photography Tips and Wedding Photography Tips.
Stunning Portraits: Manipulating White Balance
You must be logged in to post a comment.