RSS
 

Posts Tagged ‘Macphun’

MacPhun launches Filters for Photos free app for Mac users

30 Apr

Software developer MacPhun has announced a new app for Mac OSX users that comes with 30 photo filter effects, and which is being offered as a free download. The Filters for Photos application can be downloaded as an extension to Apple’s own Photos program or as a standalone product. It provides one-click effects in a similar way to Instagram, and comes with sketch, oil painting, color tones, black and white, and grain styles – among others. Once applied the filters can be down-played and adjusted according the characteristics of that effect, and users can apply multiple filters to a single image.

When finished, filtered images can be exported directly to social media or other MacPhun and Adobe software programs, or they can be saved to the hard drive.

Filters for Photos can be downloaded from: macphun.com/filtersforphotos.


Press release:

Macphun’s new extension for Photos makes Photos for Mac more creative and fun

Filters for Photos adds 30 creative photo filters, and is available for free

Macphun, a leading photography software developer has today launched a new free app, Filters for Photos. The new software works as a Photos for Mac extension, as well as standalone software? it gives users the ability to add sketch, analog, vintage, and many other filters to their photos in a single click.

The software is the next step in Macphun’s continued support for Photos for Mac. Macphun was the first software developer to launch the Photos extensions in September, 2015. And now all the bestselling Macphun apps work as extensions (Aurora HDR, Intensify, Tonality, Snapheal, Noiseless).

About Filters for Photos
Filters for Photos is available as a free download exclusively from the Macphun Store. It introduces 30 creative filters to suit every hobby photographers’ style? from sketch to oil painting, vintage to rainbow palette. Users can adjust and tweak every filter, plus apply the filters to a certain part of the photo, quickly export their creations to other photo editors, or share via the social media and email.

Apple Photos for Mac is the default photoediting software for every Mac user, and Macphun aim to accelerate the user experience with this exciting new extension. There are 8 default filters in Photos for OS X with limited styles. Filters for Photos by Macphun is changing that.

In addition to 30 new filters, users will be able to:

  • Selectively apply filters with the custom brush
  • Preview all the changes in real time
  • Adjust and tune filters
  • Mix filters, creating new creative styles
  • Export to social media
  • Export to other photo software by Adobe, Apple and Macphun

Why Filters For Photos?
Macphun have introduced Filters For Photos in response to the popularity of oneclick presets and filters in Macphun’s other software. FX Photo Studio by Macphun (available for both iOS and Mac OS) features over 170 different filters? it has over 2 million monthly active users, and a total of over 25 million downloads. Over 65% of people, who use Aurora HDR, Intensify and Tonality, use oneclick presets to give their photos the necessary look in no time. So there’s definitely a high demand for editing tools that allow a quick change of the look of the photo.

Filters for Photos integrates with the Photos for Mac user experience, and helps more people be creative with their photography, without spending anything. Filters for Photos is available as a free download from macphun.com/filtersforphotos

Articles: Digital Photography Review (dpreview.com)

 
Comments Off on MacPhun launches Filters for Photos free app for Mac users

Posted in Uncategorized


Macphun updates Tonality with batch processing and Raw support for more cameras

09 Apr

Software manufacturer Macphun has announced an update to its Tonality application that introduces batch processing, free preset packs, as well as Raw support for a wider range of cameras.

The black and white image manipulation package designed for the Mac platform already offers 160 ready-made manipulation and effects settings, but will now offer between one to three extra settings per month, created by a band of professional photographers. The company has four contributing professionals at the moment and will add a new one each month to enlarge the collection of settings users can download for free. Users can, of course, create their own presets using the tools and controls provided and can then share these amoung themselves. Further pre-sets are available to purchase.

The update also brings raw support for owners of Canon PowerShot G1 X Mark II, Fujifilm FinePix HS50 EXR, Leica Q (Typ 116), Leica SL (Typ 601), Leica M Monochrom (Typ 246), Nikon D300S, Panasonic DMC-G7, Sony DSLR-A700, Sony DSC-RX100M3 and Sony DSC-RX10M2 cameras.

The company has also added a link to the 500px image sharing website to smooth the uploading of pictures directly from the program, and has also made it easier to export files to Adobe’s Photoshop and Lightroom applications.

The program is available in three forms, as a standalone application that is priced £15 (though £7.99 until 14th April), as part of the Tonality Complete Kit you get the Pro Version for £48.99, or as part of Creative Kit 2016 with five other Macphun applications for £89.99.

For more information see the Macphun website.

New Tonality updates brings amateur photographers closer to professionals

Ability to add free preset packs created by worldfamous photographers, 500px export integration, batch processing, new cameras support, and special discounts at Mac App Store

Macphun Software, a leading innovative photography app developer with over 30 million users worldwide, have today launched a major update to Tonality, their awardwinning black and white photo editor for Mac.
To celebrate the update, Macphun are offering a 50% discount and a free batch processing in the MAS version of Tonality for one week only (7th14th April) .

What are the key highlights of the update to Tonality?

Preset Packs from WorldFamous Photographers

Tonality users will now have access to a free preset library, created by professional photographers from around the world. To access the library, users simply need to click “Get more presets” from inside the software.

Macphun have enlisted the expertise of professional photographers, including Serge Ramelli, John Batdorff, Dan Hughes, Andy Krucezk and others to create exciting new preset packs exclusive to Tonality, which can be found at macphun.com/tonalitypresets.

Statistics show that since August 2014 (when the software was launched) Tonality users have processed over 7 million images , and applied over 50 million presets to their photos. Current favourite preset packs include Portrait, Architecture, and Dramatic.

500px Support plus 3month FREE membership

Macphun have teamed up with 500px to allow users to easily export images directly from Tonality to the global online photography community. Macphun are also excited to offer a 3month 500px membership for free as a bonus to Tonality.

More cameras supported

RAW file support has been improved and extended so RAW image files can now be opened from a variety of new cameras: Canon PowerShot G1 X Mark II, Fujifilm FinePix HS50EXR 100, LEICA Q (Typ 116), LEICA SL (Typ 601), LEICA M MONOCHROM (Typ 246), NIKON D300S, Panasonic DMCG7, Sony DSLRA700,
Sony DSCRX100M3, Sony DSCRX10M2.

What other new features and improvements can be expected?

Other improvements include ability to export images from Tonality to Aurora HDR, improved Lightroom and Photoshop export, improved language translation quality, and improved stability.

Standard version of Tonality (available on the Mac App Store)
In addition to all the updates listed above, the Mac App Store version of Tonality now includes batch processing as an InApp purchase. The batch processing inapp will be available for free between 7th and 14th April. Batch in Tonality allows users to process, rename and resize dozens of photos at the same time.

What is Tonality?
Tonality is a compelling black and white photo editor. It combines the authenticity of the
monochrome analog era and the cuttingedge colour technologies of the digital age. Reimagine your monochrome image editing with hundreds of presets, layers, unique digital controls, authentic grain and more.

Pricing and Availability:

Tonality is available as a standard version through the Mac App Store, a standalone Pro version direct from https://macphun.com/tonality , or as part of Creative Kit 2016 at macphun.com/creativekit . The standard version of Tonality is available via the Mac App Store at the 50% discount: £7.99 from 7th-14th April: https://itunes.apple.com/gb/app/tonality/id892581529?mt=12

Tonality CK standalone is available direct from https://macphun.com/tonality at £48.99. Creative Kit 2016, featuring Tonality and five other incredible Macphun apps, is available direct from macphun.com/creativekit at £89.99.

Articles: Digital Photography Review (dpreview.com)

 
Comments Off on Macphun updates Tonality with batch processing and Raw support for more cameras

Posted in Uncategorized


Macphun offers Aurora HDR Pro 3-month payment plan

27 Feb

Macphun has announced a new 3-month payment plan for Aurora HDR Pro, the image editing application for Mac OS X it launched in November. Rather than requiring the full $ 99 USD price at the time of purchase, the payment plan allows users to pay $ 33 per month for three months, while still gaining immediate access to the software license.

According to Macphun, Aurora HDR has been downloaded more than 150,000 times since its launch. The payment plan doesn’t involve a subscription and does not charge interest. The company’s ‘bonus of the month’ gift to customers is also provided to users who opt for the 3-month installment.

The payment plan is now available through the Aurora HDR website.

Articles: Digital Photography Review (dpreview.com)

 
Comments Off on Macphun offers Aurora HDR Pro 3-month payment plan

Posted in Uncategorized


Macphun Aurora HDR version 1.2 update released

19 Jan

Macphun has released Aurora HDR Pro version 1.2, adding a few new features and several improvements to its image editing software. The update includes support for .EXR and .HDR image files, compatibility with Leica M Monochrom (Typ 246) Raw files, and support for Photos for Mac editing extensions.

In addition to the new features, Aurora HDR 1.2 brings several improvements to the application. Macphun claims that the user interface has been improved for 11-inch and 13-inch laptop displays, chromatic aberration reduction has been improved, and the application’s overall performance has been boosted as tools like HDR Merging are now faster.

Improvements:

  • Better Raw file handling for images created by Panasonic, Olympus and Fuji
  • Updates to Adobe Lightroom and Photoshop plug-ins for enhanced support to keywords, metadata, and “F” Screen mode
  • Enhanced masking brush for better smoothing on edges
  • Improved clipping results for overall HDR effect in shadows and highlights
  • Chromatic aberration reduction has been significantly improved
  • Better UI support for 11″ and 13″ displays at multiple resolutions
  • Improved performance and various bug fixes. Faster HDR Merging, faster Deghosting, enhanced Chromatic Aberration Reduction

Existing Aurora HDR users can update to version 1.2 within the application for free, while new users will need to buy a license for $ 39.99 USD.

Via: Macphun Blog

Articles: Digital Photography Review (dpreview.com)

 
Comments Off on Macphun Aurora HDR version 1.2 update released

Posted in Uncategorized


Macphun Aurora HDR Pro Software – First Impressions

08 Dec

HDR, or High Dynamic Range, photography originally started as an attempt to correct the limited dynamic range for standard camera sensors, compared to what the human eye can see or perceive. This is not a new concept, but in case you’ve never heard of it, allow me to explain.

Back in the day, camera sensors had an average dynamic range of about 5–7 stops, where our eyes can easily adapt and recognize ranges from 11 to 14 stops. Nowadays, sensors of modern cameras are much more capable in terms of dynamic range, but they still, depending on the situation, can’t capture the whole range.

5 Images 1 Stop Apart - Basic Preset - Slight Contrast Adjustment

5 Images 1 Stop Apart – Basic Preset – Slight Contrast Adjustment


So HDR techniques utilize multiple images, with different exposures, of the same subject, that are then merged together to create an exposure range closer to what we can perceive with our eyes. Of course, this is not a new concept, and there is always a lot of controversy among photographers regarding the subject. Some people like it extreme or artsy, and others like it more natural. Both can be achieved through HDR methods. There are many different techniques and types of software for doing HDR. But, not all of them are easy to use and understand, with resulting images that are not natural, and over-processed.

Recently Macphun, one of the world’s leading developers in consumer and professional photography software for the Mac, has teamed up with Trey Ratcliff, an artist and HDR pioneer who mastered the technique, gaining over nine million fans. According to their statement, “Aurora HDR contains every imaginable tool needed to produce high-quality next generation dramatic images.”

I’ve been a fan of Trey’s wonderful images myself, so when I heard about the software, I wanted to give it a try. I just received a copy and have been playing around for a couple of days.

5 Images 2 Stop Apart - Treys Angels Within Preset - Slight Contrast Adjustment

5 Images 2 Stop Apart – Treys Angels Within Preset – Slight Contrast Adjustment

Some of the key benefits of Macphun Aurora HDR Pro, as described by the developer, are:

  • Revolutionary HDR algorithms make possible the entire spectrum of HDR looks, from natural to highly stylized.
  • Total HDR editing experience with the most complete set of tools available.
  • Powerful one-click presets, including Signature Pro presets by Trey Ratcliff, yield fantastic results instantly.
  • Layers, masking and brushes provide the ultimate in selective editing.
  • Unique Radiance controls and custom texture blending for creative versatility.
  • Detail enhancement to increase drama in images.
  • Extensive color and toning controls for vibrant color combinations.
  • Approachable user interface makes for a comfortable, understandable experience.
  • Built-in sharing supports popular photo communities and social networks.
  • RAW, JPG, TIFF and other popular files support for the greatest flexibility.
  • Workflow tailored to any style, with support for using as a standalone app, or as a plugin to popular host applications.
7 Images 1 Stop Apart - Indoor Bright Preset - Slight Contrast Adjustment

7 Images 1 Stop Apart – Indoor Bright Preset – Slight Contrast Adjustment

As mentioned above, the software can be used as a stand-alone application or as an plugin host operation within Adobe Photoshop, Adobe Lightroom or Apple Aperture. Because Lightroom is my base, I have chosen to use it from there.

After the installation, it took me a while to figure out how to make it work with Lightroom. Most plugins automatically install the extensions but with Aurora, you actually need to open the program, open an image, and then go to the Aurora HDR Pro menu and select Install Plug-Ins. In my opinion, I think it would be better in future editions to have the option of installing the plug-ins upon the initial installation, rather than having to go through this process. But after that, it integrated with Lightroom flawlessly.

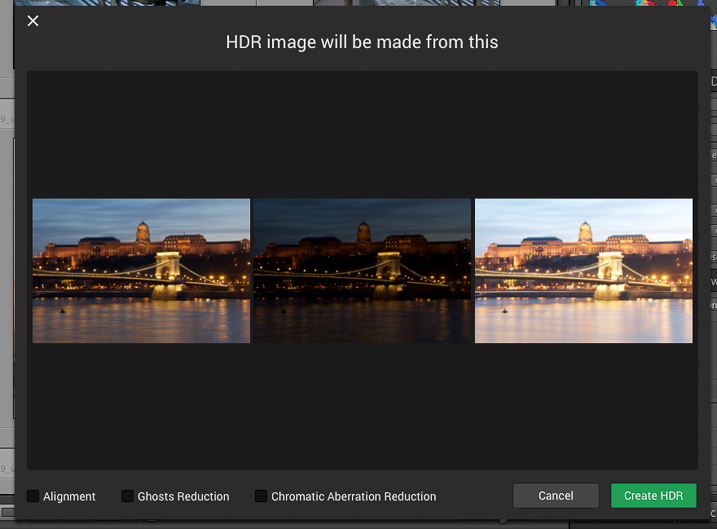
When launched, the first window that shows up displays the images from which the HDR will be made, as well as options for Alignment, Ghosts and Chromatic Aberration Reduction. So far so good. Pick alignment if the images were shot hand-held, pick Ghosts Reduction if there are moving subjects, and so on.

MacPhun-Aurora-HDR-First-Impressions (2 of 4)

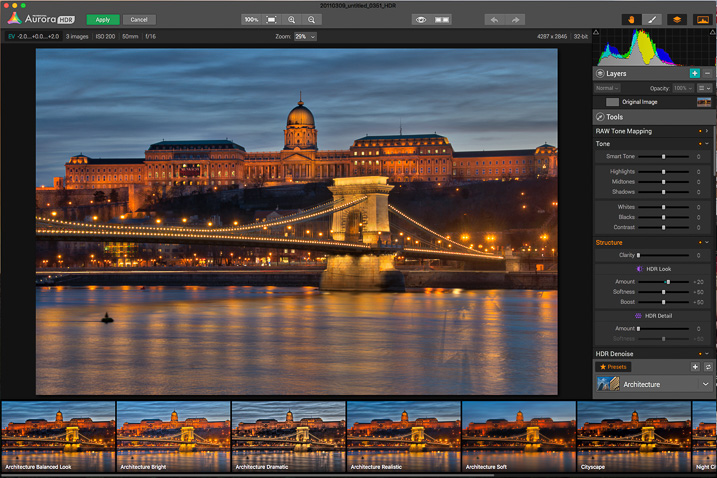
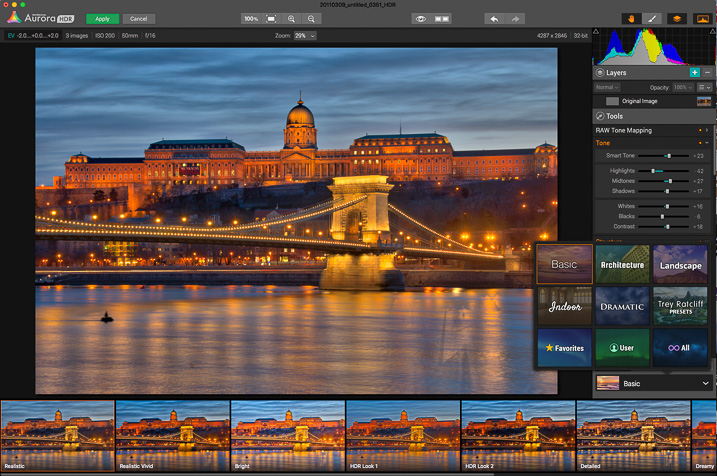
Once you click Create HDR, the images are combined and the main interface will open up. The interface is well-rounded and easy to navigate. It features a large image view with three main sections: a navigation and tool bar at the top, layer and adjusting tools on the right side, and presets selections at the bottom.

MacPhun-Aurora-HDR-First-Impressions (3 of 4)

On the top bar you’ll find: the zooming tools, quick preview and compare options (to check against your original and edited images), a move tool (to move around when zoomed in), and a brush and eraser to use in layers (when creating masks) and the layers tool.

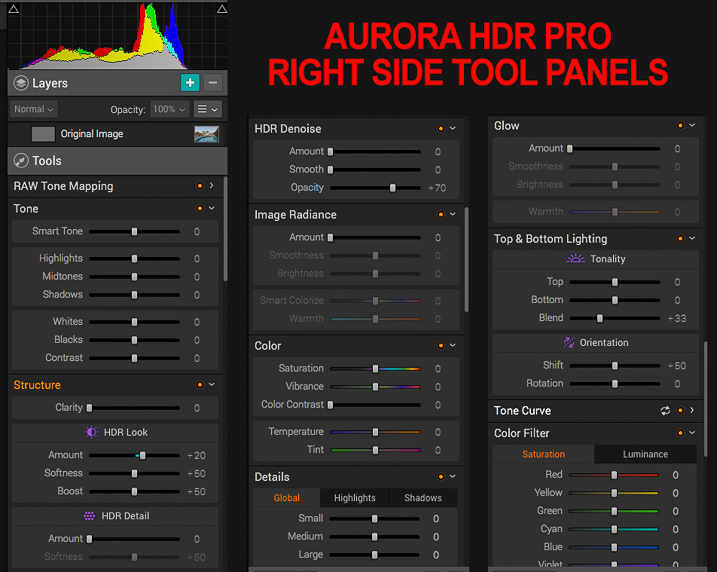
The main section of right panel contains the following tools:

  • Histogram: Displays the complete tonal range of your image from dark to light. Similar to in Lightroom, clicking the upper right and left corners will display the black and white clipping points.
  • Layers: I really liked this one; layers are a great way to stay organized and add different effects on your image by isolating them using masks. You can add as many layers as you want, and they can be also applied using different blend modes: normal, soft light, hard light, overlay, multiply, screen luminosity and color. They pretty much work as they do in Adobe Photoshop.
  • Tone Mapping: This panel controls how Aurora HDR compresses the files, and the weight it places on each exposure in the bracketed set.
  • Tone: This panel controls the highlights, mid-tones and shadows; it also helps with contrast, as well as pushing the black and white points.
  • Structure: This panel has several functions, but think of it as clarity on steroids. It works by finding edges, and avoids adding contrast to edges but rather, it affects areas. It contains several sliders to play with, including, of course, “Clarity” as well as sub-panels called “HDR Look” and “HDR Detail.” From here you can increase and decrease the texture of the image.
  • HDR De-noise: A tool to eliminate noise and artifacts produced by the merging of the photos.
  • Image Radiance: You can clearly notice Trey’s hand in this one; it gives a “dreamy” feeling to the photos.Right Panel Tools (1 of 1)
  • Color: Includes controls for adjusting color, vibrance, color contrast, temperature and tint in the image.
  • Details: Increased clarity, detail, and sharpness to bring out the details in an image. As there is no sharpening function, this works as a sharpening tool.
  • Glow: Another creative tool. With this one you can create softening effects to the lighter tones.
  • Top & Bottom Lighting: I really liked this addition too; they work similar to a graduated neutral density filter. This control splits the image in two segments and darkens or lightens the image.
  • Tone Curve: The curves tool. As in Adobe Photoshop or Lightroom, if you are familiar with working with curves, the panel is there. You can apply it overall, or it also works with independent channels: red, green and blue.
  • Color Filter: The color filters are available to adjust saturation and luminance to specific colors. It works similar to the HSL panel in Adobe Lightroom, but the Aurora Software lacks the hue option and is limited to six basic colors. Still, it is good to have it there to adjust. I’m not pretending to compare it with Lightroom as this is a different software; just mentioning options that you could be familiar with.
  • Color Toning: With this one you can change the tone of either the highlights or the shadows, and individually increase or decrease saturation of the same. A really nice creative tool for split toning. I also really like the preset options on top of the panel.
  • Vignette: The traditional vignette tool. It works as expected, but there is something very clever as well: the Inner Light function allows you to add more light to the center, or any part of the image.

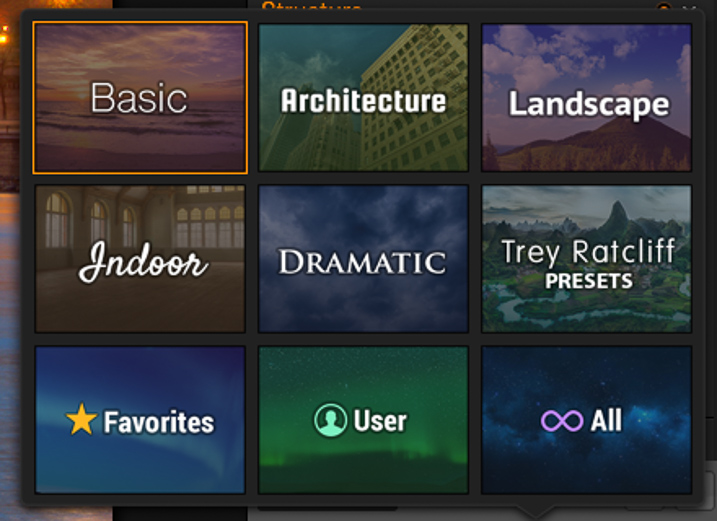
Lastly, there are the presets, created by Macphun and Trey himself. They provide a good starting point to try out different looks in a single click. Of course, you can also create your own presets and save them for future use.

MacPhun-Aurora-HDR-First-Impressions (4 of 4)

MacPhun-Aurora-HDR-First-Impressions (5 of 4)

I created the image below by using three images, shot two stops apart. I started with the Basic Realistic preset as a base, and played with the sliders until I got what I wanted. Then, I added a layer to add more light to the palace in the foreground, and masked out the rest.

One of the things that I’ve noticed while working, is that the application is fast compared to other software I’ve used in the past, and that is a godsend. Everything loads fast, and the application seems to be very responsive. I’ll definitely continue to use it in the future and test more functions.

MacPhun-Aurora-HDR-First-Impressions (6 of 6)

Whether you are an HDR fan or have never experimented with the technique, you should give Macphun Aurora HDR Pro a try. This is a well-rounded application that can serve the needs of pros and amateurs alike.

Unfortunately, the software is only available for Mac, but I think overall it is a great alternative. They are currently three options. The Aurora HDR currently retails for $ 49.99; with this option there is no RAW support, and it can just run as a standalone application. The tested version is the Aurora HDR Pro that retails for $ 99, and there is also a package that includes the application plus training for $ 129.

googletag.cmd.push(function() {
tablet_slots.push( googletag.defineSlot( “/1005424/_dPSv4_tab-all-article-bottom_(300×250)”, [300, 250], “pb-ad-78623” ).addService( googletag.pubads() ) ); } );

googletag.cmd.push(function() {
mobile_slots.push( googletag.defineSlot( “/1005424/_dPSv4_mob-all-article-bottom_(300×250)”, [300, 250], “pb-ad-78158” ).addService( googletag.pubads() ) ); } );

The post Macphun Aurora HDR Pro Software – First Impressions by Daniel Korzeniewski appeared first on Digital Photography School.


Digital Photography School

 
Comments Off on Macphun Aurora HDR Pro Software – First Impressions

Posted in Photography


Macphun launches Aurora HDR high dynamic range software for Mac users

10 Nov

Software developer Macphun has announced a new package designed to help photographers to combine multiple exposures into HDR images. Created in partnership with HDR specialist Trey Ratcliff, Aurora HDR provides tools for a wide range of effects via manual controls and a collection of pre-sets. Read more

Articles: Digital Photography Review (dpreview.com)

 
Comments Off on Macphun launches Aurora HDR high dynamic range software for Mac users

Posted in Uncategorized


Macphun Noiseless Pro Software Review

25 May

I hate digital noise. I’ve been a stickler about keeping it out of my images for years and have tried just about everything under the sun to aid in that process. So when Macphun offered to send over their new Noiseless Pro app I jumped at the opportunity (especially after seeing the promo video for it).

Before we get started, let’s go over the basics of noise for those who are just dipping their toes in this area of post-processing. Noise is basically an unwanted side effect of shooting at high ISO levels or super long shutter speeds (long exposures). Without getting into photodiode leakage currents and other super-techy jargon, just know that noise is the little salt and pepper type specs that show up in your low light images.

Noise reduction is a give-and-take process, just like anything else in photography. It comes at a cost most of the time, and the cost is some amount of detail. Because of the way the noise reduction algorithms work, and because of the nature of high noise images, you just can’t remove noise without losing some of the sharpness in your photo. So the task at hand for software companies who want to tackle noise is to eliminate as much as possible, without screwing up the image and making it unusable.

Enter Macphun

Screen Shot 2015-05-11 at 9.32.00 PMMacphun came onto the photography scene fairly recently; although only for the Macintosh users as evidenced by the first three letters of their name. Each app they have created comes in two versions: A simple, easy to use version that usually goes for around $ 20, and a pro version with more features that goes for around $ 60. With any software that has the word “pro” in it, I am going to expect it to perform at a pro level. So with that said, let’s go over some of the key features that I personally expect to see in a brand new noise reduction program, as well as how Noiseless Pro measured up.

Video Review

For those who prefer video content over reading, here’s a walkthrough of Noiseless Pro and how it stacked up to DeNoise from Topaz Labs with a couple different images. For those who prefer reading, or can’t watch the video at the moment, read on below!

Differences Between Noiseless and Noiseless Pro

Each product that Macphun offers comes in a basic version as well as a pro version. The base version of Noiseless is $ 17.99 and the pro version is $ 49.99. So what does the extra $ 32 get you?

Each version comes with all the algorithms that were created to reduce noise in your images, as well as advanced algorithms for smart phones and GoPro cameras. The pro version comes with a few extra noise reduction presets, Adobe RGB/ProPhoto color space support, a navigator view to easily peruse the image when zoomed in, more advanced controls in the Adjust panel, as well as the ability to use the app as a plugin with programs like Adobe Lightroom and Photoshop (this is how I use it).

So, in my opinion, it’s well worth the extra bit of cash to go with the pro version. Photo editing software has come down in price by leaps and bounds over the past several years, so $ 49.99 seems like a great deal to me.

Ease of Use/User Interface

This is where all of Macphun’s programs shine. By targeting a Mac-specific audience, they had to kill it in the UI department, and they have with each product I’ve seen. The program is both incredibly fast and incredibly clean in its layout.

Screen-Shot-2015-04-18-at-12.38.53-PM

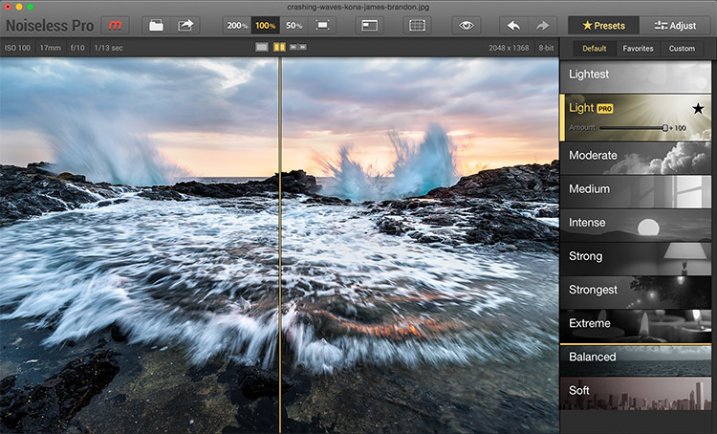
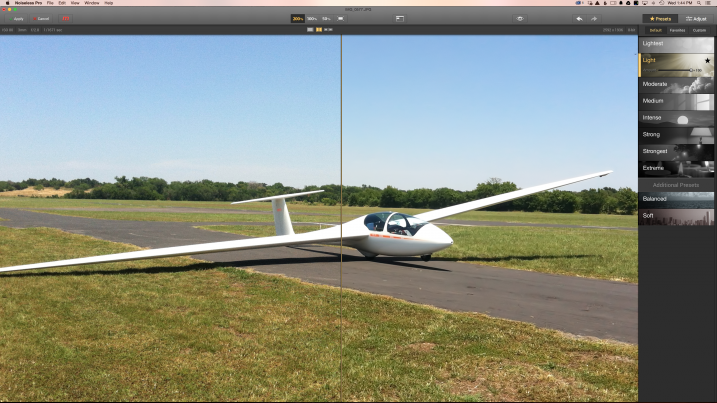
You can either drag an image right into Noiseless Pro, or you can use the program as a plug-in with Photoshop or Lightroom. The program opens immediately, and by default, opens up with the image zoomed in to 200%. This works well because it really lets you see what the noise looks like in the image, so you can see what needs to be done to combat it. It does throw you off a bit at first, but I think I like it.

From there, all you have to do is choose a preset on the right hand side (which couldn’t be easier). Just select the strength level that your image needs and make fine adjustments if needed. Each preset you select will have an “amount” slider appear once it’s been selected. Just use that to dial back the noise reduction strength if needed.

If you need to make even finer adjustments, just click the “Adjust” button up in the top right corner. Here you can adjust color noise, luminance noise, structure, details, etc.

Clouds and Skies

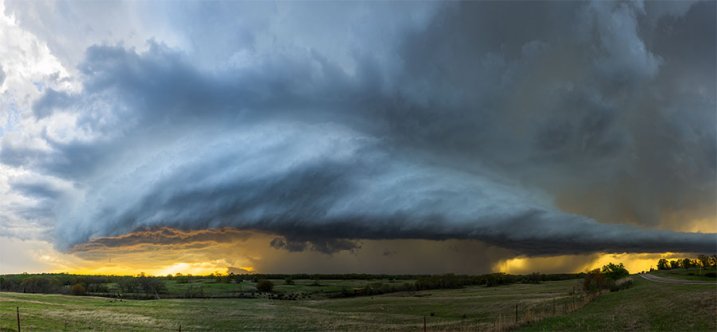
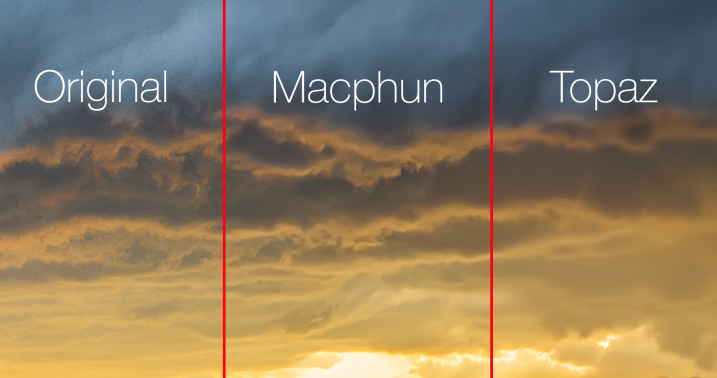
This is where Noiseless Pro exceeded my expectations. It really does a great job at reducing noise while still managing to maintain some detail in your clouds. Skies are the main thing I use noise reduction on and this is an important tip to those who are new to the idea of reducing noise in your images: Never do it globally! This is the problem with noise reduction in programs like Lightroom. They apply the reduction to the entire image, sacrificing detail in every single pixel of your image. Sure, they have some sort of intelligence built-in to preserve some details, but you’re still make a global change to the image.

Monstrosity | Somewhere Near Ardmore, OK

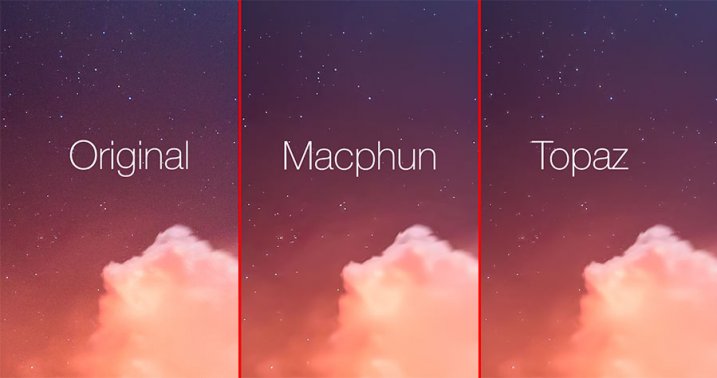
Using Noiseless Pro side by side against Topaz Labs DeNoise was pretty impressive. I’ve been using DeNoise exclusively for years now really wasn’t expecting Noiseless Pro to outperform it, or even come close. After all, Topaz has been in this game for years. However, after running the minimal amount of noise reduction necessary to get rid of the noise with both programs, I was stunned to see how much more detail Macphun retained in the clouds beneath the storm.

Screen Shot 2015-04-29 at 1.11.16 PM

Landscapes

This is one of the less common areas where I apply noise reduction. It really just depends on the image, but if I’m going to reduce noise in a foreground area, it’s usually going to be a body of water, windows on a building, the finish on a car or some other kind of flat surface that should be smooth.

Noiseless did a great job in this area, and again, it’s so fast and easy to use. It literally just works like a breeze right out of the box.

Mobile Photography

One of the pro features mentioned in the marketing materials for Noiseless is “advanced algorithms for mobile photography.” I ran a few of my random mobile images through the program and it did seem to do pretty well. I think the biggest question here is, “Why?” I mean, it’s a nice feature and all but I doubt that personally will ever care enough about a mobile photo to reduce noise in it. That could of course change in the future, as our phones will likely continue to get closer to being capable of what our SLR’s do, but that’s not going to truly be the case any time soon (no, not even with the new LG phone that shoots RAW and offers manual controls). Of course, this is just my opinion.

Screen Shot 2015-04-29 at 1.44.30 PM

Astro Images

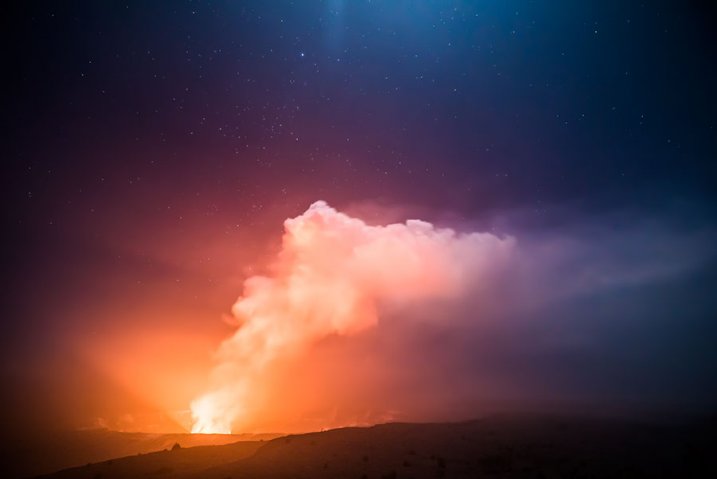
Well, every fairy tale has its villain and astro photography, unfortunately, seems to be the enemy of Noiseless at this point in the game. I was really bummed to see this, but it’s true. Here’s one of the high ISO images containing stars that I used.

Kilauea's Glow | Volcanos National Park

Using Noiseless side by side with Topaz Labs DeNoise was pretty telling to say the least. But then again, Noiseless also did surprisingly better with clouds and skies. DeNoise seems to have something built into their software that detects the stars in an astro/night sky image and masks around them. Noiseless, on the other hand, just completely degraded the stars in every night sky image I threw at it. The good news is this is a known issue and one that has already been brought up to the team at Macphun by several other photographers/beta testers. Macphun seems to be a solid company with solid people running it, so I am pretty confident they will address this and create something for the astro photography community in a future iteration. Fingers crossed.

Screen-Shot-2015-04-29-at-2.02.08-PM

Conclusion

While Noiseless may not perform as well as I’d like with astro/night sky images, it has still found a home in my post-processing workflow, especially for images containing clouds (which tends to happen quite often with landscapes). I’m certainly looking forward to where this program goes in the future, and really hope they will incorporate some better algorithms to handle stars.

googletag.cmd.push(function() {
tablet_slots.push( googletag.defineSlot( “/1005424/_dPSv4_tab-all-article-bottom_(300×250)”, [300, 250], “pb-ad-78623” ).addService( googletag.pubads() ) ); } );

googletag.cmd.push(function() {
mobile_slots.push( googletag.defineSlot( “/1005424/_dPSv4_mob-all-article-bottom_(300×250)”, [300, 250], “pb-ad-78158” ).addService( googletag.pubads() ) ); } );

The post Macphun Noiseless Pro Software Review by James Brandon appeared first on Digital Photography School.


Digital Photography School

 
Comments Off on Macphun Noiseless Pro Software Review

Posted in Photography


Product Review: Macphun Tonality Black and White Photo Editor

10 Sep

Macphun Software announces new program

Macphun Software, a photography app developer with over 20 million users worldwide just recently released their latest photo editing software program, called Tonality. This is a program dedicated entirely to editing your photos in black and white, and it is so much fun to use!

You may already be using a Macphun program – they have produced a whole suite of useful consumer photography editing tools, such as Intensify Pro, Snapheal Pro, and Focus Pro. This latest addition to their software collection is really a powerful one, for professionals and hobbyists alike.

I played around with the software a bit and there are quite a few things I liked about it, and just a couple of things that I found non-intuitive. Read on to discover more about this program.

Macphun Tonality

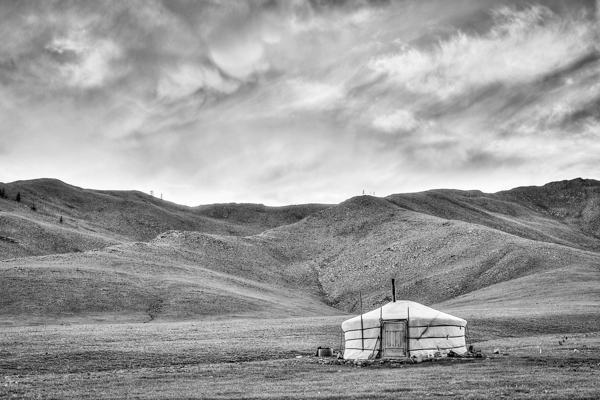
From my recent trip to Mongolia

Overview of Macphun Tonality

Macphun TonalityTonality is easy to pick up right away if you are familiar with Lightroom or Photoshop RAW editing tools. The designers intentionally created an editing panel on the right hand side of your viewing window that looks almost exactly like Lightroom’s editing panel. It includes familiar tools like Exposure, Tone Curve, Split Toning, and Vignetting.

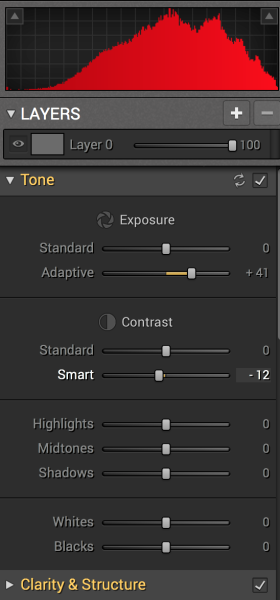
There are some other effects here that are not so familiar, and do interesting things when you play with the sliders. Clarity & Structure is a section unto itself that provides the user with highly controlled clarity effects. In the Exposure section there is an ingenious slider titled Adaptive which allows you to adjust the exposure while preserving the highlights, something Lightroom should have had in place a long time ago. There is a section called Glow which does exactly what you think it would do; add glow to your images, like a balloon lit from the inside casting a nice glow over everything. You can add Grain, adjust the overall Opacity of the changes you are creating, and there are options for Texture Overlay and Frames, which are pretty fun with black and white images.

Macphun Tonality

Layers

One thing that is really fantastic is that ability to edit with layers. This is something that I found (and still find), rather non-intuitive, but allows for huge possibilities in editing, especially with textured layers.  When you add on a new layer and insert a texture via the Texture Overlay panel, you can brush through via masking and only texturize parts of the image, like the background in this image:

Macphun Tonality

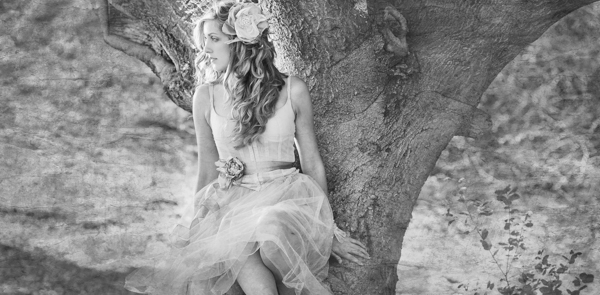
Editing with the Textures Overlay panel. I added a metal texture in one layer and a paper texture in another layer, and painted through on the girl’s face using the layer mask so the texture didn’t affect the smoothness of her skin.

Here I added a metal texture in one layer and a paper texture in another layer and painted through on the face using the layer mask so the texture didn’t affect the smoothness of the girl’s skin.

The non-intuitive part for me is in actually using the layers and brushes to mask out parts of the image. If you have grown up on Adobe Photoshop then you might not find this familiar at all. It’s not impossible, it just requires a different way of thinking about how layers work and how the masking works. It will simply slow down your workflow slightly, but as with anything new, there is always a learning curve.

Some thoughts

When I first saw the software I thought to myself; “I can edit in black and white just fine with Lightroom. Why would I need another program to do such a simple thing?”. But just as Photomatix is brilliantly designed to do just one thing (tone-map HDR images), Tonality is designed to do just one thing perfectly: create black and white images like you could never do in Lightroom or Photoshop. I took a couple of black and white images from Lightroom that I was satisfied with, and tried them out in Tonality. Just using the presets alone as a jumping board for editing in Tonality shows an astounding difference in quality, sharpness, and texture.

See these two images side-by-side and notice what Tonality can do to really make a photo pop:

Digital Photography School Review

Edited in Lightroom for a simple black and white look

Macphun Tonality

Edited in Tonality for some movie poster “pop”

Perhaps some won’t like that HDR look, but I happen to love it. It makes an otherwise bland black and white photo cause me to pause and take a second look. Which is what we are always trying to accomplish with our photos, aren’t we?

Macphun Tonality Pro features:

  • Professional image quality with proprietary 16-bit RAW processing engine
  • Advanced algorithms and a streamlined user experience for superior results
  • Scores of inspiring professional presets provide a wide range of one-click image styles
  • Built-in organic-style overlay textures, plus user-loadable textures, for incredible creativity
  • Unique adaptive exposure and smart contrast tools for advanced tone control
  • Multiple effect layers, each with separate opacity controls, blending modes and preservation of color data offer true advancements in creative toolsetsTonalityPro
  • Adjustable, pressure-sensitive brushes and masking tools for precise selective edits
  • Advanced clarity and structure detail controls yield dramatic results
  • Proprietary grain engine with over 20 emulated film types
  • Selective color using color channel sliders for unique stylistic expressions
  • Glow, lens blur, vignette, photo frame and opacity controls for finishing touches
  • Easy image sharing to popular social networks, and via email, instant messaging, AirDrop and SmugMug
  • Macphun Print Lab services, powered by MILK
  • Runs as either a standalone app or, in the Pro version, as a plug-in to popular image editing software like Adobe® Photoshop®, Adobe Photoshop Lightroom®, Adobe Photoshop Elements® or Apple® Aperture®.

Find Tonality Pro and Tonality here on the Macphun website, starting at $ 19.99, and for dPS readers they’ve given us 20% off so use this link to get that special price.

Summary:

In summary, I give this software product 5 stars. I can actually see myself using this in the future, and I think it will be a welcome addition to my limited number of tools that I use for editing photos. It’s fun, super easy, and I can use it to edit a lot of my future travel photos. Like these:

Macphun TonalityPro

Macphun TonalityPro

Macphun TonalityPro

You can also add in some coloring for sepia tints or different metallic effects

The post Product Review: Macphun Tonality Black and White Photo Editor by Phillip VanNostrand appeared first on Digital Photography School.


Digital Photography School

 
Comments Off on Product Review: Macphun Tonality Black and White Photo Editor

Posted in Photography


Macphun Intensify Pro Software Review

15 Jun

MacPhun Intensify Pro review

Intensify Pro (currently on 20% off for dPS readers here) is a Mac only image editing program from MacPhun. With apologies to Windows users (I really wish this software was available for PCs as well) let’s dive in and see what this software can do.

One of the reasons that you buy plug-ins is to take advantage of the ways you can use them to increase mid-tone contrast and enhance detail. Indeed, this is the main reason to buy Intensify Pro because it allows you to do this quickly and easily and with far more functionality than is offered by Photoshop or Lightroom.

Process in Lightroom first

To demonstrate the power of Intensify Pro I’ve selected an image that is very flat but has a lot of texture in the image to work with. You can see it below. The version on the left is more or less straight out of the camera. The version on the right was created by increasing Exposure, Contrast and Clarity in Lightroom’s Basic panel, and adding a slight vignette in the Effects panel.
MacPhun Intensify Pro review

Here’s a close-up so you can see the effect that increasing Contrast and Clarity has had on the texture and detail.

MacPhun Intensify Pro review

Bring it over to Intensify Pro

Now let’s open the photo in Intensify Pro and see what we can do with it in comparison to what is possible in Lightroom.

First, the layout. Your photo is displayed in the centre, there are various tool buttons along the top, and the controls for working with Presets and making adjustments are on the right.
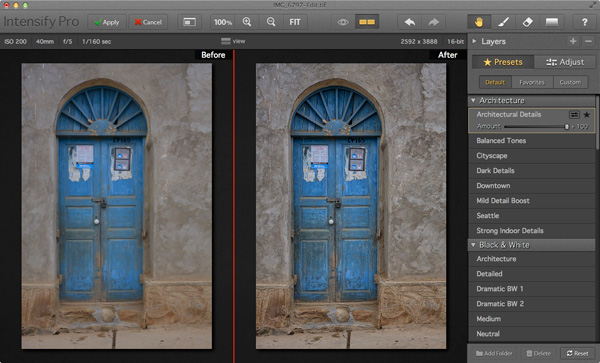
MacPhun Intensify Pro review

Presets

There are 68 presets in total (yes, I counted them) and you can select any one of them to use as a starting point or click the Adjust button to go straight to Adjust mode.

One of the problems with presets, and indeed with any program that lets you make adjustments to contrast and detail like Intensify Pro, is that it is very easy to create an image that looks over-processed.

MacPhun Intensify Pro reviewIntensify Pro provides a simple solution to this. Each preset comes with an Amount slider that lets you adjust the strength of the preset on a scale from zero to 100, much like the Opacity slider in Photoshop layers. So if you like a preset, but feel the effect is too strong, you can adjust the strength until you are happy with the result.

Here are some of the presets in action. All of them were applied to the original photo at full strength without any further adjustments.
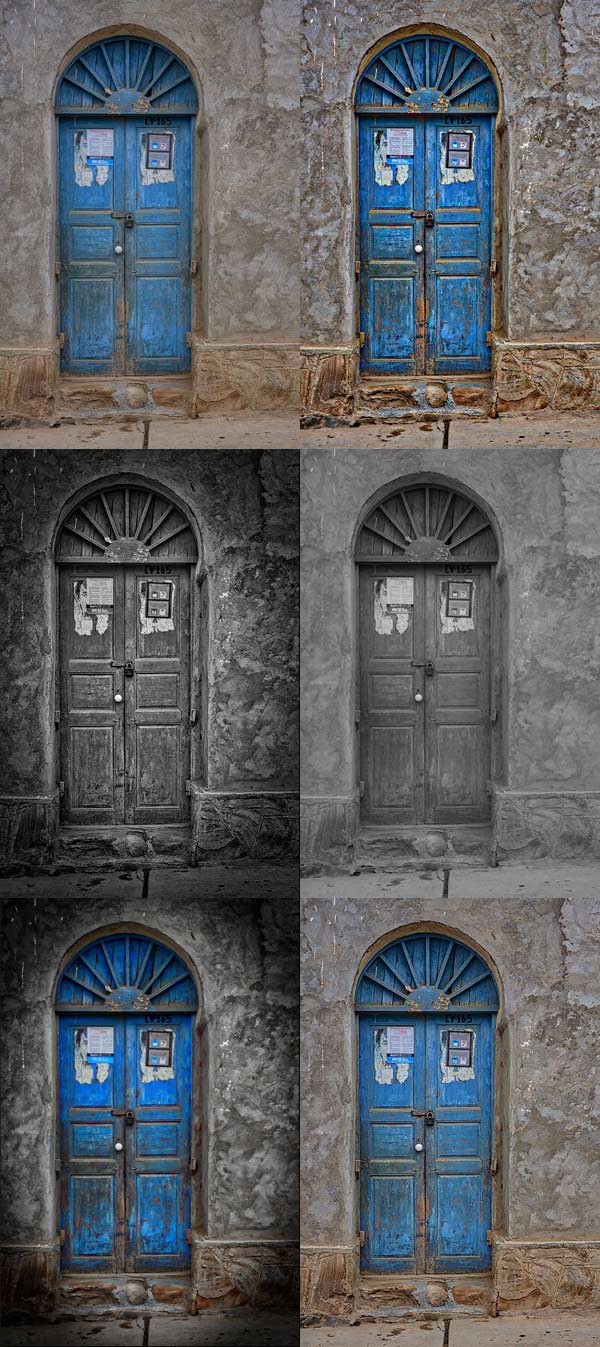
MacPhun Intensify Pro review

Adjust

After selecting (or perhaps not selecting) a preset you can move to Adjust mode. This is where you take control and use sliders to apply adjustments and enhancements to your photo.MacPhun Intensify Pro review
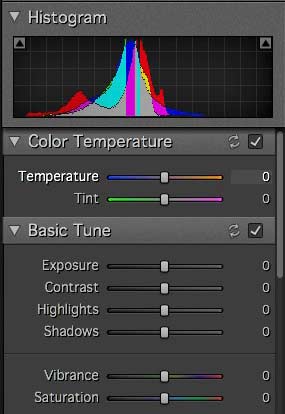
The first three Adjust panels echo the sliders found in Lightroom and Adobe Camera Raw. There’s nothing new here, these are for making adjustments to the photo before you get to the sliders that are unique to Intensify Pro.

You’ll notice the absence of a Clarity slider. It is replaced by the Pro Contrast, Structure and Detail panels. These allow you to much the same thing, but with far more control and versatility.

Pro Contrast

The Pro Contrast panel is where Intensify Pro starts to get interesting. Pro Contrast increases contrast without losing detail, and there are three sliders so you can apply it to the highlights, mid-tones and shadows individually. Under each of these is an Offset slider, which works in tandem with Pro Contrast sliders to control the brightness of the image. So, for example, if you increase Pro Contrast in the shadows and find that the image becomes too light, you can increase the Offset to make it darker.
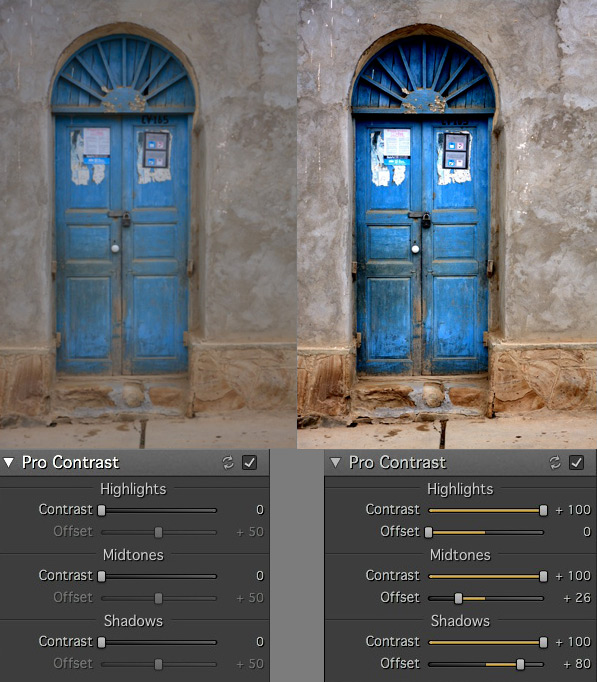
MacPhun Intensify Pro review

Structure

The Structure sliders are for enhancing areas of low contrast, revealing texture and details. There are two levels: Global (targeting small areas) and Micro (targeting really small areas).MacPhun Intensify Pro review
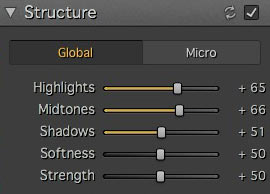
There are three sliders, enabling you to target the highlights, mid-tones and shadows respectively. The Strength slider gives you control over the strength of the effect and Softness slider control over the crispness.

It is really easy to overdo the effect and create something that looks completely unnatural, similar to some of the presets I showed you at the beginning of the article. Care is required, and I found that the Structure sliders worked best when I used the Pro Contrast sliders first.

These enlargements show you the effect of the Structure sliders.
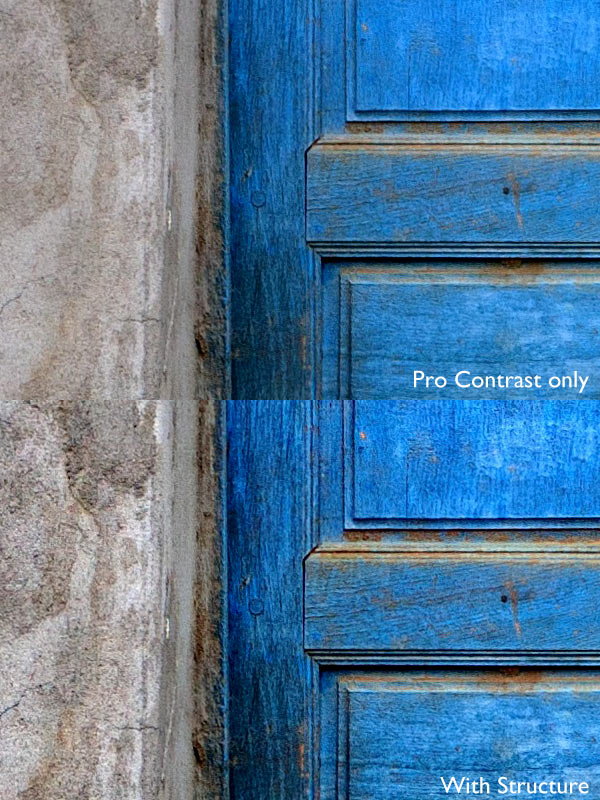
MacPhun Intensify Pro review

Detail

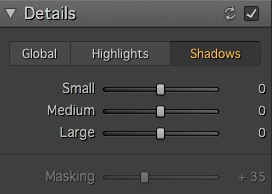
MacPhun Intensify Pro reviewThe Detail sliders are for enhancing detail. The three sliders (Small, Medium and Large) control the size of the details affected. The Large slider has the greatest effect on the image and the Small slider the least. The tabs at the top let you apply it as a global adjustment, or to the shadows or highlights.

Like Structure, the Detail sliders require care as it is easy to overdo the effect. There is an additional Masking slider to help keep it under control. If the effect is too strong, you can move the Masking slider right to limit the areas affected.

Micro Sharpness, Vignette and Opacity
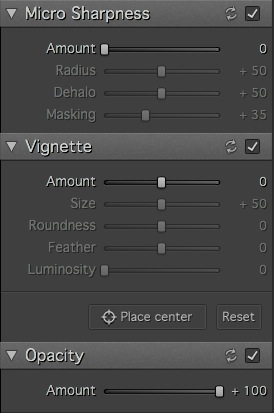
MacPhun Intensify Pro reviewThe final three sets of sliders let you make other adjustments, such as sharpening or adding a vignette. The Opacity slider lets you reduce the strength of the effect you’ve created. This does the same job as the Amount slider in the Presets panels. Use it if you realize that you’ve overdone the processing.

Local adjustments and Layers

So far I’ve looked at all the sliders in the context of global adjustments (adjustments that affect the entire image). But Intensity Pro also lets you create masks to apply the effects to a smaller area (local adjustments).

Local adjustments are important because most of the time you will want to emphasize texture and detail in certain parts of the image, but not others. A subtle touch is often key to effective post-processing, and local adjustments help you achieve that.

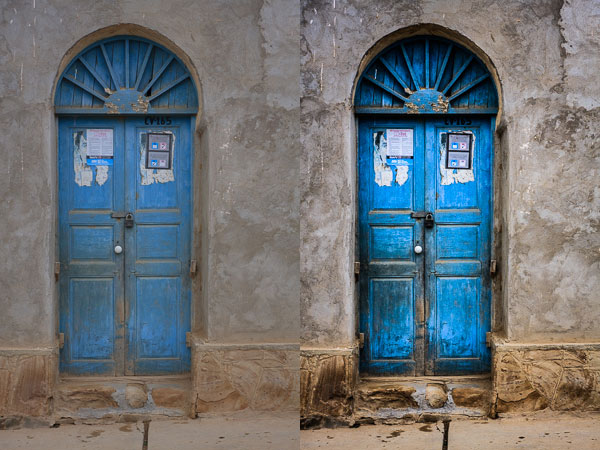
Here’s the final example (below). The image on the left shows the result of a series of global adjustments. I like the effect on the door, but the effect on the surrounding wall is overdone.

The image on the right was created using masks and layers. I used the mask to limit the adjustments made in the first image to the door. Then I created another layer and applied a softer level of adjustment to the wall. Finally I added a vignette to make the sides of the image darker. The result is a more subtle increase in contrast and detail that emphasizes the texture and detail of the wooden door.
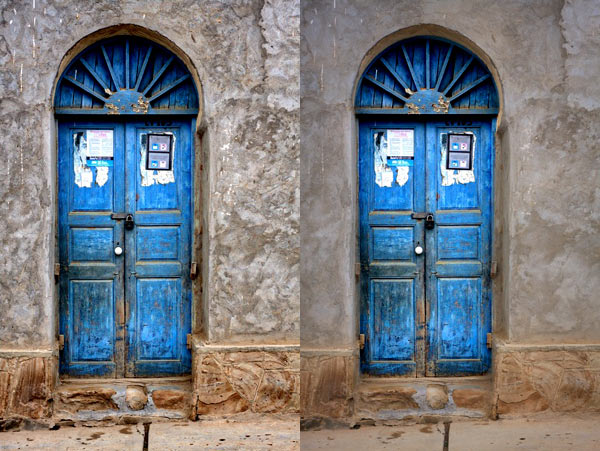
MacPhun Intensify Pro review

Conclusion

Intensify Pro is an excellent program, and I’m looking forward to working with it more. I feel I’ve only touched upon its capabilities in this short review, as like all plug-ins it takes time to explore the features and learn how to get the best from it. Hopefully I’ve given you a good idea of what it can do. The best way to see for yourself is to go to the MacPhun website and download a trial of the program (look for the grey Try for Free button above the menu).

There are two versions of the program. Intensify is a standalone app aimed at casual photographers. Intensify Pro also works as a plug-in with Photoshop, Photoshop Elements, Lightroom and Aperture and contains a few more advanced features aimed at professional photographers. The details are on the MacPhun website.

New features

For those of you who are interested, Intensify Pro was recently upgraded by MacPhun and contains the following new features. If you already own the software, go to Intensify Pro > Check for Updates to download the update. This list is from the press release:

Macphun Print Lab – Intensify photos can now with a few clicks be turned into personalized products like postcards and notecards, delivered direct to recipients. Affordable, high quality gallery frames and canvas prints can also be ordered, perfect for gifts to friends and family. The Macphun Print Lab is powered by MILK Books.

Integration with SmugMug – SmugMug is one of the world’s leading photography communities with millions of users worldwide. Images can be exported directly from Intensify to SmugMug portfolios for viewing, sharing and printing.

RAW Updates – Intensify now supports RAW formats from all the most popular cameras. The native RAW processor supports 16-bit images and opens files faster than in any other app.

Mavericks Support – Intensify is now taking advantage of all the powerful features of Apple’s latest OS, Mavericks. Support for the new Notifications feature will enable more timely communications with customers about updates, new features, free presets and more.

UI improvements – Additional shortcuts to the user interface provide quick access to the most important tools and features.

The post Macphun Intensify Pro Software Review by Andrew S. Gibson appeared first on Digital Photography School.


Digital Photography School

 
Comments Off on Macphun Intensify Pro Software Review

Posted in Photography


Macphun Contest Winners Announced

12 Jun

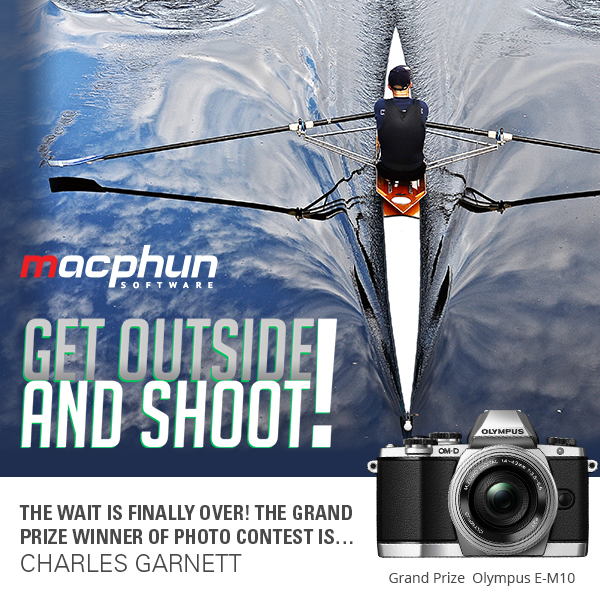
MacphunWinner

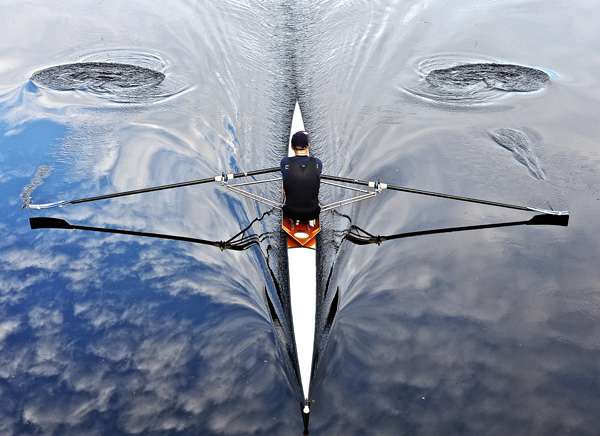
The wait is FINALLY over! The Grand Prize Winner of Macphun’s Get Outside and Shoot! Photo Contest is:

Contest Image Get Out and Shoot 600

A HUGE thank you to everyone who entered the recent Get Outside and Shoot! photo contest. The Grand Prize winner receives an Olympus E-M10! Weekly contest winners received their photo on canvas, and all runners-up received the Macphun app of their choice. EVERY entrant received a FREE copy of ColorStrokes for Mac.

The response was wonderful with so many amazing entries. It was so great that the team at Macphun wants to invite ALL of the Digital Photography School readers to take advantage of a very special offer available only to dPS readers! Receive Intensify Pro – a leading stand-alone or plug-in application photo editor – for only $ 47.99, 20% off the regular price! To purchase Intensify Pro now, click HERE.

Now, here are the winners of the competition. Thank you again to all who entered.

Grand Prize Winner of the Olympus E-M10: Charles Garnett

Charles Garnett Grand Prize Winner 600

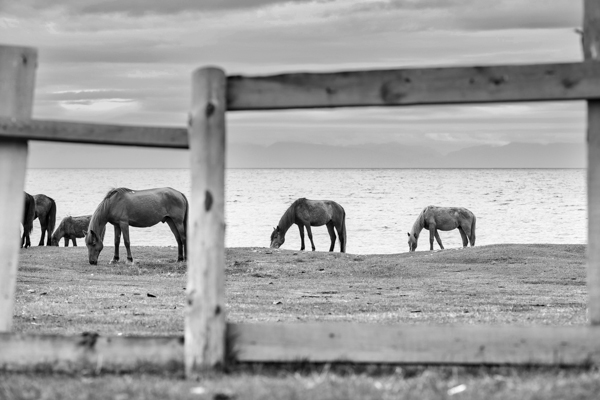
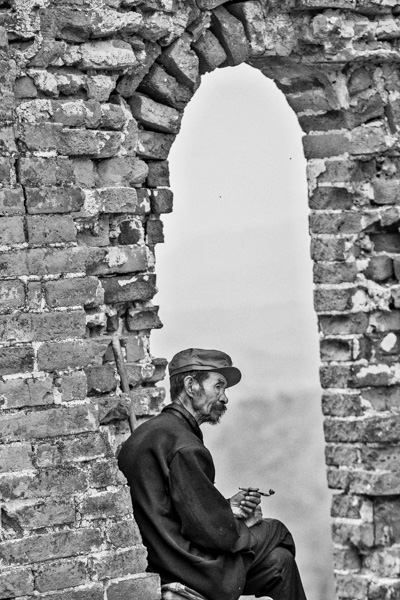
Weekly Winners of their photographs on canvas:

Michael

Weekly Winner Michael

Christian Costantini

Weekly Winner Christian 600

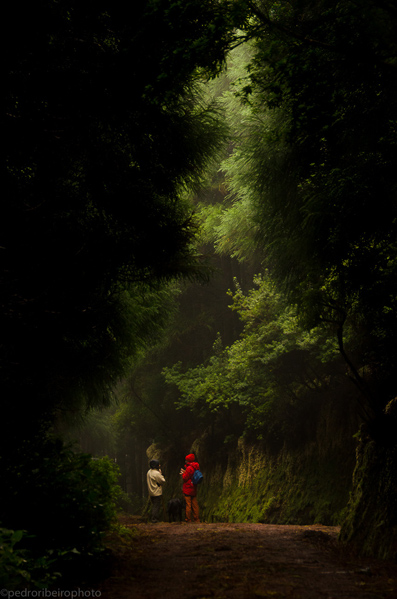
Pedro Ribeiro

Weekly Winner Pedro 600

Marzena Wieczorek

Winner Marzena 600

Also, a BIG congratulations to all of our runner-up winners.

Thanks again to everyone for entering and to Macphun for sponsoring this competition!

Don’t forget that the team at Macphun has invited ALL of the Digital Photography School readers to take advantage of a very special offer available only to the dPS audience! Receive Intensify Pro – a leading stand-alone or plug-in application photo editor – for only $ 47.99, 20% off the regular price. To purchase Intensify Pro now, click HERE.

Macphun-Logo-for-Contest-Front-Graphic.jpg
Learn more about Macphun HERE

The post Macphun Contest Winners Announced by Darlene Hildebrandt appeared first on Digital Photography School.


Digital Photography School

 
Comments Off on Macphun Contest Winners Announced

Posted in Photography