RSS
 

Posts Tagged ‘loss’

Canon image hosting platform, image.canon, temporarily shut down after loss of users content

03 Aug

Over the weekend, Canon’s cloud media hosting platform, image.canon, suffered an outage that left users unable to login and use the service. No specific information was provided over the weekend, but we now know what went wrong.

In a statement shared on the image.canon homepage, Canon confirmed there’s been an issue with its long-term storage on image.canon that’s resulted in the loss of original image and video uploads. The full notice reads as follows:

Important Notice
Thank you for using image.canon.
On the 30th of July, we identified an issue within the 10GB long term storage on image.canon. Some of the original photo and video data files have been lost. We have confirmed that the still image thumbnails of the affected files have not been affected.
In order to conduct further review, we have temporarily suspended both the mobile app and web browser service of image.canon.
Information regarding the resumption of service and contact information for customer support will be made available soon.
There has been no leak of image data.
We apologize for any inconvenience.

To prevent any further issues, Canon has temporarily shut down both the mobile and web app versions of image.canon. Per the notice, we should have further updates ‘soon.’ We will update this article when further updates are provided.

Articles: Digital Photography Review (dpreview.com)

 
Comments Off on Canon image hosting platform, image.canon, temporarily shut down after loss of users content

Posted in Uncategorized


Nikon’s FY2020 financial results: ¥225.8B in revenue, ¥17.1B loss in operating profit for Imaging Products Business

29 May

As it promised when it initially pushed back the release date, Nikon has released the financial results today for its 2020 fiscal year (FY2020), ending March 31, 2020, as well as its forecast for its 2021 fiscal year (FY2021).

Overall, Nikon Corporation recorded ¥591B in revenue and ¥6.7B in operating profit. These numbers align with what Nikon’s updated forecast suspected and are a decrease of ¥117.6B and ¥75.9B, respectively, year-over-year (YOY).

An overview of Nikon’s revenue, operating profit and more for FY2020.

Interestingly, Nikon attempts to quantify the impact of the COVID-19 pandemic, with its report saying it believes the pandemic has caused 10 billion yen in operating profit losses. Specifically, Nikon attributes ‘approximately 4 billion yen’ of that loss to its Imaging Products division ‘Due to product mix change by [the] suspension of distributors mainly selling mid- and high-end cameras, and delay of launch in main products including professional use products by stagnation of the supply chain.’

Diving specifically into its Imaging Products Business, Nikon recorded ¥225.8B in revenue and a loss of ¥17.1B in operating profit. These numbers are both worse than Nikon’s February 2020 forecast and are a decrease of ¥70.3B and ¥39.1B, respectively. The documents reveal Nikon sold 1.62 million interchangeable lens camera (ILC) units and 2.65 million interchangeable lens units, with just 840,000 compact digital cameras sold. These unit numbers are a decrease of 21.4%, 16.4% and 47.5%, respectively, YOY.

Nikon’s breakdown of the FY2020 results for its Imaging Products Business.

In notes on the revenue of its Imaging Products Business, Nikon says revenues were ‘progressing mostly in line with previous forecasts until the middle of February,’ when the COVID-19 started to wreak havoc on the supply chain and retailers. Nikon again reiterates that it’s had to delay new product launches ‘such as high-end DSLR cameras and [mirrorless lenses]’ due to the impact of the COVID-19 pandemic. This is referencing the delay of Nikon D6 shipments and suggests the Nikkor Z 70-200mm F2.8 VR S zoom delay back in January could’ve been due to COVID-19 complications as well, even though at the time Nikon said it was caused by ‘production reasons.’ Nikon also notes sales of its Z-series mirrorless cameras and Z-series lenses have increased, and that the volume/sales ratio of mid-range and high-end cameras ‘improved steadily’ YOY.

Additional comments under the ‘Operating Profit’ headline note Nikon incurred ¥2.7B in restructuring costs and posted ¥6.6B in fixed asset impairment losses, which were detailed in its statement earlier this month.

As for FY2021, Nikon doesn’t share too much information, saying performance forecast details will ‘be disclosed once reasonable estimation can be given as the impact of COVID-19 is uncertain.’ Numbers aside, Nikon notes sales for its imaging Products Business ‘decreased significantly YOY’ in April and May of this year and notes that ‘the business of luxury goods is expected to continue in a severe business environment for the time being, and the deficit for the second consecutive fiscal year is inevitable.’

The executive summary section of the report details how Nikon plans to approach its various divisions in the upcoming year.

Under the executive headline, Nikon says its strategy for the Imaging Products Business is to ‘rebuild business with an understanding of accelerating market shrinkige [and] aim to achieve early profitability.’ In other words, Nikon plans to optimize its Imaging Products Division to get ahead of the quickly-shrinking camera market by restricting and minimizing costs.

You can find all of the latest financial results and presentation materials referenced above on Nikon’s investor relations website.

Articles: Digital Photography Review (dpreview.com)

 
Comments Off on Nikon’s FY2020 financial results: ¥225.8B in revenue, ¥17.1B loss in operating profit for Imaging Products Business

Posted in Uncategorized


Sony fixes data loss issues with firmware v2.10 for a7 III, a7R III cameras

21 Dec

In October 2018, Sony released firmware version 2.0 for its a7 III and a7R III mirrorless cameras. Two months later, in early December, firmware version 2.0 was removed from Sony’s website unexpectedly, due to an issue where some users were experiencing lost data when using an SD card that had already been used multiple times.

Specifically, Sony cited the following reasons for pulling firmware version 2.0 for the a7 III and a7R III cameras:

  1. In rare cases, your ?7R III or ?7 III model may stop functioning while writing RAW data onto an SD card that has already been used multiple times.
  2. With the ?7R III, taking a picture while using the Auto Review function may occasionally cause the camera to stop responding.

At the time of the firmware removal, Sony said it would ‘provide updated system software addressing the above issues in mid-December.’ Well, mid-December is here and as promised, Sony has released an update fixing the aforementioned issues.

Firmware version 2.10 features the same upgrades and features as firmware version 2.0, while addressing the data loss and Auto Review issues that plagued the update.

Users can upgrade to firmware version 2.10 for the a7 III (Windows, macOS) and a7R III (Windows, macOS) mirrorless cameras on Sony’s website.

Articles: Digital Photography Review (dpreview.com)

 
Comments Off on Sony fixes data loss issues with firmware v2.10 for a7 III, a7R III cameras

Posted in Uncategorized


Resolution, aliasing and light loss – why we love Bryce Bayer’s baby anyway

29 Mar

It’s unlikely Kodak’s Bryce Bayer had any idea that, 40 years after patenting a ‘Color Imaging Array’ that his design would underpin nearly all contemporary photography and live in the pockets of countless millions of people around the world.

It seems so obvious, once someone else has thought of it, but capturing red, green and blue information as an interspersed, mosaic-style array was breakthrough.
Image: based on original by Colin M.L Burnett

The Bayer Color Filter Array is a genuinely brilliant piece of design: it’s a highly effective way of capturing color information from silicon sensors that can’t inherently distinguish color. Most importantly, it does a good job of achieving this color capture while still capturing a good level of spatial resolution.

However, it isn’t entirely without its drawbacks: It doesn’t capture nearly as much color resolution as a camera’s pixel count seems to imply, it’s especially prone to sampling artifacts and it throws away a lot of light. So how bad are these problems and why don’t they stop us using it?

Resolution

There’s a limit to how much resolution you can capture with any pixel-based sensor. Sampling theory dictates that a system can only perfectly reproduce signals at half the sampling frequency (a limit known as the Nyquist Frequency). If you think about trying to represent a single pixel-width black line, you need at least two pixels to be sure of representing it properly: one to capture the line and another to capture the not-line.

Just to make things more tricky, this assumes your pixels are aligned perfectly with the line. If they’re slightly misaligned, you may get two grey pixels instead. This is taking into consideration by the Kell factor, which says that you’ll actually only reliably capture resolution around 0.7x your Nyquist frequency.

A sensor capturing detail at every pixel can perfectly represent data at up to 1/2 of its sampling frequency, so 4000 vertical pixels can represent 2000 cycles (or 2000 line pairs as we’d tend to think of it). This is a fundamental rule of sampling theory.

But, of course, a Bayer sensor doesn’t sample all the way to its maximum frequency because you’re only sampling single colors at each pixel, then deriving the other color values from neighboring pixels. This lowers resolution (effectively slightly blurring the image).

So, with these two factors (the limitations of sampling and Bayer’s lower sampling rate) in mind, how much resolution should you expect from a Bayer sensor? Since human vision is most sensitive to green information, it’s the green part of a Bayer sensor that’s used to provide most of the spatial resolution. Let’s have a look at how it compares to sampling luminance information at every pixel.

Counter-intuitive though it may sound, the green channel captures just as much horizontal and vertical detail as the sensor capturing data at every pixel. Where it loses out is on the diagonals, which sample at 1/2 the frequency.

Looking at just the green component, you should see that a Bayer sensor can still capture the same horizontal and vertical green (and luminance) information as a sensor sampling every pixel. You lose something on the diagonals, but you still get a good level of detail capture. This is a key aspect of what makes Bayer so effective.*

Red and blue information is captured at much lower resolutions than green. However, human vision is more sensitive to luminance (brightness) information than chroma (color) information, which makes this trade-off visually acceptable in most circumstances.

It’s a less good story when we look at the red and blue channels. Their sampling resolution is much lower than the luminance detail captured by the green channel. It’s worth bearing in mind that human vision is much more sensitive to luminance resolution than it is to color information, so viewers are likely to be more tolerant of this shortcoming.

Aliasing

So what happens to everything above the Nyquist frequency? Well, unless you do something to stop it, your camera will try to capture this information, then present it in a way it can represent. A process called aliasing.

Think about photographing a diagonal black stripe with a low resolution camera. Even with a black and white camera, you risk the diagonal being represented as a series of stair steps: a low-frequency pattern that acts as an ‘alias’ for the real pattern.

The same thing happens with fine repeating patterns that are a higher frequency than your sensor can cope with: they appear as spurious aliases of the real pattern. These spurious patterns are known as moiré. This isn’t unique to Bayer, though, it’s a side-effect of trying to capture higher frequencies than your sampling can cope with. It will occur on all sensors that use a repeating pattern of pixels to capture a scene.
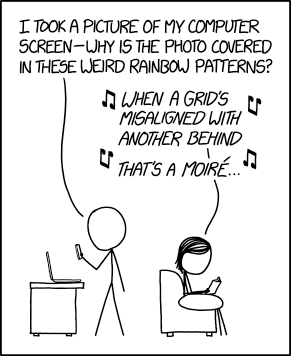
Source: XKCD

Sensors that use the Bayer pattern are especially prone to aliasing though, because the red and blue channels are being sampled at much lower frequencies than the full pixel count. This means there are two Nyquist frequencies (a green/luminance limit and a red/blue limit) and two types of aliasing you’ll tend to encounter: errors in detail too fine for the sensor to correctly capture the pattern of and errors in (much less fine) detail that the camera can’t correctly assess the color of.

‘the Bayer pattern is especially prone to aliasing’

To reduce this first kind of error most cameras have, historically, included Optical Low Pass Filters, also known as Anti-Aliasing filters. These are filters mounted in front of the sensor that intentionally blur light across nearby pixels, so that the sensor doesn’t ever ‘see’ the very high frequencies that it can’t correctly render, and doesn’t then misrepresent them as aliasing.**

The point at the center of the Siemens star is too fine for this monochrome camera to represent, so it’s produced a spurious diamond-shaped ‘alias’  at the center instead. This image second was shot with a very high resolution camera, blurred to remove high frequencies, then downsized to the same resolution as the first shot. It still can’t accurately represent the star, but doesn’t alias when failing.

These aren’t so strong as to completely prevent all types of aliasing (very few people would be happy with a filter that blurred the resolution down to 1/4 of the pixel height: the Nyquist frequency of red and blue capture), instead they blur the light just enough to avoid harsh stair-stepping and reduce the severity of the false color on high-contrast edges.

With a Bayer filter, you get a fun color component to this aliasing. Not only has the camera tried to capture finer detail than its sensor can manage, you get to see the side-effect of the different resolutions the camera captures each color with. Again, if you compare this with a significantly over-sampled image, blurred then downsized, you don’t see this problem. However, look closely you can still see traces of the false color that occurred at the much higher frequency this camera was shooting at.

This means that, a camera with an anti-aliasing filter, you shouldn’t see as much false color in the high-contrast mono targets within our test scene, but it’ll do nothing to prevent spurious (aliased) patterns in the color resolution targets.

Even with an anti-aliasing filter, you’ll still get aliasing of color detail, because the maximum frequency of red or blue that can be captured is much lower. This image was shot at the same nominal resolution but with red, green and blue information captured for each output pixel: showing how the target could appear, with this many pixels.

Light loss

At the silicon level, modern sensors are pretty amazing. Most of them operate at an efficiency (the proportion of light energy converted into electrons) around 50-80%. This means there’s less than 1EV of performance improvement to be had in that respect, because you can’t double the performance of something that’s already over 50% effective. However, before the light can get to the sensor, the Bayer design throws away around 1EV of light, because each pixel has a filter in front of it, blocking out the colors it’s not meant to be measuring.

‘The Bayer design throws away
around 1EV of light’

This is why Leica’s ‘Monochrom’ models, which don’t include a color filter array, are around one stop more sensitive than their color-aware sister models. (And, since they can’t produce false color at high-contrast edges, they don’t include anti aliasing filters, either).

It’s this light loss component that may eventually spell the end of the Bayer pattern as we know it. For all its advantages, Bayer’s long term dominance is probably most at risk if it gets in the way of improved low-light performance. This is why several manufacturers are looking for alternatives to the Bayer pattern that allow more light through to the sensor. It’s telling, though, that most of these attempts are essentially variations on the Bayer theme, rather than total reinventions.

The alternatives

These variations aren’t the only alternatives to the Bayer design, of course.

Sigma’s Foveon technology attempts to measure multiple colors at the same location, so promises higher color resolution, no light loss to a color filter array and less aliasing. But, while these sensors are capable of producing very high pixel-level sharpness, this currently comes at an even greater noise cost (which limits both dynamic range and low light performance), as well as struggling to compete with the color reproduction accuracy that can be achieved using well-tuned colored filters. More recent versions reduce the color resolution of two of their channels, sacrificing some of their color resolution advantage for improved noise performance.

‘The worst form… except all those others that have been tried’

Meanwhile, Fujifilm has struck out on its own, with the X-Trans color filter pattern. This still uses red, green and blue filters but features a larger repeat unit: a pattern that repeats less frequently, to reduce the risk of it clashing with the frequency it’s trying to capture. However, while the demosaicing of X-Trans by third-party software is improving, and the processing power needed to produce good-looking video looks like it’s being resolved, there are still drawbacks to the design.

Ironically, devoting so much of the sensor to green/luminance capture appears to have the side-effect of reducing its ability to capture and represent foliage (perhaps because it lacks the red and blue information required to render the subtle tint of different greens).

Which leaves Bayer in a situation akin to Winston Churchill’s take on Democracy as: ‘the worst form of Government except all those other forms that have been tried from time to time.’

40 not out

As we’ve seen before, the sheer amount of effort being put into development and improvement of Bayer sensors and their demosaicing is helping them overcome the inherent disadvantages. Higher pixel counts keep pushing the level of color detail that can be resolved, despite the 1/2 green, 1/4 red, 1/4 blue capture ratio.

And, because the frequencies that risk aliasing relate to the sampling frequency, higher pixel count sensors are showing increasingly little aliasing. The likelihood of you encountering frequencies high enough to cause aliasing falls as your pixel count helps you resolve more and more detail.

Add to this the fact that lenses can’t perfectly transmit all the detail that hits them, and you start to reach the point that the lens will effectively filter-out the very high frequencies that would otherwise induce aliasing. At present, we’ve seen filter-less full frame sensors of 36MP, APS-C sensors of 24MP and Four Thirds sensors of 16MP, all of which are sampling their lenses at over 200 pixels per mm, and these only produce significant moiré when paired with very sharp lenses shot wide-enough open that diffraction doesn’t end up playing the anti-aliasing role.

So, despite the cost of light and of color resolution, and the risk of error, Bryce Bayer’s design remains firmly at the heart of digital photography, more than 40 years after it was first patented.


Thanks are extended to DSPographer for sanity-checking an early draft and to Doug Kerr, whose posts helped inform the article, who inspired the diagrams and who was hugely supportive in getting the article to a publishable state.

* Unsurprisingly, some manufacturers have tried to take advantage of this increased diagonal resolution by effectively rotating the pattern by 45°: this isn’t commonplace enough to derail this article with such trickery, so we’ll label them ‘witchcraft’ and carry on as we were.

** The more precocious among you may be wondering ‘but wouldn’t your AA filter need to attenuate different frequencies for the horizontal, vertical and diagonal axes?’ Well, ideally, yes, but it’s easier said than done and far beyond the scope of this article.

Articles: Digital Photography Review (dpreview.com)

 
Comments Off on Resolution, aliasing and light loss – why we love Bryce Bayer’s baby anyway

Posted in Uncategorized


Byte sized: JPEGmini claims no loss of perceptual quality, up to 80% smaller files

03 Dec

Most of us think of image compression as a necessary evil. It makes our files more manageable in terms of size, but reduces the quality of our images and can undo the incremental benefits of buying more pixels and better lenses. If offered the choice between more or less image compression, I suspect that most photographers would always go for less. Hence, the idea of buying a piece of software that aims to reduce the size of JPEG files by up to 80% might seem a little crazy. But that is exactly what Beamr, the company behind the JPEGmini application, is offering.

Introduced in 2011, JPEGmini acts as a standalone product or as a plug-in for Lightroom and is a compression optimizer that takes in existing JPEG files and makes them smaller – without reducing the quality of the image, the company claims. The idea is to save space on hard drives, external storage devices, make websites run more quickly, deliver more manageable file sizes to clients and help reduce spending on cloud storage. We’ve read up on it and written about its desktop and mobile applications briefly, but Senior DPReview Contributor Damien Demolder recently had the chance to sit down with the company’s Chief Technology Officer to find out more about how it works.

How it works

Dror Gill, CTO and VP of Beamr, the company behind JPEGmini

In an interview, Beamr’s CTO Dror Gill explains how JPEGmini works and how the company measures its claimed ‘no change’ in image quality.

‘JPEGmini works with standard JPEGs. The input is a standard JPEG and the output is a standard JPEG. We recompress that standard JPEG photo by up to 80%, and the resolution remains the same and the perceptual quality of the image remains the same. When we talk about ‘perceptual image quality’ we mean that if you took this photo and viewed it on your screen at Actual Pixels, or 100% magnification, and compared it to the original you wouldn’t be able to determine which was the original and which one was the optimized. That’s what we call ‘perceptually identical’ to the original.’

I wanted to know who the ‘you’ was in that qualification – as the opinions of a general consumer, a photographer and a scientist will all be significantly different. Gill said that ‘99% of the population’ wouldn’t be able to tell the difference, including most photographers. 

‘Any JPEG compression introduces artefacts, but the question is,
are these artefacts visible by humans or not?’

‘Most of our customers are professional photographers, and they have realised that the photos that they get out of JPEGmini are as good as the originals and that they can use them in the same situations and for the same uses. Of course, the JPEG process introduces artefacts that you don’t find in the RAW file, so any JPEG produced by Photoshop or Lightroom will have artefacts, but our claim is that our processed image will look the same as the original JPEG and the compression will not introduce further artefacts. Any JPEG compression introduces artefacts, but the question is, are these artefacts visible by humans or not? We have developed a quality measure that gives us that answer with very high accuracy. This quality measure has much better correlation with human results than other scientific quality measures.’

The software works by analyzing the content of each image, and determining how much compression can be applied to each individual area. Images are broken down into tiles of a set number of pixels, and the degree of compression acceptable is assessed according to the level of information recorded in the tile. Gill wouldn’t say how the tiles interact with each other, but we worked on the presumption that the tiles were about 150 pixels square.

If there isn’t much data recorded the content can be compressed more than if a tile contains a lot of data, so the savings are made via a more flexible process than the usual global compression ratios that most software applications and cameras work with. The software produces compression level ‘candidates’ for each tile, which basically means it tries different levels and determines the maximum that can be achieved without loss of the information in the tile – and then that amount is applied.

$ (document).ready(function() { SampleGalleryV2({“targetContainerClass”:”sampleGalleryImageViewerContainer”,”galleryId”:”6536787672″,”isEmbeddedWidget”:true,”selectedImageIndex”:0,”startInCommentsView”:false,”isMobile”:false}) });

Gill says camera manufacturers don’t like to use a lot of compression because too many reviewers and customers think that image quality and the amount of detail in an image can be determined by the size of the file created, and that people associate smaller file sizes with lower levels of picture information. Camera brands, he says, don’t want to produce files that are smaller than their competitors as some reviewers will immediately mark them down for it without studying the comparison images.

‘what we do is take that image and determine
what is the exact optimal level of compression for that particular picture’

Cameras don’t have any mechanism for evaluating the content of the image either, he says, so the compression has to be global and to err on the safe side. ‘This results in a relatively large JPEG,’ says Gill, ‘but what we do is take that image and determine what is the exact optimal level of compression for that particular picture. Some images are more easily compressed than others – some have very delicate textures and smoothly varying color gradients, and for those you need to use high quality settings. If the content is mainly smooth surfaces and busy backgrounds, that you can’t tell if they are degraded or not, you can use a higher compression ratio.’

Gill says that out-of-focus backgrounds can be compressed more than focused areas, as the software analysis works by detecting the amount of detail and information present. This brings up the question of whether a poor lens will be made to look worse by the compression compared to the same area captured by a sharp lens, but Gill maintains that the difference wouldn’t show. Tests, I suppose, will give us the sure answer to that.

If you view the optimized images at 800% Gill admits that you would see the differences, but at normal viewing and for normal use you won’t. ‘These optimised files are designed to be viewed at 100% and to be printed. In print it is even harder to see the differences than on screen.’

‘the inefficiency of normal JPEG compression pollutes the environment’

The whole idea of JPEGmini, Gill explains, is to save space on laptops, hard disks, online and in external storage. ‘There are a lot of terabytes wasted by files that are larger than they need to be. There is no point using bytes and bits that are not visible to humans. The industry is doing it all the time. Maybe we should calculate how many exabytes are being wasted every day – the inefficiency of normal JPEG compression pollutes the environment’ he only half-jokes.

Gill’s father is Aaron Gill, who was one of the chief scientists who worked on the original JPEG standard in the 1980s. I ask how he feels about his son tampering with the way JPEGs are created. ‘At first he was sceptical and asked me what I was doing getting mixed up with this company that wants to reduce file sizes, but after he tried it I think he was proud of me.’

Trying it out

JPEGmini supports JPEG files up to 28MP, while its JPEGmini pro and JPEGmini Server siblings support up to 60MP images. To give an idea of what JPEGmini does, I ran a 25.45MB Raw file through Lightroom and exported a ‘best quality’ JPEG of 10.12MB. After being exported again via the JPEGmini plug-in the file was compressed to 2.66MB, and still measured the same 4608×3456 (16MP) pixels it did originally – so the JPEGmini file is a quarter of the size of the normal JPEG.

The software still makes considerable savings even if you don’t usually convert your images using the best quality settings. For comparison, that Raw file exported as a JPEG at 80% quality in Lightroom (not using JPEGmini) resulted in a 4.8MB file. The 2.6MB JPEGmini file is just over half the size.

Although photographers might like the idea of saving space most are not interested in doing so at the cost of quality, and frankly I think most of us struggle to believe that such a dramatic file size reduction can be achieved without any detrimental effect on the content of the picture.

Normal JPEG exported from Lightroom at best quality JPEG exported from Lightroom via the JPEGmini plug-in

In my very brief tests I have been able to see slight differences in levels of micro contrast and the amount of very fine texture that is resolved when the images I used were viewed at 100% on screen. More tests will be required to see exactly what is lost and what is at stake, and I’m compelled to make those tests by the carrot of saving a massive amount of space in storage and by the prospect of having a website with large images that runs quickly. At this stage I can say that in the image I tested the plug-in with tiny differences could be seen when the images were compared at 100%, but at print size (33%) the differences were certainly not apparent.

Normal JPEG converted from Raw at quality 11 – 2.2MB JPEG further compressed via JPEGmini app – 980KB

If you can’t wait for the results of my testing you can download the $ 19.99 standard standalone version of JPEGmini for a free trial. JPEGmini Pro costs $ 149 but can work with images of up to 60MP, is up to 8x quicker and comes with the Lightroom plug-in option as well as the standalone application. At the moment however, JPEGmini only accepts JPEG files. That means even using the Lightroom plug-in, a Raw file must first be converted to JPEG to then be re-saved as a smaller JPEG by the application. 

For more information visit the JPEGmini website.

Articles: Digital Photography Review (dpreview.com)

 
Comments Off on Byte sized: JPEGmini claims no loss of perceptual quality, up to 80% smaller files

Posted in Uncategorized


How to Avoid Loss of Your Digital Photos

24 Jun
Mariam S

By Mariam S

Nowadays almost all photos are taken using various digital devices. In the era of paper photos, the main photo destructors were natural disasters like fires, and also such a phenomenon as discolouration. Modern digital photos face mainly the same dangers – fires, floods, and so on. Surprisingly, digital photos also have some equivalent to discoloration – degradation of a photo storage device over time. However, apart from these dangers inherited from paper predecessors, digital photos are subject to new specific dangers, for example: loss of photos due to a storage device failure. Let’s discuss in more detail what dangers digital photos might face and how you can avoid many of them.

Generally speaking, there are three bottlenecks where you can lose photos – when taking photos, when transferring them, and in storage.

#1 Loss of photos in camera

Immediately after you have taken a photo there is only a single copy of it. If this copy is lost, you can in no way get it back. In all fairness, such cases are relatively rare. Even if data recovery software doesn’t help, as a last resort you can send a memory card to a repair lab in the hope that the hardware specialists can help. However, if it fails, all you have left to do is to say “goodbye” to the photos because there was only a single copy of them.

For example, you shoot a football match and then on the way home lightning hits your camera and all that was left was a pile of ashes. This is what contracts call “force majeure” and therefore nothing can be done. However, history has some funny stories. A man had dropped a camera into the sea; a year later some divers raised it and surprisingly the photos were readable. Divers were even able to identify a camera owner by the photos and then returned him his “property” (read the full story here).

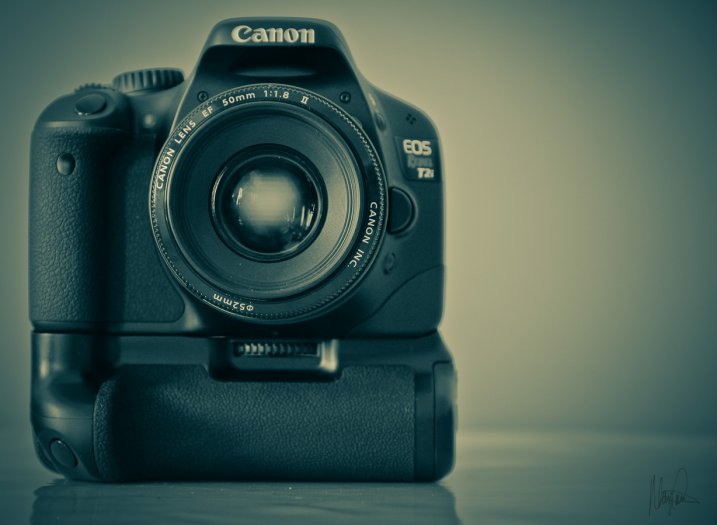
Image 2

Tips

Here, there is little advice for you because surely you know better how not to drop the ball, say due to a camera failure or something like that, when shooting a unique event.

There are some tips on memory card health that will help though:

  • How to Spring Clean Your Memory Cards
  • The Best Way to Delete Photos From Your Memory Card

Also remember to turn off your camera before removing or changing your memory card or battery. Not doing so can result in a card crash and lost images.

#2 Transferring photos

The process of transferring digital photos from your camera to computer is akin to producing paper photos from the negative. In both cases you duplicate photos from a single copy you have, whether it would be a negative from an old camera, or a flash card in a modern digital device.

In the film days, the process of transferring photos to new data storage was laborious, took a lot of time, and required certain skills and equipment; with digital photos the process becomes radically simplified. However, strange as it may be, nowadays the chance of losing photos during transfer is still significant.

Earlier, when developing film you had to stick to certain rules. Ignoring these rules inevitably resulted in destruction of photos. For example, one such rule says that all actions with negatives must be performed in a darkroom. In case of digital photos there are also some rules, however, people tend not to follow them because ignoring them doesn’t always lead to loss of photos. Those “less fortunate” people who neglected the rules and lost their photos, then have to bother with photo recovery.

Let’s look at the rules:

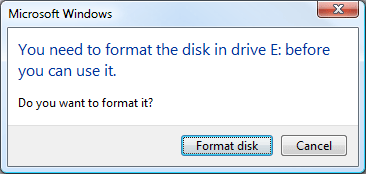
  • Always use the “safely remove hardware” option when ejecting a memory card or any other removable device from a computer. Otherwise, the operating system may not have time to handle data on the removable device properly. That sometimes can lead to the RAW file system issue, the typical symptom of which is when Windows shows you the message like this:
    Image 3 small
  • Don’t eject a memory card from a working camera, for the same reasons as in the previous case.
  • Always monitor the battery charge. If battery runs low at the wrong time, it may result in a file-system failure on the memory card. Generally, it is better to use a card reader device for transfers since it has no such problems.
  • Transfer photos regularly. By doing so, in the worst-case scenario would be that you lose only you’re latest photos, rather than an archive for the entire year.

However, it should be noted that all listed above typically don’t destroy photos themselves. It just leads to a file-system failure which is pretty well cured by data recovery software, given that you have not formatted a card.

#3 Storage

In general, loss of data in storage is bad form. Immediately after taking pictures you have just one chance to copy them, and you still can write data loss off to an “irresistible force of nature”, for example. Once you have enough time to create a copy of the photos, however, data loss is less excusable.

Charles Wiriawan

By Charles Wiriawan

Do not trust only one storage technology

Do not rely upon only one storage technology, even if you think it is very reliable. No data storage technology, be it a fault-tolerant RAID or modern Storage Spaces from Microsoft, can replace a good old backup. More than that, a proper backup procedure requires an off-site copy, maintained in some physically separate location. This is to prevent simultaneous loss of both original,
and backup copies to a fire or theft.

Tips

  • Off-the-shelf NAS devices like Synology and QNAP have several indicators that can be green, yellow, and red. These indicators significantly simplify monitoring of the device “health” – just remember what typical indications are, then glance at the NAS at least once a day. Extinguished or red lights are a reason for concern.
  • If you store photos on a Windows PC, use special software to monitor your disk state. S.M.A.R.T. is a technology used in hard drive self-diagnostics. Fairly often, it can predict hard drive failure ahead of time. A monitoring tool requests S.M.A.R.T. status of the device periodically and if S.M.A.R.T. data deviates from the normal values, the tool will alarm you so that you can back up the data.
  • Check the S.M.A.R.T. state of your hard drives at least once a month.

Photo recovery tips

If you have lost some photos and are looking for a way to recover them, there is no need to panic because photo recovery from a camera memory card is one of the easiest, and well-established data recovery tasks. All you need is to download and install any data recovery software – there exist both paid and free options – select a memory card from the device list, and see what it brings up.

If you are not satisfied with the quality of the recovery, it makes sense to try several tools since recovery algorithms used in various software may differ in some way. Note that data recovery tools, for the most part, are read-only so they will not destroy anything on your card. Windows CHKDSK is the significant exception to this rule – it sometimes does make matters worse.

Below are some tips on how to achieve the best result when recovering photos from a memory card:

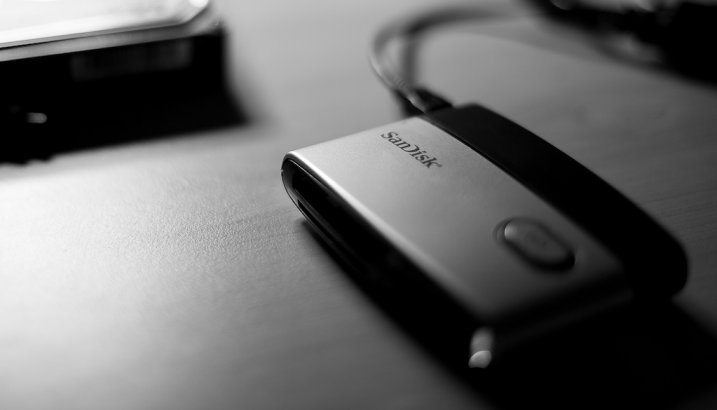
  • Stop using a card once you see that something is wrong. If the camera’s behaviour is unusual, stop taking any new photos until you clear up the situation with the existing photos.Image 4
  • If possible, use a card reader device when recovering data. It is stable and provides better performance than a cord and direct connection to the camera.

    Matthew

    By Matthew

  • Do not take new photos once you realize that you need to recover data. Usually, with each new photo you lose a capability to recover one previously deleted photo.
  • Ascertain in advance what your camera actually does when you format a card. If the camera uses a “complete” (also called low-level) format by default, change it to a “quick” format. Thereby, if you format a card accidentally you still can recover photos from it; after a complete format, all the data will be overwritten and not recoverable.

Bonus – discolouration

In early days, when archives were stored on magnetic tape, it was critical that the tapes must be rewound regularly. Otherwise, the data became unreadable because magnetic fields mixed between adjacent layers of tape (what was then known as crosstalk effect).

Some place the photos on CDs and then do not check them for years. In five years one can easily find that at best only half of the CDs are readable. CDs are not suitable for long-term storage and should only be considered as one of the backup options for a short period of time.

Those who keep their photos on old hard disks, in ten years will not be able to find a proper connector anywhere else except in a museum. If you are going to store photos for a long time you should use the most modern devices to increase the chances of find a compatible setup in the future. This is sometimes called “future-proofing”. However, you should not bet on the ultramodern technologies since it may happen that the technology does not stick and therefore, say in five years, you will not be able to find compatible components (think beta versus VHS).

Sophia Maria

By Sophia Maria

Generally speaking, digital discolouration differs from analog (paper) discolouration, only in that you can discern at least something on a discoloured paper photo, while a digital picture is destroyed immediately and completely.

Image 5

So some care and planning on your part can help you avoid losing your images, or in the worst-case scenario, quickly able to recover them. What’s your disaster avoidance plan?

googletag.cmd.push(function() {
tablet_slots.push( googletag.defineSlot( “/1005424/_dPSv4_tab-all-article-bottom_(300×250)”, [300, 250], “pb-ad-78623” ).addService( googletag.pubads() ) ); } );

googletag.cmd.push(function() {
mobile_slots.push( googletag.defineSlot( “/1005424/_dPSv4_mob-all-article-bottom_(300×250)”, [300, 250], “pb-ad-78158” ).addService( googletag.pubads() ) ); } );

The post How to Avoid Loss of Your Digital Photos by Alexey Gubin appeared first on Digital Photography School.


Digital Photography School

 
Comments Off on How to Avoid Loss of Your Digital Photos

Posted in Photography


How to Recover Photos After a Data Loss

05 Oct
Frank Grießhammer

By Frank Grießhammer

One of the worst things that can happen to you as a photographer is data loss, but there are ways to resolve it. This guide will talk you through how to recovery those all-important photos easily and quickly.

Whether it’s a quick snap of your pet or a scenic landscape shot, chances are most of the photos you take are precious and important to you. Photos capture memories and moments; losing these would be disastrous. Sadly, photo loss is not an uncommon event. In fact, either it’s already happened to you in the past or it likely will in the future.

Losing your photos can occur for a variety of reasons, one of the most common being simply human error. It could be something simple like accidentally deleting the wrong file or pressing the wrong button. However, as wonderful as technology is, it too is prone to failure. There are many stories of people unloading their memory cards from their cameras, putting it on their computer and then finding their files can’t be opened or are missing altogether.

If you’ve discovered that you’re a victim of data loss then one of the most important steps to take is to stop using the card immediately, and remove it from your camera, just to make sure that no activity takes place on it. It’s crucial that no further data is written to the card.

Jorge Quinteros

By Jorge Quinteros

When a photo is deleted, the data on the card isn’t immediately purged. There are two main types of data on an SD card: information about the files on the card and the data for the files themselves. When you delete a file, it’s that information about the files that is removed. The data for the files remains on the card until the space is needed for another file. As such, a new photo on the card could be assigned to the place where a deleted photo once was, wiping it out permanently.

It’s now time to try and get your data back, so mount your SD card to your computer. Depending on the condition of the card (e.g. if it is corrupted or uses an unrecognizable file system), your system may automatically detect that there’s a fault with it. You might perhaps be suggested to use the manufacturer’s software to try and resolve the problem. Alternatively, a pop-up box could encourage you to format the card. Do not do any of this.

Bridget AMES

By Bridget AMES

Formatting the card is especially dangerous and will lower your chances of successful data recovery to sinking level. It’s a last resort tactic. Your computer means well by suggesting a card format. It’s essentially saying “Hey, I can’t seem to locate any data, shall we wipe everything and start afresh?” However, just because your operating system can’t find the data it doesn’t mean it isn’t there, lurking under the surface.

DO: stop using the card literally the moment you realize there’s a problem; remember to breathe and stay calm!

DONT’T: browse the photos on your camera, take ‘just one more’ snap, or format the card.

The next stage is to download a program that’s going to help you get your data back. For the purposes of this tutorial we’ll be using R-Undelete. There are other programs available, but this one is entirely free for home users and works really well. The only limitation is that it only works for FAT formatted SD cards—fortunately, practically all camera SD cards are FAT formatted. There are also some professional data recovery companies who will charge you to recover data, but frankly, in this circumstance, using something like R-Undelete will do the same job for none of the cost.

Step One

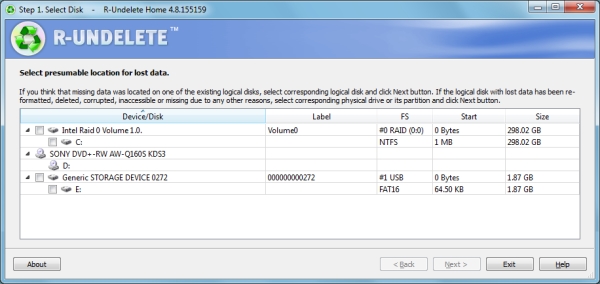
The first screen you’ll be presented with a list of all the drives mounted to your computer. All you need to do is place a tick in the checkbox next to your SD card and click ‘Next’.

Step1JPG

As you can see, the example image above shows an internal drive, a DVD drive and an SD card. The SD card being used is called ‘Generic Storage Device’, but yours might have a more unique name. Refer to this or match up the size of your card to the ones listed (1.87 GB in the example).

Step Two

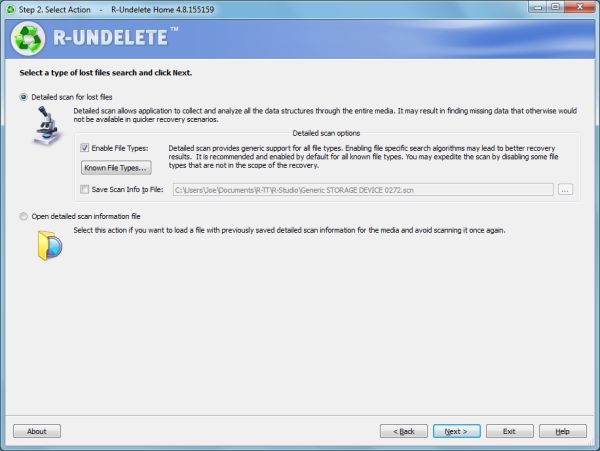
This step is a simple one. The program will automatically select a detailed scan for lost files, which is precisely what you want. You can ask for the program to only search for specific types of files (like videos or pictures) by clicking ‘Known File Types…’, but it’s better to leave it on the default setting to scan everything.

Step2JPG

The scan information is going to be saved to Documents by default, but feel free to change that file path to whatever you wish by checking the box alongside. Remember that you must not save anything to the card that you’re recovering from, so it’s easiest to keep things on your internal drive.

When you’re ready, click ‘Next’ and the scan will begin.

Step Three

Step3JPG

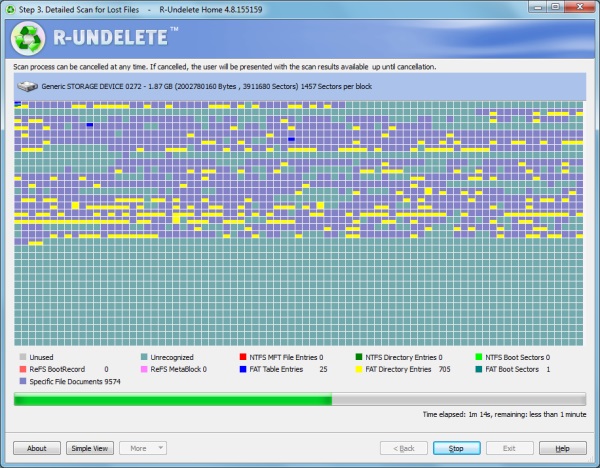
The scan will then begin. This screen might look a bit scary at first, but there’s no need to worry. It’s just a visual representation of the type of data that is being scanned. Just wait for the scan to finish (it’ll be quick, but will vary depending on the size of your card) and click ‘Next’ when that option is available.

Step Four

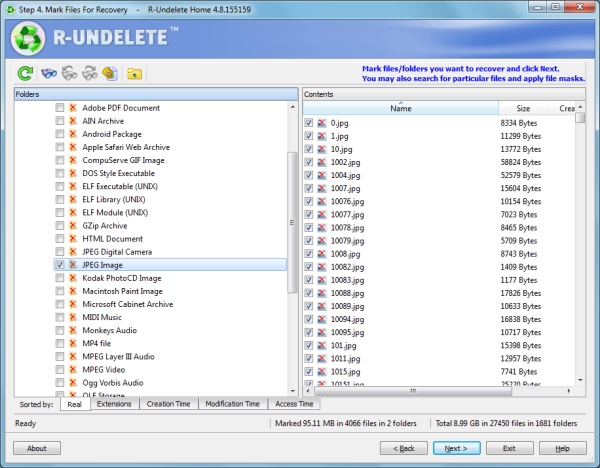
You’ll be presented with a list of all the data that the program has found on the card. On the left are the folders, which show the contents on the right when they are clicked.

Step4JPG

The great thing is that you can sort the results by filters such as the file extension, the time the data was created, or when it was accessed. If you’re trying to hunt down specific files, then there’s also an advanced search tool where you can input variables to search for, like the size of the file or when it was last modified.

One symptom of data loss is that the original file name is often lost, so don’t worry if you don’t recognize any of the file names. If you’re not sure where the data you seek is, go ahead and recover everything the program has found – you can recover as much or as little data as you want without issue.

Once you’ve got the data you want to be recovered selected, click ‘Next’.

Step Five

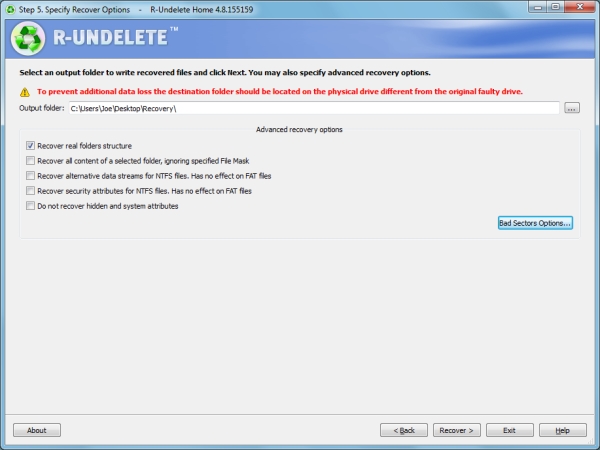
Nearly there! First, select the folder where you want all your recovered data to go. Handily, the program reminds you not to choose anywhere on your SD card – but of course you know that by now!

Step5JPG

There are also some advanced options available. The example above asks the program to try and recover the original folder structures, bear in mind however, this isn’t always possible. Providing you selected all the required files in step four, this should be the only option you might want to select.

Are you ready to get your pictures back? Click ‘Recover’ and the program will begin to work its magic. The time it takes will depend on how much data you’ve asked to be recovered, but the process is relatively quick.

Success!

R-Undelete successfully recovered every image that I asked it to and hopefully it performed the same way for you.

Try and remain calm throughout the whole process. Understandably, that’s probably easier said than done, but data recovery is entirely possible and if you follow the advice given then it should hopefully be pretty effective.

You may aware of how important it is to back up your files, but don’t actually practice it. If possible, ensure your photos are being consistently backed up to another location. Whether you’re just transferring them to your computer at the end of the day, or sending them to cloud storage services like Dropbox or OneDrive, having multiple copies of your photos will mean that it’s less of a problem if data loss does occur.

Best of luck and enjoy those recovered files!

Editor’s note: please be aware the software mentioned only works on a PC. Just do a google search for: photo recovery Mac free and you’ll find a whole bunch that work similarly to the one mentioned in this article.

The post How to Recover Photos After a Data Loss by Joe Keeley appeared first on Digital Photography School.


Digital Photography School

 
Comments Off on How to Recover Photos After a Data Loss

Posted in Photography


Olympus executive dismissed amidst loss revelations

15 Nov

Olympus has dismissed its executive vice president after admitting concealing losses on investments. In the most serious revelation since the departure of former chief executive Michael Woodford, the company said that funds from previous acquisitions had been used to hide losses on securities investments since the 1990s. The news saw Olympus shares fall in value by up to 30% during Tuesday’s trading.
News: Digital Photography Review (dpreview.com)

 
Comments Off on Olympus executive dismissed amidst loss revelations

Posted in Uncategorized


James Balog: Time-lapse proof of extreme ice loss

26 Sep

www.ted.com Photographer James Balog shares new image sequences from the Extreme Ice Survey, a network of time-lapse cameras recording glaciers receding at an alarming rate, some of the most vivid evidence yet of climate change.TEDTalks is a daily video podcast of the best talks and performances from the TED Conference, where the world’s leading thinkers and doers give the talk of their lives in 18 minutes. Featured speakers have included Al Gore on climate change, Philippe Starck on design, Jill Bolte Taylor on observing her own stroke, Nicholas Negroponte on One Laptop per Child, Jane Goodall on chimpanzees, Bill Gates on malaria and mosquitoes, Pattie Maes on the “Sixth Sense” wearable tech, and “Lost” producer JJ Abrams on the allure of mystery. TED stands for Technology, Entertainment, Design, and TEDTalks cover these topics as well as science, business, development and the arts. Closed captions and translated subtitles in a variety of languages are now available on TED.com, at http Watch a highlight reel of the Top 10 TEDTalks at www.ted.com
Video Rating: 4 / 5