RSS
 

Posts Tagged ‘Location’

Speedlight vs Monolight on Location: See How They Compare [video]

16 Nov

The post Speedlight vs Monolight on Location: See How They Compare appeared first on Digital Photography School. It was authored by Caz Nowaczyk.

In this video from Adorama, Gavin Hoey compares speed light vs monolight on location.

?

In the test, he does three very common lighting scenarios. He uses the flashes as fill flash, overpowering ambient light, and high-speed-sync flash.

He uses model, Charlotte, for the demonstration.

Gavin uses the following gear for the shoot:

  • Olympus E-M5 Mk III
  • Olympus 12-40mm f/2.8 Pro lens.
  • Olympus M.Zuiko 7-14mm f/2.8 Pro lens
  • Olympus M.Zuiko 25mm f/1.2 Pro lens
  • Flashpoint Xplor600 Flash
  • Zoom Li-on Speedlight
  • Glow Parapop 38″ Softbox
  • Flashpoint R2 Pro II Transmitter
  • Seconic L-308X-U


View this post on Instagram


A post shared by Gavin Hoey (@thegavinhoey) on

Scenario one: fill flash

First up, in the Speedlight vs Monolight comparison, Gavin uses the monolight.

Before taking any shots, he takes a meter reading of the ambient light. Then to get his flash to match those settings, rather than use trial and error (which you can do), he uses a light meter to take an accurate reading from his model’s chin. He then uses that to set the flash.

Settings: f/3.5 1/250th Sec ISO 200

Next, he uses the speedlight flash. He sets it up using the same light modifier that he uses with the mono light and puts it in the same position.

He takes another light meter reading of his model’s chin, and set’s his speedlight flash.

When comparing the photographs, it is difficult to see the difference between using the monolight and using the speedlight.

Scenario two: overpowering the ambient light

Settings: f/16 1/250th sec ISO 200

In this scenario, Gavin runs the flash at full power to see what sort of aperture he can get out of the flash.

When doing a light meter reading, he gets an aperture of f/22 at the flash’s full-power setting.

Because he doesn’t want to waste the flash battery power and have a longer recycle time, he drops the flash to half power, which gives him an aperture of f/16.

He tests the camera settings without flash first to see how dramatic the sky looks. Then he turns the flash on to get some dramatic shots.

Gavin then swaps the flash over to the Speedlight, again using the same modifier and distance. The meter reading with the speedlight gives f/11, and the speedlight is set to full power.

In the side by side comparison, Gavin prefers the speedlight version over the monolight (what do you think?). But he prefers the flexibility, faster recycle times, power usage etc. of the monolight.

Scenario three: high-speed-sync flash

High-speed-sync flash strobes the light rapidly, meaning you get less power out of the lights. It is used for a shallow depth of field, so Gavin switches to a 25mm f/1.2 lens and shoots at f/1.2.

Firstly, Gavin turns off the flash and dials in f/1.2 and his flash sync speed of 1/250th of a second and then takes a picture of his model, Charlotte, to see what he gets at those settings.

While his model is quite well exposed at those settings, the background is overexposed, so Gavin tries 1/4000th of a second shutter speed, which gives him more detail in the background.

Most light meters won’t work with high-speed sync, so Gavin uses trial and error to set the flash to light Charlotte. He settles with 1/16th power.

Settings: f/1.2, 1/4000th sec, ISO 200.

He then tries the same settings with the speedlight flash with the flash at half-power.

While the flash does well to light the model, it struggles to keep up when shooting a number of shots in quick succession. He managed to get 18 photos in a row before the speedlight stopped working. This was actually the recycle time getting much longer.

Conclusion

If you have lots of high-speed-sync photos to take on location, you are better off with a monolight.

Variables: how far flash is from the subject, amount of ambient light, and softbox.

What are your thoughts on the comparisons? Which do you think wins in the speedlight vs monolight comparison? Share in the comments!


You may also like:

  • Simple Tips to Improve Your Portrait Photography Immediately
  • Getting to Grips with Fill Light in Portrait Photography
  • What Size Beauty Dish is Right For Your Portrait Photography?
  • Your Guide to Studio Lighting Equipment
  • Learn How to Setup Studio Lighting in 15 Minutes
  • Understanding Broad and Short Lighting in Photography
  • Portraits: Lighting the Shot


The post Speedlight vs Monolight on Location: See How They Compare appeared first on Digital Photography School. It was authored by Caz Nowaczyk.


Digital Photography School

 
Comments Off on Speedlight vs Monolight on Location: See How They Compare [video]

Posted in Photography


How to Choose the Right Location for Your Photo Session

15 Feb

The post How to Choose the Right Location for Your Photo Session appeared first on Digital Photography School. It was authored by Jackie Lamas.

It’s thought that clients are the ones who choose the location for their portraits, but more often than not, choosing the right location is left entirely up to the photographer. In this article, we’ll outline a simple formula to help you and your client settle on the perfect location for the session.

1. It’s not about location, it’s about the look and feel

When you talk to your client about possible locations, change the language you use. Instead of “have you thought of where you want your session to take place” with “what look and feel would you like your photos to have?”

That simple change in language will help your clients to visualize their final images. I’ve listed a few words that can help your client choose which look and feel they want for their final images. Thus, helping you to choose the best location for the session.

These two locations offer different “feelings”.

  • Ethereal: This can be an open field, nature park, or a bright location with little to no busyness in the background like buildings.
  • Nature/natural: Here you can offer a park with lots of green grass and tall trees. Giving them a more natural feel to the photos. You can also offer a field of wildflowers.
  • High fashion/urban: This is definitely in a busy neighborhood or downtown area with lots of big buildings, reflective windows, and metal accents. Giving lots of contrast to the photos and the look and feel of a busy city.
  • Vintage: This can mean either old architectural buildings with wooden doors and big arches or it can mean that they want a location where there are lots of vintage accents, like a neighborhood of restored or historical homes.
  • Warm/homey: These words are a little broad but they can mean that the session can happen at a nice warm location like a field or during sunset at the beach. Homey can mean that they want to feel comfortable and relaxed, which can mean a location they frequent or even their own home.
  • Beach: This one is pretty easy, you can offer the beach if you are near one as a location. The time of day will give you the look and feel. The morning will give you a more blue and pink hue whereas during sunset you’ll get the beautiful golden hour lighting. Make sure to explain both options to your client so you can choose the right time for the look and feel they are visualizing.
  • Meaningful location to the client: Yes, this is an option as well! Especially for engagement sessions because it can be really meaningful to have the photo session at a location where the couple met, or where they got engaged, or simply where they spend a lot of their time together. This is also important for clients celebrating anniversaries or a really important milestone, like graduating from high school or college.

Two different locations for the same maternity portrait session to offer variety.

2. Ask what their home decor looks like

Another way to set a location for the portrait session is to find out what kind of home decor, theme, or color scheme they already have. This way, when it comes time to hang beautiful photos in their home, you can be sure that it won’t clash with the rest of the home.

Your clients will appreciate that you took the time to find out what would look best in their home before even taking a single photo. This makes you look even more professional because you are going to choose the perfect location so that when they are ready to frame, they are reassured that the photos you took will match their home decor perfectly.

This can also help you to upsell items like albums because you’ll know the right album cover and color to choose for each one of your clients. It will make them see that you care more about how their photos will match their home rather than simply choosing an easy location for all of your photo sessions.

For example, choosing a black leather cover for an album can look great in a contemporary modern home whereas a fabric cover album would look better in a more country style home. Or another example would be if the home has brown, beige, and reds in the decor then a perfect location would be a field of flowers.

3. Time of the session

Time can be a huge factor in choosing the right location. Some families need to keep nap times and energy levels in mind when scheduling a session. For example, if your clients need to keep in mind a little one’s nap time at 2 pm, you can choose to have the session in the morning or in the evening when the child is at his best. Photographing in a park that is rich in trees and greenery can help shade you from afternoon light or keeping the sun off your clients.

Or, you could schedule the family during the golden hours at a nearby beach or lake so that the child can play and still have had his nap time earlier.

Sometimes the time is dictated by the location itself. For example, photographing in an urban setting where tall buildings can shade the sun during sunset means that you might have to photograph your client at an earlier time to have enough light.

Or, if you’re photographing in a field, sometimes the early morning hours are best when it’s cool and not so bright. Golden hour is also perfect for fields and beaches.

Midday sun at the beach may be a little harsh but it is still doable. Speak with your clients to choose the best time that works for their schedule.

Talk with your client to see if time will be the determining factor in choosing the right location.

4. Use your website to help choose the location

Chances are, your clients have already looked through your website and have fallen in love with your style! This is great because this can also help your clients to choose the perfect location for their portraits.

This photo is a common favorite on my website since most family sessions are on the beach and during sunset.

If your clients are having trouble visualizing what they want their photos to look like, have them go over to your website and point out a photo that they like the most.  The one that just jumps out at them and had them convinced they wanted you to photograph them.

If the location is nearby or accessible, offer that same location to your client! They loved the photo and it is what led them to contact and hire you, so why not photograph them there? It’s guaranteed that they’ll love the final photos.

5. When they leave it up to you

Even though you’ve gone through all the steps above, some clients don’t know what they want for their photos. They’ll look to you to offer up the best locations because what they want is to have the best photos possible so any location, look, and feel is okay with them.

When this happens, don’t be afraid to take charge. Choose a location that perhaps you’ve been wanting to photograph in for a while, or a location that you know has great golden hour lighting.

Sometimes, clients just need more of a visual to get an idea of what they are actually looking for. Send your clients links to two or three specific locations that you’ve chosen so that they can see with their own eyes what the images will look like. Blog posts and images from your website would be perfect examples.

This way, even though they don’t know what they’re going for, they can choose the one that seems more interesting to them. Giving them the final decision on where they would like the location for their session to take place.

6. More than one location

Depending on your portrait business model and what you have offered your client, and if you’re willing, you can do one session in multiple locations.

For example, if you are photographing an engagement session and they are going for a natural park look but got engaged in front of the downtown theater, then you could offer your clients to photograph in both locations for their session. Either on the same day or on different days.

Photographing in multiple locations offer your clients a variety in their photos so that they can showcase different photos in different rooms in their house as well!

Of course, sticking to one location where there is variety in looks can also be an option to add variety to the photos without having to go somewhere else.

In conclusion

Each session is different and each client is different, using the tips above will help you to determine the perfect location for all of your sessions. When you guide and help your client visualize the perfect location for their session, you will not only look more professional, you will be giving your clients a very personalized experience that they will appreciate. Resulting in more referrals and return clients!

The post How to Choose the Right Location for Your Photo Session appeared first on Digital Photography School. It was authored by Jackie Lamas.


Digital Photography School

 
Comments Off on How to Choose the Right Location for Your Photo Session

Posted in Photography


How to Make Your Location Portraits Even Better

25 Sep

In photography, portraits are an art form to themselves. There are many ways to make portraits, but one of the main divisions is between portraits made in a studio and on location portraits. The end results look very different, so it’s good to choose between them depending on what you’re going for.

Do you have a preference between them, either as a photographer and/or as a viewer?

Portrait in a greenhouse. location portraits

Studio photography is a lot of fun, but when I’m working on a portrait job I usually prefer to photograph on location. Why? Portraits taken in a favorite location – outdoors or at home – are a great opportunity to really bring out the subject’s personality and to enjoy the beauty of natural light.

That’s why I thought I’d share what I’ve learned about location portraits with you. I hope you enjoy the ride!

Sports portrait on location. location portraits

The advantages of stepping out of the studio

There are both pros and cons to on-location portrait photography. The main differences between this kind of photography and studio photography are the light and the environment.

Light

In a studio setting, you’re in complete control of the light. On location, you very likely won’t be, but the advantage is that you’ll have a much richer palette of light and color. So it’s a challenge but also an opportunity.

Instead of creating the lighting setup, you can focus on creating a very unique, natural portrait. Another difference is that natural light feels less artificial, just like a natural setting. Depending on what kind of atmosphere you’re going for, this can be very important.

Portrait of child outdoors. - location portraits

Environment

Depending on the surroundings, a natural setting might not create a portrait with that timeless feel that a studio portrait often has. Again, this is neither good nor bad – it all depends on what kind of feeling you’re going for.

Including the environment in your portraits can add a lot of character and help bring out the subject’s personality.

Wedding portrait in forest. location portraits

The environment can also be a distraction, both in the final photograph and during the session. This can be a boon or a burden when you’re taking photos.

Too much going on might lead to a chaotic photo or the subjects looking (or being!) distracted, but it can also help the subjects relax and be themselves. All you have in a studio setting is the subject, the slightly intimidating lights, and the photographer; outdoors or at home, the setting might feel less oppressive.

Using the Surroundings to Your Advantage

So you’ve decided that you’re going to do a portrait session on location. What are the most important things to remember, and how can you make the session memorable?

Wedding portrait in winter.

Prepare!

You can’t ever be in complete control of a situation, but preparing is always worth the effort. It will help both you and your subject get the most out of the session and the final product. It will also let your creativity flow more freely since you won’t have to worry about all the details you will have dealt with beforehand.

Several choices need to be made before you can start making a portrait, and this can be done days and even weeks beforehand. These are: where, when, what, and what if.

First, you’ll have to find and agree on a location that’s convenient for you and works for the kind of portrait you and the client want. Unless it’s your backyard, it’s important to familiarize yourself with the place before the session.

Wedding portrait with greenery. location portraits

The time for the shoot is at least as important as the location. Both season and time of day have a huge impact on the quality of light you’ll have to work with, so keep that in mind as you plan your photo session.

In general, the hour before sunset until just after sunset is when you’ll find the really beautiful light. Overcast days are also surprisingly good for portraits. Of course, you also have to find a time that’s convenient for your subject so the timing of the photo session is often a compromise between practical considerations and optimal lighting conditions.

Graduation portrait with flowers.

Other preparations you can make are planning the types of photos you and your subject want and the clothing they’ll be wearing. Sometimes these are given – for instance, if you’re making wedding or graduation portraits.

Looking up inspiration for poses and compositions online is a good way to get ready, as is using yourself as a practice subject.

Outdoor portrait with fruit.

By “what if”, I mean you should have a backup plan. When planning a portrait session with a customer, I always make sure to have a reserve day in case the weather doesn’t cooperate, someone gets sick, or any of a million other unexpected things happen.

It can also mean having a reserve place to make the portraits, one that will still work if the original one doesn’t for some reason.

Outdoor portrait in the rain.

Do Your Best and Enjoy the Moment

The time has arrived and so has your subject. You’re in the right place at the right time, and now all you have to do is make some great portraits. There are a lot of great articles that cover the main things that will help you make the best of it, so I’ll only mention them:

  • Always be aware of the background: what kind of patterns are there, what colors, what is the light like?
  • Don’t be afraid to pose your subjects.
  • Make your subjects feel comfortable and calm – this way you can both enjoy both the session and the final portraits.

Portrait of child in the grass.

A Practical Example

Lastly, I want to share a strategy that I sometimes use for location portraits with customers. It’s not always possible or sensible to do this, but when it is, it’s an easy way to have a comfortable and fun photo session.

This is what I do…

After I know when and where the portraits will be made, I visit the place and familiarize myself with it. Then I explore the area, find a nice route to walk along, and choose several places where the portraits can be made along that route. When it’s time for the photo session, I take the subjects on a short walk along the route that I found. I also tell them about the plan, so they know what’s going to happen.

On-location family portrait.

I took this lovely family on a walk with some beautiful backdrops.

This approach offers many advantages. If you don’t know your subjects, taking a little walk is a nice way to relax and chat a bit before you start making the photos. It often also makes the subjects feel less awkward and on the spot, since they get to take in the surroundings a bit rather than immediately being put in front of a lens.

For you, as a photographer, it’s a good way to structure the session, to have a beginning and an end but leave plenty of room for spontaneity. It also lets you use several different settings within the same area so you can offer your subject a range of different portraits afterward.

Conclusion

Knowing how to make location portraits is a very useful skill in many situations: weddings, birthdays, graduations, for families, bands, teams, pets, etc. The list goes on and on.

What is your favorite part about making portraits on location? Are there some specific challenges you’ve encountered? I’d love to see your photos and your thoughts in the comments section!

Goodbye!

Sadly, this is my last article here at Digital Photography School. I’ve learned a lot and really enjoyed it, both writing the articles and taking part in all the discussions we’ve had. Thank you! You can find all my articles here.

Keep learning about and enjoying photography – I sure will!

The post How to Make Your Location Portraits Even Better appeared first on Digital Photography School.


Digital Photography School

 
Comments Off on How to Make Your Location Portraits Even Better

Posted in Photography


How to Work a Location to Get More Great Photos

20 Aug

I wouldn’t be able to count the number of potentially great photos I’ve missed because I visited a location with only one image in mind. It’s easy to fall for the temptation to set up, get your shot, then pack up and leave. I’ve done it countless times, and I’m sure you have too.

How to Work a Location to Get More Great Photos- photo of a rocky coast and trees

Every location on earth has the potential for thousands of different images. Even a simple beach scene can be photographed in a huge variety of ways to create many beautiful images. You don’t need to have stunning scenery to come home with a collection of great images.

It only takes a little planning combined with the ability to improvise and adapt to the environment. Here are some tips to help you work a location to come home with more and better photos.

Step 1: Plan Plan Plan

I’m a huge advocate of planning your photos. In landscape photography, you’re at the mercy of mother nature, so the more prepared you are, the better your chances are of getting the shot.

How do the top landscape photographers in the world manage to consistently produce gorgeous images? They’re in the right place at the right time. Of course, there’s a bit of luck involved, but it’s largely down to a lot of careful planning.

How to Work a Location to Get More Great Photos - sunset and reflection in water

Once I’ve chosen a photography location I’ll almost always do some planning for the shots I want. This usually involves looking at satellite and topographical maps on Google Maps. This will give you an idea of the landscape and features of the location.

Consider the time of day

Once you have an idea of the photos you want to take, it’s worth considering the best time of day. Golden hour at either end of the day provide great light, but you also may need to consider other factors like the tide and travel time.

There are many tools available to help you research and plan your photos. My favorite by far is PhotoPills. It’s a paid app, but worth every cent. It includes too many features to list here, and I can’t recommend it enough.

Photo sharing sites like Flickr and Instagram are great for finding inspiration. Experiment with a variety of tools and find what works for you. Whatever you decide on, be sure to use them. Planning your landscape photos will dramatically increase your rate of keepers.

How to Work the Scene to Get More Great Photos - overhead view of a rocky beach

Step 2: Work the Location

Once you’ve planned your photos, the obvious next step is to go and create the beautiful images you’ve imagined.

Make sure you’re well prepared. Nothing will ruin well-planned photography like flat batteries or full memory cards. Watch the weather forecast and get to your location with plenty of time to spare. Wear comfortable shoes because you’ll likely be doing some walking.

Get the shot, but don’t stop there. There are still many opportunities to get more great photos. Exploring on foot is the best way to find different and interesting photos that you may not have considered when originally researching the location.

Walk in the direction you just photographed and look back the way you came. Hike up to a high place. Walk up a river or climb some rocks. Move your legs. Very few incredible photos are taken from parking lots.

How to Work the Scene to Get More Great Photos - empty beach and blue sky

Change it up

Other than finding different perspectives and subjects to photograph, there are a few other ways to get more out of a location. Try using different gear. A different focal length can open up a bunch of new possibilities for shooting the same scene.

If you’re used to photographing landscapes with a wide-angle lens, put a longer lens on your camera. It will not only allow you to create many more compositions from the same place, but it will also stretch you creatively.

How to Work the Scene to Get More Great Photos - aerial view of coastline

Rent or borrow a macro lens and try taking a look at the smaller details of the location. You have almost limitless possibilities once you start looking at the grass, rocks, sand, or trees around you.

Light is everything

Another option is to wait for the light to change. Within the space of a couple of hours, you can photograph everything from daylight, through the golden hour, and into twilight. The same scene can look very different as the intensity, color, and direction of the light changes. Watch the way the shadows shape a landscape as the sun drops.

How to Work the Scene to Get More Great Photos - tidal pool at sunset

I learned to love photographing blue hour when I went out for sunset and noticed that I loved the light about 30 to 60 minutes after sunset. Try sticking around into the evening and playing with the low light. You could even stay until well after sunset and try including some stars or the Milky Way in the scene.

Finally, using various photographic techniques or effects can add a different look to the same location. If there’s movement in the scene, try photographing it with different shutter speeds. Fast shutter speeds that freeze movement look very different from long exposures that blur movement.

How to Work the Scene to Get More Great Photos - long exposure of ocean waves sunset

The way you expose the light can also change the look of the image a lot. Try exposing for a blown-out back-lit image or an underexposed the foreground for dark silhouettes. Photograph landscapes with both a large and small depth-of-field for a different look.

That’s it!

As you can see, with a bit of creativity, forethought, and patience, your options are many. You don’t need to come home from a location with only one good image.

Since I’ve learned to work a location, I often come home with many more decent images than I expected. Even with plenty of research and planning. Next time you go out to photograph a location, do some planning, get the shot, then walk, wait, and get creative to find a bunch more photos you’ll be happy with.

The post How to Work a Location to Get More Great Photos appeared first on Digital Photography School.


Digital Photography School

 
Comments Off on How to Work a Location to Get More Great Photos

Posted in Photography


How to Organize Your Photos by Location in Lightroom

09 Aug

You likely know Adobe Lightroom as a powerful piece of photo-editing software. It’s known as the industry standard for photography post-production, especially when paired with Photoshop. You may also know that its photo management features are pretty impressive. If you so choose, you can use this one piece of software to upload, rename, keyword, review, edit, export and organize your photos.

camper van on the grass - How to Organize Your Photos by Location in Lightroom

How you use Lightroom is entirely up to you, and it’s unlikely that two photographers will use it the same. The way you organize your catalog will depend on many factors, including which genre of photography you choose, who you’re shooting for, and how you have your computer hardware arranged. There is no right or wrong way to organize things, and it will likely change over time.

If you’re a portrait or wedding photographer, you might choose to organize your catalog around sessions or dates. As a landscape and travel photographer, it makes sense for me to organize my photos based on locations. Whether a location is a city, country, or even a continent, it helps me to keep things organized so I can always find what I’m looking for without wasting time searching through thousands of photos.

There are a few different ways to find photos based on location in Lightroom, but they only work if you take a few simple steps when you import them.

Import

Whenever you import photos into Lightroom, try to follow the same steps.

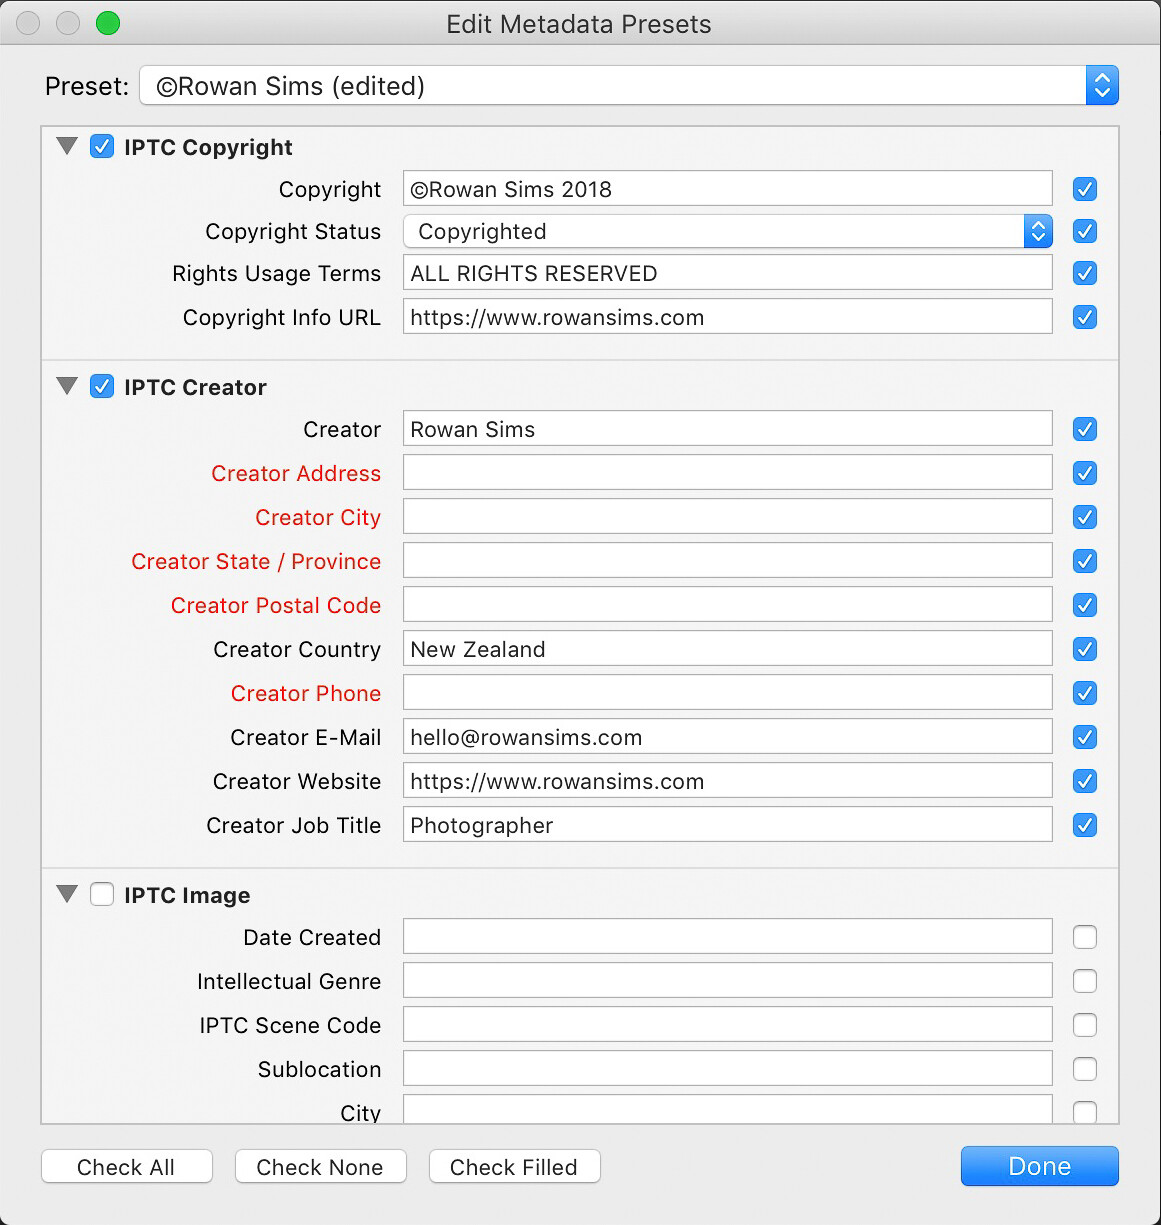
It’s a good idea to create some templates for the Develop and Metadata settings. This makes it easy to apply some standard settings and metadata to every one of your photos. You should at least apply your copyright information to your photos with a metadata preset.

metadata organizing lightroom photos by location

Keywords

The single most important thing you can do to simplify the process of finding photos is keywording. You don’t need to add a long list of keywords, just a few relevant ones that will help you later on when you search.

When organizing by location, I always add the name of the country, region, and specific place name. I’ll also add any other relevant keywords that I may want to search for, such as aerial or long-exposure.

When renaming my images during import I always include the location in the name. Something like “noosa-beach-qld-australia” works well. The words in your filenames become searchable keywords themselves (make sure to use a dash between words). I don’t use dates in my file names, but it’s up to you whether you want to or not.

How to Organize Your Photos by Location in Lightroom

Folders

Using a good folder structure will make your life far easier, especially when you have tens of thousands of images.

To organize your folders by location, you can create a new folder for each specific location or one for each city or country. I have one folder for each country I visit and just keep adding to it. Even if I visit that country again years later, I’ll still keep using that same folder. It makes it far simpler and I know where I can find a photo from anywhere on earth.

It also makes it simpler to find image files on my computer as the folder structure I set up is identical both inside and outside Lightroom. Organizing folders by date or some other number-based system would never work for me.

Collections

Collections are another one of Lightroom’s great features that can help you keep everything organized by location. Where Folders contain every photo from a given location, Collections contain only the photos you choose. Again, I’ll create a new Collection for each country, but I only put the keepers in there.

How to Organize Your Photos by Location in Lightroom

In the past, I’ve done this manually, but I now create a Smart Collection for each location. I only need to add two rules to each Smart Collection: Flag and Keyword. Based on these settings, any photo that I flag that has that keyword is automatically added to the collection.

smart collections - How to Organize Your Photos by Location in Lightroom

Map

As a travel photographer, my favorite Lightroom tool for finding photos based on location is the Map module. One of the first things I’ll do after I’ve finished importing new photos into Lightroom is to add GPS coordinates. There are a couple of ways you can do this.

If you know the coordinates you can add them manually in the Metadata panel. The easiest way is to select all your images (Cmd/Ctrl+A) then go into the Map module, search for the location in the search bar above the map, then drag all your photos onto the right location on the map.

Depending on your camera, your photos may already have GPS coordinates embedded in the file. This is often the case with drone photos or any other GPS-connected camera or device. If not, you can record the GPS coordinates by taking a photo with your phone then grabbing them from that photo’s metadata.

map module - How to Organize Your Photos by Location in Lightroom

Searching for Photos

Now that you’ve imported your photos with location-based keywords and filenames, organized them into location-based Folders and Collections, and geotagged them with GPS coordinates, finding them later is simple.

I use a different approach depending on whether I’m looking for a specific image or a group of images from a specific location.

If it’s a specific image you want, and you know you flagged it, select the Collection associated with that location. If you’re not sure if it’s flagged, select the folder. Then search inside the collection or folder using the Library Filter.

Click on Text, select Any Searchable Field in the first drop-down menu, then Contains All in the next menu, then type your keywords in the search field. The more keywords you add, the more specific the search becomes.

library filter - How to Organize Your Photos by Location in Lightroom

If I’m looking for an image or group of images from a specific location, I like to use the Map module. Select All Photographs in the Catalog panel on the left then go to the Map module and type the location name into the search bar. Any geotagged images in that area will show up on the map.

You can zoom in or out on the map to make your search location more or less specific. Images in the specified location will appear along the filmstrip below the map.

Summary

A little forethought and organization when importing your images are worth the effort. It doesn’t take much time to apply these settings but can save you a lot down the road.

If you’re anything like me and have tens of thousands of photos in your catalog, you’ll be doing yourself a favor, and future you will thank you for your efforts.

The post How to Organize Your Photos by Location in Lightroom appeared first on Digital Photography School.


Digital Photography School

 
Comments Off on How to Organize Your Photos by Location in Lightroom

Posted in Photography


DJI ‘AeroScope’ tech shares your drone’s ID and location with law enforcement

17 Oct

DJI has launched a security solution that enables law enforcement and other ‘authorized parties’ such as aerospace agencies to receive identifying information and location data from DJI drones being operated nearby.

The company calls this solution AeroScope, and explains that it is based on existing communication technologies. Put simply, AeroScope uses the communications link between a DJI drone and its remote control to broadcast telemetry data and either a serial number or registration number to anyone with an AeroSpace receiver. In addition to location and ID, the data that is being broadcast includes details such as altitude, flight speed, and direction.

AeroScope is already in use at two unspecified international airports and DJI says that testing is underway in other environments.

During a demonstration last week, DJI explained that AeroScope receivers automatically detect when a related drone powers on nearby, plotting the drone’s location on a map alongside its serial or registration number. With this information, officials can determine who the device’s registered owner is; however, DJI was adamant that this system does not broadcast personally identifiable data (though that could change in any jurisdiction that establishes regulations requiring such info).

AeroScope is DJI’s way of addressing growing concerns from law enforcement and governments around the world over the ability (or lack thereof) to identify and track drones that violate UAV regulations. There have been, for example, instances of drones flying in restricted airspaces, at too high of altitudes, over crowds, and over prison yards. Identifying the owner and operator of these drones remains difficult.

On the other side of the debate are concerns over privacy, which is why DJI decided to use existing communications tech to locally transmit info—rather than the Internet. This, explains DJI, prevents governments from automatically cataloging this data in a database. Only authorized parties will have access to the AeroScope receiver.

The receiver is already compatible with all current DJI drones, but other drone makers can configure their products to transmit ID information that can be picked up by AeroScope, in case law enforcement decides to set this up as some sort of ‘standard.’

Press Release

DJI Unveils Technology To Identify And Track Airborne Drones

AeroScope Addresses Safety, Security And Privacy Concerns While Protecting Drone Pilots

12 October 2017 – DJI, the world’s leader in civilian drones and aerial imaging technology, today unveiled AeroScope, its new solution to identify and monitor airborne drones with existing technology that can address safety, security and privacy concerns.

AeroScope uses the existing communications link between a drone and its remote controller to broadcast identification information such as a registration or serial number, as well as basic telemetry, including location, altitude, speed and direction. Police, security agencies, aviation authorities and other authorized parties can use an AeroScope receiver to monitor, analyze and act on that information. AeroScope has been installed at two international airports since April, and is continuing to test and evaluate its performance in other operational environments.

“As drones have become an everyday tool for professional and personal use, authorities want to be sure they can identify who is flying near sensitive locations or in ways that raise serious concerns,” said Brendan Schulman, DJI’s Vice President for Policy and Legal Affairs. “DJI AeroScope addresses that need for accountability with technology that is simple, reliable and affordable – and is available for deployment now.”

DJI demonstrated the system today in Brussels, Belgium, showing how an AeroScope receiver can immediately sense a drone as it powers on, then plot its location on a map while displaying a registration number. That number functions as the equivalent of a drone license plate, and authorities can use it to determine the registered owner of a drone that raises concerns. In March 2017, in response to growing calls by governments worldwide for remote identification solutions, DJI released a white paper describing the benefits of such an approach to electronic identification for drones.

AeroScope works with all current models of DJI drones, which analysts estimate comprise over two-thirds of the global civilian drone market. Since AeroScope transmits on a DJI drone’s existing communications link, it does not require new on-board equipment or modifications, or require extra steps or costs to be incurred by drone operators. Other drone manufacturers can easily configure their existing and future drones to transmit identification information in the same way.

Because AeroScope relies on drones directly broadcasting their information to local receivers, not on transmitting data to an internet-based service, it ensures most drone flights will not be automatically recorded in government databases, protecting the privacy interests of people and businesses that use drones. This approach also avoids substantial costs and complexities that would be involved in creating such databases and connecting drones to network systems.

This system is consistent with DJI’s problem-solving approach to drone regulation, which aims to strike a reasonable balance between authorities’ need to identify drones that raise concerns and drone pilots’ right to fly without pervasive surveillance. DJI has led the industry with safety and security advances such as geofencing and sense-and-avoid technology, and believes the rapid pace of innovation provides the best means to address new policy concerns.

Drone identification settings will be included in DJI’s initial drone software to allow customers to choose the content of their own drone’s identification broadcast to match local expectations both before and after identification regulations are implemented in different jurisdictions. To protect customers’ privacy, the AeroScope system will not automatically transmit any personally identifiable information until regulations or policies in the pilot’s jurisdiction require it.

“The rapid adoption of drones has created new concerns about safety, security and privacy, but those must be balanced against the incredible benefits that drones have already brought to society,” said Schulman. “Electronic drone identification, thoughtfully implemented, can help solve policy challenges, head off restrictive regulations, and provide accountability without being expensive or intrusive for drone pilots. DJI is proud to develop solutions that can help distribute drone benefits widely while also helping authorities keep the skies safe.”

For more information about AeroScope, please contact aeroscope@dji.com.

Articles: Digital Photography Review (dpreview.com)

 
Comments Off on DJI ‘AeroScope’ tech shares your drone’s ID and location with law enforcement

Posted in Uncategorized


5 Tips for Location Scouting Before a Photo Session

20 Jul

Maybe by a show of virtual hands, how many of us have ever been in a situation where we have gone to a location for a photoshoot only to find out that something unexpected like a marathon, construction or worse demolition, is going on that prevents you from using the space as you intended? And I am being very serious in the demolition example!

One of my favorite local parks went through a complete revamp a couple of years ago and for months the only thing I could see was demolition equipment all around. The dirt paths that I loved so much had all gone and tar biking paths took their place!

5 Tips for Location Scouting Before a Photo Session

The dirt path with the cover of trees in the background was one of my favorite spots in this local park. The light would filter through the trees and the dirt path would act as a natural reflector and bounce golden light back to my subjects! – now this whole area is a parking lot that leads up to the trees!

I am a natural light outdoor photographer for the most part. Hence, I rely on outdoor locations for 75% of my photoshoots including the weddings I photograph. More often than not, my clients, the bride and groom, look to me for suggestions on natural outdoor locations for their bridal portraits and family formals. Even my lifestyle family photo shoot clients love suggestions on the best locations for beautiful family photos especially in the fall when the leaves all change colors. To that end, I am always on the look out for clean, beautiful and unique outdoor locations for my photoshoots.

Here are a few tips on how to scout and find the perfect location for your next photo shoot.

#1 Know your clients

Every client is different and every photoshoot is unique. It behooves us photographers to really get to know our clients so we can tailor the photo shoot to fit their personality. This not only ensures that they will have a good time but also that they will be more relaxed and happy during their photoshoot. This means you will get pictures that they are bound to love and hence recommend you to all their friends and family. It’s a win-win for everyone.

For my wedding clients, I have a formal questionnaire that they fill out to describe their style and that of their wedding. This helps me plan out locations and poses that will reflect their style and personality. For my family photos, I have a conversation with the family to see what type of photos they gravitate towards. Do they want to have fun outside in a park? Or do they want to hang out at home with each other? The family photo session is tailored around their needs.

5 Tips for Location Scouting Before a Photo Session

My lovely clients wanted a location in nature among the trees. She told me her outfit choices ahead of time so I chose this park with a small waterfall. It seemed to fit their personality and the theme of the shoot ‘The quiet before the storm” quite well.

5 Tips for Location Scouting Before a Photo Session

This session, on the other hand, took place at my client’s home. During our consultation, she mentioned that she wanted to use her 2.5-acre backyard for photos. I knew the green of the grass and the trees would add a lot of color cast to my subjects so I recommended neutral colored clothing. We also waited until the sun passed behind some clouds to take some of these shots to prevent too much color cast on their faces.

#2 – Scout at different times of the day

When I look at potential locations for my photo shoots, I always try and visit the place at multiple times during the day. This gives me an idea of the lighting at different times. Does the location get direct sunlight or is it shaded and hence gets only directional light? Is it a busy street and with potentially lots of people that might be walking around and getting in my shots? What are the traffic patterns to get to the location? All these little details are really important for me to be able to plan my day and photoshoot so that I can get the best possible pictures in the time I have at the location with my clients.

Tip: If you cannot get to a location ahead of time, use Google maps and sunset/sunrise times to figure out where the sun will be at the time of day you are photographing. This will help you be a little prepared when you get to your location.

5 Tips for Location Scouting Before a Photo Session

For a bridal editorial shoot at a beautiful historic location, I scouted the location a few days ahead of time and realized that the area where I wanted to photograph was full sun at 2:00pm (on the left)). So I knew that if I moved the photo shoot to the morning, this area would be in the shade and be evenly lit. Sure enough, the light was gorgeous for my editorial photo shoot! Had I not scouted the location, I would have been scrambling to find the right spot in the afternoon.

#3 Pay attention to details

One of the biggest problems that most photographers face is related to light. Not all light is equal and photographing in different lighting conditions will lead to different results.

Early morning light is generally soft and subtle. The afternoon light is often harsh, especially if you place your subject in full sun. Evening light tends to be more warm and golden hue. Post-sunset light is blue. You can photograph in each of these lighting conditions provided you know how to position, pose, and light your subject in each of instance.

Quality of light matters

When scouting a location, pay attention to details around the quality of light at different times of the day. Another thing to keep in mind is color casts from surrounding objects. This is quite prominent around trees, colorful buildings and graffiti walls. Try and find natural reflectors (eg. a white wall) that will bounce light back onto your subjects or use reflectors that do the same thing and balance off the color cast. You can always fix it in post-processing if all else fails.

5 Tips for Location Scouting Before a Photo Session

A location in historic prairie preserve is a photographer’s favorite in my town. But I find that photographing inside the front patio adds a color cast from the yellow ceilings and directional light (photo on right). Yes, in a pinch I will take the shot and fix it in post-processing. But I prefer to either photograph my clients sitting at the edge of the patio on the steps where they are still in the shade of the patio arch but don’t have any color cast.

Karthika Gupta Memorable Jaunts DPS Article Importance of Location Scouting For a Photoshoot-06

So instead of dealing with the color cast from the porch, I took my client outside along the dirt path by the house and photographed her there. The concrete and the dirt path acted as natural yet neutral reflectors and bounced soft white light back onto her face, eliminating any color casts.

#4 – Tap into other resources

I belong to several photographer groups online and offline and we constantly share tips/tricks and location ideas amongst the groups. These groups exist to help each other out and everyone is open and welcoming. If you are photographing in an area that you are not familiar with, try finding a local photographer group for that region and ask around. Be friendly and genuine in your requests, and you may find some unique and off-the-beaten-path locations from the locals in the area.

#5 – Take a road trip

I love road trips! It is the best way to explore new areas and scout potential photography locations that will suit you and your specific needs. I generally take my family along so it is a fun-for-all experience. In a pinch, my kids will also act as models helping me test the light and background ahead of my client photo shoots.

A few years back I had a high school senior’s photo session and her mom wanted to find a unique spot where we could see the fall colors. I drove around my area for a few hours but was not finding anything that I really liked. I stopped by a local farm to pick up some fresh fruits and realized that the farm had everything I was seeking for my photo shoot. So I walked up to the owner and got permission to photograph there the next day. The senior’s mom got the photos she wanted and I found a unique location for my fall photos.

5 Tips for Location Scouting Before a Photo Session

The red of the trees does add a little color cast to my subject’s face but she really wanted the backdrop of the fall colors.

What are your tips to find the perfect location for your photos?

The post 5 Tips for Location Scouting Before a Photo Session by Karthika Gupta appeared first on Digital Photography School.


Digital Photography School

 
Comments Off on 5 Tips for Location Scouting Before a Photo Session

Posted in Photography


Tips for Location Scouting to Get the Perfect Sunset Photograph

12 May

Location scouting to find the ideal spot is just as important as what camera settings you use. Don’t miss this important first step in order to get your perfect sunset photograph.

Scouting is part of the photography process

“Hi. Are you a photographer?” a young voice called to me.

“Hello,” I turned back and replied to a smiling and inquisitive face. It was a little girl with a point-and-shoot camera.

“Yes, I am,” I nodded in affirmation. The backpack and tripod were a dead giveaway.

“This is so beautiful,” and after a moment of watching me, “Aren’t you going to take a photo?” the girl continued, as she scrutinized me searching for something in between granite boulders on the beach but not taking photos.

location scouting

Composing for the water channel.

Mother Nature had put on a mesmerizing show of stormy clouds and light at Camps Bay Beach in Cape Town, and it seemed that almost everyone had their cameras and cell phones pointed towards the far horizon. Our brains are programmed to do routine work subconsciously, like changing gears of a car.

For a landscape photographer, scouting for a good location is part of the job. It can be a challenging, albeit fun routine, and I was doing exactly that an hour prior to what was going to be a stunning sunset. In fact, I find it quite therapeutic to search for a good spot. You pay attention to details and discover small wonders in the process.

Tips for Location Scouting to Get the Perfect Sunset Photograph

Lightning strike while location scouting.

The question from the little girl triggered a lot of possible answers in my mind. “I am trying to make a good photo,” could be one of the answers, but it would have confused her even more, so I told her that I was looking for an interesting pattern of rocks for my sunset shot. My quest resumed after she and I finished chatting.

Tips for Location Scouting to Get the Perfect Sunset Photograph

Nature’s wonder.

What makes a good photo?

In my journey of landscape photography thus far, I have learned that the main characteristics to look for are good light and composition. After you find these, you need good camera settings and technique to capture the moment.

What can you do to take a better photo?

The light is not within your control. But you need to gain knowledge of the terrain, keep an eye on the weather and clouds, and possibly go around dawn or dusk to get softer colors and light.

The choice of composition is yours based on your own style and preferences. As a landscape photographer, you need to have an aesthetic sense that attracts viewers to your images, a style that will become your own. Composition is a topic in itself, but obviously, the key is choosing a location that provides good subjects (e.g. a waterfall, mountains, icebergs, boulders, trees, rocks) or something that appeals and possibly tells a story.

Camera settings and techniques come with experience. Do not compare it to the value of the equipment you own – the simplest equipment can take a great shot. The only way you can get better is by taking photos, learning more about the basics, and correcting yourself after making mistakes. If you can invest in the best camera, filters, tripods and other accessories, then that’s a bonus. Whatever equipment you own, you must know its full capabilities and how to make good use of it.

Tips for Location Scouting to Get the Perfect Sunset Photograph

Camp Bay boulders.

How did I make a good photo that day?

The day I met the girl, I was at one of the most picturesque beaches in the world, Camps Bay. The location and subjects were there, but I still had to work to narrow down my composition for the sunset.

I needed to make decisions such as; Am I going to set up on the sand or in between the boulders? Should I go on the mossy rocks or stand in the water?

The light, as per my assessment of the weather forecast, was going to be perfect if the clouds allowed the sun to peek through the horizon. I brought the lens and camera of my choice, filters, shutter release, and tripod to take photos in low light.

After some exploration, I settled upon a water channel between two massive granite boulders. My test shot looked promising. My hunt for an agreeable foreground was finally over. The water would make interesting patterns through that small ally, and the leaden clouds and orange sun would be my background.

Tips for Location Scouting to Get the Perfect Sunset Photograph

Test shot with minimal post-processing.

I took another test shot and soon realized that the sun was going to be behind the boulder on the left, and I would miss it in my photo as I had miscalculated the angle. I re-evaluated the scene and adjusted my perspective to align the composition with the drowning sun. Careful use of camera settings, a polarizer, and a soft graduated ND filter yielded a result that I was satisfied with. Mission accomplished!

Tips for Location Scouting to Get the Perfect Sunset Photograph

The water channel.

Conclusion and video

As you will see in the video (and image) below, I took an additional photo of this channel from a higher vantage point as well.

So the next time you see a landscape photographer rushing to and fro on a location, you must know that he is busy making a photo, as pressing the shutter button is only the last part of the job!

I hope these tips are helpful. Please share your questions and comments below.

Tips for Location Scouting to Get the Perfect Sunset Photograph

Water channel from above.

The post Tips for Location Scouting to Get the Perfect Sunset Photograph by Mujahid Urrehman appeared first on Digital Photography School.


Digital Photography School

 
Comments Off on Tips for Location Scouting to Get the Perfect Sunset Photograph

Posted in Photography


8 Reasons to Revisit the Same Photography Location Again and Again

31 Mar

It’s good to keep moving forward and trying new things all the time. There are times when going back to an old photography location can be a great idea, though. Even if you have a stellar photo from that location it doesn’t mean you can’t get an equally good image that has different characteristics.

The easiest places to make return visits to are of course those local to you, but heading back to that far-off exotic destination is also rewarding. Let’s take a look at those eight reasons to revisit a photography location, and why this will improve your work.

8 Good Reasons to Revisit the Same Photography Location Again and Again

This is a great vantage point in Busan. I returned to this location to take this photo.

1 – Conditions are never the same!

The earth is a constantly changing and dynamic entity, that means you’ll almost certainly get a different image if you go to the exact same spot and photograph it again. There are even projects that show the same location photographed every day, with the intent of showing subtle changes. You don’t need to go every day, of course, but you might take a shot of the location in the snow, and one in the sun.

The following is a list of variables that should ensure you can return to a photography location, and get something different from it each time.

8 Good Reasons to Revisit the Same Photography Location Again and Again

A different angle of the bridge in Busan. This time photographed from the coast.

  • Season –  Provided you live in a temperate area that sees a change of the seasons, you can make the most of this with your photography. Taking shots of the same location in spring, summer, fall and winter is a classic photography idea.
  • The tide  If you’re in a coastal location the change in the tides can alter the scene you photograph dramatically. You can check the state of the tide at this website, and remember to stay safe in coastal areas.
  • The sun position – This is similar to the seasonal change, though the position of the sun could make or break the photo more than if there is snow or not. The position of the sun can be planned before you go back using the suncalc website.
  • Astro-photography – You may have photographed a place by day, but how about photographing it at night? You could try photographing star trails, or even the Milky Way. As with the sun, the position of the Milky Way shifts in the sky throughout the year, so prior planning is needed when shooting the night sky.
8 Good Reasons to Revisit the Same Photography Location Again and Again

Everything looks great with snow! Snow is one of the best weather conditions in which to shoot.

2 – Revisit a photography location with brand new gear!

New photography equipment can really open up other creative angles that you’d never thought of before. One of the best pieces of equipment any new photographer can purchase is a tripod, which will then open up the door to lots of long exposure photography.

The addition of a new lens to your camera equipment will open up yet further possibilities, especially if you’re trying a wide-angle or fisheye lens for the first time. Those who like light painting should look at the pixelstick, a great tool for this type of photography.

8 Good Reasons to Revisit the Same Photography Location Again and Again

New gear is a great reason to revisit a photo location. In this photo I used a glass ball, it’s one of the first photos I took with it.

3 – New photography techniques

New gear often means learning a new technique. There are plenty of techniques you can learn with your existing gear.

As a landscape photographer, you may have photographed a location before using a technique like digital blending. Of course, once you know this new technique you’ll want to revisit a photography location and see if you can improve on your old shots. Equally, if you’re a portrait photographer learning to use

Equally, if you’re a portrait photographer learning to use off-camera flash will really enhance your work. This would give you a good reason to go back and shoot a place again.

8 Good Reasons to Revisit the Same Photography Location Again and Again

A new technique such as steel wool spinning can lead you to revisit a photography location.

4 – A special event is happening

There really is no better reason to revisit a photography location than some kind of event happening there. A big cultural event can give a location much more context and story, enriching your photo. The potential for unique photos that other photographers won’t be able to replicate also exists at these kinds of events.

Photographing an event also presents a good test of your skill, there are no second chances with these type of photos. Lastly, it’s great to experience a place at its vibrant best, which will be the case during a festival or event. It’s always worth running a google search on a particular location to see what yearly festivals they have, this way you can plan to be there during that time.

8 Good Reasons to Revisit the Same Photography Location Again and Again

A fireworks festival will often show a location in a different way.

5 – Improvement as a photographer

The longer the gap between revisiting a photo location, the more your photography will have changed. This can be a great way to gauge your improvement as well.

Lay out your best five photographs from the first trip you made, and then your best five when you return this time. Are there differences? How have you improved as a photographer? Is there something you wanted to improve that you still need to work on? It is typical for a photographer to first improve by making their photos more minimal. After a period of learning the next step is to add story and context to a more minimal scene, this is a step-by-step process.

8 Good Reasons to Revisit the Same Photography Location Again and Again

As you develop as a photographer the angles you use will change. You should be able to look back and see your improvement.

6 – Revisit a photo location until you get the best weather

If you know a good landscape photographer they’ll likely tell you they revisit the same spot until they get the photograph they want. The truth is you never know whether you will get the perfect sky. This can be especially frustrating if you need to travel several hours to reach the location. Weather can change fast, and these days pollution can also be a factor.

The need to make repeat journeys then is important if you wish your photo to be striking. Even once you have that perfect shot going back can be fun. Can you take this scene with different weather conditions and make another striking image?

8 Good Reasons to Revisit the Same Photography Location Again and Again

This is what happened the first time I visited this spot. The day was nice, then dust and smog rolled in.

7 – Previous experience of a location

As a photographer, it’s always a good idea to have some stock locations you know about. These are places you’ve been before, and you will know very well. The big advantage here is you will automatically know the best location and shooting angles.

That means no losing the shot because you’re scrambling around looking for the best perspective. Landscape locations very often work well for portraits as well, and prior knowledge of a place will help you choose a good spot for this. It’s always good to have a killer location in your back pocket.

8 Good Reasons to Revisit the Same Photography Location Again and Again

I’d shot this bridge several times before. I used my prior knowledge of this location to choose a new angle.

8 – Visit with friends

When friends come and visit, and especially if they’re photographers, it’s great to show them a nice place. They’ll appreciate the local knowledge passed on to them. The chances are one day you’ll benefit when someone takes you to a great location that they know about, so sharing is always a good idea.

The other benefit of going with another photographer is they’ll have fresh eyes. They may spot something you missed, and give you further ideas about how you can photograph that location.

8 Good Reasons to Revisit the Same Photography Location Again and Again

Infrared is another photography technique that opens new creative possibilities.

Get out there and play it again!

Do you really need any of the above reasons to revisit a photography location? Those areas of natural beauty or the cool festival you went to the year before are always great to see again.

Let’s see your favorite photography location in the comments below. What draws you back to this place, and do you have more than one favorite photo from there? Is there anywhere you’ve been to that you’d like to visit again? We’re all looking forward to hearing your stories in the comments below!

This was one of the first photos I took at this location. Return visits have meant better photos.

8 Good Reasons to Revisit the Same Photography Location Again and Again

This bridge in Busan is photogenic. It’s fair to say one of my first photos of it isn’t that dynamic.

8 Good Reasons to Revisit the Same Photography Location Again and Again

This bridge at Seonamsa in South Korea was a favorite photo when I took it. I have since photographed this place several more times.

The post 8 Reasons to Revisit the Same Photography Location Again and Again by Simon Bond appeared first on Digital Photography School.


Digital Photography School

 
Comments Off on 8 Reasons to Revisit the Same Photography Location Again and Again

Posted in Photography


Croatia in 4K: travel photographer Max Lowe on location with Canon EOS 5D IV

24 Jan

The Canon EOS 5D Mark IV is Canon’s latest full-frame DSLR, aimed at enthusiast and professional photographers. As well as 30MP stills, the 5D IV can also capture HD and 4K video, at up to 60p. 

Late last year, we joined travel photographer Max Lowe on location in Croatia. Over the course of several days, Max documented the people and beautiful scenery of the Dalmatian Coast, while we filmed the experience entirely using the EOS 5D Mark IV.

Read our in-depth review of the Canon EOS 5D Mark IV


This is sponsored content, created in partnership with Canon. What does this mean?

Articles: Digital Photography Review (dpreview.com)

 
Comments Off on Croatia in 4K: travel photographer Max Lowe on location with Canon EOS 5D IV

Posted in Uncategorized