RSS
 

Posts Tagged ‘Lightroom’s’

Making Sense of Lightroom’s Grid View

23 Oct

Using Lightroom's Grid View

In last week’s article about Lightroom you learnt how to use Collections and Smart Collections to organise your images. Today, I’m going to take a closer look at the Grid View (part of the Library module) and show you how to customise the display.

If you’re not in Grid view, just press the ‘G’ key. It’s a keyboard shortcut that will take you to the Grid view from any part of Lightroom.

The Grid View displays thumbnails of photos contained in the currently selected Folders, Collections or search results. Here, I used the Shift+Tab shortcut to remove the left-and right-hand panels, the filmstrip and the module picker button panels from the view:

Using Lightroom's Grid View

These are the three main sections of the Grid View:

Using Lightroom's Grid View

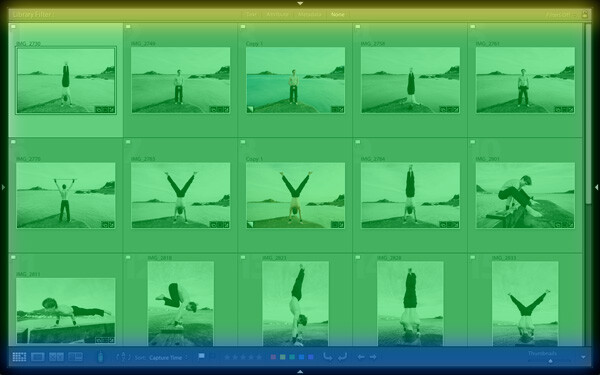
The Filter bar: marked in yellow. Press the backward slash (‘\’) key to reveal the Filter bar if you don’t see it. You can use the same key to hide it.

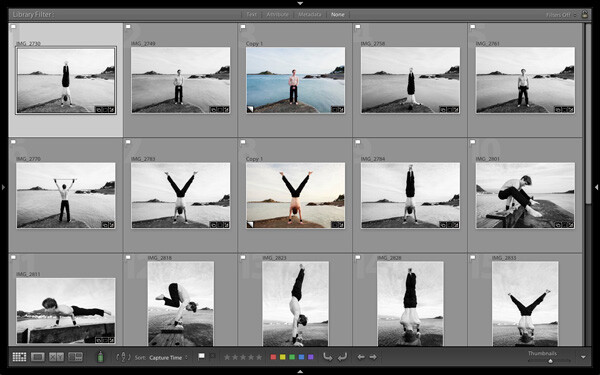
The Content window: marked in green. This is where Lightroom displays the image thumbnails.

The Toolbar: marked in blue. Press ‘T’ to reveal it if you don’t see it. The same key also hides the Toolbar.

The Toolbar

There are several items on the Toolbar of immediate interest:

Using Lightroom's Grid View

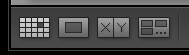
These icons represent the four view modes of the Library module. From left to right they are Grid View, Loupe View, Compare View and Survey view. The Grid view icon is highlighted to indicate that it is the active view mode (I will look at the other view modes in future articles).

Using Lightroom's Grid View

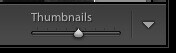
The Thumbnails slider is on the right-hand side of the Toolbar. Use it to set the size of the thumbnails in the Content window.

Using Lightroom's Grid View

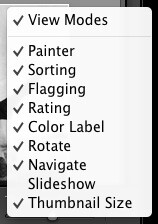
Finally, if you click the white arrow on the very right of the Toolbar, you’ll see the above menu. Each menu item corresponds to an item on the Toolbar. The ticks indicate which items are displayed on the Toolbar. Click on any of the menu items to add or remove them.

The Content window

The Content window is where Lightroom displays thumbnails. Each thumbnail, plus the grey border around it, is called a cell. There are two types of display: Compact cells and Expanded cells.

Compact cells

This is what the Compact cell display looks like:

Using Lightroom's Grid View

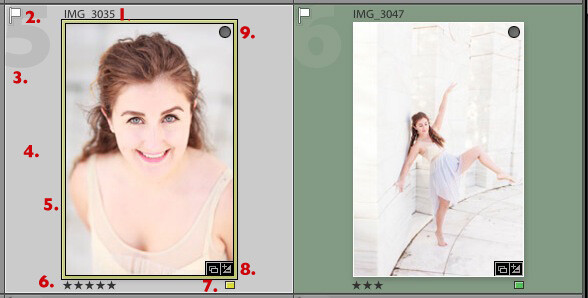
I’ve numbered the important parts:

1. The filename of the photo.

2. The white flag indicates this photo has been flagged as a pick.

3. The big number 5 shows this image is the fifth in the sequence in the currently selected folders or Collections.

4. The light grey border means this photo is selected.

5. The yellow border shows that the yellow colour label has been applied to this image. This photo is selected, so Lightroom displays a thin border. If the image is not selected, Lightroom applies the colour label to the entire border. That is why the thumbnail on the right is surrounded by a thick green border.

6. These stars show that the image has a five star rating.

7. The yellow square also indicates the colour label.

8. There are two icons at the bottom right of the photo (you may see different icons depending on what you have done to the image). The icon on the left indicates that the photo has been added to at least one Collection. The icon on the right tells you that the photo has Develop adjustments.

Tip: If you hover the mouse over an icon and keep it still, Lightroom will display a label telling you what the icon means. It appears after about two seconds.

9. The grey circle in the top right indicates that the photo has been added to at least one Collection.

Tip: To see what Collections the photo has been added to right-click on the thumbnail and go to the ‘Go to Collection’ option. Click on a Collection name to open that Collection in Grid View.

Expanded cells

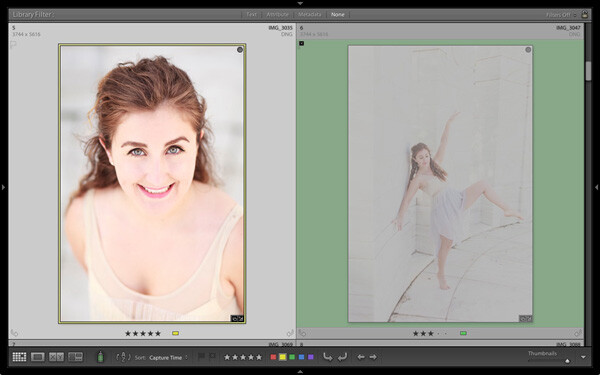
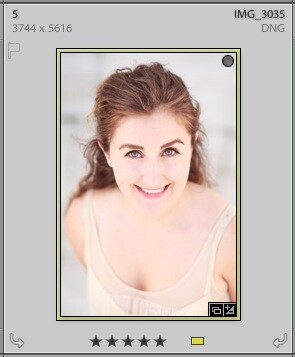
Here is the Expanded cell display. The cells are larger than the Compact cells, and contain a little more information. I’ve marked the parts that are different:

Using Lightroom's Grid View

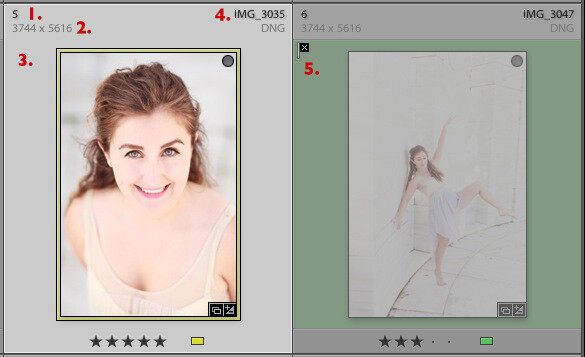
1. The size of the number indicating that this is the fifth photo in the currently selected folders or Collections has changed.

2. These figures show the dimensions of the photo in pixels.

3. There is no flag here, indicating that this photo hasn’t been flagged as a pick or flagged as a reject.

4. The filename of the photo, with the file type (in this case, DNG) underneath.

5. The black flag indicates that this photo has been flagged as a reject. Lightroom fades out the thumbnail so you can see it has been rejected.

View Options

Lightroom lets you customise the layout of the cells so the display shows as much or as little as you wish. Go to View > View options (or use the keyboard shortcuts PC: Ctrl+J, Mac: Cmd+J) to bring up the Library View Options window. Again, I’ve marked some of the interesting menu options:

Using Lightroom's Grid View

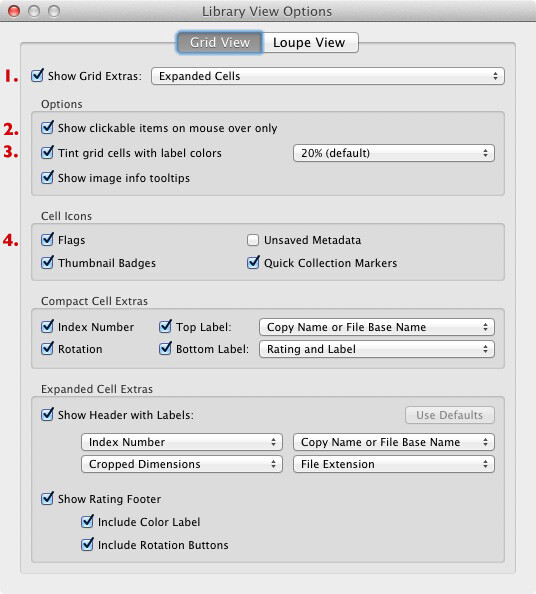
1. Show Grid Extras. This is where you chose between Compact Cells and Expanded Cells. Untick the Show Grid Extras box if you want to simplify your display. Doing so removes the information displayed around the thumbnails in Grid View.

2. Show clickable items on mouseover only. If you untick this box every thumbnail is displayed with arrows in the bottom corners that you click to rotate the image, and a grey flag if the image is unflagged. With this box ticked, these icons are only displayed when you move the mouse over the image:

Using Lightroom's Grid View

3. If the colour labels annoy you, or you just don’t use them, untick this box to turn them off. The menu on the right lets you adjust the intensity of the colour tint.

4. The rest of the View Options let you customise what icons and information are displayed alongside the thumbnails.

Your thoughts

How do you customise Lightroom? I’d be interested to hear your thoughts, whether they are about the Grid View or another part of Lightroom. Leave a note in the comments if you have anything to share.

Mastering Lightroom Book One: The Library Module

Using Lightroom's Grid View

My latest ebook Mastering Lightroom Book One: The Library Module is a complete guide to using Lightroom’s Library module to import, organise and search your photo files. You’ll learn how to tame your growing photo collection using Collections and Collection Sets, and how to save time so you can spend more time in the Develop module processing your photos.

Post originally from: Digital Photography Tips.

Check out our more Photography Tips at Photography Tips for Beginners, Portrait Photography Tips and Wedding Photography Tips.

Making Sense of Lightroom’s Grid View

The post Making Sense of Lightroom’s Grid View by Andrew Gibson appeared first on Digital Photography School.


Digital Photography School

 
Comments Off on Making Sense of Lightroom’s Grid View

Posted in Photography


Lightroom’s Tone Curve Explained

12 Sep

It’s no secret that there are many ways to enhance our photographs with Lightroom. By using just a handful of sliders we can get some great results in a matter of minutes and by learning how to use tools like the gradient filter tool we can create some more specialized effects with just a little extra effort.

So with all these great tools is there still a need for the Tone Curve tool in Lightroom 4 and beyond? Or is it just another way of creating the same effects?

What is Lightroom’s Tone Curve Tool?

tonecurve

Well the answer to that question really lies in the details of what you are trying to accomplish with your post production. The Tone Curve tool is designed to allow you to modify the various light levels found within an image in a way that will give you greater control over the tonal range and contrast of your photograph.

As we capture our images we are capturing an array of light from the scene. From the darkest of the shadows to the whitest of the highlights the Tone Curve gives us a way of visually modifying how these levels of lights appear in the final image.

With the changes made to the basic tab back in Lightroom 4 the Tone Curve tool certainly doesn’t boast the power that it once did in comparison, but that doesn’t mean it’s useless. Today I’m going to show you how you can use the tool to modify your images and squeeze every little bit you can out of the tonal range that you’ve captured. As I’ve numbered above there are five ways that we can modify our images using the tool – let’s break them down now.

Number 1 – Make Tone Curve Adjustments by Dragging In Your Photo

I honestly didn’t even notice this button until I started doing research for this article, but it does add a cool little function to the Tone Curve. By clicking on this button your mouse cursor will change allowing you to click and drag within your photo to make adjustments.

As you hover over your image you will notice that a point appears on the Tone Curve in the box to the right. As you move your mouse this point will move according to the light level of the area you are hovering over which makes it easy for you to determine what levels of light need adjustment in your image.

To use this tool simply click and drag up for more or down for less effect of the selected light level. It is important to note that this is a global change so it doesn’t just effect the area where you’re hovering, but all like pixels within the image.

You’ll notice in the image below I dragged down on an area in the green algae and up on a highlight on the frog’s face. The result is more contrast in the final image. Please keep in mind that the examples in this article are extremes done to demonstrate the tool and not necessarily how you would use it in practice.

image1

Number 2 – Adjust Tone Curve by adjusting the curve itself

The Tone Curve itself is something that you can modify simply by clicking and dragging on the areas you wish to change. As you hover over the curve you’ll notice different pieces of the curve will be highlighted to show you what levels of light you are going to effect with your changes and how much room you have to make these changes.

In this photo I added a little more contrast by dropping a point towards the shadows end of the curve and raising a point towards the highlights end of the curve. This can be done in a similar manner with the sliders below the curve (see number 4 for that example).

image2

Number 3 – Adjust the strength of each light level’s region

With this area of the tool we’re controlling the amount that each ‘region’ of light (highlights, lights, darks and shadows) effects the image.

The default settings (which are set in the modified image of #2 on this list) are set at 25, 50, 75 for the three sliders. In the first image below I’ve slid all three sliders to the right (an extreme example I know) which gives the shadow tones a greater impact over the overall photo. In contrast to this, the second image I’ve slid the sliders to the left which as you might expect gives the highlights within the image  more impact. In most cases I never touch the default settings, but they are good to be made aware of and might be useful one day when processing a specific image.

image3

Number 4 – Adjust using the familiar slider set up

Much like the sliders from the basic panel the sliders in the Tone Curve work in a similar manner. Slide left to lower a setting, slide right to raise a setting, double click to reset to zero.

It’s very straight forward and is important to note that it doesn’t do anything different than the other two methods I mentioned above. In fact you’ll notice that when you make any adjustments whether using #1, #2 or #4 the sliders and the tone curve will move to their respective positions regardless of which method you use to make your adjustments.

image4

Number 5 – The Point Curve Presets

Today we are going to only be talking about the three presets of the point curve and save the button in the lower right corner for another day – the presets are as follows – Linear, Medium Contrast and Strong Contrast and as you might expect the names pretty much say it all.

Linear contrast is a default and fairly flat setting and when using this setting you’ll notice that the curve is a straight line from the lower left corner to the top right corner. Medium and Strong contrast presets effect the ends of the curve in either a subtle way or a less subtle way changing the amount of contrast that is applied to the image simply by expanding the ranges of light at the ends of the curve.

In the example below I’ve simply switched from a Linear Curve to a Strong Contrast Curve to show the differences.

image5

When Would You Use the Tone Curve?

So now that we know how to use the tool, the question remains, when would you use it? I find that in my typical workflow I rarely touch the Tone Curve except for a small tweak here or a slight adjustment there. In my eyes the tool is designed to be a final adjustment to your images. Need a little extra shadow detail? Pull them down just a hair. Need some stronger highlights? Pull up on the highlights slider just a bit.

Of course you can get really creative with the Tone Curve to create some very unique and interesting effects and you can even click on the button that I didn’t cover above in the lower right hand corner and have access to the RGB scale and not only modify the overall tonal range, but the range specific to each color level in your photograph – but that’s an entirely different article.

Do You Use The Tone Curve?

With all the power that Lightroom offers in the other areas of it’s program it’s very easy to overlook the tone curve, I know I did for years, and even today I don’t go much further than applying one of the preset point curves to a photo, but I’d love to hear if you use it in your regular workflow and if so which one of the region adjustments do you use most often?

Post originally from: Digital Photography Tips.

Check out our more Photography Tips at Photography Tips for Beginners, Portrait Photography Tips and Wedding Photography Tips.

Lightroom’s Tone Curve Explained


Digital Photography School

 
Comments Off on Lightroom’s Tone Curve Explained

Posted in Photography


4 Fun Tricks to Enhance Your Photos With Lightroom’s Graduated Filter Tool

18 Jul

A few weeks ago I shared some key tips on how to get a lot out of Lightroom by using only a handful of sliders and while this is a great place to start eventually you’ll want to get a bit more creative with the software. Today I’m going to show you four different things that you can accomplish by using Lightroom’s Graduated Filter tool.

4 Creative Ways to Use Lightroom’s Graduated Filter

Split White Balance – This technique can be a powerful one when trying to get some interesting colors out of the sky, but retaining the natural colors of the earth. In the photo below I’ve added some pinks and purples to the sky, but was able to retain the natural green color of the grass.

whitebalanceb&a  

How I Did It – The graduated filter was dropped in from the top and rests just above the horizon line. I then made adjustments to the temperature and tint sliders until I was happy with the colors. Note: if there are objects that fall within your graduated filter’s effected zone you can correct it by using the adjustment brush and adjusting the tint & temp sliders locally for that specific area.

Direct the Light – By applying multiple filters to your photo you can create spot light like effects, leading lines and even your own very customizable vignette effect like seen below.

directing eyes

How I Did It – Here I’ve dropped in four different filters which all work together to create the final effect. There are two that are pulled in from the sides of the frame to drop the exposure of the edges. Then I dropped one in from the top and placed it almost at the bottom of the frame I use this one to increase the exposure of the overall photo excluding the very bottom of the frame. However, once this one was applied the top of the frame was over exposed so I then apply one more filter, again dropped in from the top, but placed towards the middle of the frame. This time I drop the exposure to cancel the effect of the previous filter and thus create the vignette effect. Yikes that was a mouthful!

Soften Your Borders – Sometimes you might want to soften the borders of your photo to draw in more attention to the center of the frame.

soft borders

How I Did It – This is a fairly simple process of dropping two filters in one from each side of the photo and then reducing the sharpness and clarity on both of them to -100. This effectively blurs out the sides of the frame and draws your attention to the middle.

Create a B&W to Color Transition – A very cool effect can be the black and white to color transition. It’s  not something that’s going to be used on every photograph you produce, but when you do use it it will often get people to look twice.

Black & White Color

How I Did It – The black and white to color transition is done by using one single graduated filter and dropping the saturation to -100. It’s up to you where you want it placed and how dramatic you’d like the transition to be – a narrow filter makes for a more dramatic transition.

For Those Who Prefer Video

If you’re anything like me it is so much easier to learn this kind of thing when things are in motion and therefore I’ve included a video which walks you through everything I talked about above, plus a few other Lightroom goodies as well. Enjoy!

Post originally from: Digital Photography Tips.

Check out our more Photography Tips at Photography Tips for Beginners, Portrait Photography Tips and Wedding Photography Tips.

4 Fun Tricks to Enhance Your Photos With Lightroom’s Graduated Filter Tool


Digital Photography School

 
Comments Off on 4 Fun Tricks to Enhance Your Photos With Lightroom’s Graduated Filter Tool

Posted in Photography


4 Uses for Lightroom’s Graduated Filter Tool

18 Jan

The Graduated Filter tool in Lightroom 4 allows you to apply edits across an even gradient. In this article I will explain 4 ways to use the Graduated Filter tool to enhance your photos.

Sunset in Kamakura Japan

I used a Graduated Filter to adjust exposure on the left side of this photo. Read on to see how.

Adding a Graduated Filter to a Photo

Graduated Filter Controls

  1. Click the Graduated Filter tool, or use keyboard shortcut ‘M’
  2. Dial in the desired settings (exposure, color temperature, etc)
  3. Drag your mouse across the image, starting at the point where you want the filter to be the strongest. An easy way to remember this is that you start dragging your mouse from the area of the photo that you want to change. Create as large a gradient as you need to make the transition subtle.
  4. Adjust the size, position, and angle of the gradient, as well as its settings until you get the result you need.

4 Uses for the Graduated Filter Tool

1. Changing exposure on one side of the frame

In my own workflow, I use the Graduated Filter to change exposure more than for any other purpose. In Lr4 with the 2012 Process, you can control overall exposure, or target just the shadows or highlights. For this image of some sailboarders on a beach in Kamakura, Japan, I added a Graduated Filter to increase the exposure on the left side of the photo by about half of a stop.

Graduated Filter used to change exposure

I used a graduated filter to increase the exposure on the left side of the image.

Graduated filter to change exposure

This Graduated Filter increases the exposure on the left side of the image by about 1/2 stop

2. Reducing atmospheric haze

Another good use for the Graduated Filter is in reducing haze in the distance for landscapes and cityscapes. I’ve found that increasing contrast, clarity, and sharpness across a vertical gradient can help reduce haze. Here, a Graduated Filter helps make the best of this image, shot on a particularly hazy day from the Metropolitan Government Building in Tokyo.

Graduated filter used to reduce haze

I used a Graduated Filter to reduce some of the haze and produce a final image with more detail.

Graduated filter to help remove haze

This Graduated Filter helps reduce the haze in the air.

3. Selectively Adjusting White Balance

Using the Temp and Tint controls in the Graduated Filter settings, you can adjust white balance across a gradient. This is an image of morning dew on rice plants in Takasaki, Japan. I used two Graduated Filters to separately enhance the sun flare and the rice grass.

Graduated Filter used to selectively change white balance

I used two Graduated Filters to separately emphasize the yellow and green tones.

Graduated Filter to adjust white balance

This Graduated Filter enhances the yellow and pink in the sunrise

Graduated Filter to adjust white balance

This Graduated Filter makes the grass more green.

4. Customizing a vignette effect

This technique builds on #1 above, because we are actually manipulating exposure. But I mention it separately because it’s a combination of two Lightroom effects. In some portraits, I like to use a subtle vignette to draw the eye to the subject. But the standard post-crop vignette is not effective at drawing the eye toward one side of the frame.

In these cases you can use a Graduated Filter to selectively modify the vignette, as in the natural light portrait below. A strong vignette darkens the outside of the frame, while an exposure gradient lightens the right side of the frame over the model’s face. This has the effect of pulling the viewer’s eye to the subject’s face.

Graduated filter combined with a vignette

I used a Graduated Filter to remove the vignetting on the right side of the frame

This Graduated Filter counters the vignetting on the right side

This Graduated Filter counters the vignetting on the right side

I hope this article has been interesting and informative, and has given you a few ideas about how to use the Graduated Filter tool to enhance your images. I appreciate feedback, please comment below or feel free to connect with me through Facebook or Google+. I’ll do my best to answer questions and reply to comments.

Post originally from: Digital Photography Tips.

Check out our more Photography Tips at Photography Tips for Beginners, Portrait Photography Tips and Wedding Photography Tips.

4 Uses for Lightroom’s Graduated Filter Tool


Digital Photography School

 
Comments Off on 4 Uses for Lightroom’s Graduated Filter Tool

Posted in Photography


Martin Evening: Using Lightroom’s Import dialog for better image management

25 Aug

lead.jpg

Adobe Photoshop Lightroom offers workflow benefits that can make it easier to organize your photo collection. Pro photographer and Lightroom expert Martin Evening gives an overview of ‘best practices’ for managing the import process itself. Click here to find out how to make the best use of metadata, file renaming and custom templates during the image upload process, in his four-page article. 

News: Digital Photography Review (dpreview.com)

 
Comments Off on Martin Evening: Using Lightroom’s Import dialog for better image management

Posted in Uncategorized