RSS
 

Posts Tagged ‘Kids’

Tips for Photographing Your Own Kids

28 Feb

Are you one of those parents whose kids were born being comfortable in front of the camera? Are your kids complete naturals with no stage fright or anger management issues when you yell, “Look at me…for the last time…please look at me and don’t close your eyes”? If so, then just skip this article and move on to the next one that probably teaches some amazing tips and tricks on night photography, or posing or Lightroom tricks.

But, if you are like me, a camera obsessed parent whose children sprint at what seems like a-mile-a-minute when they see you, camera in-hand, and a determined look on your face, coming towards them to snap a frame, then keep reading. I have a few tips and tricks to help you maintain your sanity and snap a few Kodak moments of your pride and joy that you can “oohhh” and “ahhh” at for years to come! In other words, top for photographing your own kids.

Tips for Photographing Your Own Kids

Is this a family portrait you can relate to?? Imperfect timing + Imperfect expression = Perfect Family Photo

Note: Some of the images in this article are not edited and some are technically flawed – they are simply used to drive home the tips shared below. The images that I print of my family are edited to my particular style. You will find a lot of rules broken here but I am okay with these as my focus was not on photographic perfection but on capturing the moment.

Know when to click and when to back off

This one is a game changer in your relationship with your kids and your camera. Yes, the very definition of being a parent is that we are insanely in love with our kids and want to freeze every moment of their childhood, teen, and adult lives forever in our brain and forever in photographs. I mean, what parent doesn’t want to whip out images of their babies years later at their wedding. Not as a means of embarrassing them but as a way to cherish all the fun times they have had in their parent-child relationship.

googletag.cmd.push(function() {
ruleset_slots.push( googletag.defineSlot( “/1005424/_dPSv5topic-rhs(300×250)”, [300, 250], “pb-ad-0” ).addService( googletag.pubads() ) ); } );

But sometimes, just sometimes, it is completely okay to skip that insane urge to freeze the frame and instead BE in the moment. I still remember many of my children’s “firsts”. Even though I may not have photographs to prove it, I have my memories that I have documented in their journals and talked about with them. I am okay with neither of us remembering these things decades later because I know that every day we create new memories that simply replace some of the old ones.

Tips for Photographing Your Own Kids

I tried for a good 20 minutes to try and get both of them to look at the camera and smile at the same time…but alas, this was the best I could get. But this is one of the most precious memories because a few months after this was taken, I lost my mom to cancer. So this grandmother-grandson memory is priceless…in all its flaws lies its perfection!

Embrace the chaos

This one is a little hard to digest because as photographers we tend to be perfectionists. The lighting has to be right, the styling has to be perfect, and the angle and composition has to be one of the allowed rules. You know, all those things that we learn in Photography 101, Photography 201 and perhaps even Photography 301!

But guess what, all of that doesn’t quite matter when you have all of three seconds to take the shot. Most of the time that my family is together is in the evening hours. When the night is fading and I am only left with either using the overhead florescent light or pop on an off-camera flash, neither of which I really like. But sometimes it is okay to break the rules and just go with the flow. Yes, every frame here will not be PERFECT and more than likely, it will break all the rules of the photography but

googletag.cmd.push(function() {
ruleset_slots.push( googletag.defineSlot( “/1005424/_dPSv5topic-rhs(300×250)”, [300, 250], “pb-ad-1” ).addService( googletag.pubads() ) ); } );

But sometimes it is okay to break the rules and just go with the flow. Yes, every frame here will not be PERFECT and more than likely, it will break all the rules of the photography but that’s okay. It may be more important to capture that fleeting moment than to be technically correct.

Tips for Photographing Your Own Kids

The first Lego car that he completed all on his own. I was just an observer and had one shot. The light was terrible, his clothes were completely mismatched, but it was a moment I wanted to cherish forever.

Tips for Photographing Your Own Kids

Another moment that means nothing to him but everything to me. My boys just hanging out doing their thing – reading and napping!

Tips for Photographing Your Own Kids

A creative lighting exercise gone wrong – thanks to a sleepy and nervous dog who was scared of the shutter clicking!

Follow their lead

This one is a little harder to experience especially if you have little ones. Right now, my kids are at the age where they are opinionated on what, where, and how they want to be photographed.

My son plays soccer and insists I take pictures of his games every weekend. My daughter, who is an equestrian rider, wants several hundred shots of her horse – from every angle, covering every detail. But I have found that if I oblige their photography wants, they are more likely to listen to me when the tables turn (a.k.a a little bribery never hurts). Besides like any parent, I know that these moments are just as precious as their traditional portraits even if they are blurry because I missed focus when he was kicking the ball or when she rides her favorite horse.

Besides like any parent, I know that these moments are just as precious as more traditional portraits – even if they are blurry because I missed focus when he was kicking the ball or when she rides her favorite horse.

Tips for Photographing Your Own Kids

A technically flawed image (out of focus) for my daughter. A shot of her favorite horse and her favorite instructor.

Tips for Photographing Your Own Kids

Something a little bit more my cup of tea – an action shot that makes me hold my breath every time she jumps!

Tips for Photographing Your Own Kids

This was the highlight of my son’s soccer game…for me and for him!

Hand over the reins

googletag.cmd.push(function() {
ruleset_slots.push( googletag.defineSlot( “/1005424/_dPSv5topic-rhs(300×250)”, [300, 250], “pb-ad-2” ).addService( googletag.pubads() ) ); } );

A few years back there was a beautiful article that was written for moms who were also photographers. This really hit home to a lot of us moms. It encouraged moms who are generally behind the camera to be brave and exist in photographs with their kids, for their kids. It is absolutely acceptable if your hair is not perfect, you are in your sweat pants, and have no makeup on. Being present in photographs is more important than taking several hundred photos where you are nowhere to be found.

Since that day, I take the photos that I want but also hand over the camera to my husband or a stranger who volunteers to take our picture. Sometimes I even use the remote trigger so I can be a part of my kids’ childhood just as much as their dad, especially on important occasions like family vacations and birthdays.

Tips for Photographing Your Own Kids

The MUST have photo of any birthday party. Heads chopped off, goofy faces and partial cake – thanks to a helpful, willing volunteer! But I am with my child and that makes me happy!

Tips for Photographing Your Own Kids

Because out of focus photos are so very artistic! For a clearer picture, try switching to Auto mode and then handing the camera over to a willing helper!

Tips for Photographing Your Own Kids

The magic of a remote trigger! Our family in our element!

What are some tips and tricks that work when you photograph your own children? When all else fails, perhaps chocolate and candy are the way to go, for adults and kids alike! Please sure your tips and photos in the comment section below.

googletag.cmd.push(function() {
ruleset_slots.push( googletag.defineSlot( “/1005424/_dPSv5topic-rhs(300×250)”, [300, 250], “pb-ad-3” ).addService( googletag.pubads() ) ); } );

The post Tips for Photographing Your Own Kids by Karthika Gupta appeared first on Digital Photography School.

Digital Photography School

 
Comments Off on Tips for Photographing Your Own Kids

Posted in Photography


Pixlplay turns a smartphone into a big, durable ‘camera’ for kids

11 Feb

A new Kickstarter project aims to make digital photography easily accessible to children, with a product that is relatively inexpensive and durable. Called Pixlplay, the device is essentially a smartphone case shaped like a classic 35mm film camera, and it includes moveable dials and knobs, as well as a functional shutter button.

The Pixlplay case features a pair of rubber handgrips, adjustable clamps for accommodating phones of various sizes, and a 3.5mm cable that plugs into the phone’s audio jack to power the case’s shutter button. Photos can be snapped through the phone’s built-in camera app using the shutter button, or by touching the phone’s screen (a touch-sensitive screen protector is built into the case). Camera settings can also be adjusted by touching the screen.

Pixlplay features child-resistant dual latches to help prevent children from removing the smartphone, which is offered some protection from drops and dirt while inside the case. Included activity sheets, meanwhile, teach kids the basics about photography, while a dedicated iOS photo editing app allows kids to add frames and silly stickers to their photos. There doesn’t seem to be an Android app, however the case itself can be used with Android and Windows phones.

The case’s maximum phone dimensions are 5.59 x 2.95 x 0.374 in / 142 x 75 x 9.5mm, making it suitable for the iPhone 7 and older models, as well as most Android smartphones. The product’s maker, Pixl Toys, is currently seeking funding for Pixlplay on Kickstarter, where it has raised about $ 13,000 of its $ 25,000 goal. A single Pixlplay camera is being offered to backers who pledge at least $ 25, with shipping estimated to start in June.

Via: VentureBeat

Articles: Digital Photography Review (dpreview.com)

 
Comments Off on Pixlplay turns a smartphone into a big, durable ‘camera’ for kids

Posted in Uncategorized


How to Turn Your Kids into Star Wars Characters Using Photoshop

10 Feb

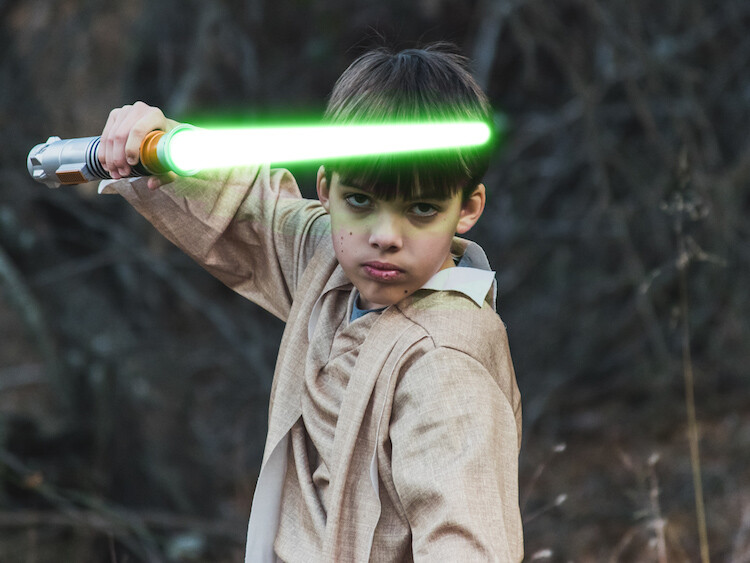
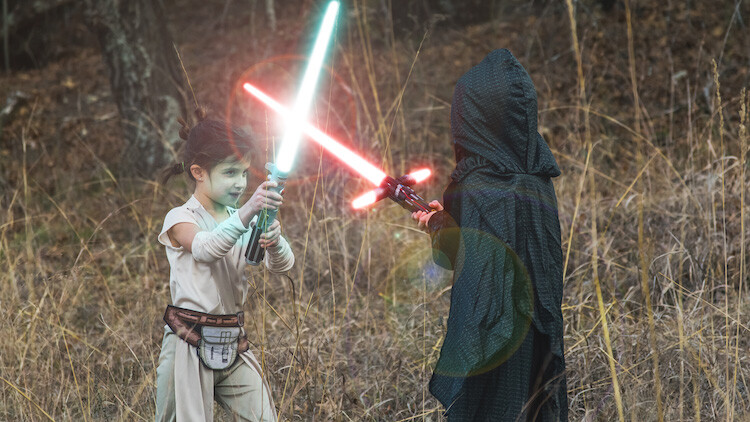
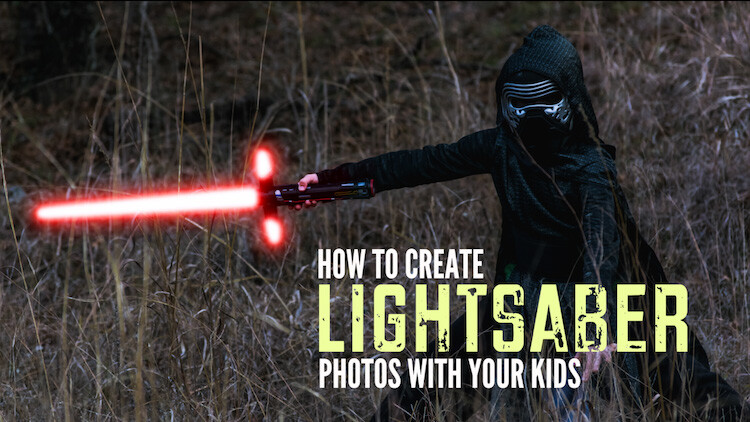
Do your kids love Star Wars? Do you love photography? If so, here’s a great opportunity to join forces and turn your kids into Star Wars heroes or villains by giving them the ultimate Star Wars weapon, the lightsaber.

How to Turn Your Kids into Star Wars Characters Using Adobe Photoshop

All you need to awaken the force are these three steps:

  1. The setup
  2. Capturing the shot
  3. Light up your sabers using Photoshop

BONUS tip – The Jumping Jedi

Step #1 – The Setup

For the setup, you will want to make sure that the photographs of your kids look as close to a Star Wars scene as possible. Don’t just take a picture of your kids wearing a t-shirt standing in the kitchen. Luke Skywalker doesn’t light up his lightsaber in a kitchen. Your kids will have a lot of fun getting into character, so spend some time on the setup.

Costumes

You can buy costumes for your kids on Amazon. Here are the costumes used in this tutorial.

  • Luke Skywalker
  • Rey
  • Kylo Ren
  • Lightsabers
  • Total customs cost ~ $ 40-70

Location

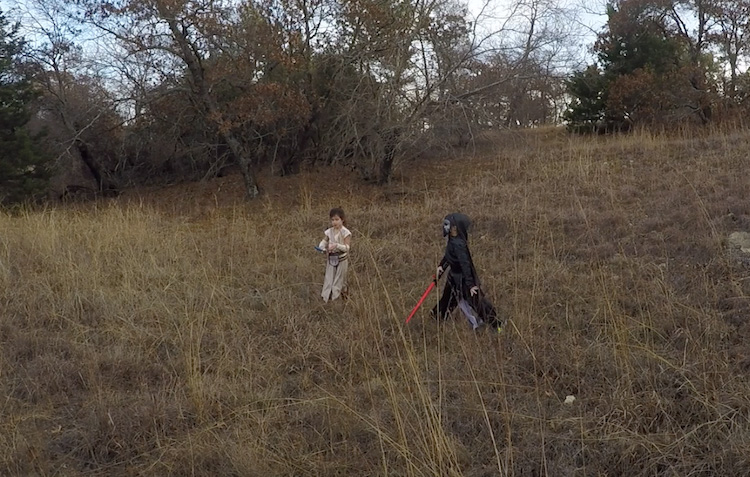
For the location, you will want to find a place that looks like it could be a scene in any of the Star Wars movies. The easiest location to use would be a park with trees, and no noticeable man-made objects in sight.

2 Location - How to Turn Your Kids into Star Wars Characters Using Adobe Photoshop

Step #2 – Capturing the Shot

Action shots

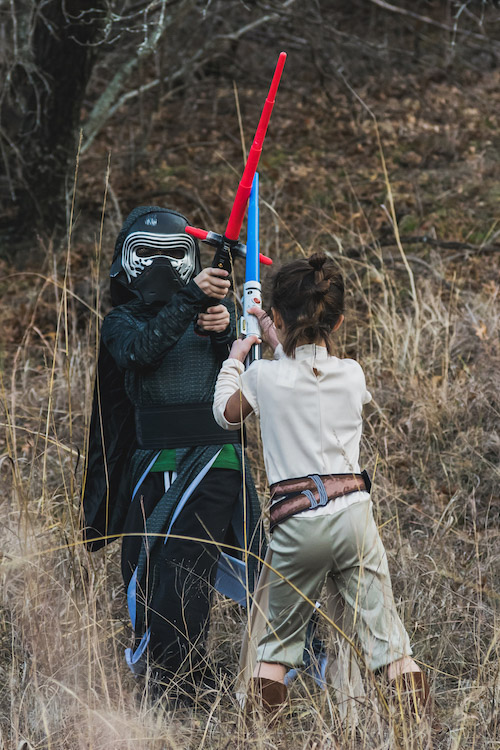
For action shots of a lightsaber battle, you will want to use a fast shutter speed of at least 1/500th of a second, and set your camera to continuous (burst) shooting mode. This will allow you to freeze the action of the battle and take multiple shots in sequence to ensure you capture the best of the action.

4 Action shot - How to Turn Your Kids into Star Wars Characters Using Adobe Photoshop

Shutter speed was 1/800th of a second.

Portraits

For the portraits, give your kids some epic poses to follow. To give you ideas for creative poses, do a Google images search for the Star Wars character of your choice. This will also help your child get more into the character. For example here are some for Rey.

5 Portrait pose - How to Turn Your Kids into Star Wars Characters Using Adobe Photoshop

Do basic edits to the image

After you capture the image, you will need to make a few adjustments to the image to make it stand out. This can be done in Adobe Lightroom and is the final step before your photo is ready to go into Photoshop for the lightsaber effect.

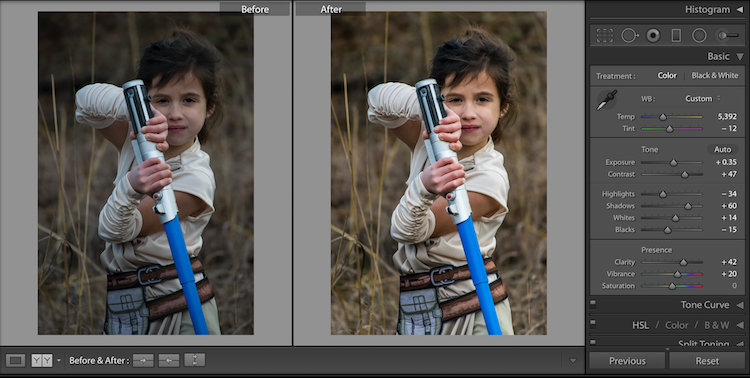
For the look of Star Wars, a few basic edits, such as increasing the contrast and the clarity will help give it a rough and grungy look that Star Wars is known for.

6 Before After Lightroom Edit Star Wars

Notice the differences between the before and after of this image by making a few basic edits in Adobe Lightroom.

Step #3 – Light your sabers up in Photoshop

Adding the lightsaber effect is the last and final step in making turning your kid into the Star Wars character of their dreams. This process should take about five minutes per photo once you have done it a few times.

Part 1: Prepare the layer

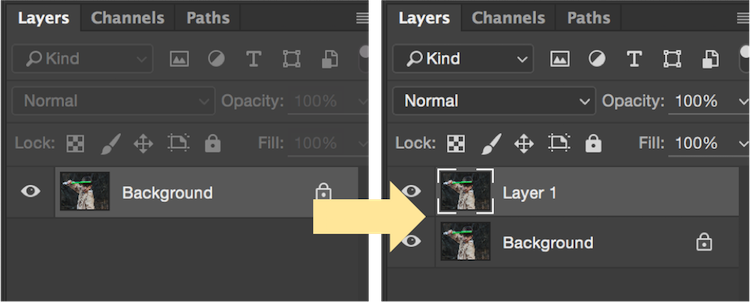
Start by creating a duplicate layer by pressing CTRL/CMD + J.

8 Duplicate layer - Star Wars character in Photoshop

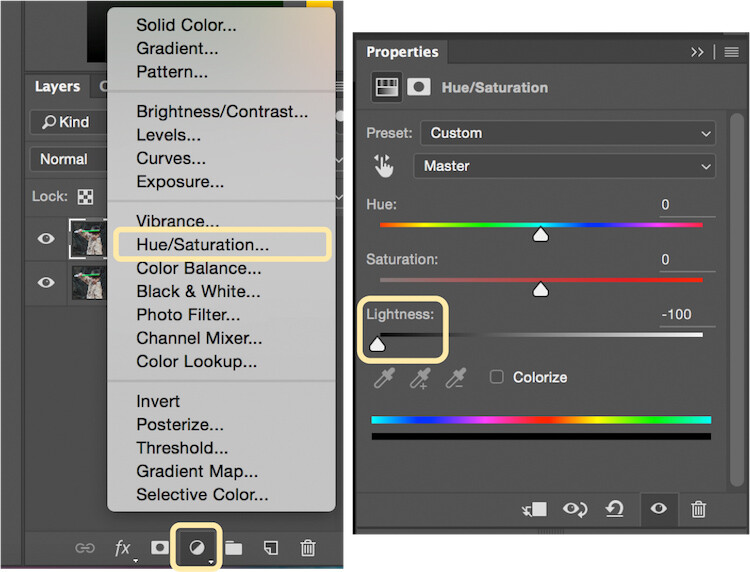
Select the icon to create a new fill or adjustment layer, and from that menu select Hue/Saturation. Then, move the lightness slider to -100 to make it black.

9 Hue Saturation

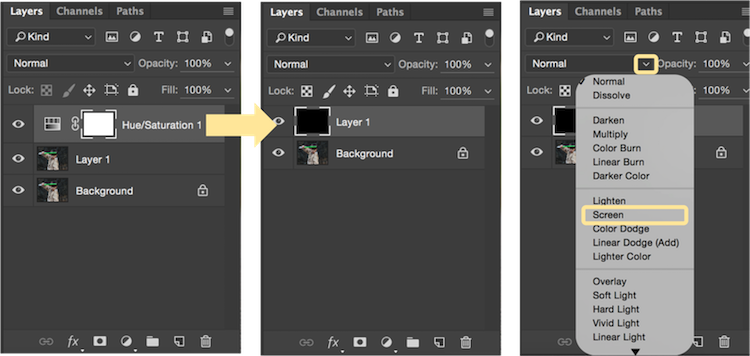
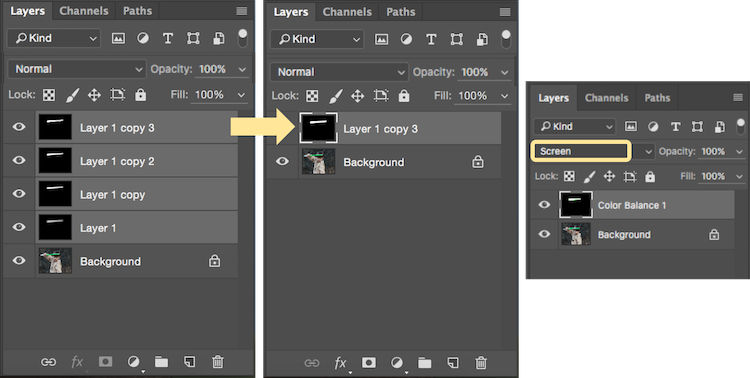
Select CTRL/CMD + E to merge the adjustment layer and duplicate layer. Next, set the blending mode drop down to Screen.

10 merge and screen Star Wars

At this point, your layers are prepped and ready to add the lightsaber.

Part 2: Add the lightsaber by using the brush tool

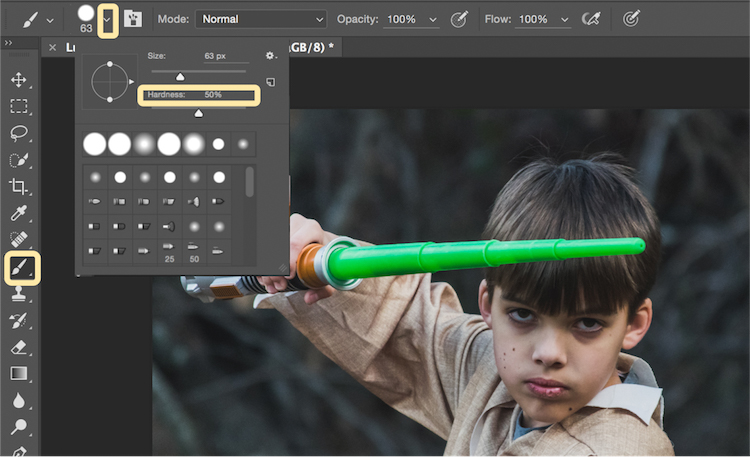
Select the brush tool, and adjust the size and hardness of the brush. The size of your brush will vary based on the size of the lightsaber and your image. Set the hardness of the brush to approximately 50%.

11 brush selection

Begin to add your lightsaber using brush strokes. Select the end point of the lightsaber, then hold down shift, and click the other end of the lightsaber to draw a straight line. Repeat these lines multiple times to fill in the lightsaber with brush strokes. You will likely need to add free-form brush strokes around the base of the lightsaber to fill it in.

12 draw the saber

Illuminate the lightsaber

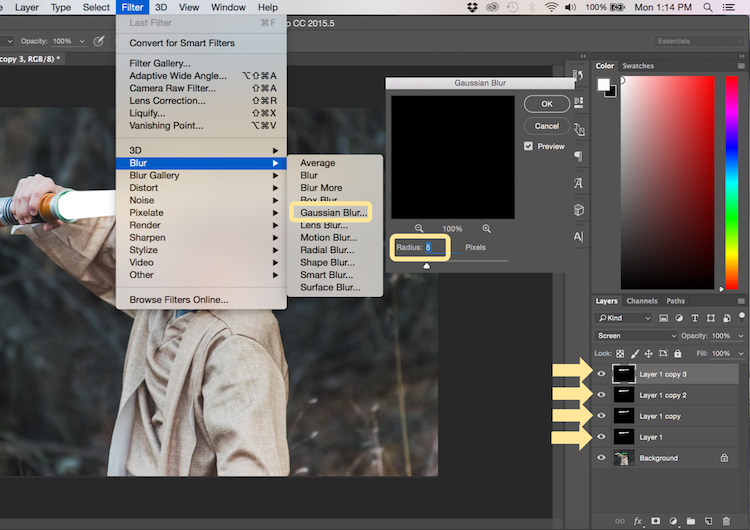
The next step allows you to illuminate the lightsaber. Create three duplicate layers of the lightsaber by selecting CTRL/CMD + J three times. For each layer, you will then select Filter > Blur > Gaussian Blur. But, each layer will be set to a different radius setting. For this image, we used 5, 15, 35, 75 for each respective layer. Note, that the amount of Gaussian Blur needed may vary based on the size of your image. Adjust these numbers as needed to ensure you have a nice glow from the lightsaber.

13 Gausian Blur

Select all of the duplicate layers (do not select the background), and merge them into one layer by pressing CTRL/CMD + E. Then set the blending mode to Screen.

14 Merge and Screen

Add color to the lightsaber

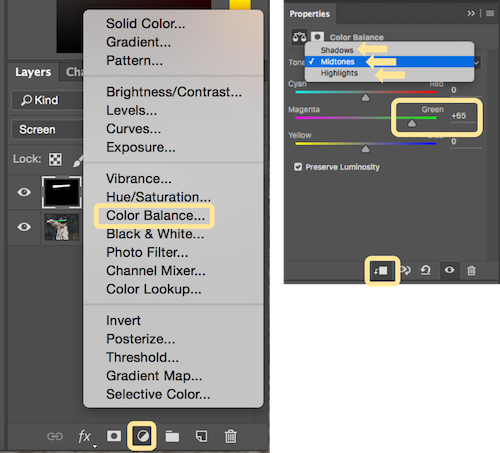
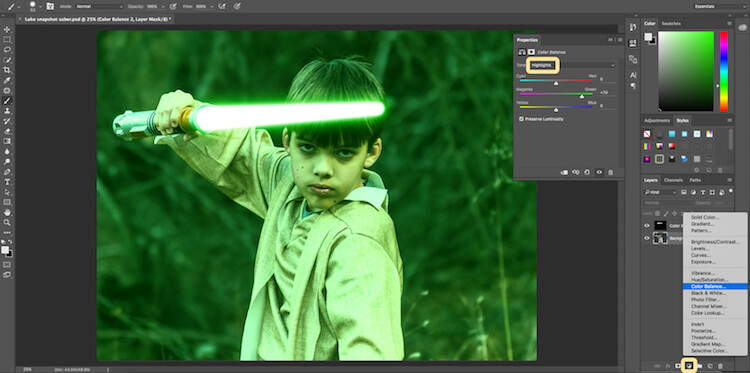
It’s now time to add color to your lightsaber. Select the icon to create a new fill or adjustment layer, and choose the option for Color Balance. Activate the clipping mask so that you only add color to the lightsaber, not the entire image. You can choose any color of your choice, but in this example, we are working with green.

You will want to add the color selection to each option for Shadows, Midtones, and Highlights. Adjust the color slider up or down based on the color preferences for your lightsaber. For this photo, we set shadows, midtones, and highlights to green at around +65.

15 Color Lightsaber

Your lightsaber is now complete, but there is still one more important step to get a realistic photo. You need to add some glow to the subject from the illumination coming off of the lightsaber.

Part 3: Add the reflective glow from the lightsaber

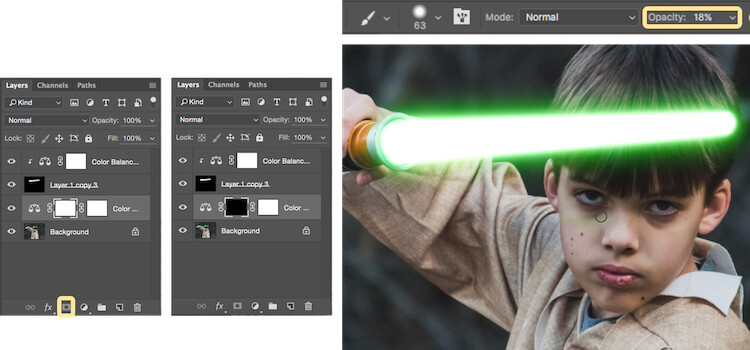
Select the background or base layer. Click the icon to create a new fill or adjustment layer, and choose the option for Color Balance. Choose the same color as you used for your lightsaber, but this time as you adjust the color for Shadows, Midtones, and Highlights, it will work best if you emphasize the color around the highlights more than the shadows or Midtones. For this photo, we used Shadows +32, Midtones +38, and Highlights +70

16 Color for Glow

Add a vector mask and then select CTRL/CMD + I to hide all of the color balance. Select the brush tool, and make it a soft edge brush with an opacity around +18. This will allow you to brush in a soft reflection of glow to parts of the image that make it look realistic.

17 Brush in glow reflection

Bonus – Jumping Jedi

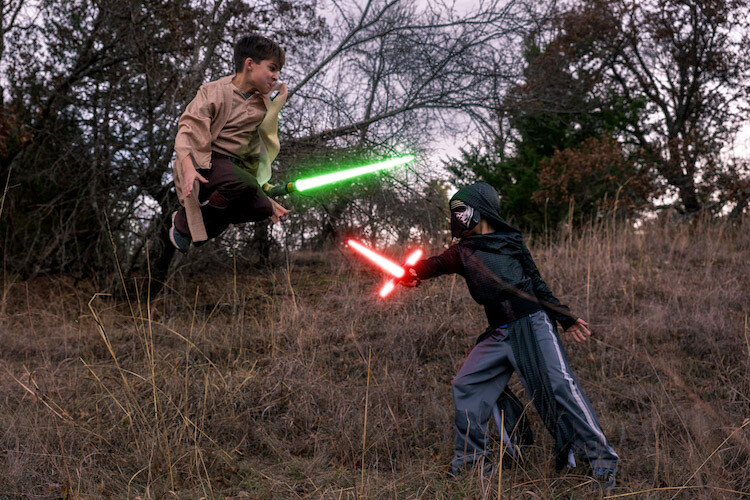
A bonus tip that you may want to use in your Star Wars photo shoot is a jumping Jedi. With a few simple tricks, you can give the illusion of your Jedi jumping high into the air over a swinging lightsaber.

First, make sure you use a tripod as you will need the camera to be completely stationary for two different shots. You can have your Jedi jump off a chair at the same time that his enemy swings his lightsaber. Then remove the chair and capture a shot of the exact same scene, but this time without the chair or characters in the shot (tripod use is important for image alignment later).

The second shot should be empty with the exception of the background because it will allow you to take the chair out of the original picture to create the illusion of a jumping Jedi.

19 Jumping jedi tripod shots

Here’s how it’s done in Photoshop.

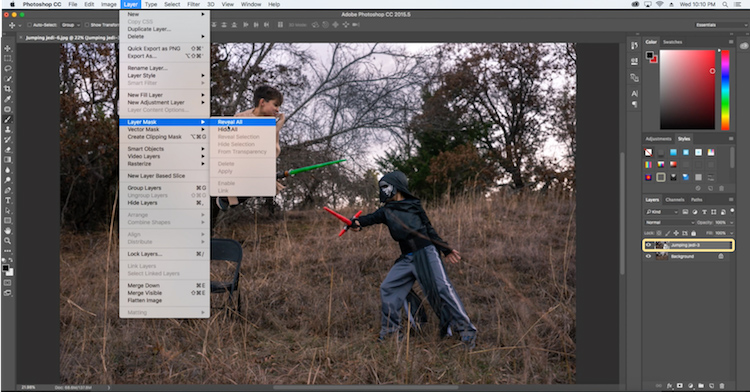
Start by opening both photos as layers. You will want the empty background shot to be set as the base layer and the action shot as the top one. Select the top layer of the action shot, and click Layer > Layer Mask > Reveal all.

20 Jumping Jedi mask

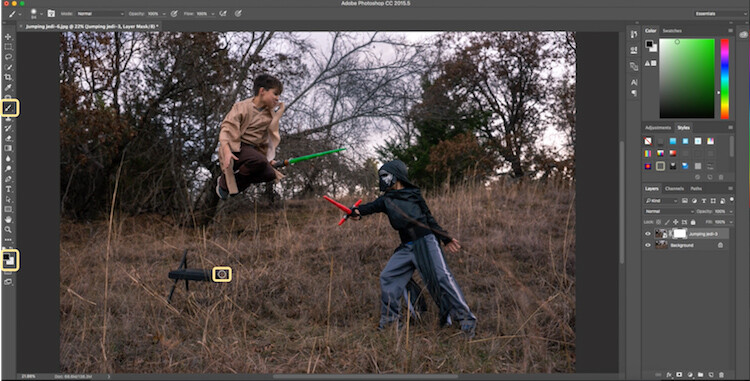
Select the brush tool, and make sure that your foreground color is set to black, which will allow you to brush away the top layer to reveal some of the base layer. If your foreground color is set to white as opposed to black you can switch it to black by clicking X. Simply brush over the chair (make sure you are painting on the mask NOT the layer) to make it disappear.

21 Jumping Jedi brush away

Add the lightsaber effect from above, and you have the illusion of a jumping Jedi.

22 Final photo Jumping Jedi

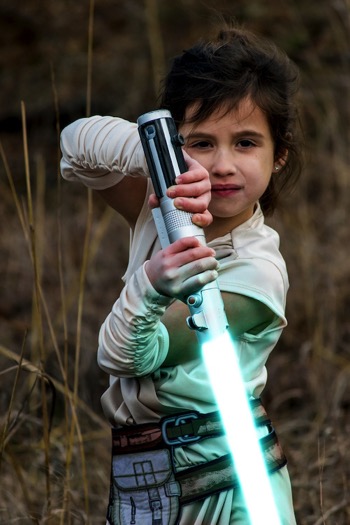
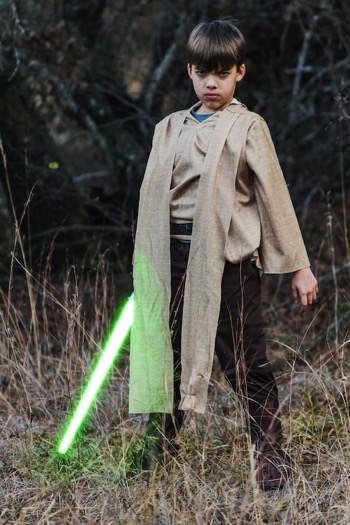
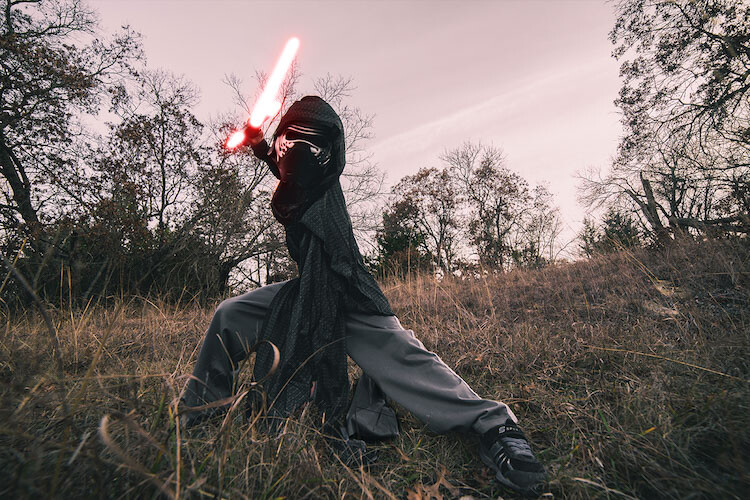
Below are some additional examples of the final images from this Star Wars project to give you additional ideas for action shots and portraits to bring your characters to life.

28 Final photo Rey portrait 29 Final Photo Luke portrait

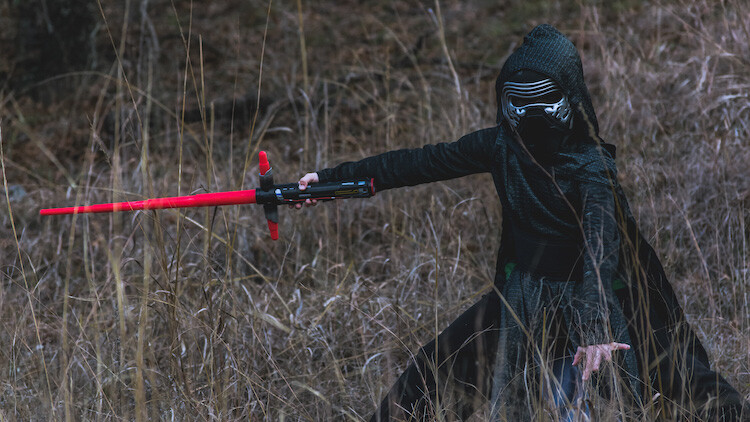
30 Kylo Ren Red

27 Final photo saber battle

Finally

You can watch this whole process in the follow short video as well:

Note: thanks to my co-author on this article, David Kahl.

Try to awaken the force in your family by giving them a lightsaber and following this tutorial. In addition, leave a comment with any other fun photography projects that you have captured with your kids or family. Share your images if you give this a go, we’d love to see them!

googletag.cmd.push(function() {
tablet_slots.push( googletag.defineSlot( “/1005424/_dPSv4_tab-all-article-bottom_(300×250)”, [300, 250], “pb-ad-78623” ).addService( googletag.pubads() ) ); } );

googletag.cmd.push(function() {
mobile_slots.push( googletag.defineSlot( “/1005424/_dPSv4_mob-all-article-bottom_(300×250)”, [300, 250], “pb-ad-78158” ).addService( googletag.pubads() ) ); } );

The post How to Turn Your Kids into Star Wars Characters Using Photoshop by Paul Fontanelli appeared first on Digital Photography School.

Digital Photography School

 
Comments Off on How to Turn Your Kids into Star Wars Characters Using Photoshop

Posted in Photography


How to Turn Your Kids into Star Wars Characters Using Photoshop

09 Feb

Do your kids love Star Wars? Do you love photography? If so, here’s a great opportunity to join forces and turn your kids into Star Wars heroes or villains by giving them the ultimate Star Wars weapon, the lightsaber.

How to Turn Your Kids into Star Wars Characters Using Adobe Photoshop

All you need to awaken the force are these three steps:

  1. The setup
  2. Capturing the shot
  3. Light up your sabers using Photoshop

BONUS tip – The Jumping Jedi

Step #1 – The Setup

For the setup, you will want to make sure that the photographs of your kids look as close to a Star Wars scene as possible. Don’t just take a picture of your kids wearing a t-shirt standing in the kitchen. Luke Skywalker doesn’t light up his lightsaber in a kitchen. Your kids will have a lot of fun getting into character, so spend some time on the setup.

Costumes

You can buy costumes for your kids on Amazon. Here are the costumes used in this tutorial.

  • Luke Skywalker
  • Rey
  • Kylo Ren
  • Lightsabers
  • Total customs cost ~ $ 40-70

Location

For the location, you will want to find a place that looks like it could be a scene in any of the Star Wars movies. The easiest location to use would be a park with trees, and no noticeable man-made objects in sight.

2 Location - How to Turn Your Kids into Star Wars Characters Using Adobe Photoshop

Step #2 – Capturing the Shot

Action shots

For action shots of a lightsaber battle, you will want to use a fast shutter speed of at least 1/500th of a second, and set your camera to continuous (burst) shooting mode. This will allow you to freeze the action of the battle and take multiple shots in sequence to ensure you capture the best of the action.

4 Action shot - How to Turn Your Kids into Star Wars Characters Using Adobe Photoshop

Shutter speed was 1/800th of a second.

Portraits

For the portraits, give your kids some epic poses to follow. To give you ideas for creative poses, do a Google images search for the Star Wars character of your choice. This will also help your child get more into the character. For example here are some for Rey.

5 Portrait pose - How to Turn Your Kids into Star Wars Characters Using Adobe Photoshop

Do basic edits to the image

After you capture the image, you will need to make a few adjustments to the image to make it stand out. This can be done in Adobe Lightroom and is the final step before your photo is ready to go into Photoshop for the lightsaber effect.

For the look of Star Wars, a few basic edits, such as increasing the contrast and the clarity will help give it a rough and grungy look that Star Wars is known for.

6 Before After Lightroom Edit Star Wars

Notice the differences between the before and after of this image by making a few basic edits in Adobe Lightroom.

Step #3 – Light your sabers up in Photoshop

Adding the lightsaber effect is the last and final step in making turning your kid into the Star Wars character of their dreams. This process should take about five minutes per photo once you have done it a few times.

Part 1: Prepare the layer

Start by creating a duplicate layer by pressing CTRL/CMD + J.

8 Duplicate layer - Star Wars character in Photoshop

Select the icon to create a new fill or adjustment layer, and from that menu select Hue/Saturation. Then, move the lightness slider to -100 to make it black.

9 Hue Saturation

Select CTRL/CMD + E to merge the adjustment layer and duplicate layer. Next, set the blending mode drop down to Screen.

10 merge and screen Star Wars

At this point, your layers are prepped and ready to add the lightsaber.

Part 2: Add the lightsaber by using the brush tool

Select the brush tool, and adjust the size and hardness of the brush. The size of your brush will vary based on the size of the lightsaber and your image. Set the hardness of the brush to approximately 50%.

11 brush selection

Begin to add your lightsaber using brush strokes. Select the end point of the lightsaber, then hold down shift, and click the other end of the lightsaber to draw a straight line. Repeat these lines multiple times to fill in the lightsaber with brush strokes. You will likely need to add free-form brush strokes around the base of the lightsaber to fill it in.

12 draw the saber

Illuminate the lightsaber

The next step allows you to illuminate the lightsaber. Create three duplicate layers of the lightsaber by selecting CTRL/CMD + J three times. For each layer, you will then select Filter > Blur > Gaussian Blur. But, each layer will be set to a different radius setting. For this image, we used 5, 15, 35, 75 for each respective layer. Note, that the amount of Gaussian Blur needed may vary based on the size of your image. Adjust these numbers as needed to ensure you have a nice glow from the lightsaber.

13 Gausian Blur

Select all of the duplicate layers (do not select the background), and merge them into one layer by pressing CTRL/CMD + E. Then set the blending mode to Screen.

14 Merge and Screen

Add color to the lightsaber

It’s now time to add color to your lightsaber. Select the icon to create a new fill or adjustment layer, and choose the option for Color Balance. Activate the clipping mask so that you only add color to the lightsaber, not the entire image. You can choose any color of your choice, but in this example, we are working with green.

You will want to add the color selection to each option for Shadows, Midtones, and Highlights. Adjust the color slider up or down based on the color preferences for your lightsaber. For this photo, we set shadows, midtones, and highlights to green at around +65.

15 Color Lightsaber

Your lightsaber is now complete, but there is still one more important step to get a realistic photo. You need to add some glow to the subject from the illumination coming off of the lightsaber.

Part 3: Add the reflective glow from the lightsaber

Select the background or base layer. Click the icon to create a new fill or adjustment layer, and choose the option for Color Balance. Choose the same color as you used for your lightsaber, but this time as you adjust the color for Shadows, Midtones, and Highlights, it will work best if you emphasize the color around the highlights more than the shadows or Midtones. For this photo, we used Shadows +32, Midtones +38, and Highlights +70

16 Color for Glow

Add a vector mask and then select CTRL/CMD + I to hide all of the color balance. Select the brush tool, and make it a soft edge brush with an opacity around +18. This will allow you to brush in a soft reflection of glow to parts of the image that make it look realistic.

17 Brush in glow reflection

Bonus – Jumping Jedi

A bonus tip that you may want to use in your Star Wars photo shoot is a jumping Jedi. With a few simple tricks, you can give the illusion of your Jedi jumping high into the air over a swinging lightsaber.

First, make sure you use a tripod as you will need the camera to be completely stationary for two different shots. You can have your Jedi jump off a chair at the same time that his enemy swings his lightsaber. Then remove the chair and capture a shot of the exact same scene, but this time without the chair or characters in the shot (tripod use is important for image alignment later).

The second shot should be empty with the exception of the background because it will allow you to take the chair out of the original picture to create the illusion of a jumping Jedi.

19 Jumping jedi tripod shots

Here’s how it’s done in Photoshop.

Start by opening both photos as layers. You will want the empty background shot to be set as the base layer and the action shot as the top one. Select the top layer of the action shot, and click Layer > Layer Mask > Reveal all.

20 Jumping Jedi mask

Select the brush tool, and make sure that your foreground color is set to black, which will allow you to brush away the top layer to reveal some of the base layer. If your foreground color is set to white as opposed to black you can switch it to black by clicking X. Simply brush over the chair (make sure you are painting on the mask NOT the layer) to make it disappear.

21 Jumping Jedi brush away

Add the lightsaber effect from above, and you have the illusion of a jumping Jedi.

22 Final photo Jumping Jedi

Below are some additional examples of the final images from this Star Wars project to give you additional ideas for action shots and portraits to bring your characters to life.

28 Final photo Rey portrait 29 Final Photo Luke portrait

30 Kylo Ren Red

27 Final photo saber battle

Finally

You can watch this whole process in the follow short video as well:

Note: thanks to my co-author on this article, David Kahl.

Try to awaken the force in your family by giving them a lightsaber and following this tutorial. In addition, leave a comment with any other fun photography projects that you have captured with your kids or family. Share your images if you give this a go, we’d love to see them!

googletag.cmd.push(function() {
tablet_slots.push( googletag.defineSlot( “/1005424/_dPSv4_tab-all-article-bottom_(300×250)”, [300, 250], “pb-ad-78623” ).addService( googletag.pubads() ) ); } );

googletag.cmd.push(function() {
mobile_slots.push( googletag.defineSlot( “/1005424/_dPSv4_mob-all-article-bottom_(300×250)”, [300, 250], “pb-ad-78158” ).addService( googletag.pubads() ) ); } );

The post How to Turn Your Kids into Star Wars Characters Using Photoshop by Paul Fontanelli appeared first on Digital Photography School.

Digital Photography School

 
Comments Off on How to Turn Your Kids into Star Wars Characters Using Photoshop

Posted in Photography


How to Avoid Blurry Photos of Kids

29 Nov

One of the most frequent questions that I see on the Digital Photography School Facebook Group is some variety of this: “Help! Every photo of my kid is blurry! What am I doing wrong?!” If you’ve found yourself wondering the same thing, I’ll walk you through five things that you can do to help you avoid taking blurry photos of kids.

photographing-kids

1. Mind Your Aperture

When it comes to photographing children and experiencing blur, many issues can be solved by either stopping down or opening up your aperture. That said, if you’re relatively new to photography, it can be difficult to know which direction you need to go.

sharp-kid-photos

If you’re currently shooting with a large aperture and notice some issues. Like an aperture of f/1.4 or f/1.8 and only part of your child’s face is in focus, or only one of several children in the image is in focus even when they’re fairly close together. Then, you might want to try stopping down (making it smaller) your aperture (in other words, make the number larger like f/4 or f/5.6).

If you’re currently shooting with an aperture of f/5.6 or greater (like f/8 or f/11) and you notice a lot of camera shake or motion blur, you may want to try opening up your aperture (make the number smaller like f/4 or f/2.8) if you can. That will allow in more light, which can help create a better balance between the aperture and shutter speed.

2. Utilize Shutter Priority Mode

photograph-moving-kids

If you’re using one of your camera’s shooting modes and are currently photographing kids that are moving, you may want to try shooting in Shutter Priority Mode with your shutter speed set at 1/500th or even faster. By using Shutter Priority Mode, you’ll set the shutter speed, and your camera will select the other settings to balance out the shutter speed that you’ve selected.

Keep in mind that you can still select your ISO in Shutter Priority Mode. You will definitely want to watch your exposure make sure you’re making adjustments to your ISO (or set it to auto). Often, leaving your ISO at 100 in Shutter Priority Mode with a fast shutter speed can result in very dark, or even black images.

3.Use Burst Mode Selectively

photos-moving-kids

In the photography world, the practice of “spray and pray” where you take a series of images using burst mode and hope that one of them turns out, has received a lot of negative attention lately. Certainly, we shouldn’t use burst mode through the entirety of every session, but there are some instances when it comes in handy photographing kids.

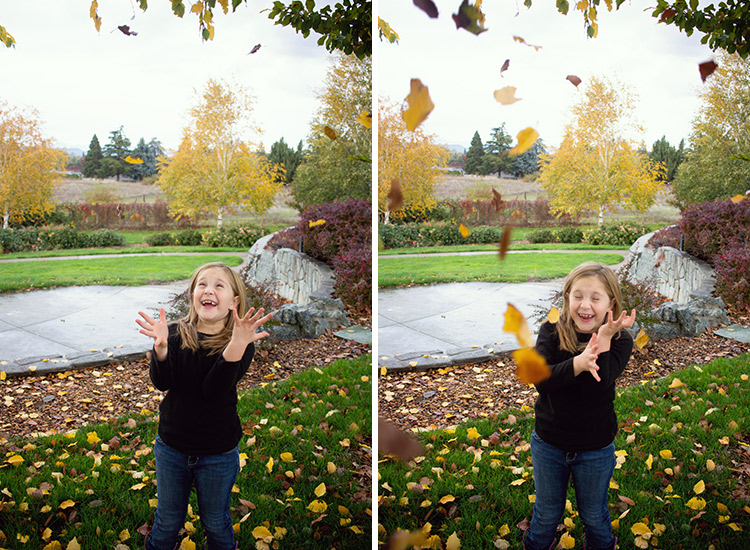
The other day, we took my girls to the park. They were having a blast tossing piles of leaves into the air and letting them fall down onto their heads. In that instance, I chose to use burst mode because it allowed me to capture an event in which the action/movement changed very quickly, as did their expressions.

I sometimes use burst mode in a short series of images to capture kids twirling, running, or any time they’re moving very quickly for a limited period of time. It’s never a bad idea to practice capturing those same events without using burst mode. But when I know that my opportunity to capture a particular event is limited (a child attempting a goal in a soccer game for example), I choose to use burst mode to my advantage.

4. Don’t Be Afraid of Autofocus

sharp-images-moving-kids

Somewhere along the way, a rumor was started that you’re not a “real” photographer unless you shoot in full Manual Mode all the time. I don’t know how that particular rumor got started or why it has taken such a hold on the photography world, but it’s garbage.

If you’re trying to photograph really active kids, please don’t be afraid to use autofocus! It will make life so much easier! If you’re already using autofocus but are still experiencing problems, there are two other things to try adjusting. First of all, it has been my experience that selecting a single focus point for my camera yields far more in-focus images than allowing the camera to auto-select one. If you have the ability to select a focus point for your camera, you may want to try selecting a single point (start with the center point if you’re unsure where to begin) for your camera, and see if the focus improves.

moving-kid-photo2

Focus modes

Another option when it comes to autofocus is to change the autofocus mode. If you’re trying to photograph moving children, and your autofocus mode is currently set to One Shot (Canon) or AF-S (Nikon), try switching to continuous autofocus mode – Al Servo (Canon) or AF-C (Nikon).  One Shot mode is designed to focus on objects that are largely inanimate, and consequently it’s not the best choice when you’re photographing quickly moving children.

When you switch to Al Servo, you’re selecting continuous autofocus. In continuous autofocus mode, you can push down the shutter halfway and let the camera focus, but the camera will continue to track that subject and recompose focus (even as the subject moves) until you depress the shutter button all the way.

moving-kid-photo-2

Some camera models also have a hybrid setting called AI Focus (AF-A for Nikon), which is designed to fluctuate between an object that starts out as stationary but then begins to move. I have been less satisfied with the images I’ve captured in AI Focus than other modes. But each camera model works a little differently, so it’s certainly worth experimenting with the hybrid autofocus mode if your camera has that option.

5. Use a Flash (Sparingly)

fix-blurry-photos

Though I prefer to shoot without a flash whenever possible, there are certainly instances in which using a flash can help to freeze the action, and help you avoid blurry images. When it comes to using a flash, my best advice is to use it sparingly.  Balance it with the available/ambient light (use only the strength of flash you absolutely need), and diffuse or bounce the flash whenever possible in order to create an image that looks crafted rather than like a snapshot.

Photographing children can certainly be a test of patience. These five tips will help you eliminate the blur, and begin to capture photographs of your children that you’ll treasure for years to come! Do you have any other tips? Please share them, and your images of kids in the comments below.

googletag.cmd.push(function() {
tablet_slots.push( googletag.defineSlot( “/1005424/_dPSv4_tab-all-article-bottom_(300×250)”, [300, 250], “pb-ad-78623” ).addService( googletag.pubads() ) ); } );

googletag.cmd.push(function() {
mobile_slots.push( googletag.defineSlot( “/1005424/_dPSv4_mob-all-article-bottom_(300×250)”, [300, 250], “pb-ad-78158” ).addService( googletag.pubads() ) ); } );

The post How to Avoid Blurry Photos of Kids by Meredith Clark appeared first on Digital Photography School.

Digital Photography School

 
Comments Off on How to Avoid Blurry Photos of Kids

Posted in Photography


Tag, You’re It! Banksy Shows Softer Side, Makes Mural for Kids

16 Jul

[ By WebUrbanist in Art & Street Art & Graffiti. ]

banksy stick figure art

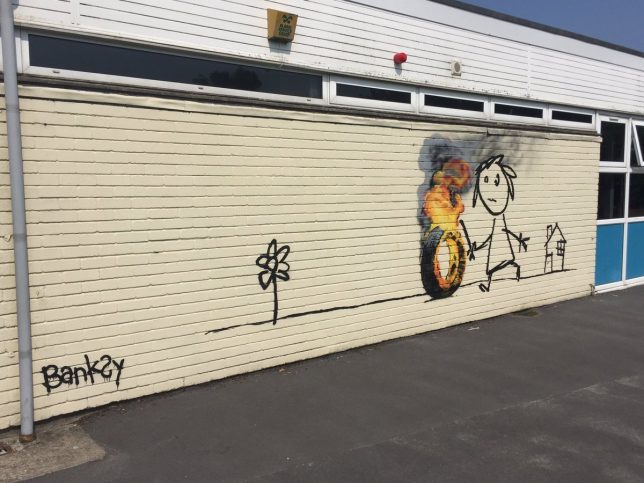
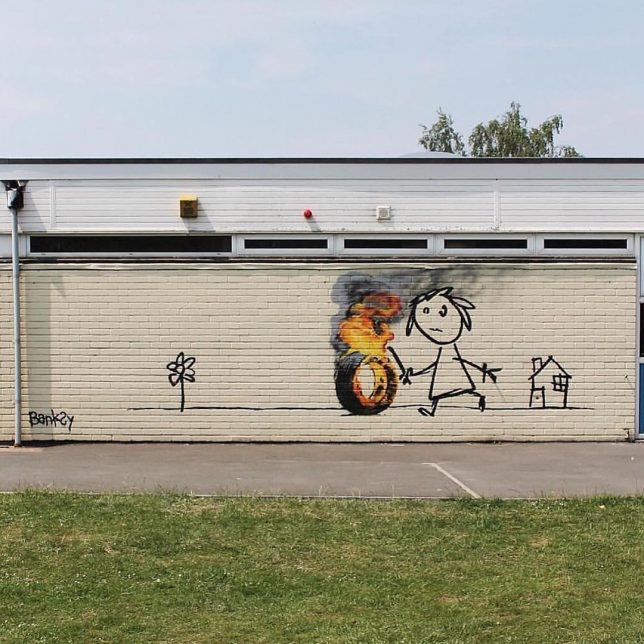
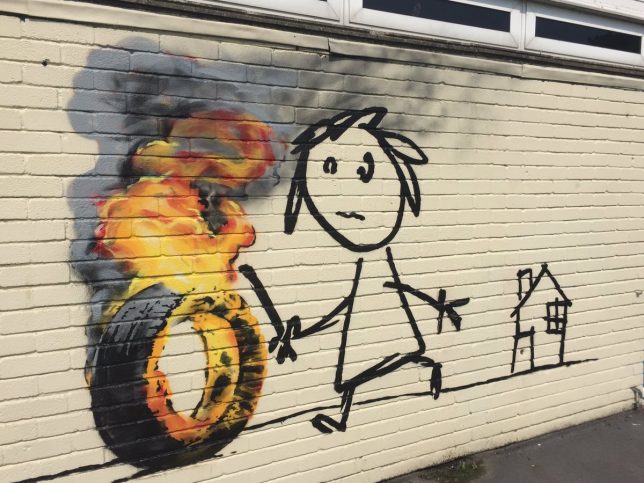
Best known for biting political commentary and poignant artistic critiques, mysterious artist Banksy showed a somewhat friendlier side of his personality in gifting a mural to elementary students who named a building after him.

banksy in bristol

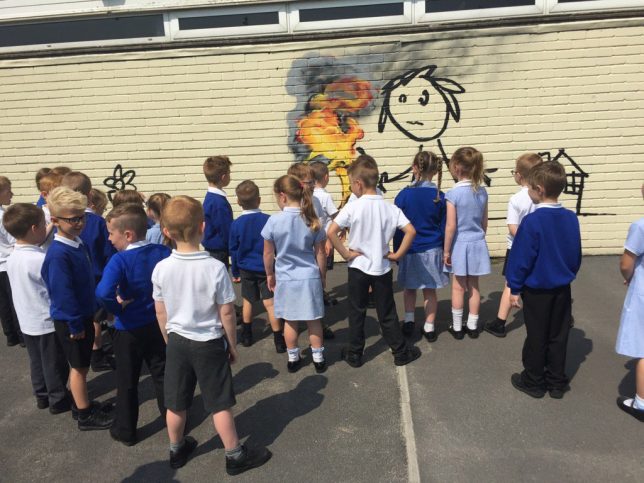
Students at the Bridge Farm Primary School in Bristol, thought to be the anonymous street artist’s hometown, renamed several campus structures in a contest. Among the winners were Blackbeard, Cabot and Banksy.

banksy rolling tire

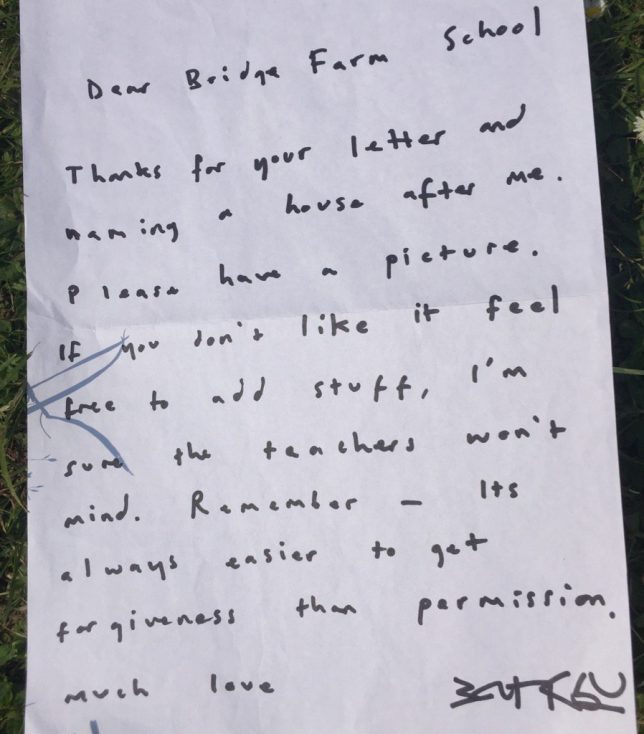
The work itself features a child playing with a hoop, but because it’s Banksy … the hoop was turned into a tire, and the tire was set on fire. Banksy stopping by to make a mural was surprise, but he also left a note, which is even more out of character (though the work has been confirmed authentic):

banksy hand written note

“Dear Bridge Farm School,” the letter reads. “Thanks for your letter and naming a house after me. Please have a picture, and if you don’t like it, feel free to add stuff. I’m sure the teachers won’t mind. Remember, it’s always easier to get forgiveness than permission. Much love, Banksy.”

banksy school mural stick

In a somewhat ironic twist, the school is forbidding children from painting over or around the mural, perhaps out of respect or because if its doubtless high monetary value – either way, one can be sure Banksy would approve should one of those students break the rules (images by Jon Kay via Colossal).

Share on Facebook


[ By WebUrbanist in Art & Street Art & Graffiti. ]

[ WebUrbanist | Archives | Galleries | Privacy | TOS ]


WebUrbanist

 
Comments Off on Tag, You’re It! Banksy Shows Softer Side, Makes Mural for Kids

Posted in Creativity


Urban Fairytales: Hyperrealistic Paintings of Kids Exploring the City

18 Jun

[ By SA Rogers in Art & Drawing & Digital. ]

urban fairytales main

Modern-day children move through a decidedly un-fairytale-like world with unlikely gangs of friendly wild animals to protect them in this series of paintings so realistic, it takes a moment to realize they’re not photographs. Artist Kevin Peterson creates these incredible scenes in oil paint on panel, highlighting the inner strength it can take to survive in places beset with violence and poverty.

urban fairytales 5

urban fairytales 2

urban fairytales 3

Princesses regally make their way through rubble in abandoned industrial districts with crowned polar bears at their heels, point the way for the fierce lions acting as their champions and saunter down sidewalks with raccoons and foxes. The contrast of wild creatures and worn, neglected urban environments is a startlingly effective one most often utilized for post-apocalyptic scenes, but the addition of the little girls suggests a hope of human resilience.

urban fairytales 6

urban fairytales 7

urban fairytales 9

“My work is about the varied journeys we take through life,” says Peterson in his artist statement. “It’s about growing up and living in a world that is broken. These paintings are about trauma, fear and loneliness and the strength that it takes to survive and thrive. They each contain the contrast of the untainted, young and innocent against a backdrop of a worn, ragged, and defiled world. Support versus restraint, bondage versus freedom, and tension versus slack are all themes that I often visit.”

urban fairytales 8

urban fairytales 10

urban fairytales 1

A look through Peterson’s history of work reveals an interesting progression from fairly straightforward (albeit stunningly realistic) portraits of women and little girls in urban environments to these fairytale scenes. Some of these paintings are also going large-scale as public murals. Check out details and stay on top of Peterson’s current work on Instagram.

Share on Facebook


[ By SA Rogers in Art & Drawing & Digital. ]

[ WebUrbanist | Archives | Galleries | Privacy | TOS ]


WebUrbanist

 
Comments Off on Urban Fairytales: Hyperrealistic Paintings of Kids Exploring the City

Posted in Creativity


Mattel ThingMaker: New Device Lets Kids 3D-Print Their Own Toys

17 Feb

[ By WebUrbanist in Gadgets & Geekery & Technology. ]

mattel thingmaker

Toy-maker Mattel has announced a 3D printer with a novel application: a way for children to make their own custom toys using a simple digital interface. The app, designed by Autodesk, is easy to learn, fast to use and simple enough even younger kids can use it. The gadget itself is priced at $ 300.

3d home printer

The ThingMaker program comes with a number of templates and basic characters that can be customized in terms of color and texture, but also allows for from-scratch designs. Each design can be saved for future editing and printing as well, in standard formats that work with or beyond the printer.

3d custom toy printer

Finished objects are only one piece of the puzzle, however: the idea is to also allow for printing, connecting and assembling larger creations from smaller parts. Ball-and-socket joints can be easily included for attachment purposes, helping facilitate complex dolls and action figures. Eventually, Mattel may also facilitate combinations and accessories associated with existing branded toy lines, like Barbie and Hot Wheels.

3d printer interface

Various safety measures have been included to keep kids safe, from an automatically-locking door to a retractable print head. For liability reasons they are listing it as a device for kids ages 13 or older.

mattel device

“In today’s digital age, it’s more important than ever for families to transcend the digital world and make their ideas real,” said Aslan Appleman, senior director, at Mattel. “ThingMaker pushes the boundaries of imaginative play, giving families countless ways to customize their toys and let their creativity run wild.”

Share on Facebook


[ By WebUrbanist in Gadgets & Geekery & Technology. ]

[ WebUrbanist | Archives | Galleries | Privacy | TOS ]


WebUrbanist

 
Comments Off on Mattel ThingMaker: New Device Lets Kids 3D-Print Their Own Toys

Posted in Creativity


5 Steps to Creative Storytelling in Pictures with Your Kids

19 Jan

image

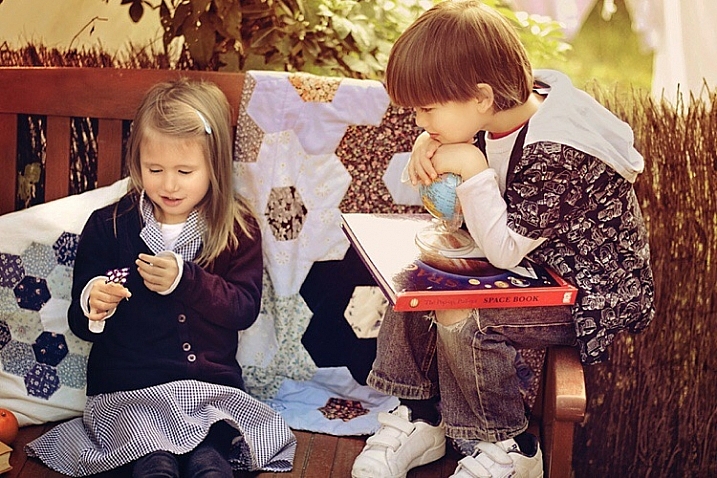
Creative storytelling in pictures need not be daunting nor time-consuming. You can easily set up something really simple at home to take pictures of and at the same time make new memories with your kids.

The actual shoot must be kept really short, so as not to exasperate your kids too much, especially if they are very young, and therefore have relatively short attention spans. The real work is in the planning and thinking ahead.

image

The first rule to telling a good short story in pictures, is to keep it simple. Think of a singular plot: beginning, middle, and end. You can then fill in the gaps with interesting takes and angles. The biggest, and best, tip I give to anyone before taking on any creative project, is to imagine the emotion and feeling you want to evoke at the end of the project. Then work your way backward.

Start planning and decide on a theme. Take for example a simple back to school theme.

image

Step 1. Plan ahead

Think through the story you want to tell; decide on the details, picture the sequences in your head, and feel the story. Think through the items and characters that play a major role in the shoot. Half the battle is won by good meticulous planning, even if it’s just in your head.

What is the overarching emotion, look, feel, and colour of the shoot that you want to achieve? Pare everything back that doesn’t fit in with that look and feel. This shoot below had three requirements: golden, sentimental, and rich in bokeh (background blur). So I planned everything to achieve those three specific requirements.

image

To get rich bokeh, you need to shoot with a wide aperture, between f/1.2 to f/3.2, if you have normal shorter focal length lenses. For longer lenses like 85mm upwards, you can stop down a bit more, as the longer the lens, the more compression there is in the background. Using a 200mm lens, for example, would still give you nice background bokeh even at f/5.6.

To get golden images, use a gold reflector, and wait for the golden hour when you can get soft diffused yellow light. Golden hour usually happens about 1-2 hours after sunrise and before sunset depending on where you are in the world.

image

Step 2. Coordinate colours and props

Reign in the colour palette, go for a family of colours like blues and greens, or reds and purples, or warm yellows and oranges. You can add a splash of contrasting colour for focus. But it is always good to reign in the colour palette keeping it to 3 or 4 colours maximum.

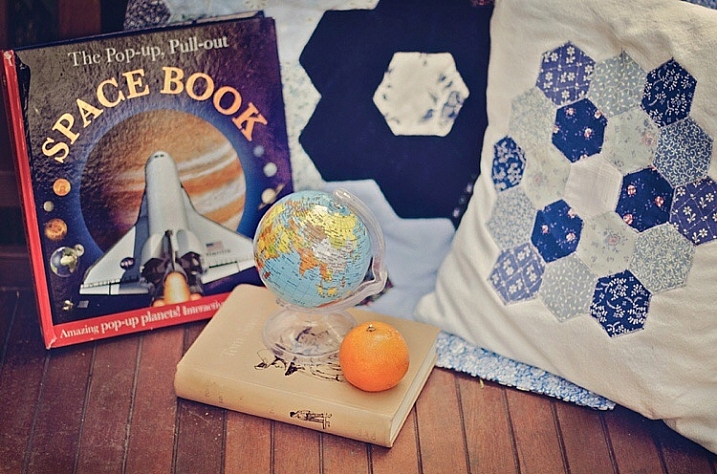
Props need not be bought, or expensive. Use what you have at home; fruit, books, toys, cushions, quilts, etc. Just make sure they are colours that complement your chosen theme.

image

Step 3. Don’t be over ambitious

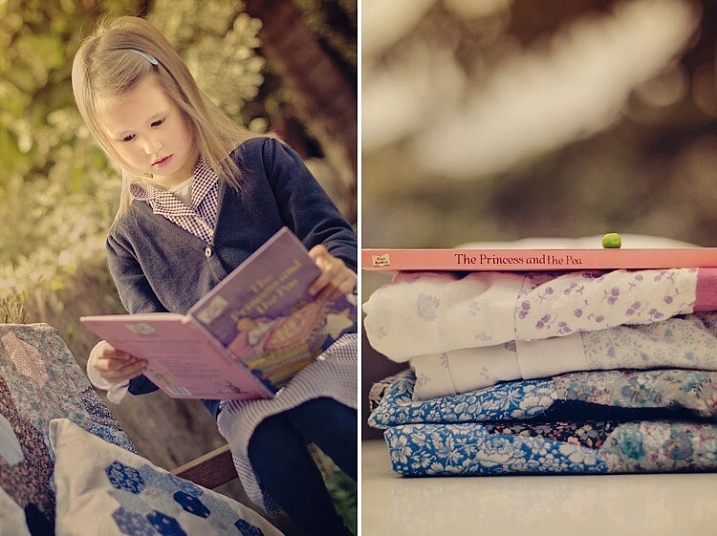
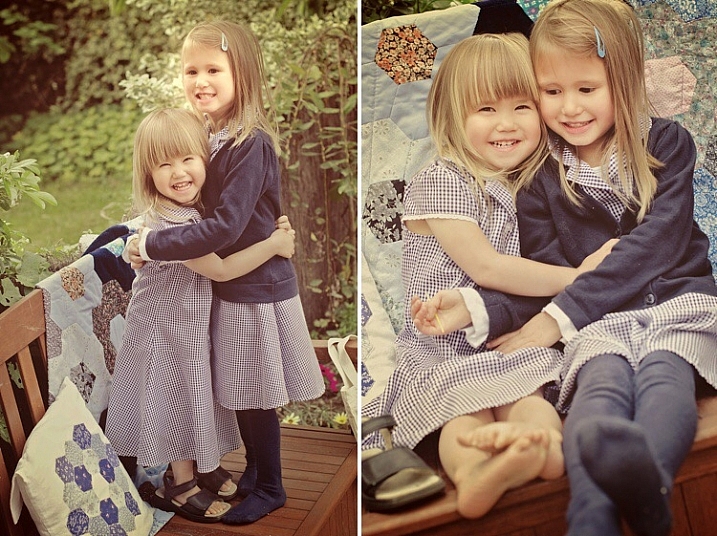
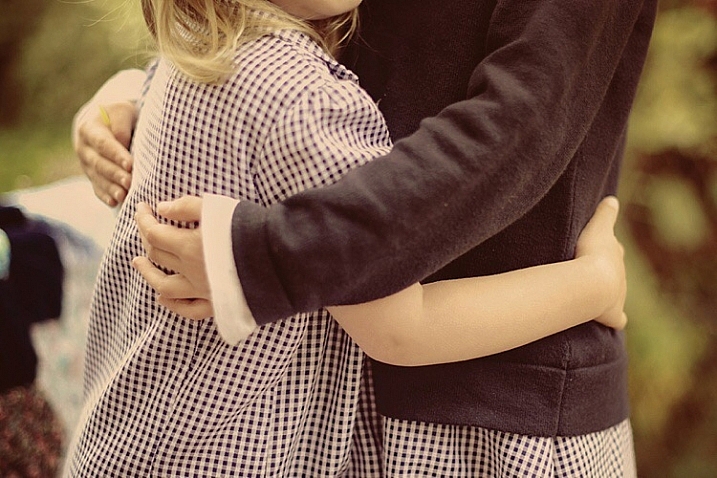
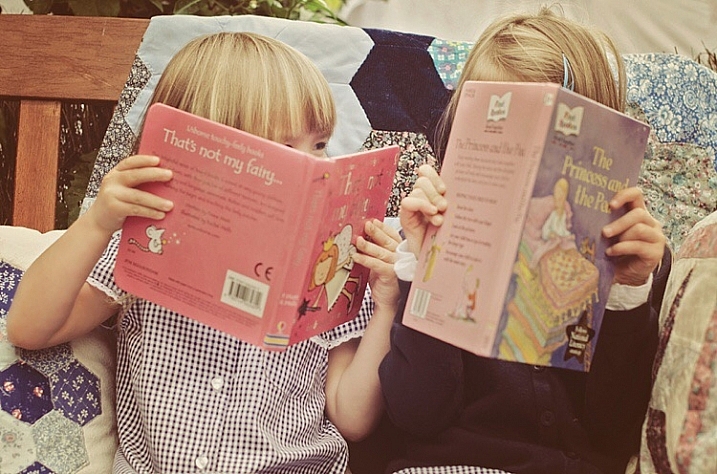
Keep goals simple when it comes to photographing kids, especially if they are your own. It’s one of the most difficult things to do. Keep it short and sweet by focusing on one or two actions or scenarios, and make them super easy like reading a book, hugging, or laughing at a silly joke.

A plot is not always necessary, you can even just aim for capturing some interactions between your kids. The props are to create some new context for them, hold their attention for a few short minutes, and keep them engaged during that time.

image

Step 4: Plan a beginning and end shot

The beginning and the end are crucial to a story because they bring the theme together. Make sure you have an establishing first shot, and a feel good last shot. Details are always a good idea for a contextual or establishing shot. They not only enrich emotion, and reinforce a story, but also strengthen memories. Interesting close-ups, and expressions or unusual crops are also good for closing shots, and stay in the viewer’s memory for a second longer.

image

image

Step 5: Edit your images with a plan

If you edit your photos, edit them according to your vision. there is no one else to please but yourself. The photoshoot you planned is for you and your family, so be true to your original vision and be brave, then sit back and enjoy your creative story in pictures.

image

Have you taken images that tell a creative story of your kids at home or more tips to add? Share them in the comments below.

googletag.cmd.push(function() {
tablet_slots.push( googletag.defineSlot( “/1005424/_dPSv4_tab-all-article-bottom_(300×250)”, [300, 250], “pb-ad-78623” ).addService( googletag.pubads() ) ); } );

googletag.cmd.push(function() {
mobile_slots.push( googletag.defineSlot( “/1005424/_dPSv4_mob-all-article-bottom_(300×250)”, [300, 250], “pb-ad-78158” ).addService( googletag.pubads() ) ); } );

The post 5 Steps to Creative Storytelling in Pictures with Your Kids by Lily Sawyer appeared first on Digital Photography School.

Digital Photography School

 
Comments Off on 5 Steps to Creative Storytelling in Pictures with Your Kids

Posted in Photography


DPReview recommends: Best Cameras for Kids 2015

23 Dec

If they’re young enough, your kids have always known a world in which smartphones are the most popular devices for taking photos. That’s too bad. To ensure that the next wave of young photographers understand the performance and ergonomic advantages of using a real camera, you’ll need to get one into their hands as soon as possible.

But wait! Before you sneak a Nikon D810 into your baby’s basket of toys, you’ll need to consider choking hazards and the fact that some children are a lot more careful than others when it comes to handling expensive electronics. If you want to buy a camera specifically for your child – or a camera that your entire family can share without worrying too much – durability and ease of use are just as important, if not more, as image quality and features.

And, of course, much of that depends on the age and maturity level of your child. We wouldn’t trust any toddler or the vast majority of 10-year-old boys with an advanced point-and-shoot, but for a teenager or pre-teen that’s wise beyond their years and genuinely interested in photography, a compact with a lot of zoom and manual controls to grow into might be a great fit.

So here’s a selection of some of what we think are the best camera options for your kids. Most of these models aren’t specifically for kids, and all of the obvious caveats apply. Batteries aren’t edible, memory cards are choke hazards, cameras can hurt when they’re thrown at people, etc. All prices are approximate street prices, correct at time of publication, and if you think we’ve missed a model that deserves consideration, let us know in the comments!

Younger Kids

If you’re shopping for kids 6 and under, you probably don’t want to spend a lot of money, and durability is likely to be important. You want something lightweight that won’t break the first time it gets dropped, and the simpler the operation the better.

Vtech Kidizoom Connect ($ 48)

1.3MP sensor | 4X digital zoom | 1.8″ LCD | 320 x 240 video | 128MB built-in memory | uses AA batteries

Baby’s first piece of kit should be tough and inexpensive, and the VTech KidiZoom fits the bill. This durable 1.3-megapixel camera/toy comes has a fixed lens with 4X digital zoom, 128MB of internal memory (with an option for MicroSD memory card expansion), a 1.8″ LCD and 320 x 240 video. There are even three photo-related games to keep your kids entertained.

Nikon Coolpix S33 ($ 99)

13.2MP CMOS sensor | 30-90mm equiv. lens | Waterproof to 32ft | Shockproof from 5ft | Full HD video

Cameras do get bumped and dropped (or worse), making Nikon’s inexpensive waterproof, shockproof and freezeproof Coolpix S33 worth a look. It features an easy-to-use interface and dedicated one-touch buttons for simple shooting. Although it’s 13.2 megapixel CMOS sensor is roughly the size of what’s in your smartphone, it can capture decent quality images. Its lens has a focal range of of 30-90mm – adequate for most purposes. A dedicated movie record button allows users to quickly shoot Full HD video clips. The S33 offers sixteen creative styles and effects options (including Underwater Face Detection) and an option to shoot videos with a miniature effect.


Fujifilm instax mini 8 ($ 80)

Makes card-sized instant prints | 60mm equiv. fixed lens | Uses AA batteries | Comes in several colors

Now your kids can relive the days of instant prints with the Fujifilm instax mini 8, one of several models available from the company. It’s definitely not rugged, but the thrill of getting a 2.4 x 1.8 inch print in about 2-3 minutes will excite both kids and adults alike. The mini 8 is a very basic camera, with a small optical viewfinder (and no LCD), dial-in exposure, and a flash that always fires. One important thing to know is that instax cameras are a bit of a money pit, with a ten pack of film priced at around $ 8.50, so your little photographers will need to be pretty selective before pressing that shutter release button.  


Viddy Pinhole Camera kit ($ 57)

DIY pinhole camera | Accepts 35mm or medium-format film | Available in four colors

For the creative kid with a do-it-yourself attitude, the VIDDY is a pinhole camera kit made from tough, durable recycled cardboard in four colors: green, black, blue or red. It accepts both medium format and 35mm film. Bonus: it’s a perfect project between parent and child. Pop out VIDDY’s screen printed parts and assemble in 30 minutes.


Polaroid Cube ($ 99)

6MP sensor | 35mm lens w/124° angle-of-view | Weatherproof | Full HD video | Numerous mounts available

The latest HD action camera from Polaroid combines a 6MP sensor with a lens with an impressive 124° field-of-view and puts it into a weatherproof body measuring just 35mm on each side. The camera has can record Full HD video onto an optional microSD card, and a 90 minute battery allows extended recording for every bike ride and beach adventure. Just like more expensive GoPros, there are numerous mounts available for the Cube, plus an underwater housing. And a magnet in the camera’s base opens up even more potentially interesting vantage points.

For those seeking Wi-Fi capabilities, the Cube+ offers that for $ 149.

Older Kids

Durability may be less important in a camera for this age group, but it really depends on the child. In our selection we’re assuming that you’re buying for a kid who’s learned not to throw precious things around, and most of the models we’ve chosen offer a little room for your child to grow away from the strictly auto-everything snap-shooting if they get more confident.

Olympus Tough TG-4 ($ 349)

16MP BSI CMOS sensor | 25-100mm equiv. lens | Waterproof to 50ft | Full HD video | Wi-Fi + GPS

For kids that are on the go – or have the tendency to drop expensive pieces of electronics, the Olympus TG-4 is a good choice. It’s well built, responsive, full-featured and produces excellent quality images for a small-sensor camera. It offers automatic shooting modes but opens up the world of manual exposure for older children ready to get their feet wet (no pun intended) in more serious photography. Other features include numerous ‘art filters’, Full HD video recording, and support for fisheye and telephoto conversion lenses. It has very good battery life as well, so it can make it through the day with ease.

The TG-4 is waterproof to 50ft, shockproof from 7ft, crushproof to 220lbf and freeze proof to +14F, so it can take a beating. Wi-Fi is built-in for easy photo sharing, and the GPS receiver will let young photographers check a map to see where a photo was taken.

Panasonic Lumix DMC-ZS50 ($ 250)

12MP BSI CMOS sensor | 24-720mm equiv. lens | Electronic viewfinder | Full HD video | Wi-Fi


For the child you trust with more fragile cameras, might we suggest the Panasonic Lumix DMC-ZS50. It’s a great camera to take on vacation, thanks to its long 24-720mm (30X) zoom lens and ultra-compact body. It offers speedy focusing and continuous shooting, and photos can be composed on either a 3″ LCD or a small (but still useful) electronic viewfinder. The camera can record Full HD video with ‘hybrid’ image stabilization to reduce severe camera shake. 

The ZS50 offers more advanced manual controls than the TG-4 above, so if you want to teach your budding photographer about aperture and shutter speed or how to manual focus, the ZS50 is a camera which can do it.


Apple iPod Touch ($ 199 and up)

Full-featured smart device | 8MP BSI CMOS sensor | F2.4, 29mm equiv. lens | 4″ Retina display | Full HD video

While it may be too early in their lives to buy your kids an iPhone, you might as well prepare for the inevitable by picking up an iPod Touch (2015). It’s essentially an iPhone without the phone, meaning that you get access to hundreds of thousands of apps, many photo-related, easy photo sharing over Wi-Fi, and all of the other things that have made iPhones a smash hit.

On the photo side, the iPod Touch sports a 8MP BSI CMOS sensor and an F2.4, 29mm equivalent lens, plus a lower resolution front-facing camera for selfies. It has the usual features you’d expect to see on a ‘regular’ camera, plus impressive Auto HDR and panorama features. The iPod Touch can also record Full HD video, with slo-mo and time-lapse options. You couldn’t ask for a better screen on which to compose photos, either, as the 4″ Retina display truly shines. You can even add extra lenses from companies like Olloclip for more flexibility.

Articles: Digital Photography Review (dpreview.com)

 
Comments Off on DPReview recommends: Best Cameras for Kids 2015

Posted in Uncategorized