The post Luminar vs Lightroom: Three Reasons Luminar is Better (and Two Reasons It’s Not) appeared first on Digital Photography School. It was authored by Jaymes Dempsey.

Are you struggling to decide whether you should be working in Luminar vs Lightroom? Do you want to know how these two post-processing powerhouses match up?
You’ve come to the right place.

Because this article will give you three ways Luminar excels over Lightroom, followed by two areas where Lightroom dominates.
And it’ll help you decide which option is best for your needs.
Let’s dive right in, starting with the biggest reason to choose Luminar:
1. Luminar offers one-click features for quick edits
When dealing with the question of Luminar vs Lightroom, I always recommend you take a look at the biggest feature Luminar offers:
One-click editing.
You see, Luminar offers a modern approach to editing, where you tap a few buttons and the software does most of the editing for you. This is ideal for photographers who don’t feel comfortable doing advanced edits in a program like Lightroom, or who simply don’t have time to carefully edit every photo.
These one-click options include the Orton Effect (which gives your photos a soft glow), to the Sunrays tool (which adds surprisingly realistic sun rays to your photos), to the Fog tool (which adds, well, fog).

Even more impressive, some of Luminar’s best editing features are powered by artificial intelligence.
For instance, Luminar’s AI Enhance tool offers an AI Accent slider that often looks quite good; it makes your photo pop with some carefully applied color and tonal adjustments, among others.
And the Luminar AI Sky Replacement is nothing short of amazing. With a couple of clicks, you can take a boring sky and turn it into something eye-catching (an edit that could previously only be pulled off by a Photoshop expert).

So if quick editing is your thing, then Luminar is a great choice.
2. Luminar offers useful layer-based editing
If you’ve ever used Photoshop, then you’ll know that one of its most powerful features is layer-based edits.
Because with layers, you can stack edits on top of one another, selectively delete edits, mask out certain edits, and more.
And while Lightroom doesn’t offer layer-based editing…
…Luminar does.
In Luminar, you can make adjustments on different layers. Then you can selectively apply these adjustments by masking out different areas of the layer, ensuring that only part of the photo is enhanced by a slider or corrected by a tool.

You can also use Luminar’s Luminosity Mask tool to selectively adjust areas of your photos based on their underlying brightness.
Now, Lightroom does offer some similar features, though they don’t technically use layers. Features such as the Adjustment Brush.
But these aren’t quite as useful as true layer-based editing, not least because you can only apply some edits via the Adjustment Brush, whereas Luminar allows for almost every slider to be separated into a different layer and masked out (if you so choose).
Personally, I’m a huge fan of layer-based editing, and I love that Skylum included it in their software.
On the other hand, layer-based editing can be a bit complex for newcomers. Fortunately, as discussed in the section above, Luminar also has a handle on basic editing tools.
So you have a choice:
Do more complex, layer-based editing.
Or work with the one-click edits.
(Or both!)
Very cool.
3. The Luminar editing interface is incredibly easy to work with
Here’s the third big area where Luminar dominates Lightroom in the Luminar vs Lightroom question:
The Luminar interface is streamlined, simple, and ridiculously easy to use.
Open up Luminar, and you can immediately tell that it’s great for beginners. There’s a toolbar at the top that lets you access basic options, no matter the module you’re in, and the tool panels on the right are simple and uncluttered.
To do some quick editing, all you have to do is tap the Looks icon at the top, and a handy image carousel pops up:

Lightroom, on the other hand, is far less sleek, and a little bit messy.
Take a look at the Lightroom interface:

Sure, it’s workable, but it’s not exactly simple, and it can feel overwhelming at times. There’s a huge number of editing panels, quite a few modules, and many sliders.
So while a professional probably wouldn’t balk at the Lightroom display, a beginner may feel far too out of their depth.
Which is why Luminar is worth a look.
4. Lightroom offers far superior image organization options
Now it’s time to look at areas where Lightroom excels over Luminar, starting with Lightroom’s digital asset management capabilities.
You see, Lightroom is carefully designed to catalog, group, and label your photos. It has ultra-useful collection options and a huge number of ways to filter your images (in case you’re after an elusive image buried somewhere deep in your catalog).

I love Lightroom’s organization features, and I still use my Lightroom catalogs to keep track of all my images, even when I’m doing editing in Luminar.
You see, Luminar’s photo organization options are far less powerful compared to Lightroom’s. Luminar does offer a Library feature, which gives you the option to group your photos into Albums.
But Albums don’t offer much in the way of functionality; for instance, you can’t group one album under another, nor can you sort them into a meaningful hierarchy.
Hence, when it comes to Luminar vs Lightroom in photo organization capabilities, Lightroom is the winner. Hands down.
Lightroom features a set of powerful, complex tools for precise editing
One other gripe that I have with Luminar compared to Lightroom:
It’s just not as precise.
Even though Lightroom has a complex interface, there’s a lot of options within that interface. Whereas Luminar’s editing tools are often a bit too simple.
For instance, look at Lightroom’s Split Toning panel:

You can drag around a point on the color display, and your photo will respond.
Then compare this to Luminar’s Split Toning tool, where you’re stuck dragging sliders in a far less helpful way:

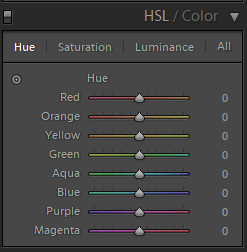
The same is true of Lightroom’s HSL/Color editing panel. You have basic HSL options, which allow you to modify colors according to hue:

But then you also have a more targeted color adjustment tool, where you can click and drag to edit particular colors of your photos.
This is in contrast to Luminar’s Color tool, where you have the basic HSL options, and that’s all:

Now, for a beginner, this may not be a big deal. You may not be interested in more complex editing tools.
But more experienced editors want this sort of thing, and so you should be aware that you can’t find it in Luminar.
Luminar vs Lightroom: Conclusion
Lightroom and Luminar are both excellent for post-processing, just in different ways.
Luminar offers fantastic one-click editing, along with powerful AI options.
Whereas Lightroom features superior image organizational features and complex editing tools.
So which is better, Luminar vs Lightroom?
In the end, the choice is yours!
The post Luminar vs Lightroom: Three Reasons Luminar is Better (and Two Reasons It’s Not) appeared first on Digital Photography School. It was authored by Jaymes Dempsey.

Digital Photography School


You must be logged in to post a comment.