RSS
 

Posts Tagged ‘infrared’

Hoya Solas infrared neutral density filters launch in USA

05 Oct

Hoya has launched new USA-exclusive Solas infrared neutral density filters. The company says its new IRND filters offer a consistent color balance across the density range while also suppressing infrared, the end result being a balanced image with reduced ‘IR contamination’ like excessive digital artifacts and color shifts.

Hoya has launched the new Solar IRND filters in the following sizes and densities:

0.3 (1-stop) – 49mm ~ 82mm
0.6 (2-stop) – 49mm ~ 82mm
0.9 (3-stop) – 46mm ~ 82mm
1.2 (4-stop) – 49mm ~ 82mm
1.5 (5-stop) – 49mm ~ 82mm
1.8 (6-stop) – 46mm ~ 82mm
2.7 (9-stop) – 49mm ~ 82mm
3.0 (10-stop) – 46mm ~ 82mm

B&H Photo currently lists the filters with the following prices: 46mm ($ 48.90), 49mm ($ 48.90), 52mm ($ 53.90), 55mm ($ 61.90), 58mm ($ 69.90), 62mm ($ 85.90), 67mm ($ 93.90), 72mm ($ 100.90), 77mm ($ 120.90), and 82mm ($ 151.90).

Via: Kenko Tokina USA

Articles: Digital Photography Review (dpreview.com)

 
Comments Off on Hoya Solas infrared neutral density filters launch in USA

Posted in Uncategorized


How to Create an Infrared Effect in Photoshop

10 Sep

Note: For this tutorial I am using Photoshop CS6, however every version from CS2 up will work for this technique.

What is Infrared Photography?

Infrared (IR) light lies just beyond the visible spectrum, so we can’t actually see it with the naked eye. However, IR photography allows us to view this spectrum with a camera, to capture a whole new world of invisible light.

13Done

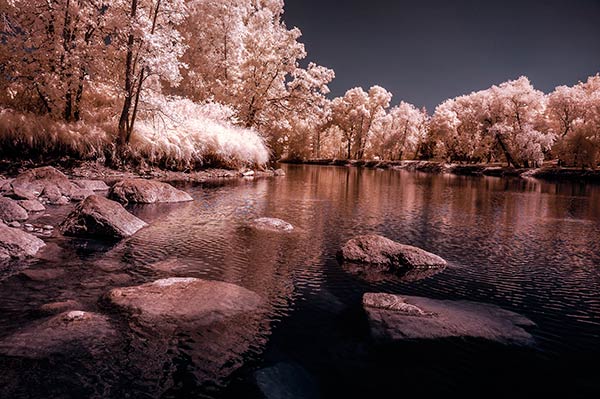
In basic terms, anything that reflects a lot of infrared light, will appear red in IR photography. As healthy vegetation absorbs blue and red-light energy to fuel photosynthesis and create chlorophyll, organic matter is the most popular subject for IR photography. The surrealistic effects that are created when IR comes into contact with plants and grass makes the method very popular for with landscape photographers, and is a great way to diversify your portfolio.

There are a few ways to capture IR photos in-camera

As most digital cameras are somewhat sensitive to IR waves already, screw-in filters are a reasonably straightforward way to make IR photographs. They are, however, fairly expensive and significantly reduce the amount of light that reaches the sensor of your camera, thus also increasing exposure times. Infrared light also focuses at a slightly different point than visible light. Once the filter is on, you won’t be able to see much at all, a combination that makes for a difficult time focusing. Autofocus is also rendered useless.

You can also use a film camera with special infrared film. This type of film is quite expensive and requires special handling, but shooting IR photos with it requires no modification to your camera.

Your third option is to pay for your digital camera to be altered to capture infrared light exclusively. But the procedure is expensive, and involves altering the internal layout of the camera, meaning it will never photograph light in the visible spectrum again.

This simple tutorial will show you how to mimic the distinct, surrealistic effect of in-camera IR photography, without the hassle or expense of buying an IR filter, IR film, or doing a camera-overhaul.

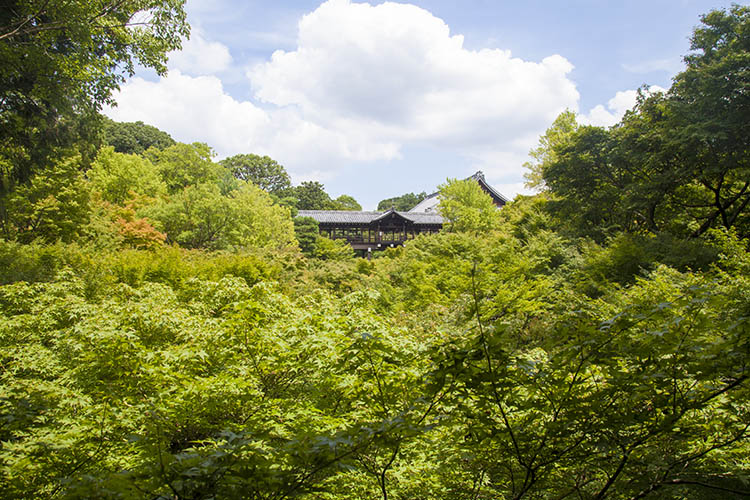
1Originalimage

Step 1 – Open our image in Photoshop

Open up your image with Adobe Photoshop. The image I’ve chosen for this tutorial has plenty of organic material in it, so the finished result will be pretty intense. However, if a subtler effect is what you are after, simply pick an image with less dense greenery. As demonstrated in the conclusion, sometimes less can be more with this effect.

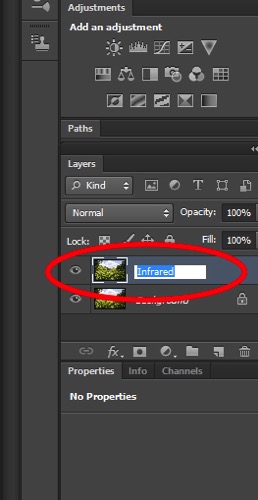
Now, duplicate the image layer via Image > Duplicate Layer or by using the shortcut CMD/CTRL + J. Rename this layer “Infrared” via the command box or by double-clicking on the layer name.

2Rename

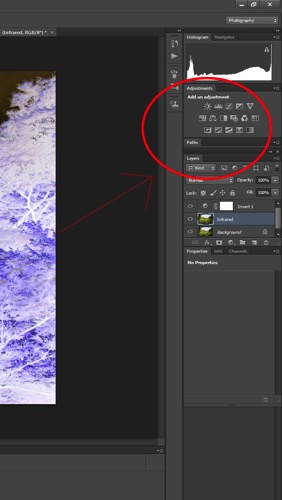
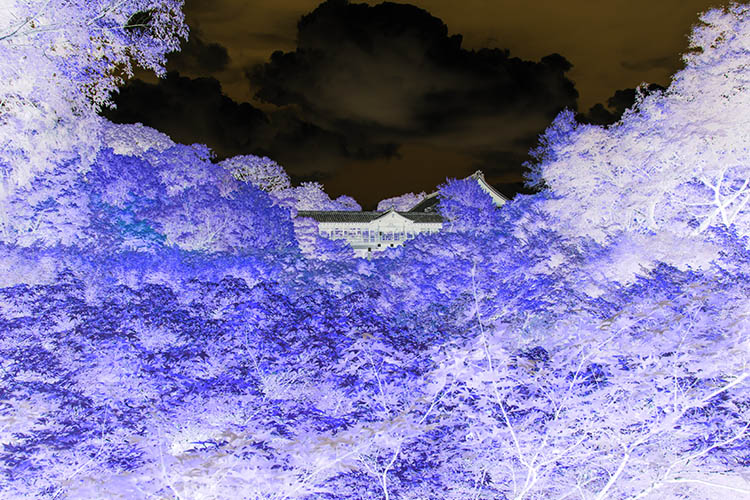
Next, invert the colors of the layer you just named “Infrared” by using the Invert option in the Adjustments Layer Panel. We will be using a few tools in the Adjustment Layer Panel. This method adds layers over the original image rather than directly editing it, which reduces the overall image quality and its ability to be altered again later if you change your mind. This is called non-destructive editing.

3Adjustmentlayers

Once the layer is inverted it will look like a color negative.

4Inverted

Step 2 – Blending Modes

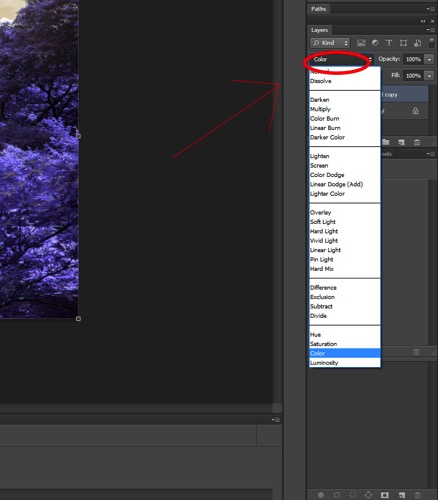
With the Invert Adjustment Layer selected, change the Blending Mode to Color, from the dropdown menu in the layers panel.

5Blendingmodesdropdown

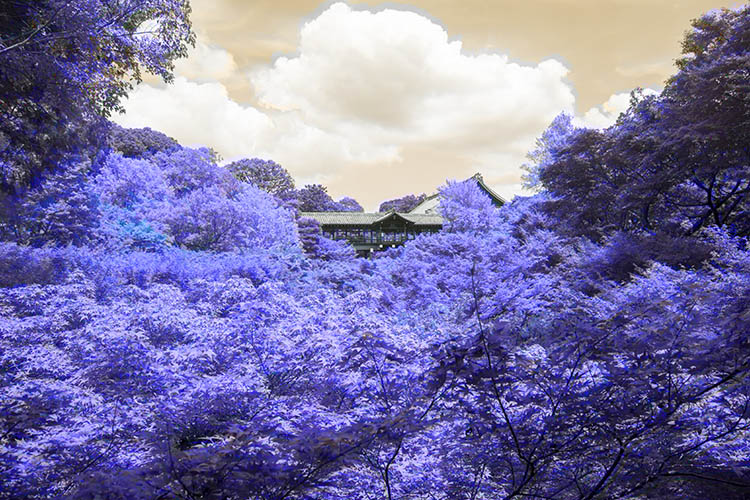
The image should now have a nice orange and blue tone.

6Color

Step 3 – Channel Mixer

Select Layer > New Adjustment Layer > Channel Mixer, or select the Channel Mixer icon in the adjustment layers panel.
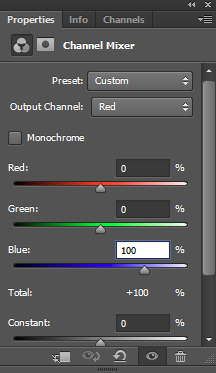
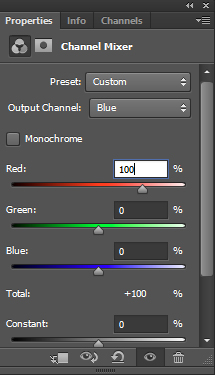
Now, in the Channel Mixer, first set the output channel to red, and move the red slider to 0. Move the blue slider to +100.

7colorbalance1panel

Then set the output channel to blue. Increase the red to +100 and move the blue slider to 0.

8colorbalance2

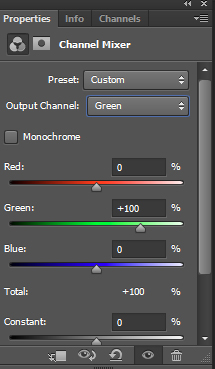
Leave the green output channel as it is, making sure that the green slider it is set to +100.

9colorbalance3

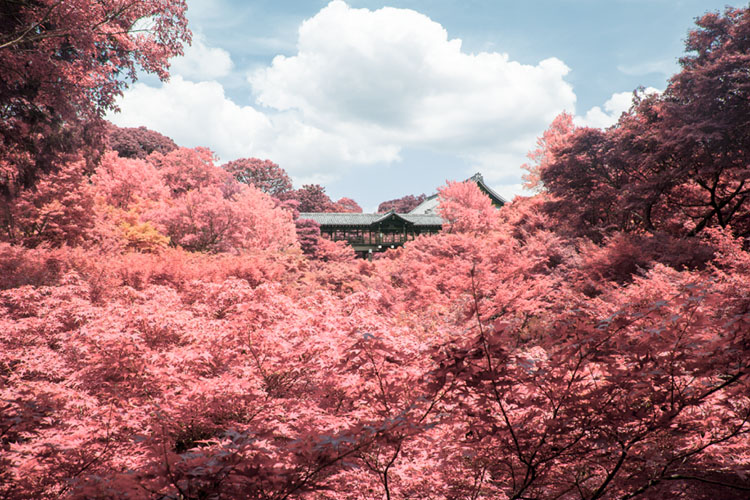
The image will now look a lot more saturated, color wise.

10Channelmixer

Step 4 – Hue and Saturation

This step is going to vary depending on what photo you have selected, but the overall goal is the same: isolating the pink/red colors and converting them to whitish/yellow color.

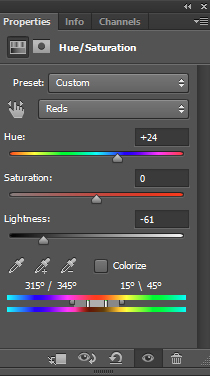
Make a Hue and Saturation adjustment layer via the Adjustment Layer Panel. Select the red channel. Reduce the saturation down so the result is almost grey.

Following this, adjust the hue slider until you get a hint of yellow. Feel free to play around with the other channels slightly to get the best results.

11HueSaturation

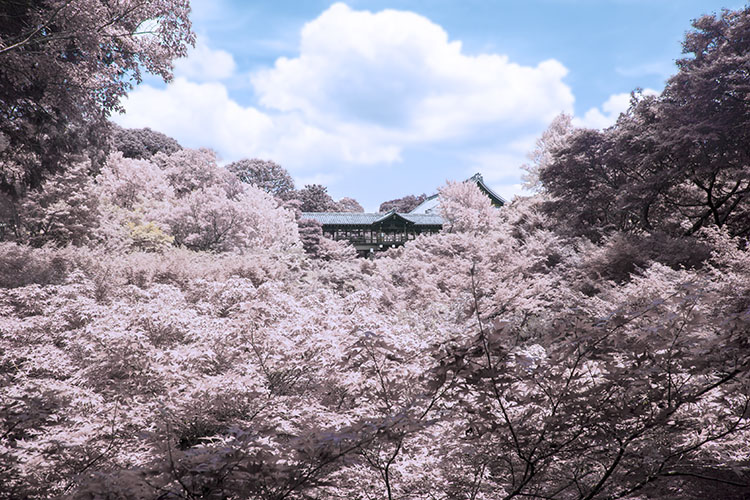
My image now looks more faded and subtle:
12Afterhuesaturation

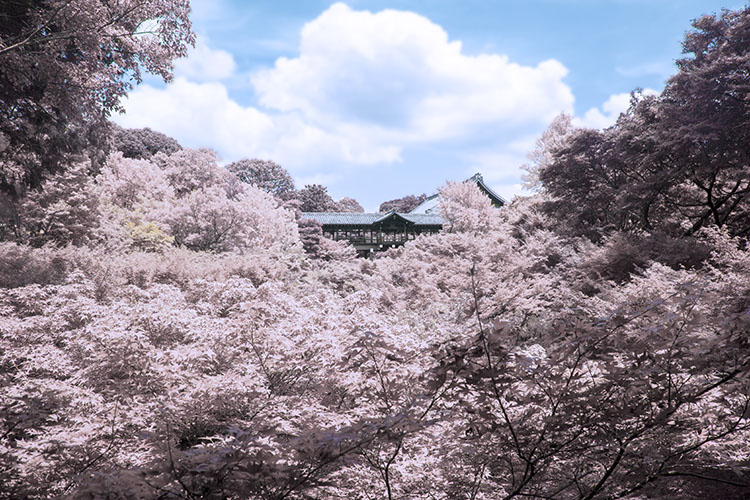
Step 5 – Finishing Touches

To finish up, I adjusted the contrast of the image using the Curves Adjustment Layer on the Adjustment Layer Panel.

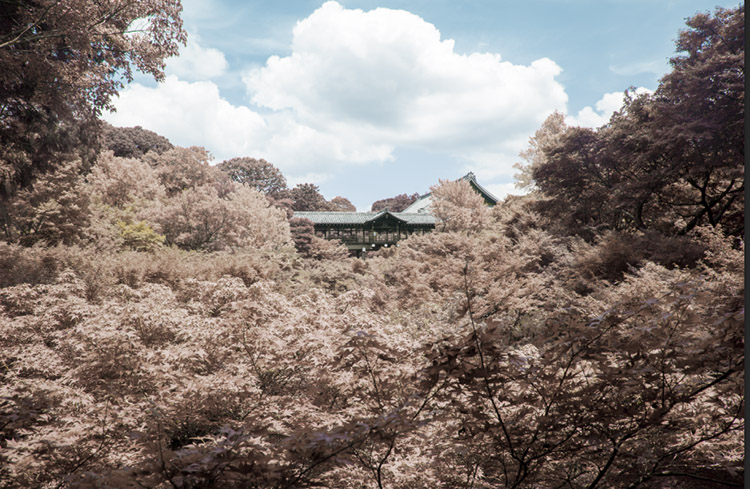
13Done

Other Examples

Here are some examples of other landscapes I’ve used this technique on:

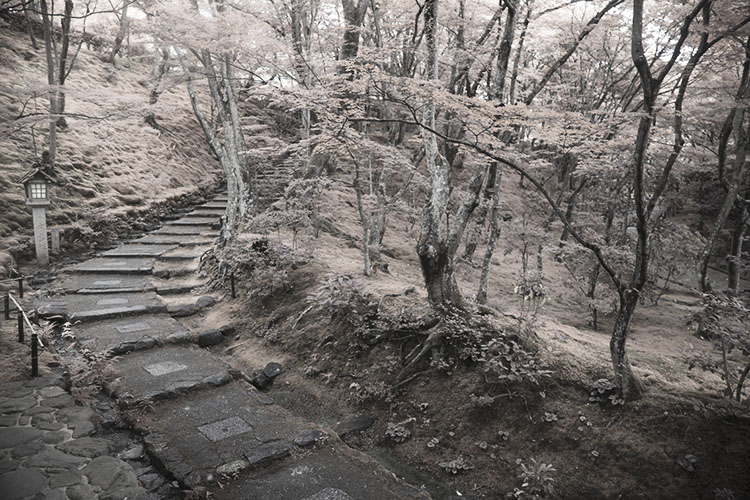
The image below started with little or no blue tones. The final image takes on the appearance of a black and white, hand painted with a slight yellow tone.

14Example1

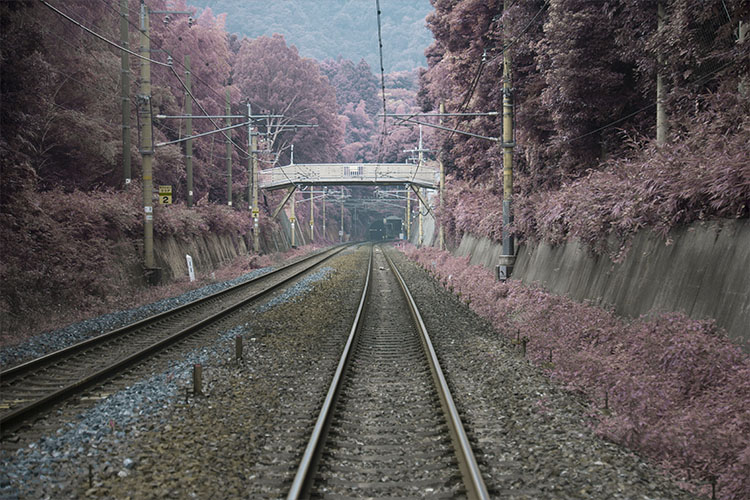
Inorganic material isn’t really affected by the IR treatment, so only the grass and plants in this image take on a surreal hue.

15Example2

I hope this tutorial was useful as a quick trick to diversify your landscape work.

Enjoy playing around with this technique, because the results are often unpredictable and can lend a completely different perspective to an image. Please share your questions and IR image results in the comments section below.

googletag.cmd.push(function() {
tablet_slots.push( googletag.defineSlot( “/1005424/_dPSv4_tab-all-article-bottom_(300×250)”, [300, 250], “pb-ad-78623” ).addService( googletag.pubads() ) ); } );

googletag.cmd.push(function() {
mobile_slots.push( googletag.defineSlot( “/1005424/_dPSv4_mob-all-article-bottom_(300×250)”, [300, 250], “pb-ad-78158” ).addService( googletag.pubads() ) ); } );

The post How to Create an Infrared Effect in Photoshop by Megan Kennedy appeared first on Digital Photography School.


Digital Photography School

 
Comments Off on How to Create an Infrared Effect in Photoshop

Posted in Photography


New infrared image of Orion Nebula surprises ESO researchers

12 Jul

ESO/H. Drass et al. Music: Johan B. Monell (www.johanmonell.com)

A new image from the European Southern Observatory in Chile is making researchers reconsider what they thought they knew about the Orion Nebula. The image comes courtesy of the Very Large Telescope’s HAWK-I infrared imager, and provides the deepest view of the nebula ever recorded. According to ESO, the imagery ‘reveals many more very faint planetary-mass objects than expected.’

Multiple infrared exposures were layered to get this new look into the nebula, and you can see a comparison of how the infrared images compare to visible light. ESO has made the videos available for download in resolutions up to 4K.

Articles: Digital Photography Review (dpreview.com)

 
Comments Off on New infrared image of Orion Nebula surprises ESO researchers

Posted in Uncategorized


Pentax launches limited-circulation 645Z IR, an infrared version of its medium format camera

02 Dec

Ricoh has announced it is to offer an infrared-sensitive version of its 645Z medium format camera, the 645Z IR. Sadly, the new model is not intended for public consumption, but will be aimed at museums and scientific establishments who will have to sign a usage agreement before they can make a purchase. 

The camera will be made sensitive to infrared by removing the IR-cut filter that sits in front of the sensor. The photographer will then need to fit a filter over the lens to cut visible light according to the requirements of the occasion. With a hot mirror in place the camera will operate as a normal 645Z, but without one the sensor will be able to record wavelengths of up to 1100 nanometers. 

Ricoh says that there is no provision for auto focusing when the camera is working with infrared light as the light focuses at a different distance to visible light, and advises owners to use the magnify function of the live view display on the rear tilting-LCD screen. 

Other than the removal of the IR cut filter the 51.4MP camera will operate in exactly the same way as the normal version – including the scene modes, compatibility with Flucards, wireless control from a smartphone and the ability to shoot HD video. 

Ricoh is offering the Pentax 645Z IR to museums, libraries, government agencies and research institutions for specialist operations, often involving forensic work or recording detail in artworks concealed by layers of paint or faded with time. Shooting with infrared sometimes makes visible what can’t be seen with the human eye. 

The company hasn’t made public the price, but says the camera will be available from 15th January next year.  

For more information see the Ricoh website (Japanese)

Articles: Digital Photography Review (dpreview.com)

 
Comments Off on Pentax launches limited-circulation 645Z IR, an infrared version of its medium format camera

Posted in Uncategorized


Fujifilm announces X-T1 IR for infrared photography

03 Aug

Fujifilm has introduced the X-T1 IR, a version of its flagship mirrorless camera designed specifically for infrared photography. The camera captures light from UV, visible, and infrared portions of the spectrum, from approximately 380-1000nm. Everything else is identical to the standard X-T1. Read more

Articles: Digital Photography Review (dpreview.com)

 
Comments Off on Fujifilm announces X-T1 IR for infrared photography

Posted in Uncategorized


5 Creative Ways to Process Infrared Photographs in Photoshop

21 Jun

Digital cameras have made the process of infrared photography relatively simple and very accessible, compared to the days of shooting with infrared film. No darkroom is required and all you need to get started is an infrared filter on your lens (click through to read my article on How to do Surreal Digital Infrared Photography Without Expensive Gear or Camera Conversions) and to mount your camera on a tripod. Maybe you’ve tried digital infrared photography already. You’ve learned all the correct infrared shooting and compositional techniques so you know you have great images in your camera, but how do you transform those strange looking red or violet frames into stunning infrared photographs?

Here are 5 creative ways to process your digital infrared images in Photoshop to create arresting photos in color, and Black and White.

1) Color infrared one-click post-processing method

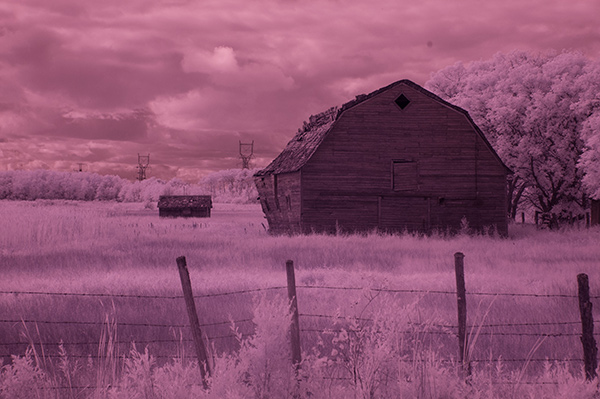
_DSC5456AsShot

As shot, before Auto Tone

This is the quick and instant method. Open your image in Photoshop and go to Image> Auto Tone. Look at the difference this one click makes! In fact Auto Tone should be the first thing you do to all your infrared images.

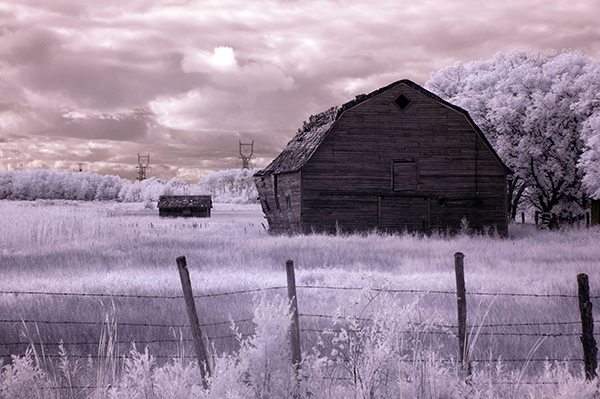
infrared image with autotone applied

Same image after Auto Tone has been applied

This has become a perfectly delightful infrared image. It has a variety of textures and colors for interest. However you may want to further process it to add more WOW and impact. The next step adds a few more tweaks that will help you do this.

 2) Color infrared gradient method

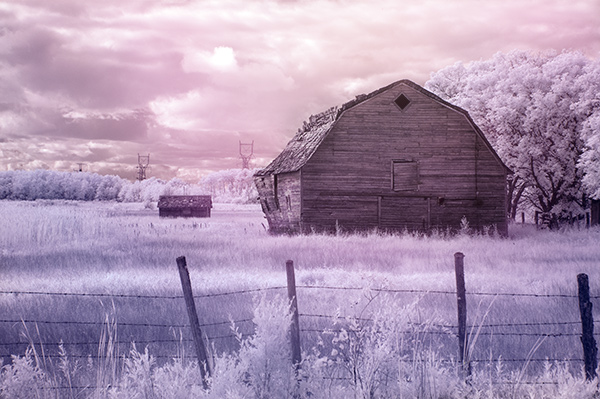
After you apply Auto Tone, you can also apply a Gradient Layer and set the blending mode to Soft Light, or Hard Light – you’ll need to experiment a bit depending on the tonal qualities of your original image. You can also adjust the opacity of this gradient layer.  If you are familiar with layer masks, you may want to mask out any areas where the gradient might be too strong.

Here is the same image with the Gradient Layer added. Can you see how it adds a little more depth and drama?

infrared image with post processing added.

Infrared Image with a Gradient Layer Added

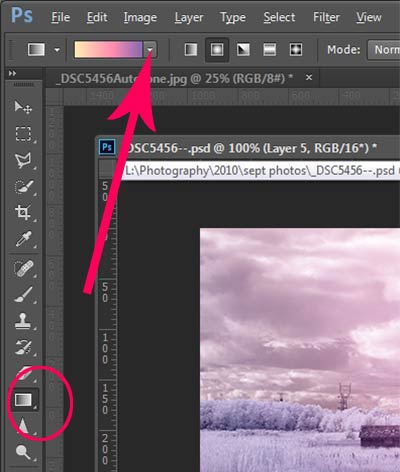
gradient-toolTo add a Gradient Layer, go to your Layers palette, and click on the new layer icon at the bottom (it’s the one that looks like a sheet of paper with the corner turned up) or you can use  the keyboard shortcut Shift+Ctrl+Alt+N.  I find it quicker to use the icon in this case. While this new layer is active, go to the Tools palette and select the Gradient tool. On the context menu on top of the window you’ll see the Gradient library and you can select your pre-set gradient from there.

Now, back on your layer, drag your mouse to get the gradient on your image.  Select the blending mode to soft light or hard light and then adjust the opacity. This is where your artistic eye comes into the picture.  Play around with these settings until you have something you like.

Here is another infrared image processed the same way. You don’t have to use the same gradient each time – experiment a bit and see how things turn out. It’s art after all!

infrared image with a gradient texture.

3) Using the Camera Raw filters and the Channel Mixer

One of the key concepts in infrared photography is to have a very distinct separation of color tones between the sky, and your high infrared reflecting subjects. This is usually the grass and foliage in your scene, or it could be buildings or other subjects that reflect infrared light because of their paint or construction materials.  But it’s important to have this separation because you need the sky to be dark, and you’ll want the foliage to be light, if not pure white.

Happily, in Photoshop you can give a tonal boost to your images in a couple of way,s in addition to the Auto Tone setting.  After you’ve applied Auto Tone, look for the Camera Raw Filter under Filters. If your image is not a RAW file you can still use these adjustments, although it is best to shoot RAW when capturing infrared photos.

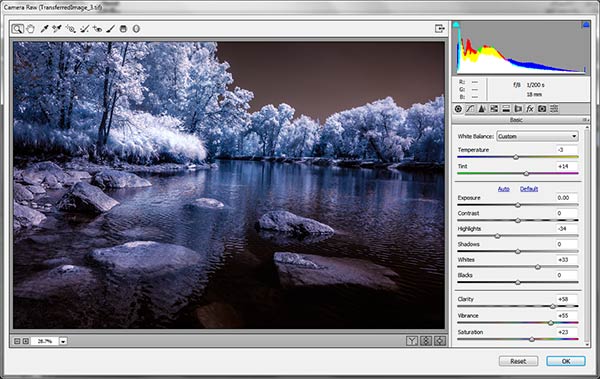
In the Camera Raw Filter, to get this color separation between the light and dark areas of your image, use the the Basics filters and  HSL/ Greyscale Slider to adjust the colors until you get a clear difference between the cyan and red shades.

 Original image as shot:

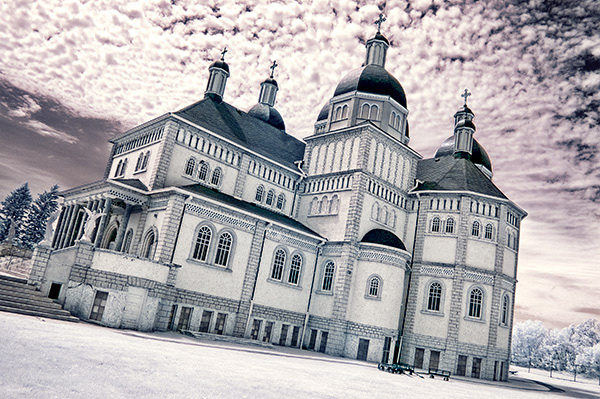
1as-shot-infraredimage

After applying Auto Tone and Using the Camera Raw Filters:

2cameraraw

Notice how these adjustments bring out the red in the sky and the blue in the leaves.

Now to the Channel Mixer

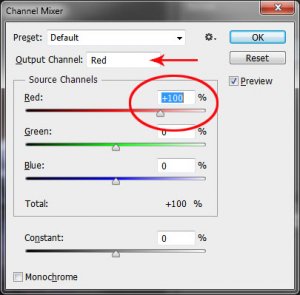
Go to Image>Adjustments>Channel Mixerchannelmixer

Here we will “swap” the channels to get a nice  blue sky and red or purple, and in a few quick steps, white foliage. Your Channel Mixer will look like this:

In the Red Output Channel, change the Red slider from +100 to 0, and the Blue slider from 0 to +100. Change the Output Channel drop-down to Blue, and make the Blue slider +100 and the red slider 0.  Your image will look something like this:

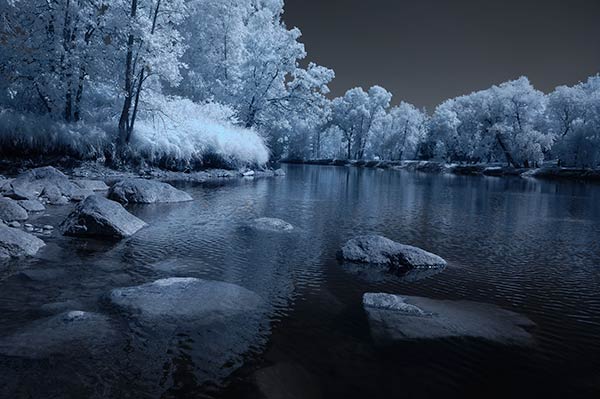
3infraredwithchannelmixer

There is a clear color difference now between the blue sky and the red foliage.  It doesn’t matter if the foliage of your image is purple and  the sky blue, as long as you can see a clear difference in colors with the sky having some shade of blue.

Now the last part. Go back into your Raw Filters, and in the Basic panel, move the White Balance Color Temperature slider to the left to get a nice blue sky.  In the HSL/ Greyscale tab, use the sliders in the Saturation tab to desaturate the colors of your foliage.  Your image should have a blue sky and white leaves and grass. Gorgeous!

The final image

4infraredwithcameraraw2-FINAL

 4) Instant Black and White infrared processing

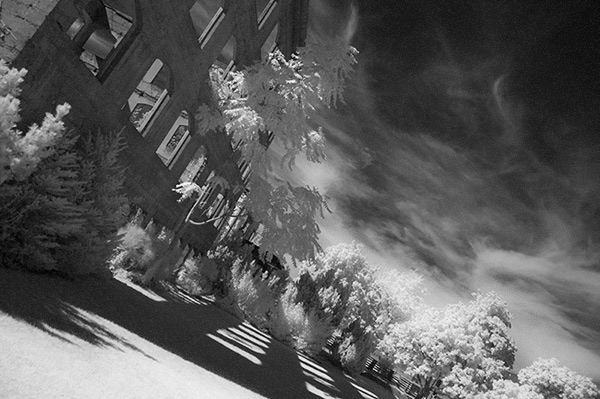
This is a “quick and dirty” method for getting the classic infrared look from your captures. You’ll get the tell-tale light colored foliage, and dark skies. For best results your image should have a clear sky with some clouds for effect. Overcast skies detract from the image, leave things without enough contrast, and very flat. No clouds make the sky seem like a vast black void – not too interesting.

2StepprocessingblackandwhiteinfraredClassic black and white infrared images tend to be non-contrasty, so from an artistic perspective a blue sky with wispy or puffy clouds can really add interest to your image, create a powerful story, and keep that soft contrast intact.

  1. Open your image in Photoshop
  2. Go to Image>Auto Tone
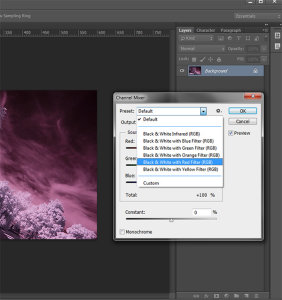
  3. Next go to Image>Adjustments>Channel Mixer>Black and White with Red Filter (From there you can adjust the sliders to get the effect you want)
  4. To get the classic infrared glow, check to make sure that in the Tools palette the colors are set to the default – black foreground and white background. To be sure, a simple way to set this is to hit the letter D to reset the colors to the default state.
  5. Then duplicate your layer (Ctrl J), and go to
  6. Filters>Filter Gallery>Artistic>Diffuse Glow
  7. In the Diffuse Glow filter, set the sliders so you can see some halo glows around the white areas of your image. You will have to adjust these to suit your image but it will create the classic graininess and glow of film infrared photos.

If the glow amount is too strong and you’re getting blown out highlights, you can decrease the opacity of your glow layer in the Layers Palette. A little experimentation goes a long way. Remember your History palette in case you want to go back a few steps.

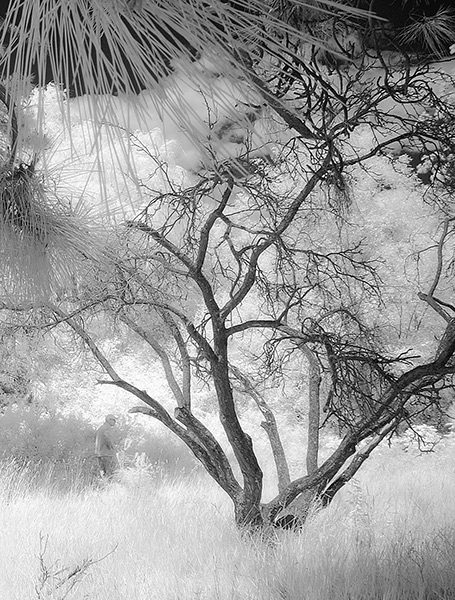
4blackandwhiteinfraredFianlwithglow

5) Advanced Black and White infrared processing

This is the method I use most for processing Black and White infrared images. It’s easy and it gives you far more control of your final result.

  1. Open your image in Photoshop
  2. Go to Image>Auto Tone
  3. Now create an adjustment layer for Color Balance.
  4. Layer> New Adjustment Layer> Color Balance

Again, the idea is to get as much color distinction between the sky and any foliage. Color Balance provides an addition method of doing this – in Black and White processing, as well as for color.

  • Move the sliders for Midtones, Shadows and Highlights until you have a nice, distinct separation of your color tones betweeb your foliage and your sky.
  • Finally add a new adjustment layer for Black & White
  • Layer> New Adjustment Layer> Black & White
  • Now use the sliders to get the full range of Black and White tones, paying special attention to maintaining detail in the white highlights in the trees, while making sure that the dark areas also have some detail
  • To apply the infrared glow, follow from Step 5 in the first method.

This image is called CREEP. Can you see why?

blackandwhiteinfrared

flowerheartCW

I love the softness and translucency of Black and White, infrared photography. Post-processing really brings out all the infrared characteristics that draw viewers in, and gets the emotions flowing. Using these five processing techniques will get you off to a fine start, but these are only five of many ways you can process your digital infrared images in Photoshop. If you have a favorite post processing formula I’d love to see how you do it. Post your infrared shots too.

The post 5 Creative Ways to Process Infrared Photographs in Photoshop by Alex Morrison appeared first on Digital Photography School.


Digital Photography School

 
Comments Off on 5 Creative Ways to Process Infrared Photographs in Photoshop

Posted in Photography


How to do Surreal Digital Infrared Photography Without Expensive Gear or Camera Conversions

17 Jun

Photos made with invisible infrared light, rather than visible light, yield wildly strange and eerie photographs that always have the “WOW Factor.”  For landscapes or scenic imagery, infrared (IR) photography is highly regarded as fine art. But back in the days of film photography, shooting infrared was complicated, expensive and the results were often not great. For those with determination though, that one image that did ‘work” was always worth the trouble.
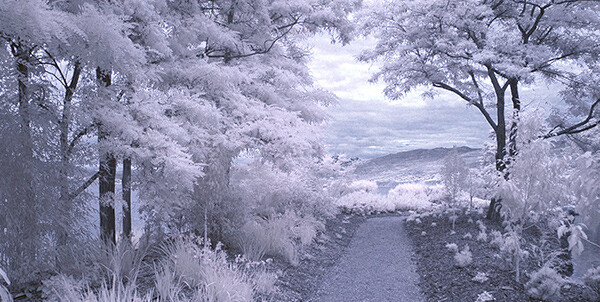
But now the complexity of capturing infrared photos has changed – digital cameras have made the technique almost foolproof, inexpensive, and a lot of fun! All you’ll need is a tripod, a special infrared filter, and any camera that is sensitive to infrared light. With a few easy steps you’ll be shooting infrared photos in no time at all.

But before I get into the process, it’s not my intention in this article to delve into the physics of infrared light, and all the scientific mumbo jumbo that goes along with understanding WHY infrared light creates amazing images, but rather to give you some simple steps to get you started in this super creative technique.
_DSC1747W

Visible Light Black and White Image

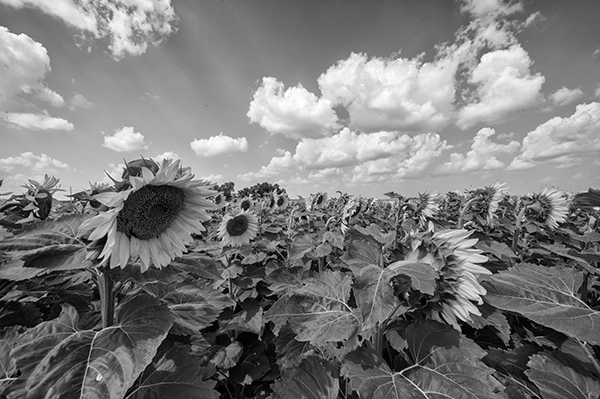
Just know that anything that is alive will reflect a greater amount of infrared light than inanimate objects. Leaves, foliage, and grass, along with skin, reflect the greatest amounts of infrared light, and so will be the whitest objects in your image. Stones, concrete, mountains, water and sky tend to absorb infrared light and so appear as darker objects in your images.  The tonality is very different from that of visible light black and white photography though. Notice how the tones of the leaves, seeds and sky are quite different in the infrared image below.

Digital Infrared Image

Digital Infrared Image

Okay, are you ready to give this a try? Here are the simple steps you need to follow so your images will turn out into hauntingly beautiful, surreal infrared photographs. The first steps deal with equipment and settings, and the last steps are all about how to best capture beautiful infrared light.

Step 1: Test your Camera

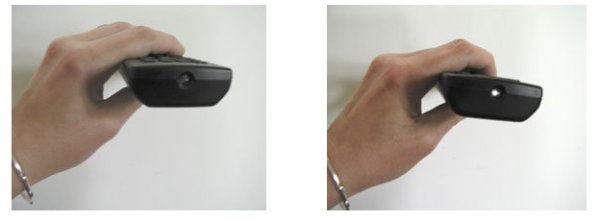
Before you go out and buy an infrared filter test your camera to make sure it’s sensitive to infrared light.  Not all digital camera sensors are able to “see” infrared light. In fact the newer the camera, the less sensitive to infrared light it may be. Try this simple test to see if your camera will give you good results.
Testing your camera for infrared sensitivity.

Testing your camera for infrared sensitivity.

Hunt down a TV, VCR or DVD player remote control. Look at the end that points to the TV (or VCR etc), and you’ll see a little bulb or flat back plastic window. This is the transmitter that sends the signal from the remote to your device. That signal usually uses infrared light. You can see that it is invisible light – i.e. when you look at the remote with your eye, you can’t see anything when you press the buttons. But just wait until you do this looking through your camera! You’ll be able to see invisible light – the infrared spectrum that makes such cool photos.

If you have a point & shoot camera look through your LCD viewer while pressing any button on the remote. If you see the bulb light up, your camera can see infrared light.  If you have a DSLR you’ll have to take a photo to see the results, or if you camera has a live view feature, you will be able to see the the results on your LCD as well.

The whiter and brighter the light you see from the remote, the more sensitive your camera is to infrared. If the light is more purple or red your camera may not be a good candidate for shooting infrared photos.

Step 2: Equipment

If your camera passed the sensitivity test, you’ll need two more pieces of equipment before you can shoot infrared photos, a tripod and an infrared filter. The tripod will help you take a sharp shot, as your exposure times will be quite long. The filter will  block most of the visible light from reaching your camera sensor, but will allow the beautiful infrared light to pass through.

When I first started shooting infrared images, I used  a Hoya R72 screw-on infrared filter. B+W, Tiffen and other manufacturers also have equivalent infrared filters.  If you are using a slide in filter system, such as Cokin or Lee, they also make infrared filters to work with their holders. If this is the filter you’ll be using, make sure to slide it into the slot closest to the camera to prevent unwanted visible light from sneaking in. The R72 refers to the amount and type of infrared light that passes through to your sensor and I recommend using this to start. It allows some visible light to pass to the sensor so it will allow you do to all sorts of creative post processing with your images.
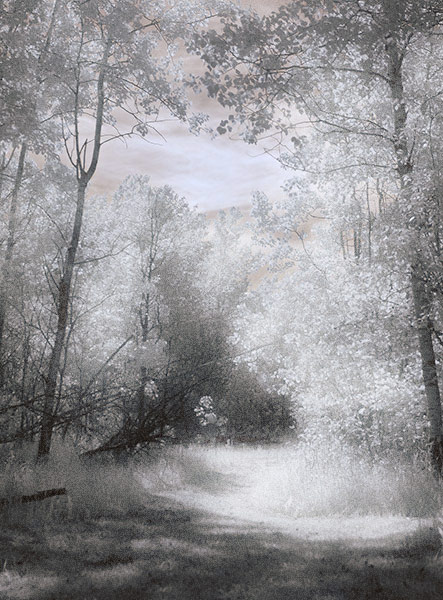
Infrared Image with creative post processing.

Infrared Image with creative post-processing

Step 3: Camera settings

Because the infrared filter blocks out most of the visible light, your exposures will be quite long. You’ll have to adjust your camera settings to ensure you get a good exposure, while keeping noise to a minimum.  Set up your camera on your tripod and make these adjustments:

  1. Set your ISO between 200 and 400, keep it as low as you can
  2. Set your Long Exposure noise reduction to ON
  3. Set your camera to shoot in RAW mode
  4. Set your camera to Aperture Priority (Av mode on a Canon), and your aperture to around f/8 for maximum sharpness
  5. If your camera does auto bracketing (refer to your owner’s manual), set your bracketing to +/-1 EV.  Your series should be -1 EV, 0 EV, good exposure, and + 1 EV. You can also bracket manually.

Shooting in RAW will give you a bit more latitude for processing and adjusting.  Bracketing will help you find the sweet spot for exposure at your preferred aperture and ISO.

I’m not going to go deep into the White Balance setting, as this could be an entire article on its own. But for now set your White Balance to the Sunny or Daylight preset.

Step 4: Composition

Just as in regular light photography, composition is a critical component of infrared photography. However there are a few additional considerations to keep foremost in your mind when planning your infrared composition.
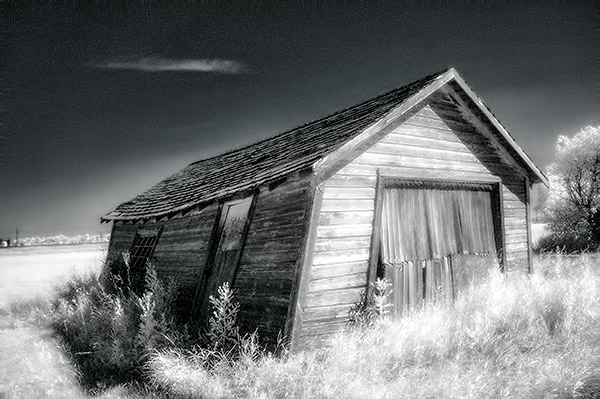
A variety of textures make the image more dynamic.

A variety of textures make the image more dynamic.

Infrared photography is similar to black and white photography, in that you are dealing with a limited number of tones. To add more dynamism and energy to your infrared shots, add contrasting elements. By this I mean using dark and light objects in close proximity to each other. But also use smooth and textured objects together. You can mix and match for artistic composition and design.

 COLUMN 1  COLUMN 2
  • light
  • white
  • smooth
  • large patterns
  • light with fine textures
  • light with large textures
  • dark
  • black
  • textured
  • small patterns
  • dark with fine textures
  • dark with large textures

In every infrared shot you make, include at least one element from Column 1 with the corresponding one from Column 2. You can add as many elements as you want, but it’s best to keep your composition simple. You can use light and small patterns, with dark and large patterns and so on. Foliage and clouds will always be a light element in your image; the sky, stones, bark, water  and concrete will be darker. Leaves from a distance are a rough texture, with many small elements appearing rough and textured; while human skin is very smooth.  This should give you a great starting point for infrared compositional considerations.

Step 5: Shooting Infrared

There is only one critical thing to remember when shooting infrared – you must shoot when there is lots of sunshine, and in the summer when there is lots of deciduous foliage. Overcast days won’t give you great results, and because living things reflect the most infrared light, snowy winter days are usually devoid of anything that reflects infrared.  If there are clouds in the sky these can add an element of interest, but don’t make your capture until the sun is out, and shining on your subject.

Find a great place to shoot and adjust the settings on your camera. I like graveyards, parks, and old abandoned buildings. The contrast between the stones, the pathways, the old wood and leaves and grass provides outstanding tonality for infrared images. If you can get a few wisps of cloud in your sky all the better.

Put your camera on your tripod, and compose your image. Place the infrared filter on your camera, and use your autofocus as usual. Yes, it works just fine for infrared photos! Your light meter will work too but be sure to bracket on either end to make sure you have at least one usable exposure. Then click the shutter.  You’ve just made an infrared photograph.
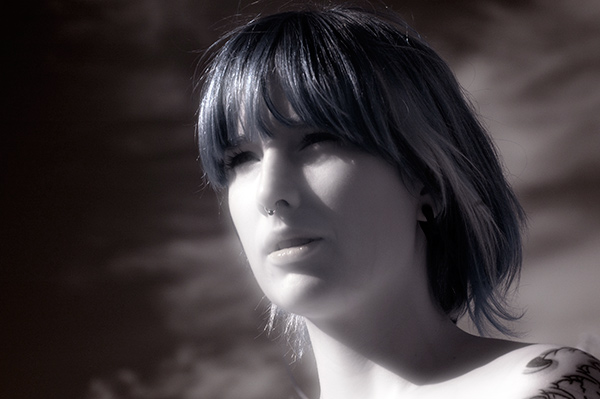
Skin looks like alabaster when shot using infrared light.

Skin looks like alabaster when shot using infrared light

For techniques and ideas for post-processing our infrared images, watch for my article on post processing infrared photos coming soon!

The post How to do Surreal Digital Infrared Photography Without Expensive Gear or Camera Conversions by Alex Morrison appeared first on Digital Photography School.


Digital Photography School

 
Comments Off on How to do Surreal Digital Infrared Photography Without Expensive Gear or Camera Conversions

Posted in Photography


In Photos: Iceland captured in infrared

07 Jun

kirjufell.jpg

Iceland, it seems, is extremely photogenic. Photographers traveling the country routinely emerge with stunning photos of mountains and waterfalls. Visiting for the first time, Andy Lee saw an opportunity to bring out even more of the drama in the country’s already dramatic landscapes. He used a DSLR converted for infrared photography, capturing the scenery in deep blues and blacks. See gallery

News: Digital Photography Review (dpreview.com)

 
Comments Off on In Photos: Iceland captured in infrared

Posted in Uncategorized


Deutche Börse Prize winner captures conflict in infrared

01 Jun

The_Enclave_2_600.jpg

An ongoing war in eastern Congo has killed more than 5 million people since it started in the early 1990s. How do you draw attention to an armed conflict the world is largely ignoring? Photographer Richard Mosse spent years in the region documenting combatants with infrared film to make the camouflaged soldiers of the Democratic Republic of Congo stand out rather than blend in with their surroundings. Last week, Mosse won the Deutche Börse Photography Prize for his installation The Enclave. Read more

News: Digital Photography Review (dpreview.com)

 
Comments Off on Deutche Börse Prize winner captures conflict in infrared

Posted in Uncategorized


How to Shoot Nude with an Infrared Camera

13 Feb

Jean-François O’Kane, The Studio Coach, shows how to use an infrared camera in studio. His infrared Olympus camera was modified by PrecisionCamera.com www.thestudiocoach.com www.jeanfrancoisokane.com