Fujifilm has announced a special version of its 100MP GX100, for infrared imaging. Photography is possible at up to 400MP, courtesy of a new ‘Pixel Shift Combiner’ feature The new camera will be available for special order in early 2021.
Press release:
Fujifilm Introduces FUJIFILM GFX100 IR (Infrared) Large Format Mirrorless Digital Camera
Valhalla, N.Y., November 25, 2020 – FUJIFILM North America Corporation is pleased to announce the launch of FUJIFILM GFX100 IR digital camera (GFX100 IR), a uniquely specialized version of its GFX100 large format mirrorless digital camera, now with infrared image-making capabilities, which can be produced upon order for professionals in forensic, scientific, and cultural preservation fields. Infrared images can now be made at 100MP – and even at 400MP through GFX100 IR’s new Pixel Shift Multi-Shot function – to reveal intricate details within a subject or scene that can only normally be seen through the infrared spectrum.
GFX100 IR also includes the ability to:
Make images in the infrared spectrum at an incredible 100MP or 400MP of resolution
Images made of a subject within the infrared spectrum can reveal details that a regular (non-IR) digital camera or the naked eye cannot see. For example, in the field of forensics, this can be an important tool in helping to identify counterfeit documents. For individuals working in cultural preservation, GFX100 IR can be used to analyze pigments in works of art and historical artifacts, even if they have degraded over time. Using the Pixel Shift Multi-Shot feature on GFX100 IR can create 400MP images with incredible detail and little-to-no color fringing.
“Using GFX100 IR with the Pixel Shift Multi-Shot feature is invaluable for cultural research because reviewing images in infrared could lead to unlocking the secrets of some of history’s most treasured artifacts,” said Victor Ha, senior director of marketing and product development for FUJIFILM North America Corporation. “It can also be an incredibly powerful tool for researchers using the images to evaluate works of art or pieces of evidence.”
Use special filters to make images within specific wavelengths
Different IR filters in front of the camera lens can be used to make images at various wavelengths, which can reveal different details within a subject. However, using the appropriate IR cut filter will allow GFX100 IR to be used normally (i.e. in the same manner as the standard FUJIFILM GFX100 digital camera) to make regular, color images within the visible spectrum.
Additionally, when the camera is set in a fixed position and paired with Capture One or a similarly compatible software application to engage tethered capture functionality, users can create images with the same angle of view. This enables them to maintain a simple capture to output workflow for maximum efficiency.
Availability
GFX100 IR is designed for forensic, scientific, and cultural preservation applications, and the product will not be made available to general photographers or customers for personal use. GFX100 IR will only be offered by specific, Fujifilm authorized retailers, and sales of GFX100 IR will be subject to a GFX100 IR User Agreement, which sets out the specific terms of use for the camera. GFX100 IR is currently expected to be available in the first quarter of 2021.
NASA’s Stratospheric Observatory for Infrared Astronomy (SOFIA) has used its onboard Faint Object infrared Camera for the SOFIA Telescope (FORCAST) to discover water molecules on the sunlit surface of the Moon. For the first time, there are indications that water may be distributed across the Moon’s surface, and not limited to just cold, dark areas of the lunar surface.
SOFIA’s infrared camera, used in conjunction with a 106-inch diameter telescope, picked up ‘the specific wavelength unique to water molecules, at 6.1 microns, and discovered a relatively surprising concentration in sunny Clavius Crater.’ This crater is one of the largest craters visible from Earth and is in the Moon’s southern hemisphere.
Casey Honniball is the lead author who published the results as part of her graduate thesis work at the University of Hawaii at M?noa. She is now a postdoctoral fellow at NASA’s Goddard Space Flight Center in Maryland. Of the discovery, Honniball says, ‘Prior to the SOFIA observations, we knew there was some kind of hydration. But we didn’t know how much, if any, was actually water molecules – like we drink every day – or something more like drain cleaner. Without a thick atmosphere, water on the sunlit lunar surface should just be lost to space. Yet, somehow we’re seeing it. Something is generating the water, and something must be trapping it there.’ If you’d like to read the full paper, it has been published in Nature Astronomy.
Data gathered using SOFIA’s onboard camera shows water in Clavius Crater in concentrations of 100 to 412 parts per million, ‘roughly equivalent to a 12-ounce bottle of water trapped in a cubic meter of soil spread across the lunar surface.’ Paul Hertz, director of the Astrophysics Division in the Science Mission Directorate at NASA Headquarters says, ‘We had indications that H2O – the familiar water we know – might be present on the sunlit side of the Moon. Now we know it is there. This discovery challenges our understanding of the lunar surface and raises intriguing questions about resources relevant for deep space exploration.’
It’s not a lot of water, about 1% of the water found in the Sahara desert, but it’s a significant discovery. The work of the SOFIA team has uncovered new questions about how water is created and how it persists on the airless Moon. Further, water is a critical resource in deep space exploration. NASA’s Artemis program is keen to learn more about the presence of water on the Moon, and ideally, discover a way to access water in its pursuit of establishing a sustainable human presence on the Moon by 2030.
‘Water is a valuable resource, for both scientific purposes and for use by our explorers,’ said Jacob Bleacher, chief exploration scientist for NASA’s Human Exploration and Operations Mission Directorate.’ Bleacher continues, ‘If we can use the resources at the Moon, then we can carry less water and more equipment to help enable new scientific discoveries.’
As to how the water molecules ended up on the surface remains an unanswered question. One theory is that ‘Micrometeorites raining down on the lunar surface, carrying small amounts of water, could deposit the water on the lunar surface upon impact.’ Another theory involves a two-step process ‘whereby the Sun’s solar wind delivers hydrogen to the lunar surface and causes a chemical reaction with oxygen-baring minerals in the soil to create hydroxyl’ which is then transformed into water by radiation from micrometeorites.
‘This illustration highlights the Moon’s Clavius Crater with an illustration depicting water trapped in the lunar soil there, along with an image of NASA’s Stratospheric Observatory for Infrared Astronomy (SOFIA) that found sunlit lunar water.’ Image and caption credits: NASA/Daniel Rutter
SOFIA, which is a modified Boeing 747SP jetliner, typically focuses on very distant objects, such as black holes, galaxies and star clusters. In fact, the newly-published results are from SOFIA’s very first mission looking at the Moon. The team was essentially testing the tracking capabilities of its equipment, and this test produced a significant discovery. Additional flights will take a further look at the lunar surface.
SOFIA’s standard observations take place during a 10-hour overnight flight and captures images at mid- and far-infrared wavelengths. You can view some of the images it has captured by clicking here.
This is far from the first time NASA’s camera technology has produced meaningful, significant scientific discovery. Looking to the future, NASA’s Perseverance is currently about halfway to Mars, carrying a rover outfitted with a record-breaking 19 cameras. These cameras will capture incredibly detailed images of the Martian landscape.
The post 4 Ways to Create Awesome Infrared Images appeared first on Digital Photography School. It was authored by Simon Bond.
A really interesting form of photography that can transform your images is infrared photography. This form of photography has been around for a long time, and today, you’ll discover how to make your own infrared images. Anyone can do this, and it’s possible to do with minimal or even no extra equipment at all. So read on and find out how you can enhance your photographs today.
Infrared works very well as a long exposure, especially with moving water.
1. Infrared photography with an infrared filter
The first and most accessible way for photographers with a digital camera to get into infrared photography is to buy a filter. Filters work by filtering out all light except infrared. This will lead to an infrared image rendered onto your camera sensor.
The imperfect solution
Using a filter is the quickest route into this genre of photography, but it’s not without it’s problems. The fact is your camera is built to resist infrared light, a fact that has both positive and negative results for you as a photographer. Let’s take a look at some of the factors you’ll need to consider.
Camera sensor – Different cameras will work better or worse when it comes to infrared photography with a filter. This comes down to how strong the filter that blocks infra-red light hitting your camera sensor is. A strong filter will mean you’ll need longer exposures, and the results are not always as strong.
Light leaking – With the long exposures needed it’s important to cover area’s of the camera that allow light in, other than of course the lens. If you fail to do this you’ll find light leaks in, effecting the outer area’s of your image. The most obvious area that needs covering on a dSLR camera is the viewfinder.
Camera noise – If your camera is not sensitive to infrared light you’re going to have two choices, both will lead to digital noise on your image. Those choices are upping the ISO, to allow a shorter long exposure, or exposing for several minutes in bulb mode.
In this photo the clouds in the sky work very well for infrared. There is also a lot of green leaves photosynthesizing.
The need for long exposure
As mentioned infrared photography with a filter requires long exposure, however this can often really add to your image. You’ll need a tripod, a way for triggering your shutter remotely, and you’ll need to cover your camera to prevent light leaking in. Using long exposure is often the choice of many landscape photographers anyway, so what will you gain? If you’re photographing anywhere with moving water or clouds, then you’ll capture their movement with long exposure. Coastlines and seawater are somewhat different in that it will flatten the water, again often a desirable effect.
This image shows an infrared photo without white balance adjustment.
Which filter?
There are plenty of options when it comes to filters you can buy. Obviously, as with different manufacturers, the results will vary, and you’ll need to choose a filter that suits your style. However, all of these filters will do the same thing, and that is filter out infrared light. The photos in this article were produced using the Hoya R72 filter.
The white balance
To get to your desired result with an infrared filter, you’re going to need to adjust the white balance. You’ll usually want to do this in post-processing, however, it’s also possible to do it in-camera.
The method needed to do this in-camera is as follows:
Compose your photo and aim at some grass that is well-lit by the sun – it needs to be photosynthesizing.
Use an exposure of 10 or 20 seconds – enough to correctly expose the photo.
During the exposure, which in this case can be handheld, move the camera around so you get a blurred photo.
Your image should now be red, with no sharp portions to your photo.
Now go to your camera’s white balance settings.
Select the custom white balance option.
Select the photo you have just taken, and use this to set the custom white balance. It will now set everything that is red in your image and make it white.
In this scene, I adjusted the camera’s custom white balance.
Post-processing required
If you chose not to use the camera’s custom white balance, then you’ll now need to process your image. You’ll have a RAW image that is mostly red. You can now decide whether to process for a color infrared image, or a black and white one. In both cases, you’ll need to adjust the red and blue channels to achieve this.
Post-processing is used here from the red image above, and a color infrared was produced.
2. Modify your camera to produce infrared images
Those more serious about infrared photography can look into modifying their camera. It’s important to mention that once modified, your camera will only be useful for infrared photography, so don’t get this done with your main camera.
Those that go down this road often have a second camera body, which they’re prepared to dedicate to infrared photography.
What’s involved?
Remember that most camera manufacturers produce cameras that block out infrared light? You will modify your camera to remove that infrared blocking filter in front of your camera sensor and put an infrared filter in place. That’s the process, and now your camera will be sensitive to infrared light.
What are the advantages?
You can now use this camera more like a regular camera, instead of only being able to take long exposure photos. That means techniques like panning and infrared are possible. You’ll be able to use fast exposures to capture moments. In other words, you will regain full artistic control of your camera, just now it only photographs in infrared.
Cityscapes can work well with infrared. This one has a sepia tone.
3. Film photography and infrared
Infrared images have been produced for a long time, and certainly predate digital photography. It’s possible to take beautiful infrared images with film, though you’ll need to get film that specifically for this form of photography.
An infrared filter used on a digital camera won’t be needed this time, as the film itself exposes for infrared light. However, you may well consider using filters anyway. The same filters that enhance regular black and white photos can also do the same for infrared. That means the classic yellow, orange, and red filters should be in your camera bag. Should you choose to use an infrared filter this will certainly work, but again it will block most of the light, meaning you’ll be taking a long exposure.
The technique creates a dreamscape mood for your photos.
4. Producing infrared images in post-processing
The last method to produce infrared images is post processing.
That means you can choose any of your existing photos, and process them to replicate the infrared effect. It’s worth choosing a photo that would work well if it were photographed as an infrared.
Think of a landscape photo with plenty of green foliage, and a blue sky with one or two clouds. Those wishing to learn how to process their images in this way can do so by reading this article.
Long exposure and reflection on water is a good combination.
Time to create your infrared image dreamscapes!
This article has given you all the information needed to create infrared images, or where to find that information.
Have you tried out this form of photography? If so, which of the above methods did you use, and do you have a preference?
Infrared photography is fun. If you’re waiting to get out on a sunny day, why not try the post-processing route? If you have any infrared images already, why not share them in the comments? We love to see your images!
The post 4 Ways to Create Awesome Infrared Images appeared first on Digital Photography School. It was authored by Simon Bond.
The post Simulating False-Color Infrared Photography in Photoshop appeared first on Digital Photography School. It was authored by Adam Welch.
Let’s get right down to it and say that today, things might get a little weird. The techniques we’re about to discuss aren’t for everyone or every photograph. With that said, I’m about to show you something extremely cool. You’re about to learn how to simulate color infrared photography in Photoshop.
More specifically, I’m going to show you how to approximate the looks of the legendary color infrared film stock, Kodak Aerochrome.
The best part is, this technique is infinitely customizable.
Let’s dive in and enter the overtly surreal world of infrared color photography in Photoshop.
What is false-color infrared photography?
Simply put, infrared photography makes use of wavelengths of light which fall outside the visible spectrum. Specifically, those which range from about 700 nanometers to about 1mm.
Don’t worry, that’s about as deep as we’re going to go into science with this tutorial.
The important thing to note is that while infrared photography stems from this invisible form of light, we can still use it to form photographs – even in color.
This is where the “false-color” aspect comes into play. In particular, the Aerochrome “look.”
The Aerochrome Effect
Kodak Aerochrome is/was an infrared-sensitive, false-color reversal film.
It was specifically produced for practical uses in aerial photography applications for forestry and camouflage detection, as well as other scenarios where specific infrared reflectance photographs could be useful.
For our purposes, it produces some highly interesting effects as far as colors are concerned.
Primarily, vegetation with high amounts of chlorophyll content appears as pinkish-red instead of the normal green color. This has led some notable photographers and filmmakers to make use of Aerochrome to produce stylistically creative images.
Luckily for us, we can come close to producing this effect with just a few quick tricks inside of Adobe Photoshop.
What images work best?
Naturally, seeing as the original color effects of the false-color Aerochrome worked best with green vegetation containing large amounts of chlorophyll, this is the main subject matter that will work best for our simulation.
However, it’s still fun to experiment with different images ranging from landscapes to portraits, street photography and still life. The results can range from the mundane to the aesthetically startling.
That’s enough of the background. Let’s go through step-by-step and explain how you can produce a digital simulation of the false-color infrared photography effect right inside of Photoshop.
How to simulate false-color infrared photography
The basis of our digital, false-color infrared simulation, centers around switching around the color channels of our photo.
Photoshop allows us to accomplish this switch quite easily using color channels.
Not only that, but we can further tweak the look of our photo to achieve exactly the colorization effects we want. This arguably makes this method more convenient and controllable than its analog counterpart.
To get started, I’ve brought an image into Photoshop that contains a relatively large amount of greens.
The first step is to make a copy of the base layer. With this layer selected, use the keyboard shortcut ‘Ctrl+J’ (Cmnd+J for Mac) to copy the layer.
Next, we’ll invert the layer we’ve just copied by using the keyboard shortcut ‘Ctrl+I’ (Cmnd+I for Mac).
Note the readily apparent psychedelic change. We have essentially converted the photo to a negative image.
From here, we’ll change the blend mode to ‘Color’. Alternatively, the ‘Hue’ blend mode will produce similar results.
With the blend mode changed to ‘Color,’ much of the heavy lifting is already done for us. Next, we’ll need to switch around the color channels to make the false-color infrared effect become more apparent.
Remember, we’re looking for a reversal of certain colors; namely blue and red. This is easily done using the “Channel Mixer.”
Select the ‘Channel Mixer’ icon to add the mixer adjustment. This is where the magic happens. And it couldn’t be easier.
Select the red channel from the drop-down and set that slider value to ‘0.’ Next, set the blue slider to ‘100.’
From here, select the blue channel. Set the red slider to ‘100’ and blue slider to ‘0.’
What we’ve done is ‘reversed’ the blue and red channels much the same way as false-color, infrared photography does with infrared color-reversal film.
At this point, our core processing is completed. However, there are other ways to make the effect much more refined depending on your photo.
Fine adjustments of your false-color infrared photography
While we have finished the bulk of the false-color infrared conversion, we can go a bit further and adjust the hues and color temperature of our photo. After all, this effect is not born simply from Aerochrome film but also the filters used during shooting and the subject matter itself.
Hue and Saturation
The greatest control over the effect comes from adjusting the hue and saturation of the false-colors we’ve just created. We can adjust these by creating a ‘Hue and Saturation’ adjustment layer.
Use the hue and saturation to dial in the exact look you like.
Color Temperature
When shooting with true infrared color-reversal film, such as Kodak Aerochrome, you must use lens filters.
Often times these are yellow and orange color filters which generally “cool” the tone of the colors within the image. We can simulate this by adding a “cooling” filter in Photoshop. This is optional, but I find it lends a much more authentic feel to the final photo.
After adding the cooling filter, it’s a good practice to go back and adjust your hue and saturation layer to tweak the resulting balance of the individual colors a bit further.
Parting thoughts on false-color infrared photography
The advice that can be given when dipping your feet into simulating false-color infrared photography in Photoshop is to view true false-color infrared photos made with this type of film.
I suggest the images of Richard Mosse and his work in the Congo to give a great example of the effects of this sort of photography.
Of course, there are many other examples, and a quick Google search will help you immensely. As you move forward, here are a few tips that will aid your image selection and processing for your simulations:
The infrared effect is based on the reflectance of chlorophyll, so choose images that have healthy green vegetation for the best results.
When shooting, go for the brightest lighting conditions possible.
The bright, mid-day sun makes for the best lighting. After you make your base color swaps using the channel mixer, experiment with adjusting the hue and saturation of the individual colors within your photo.
Don’t forget the benefits of creating Photoshop Actions! You can save all the adjustments for easy one-click applications later.
Perhaps the best part of creating the false-color infrared effect is that it preserves the unique effects of this sort of analog film photography, which as of 2007, is no longer produced.
It’s a dying art that we can enjoy for years to come with our digital photography. Again, it’s not for everyone, but it is a great way for you to create stunningly-surreal color images that will stand out from anything else.
Also be sure to check out my very first experience using an infrared-converted DSLR here!
Try out this effect of simulating false-color infrared photography in Photoshop, and please share your resulting images with us in the comments section. We’d love to see them.
The post Simulating False-Color Infrared Photography in Photoshop appeared first on Digital Photography School. It was authored by Adam Welch.
A few years ago I become friends with a guy who likes dong infrared photography. It was something that I had tried when I was shooting film, but never quite figured out. My friend had converted an old camera of his and it seemed like a good idea. At the time, I had two old cameras and thought perhaps I could use one of them for infrared. However, the price was too high then.
Port Arthur and the main Penitentiary looks a lot better in infrared.
Move forward to a few years, and after buying a second-hand camera from a friend, I found myself in the same position. I had two extra camera bodies, so why not convert one to infrared.
You can do this by putting a filter on the end of the lens, but from searching around for information, getting the camera converted specifically for infrared seemed like a better alternative.
What is infrared photography
Perhaps before going any further, it might be good to get an understanding of what infrared photography is actually all about.
Infrared photography is the capture of part of the spectrum of light that is invisible to the naked human eye. Infrared light is at the top end of the spectrum and is not visible to the eye, so to capture it with a camera some special techniques and equipment are required.
It isn’t an easy concept to understand, but once you get out there and start doing it, you will figure out what works and what doesn’t.
Late winter at Alowyn Gardens. It never snows here, but the infrared camera makes it look like it had.
Different ways of doing infrared
As with most types of photography, there are various ways to go about it. Infrared photography is no different.
Computer conversion to infrared
You can find ways to do infrared conversions on the computer. There are processes that you can use that will help give you that infrared look, however, it is just a look and won’t be the same as doing it with filters or a dedicated camera. If you are curious, though, you could try this first before investing any extra money into it.
Filters
Alowyn Gardens again, looking again like winter and snow, or perhaps a frost.
There are filters that you can get to put on your lens that will help you to get infrared-style images. These will let the IR light through to your sensor. The advantage is that you don’t have to give up a camera body to do this. I’ve never tried them, so I can’t comment on how good they are or are not.
Camera
One thing a lot of photographers who love this kind of photography do is to get one of their cameras converted to be dedicated just for doing infrared photography. Some do this themselves, or you can take it to camera repair place to do it for you.
I took mine to a place to get the infrared conversion done. I’m always wary of playing around with the sensor. They have to remove the filter that comes with the camera and replace it with one that will let through the infrared light, and block all visible light.
Late winter at Alowyn Gardens. It never snows here, but the infrared camera can give it that look.
Choosing which sensor filter
You do have to choose which filter you want and some places will give you many choices. Where I sent my camera there were only two options.
The first choice is the 720nm filter. This will give you close to a full infrared effect, but it will allow you to put some color into your images. The second is the 850nm which would give you very rich dark blacks and perfect if all you want to do is black and white infrared.
For me the choice was easy, I wanted to get some of that color. Not all the time, but it was important to have a choice, so I went with the 720nm filter.
The 720nm sensor filter allows you to get some color, like having a blue sky.
What to photograph in infrared
Like any type of photography, you can photograph anything with an infrared camera or one with a special filter. However, not everything will have the same effect or give you great results. You really need to experiment with it to see what will work.
People
Portraits can be quite weird, and the infrared light does strange things to the skin and facial features. The hair can look funny too and the lips almost disappear. I don’t know that many people would enjoy getting their portrait done this way. Perhaps for a special event or something, maybe. Who knows.
The infrared camera gives Chris a completely different look.
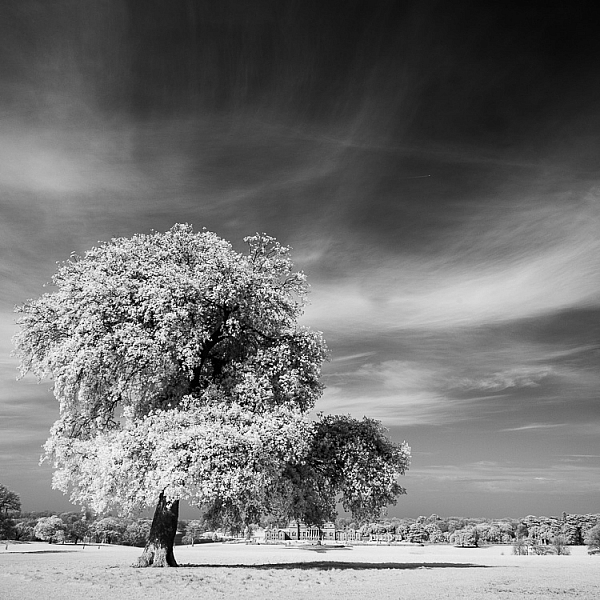
Trees and nature – give your scene the look of winter
Trees are fantastic for this type of photography. All the leaves come out looking white. The more moisture the leaves have the whiter they are in the image. The gum trees in Australia don’t have quite the same effect as trees that are not indigenous to the area.
It makes photographing in rain forests pointless as everything shows up as white and doesn’t have the same effect as it does with a color image. It’s hard to see any definition between the plants.
Australian natives are a little different with infrared photography.
One thing I found was that dead trees looked amazing in infrared. If you photograph them surrounded by lots of other trees, or on their own you would get a very different look. They stand out with an elegance that color photography just doesn’t give them.
When traveling around Tasmania with my infrared converted camera I was looking for dead trees everywhere.
Dead trees on the side of the road in Tasmania.
Architecture
One of the first times using the camera was in the city of Melbourne. I just walked around and took photos of the buildings and streets to see what could be captured in infrared.
The images were disappointing. Once converted to black and white they didn’t look any different than other images done with a normal camera. They did have a quality that gave them an antique look, but other than that there was no discernable differences.
St Paul’s Cathedral in Melbourne, it looks like any black and white image, though taken with the infrared camera.
While on that same trip to Tasmania there did seem to be some buildings that were really suited to infrared, like some old sandstone structures. Places like Port Arthur, where all of the buildings are made of stone, came out looking really good with the camera.
When visiting Port Arthur I took images with the infrared camera and the normal one. Once the photos were on the computer it seemed clear that the ones done with the special camera were by far more interesting. Many of the images were processed, some hand colored and then published on social media. The color images of the same subjects were boring in comparison.
Processing
All the images taken with the infrared camera need to be processed. You may find the sepia quality of the images quite good, but there is so much you can do to them. You can convert straight to black and white or play around with the white balance to get some color in the images.
A small church in Tasmania, the sky was made blue because of the filter and the stone was hand colored on the computer later.
Experimenting
Really, this is what photography is all about. Get out there with your camera to see what you can capture, what will work, and what doesn’t. Each subject will look different with infrared photography, but you should try every type of photography you can think of to take images and then review your results.
Right now, I’m experimenting with a red filter on the lens. The images are interesting, but I need to try it a lot more.
Cascade Brewery is an old sandstone building that came out well. In the background, you can see the snow on Mount Wellington.
Finally
While it can be an expensive exercise converting a camera to infrared, if you have an old body lying around, then you might want to consider it. You can do a lot of experimenting with it and you will likely not regret getting it done.
If you like the look of this sort of photography, then there are also other options. It is amazing how much the world can change with infrared and it is a great way to add something different to your portfolio.
The post Tips for Converting an Old Camera for Shooting Infrared Photography appeared first on Digital Photography School.
Up until a few months ago, my only experience with infrared photography was through the work of Minor White and a few other photographers that shoot masterful infrared photographs. Their images were dreamy scenes with glowing trees that completely transformed my idea of what made a beautiful picture.
Most people I speak to about infrared photography immediately say something about the movie Predator or ask, “You mean like those cameras they use in police chases, right?” While those are in fact infrared cameras, they use thermal infrared which…hang on. I’m getting ahead of myself here.
A couple weeks ago I was lucky enough to have the opportunity to try out an infrared converted digital camera (Canon 60D) from LifePixel Infrared. Seeing as this would be my first time shooting any type of infrared photography I immediately wanted to share my experience with anyone who might be considering taking the leap and trying infrared picture work.
In this article, I’m going to take you along with me and tell you all about my first experience shooting infrared. This will not be a tutorial on how to make and process infrared but rather a real-world account from an infrared newbie. And I promise, no more Predator references.
The Camera
It might come as a surprise but all digital cameras are capable of capturing infrared images. The reason your unconverted DSLR can’t is that manufacturers add filters to purposefully eliminate (or greatly reduce) light in infrared wavelength from reaching the sensor. An infrared conversion is essentially camera surgery where the infrared eliminating filter is replaced with one that allows infrared light to pass through.
And unconverted sensor.
In reality, the images we think of as infrared are in fact near infrared. This type of light has a wavelength that hovers approximately around 700nm. Exactly how much infrared light passes through to the sensor depends on the filter and the type of conversion.
The 60D I was sent sports LifePixels’ popular Super Color IR filter which allows for a more flexible infrared experience because it also allows a small amount of visible light to pass through as well. This Super Color filter leaves lots of room for incredibly creative and downright insane post-processing possibilities for working with color and black and white pictures. The filter looks dark red (below) compared to a non-converted sensor filter (see above).
The infrared converted camera from LifePixel.
Aside from that, there’s not much to say about the external appearance of the converted Canon 60D. It just looks like a normal 60D. This is a good thing in my opinion. Given the complexity of the conversion procedure, it’s nice to see all the screws and joints of the camera remaining just as they were before.
Out and about with infrared
The entire experience of actually shooting images with an infrared camera was incredibly different than how I had imagined. Not at all in a negative or even difficult way, but the creative involvement that was needed reminded me of shooting film and also added an element of excitement you don’t always get when shooting straight digital.
I had assumed that using an infrared camera would be fairly straightforward. Meaning that the image that came out of the camera would essentially be an entity unto itself complete with weird colors and that finished infrared look. This is not the case. Have a look at a RAW infrared photo fresh from the camera equipped with the Super Color IR filter.
Shock. Panic. Gnashing of teeth. When I saw this on the LCD screen my heart sank. What had I done wrong? This wasn’t the cool looking picture I had expected. As it turns out, everything was just as it should be. So, if you’re thinking about using an infrared camera for the first time take some comfort in knowing that things are going to look downright horrible until the image is appropriately processed. We’ll talk about the post-processing of the infrared images a little later.
And seriously, I mean just look at that. They really do look horrible. Moving on…
The best thing about putting the camera into use is relearning how to visualize a photo before you actually snap the shutter. As I said, this is something that has been lost in translation during the digital age. Shooting infrared brings in a fresh feeling of involvement when shooting because you can make all the creative choices but still not know what you have until the photo has been processed.
What’s more is that infrared photography loves being shot in harsh midday light that would normally be absolutely fatal to most sorts of photography. Which is actually really cool. Something I would recommend is to make use of your camera’s Live View mode if it is so equipped. This allows you to see what your sensor sees in real-time.
Also, note that with infrared converted DSLR cameras there can be a slight focusing inaccuracy when shooting at wider apertures unless it is corrected (which LifePixel offers). The Canon D60 I tested out was focused corrected before it was sent to me. Now, let’s talk about the completely incredible way (but not the only way) I processed some of the photographs I made with the infrared converted 60D. You’re not going to believe this.
Post-processing the IR images
Let me start off by saying that post-processing infrared photos is not difficult. The biggest help you can give yourself is to remember these images are just photographs, but they are photographs that include nearly infrared light.
I feel as if I entered into the post-processing phase of my newly shot IR photos with a certain timidness, which was completely unfounded. While we’re about to briefly talk about the biggest hurdle I had to overcome with the processing the overall concept of editing an IR photo is really no different than any other picture.
The Magical Realm of White Balance
If you’ve ever heard someone say “always shoot RAW” and doubted the truth of it – let me tell you now that when it comes to post-processing your near-infrared images, shooting in RAW format is essential. I made the mistake of not switching the camera from JPG (my fault, I should have checked) to RAW and the resulting images were completely unusable.
Why? Because JPG files simply do not have the information to effectively set an accurate White Balance in post-production. If there’s one thing that is completely 100%, definitely, totally essential, and inescapable it is that White Balance is key to a successful infrared photograph.
The challenge with IR converted cameras is that the influx of IR light confuses the camera so that Auto White Balance is completely inaccurate. You can set a Custom White Balance in camera and the easiest way is set it off of green foliage (chlorophyll reflects infrared and is thusly white or close). But if you want to do it all in the editing phase, here’s a quick run-through of how to get it done.
Using Adobe’s DNG Profile Editor
This goes back to what we talked about earlier in this section. Don’t assume that there is a secret to IR photography processing. They are no different from normal photos in that you should have a desired White Balance and exposure. That’s it.
The problem with setting a White Balance for IR images in post-processing is that the color temperature can’t go low enough to correct the image. This is where an often neglected section of Adobe Lightroom called “Camera Calibration” will quite literally save you from pulling out clumps of your hair in frustration.
Using an even lesser known piece of Adobe wizardry called the DNG Profile Editor, you can create a custom White Balance profile and place it in the Camera Calibration section of Lightroom. This is what will allow you to accurately color correct your IR photos.
Never heard of the DNG Profile Editor? Don’t worry, I wrote a book on Lightroom and I had no clue about it myself. Firstly, it’s a free download from Adobe that allows you to create custom profiles based on your camera, and save those so that they appear in the Camera Calibration section of Lightroom.
Read more here: How to Use Adobe’s DNG Profile Editor to Make Custom Camera Profiles
It’s easy, actually kind of fun, and it doesn’t take much time. We’ll skip the particulars but if you want to learn more about the entire IR process, check out this excellent video from B&H Photo by Vincent Versace.
Once you’ve created your custom camera profile it can then be applied to any image you make with your IR converted camera. Then you can go back and make detailed White Balance selections based on the particular image you happen to be editing at the time. Here’s that RAW image again from earlier as it looked straight from the camera.
With the White Balance corrected using the custom profile from the DNG Profile Editor.
With a color channel swap (blue/red) in Photoshop and some basic editing back in Lightroom.
The possibilities really are endless and include black and white conversions, color swaps in Photoshop, selective color, as well as any other edits you feel like trying out!
Here are a few more images I shot with the IR converted Canon D60 from LifePixel.
Final Thoughts on My First Infrared Experience
Often times I talk about the importance of stepping outside of your comfort zone when it comes to your shooting. It’s essential to be bold and extend your creative reach which will, in turn, help you grow technically, professionally, and creatively.
My first time shooting infrared is a classic example of how refreshing it can be to try something completely new with your work. I learned so many new things and reminded myself of how much I truly love this thing that we all do, called photography. Needless to say, my time shooting infrared was immensely positive. Here are a few tips that will help avoid some pitfalls should you decide to try IR photography for yourself:
Shoot RAW.
Use your camera’s Live View mode.
Remember plants and foliage generally reflect IR light.
Accurate White Balance is a MUST!
Use Adobe’s DNG Profile Editor to create a custom color profile for your camera.
Remember there is no set way to edit your IR photographs.
Check out LifePixel Infrared at their website. Not only are they a group of super nice people who do awesome camera conversions but they also offer a treasure trove of educational information about infrared photography and post-processing infrared images.
I hope you enjoyed taking a trip with me during my first time with IR photography. Next on the agenda? Deciding which of my cameras to have converted to IR.
The post My First Time Shooting Infrared Photography by Adam Welch appeared first on Digital Photography School.
Infrared light is not visible to human eyes. The light your eyes see is that within what is referred to as the “visible spectrum” and infrared (IR) lies beyond this band. Thus Infrared (IR) Photography requires special equipment beyond your standard camera, to tap into this “unseen” world.
Over the years, IR photography has not only become more accessible but is also less complicated with more inexpensive options. If you have been exposed to infrared images, you immediately notice how the look stands out. While some find it rather eerie, others are intrigued by the way the ordinary transforms.
In this article, we’ll look at a few things you need to know to get started with infrared photography.
1) What gear do you need to shoot IR?
Filters
If you are just starting to explore this haunting genre of photography, a filter is an easy addition to your gear list. It is least expensive and a good way to gauge how much further you want to delve into and invest in infrared photography.
Infrared filters allow infrared light to hit your camera’s sensor, while at the same time prevent visible light from doing so.
Most manufacturers offer infrared filters and they can range from screw-on to slide-in filter systems. The Hoya R72 is a popular screw-on infrared filter. Interestingly this filter allows just a little bit of visible light through as well, which makes it a nice introductory filter to the world of infrared.
If you already have or prefer to use slide-in systems, note that the infrared filter should be closest to the camera body, to avoid any unwanted visible light hitting your camera sensor.
Different brand filters render color differently as they may address specific ranges of the infrared spectrum. The plus side is that you can experiment with different filters until you find the one that suits your vision.
Converted Camera
If you are committed to doing infrared, a more permanent option is having a dedicated infrared camera body. When a DSLR camera is converted, the infrared blocking filter (that resides in front of your DSLR sensor) is removed. It is a more expensive option, but the benefits include using your camera similar to how you usually do, with normal exposure values.
Note: once a camera has been converted, its sole use is infrared photography – you cannot take “regular” images with it any longer.
Film
With film photography on the rise again, infrared film is readily available and relatively cheap. Developing this film though may nullify that cost-benefit, as you will have to find a lab that has the ability to process infrared.
2) Camera Settings
RAW and JPEG
Shoot both RAW and JPEG files in the beginning. As with any images taken with a DSLR, RAW gives you the most scope when processing. If you are just starting out with infrared photography though, you may be horrified when you look at the back of your camera and see a flat pinkish red image staring back at you.
The JPEG option allows you to see a little more differentiation and determine how to adjust your settings. Believe it or not, with time you will be able to look at those dull pinkish RAW files and be able to tell if they are good or not.
Exposure
If you are using infrared filters, you will need longer exposures when you block out the visible light. So on a bright sunny day, you can work with exposure times between 30-120 seconds, at f/8. Thus a tripod is a must!
If your camera is infrared converted, your settings will vary depending on the amount of light as with normal exposures. Using the sunny day example, your settings could be 1/125th or faster at f/8.
White Balance
A topic all of its own, white balance is important in infrared photography. Refer to your camera’s manual on setting custom white balance, as this is your friend when it comes to infrared.
3) Post-processing Infrared
Auto Tone
As previously mentioned, when you shoot RAW images your output is a dull pinkish red image as shown below.
Infrared RAW image straight out of the camera.
There are several methods to start your infrared file processing, including applying a DNG profile conversion tool. One of the more common ways is to import it into Photoshop and apply Auto Tone.
Note:You can also do both of these processes if you wish.
Auto Tone applied to an infrared image.
Channel Swap
Next, to get those blue skies you need to Channel Swap your colors. While channel swapping is an essential part of infrared photography processing, there are mixed views on which channels to swap to what values. The following are some of the values that are used. Experiment until you find which one works for you:
Changing the Red and Blue Channels only:
Red Channel: Red=0, Green=0, Blue=100
Blue Channel: Red=100, Green=0, Blue=0
Changing all the channels:
Red Channel: Red=0, Green=0, Blue=100
Blue Channel: Red=100, Green=0, Blue=0
Green Channel: Red=0, Green=100, Blue=0
or another option:
Red Channel: Red=0, Green=0, Blue=100
Blue Channel: Red=100, Green=100, Blue=-100
Green Channel: Red=0, Green=0, Blue=100
After Channel Swapping has been applied.
Final Processing
Final touches include adjusting your hue/saturation and your curves and levels adjustment in Photoshop. It all comes down to your personal taste. Then there is the whole other topic of black and white infrared photography. Read more on that here: How to Enhance your Black and White images with Infrared Photography.
Conclusion
Infrared photography is a small but growing niche of photography, that has evolved with time. It offers creative choices and opens a whole new dimension to explore. You can start off simple with filters and then graduate to converting your camera to be a full-time infrared camera in time.
If you have tried infrared photography please share your tips and images in the comments below. If you haven’t, please let me know if you have any other questions.
The post 3 Things You Need to Know to Get Started with Infrared Photography by Nisha Ramroop appeared first on Digital Photography School.
Conventional tracking systems tend to struggle when the tracked subject briefly exits the frame or disappears behind another object. The new Taro auto-tracker and stabilizer tackles this problem with infrared technology.
Users connect their smartphones, DSLR cameras or existing Bluetooth stabilizers to Taro and select the target they want to track. Taro will then follow the target using an AI-based infrared tracking algorithm that performs 30 calculations per second. According to the Taro team, this allows for tracking of objects that are moving as fast as 50 MPH.
“In developing Taro, we’ve essentially designed a robot that operates your camera just like a real cameraman could,” said Taro founder, Hao Qian. “Taro can instantaneously establish the intended object’s approximate location,” he said. “Taro also has a powerful learning algorithm that immediately eliminates sub-optimal positioning, precisely pinpointing the object’s exact location – which results in the perfect balance between efficiency and accuracy.”
The Taro robot looks like an interesting solution for anyone wanting to film themselves during sports and action activities or for filming while moving. The Taro is available on Kickstarter now in three versions, a kit for smartphones, a kit for DSLRs or just a tracking module that can be used with existing Bluetooth stabilizers.
The smartphone kit will set you back $ 200 while the DSLR kit is $ 600. The tracking module on its own is available at $ 100. Early-bird offers are available as well. For more information watch the video below and have a look at the project’s Kickstarter page.
This article will give you some tips on how you can enhance your black and white images by using infrared photography.
Infrared photography for something different
Are you a fan of black and white photography? Like many, I love a good black and white image. The mood you can exude from the shadows and light always fascinates me.
When I was new to photography, I mostly avoided black and white landscapes. I used it mainly a handy way to hide the sporadically bizarre white balance my old Olympus EPL1 used to occasionally surprise me with.
Infrared photography (IR) also took a while to attract my attention. I wasn’t a huge fan of the typical false colour images, but quite liked the black and white IR photos, particularly the work of Simon Marsden. If you haven’t explored his portfolio of dark and atmospheric infrared film photography, you are missing something unique.
Anyway, after a while, I started doing more black and white landscape images, and eventually followed the urge to get into IR images purely for their unique monochrome potential.
I went down the path of buying a modified camera off Ebay. You can buy anything from a point and shoot to a full frame DSLR, and everything in between. If you have an old body you can always get it converted, but it’s worth checking the cost against buying one that’s already been modified.
I picked up an Olympus EPM1 for around AUD $ 300 ($ 230 USD). The advantage for me was being able use the same lenses and batteries I already had for the EPL1.
Why buy a modified camera rather than use IR filters?
Filters are a great and relatively inexpensive way to get into IR photography, but they have their limitations.
The main attraction of a modified camera is that you are not limited to the long exposures needed for an IR filter. You can capture sharp images in any conditions, and can be more creative with your exposures (e.g. pick the perfect shutter speed for moving water). You can shoot handheld from any point of view without being limited by a tripod.
It is also much quicker. When using filters, you need set your focus before attaching the filter which can become tiresome.
I used to take my IR camera with me for a run along the river. Without the need for a tripod, I could travel light and take quick photos whenever an interesting composition presented itself.
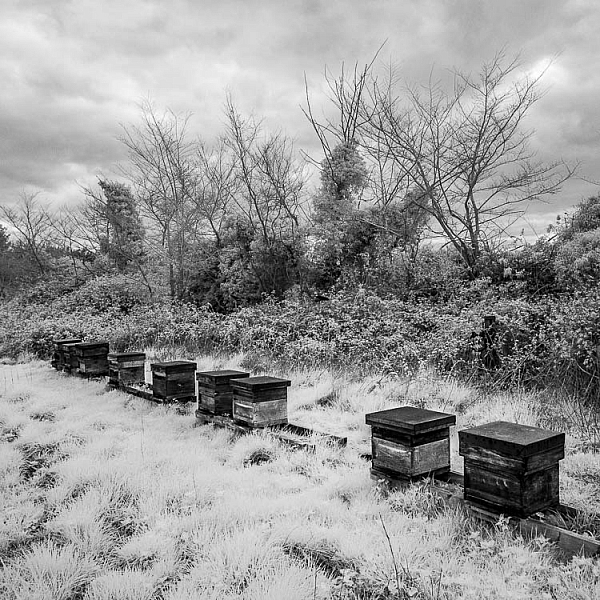
What can infrared photography bring do for a landscape photographer?
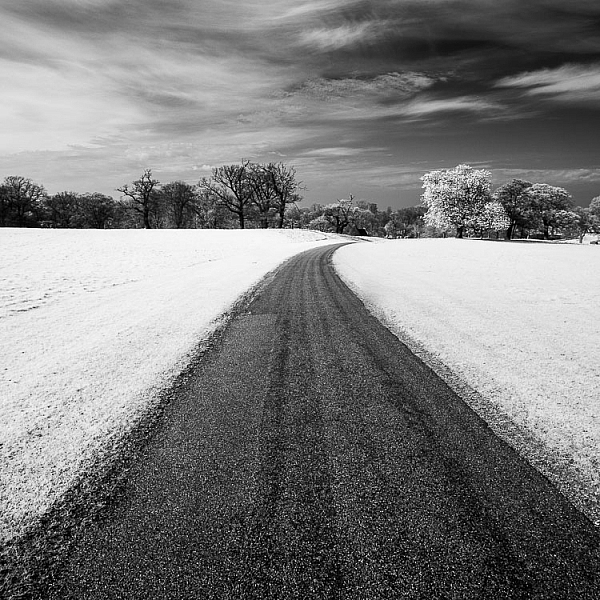
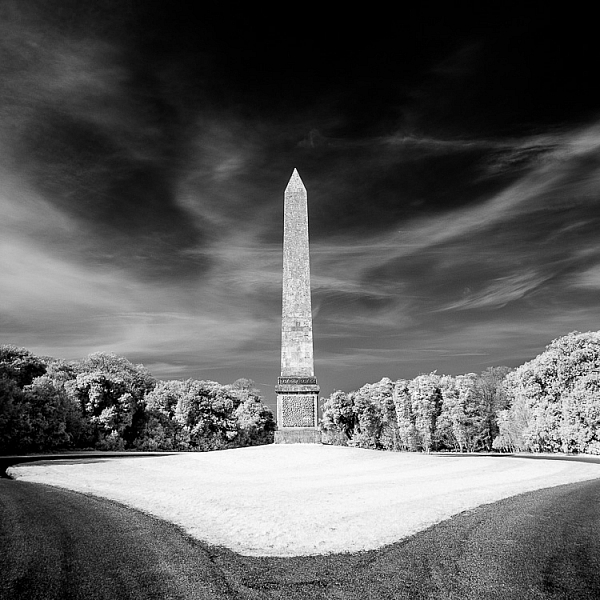
Perhaps the most striking characteristics of infrared photography are the typical white vegetation, black water, and dark skies. You can create punchy, high contrast images. The middle of the day works best for these type of shots. Perfect for those landscape photographers that hate early mornings!
If you like capturing the complex patterns in clouds, you’ll find that the black skies really allow the clouds to stand out.
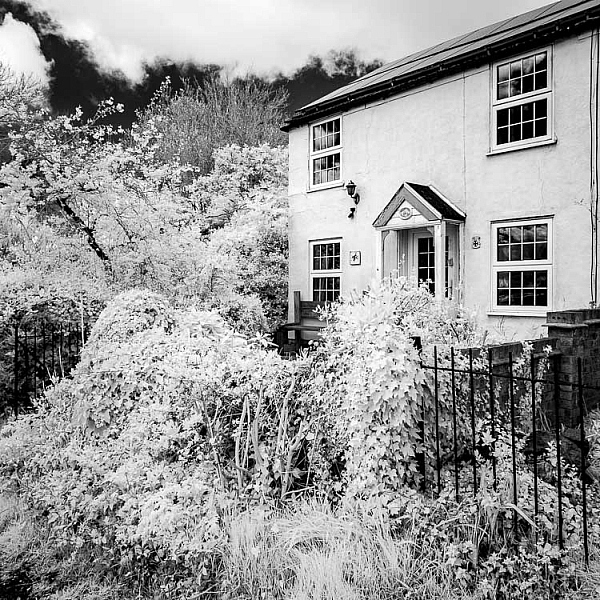
IR also gives you clarity. Any haze visible to the eye tends to disappear in infrared photography. So you can achieve a very crisp and contrasty look.
The deciding factor for me was tone. I found the infrared monos gave me a wonderful palette of greys and blacks to work with, particularly for trees and vegetation. The balance between light and dark just seems easier to manage in infrared and really lets you produce some unique images.
Processing
So what processing should you use for infrared photography? The short answer is not much really. Experiment to find out what works for you.
Myself, I don’t normally use Lightroom or Photoshop, so my workflow may be a little different than yours. But the principles will be the same.
I import my raw images into Corel’s AfterShot Pro, which is a handy little raw file editor. Here I’ll straighten the image, adjust the exposure, and maybe increase the contrast if required. My infrared raw files come into AfterShot Pro displaying blue-grey hues, which is a good starting point for me. From here I export them as TIFFs into PaintShop Pro.
PaintShop Pro has a “Black and White Film” effect that lets you apply a colour filter to your image. Changing your filter between blue, red, and green gives a different result.
From here it is a matter of personal taste adjusting the light and dark of your image, the white and black points to suite the image, and maybe applying curves as appropriate.
What is the Secret Sauce?
Infrared photography is wonderfully clean and crisp. But what if you love that IR film look with a ghostly flare?
Don’t worry. PaintShop Pro has it in the bag. They have an “Infrared Film” effect that was probably created to make ordinary images look a bit infrared-ish.
But when you apply it to a proper infrared image as a starting point, you get a wonderful controlled flare effect. It doesn’t quite match the often spooky and surreal results Simon Marsden achieved with IR film, but it does get you a lot closer than anything else.
The flare can be applied to give a sense of mystery, mood, and surrealness that is hard to replicate any other way.
Are there any downsides to infrared photography?
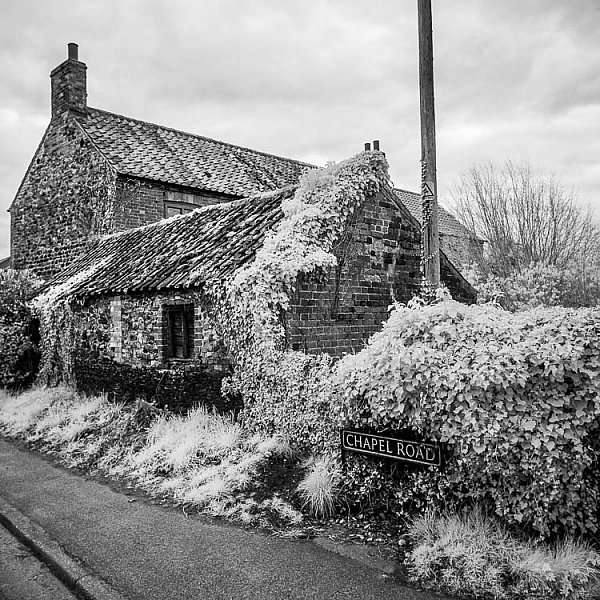
Not really. The only big drawback you’ll find is that you cannot use your favourite filters. Standard neutral density and polarizers do not work in the IR spectrum. If you sky is very bright and your subject is dark, you’ll just have to blend a few different exposures. Shooting in RAW of course gives you more leeway, but my Olympus files are not as forgiving as my Nikon files when recovering blown highlights.
The only other thing I notice is that some people get so enamoured by the white leaves and black sky effect that they forget to put their attention on the composition. Yes, everything looks cool in IR, but don’t take pictures of everything. Aim for strong compositions and uncluttered images. IR really shines with a minimalist approach.
Many dismiss infrared photography as an oddity; a strange niche that is a bit too left of centre for them. Others just think it is too hard and expensive to get into.
But if you like creating black and white images that stand out from the crowd, I’d suggest you have a crack at it. You’ll find it a challenge but also quite rewarding.
The post How to Enhance your Black and White images with Infrared Photography by Matthew Larsen appeared first on Digital Photography School.
Get Andrew’s The Black and White Landscape eBook bundle at 30% off now over at Snapndeals, only until December 20th (AUS time).
Do you have an old digital camera that you don’t use much anymore? If you do, one way to make it useful again is to convert it to infrared for black and white landscape photography.
Why would you want to do this? For me, the main reason is that it gives me a new way of working in black and white. Yes, infrared converted cameras can give you color images as well as black and white ones, but for me, the strange colors are more of a gimmick than a useful tool. With black and white, it’s different. In infrared photography, the tonality of the photo changes, giving you new and interesting ways to capture the landscape.
What is infrared photography?
The simple (non-technical) explanation is that infrared light is a kind of invisible light, formed of electro-magnetic waves that are undetectable to the human eye.
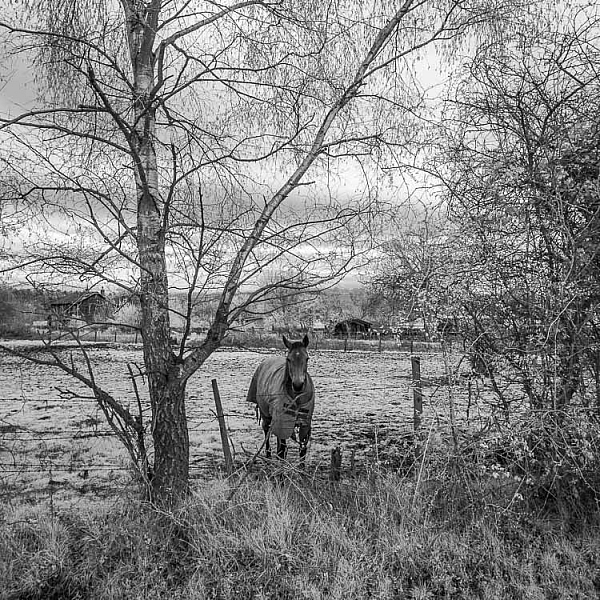
Human skin reflects a lot of infrared light, so does vegetation. These these things appear very bright in black and white infrared photos. Inanimate objects, such as roads, stones, and buildings, don’t reflect as much infrared light and can look remarkably similar to regular black and white photos when photographed in infrared.
What is an infrared conversion?
Digital camera sensors are sensitive to ultraviolet (UV) light and infrared light as well as the visible wavelengths of light. Because of this, digital cameras have filters to block both ultraviolet and infrared light. The infrared filters on most cameras do let some infrared light through, but not enough to affect the image.
During an infrared conversion the technician removes the infrared filter so that the sensor can now see infrared light, and replaces it with a filter that blocks visible light, so the sensor can only see and record infrared. The process isn’t complex, and because of that isn’t particularly expensive. If you are technically minded you could even try it yourself. There are videos on YouTube that explain how. You just need the right tools and parts.
The usual caveats apply. If your camera is still under warranty that will be voided, and bear in mind that you can damage your camera if you don’t know how to do it properly. You should only attempt it if you know what you are doing!
The infrared conversion on my camera was done by Protech Photographic in the UK (they also handle orders from mainland Europe). LifePixel and Kolarivision are US based companies that also do infrared conversions. If you know of any other reliable companies, please let us know in the comments section below.
Types of infrared conversion
There are several types of infrared conversion. These are some of the most common.
Full spectrum conversion
The UV and infrared filters are removed. Your camera’s sensor can now see UV and infrared light as well as visible light. You control the effect by using filters (on the lens) to block different amounts of visible and/or infrared light. This may be interesting if you like to experiment, but the disadvantage is that you need to buy filters, adding to the cost. Filters also block light, so you need to use slower shutter speeds or higher ISOs to compensate.
720nm conversion
The technician places a filterin front of the sensor that blocks all wavelengths under 720nm (nm = nano-meter and is a unit of measurement equivalent to 1/1,000,000,000 meter used for measuring wavelengths of light). In other words, it only lets infrared light through. It’s the type of conversion best suited for landscape photography, giving you a color image that’s easy to convert to black and white. This is probably the most common type of infrared conversion and the one you should go for unless you have a specific need for one of the other types.
830nm conversion
The sensor is fitted with a filter that blocks all wavelengths under 830nm. This gives a more intense type of infrared effect, with very little color. It’s ideal for dramatic black and white landscape photography.
Some companies offer different types of conversion in addition to these, so check their websites for details.
Camera types and infrared conversions
When it comes to converting digital SLRs to infrared there is something you need to bear in mind. Infrared light focuses at a different point to regular light. Your camera is calibrated to focus visible light, which means that if you try to focus on something using a wide aperture (which gives less depth of field) then your focus may not be accurate. It is possible to calibrate a lens to focus accurately with infrared, so check with the company that is going to handle your infrared conversion for details.
But for landscape photography, where most photographers use wide-angle lenses and stop down the aperture for sharp focus, it is not so important. If your camera offers some sort of contrast detect autofocus in Live View (where the camera focuses by taking a reading from the sensor rather than using the camera’s phase detection autofocus system) then you will have accurate focusing in Live View (just not when using the viewfinder).
Mirrorless advantage
Mirrorless cameras have an advantage over digital SLRs for infrared because they are able to focus from the camera’s sensor. That means that if you plan to hand-hold the camera and look through the viewfinder to take photos (rather than put the camera on tripod and use Live View) then a mirrorless camera is an excellent choice as you won’t get any focusing errors.
Another advantage of cameras with electronic viewfinders is that when you set the camera to its black and white mode the camera displays the scene in black and white in the viewfinder. This makes it easy to visualize how the photo will come out in black and white with the infrared effect applied.
Lenses and infrared photography
Another consideration is that not all camera lenses are suitable for infrared photography. Older lenses in particular tend to show a hot spot at the center of the frame, especially at wide aperture settings. Before converting your camera you should check and see if there are any reported problems with the lenses you intend to use with it. Kolarivison have a comprehensive list of infrared compatible lenses.
Infrared filters
Another option, if you don’t want to convert a camera to infrared, is to buy an infrared filter that blocks out visible light and just lets infrared light reach the camera’s sensor. The Hoya R72 filter is a great option and not very expensive, especially if you have smaller lenses. It blocks wavelengths below 720nm, just like a 720nm infrared conversion.
Note: shop for the Hoya R72 Filter on Amazon.com or on B&H Photo’s site.
You may remember that digital cameras have a filter that blocks most infrared light. An infrared filter is opaque, so the result is that not much light reaches the sensor. In effect, an infrared filter is a strong neutral density filter as well as an infrared filter.
The strength varies according to the camera used, but don’t be surprised if you lose 16 stops of light. A tripod is essential. Luckily, this is not necessarily a bad thing for landscape photographers. If you are prepared to work within this limitation then an infrared filter could be for you.
Test first
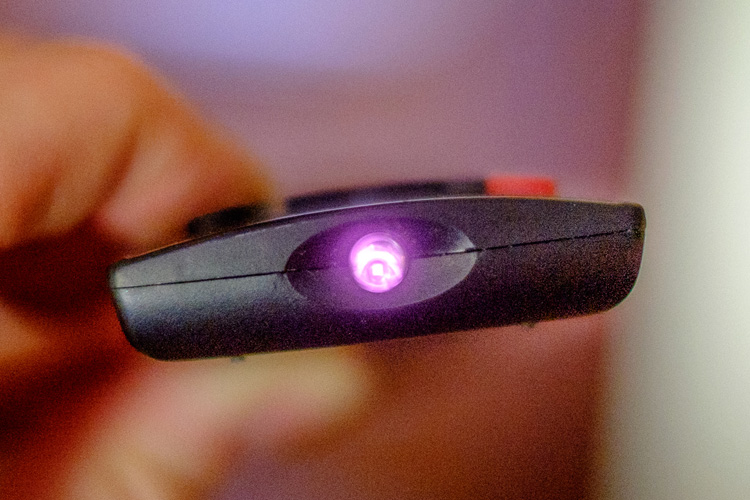
The infrared filter on some cameras is so strong that no light reaches the sensor at all. This makes using an infrared filter impossible. There’s a simple way to check to see if your camera’s sensor can detect infrared light. Do this test first before buying an infrared filter.
Set your camera to Live View and focus on the end of a television remote control while pushing down one of the buttons. If you can see a light (the infrared communication in action) then it is sensitive enough to infrared light to use with a filter. It’s probably easiest if you ask somebody to hold the remote control for you.
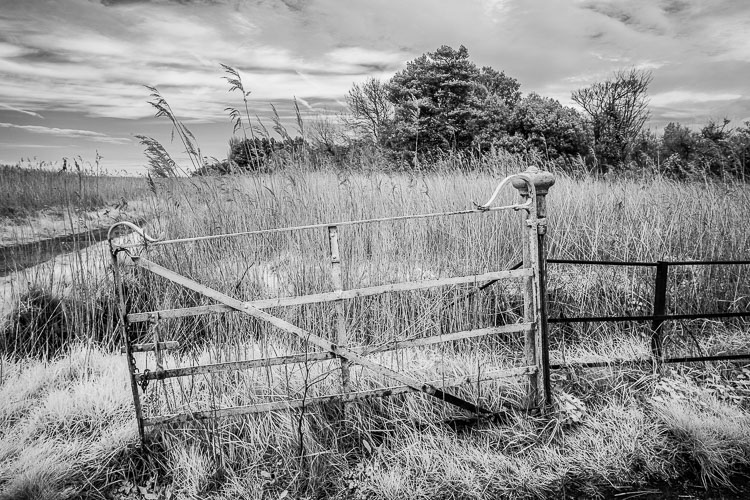
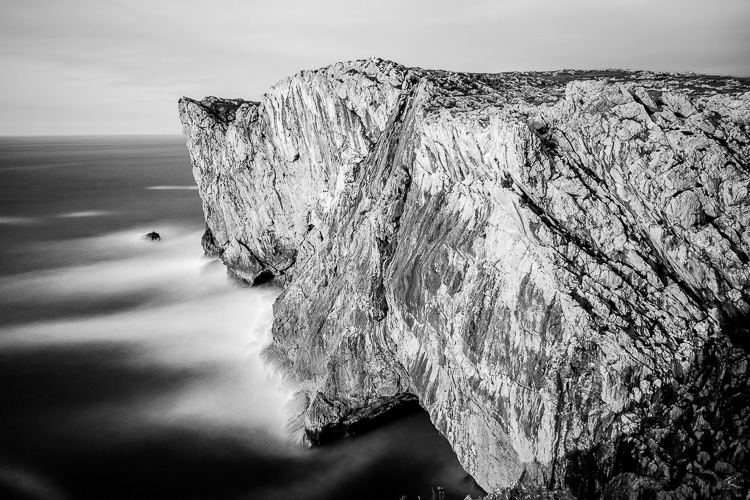
This photo (below) was taken with a Hoya 72 filter. It required a shutter speed of 180 seconds, even though the cliffs were lit by the light from the setting sun.
All the other photos in the article were taken with a Fujifilm X-Pro 1 converted to infrared.
Conclusion
That concludes our overview of converting cameras to infrared for black and white landscape photography. Have you tried this yourself? What camera did you have converted and how did it work out? Please let us know in the comments.
Get Andrew’s The Black & White Landscape eBook bundle at 30% off now over at Snapndeals, only until December 20th (AUS time).
The post How to Convert a Camera to Infrared for Black and White Landscape Photography by Andrew S. Gibson appeared first on Digital Photography School.


You must be logged in to post a comment.