RSS
 

Posts Tagged ‘improve’

Tips for Doing Drone Photography and How it Improve All Your Images

28 Aug

In this article, I’ll share with you some of my experiences doing drone photography in my first month with my new flying camera. You’ll see how learning to use and fly a drone can help you improve all your photography as well.

Getting into drone photography

A filmmaker friend of mine brought his DJI Mavic Pro (a small drone with a built-in 12-megapixel camera) to our house several months ago. I told him that I’d been thinking about all the photos I could take if I had a drone. He insisted that I try his out, so I did.

Bad move. I probably raved about it far more than was wise. My family took my enthusiasm seriously. Thus, for a combined Father’s Day/Birthday/Christmas present (since these flying cameras don’t come cheap), they got me a DJI Mavic Pro. I then owned a drone. And had no idea what to do with it.

You may be in the same situation if you’ve recently purchased a drone or are considering doing so. If you’re still determining which one to get, check out this helpful overview. Or take a look at these tips and reasons why you might want a drone.

Lessons Learned from Drone photography 2

What we’ll focus on here are the issues no one tells you about when you do finally get a drone. Learn how to speed up the learning curve and some surprising discoveries about how using a drone can make you an overall better photographer.

Take time to learn the basics

How long it will take you to learn to fly your drone depends in part on the drone you get. With the DJI Mavic Pro, I spent time reading the manual (somewhat helpful), watching the DJI videos (more helpful) and then watching other people’s YouTube videos (super helpful).

Even if you’re a “forget the instructions, let’s get going” type of person, spend time watching some of these videos. It will be worth the effort since not everything about your drone, especially from a photography perspective, will be intuitive. Besides, you can do it while your batteries are charging.

Lessons Learned from Drone photography 3

On most drones, the controller connects to your smartphone. Your phone’s screen becomes your remote viewfinder. Let’s state what may seem obvious but isn’t if you’ve never owned a drone.

You need a smartphone to fly most drones for photography purposes.

It took me three days of trying to get the detested DJI app (just read the app reviews and you’ll see what I mean) to work only to find that it was incompatible with my older phone. I switched to my wife’s phone and voila, everything suddenly worked.

If your drone doesn’t connect immediately once you download the app, it’s likely the app/phone combo. My advice is to focus on solving the phone/app connection first.

Starting to fly

Lessons Learned from Drone photography 17

The first time I actually flew the drone, I freaked out seeing it go up so high. The second time, not so much. The third time, I stopped looking at the aircraft (which, DJI reminds you repeatedly, is the proper name for the device, not a drone. Drones shoot missiles and spy on terrorists. Aircraft are, well, aircraft, I guess, even if this one can fold up and fit in a purse).

Instead, I just watched the screen. That is much easier. In short, while you want to have your drone in visual range at all times so you’re aware of hazards (that’s actually the law in most areas), concentrate mostly on your screen and you’ll gain confidence in flying it faster.

Learning how to make photos

I posted my first drone shots on Instagram and found some nice folks out there who liked them and have inspired me with their own drone photos. After looking at their photos (I’m only concentrating on photos initially, videos will come later), it gave me additional ideas on how to use my aircraft as a photography tool.

Here are some of the lessons learned in my first month of flying:

Lessons Learned from Drone photography 6

Learn to fly before you learn to shoot

This means finding a really open space and learning the controls well so don’t have to consciously think about every lever and button and what it does. You’ll have plenty of time for making photos later. Get the feel of the aircraft now.

Visualize before you take off

On the Mavic Pro, you get about 26 minutes of flying time on each battery (so definitely consider buying extras). Because of that, try to visualize your shots before you take off so you’re not spending that precious 26 minutes of battery life just flying around aimlessly.

You must realize, however, that when you first start working with a drone, everything will look different from above. Don’t worry. As you get more experienced, you’ll learn how to “read” a scene better and you’ll spend less time searching and more time setting up the shots you want.

Lessons Learned from Drone photography 13

Shoot RAW

Consider photographing in RAW (the camera’s native format for images as opposed to JPEGs) if you know how to process them in a program light Lightroom. For me, it is too hard to see all the lighting nuances on my phone screen. RAW gives me more latitude than JPEGs for fixing later.

Consider bracketing your shots as well (if your drone has that feature) to allow for even greater flexibility with exposure.

Don’t let the initial images fool you

DJI’s RAW files look pretty bad right out of the camera. But pump up the Blacks (for contrast) and increase the Vibrancy and the images can be stunning. Overall, the camera and the Mavic Pro aircraft are surprisingly good.

Lessons Learned from Drone photography 11

Learn the focus and metering buttons

Switching between the focus and metering buttons is easy once you locate them on the controller. Both are very useful since you get strong contrasts from the air.

At first, I blew out a lot of highlights. Once I learned to meter on the right areas of the scene, my photos improved dramatically. Start by sticking with the auto functions of the camera but quickly learn and use the other focus and metering functions available.

Consider getting a polarizer

Lessons Learned from Drone photography

A polarizing filter reduces glare but you can’t just twist it like a circular polarizer on your DSLR (it’s a bit out of reach when the drone is 300 feet above you). You can only adjust it by changing the angle of the aircraft which isn’t always helpful when composing a particular shot.

But the polarizer does protect the lens and makes the sky pop in your images. My next purchase will be some ND (Neutral Density) filters to knock down even more of the light and glare. Because you’re shooting from above, you’ll experience new angles of light that you don’t usually get with traditional photography.

Pay attention to the weather

Wind and moisture are big limiters in some areas. I recently returned from a trip to England (yes, most airlines allow drones on board as long as your batteries are in your carry-on) and was only able to fly the aircraft three times in 10 days.

Lessons Learned from Drone photography 8

Mostly, it was either rainy (moisture will ruin your battery) or too windy. But I did learn that I can fly in more wind than I initially thought, up to about eight mph of wind. I have gotten the high wind warning on the controller (which warns you about wind, if you’re in a restricted area or are too close to an object), but otherwise, no problems. But use your own discretion as one bad gust could ruin your day and your aircraft.

Don’t fly too high

Overhead shots can become more intriguing when you limit your altitude. As the photo above of the couple reveals (shot at a height of about 12 feet/three meters), you can get great images with a drone that no one but you will even know were shot with a drone.

Lessons Learned from Drone photography 10

Play with the color

Because sunlight is hitting the subject from a different angle than you’re used to, that will affect the color of your photos in surprising ways. Some familiar objects such as trees will be more vibrant when shot from above than from the side.

Just be prepared to experiment a good deal in your editing software with color.

Compensate for parallax

Lessons Learned from Drone photography 5

There’s a parallax phenomenon that takes time to understand. Compare the photos of two bridges above and below. In the first, I wasn’t directly over the bridge and the photo isn’t as good as the second one where I took the time to turn the drone sideways while rotating it at the same time to get the shot lined up perfectly.

Lessons Learned from Drone photography 7

It seems simple until you try it. But with practice, you’ll learn little tricks on how to maneuver your drone to get the shot you want. And the image stabilization, at least in my Mavic Pro, worked better than expected. Thus, if you can line up the shot, you’ll likely get a good image.

Start with photographs

As noted, I’ve held off on shooting more than quick snippets of video. Why? Because with still photography, the aircraft is essentially a floating platform that I can nudge into position. If my turns are awkward, it doesn’t matter.

But when you’re shooting video, flying is everything (or a whole lot). You want your aircraft’s movements to flow smoothly. In my first month of periodic flying, I just wasn’t experienced enough for video. But I did ask my friend Randy (who’s had a drone about as long as I have) about his experience with video.

Lessons Learned from Drone photography 18

He noted that a) videos are smoother when you lower the frame per second rate, and b) it’s far better to keep the focus on a single element rather than panning around to capture everything at once.

Learn how to avoid obstacles

In the early stages, you’ll likely be a bit freaked out by trees or other objects that seem to reach out toward your drone. Personally, I haven’t yet gotten close enough for the aircraft to employ its obstacle avoidance procedures.

Randy tested the sensors out by flying his aircraft directly at him. He figured that unlike flying into a tree, he could move out of the way if the sensors failed. As it turns out, they worked great. The aircraft stopped a few feet before him.

You still want to fly carefully, but it is nice to know you have the sensors working for you.

Recognize the limitations of where you can fly

Lessons Learned from Drone photography 12

There are restrictions where you can fly your drone (no national parks, no crowded areas, no flying near airports, etc.) but there are still vast regions you can explore by air that you can’t when tied to the ground. Also, scenes that look boring from the ground (a wheat field, for example), take on new possibilities when viewed from above. You just have to rethink what makes for a great image.

Try direct overhead photos

Shots taken directly overhead will likely be more intriguing to you when you first start. Remember when Instagram was first getting going? Everyone took photos of their feet because they were more enamored with the filters on Instagram than in taking great photos.

You’ll likely soon grow to improve and get better shots at angles, but as a beginner, the direct overhead shot is fun because it is a completely new way of seeing things. And don’t rule them out even as you get better. You’ll still find scenes where the direct overhead shot tells the best story.

Lessons Learned from Drone photography 15

Compare, for example, the two shots of the wrecked fishing boat above and below. Which is better? It’s all a matter of taste, but now you have options.

Lessons Learned from Drone photography 16

Learn to shoot at angles

Angled images are tougher to shoot at just the right height, distance and direction than direct overhead ones. But they don’t scream “DRONE SHOT” the way some higher-altitude-direct-overhead photos do.

Also, a benefit of angled shots is that you can isolate your subject from distracting foreground or background items. For example, in the shot of the ruined church above, using a drone allowed me to avoid several unwanted foreground elements.

Lessons Learned from Drone photography 9

Photograph like a designer

Back to direct overhead shots, another benefit is that they can help you think differently about photography. You may, in fact, start perceiving the world more from a design perspective, being more aware of line, texture, patterns, and colors.

You’ll see shapes, arrangements and interesting connections you wouldn’t otherwise just because you’re viewing scenes from different heights and angles. Check out these 11 drone tips for inspiring examples of using design principles in your photography.

Lessons Learned from Drone photography 14

The added benefits of photographing with a drone

For most photographers, a good quality drone is a luxury, not a necessity. But its greatest value isn’t just in allowing you to take photos you cannot without it. It’s helping you to make better photos even when you’re not using it simply because it will cause you to rethink how you see a scene and thus make a photo.

When I was in college, I played on the school’s tennis team. Part of the training included a class on how to teach others to play the game. For the month that the class lasted, each participant had to play using his or her non-dominant hand. Not easy.

Shooting with the drone/aircraft is similar. Because it is initially so unfamiliar, it will rewire how your brain thinks about the subject you’re photographing and how to compose the image the best way. Without a drone, your photography will likely be two-dimensional and you’ll probably continue shooting in the same way as you always have.

With a drone, you have to factor in height and different angle possibilities. That, in turn, will affect your more terrestrial shots as well since you’ll see more possibilities than you did before.

It may take time to master drone photography. But along the way, you’ll likely capture some surprising and astounding images. And best of all, you may become a better overall photographer as a result.

The post Tips for Doing Drone Photography and How it Improve All Your Images appeared first on Digital Photography School.


Digital Photography School

 
Comments Off on Tips for Doing Drone Photography and How it Improve All Your Images

Posted in Photography


6 Ways to Improve Your Street Photography

23 Aug

Street photography is an exciting genre of photography that interests many people. Although it has many meanings, in its simplest form, it is candid photography of life and people. Street photography encapsulates everyday life, not just in roadways, as the name suggests but within our surroundings.

It can be demanding to capture good pictures that tell the viewer about the daily moments we encounter. Here are six tips to help you improve your street photography.

Street photography 01 - graffiti artist working

#1 – Walk around

Have you ever felt uncomfortable at the thought of photographing random people in public places?

My first tip is to just walk around and get comfortable with your surroundings. Look for interesting things to photograph in the everyday life that encompasses you. Once you have taken some pictures, move on to another location and capture a few more images of another subject that pleases you.

Street photography 02 - old lady in Peru in traditional attie

I saw this elderly lady walking through an old town while out taking photos during my travels and thought she would make an interesting photo.

#2 – Shoot in crowded places

With life at the core of street photography, it makes perfect sense to capture pictures of people amongst crowds going about their everyday lives.

Capturing life around us in different situations can be a challenging undertaking.

Street photography 03 - 2 ladies walking past street art

You may feel uncomfortable at the thought of taking photos of people in busy areas. However, it can be very rewarding to get out of your comfort zone and photograph in crowded places. From a busy marketplace to photographing the general public attending a sporting event, these are just some examples of where you can capture street style photos in crowded areas.

Next time you go on holiday or visit your local neighborhood, visit the park to practice your street photography.

Street photography - Asian men playing a board game

#3 – Photograph people on the streets

Street photography as a subject can take many forms from scenes depicting human nature to interesting moments in everyday locations. To enhance your street photography images, try and capture scenes that evoke different emotive responses such as happiness or humor, for example.

Street photography 05 - street dancers

While on a city break, I came across an interesting scene where I captured these guys enjoying dancing to music.

#4 – Consider color

Street photography is very popular as black and white images because the contrast can emphasize light, shadow, and form. It can also reduce the elements of a busy scene down to its most vital shapes and narrative. Although black and white pictures can look great, I encourage you to shoot in color.

Color can be a great visual element to consider and it has the advantage of adding another layer of narrative.

Color shows the world as it truly is and is a more honest reflection of how we see the world. Anything from radiant buildings to transport or street lighting can provide an element of luminosity that may help to elevate your photos. Street art and graffiti is another aspect that could provide some vibrancy to your street photography.

Street photography 06 - graffit artists working

#5 – Shoot spontaneously

Street photography is all about spontaneity. It is at the opposite end of the spectrum to say landscape photography where the approach to capturing images is pre-planned and everything related to the shot can be set up in advance.

Shooting spontaneously to photograph an intriguing moment can happen at any time from the minute you leave your house to getting your morning coffee. This cannot be taught and is entirely an intuitive and instinctive process. Practice is the way to develop this skill.

Allow yourself to shoot freely in order to make interesting pictures of the world around you and your everyday life.

Street photography 07

#6 – Shoot an event

Lastly, local events are great places to try your hand at street photography. This could be a sports match, a local event with some interesting activities or even an annual festival, where you can capture compelling shots of the participants.

Festivals provide great subjects for street photography as you have the opportunity to capture pictures of street parades, performers in action and candid portraits of interesting characters on location. Find out if an event is happening near you, find some engaging subjects to photograph and put these tips to the test.

Street photography 08

Conclusion

It’s now time for you to go out and practice your street photography skills by photographing a person on the street or a local event near you. What tips and images do you have to share with us?

The post 6 Ways to Improve Your Street Photography appeared first on Digital Photography School.


Digital Photography School

 
Comments Off on 6 Ways to Improve Your Street Photography

Posted in Photography


6 Tips To Help You Improve Your Documentary Photos

06 Aug

Documentary photos can have a powerful impact on viewers. They can notify people of an issue that they wouldn’t otherwise know about. Documentary images can help focus attention on different cultures that are rarely seen by other people. They can inspire, tell stories, and above all they can take the viewer on a journey that they may not go on themselves.

It’s important to remember that documentary photos differ to the conventional travel photographs. Yes they can overlap sometimes but documentary photos need to tell a story first and foremost. Here are 6 tips to help you improve your documentary photos.

woman burning leaves - Documentary Photos

1. Tell a Story

Before even a single photo has been taken, you need to decide on the story that you want to tell.

Are you trying to capture a specific event or ritual? Do you want to shed light on an environmental issue? Or do you want to document a different aspect of an already well-photographed location by focusing on say the grittier side of it away from the glitz and glamour?

Whatever the story is, your first action should be to write it down in a sentence. That will become your brief and with every photo you take, you should be looking to ensure it meets that requirement.

Not only will this help you to begin to build a shot list of potential things to photograph, but it will also ensure that you are always focused on the subjects you are photographing.

man cooking over a fire - Documentary Photos

2. Brainstorm Shots

Once you have an idea of what your story is about, you can begin to create a shot list based on that headline. So for example, if you want to photograph a traditional festival, some of the things that might be on your shot list could be things like:

  • The performers getting ready
  • Close up of the costumes
  • Head and shoulder portraits of the performers and audience
  • Action shots of the festival in action (for example dancing, singing, etc.)
  • Wide-angle shots capturing the entire event (for example to show the scale)
  • The venue (if it is in a place of special interest)
  • Any traditional foods or drinks served

This will help you plan your shoot and make sure that you cover different aspects of the story you are trying to tell.

Clearly, while you are there you may find that this list changes and other things get added or crossed off. The key is to make sure you capture a variety of shots based on your initial brief.

two men in red costumes - Documentary Photos

3. Planning and Setting Up

It’s not by accident that documentary photographers seem to be in the right place at the right time to capture stunning shots. This is not by accident or luck. There has likely been a lot of planning and research that’s gone into the shoot to ensure that they can maximize their time and capture the best photos. So, do your research before you start shooting.

For example, if you are photographing a parade get to that location a day before and work out the best place to be. Ask the locals if they know anything that might help you. Or if you are planning to photograph a remote tribe, contact local guides that can help you get there and also translate if needed.

Preparation is a huge part of documentary photography and you should spend time making sure you are fully prepared before you start.

parade with a religious float - Documentary Photos

4. Be Ready to Shoot

Once your research is done and you have planned everything, it’s time to execute and capture the photos. There is no magic formula for choosing your camera settings when taking documentary photos, as every scenario is different.

But you can prepare for it in advance by understanding your camera and predicting the scenario that you might face. For example, if you are photographing locals in their home where you are likely to encounter low light conditions, you can safely assume that you will need to raise your ISO level to be able to capture the shot. So, practice at home so that not only can work quickly but also you know your camera’s capabilities at high ISO settings.

Or if you are going to be photographing a dance festival where there will be fast movement practice being able to focus accurately and capture sharp photos. Trying to predict the scenario you are working in will often help ensure that you don’t panic when you are actually there and taking photos for real.

demonstration by doctors and nurses - Documentary Photos

5. Story Over Aesthetics

Arguably this is where documentary photography and travel photography differ.

While often in travel photography you want to try and tell a story, you also need to convey that in a beautiful and aspiring way that will make people want to travel to that destination. But documentary photography is about telling the story first and foremost and if the aesthetics have to suffer to capture it, then so be it.

So, don’t be afraid to break away from convention if it means you will capture the shot that will help tell that story.

protestors in the park - Documentary Photos

6. Edit Ruthlessly

Once you have captured all of the images that you wanted to get, then arguably the really hard work starts.

You need to edit and select the best of those images with which to showcase and tell the entire story. Flick through magazines and you will see that generally, a photo essay is anywhere between  6-10 photos maximum. You need to be ruthless in your culling and only feature photos that contribute to the overall story.

Try to detach yourself and think like a photo editor, not a photographer. The end result should be a collection of photos that are strong enough individually but also work as a collective.

Lightroom browser of images - Documentary Photos

Conclusion

Well done documentary photos can be mesmerizing to view and they tell an incredibly powerful story. It could be argued that they are often more powerful than the words that go along with them. Even the simplest stories can be phenomenal in a series of photos.

But capturing a set of photos that are different and yet can work together as a series and also tell a story is incredibly difficult. Follow these six simple tips and you will be on your way to capturing amazing documentary photos.

Now it’s your turn. Share your amazing documentary photos below.

The post 6 Tips To Help You Improve Your Documentary Photos appeared first on Digital Photography School.


Digital Photography School

 
Comments Off on 6 Tips To Help You Improve Your Documentary Photos

Posted in Photography


5 Tips to Improve Your Portrait Photos

03 Aug

In this 7-minute video, photographer Craig Beckta has 5 tips that will help improve your portrait photos drastically.

?

#1 Use Off-Camera Flash

“The larger the light source and the closer it is to your subject, the softer the light,” says Beckta. He also prefers to use round softboxes, as it creates a round catchlight similar to that which you can expect from the sun.

For more on this topic read:

  • Why Off-Camera Flash Isn’t as Scary as You Think
  • A Beginners Guide to Light Modifiers

#2 Use Different Lighting Patterns

Moving your light source around and adjusting the angles and modifiers allows you to change the pattern of light. Some lighting patterns are more flattering for particular situations, but changing the lighting pattern throughout a shoot means that you have more options available to you back in the editing room.

Read 6 Portrait Lighting Patterns Every Photographer Should Know

#3 Direct Your Subjects

Even with experienced models, it is “important that you give them subtle directions.” After all, the model can’t see what you can see as the photographer. Keeping good direction over the shoot keeps you in control creatively, and dialogue between yourself and the model can only be a good thing to keep everyone comfortable.

Check out our dPS printable posing guides for more ideas.

#4 Think About the Background

A wide aperture will allow you to blur the background, but be careful that there aren’t distracting objects intersecting your subject.

#5 Watch Your Exposure

Be careful with your exposure. There’s nothing worse than coming home from a shoot and finding the highlights are blown out or the shadows lost. Beckta runs through his entire process with regards to monitoring his exposure during a shoot.

Over to you

What do you think? Do you have any other tips for portrait photography?

The post 5 Tips to Improve Your Portrait Photos appeared first on Digital Photography School.


Digital Photography School

 
Comments Off on 5 Tips to Improve Your Portrait Photos

Posted in Photography


6 Ways to Improve your Cityscape Photography

29 Jun

Cityscape photography is becoming increasingly popular and can be a welcome change to capturing rolling hills and scenic vistas. Urban landscape environments can offer you, the photographer, attractive buildings, patterns and lines to capture stunning scenes and an alternative to the familiar nature shots found in the countryside.

6 Ways to Improve your Cityscape Photography

Here are 6 elements you will want to consider to improve your photographs of cities:

1. Shoot at different times of the day

Think about blue hour, golden hour, and daytime for your city images.

As the sun goes down and darkness falls, cities come to life when buildings and architectural details become illuminated and can make for some spectacular image opportunities. However, a common mistake people make when doing cityscape photography is to capture images too late at night when the natural light has disappeared and the sky is completely black.

6 Ways to Improve your Cityscape Photography

Shanghai skyline at night.

Total darkness is generally not the best time to photograph buildings as they will appear less attractive with little detail.

If you intend to photograph in the evenings, I would recommend that you arrive at your location for sunset and wait for dusk to fall. You could shoot during blue hour, a period of twilight when the sun is at a significant depth below the horizon and when the sky takes on a predominantly blue shade.

Although it is called the blue hour, it usually occurs for a window of around 20-30 minutes, depending on your location and the season.

Golden hour is another good time for cityscape photography. During the early morning or late afternoon, you’ll have beautiful long shadows to work with, as well as soft golden light.

6 Ways to Improve your Cityscape Photography

Daytime shot of the same city.

Alternatively, photographing during the day allows for a more interesting composition as scenes can be more crowded. Just add people in your frame that can make intriguing subjects combined with buildings.

2. Use ambient light effectively

If you capture the final elements of ambient light in the sky before darkness falls and combine it with the artificial light of the buildings, this will usually result in good photographs.

Once the city lights come on there is usually a window of about an hour to capture pleasing cityscapes. Shooting scenes at this time will allow you to balance the sky with the artificial lights of the city.

6 Ways to Improve your Cityscape Photography - blue hour bridge

3. Consider color

Look for patterns and blocks of color that may offset one another. Buildings may be painted in different colors that work well together, for example.

The cool blue sky of the blue hour complements the warm, golden, amber hues of street and building lights perfectly. The harmony of an image is apparent when colorful tones come together, such as this image of Oxford at night.

6 Ways to Improve your Cityscape Photography - Oxford at blur hour

Also, the sun can create different colors as it strikes buildings and reflects off them.

4. Consider composition

It is best to try and exclude any distracting and unwanted objects from the frame such as trash bins, signs, and any unsightly buildings that will make your image less attractive. Re-compose your image until it’s free of clutter and you are happy with the way the image looks.

6 Ways to Improve your Cityscape Photography - building at night

Work with the light if you’re capturing cityscapes during the day. Usually, you will want to shoot with the sun lighting the buildings for the best results and to ensure everything in your view is illuminated.

5. Experiment with exposure

Cityscapes often provide a great opportunity to experiment with your exposure. You will discover that after sunset, as the light fades, you will be less able to hand hold your camera to capture your cityscape scene. Recording long exposures in cityscape photography will create motion and that feeling of movement is only possible by using a tripod.

6 Ways to Improve your Cityscape Photography - London Tower Bridge

As twilight unveils, you can capture the low ambient light by using slow shutter speeds to create mobility within your image. The stillness of buildings contrasting the movement of clouds or light trails from traffic, for example, make for an interesting image and can add drama to your composition.

Using fast shutter speeds can help to freeze the motion of different objects in the scene. I recommend that you experiment with different shutter speeds to see what different moods this creates and see which style of image you like.

6. Get creative

Add some beauty to your shot by capturing close up objects such as bridges or signs with the cityscape in the background. You could even try photographing people and the cityscape to show the full setting you are photographing within.

6 Ways to Improve your Cityscape Photography

Don’t be afraid to get closer to your subject and focus on the action. I suggest that you play around with various angles to capture something truly unique and inspirational, one that you are proud of.

Cityscape photography requires a great deal of practice and you most likely won’t walk away with award-winning cityscapes overnight. Keep shooting and with these tips, you will become more adept at capturing urban imagery you can be proud of.

Now it’s your turn, please share your cityscape photography images and tips in the comments area below.

The post 6 Ways to Improve your Cityscape Photography appeared first on Digital Photography School.


Digital Photography School

 
Comments Off on 6 Ways to Improve your Cityscape Photography

Posted in Photography


How to Improve Your Landscape Photography By Understanding Portrait Lighting

24 Jun

The further I have gone on my photography journey, the more I have come to learn about the importance of understanding light. I believe light is the single most important element that makes a photograph. Not a great subject. Not great composition. It’s great lighting that will make a photograph amazing.

colorful landscape scene - How to Improve Your Landscape Photography By Understanding Portrait Lighting

So what is great light? There is no one type of light that makes a photograph good or bad. Hardness, brightness, color, direction. All these things and more will dictate how your image looks, and more importantly, how it feels.

One of the ways I’ve learned to see and understand light and how it affects my landscape photography is by learning about and understanding portrait lighting. Portrait photographers know that the way light falls on the human form dramatically affects the photograph.

Although you can’t control the light in landscape photography, learning to apply the principles of portrait lighting will help you create far more dramatic landscapes that make the viewer feel something.

Light and Shadow

At its most basic level, a photograph is made up of light and shadow. We have a tendency to focus a lot on light in photography, but shadows are just as important, if not even more so. Shadows reveal shape, depth, and texture.

aerial photo - How to Improve Your Landscape Photography By Understanding Portrait Lighting

Portrait photographers understand light and shadow better than anyone. They shape a portrait by moving the light source around until the light falls in just the right way so that the shadows reveal the contours of the subject. When shooting with natural light that can’t be controlled, they will move the subject instead.

The transition from light to shadow is often lost in modern landscape photography. Camera sensors with incredible dynamic range, along with the popularity of HDR techniques, have allowed us to bring back a lot of detail in the shadows of our landscapes.

This isn’t a bad thing in itself, because usually, we want some detail in the shadows, but it often goes too far. Just because we can brighten the shadows doesn’t mean we should. Leaving parts of the image in darkness add mood and mystery.

long exposure seascape - How to Improve Your Landscape Photography By Understanding Portrait Lighting

Rembrandt Lighting

I learned about Rembrandt lighting before I had ever heard of the artist it was named after. Rembrandt was a master painter who understood the principles of light and shadow better than anyone. Studying his paintings will teach you a lot about how they can create mood and drama in an image.

Rembrandt self portrait - How to Improve Your Landscape Photography By Understanding Portrait Lighting

Rembrandt self-portrait.

Rembrandt lighting has become known as a classic lighting setup in portrait photography. Using soft side-lighting, this technique creates a beautiful look that you will likely recognize.

When the light source is coming from the side of the subject, it causes the light to reveal and conceal various elements. The parts of the subject that are visible to the light source will be illuminated while the parts which aren’t visible to the light source will be in shadow.

portrait lighting for landscape photography - How to Improve Your Landscape Photography By Understanding Portrait Lighting

Understanding portrait lighting to bring out texture and dimension.

You obviously can’t control the light source when photographing landscapes, but you can still apply the same principles.

Considering how the light will fall on your landscape can guide the way you photograph it. The position you shoot from, your composition, and the time of day will all affect how the lighting affects your landscapes. Even though you can’t control the light, it never stays the same, so waiting for the angle of the sun to change or for a gap in the clouds can make a big difference to that way it illuminates the scene.

Reverse Engineering Photos

A great exercise for learning to understand light is to reverse engineer a photograph. When I was learning portrait photography I would regularly study an image and try to figure out how it had been lit. Is it natural light or flash? How far away from the subject is it? How big is the light source? Is there more than one light source?

How to Improve Your Landscape Photography By Understanding Portrait Lighting - lighthouse on a rocky shoreline

These days as a landscape and travel photographer, I still ask myself those questions when looking at a photograph. Which direction is the light coming from? What time of day was it taken? Was the sky clear or cloudy? Learn to get in the habit of analyzing photos that you admire by asking yourself more specific questions like this rather than what gear or presets the photographer used.

Dodging and Burning

Shaping light and shadow doesn’t stop when you take the photo. Dodging and burning is the process of lightening and darkening areas of a photo in post-production. It doesn’t need to be a complicated process. Often all that is necessary is burning (darkening) areas that could use more shadow or might be distracting.

portrait lighting for landscape photography

One of the best ways to think of dodging and burning is to ask yourself where you want the viewer to look. It may be a specific element of the photo, or you may want to draw the viewer’s eye through the image. You can paint more light and shadow into a photo to guide this process.

Our eyes are naturally drawn to brighter parts of an image. Portrait photographers will often dodge and burn to draw the viewer to the subject’s eyes or another important element of the subject. When editing landscapes, try to paint in light and shadow to control which parts of the image are attracting your attention.

waterfall and mountain and reflection in a pool of water - How to Improve Your Landscape Photography By Understanding Portrait Lighting

Go Practice

The next time you’re photographing a landscape, try taking another look at the light. Ask yourself some of the questions I’ve mentioned. Look for the shadows. Experiment with side-lighting. Wait until the light changes. By understanding portrait lighting you will be better equiped to apply it to your landscape photography.

You’ll find that thinking of the landscape as contours with depth and shape rather than separate elements will help you make more engaging landscapes with mood and drama.

The post How to Improve Your Landscape Photography By Understanding Portrait Lighting appeared first on Digital Photography School.


Digital Photography School

 
Comments Off on How to Improve Your Landscape Photography By Understanding Portrait Lighting

Posted in Photography


The Best Way to Improve Your Photography is to Forget About Your Camera

21 Jun

Are you confident using your camera to take photographs in every situation in which you want to shoot? Do you experience anxiety when you think about reaching for your camera? Would you like to feel sure that when you do head out for a photography session you will return more than satisfied with your results? So what is the best way to improve your photography?

portrait of a Kayan girl - improve your photography

If you are anxious or lacking confidence in using your camera you will most likely not be so happy with your photographs. As photographers, most of us like to be improving our pictures each time we use our cameras. I don’t know of a photographer who is not interested in continuing to create better photos than they have previously.

Photography is so much more than having the most up to date equipment and knowing which dials to turn and buttons to push to make it work. The best way to improve your photography is to forget about your camera.

Photography is More Popular Than Ever

Photography is currently more popular than it has ever been. People are taking more photos every day than ever before in history. Why? Because they can and because it is easy. And because everyone always has a camera with them.

Northern Thailand landscape near Suan Sook Homestay, Doi Inthanon - improve your photography

Mobile phone cameras have made photography more popular than ever. This photo was taken with my phone camera.

It is easier and more convenient than ever to be able to take and share your photographs. Most people can take a photo with their phone very easily and without much knowledge of photography technique. Most phone camera users are not concerned with their shutter speed or their ISO setting. But you don’t have to search much to find some outstanding photographs made with phone cameras.

When people take photos with their phone they are most often concentrating on the moment, not the mechanics of how to work the camera. The more you can learn to do this when you are using your DSLR, mirrorless or any other camera the more you will improve your photography.

Make Time to Learn

Make time to study how your camera works. If you are just starting out, begin with the essentials. Become familiar with the settings for obtaining a good exposure and well-focused photos.

Night photo of a buddhist monk at a ceremony at Wat Pan Tao - improve your photography

In any situation you find yourself wanting to photograph, you need to be confident in adjusting your settings well without losing concentration on your subject.

For more advanced photographers, don’t neglect to keep learning more about your camera. Learn to use more of the functions and become proficient at them. If you can do this you will be well prepared whenever you want to head out for a photography session.

If you are constantly trying to figure out how to use your camera at the times when you want to make great photos, you will not be as successful.

Know your camera functions and settings well, so you can use it as quickly and easily as your phone camera. You’ll be able to pay more attention to the moment if you do so.

:aughing Karen woman in a rice field - improve your photography

Be Prepared

When you are in a situation where you want to take photographs, be prepared. Have everything with you that you need. Do you need another lens? Will you need flash? How about your tripod? As well, be mindful of whether or not you will need anything other than your camera and one or two lenses. If not, don’t carry it with you. It will only hinder you.

Always try to anticipate the situation ahead of time. Be well set up with the right lens and any other accessories you need. If you can do this in advance you will be able to concentrate more on making great photos.

Thai woman in traditional costume - improve your photography

Being prepared means you will not miss any opportunities to make great photos.

Review and Critique

Always take a good look at your photos, including the ones you are not satisfied with. Hopefully, you are not deleting any of your photos from your cards before reviewing them on your computer. Aside from this being poor technical practice, you can learn a lot from your dud photos.

lady and giant soap bubbles - improve your photography

Studying your photos for composition, exposure, timing, subject choice, etc., will help you improve. If you are reviewing photos you are not so happy with, this will help you avoid making the same mistakes in future.

Having someone else look at your photos and offer critique can be very valuable. Even if it’s a friend or family member who has little or no photography experience it can help keep you on track, (so long as they are honest and positive.)

Sharing your photos for critique with an experienced photographer can help your growth. They will be able to point out things you may not have noticed. By seeking feedback you will learn directly from your own images.

Reflection of a monk in a puddle of water - improve your photography

Art and Science

Photography is very much a whole brain experience. The left hemisphere of your brain engages to manage the technical aspects. Your right hemisphere is more attentive to the creative aspects. There must be a cohesion and a balance.

If you are too focused on the technical aspects of photography you will not produce such creative pictures. If your right brain takes over you may not get well-exposed or focused images because of not paying attention to your camera.

Pink dahlia photo - improve your photography

Knowing your equipment, whatever camera you are using, will help you improve your photography. A photo that was taken with my camera phone.

Being confident to use your camera, whichever one you choose to use, will help you be more successful. Understand how to use it and to adjust the settings to get the photos you want easily. This takes some study, commitment, and practice, but it’s well worth it to be able to achieve consistently better results.

The post The Best Way to Improve Your Photography is to Forget About Your Camera appeared first on Digital Photography School.


Digital Photography School

 
Comments Off on The Best Way to Improve Your Photography is to Forget About Your Camera

Posted in Photography


This Photography Training is Guaranteed to Improve Your Photography [48 Hours Only]

18 Jun

Are you looking to give your photography a boost?

If so – for the next 48 hours we’ve got a bundle of training resources that you’ll want to snap up.

It’s the Ultimate Photography Bundle and it’s back for 2 days only.

The Short Story:

Here’s what you need to know about this bundle of photography training:

  • It contains 26 eBooks, 21 courses, 1 membership and 10 amazing tools
  • It is valued at just over $ 5000 USD
  • It is currently 98% off and yours for $ 97 USD
  • This offer disappears forever in less than 48 hours
  • There’s no risk – buy it today and if you’re not 100% satisfied Ultimate Bundles will refund the purchase

There’s so much covered in this bundle. There’s training on travel photography, landscape photography, black and white, portraits, post production, making money from photography and so much more.

Check out what’s included here but don’t delay because it’ll be gone in a snap.

Here’s how long is left:

There's not much time left! Enable images to see just how much time is left on the clock!

The Longer Story:

Earlier this year our friends at Ultimate Bundles released this Ultimate Photography Bundle and when we saw it we were quite amazed by what they’d included.

For example one of our writers – Gina Milicia – has her best selling ‘How to Direct and Pose Like a Pro‘ Course in the bundle. This is definitely one of the highlights of this bundle and one we’re very excited about because Gina is an accomplished photographer and brilliant teacher.

Gina’s course is normally priced at $ 297 – 3 times what you’ll pay for the full bundle which also gets you over 50 other resources including:

  • Light & Airy Lightroom Presets by Cole’s Classroom ($ 67)
  • The Essentials of Street Photography and Street Photography Conversations eBooks by James Maher ($ 19.95)
  • Colour Portrait Tools by Gavin Gough ($ 59)
  • Photoshop for Portrait Photographers by David Molnar ($ 197)
  • Easy Way Photography Photoshop Essentials Workflow by Adam Williams ($ 200)
  • Food Photography Behind the Scenes: Bright Food, Dark Shadows by Nicole Branan ($ 20)
  • Lighting 101: Foundation & Light Shaping by Pye Jirsa ($ 99)
  • Intentional Documentary: The Session Workflow for Documentary Family Photographers by Marie Masse ($ 149)
  • The Winning Creative’s Way by Christina Scalera ($ 997)
  • Our own dPS Essential Guide to Black and White Photography eBook ($ 19)

Everything I’ve mentioned already normally cost $ 2104 and we’re just scratching the surface of what’s included – see the full list of what you get here.

Don’t Miss It This Time

Many dPS readers picked up this bundle when it was first offered in February but we heard from quite a few of you that you missed out.

Thankfully Ultimate Bundles have brought it back one last time for a quick 48 hour flash sale.

This is the last time it’ll be offered so don’t miss out.

30 Day Happiness Guarantee

As I mention above – this bundle is covered by a 30 day happiness guarantee – so you can snap it up today before it’s gone and rest easy that if you don’t find it quite fits your need that the team at Ultimate Bundles is happy to refund your purchase price any time within 30 days of purchase.

dPS is proud to be involved in this Ultimate Photography Bundle as an affiliate and partner because we know it will help you to improve your photography.

Secure this bundle of great training here now before time runs out.

There's not much time left! Enable images to see just how much time is left on the clock!

The post This Photography Training is Guaranteed to Improve Your Photography [48 Hours Only] appeared first on Digital Photography School.


Digital Photography School

 
Comments Off on This Photography Training is Guaranteed to Improve Your Photography [48 Hours Only]

Posted in Photography


6 Ways to Improve Your Images and Take Better Vacation Photos

17 May

Have you ever been on a vacation only to return home disappointed with your images? Many people take pictures while on holiday but find they are unsatisfied with their results. You can improve your chances of capturing better vacation photos by learning the basics and applying a few simple techniques.

better vacation photos - trees in Namibia

1. Choose the right equipment

Firstly, you don’t need expensive equipment to achieve photos from your travels that are satisfying. If you’re looking to buy a camera, choose one that suits your needs and budget. Digital cameras now range from professional DSLRs to great compacts that can produce quality images. Even mobile phones can give you stunning results.

Generally, a camera with more megapixels will provide a better picture resolution and higher quality images when printed. Whichever camera you decide to use, choose a compact with a good quality lens and broad optical zoom or a digital SLR with a zoom or telephoto lens depending on the subjects and angle of view you want to capture.

For example, a wide zoom would help to photograph a wide sweeping landscape and a telephoto can be used to capture wildlife. Also consider the size and weight of your equipment and make sure you can carry your camera kit comfortably.

Lion's roar Ngorongoro Crater Tanzania - better vacation photos

2. Make mistakes

A common mistake people tend to make is to pick up a camera and shoot a scene without giving any thought to what they are actually photographing.

You can dramatically improve your images by learning from your mistakes and analyzing why an image may not look as good as the view that you saw when you took the image.

Appraise your work and think about how you could improve your images next time. It’s good to recognize your mistakes, such as poor camera technique and poor composition and improve on those things next time around.

Zhangjiajie China scene - better vacation photos

3. Improve your camera technique

A great photograph is rarely achieved without some initial technical knowledge and photographic skills. Learn the basics about your camera and how it works. Study your camera manual and read up on other technical areas such as depth of field.

Know the limits of your equipment and how to use it effectively to create the style of images you want to capture.

Handling your camera in advance of your trip can help familiarize yourself with the buttons and you will be more comfortable with how it works when you’re away. Time spent understanding your camera will help take your photography to the next level and make for a more enjoyable experience when on vacation.

town with mountains and a lake - Take Better Vacation Photos

4. Improve your composition

A thoughtless composition can let your image down. Too many different subjects can complicate a scene. Look for features, shapes and patterns that may work in harmony to strengthen your images. Take time to manufacture your shot, trust your instinct and aim for a composition that you like.

The image of trees and the towering sand dunes shows an example where the different subjects of the composition can work well together and strengthen an image.

Camel thorn trees Deadvlei Namibia - Take Better Vacation Photos

5. Focus on details

You can choose to photograph specific and interesting subjects to improve your holiday pictures. Focusing on details allows you to reduce the number of variables in the frame and concentrate on the different shapes and forms that can be found within your subject.

By shooting only a portion of a famous building or scene of nature, you can isolate an image to concentrate on the aspects that appeal to you. Try zooming in or moving closer to your subject to narrow your point of interest and make it stand out.

scenice view of a town with church steeple - Take Better Vacation Photos

6. Consider the time of day

The quality of light varies throughout the day and can have a huge impact on your final image. Most holiday snappers go on vacation for a break, rest in the mornings and go out and shoot during the middle of the day. However, bright sunlight at noon provides harsh shadows and flat lighting.

Try and shoot outside this time for better vacation photos and more dramatic light. Instead of sleeping in, set the alarm clock and get out early at least once when on vacation, or stay out late to capture the beautiful tones from the sun.

The light at this time of day can make a pleasing difference to your images. Be aware of the effects light can create and use it to capture better images. For example, look for shadows and highlights that may improve your images by providing contrasting shapes.

The Grand Canyon USA - better vacation photos

Conclusion

Taking photographs during a vacation is a wonderful way to improve your photography. By applying the tips above you can achieve better images while capturing lasting memories of the places you have visited that can give you immense pleasure for years to come.

Do you have any other vacation photography tips and photos? Please share them in the comments area below.

The post 6 Ways to Improve Your Images and Take Better Vacation Photos appeared first on Digital Photography School.


Digital Photography School

 
Comments Off on 6 Ways to Improve Your Images and Take Better Vacation Photos

Posted in Photography


Top 10 Ways to Improve Flickr for 2018

28 Apr

Having spent thousands of hours on Flickr over the past 15 years or so, on a personal level I’ve become fairly invested in the site. To date I’ve published over 140,000 of my photographs there. I publish 40 or so new photos there every single day. It’s my primary archive of my photography work on the internet. I’ve also been actively involved in groups over the years which have led to many personal friendships for me. I’ve favorited over 720,000 photos that I’ve browsed over the years. I blog about it. I search it for photos to map as I’m going about my project of documenting America. It’s my favorite site on the internet.

That said there are some significant ways that Flickr can improve and given the new recent ownership change I thought now would be a good time to write about some of the ways Flickr can improve from here. Jef Poskanzer another early Flickr user also made his own excellent to do list for Flickr here.

The power of Flickr in my opinion has always been the community. I think there are ways that Flickr can recapture some of the community spirit that it did have in years past and grow to become the primary community for photographers on the web going forward. This will take work but will be worth it in the end for the community, it’s users and now SmugMug.

Flicker Meetup, 7-7-2005, #3
Flickr Meet Up, Crossroads Cafe, 2005.

1. Community. In the earliest days of Flickr when a new user would join co-founder Caterina Fake would greet them personally on the site and welcome them — not a bot or a script, but Caterina herself. While this would not scale today, I think the original founders of Flickr realized how important community development was in the early success of the site. I remember shortly after I joined Flickr going to some of my first photo meetups in San Francisco at a local coffeehouse. Flickr’s other co-founder Stewart Butterfield would show up and so would Cal Henderson and many of the other early Flickr staff and engineers. They eventually brought Heather Champ on as Community Manager and her sole focus was in managing this new community that was growing at Flickr.

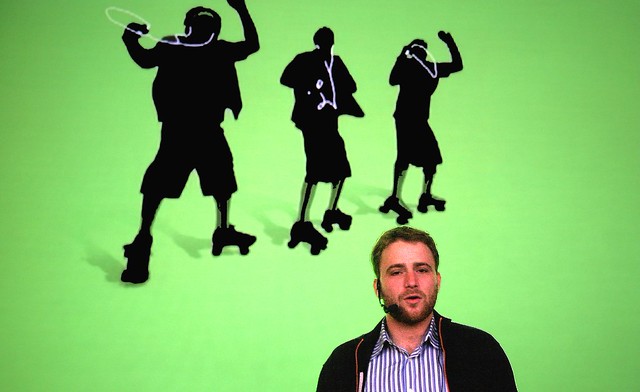
Stewart and the Skatepods
Flickr Co-Founder Stewart Butterfield introducing Flickr Photographers at a group show at the Apple Store, 2005.

Back in those early days Heather organized an event at the San Francisco Apple Store where some Flickr photographers shared their photos on the giant large screen upstairs in the old Apple Store off Market Street. There was a show where Flickr photographers from all over the world sent in a photo and Flickr printed them all for a group gallery show at 111 Minna. There were active meetups and drinkups and photowalks and even a giant party hosted by Flickr once a year. Flickr Fiesta, Flickr Turns 2, Flickr Turns 3…

I think what Flickr realized early on was that getting users to connect personally offline after first meeting online could be a powerful thing. Friendships were created. A group I was in started doing phototrips together. We did a trip to Miami, a trip to Detroit, a trip to Las Vegas a trip to Toronto. These trips would originate and be planned out in groups on Flickr. When out of town Flickr friends came to town you’d meet up and go shooting together. Meeting Mr. Chalk for the first time in person was fantastic! Because Flickr was the online community bringing all of these people together, it became a very beloved site for so many early Flickr users.

The challenge now is to try and restore much of that sense of community that over the years has been lost in my opinion. I think SmugMug should invest in this aspect of Flickr more than any other. They should hire perhaps a few community managers. They should host events. They should engage directly with the most active users on the site and promote Flickr evangelists from their user base who work to build and maintain that photography community at Flickr. I think Don MacAskill (SmugMug’s CEO) is the type of guy who will be good at this. It was good to see him engaging publicly about the acquisition on Hacker News shortly after the purchase. Management most of all has a role in actively engaging with the users of the site following the early example of Caterina Fake.

2. Groups. Much of Flickr’s early success was built around groups. More than just places to post a photo about a certain topic the group threads were vibrant conversations. Conversations about photography and Flickr itself sure, but also conversations about politics, about popular movies and television, about really anything and everything. Through some redesign over the years group discussions lost ground to the photos themselves. Discussions became harder and harder to track and follow. Facebook showed up and many people moved conversations over there, etc.

There are some significant ways that Flickr could rebuild group conversations.

The single most significant thing Flickr could do to improve group discussions would be to allow users to subscribe to individual discussion threads and then give them a central page where those conversations are bumped as activity/conversations happens in those threads. These are the conversations that I care the most about.

Many Flickr users belong to many different groups. Having to go to each individual group discussion page one by one just does not work for monitoring all of the conversations you are a part of. I may really care about a conversation about William Eggleston’s photography, but if there is only one new update to that conversation a week, as much as I care about it, I may not be checking it as regularly as I should. What’s more, the best time to see a conversation is as quickly after it happens as possible because that’s when others in that conversation still might be online. If I reply to a conversation 10 minutes after it happens that generates much more activity than if I reply 1 day after it happens. Giving users the ability to track all of the conversations they are interested in across the site would be a powerful tool.

Conversation begets more conversation. Activity begets activity. Give users the tool to track all of the group conversations across Flickr that they care about. This thread subscription page should be easily accessed in the mobile app as well.

After building conversation subscriptions, Flickr should also allow users to hide conversations in groups. Groups can get very noisy at times. The most recent group discussion is bumped to the top of the discussion page. If I don’t care about Game of Thrones, but that is the conversation that is repeatedly being bumped to the top of the threads I should allowed to hide it and make it disappear for me.

Flickr should identify 50 or so of the most active groups and have their community managers personally be involved in those groups and conversations. People should know that they can interact with management there. Flickr’s help forum is a bit like this, but the help forum is really only about Flickr help which can be boring at times. Flickr should promote these groups across the site and do everything that they can to make them as active as possible. If the discussions are not active in a group people stop coming. If the discussions are active it becomes a wonderful watering hole where people will spend hours online engaging with each other.

In the early days of Flickr Stewart Butterfield was active in Flickr Central threads. He’d frequently chime in and interact with the community there. This was a great thing.

I should also be able to mute certain users in a group. Inevitably trolls can/will invade groups and while some trolls can be charming and funny, others can be destructive. Allowing me to mute certain people gives me a bit of control over these conversations.

Groups should have photo pools, but these should really be secondary to the discussion threads and the groups pages should be designed to reflect this.

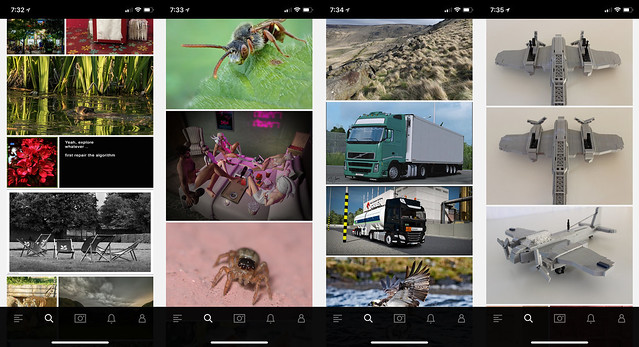
Flickr Explore
Some sample photos from yesterday’s Flickr Explore page.

3. Explore is so broken. There are so many bad photos regularly in Explore. The algorithm screens out more active users (like myself and many others). I looked at Explore for the first time in months yesterday and what do I see? Exactly the type of photos I don’t want to see on Flickr. Macro photos of insects. Lots of photos with signatures and watermarks. Three photos in a row of a LEGO airplane. Some screengrab of some user mocking Explore. Photos of big trucks and other transport. I don’t mind great train shots actually, but shots of boring city busses and big trucks that some Flickr transport fans collect are less interesting to me.

As much as I dislike Instagram and their world of ads, of all things, Instagram is doing a great job with their version of Explore. When I click on the search bar on Instagram it populates their version. What do I see there? Lots of photos of neon signs. Interesting analog photography. Great architecture.

The problem is that everyone sees the exact same version of Explore. In today’s world of AI Flickr should be smart enough to look at the photos I’m favoriting and serve me up my own customized version of Explore. Photos that I might be interested in based on what it knows about me.

Do I never favorite the classic bee on a flower shot? Then don’t show more to me. Someone who favorites 10,000 Second Life screengrabs might like to see more of them that they don’t know about on the site. I don’t. I love neon signs. Show me the most kickass photos of neon signs that I haven’t seen yet on the site from the past 24 hours. If I hate watermarked photos and never favorite them, don’t show them to me. If someone else watermarks their own photos and only favorites watermarked photos, show lots of them to them.

4. Maps. Although Stig’s excellent Flickr Fixr already fixes this, put a link to the Google Maps location under the map of a geotagged photo on Flickr. Google’s maps are the best in the world — and while it may be too expensive to actually license the maps to embed themselves, put a link there so users can go actually find the place. As it is now the Flickr maps are worthless. They won’t show you where something is. They will provide you the general vicinity of where something is, but they won’t show you exactly where it is.

If I am going on a trip and want to research a new city on Flickr, I want to know EXACTLY where things are so I can build a Google Map to go see and photograph those things myself.

5. Fix the Yahoo Log In. This is probably easy to do and from what I’ve read Don MacAskill is already on this one as a first priority. The Yahoo Login system (and especially for those using old legacy AT&T, PacBell, etc, versions of the login) is much too difficult to use. Pre-yahoo Flickr had a very simple user name / password log in that you set yourself. Users should be given an easy option to have that again and to get back into their Yahoo accounts that so many seem to be locked out of.

6. Fix the jumpy problem in photos from your contacts. Jef Poskanzer mentioned this one in his post as well. For years now whenever you browse photos by your contacts, right before you are about to favorite a photo on that page Flickr will inexplicably jolt and jump to some other random area on the page making you lose your place. Worse, right when you press the favorite button, because the page has suddenly jolted somewhere else you will accidently click on a photo which will take you away from that page and you have to press the browser back bar to get back and reload your contact’s photos page from the beginning. It’s a frustrating user experience and something that has been broken for YEARS now. It is time to fix it. Photos from your contacts is a very popular page and it is a problem that your most active users are having.

Flickr No Connection Issue

7. Flickr app connection issues. The Flickr photo app has a connection problem that other apps don’t. Just about every single day at some point you get a red “no internet connection” message at the bottom of the app. Even if you are connected to the internet and even if all your other apps work just fine. Flickr will not work. The only way to make the Flickr app work again is to quit the app and relaunch it. I think what may be happening is that at some point the Flickr app loses internet connection and isn’t smart enough to try and re-establish connection. So the app is dead and the only way to re-establish the connection is to quit it and relaunch it.

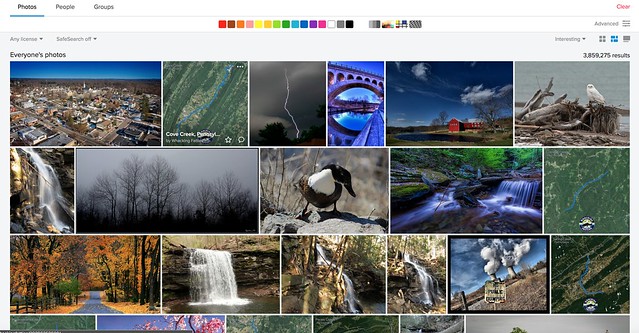
Searching Pennsylvania by Interestingness

8. Fix search. I’ve got a trip to Pennsylvania planned in a few months. Why when I search “Pennsylvania” (over 3.5 million photos on Flickr by the way) and sort by interestingness is the 2nd most interesting photo on all of Flickr a dumb aerial map screengrab with a squiggly blue line with a “whacking fatties” watermark? The photo has zero faves, zero comments and only 11 views. In fact there are four “whacking fatties” screengrabs in the top 20 most interesting of the millions of photos of Pennsylvania. This is dumb. If Flickr’s interestingness algorithm is so broken that it puts this photo as the 2nd most interesting photo in all of Pennsylvania at least give me the option to sort the photos by favorites. If I sort the photos by favorites chances are that some of the most favorited photos might be better and more interesting photos. While favorites alone might not be the best indicator of what photos are most interesting, at least give me that option. Alternatively, stop showing photos with low faves, comments, views on the first page of search results by interestingness.

9. Fix recent activity. The recent activity page is the most important page on Flickr. I load it more than any other page. For me (and many others) recently it stopped loading. It times out the majority of the time and returns a server error. I can get around this error by changing my recent activity settings from “since the beginning” to “in the last month” but I shouldn’t have to. I should be able to get it to load reliably 100% of the time since the beginning. Your most active users are users are your most valuable users. This should be fixed.

10. Let users favorite multi photo batches from the Flickr homepage. At present if I go to the main flickr homepage at flickr.com and I hover over a single photo there I’m given an option to favorite that photo by pressing a little star. This is great. But if I hover over a batch of photos that a user has uploaded I am not given this option. The only way there I can favorite a photo is to click through on the photo and leave a favorite. Flickr should treat all photos whether individual or batch on that page the same giving me a hover over star to favorite the photos.

Bonus: The “taken on” date on a photo’s photo page, really should be a hyperlink that you can click that will take you to that date in your camera roll.

That’s all for now. Much more later. See you on Flickr.

You can find me on Flickr here. ?


Thomas Hawk Digital Connection

 
Comments Off on Top 10 Ways to Improve Flickr for 2018

Posted in Photography