RSS
 

Posts Tagged ‘Handy’

How to Use Lightroom Presets- A Handy Guide

09 Apr

How many of you love wasting hours of time making the same basic edits to a lot of photos? Anyone? No? Well, that’s understandable. None of us like doing menial repetitive tasks and it’s no different when editing images — even for those of us who enjoy the editing process. The good news is that Lightroom has a handy tool Continue Reading

The post How to Use Lightroom Presets- A Handy Guide appeared first on Photodoto.


Photodoto

 
Comments Off on How to Use Lightroom Presets- A Handy Guide

Posted in Photography


A Photographer’s Shutter Speed Cheat Sheet as a Handy Reference for You

01 Mar

To take your photography to the next level and achieve perfectly exposed photos, it’s important to understand and master shutter speed and its relationship to Exposure. However, what’s even more exciting and challenging is using shutter speed as an artistic tool to achieve stunning effects.

Whether you want to master shutter speed as part of Exposure Triangle or use it artistically, the Shutter Speed Cheat Sheet makes things much easier!

Shutter Speed Cheat Sheet DPS 700px

Full Stop, ½ Stop, 1/3 Stop

The equation behind the relationship between Exposure and Shutter Speed is straightforward; by doubling or halving the shutter speed you are changing the exposure value by 1-stop. However, the introduction of digital cameras changed everything by no longer restricting how much we can change the shutter speed. Some cameras allow us to change the speed by half or even a third of a stop. Use the Shutter Speed Cheat Sheet to help you estimate and calculate your exposure.

Safe Shutter Speed

Using the right shutter speed is vital in photographing moving objects. Look at the Shutter Speed Cheat Sheet to see how speed directly affects image sharpness.

googletag.cmd.push(function() {
ruleset_slots.push( googletag.defineSlot( “/1005424/_dPSv5topic-rhs(300×250)”, [300, 250], “pb-ad-0” ).addService( googletag.pubads() ) ); } );

Light

The Cheat Sheet illustrates how a faster shutter speed means that less light reaches the camera sensor and a longer shutter speed means that more light reaches the sensor.

Artistically Shooting with Shutter Speed Cheat Sheet

Birds in Flight 1/2000

Wildlife photographers typically use a 1/2000th of a second shutter speed to ensure birds in flight are sharp. Ultimately, you can reduce the speed to 1/400th to give the bird a sharp body and blurry wings.

Action Sports

Shutter speed is crucial in fast-moving sports like football and soccer where a shutter speed between 1/500th and 1/1000th freezes the action to create crisp and sharp images.

Street Photography 1/250th – 1/500th

googletag.cmd.push(function() {
ruleset_slots.push( googletag.defineSlot( “/1005424/_dPSv5topic-rhs(300×250)”, [300, 250], “pb-ad-1” ).addService( googletag.pubads() ) ); } );

Most streets are in constant movement with pedestrians and vehicles. That is why shutter speed is critical to produce the right exposure and to avoid soft or blurry images.

Shutter Spped Cheat Sheet StreetPhotography

Street Photography 1/250th, f/8, ISO 100.

Landscapes 1/125th – ¼

Shutter speed varies across landscapes and techniques. When using a tripod, a slower shutter speed of 1/8th or ¼ of a second is acceptable. However, to avoid blurry images when shooting hand held, you need to use a faster shutter speed.

Shutter Spped Cheat Sheet Landscapes

Landscape 1/125th, f/8, ISO 100.

Panning Cars 1/15th – 1/60th

Panning is an artistic effect created when a slower shutter speed of 1/15th to 1/60th is used to track a moving object like a car. This causes the car to stay in focus while its surroundings are completely blurred.

Waterfalls 1/8th – 2 seconds

Capturing fast-moving water with a longer shutter speed creates a visual effect of motion blur which does not exist in reality.

Shutter Spped Cheat Sheet RunningWater

Waterfall 1/6th, f/20, ISO 100.

Blurring Water half – 5 seconds

For slower moving water like ocean, lakes, and rivers you need to use a shutter speed slower than half a second to create dreamy landscapes and seascapes with silky, smooth water.

googletag.cmd.push(function() {
ruleset_slots.push( googletag.defineSlot( “/1005424/_dPSv5topic-rhs(300×250)”, [300, 250], “pb-ad-2” ).addService( googletag.pubads() ) ); } );

Shutter Spped Cheat Sheet Water

Slow Moving Water 4 seconds, f/6.3, ISO 100.

Fireworks 2-8 seconds

Capturing fireworks can be exceptionally difficult. A faster shutter speed yields a speck of light across a dark sky and a slower speed creates a blurry, overexposed image. Try using a 3-5 second shutter speed for optimal results.

Stars 15–25 seconds

Like fireworks, shooting the stars requires balance. A faster shutter speed produces tiny and dim stars, but a longer shutter speed (over 30 seconds) produces a trail effect. For the brightest and clearest stars, try a shutter speed between 15 and 25 seconds.

Star Trails

Take advantage of the earth spinning on its axis by opening the shutter speed long enough to capture the star trail. This is often done with a 15-minute (or longer) shutter speed (exposure time). However, you can create the same effect digitally by taking a series of photos (100+) with a 30 seconds exposure each. Later, blend the images together using editing software to create a gorgeous trail effect.

googletag.cmd.push(function() {
ruleset_slots.push( googletag.defineSlot( “/1005424/_dPSv5topic-rhs(300×250)”, [300, 250], “pb-ad-3” ).addService( googletag.pubads() ) ); } );

The post A Photographer’s Shutter Speed Cheat Sheet as a Handy Reference for You by Viktor Elizarov appeared first on Digital Photography School.


Digital Photography School

 
Comments Off on A Photographer’s Shutter Speed Cheat Sheet as a Handy Reference for You

Posted in Photography


3 Handy Lightroom Features I Discovered by Accident

27 Jan

When I first started to dabble in photography, I knew very little about post-processing. I used Picasa to edit my photos. It’s free and easy to use. I experimented with the different settings and created some pretty interesting images (they weren’t very good). Needless to say, I had no idea what I was doing.

This was the extent of my early post-processing attempts. I created collages in Picasa.

This was the extent of my early post-processing attempts. I created collages in Picasa.

Self-learning methods and benefits

Like many of you, I am a self-taught photographer. My degree is in English Literature, and photography was something I dabbled in as a hobby. I learned photography by reading books, participating in online forums and through trial and error. It’s been a long hard road but it’s been well worthwhile.

I learned most of my post-processing by watching YouTube videos. It has become one of my favorite ways to learn. There’s some inspirational stuff available that you can use to teach yourself all kinds of different skills. It’s a lot of fun, and the benefit of learning in this way is that you can go at your pace.

This type of learning is perfect for my lifestyle, and I’m sure for many of you the same factors apply. It always amazes me what we can teach ourselves when we put our minds to it. Check out this video. Sean Tucker experiments with landscape photography and discusses how important it is to continue to learn and push ourselves.

Three Lightroom Features Discovered by Accident

Now that we are on the path to self-directed learning I would like to share with you three Lightroom shortcuts, hacks, tricks, or whatever you want to call them, that I learned completely by accident. I just pushed buttons to see what would happen. By just experimenting, the results paid off. I learned some very efficient ways to manage my post-processing workflow, and I want to share them with you.

Accidental Discovery #1 – the Alt key

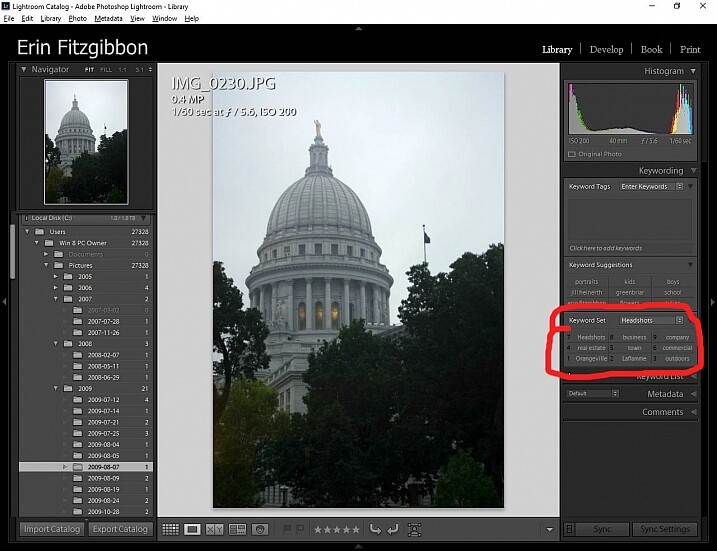
By simply pushing buttons I discovered some pretty cool functions. If you hold down the Alt key while in the Library module, little numbers appear by each keyword. You can then simply hit the number, and the module will tag your images with that keyword. Brilliant!!!

If you create a set keywords, this little trick becomes even more useful. The keyword set is then added to your images by simply typing in the correct number.

Alt key Lightroom Library module

This little discovery saves me loads of time.

In the Develop module, the Alt key is very useful when setting black and white points in your images. Hold down the Alt key while hovering your cursor over the Blacks slider. The image will go completely white and as you move the slider from side to side (move it left to darken or add black) you will be able to see when the blacks begin to clip in your image.

This is a great way to adjust your image and super easy to see (and adjust) how much contrast range it will have. You can use the same principle to adjust the white points in your image. Give it a try. It’s one of the first steps I take when editing my work.

Note: It’s okay and even desired to have some blacks clipping in your image, but ideally you want to keep any whites from doing so. Clipping means areas with no detail in that tonal range.

Alt key Lightroom Develop module black point slider.

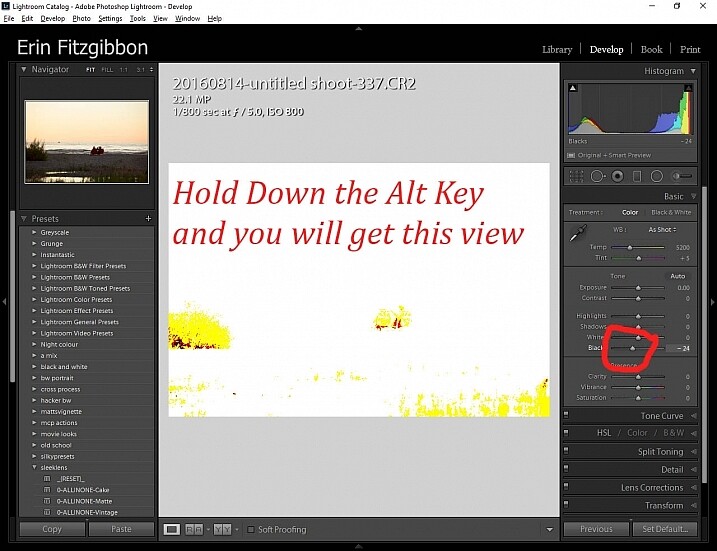
Here’s a screen shot of the black point slider.

Accidental Discovery #2 – Navigator Window

The Navigator window is very useful when you need to zoom in. This is probably really obvious and silly to those who have formal Lightroom training. Before discovering this little trick, I would zoom in and out applying the adjustment brush to small sections of the image. It was very tedious.

Then one day I discovered that if I click the 1:1 button on the Navigator (preview) window and then slide the square around on the screen, I could apply the adjustment brush without the tedium of closing the adjustment brush and moving out to the full-screen view.

Lightroom features 1:1 preview window

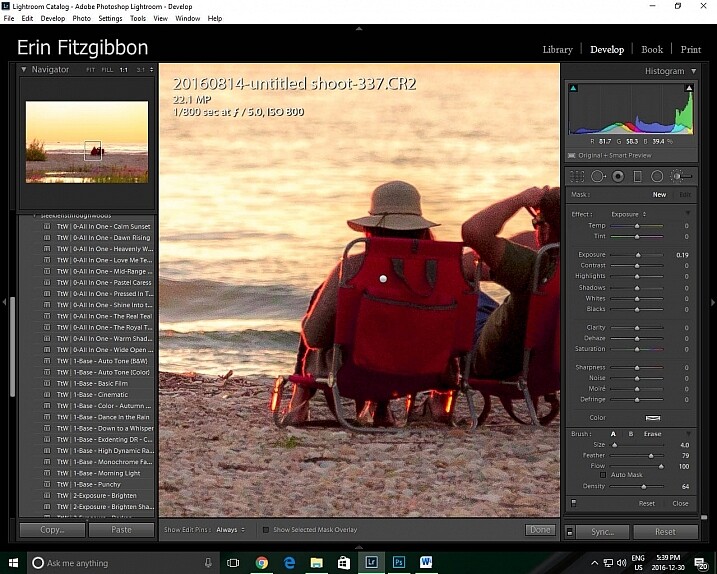
When I need to apply the same brush to several different areas of an image I click on the 1:1 feature and slide around the image making adjustments.

Accidental Discovery #3 – Lights Out in the Library

It took me a little while to figure out this trick. Again, I was just experimenting and pushing buttons. I had learned to use the Lights Out feature in the develop module.  When you press the letter L on your keyboard, it dims the surrounding panels so that you can focus more on the image at hand (press L again for total black around your image, and once more to return to normal). This same tool works well in the library module. I now use the “Lights Out” feature to isolate specific images. Simply select the images you wish highlight then hit the “L” button. It’s a neat little trick.

This same tool works well in the library module. I now use the Lights Out feature to isolate specific images. Simply select the images you wish highlight then hit the “L” button. It’s a neat little trick.

Lightroom features Lights Out in Library module

I use this feature to help me analyze an image before I decide it’s finished.

Lightroom features Lights Out in Library module

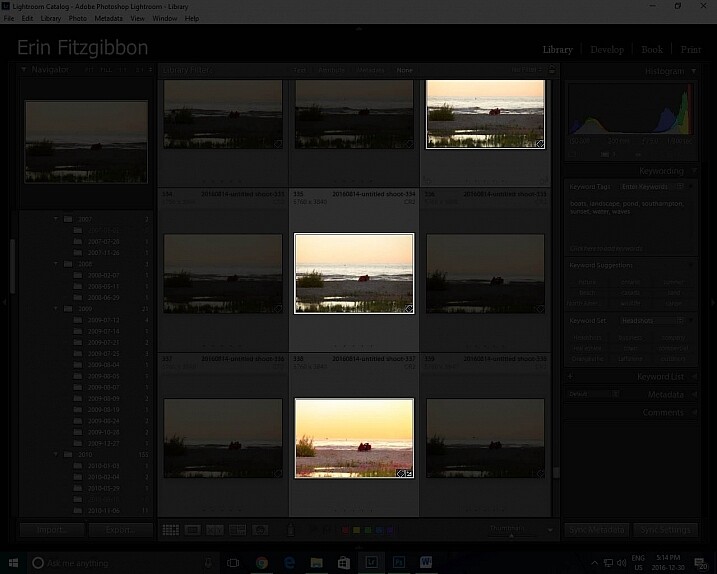
Look how easy it is to isolate specific images in the library module.

Conclusion

Experimentation is never a bad thing. We live in an age when we are lucky to have so many resources available to us. The internet is a true cornucopia of opportunity. Don’t be afraid to try different things. You really can’t break the program.

Sure there have been times when I have had to call Adobe and ask for assistance because I’ve pushed some button and haven’t been able to reset the program, but those times have been very few and far between.

Let me know about some of the tricks you use when post-processing. I’m sure there’s so much out there I still need to learn and I’m hoping you can add to my list of discoveries. What have you taught yourself about post-processing or using Lightroom in general? Please share in the comments below.

googletag.cmd.push(function() {
tablet_slots.push( googletag.defineSlot( “/1005424/_dPSv4_tab-all-article-bottom_(300×250)”, [300, 250], “pb-ad-78623” ).addService( googletag.pubads() ) ); } );

googletag.cmd.push(function() {
mobile_slots.push( googletag.defineSlot( “/1005424/_dPSv4_mob-all-article-bottom_(300×250)”, [300, 250], “pb-ad-78158” ).addService( googletag.pubads() ) ); } );

The post 3 Handy Lightroom Features I Discovered by Accident by Erin Fitzgibbon appeared first on Digital Photography School.


Digital Photography School

 
Comments Off on 3 Handy Lightroom Features I Discovered by Accident

Posted in Photography


Handy tool helps you say no to work for ‘exposure’

16 Dec

Graphic designer Jessica Hische has developed a tool to help creatives respond to requests for work. Made with designers in mind, photographers who are frequently asked to work ‘for exposure’ or very little pay might find it appealing too. The choose-your-own-adventure style tool helps you build a letter based on the client and the proposed budget – none, very low or good. It will also help you negotiate other tricky situations like an ambiguous timeline or very quick turnaround. 

Hische’s tool creates a letter that’s polite but firm, and more than just saying ‘no,’ aims to inform the asker why creative professionals must insist on being paid for their work. It also offers terms for taking on no-budget projects for charities and friends. 

Articles: Digital Photography Review (dpreview.com)

 
Comments Off on Handy tool helps you say no to work for ‘exposure’

Posted in Uncategorized


Kinderfotos mit dem Handy

09 May

Kind auf einer blauen Hüpfburg

Knipsen nennt man es ja gern, wenn man mit dem Handy schnell ein paar Momente festhält. Aber damit tut man den Bildern völlig unrecht, denn sie sind oft sogar wertvoller als die Fotos vom Fotografen. Und das schreibt hier gerade tatsächlich eine Person, die als Kinderfotografin Geld verdient.
kwerfeldein – Fotografie Magazin | Fotocommunity

 
Comments Off on Kinderfotos mit dem Handy

Posted in Equipment


Apps for Architects: 12 Handy Digital Tools for Home Design

27 Oct

[ By Steph in Design & Fixtures & Interiors. ]

Architect Apps Photomeasures 2

Remodeling your house, decorating a room or designing an entire structure gets a lot easier with a range of mobile apps that let you draw to scale, save measurements on top of photos, access thousands of inspirational images and more. These 12 handy tools will ensure that you ever buy a piece of furniture that’s too big for your space, lose the ideas you scrawled on paper or stand around staring at bedding wondering whether it’ll clash with your drapes again.

Photo Measures
Architect Apps Photomeasures 1

Save measurements right on your photos with the Photo Measures app. Snap images of rooms or objects and immediately save their exact dimensions so you can be sure whether furniture will fit in a given space, or give contractors all the info they need for a renovation.

Phaidon Design Classics
Architect Apps PHaidon Design Classics

Architect Apps Phaidon Design Classics 2
You can buy the 10-inch-thick Phaidon Design Classics book for $ 175, or just get the iPad app for $ 19.99. Either option will give you access to 1,000 iconic design projects, but the app is definitely more portable. It’s a handy reference for anyone trying to style an interior, providing visuals for everything from Eames chairs to antique glassware.

Remodelista
Architect Apps Remodelista

Sort through thousands of inspirational interior design images, save them to your own customized folders and share them with the Remodelista app for iPad, iPHone and Android. It puts the entire archive of Remodelista.com posts at your fingertips, along with a list of products featured in each post.

Penultimate
Architect Apps Penultimate

Architect Apps Penultimate 2

Want the ease and comfort of writing on paper, with the search functions and shareability of digital? The Penultimate app is a replacement for your physical notebook, allowing you to write and sketch with a stylus. Even better, you’ll never lose another important note again – everything you create in the app is synched to your Evernote account automatically so you can view, search and share them across a range of devices.

Next Page – Click Below to Read More:
Apps For Architects 12 Handy Digital Tools For Home Design

Share on Facebook


[ By Steph in Design & Fixtures & Interiors. ]

[ WebUrbanist | Archives | Galleries | Privacy | TOS ]


WebUrbanist

 
Comments Off on Apps for Architects: 12 Handy Digital Tools for Home Design

Posted in Creativity


Essential Photography Business Kit: 5 Things to Keep Handy at All Times

27 Oct

Even if you don’t have a business plan, or much of a business to speak of, if you’re going to be or already are a professional photographer, there are certain things you will need and often will be asked for over and over again. Luckily, you don’t have to do extra work every time to meet these needs — instead, Continue Reading

The post Essential Photography Business Kit: 5 Things to Keep Handy at All Times appeared first on Photodoto.


Photodoto

 
Comments Off on Essential Photography Business Kit: 5 Things to Keep Handy at All Times

Posted in Photography