RSS
 

Posts Tagged ‘Handle’

Synology launches ‘budget-friendly’ 4-bay NAS that can handle up to 40TB of storage

15 Aug

Data storage solutions manufacturer Synology has added a new, lower-cost NAS to its DiskStation j line that has a maximum capacity of 40TB, and is aimed at the home user and photography enthusiast.

The DS418j has 4 disk bays, each of which can accommodate HDDs or SSDs of up to 10TB. Data is controlled via a new 64-bit dual-core processor and the device has been fitted with 1GB of DDR4 RAM—doubling the memory of the previous model.

Synology claims the DS418j can read at 112MB/s and write at 87MB/s encrypted and in RAID 5, providing fast data storage and retrieval, and allowing high resolution media streaming and synchronisation in domestic or small office environments. The case has a single RJ-45 1GbE LAN port and a pair of USB 3.0 sockets, and can support wireless access via a dongle.

The DS418j comes with a two-year warranty and is available now for £284/€312/$ 330. For more information see the Synology website.

Press Release

Synology® Introduces DiskStation DS418j

Powerful entry-level 4-bay NAS for home data backup and multimedia streaming

Synology® Inc. today launched the new DiskStation DS418j, a budget-friendly 4-bay NAS server designed to help home and individual users to manage, protect and share data effectively.

DS418j is powered by a brand-new 64-bit dual-core CPU and delivers an outstanding encrypted file transfer performance at over 112 MB/s reading and 87 MB/s writing under a RAID 5 configuration in a Windows® environment. Equipped with a 1GB DDR4 memory, which is twice the size of its predecessor, and over 40TB single volume raw capacity support, DS418j brings flexible storage management in addition to smooth performance.

“In the digital era, photos, videos, and digital assets are being generated faster than ever. For home and individual users, it is essential to have a private storage solution that can satisfy the needs for both large storage capacity and secure data sharing,” said Michael Wang, Product Manager at Synology® Inc. “Combining hardware innovations and rich applications, the 4-bay DS418j allows users to enjoy cloud synchronization and multimedia streaming at a competitive price.”

Designed with user experience and energy efficiency in mind, DS418j is equipped with adjustable front LED indicators, allowing users to precisely control and schedule the brightness in four levels. In addition, the model consumes only 21.22 watts in full operation and as little as 8.97 watts in HDD hibernation.

DS418j runs on DiskStation Manager (DSM), one of the most advanced and intuitive operating systems for network-attached storage devices which offers a wide range of applications from backup to multimedia for home and personal use. With DSM, Synology® has received numerous media accolades, including PC Mag Readers’ Choice for seven years in a row.

For more information, please visit https://www.synology.com/products/DS418j

Availability
Synology DiskStation DS418j is available worldwide immediately.

Articles: Digital Photography Review (dpreview.com)

 
Comments Off on Synology launches ‘budget-friendly’ 4-bay NAS that can handle up to 40TB of storage

Posted in Uncategorized


Handle with Care: 10 Years of Fragile Glass Boxes Broken by FedEx

10 Feb

[ By WebUrbanist in Art & Sculpture & Craft. ]

fedex-box-arts

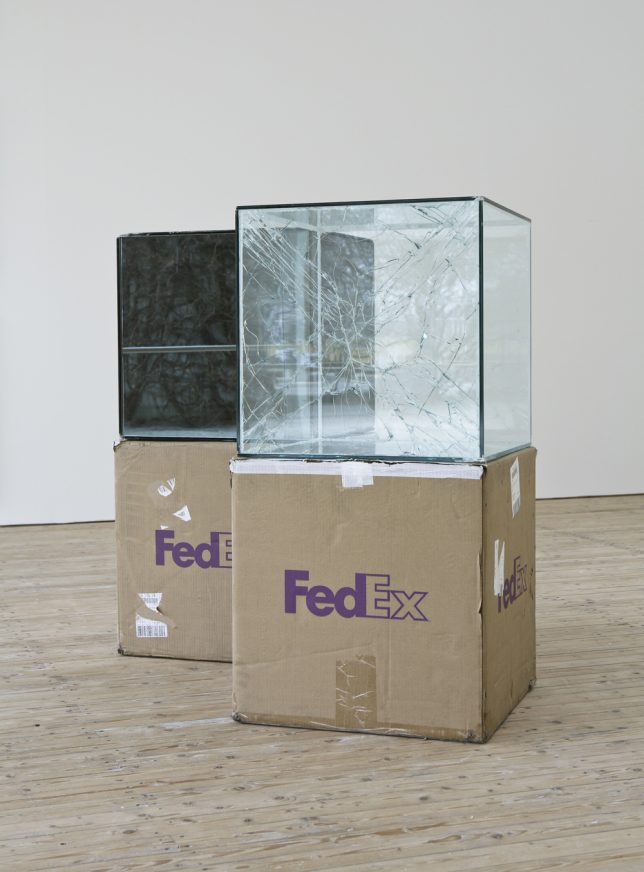
Packing and shipping artwork is a delicate and costly process, unless your intention is to create new pieces by allowing them to break along the way. Starting in 2005, artist Walead Beshty began a decade-long project, sending works of art to galleries around the world with an important twist: the key element of their creation happened in transit.

fedex-cubic-assembly

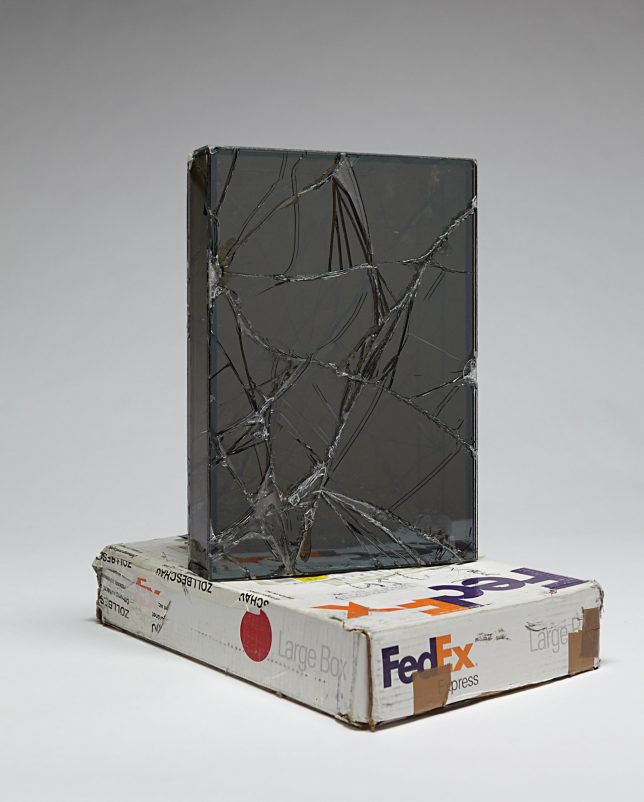
Beshty would construct glass boxes to fit inside the cardboard shipping containers, matching their interior dimensions (no padding or other protection). Curators then unpacked the finished works, usually cracked but not totally destroyed (being constructed from shatter-proof glass).

fedex-express-tube-art

Each piece was given a descriptive name including the date of shipment, tracking number and box dimensions, then put on display (resulting in titles like: FedEx® Large Box ©2005 FEDEX 139751 REV 10/05 SSCC, Priority Overnight, Los Angeles-New York trk#795506878000, November 27-28, 2007). In some cases, the glass contents are reshipped, changing form again and again as they move between exhibitions.

fedex-pedestals

The net result is a work that tells the story of its own travels, particularly a period between leaving the hands of the artist and being received by a museum or collector. The displays vary, but in some cases the battered boxes become pedestals for the finished sculptural displays.

not-borken

But beyond this fixation with the story behind the art, there is another element that drove Beshty: the “perversity of a corporation owning a shape” – as it turns out, FedEx has managed to copyright the dimensions of their box designs.

fedex-glass-cube

“They are basically a unit of space owned by a corporation in which to ship objects,” explains the artist. This idea of a company being able to “own” an empty volume of air designed to transport goods seemed surreal, and was another factor motivating this unusual mobile art project.

Share on Facebook


[ By WebUrbanist in Art & Sculpture & Craft. ]

[ WebUrbanist | Archives | Galleries | Privacy | TOS ]


WebUrbanist

 
Comments Off on Handle with Care: 10 Years of Fragile Glass Boxes Broken by FedEx

Posted in Creativity


Camera Lift-Strap eases camera weight by clipping to a backpack handle

07 Jul

A unique camera strap from PONTE Leather Co. called Camera Lift-Strap has surfaced on crowdfunding website Kickstarter, and it aims to ease the discomfort of carrying heavy cameras around the neck. Camera-Lift Strap features a clasp that is positioned behind the wearer’s neck. When a photographer is also wearing a backpack, the camera strap can be clasped to the backpack’s handle, moving the camera’s weight off the wearer’s neck and distributing it onto his or her shoulders.

The Camera Lift-Strap is presented in two varieties: the Canvas Camera Strap, which is made of weather-treated nylon, and the Leather Camera Strap, which is made from ‘top grain leather,’ according to PONTE Leather Co. The strap’s metal components are made of brass with an oxide finish. The company plans to offer two attachment types, as well as a custom steel ring for securing all types of cameras to the strap. 

PONTE Leather Co. is currently seeking funding for the product on Kickstarter where remaining pledge options include a canvas Camera Lift-Strap for $ 26, an early bird leather Camera Lift-Strap for $ 35, and various multi-strap bundle options at higher price points. The company anticipates shipping the straps to backers in November 2016.

Via: Kickstarter

Articles: Digital Photography Review (dpreview.com)

 
Comments Off on Camera Lift-Strap eases camera weight by clipping to a backpack handle

Posted in Uncategorized


DJI introduces stabilized Osmo Gimbal handle with 4K 12MP camera

16 Oct

DJI, the maker of Phantom drones, has introduced a stabilized handheld 4K video system that uses a gimbal head to produce smooth video footage. The DJI Osmo is a handle-mount with a 3-axis head that senses movement and cancels out sudden jerks and bumps to ensure the camera moves slowly and the footage looks professional. Read more

Articles: Digital Photography Review (dpreview.com)

 
Comments Off on DJI introduces stabilized Osmo Gimbal handle with 4K 12MP camera

Posted in Uncategorized


7 Ways to Handle High Contrast Scenes

02 Dec

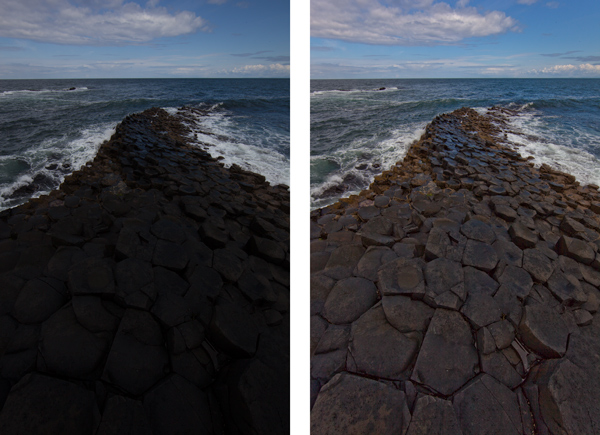
Perhaps the greatest challenge you will face in outdoor photography is the high contrast created by the sun and the bright sky versus a darker foreground. That is one of the reason photographers try very hard to shoot at dawn or sunset. Otherwise, the sky is virtually always so much brighter than anything on the ground that it is hard for your camera to deal with the contrast. Either your camera exposes the sky correctly, which makes everything on the ground look black, or the camera exposes the foreground correctly resulting in a blown out (or pure white) sky. If you try to expose in the middle, you will have problems with both highlights and shadows.

The challenge is constant and great, but there are some things you can do to create great pictures no matter what the light. This article will walk you through some ideas for doing that.

1. Fix it in Post-Production
GiantsCauseway

The first thing you can do is try to fix the problem in post-processing. Both Lightroom and Adobe Camera Raw (used in Photoshop and Photoshop Elements) have sliders that can help bring your sky back or add detail to a dark foreground. They won’t bring back a truly blown out sky or pitch black foreground, but you might be surprised at what they can do.

For an overly bright sky, try pulling the Highlights slider down (in other words, pull it to the left). That will usually add detail. If you have blue portions of your sky, another trick is to target the blue portion and make that darker, while keeping the clouds white.  To do that, go to the HSL/Color/B&W panel in Lightroom, or the HSL/Greyscale tab in ACR, and find the Blue slider.  Click on the Luminance tab, and pull the Blue slider down (to the left). That will preserve good highlight tones in the clouds but darken the blue tones to make the sky look much better.

If your foreground is too dark, you can brighten it up using the Shadows slider in the Basic tab of Lightroom or ACR. Pull that slider up (to the right). That will brighten up the darker tones.  You may find, however, that lightening the shadows in this fashion makes the foreground look too flat or washed out. There is a simple cure for that though. Find the Blacks slider, which is just below the Shadows slider, and pull the Blacks slider down (to the left) a little bit. It may seem counter-intuitive to darken the Blacks since you just lightened the Shadows, but this adds contrast back to your foreground. So the foregound will be lighter due to the increase you made to the Shadows, but will still have contrast because of the decrease you made to the Blacks.

2. Consider Converting to Black and White

Horse

The problem you’ll encounter most of the time when you convert your pictures to black and white is a lack of contrast. Very often, photographers convert their pictures to black-and-white only to find that they look dull and flat. You want tones ranging from pure white all the way to pure black. The high contrast you are combating can actually be an asset in black and white photography.

One problem with shooting with a bright sky or at midday, of course, is usually the high contrast. In addition, people are just plain used to seeing the middle of the day, so when they see a picture taken at midday viewers can find it uninteresting. Converting to black and white can solve both of these problems. As mentioned above, the high contrast can be an asset in black and white. Further, black and white is not how people are used to seeing the world, so the photo may look more interesting to them. Of course, this is not a cure-all, and a blown out sky is still a blown out sky, but converting to black and white can occasionally save a really high contrast picture. So, try converting toblack and white if your picture is overly contrasty.

3. Use Fill Flash

People often think about using a flash only in low-light situations. But perhaps a better use for flash is in very bright situations like those we are talking about here. It doesn’t seem to make sense at first, but what you are doing is letting the flash fill in some of the harsh shadows and thereby deal with your high contrast problem.

If you use fill flash, set your camera’s exposure settings so that the sky is properly exposed. You might take a shot or two without the flash to make sure you have it set properly. Then add the flash to brighten up the foreground and keep it from being black. Dial back on the power of the flash unit or the flash exposure compensation to make it look more natural. That should result in a properly lit subject with a sky or background that looks good as well.

4. Use a Graduated Neutral Density Filter

MarinCo

The scenes we are talking about in this article stem from an overly bright background and a dark foreground. The previous tip addressed a way for you to brighten the foreground. Now let’s reverse that and talk about a way to darken the sky so that it is roughly the same exposure as your foreground.

To do that to, you will want to buy a graduated neutral density filter. These are square filters that fit in holders attached to the front of your lens. The top portion of the filter is dark, and it fades to clear glass at the bottom. That way it darkens the sky while having no effect on the foreground. Use one to darken the sky and keep the brightness values within the dynamic range of your camera.

5. Blend Your Exposures
GrandCanyonAll

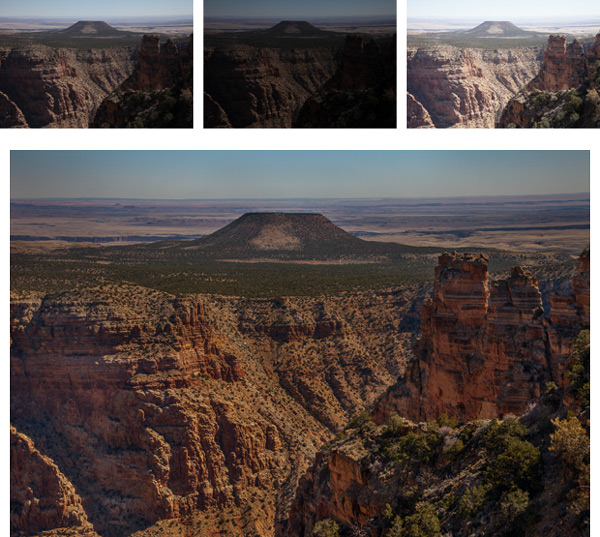
Another way to deal with contrast that goes beyond the dynamic range of your camera is to bracket your pictures and blend them later. Most cameras have a function in the menu that allows you to set the amount you would like to overexpose or underexpose your pictures. That way when you press the shutter button it will take three pictures: One at normal exposure, one underexposed, and one overexposed. Some cameras will actually allow you to take five or even seven photos.

You can blend these three pictures later in Photoshop by using parts of each exposure for your final photo. For example, you may want to use the sky from the darker, underexposed photo. You may want to use the foreground from the brighter, overexposed photo. There may be elements of each that you want to take from the normally exposed picture. By blending them all together in Photoshop, you will have a picture that is properly exposed across the board.

To accomplish the blending, here’s a quick primer on the process:

  1. Open all your files as layers in the same picture. You can accomplish this in Lightroom by selecting your photos, and then going to Open as Layers in Photoshop (either Photo > Edit In > Open as Layers in Photoshop or right-click and select Open as Layers in Photoshop).  If you don’t have Lightroom, there is a similar function using Adobe Bridge. In addition, in Photoshop you can select photos and open them as layers by choosing File > Scripts > Load Files into Stack, and then using the resulting dialogue box to select the photos you want.
  2. From there, add a layer mask to your top layer (Layer > Layer Mask > Reveal All). The white layer mask you just created does not change anything, and all of this top layer will still show up in your picture. But you have created a mechanism to change that.
  3. To have Photoshop apply portions of the layer below, select your brush tool and set the color to black. Then just brush in where you want the layer below to appear. Remember, anywhere the mask shows white the top layer will show; anywhere the mask shows black it will reveal the layer underneath.
  4. If you want to combine a little of each layer, reduce the opacity of your brush to a lower percentage. Often this process works best by  setting the opacity very low (under 10%) and brushing in the layer below where you want it gradually with a large brush.
  5. When you are done with that process and the photo looks the way you want, merge these layers (Layer > Merge Down). Then repeat the process for the layer below, revealing whatever portions of that layer you want in your final picture.

6. Blend into an HDR File

Thus far, I’ve avoided the option of using High Dynamic Range (HDR) software to deal with the dynamic range problem you face. Of course, you can bracket your photos (as set forth above) and process them using Photomatic Pro, HDR Efex Pro, Photoshop, or other HDR software. That is a topic in and of itself.

For purposes of this article, consider using an HDR file as part of the blending process discussed above. In other words, first bracket your exposures. When you are in front of your computer, create an HDR file using your preferred method. Now, bring your original three exposures and the HDR image into Photoshop using the method outlined above. When you bring them all in, you should have four layers showing.

Then just do the blending process described above. Put the file you think looks the best on top. Next, follow the process set forth above for blending in each of the other layers. If it turns out you don’t want to use one of the layers you can just delete or hide it. Using this method, you should have complete control over the exposure levels in your picture. In addition, this process will provide you the benefit of HDR software without that HDR-look that many photographers try to avoid.

7. Work with it

Tree

This might sound like giving up, but you might consider using the high contrast for effect. For example, you can use the brightness by adding sun’s rays into the picture. You can use the darkness by creating a sillouette. Think about effects like these at the time you are shooting. Sometimes you can turn a problem into an interesting feature of your photograph.

Or, if there is no way to use the high contrast as an effect, you can sometimes minimize it by shooting away from the sun. Not having the sun in your picture will keep the sky from being too bright.  If you are lucky, the sun will lighten up the foreground enough to keep it within the dynamic range of your camera without creating any harsh shadows.

Your Greatest Challenge

Dealing with this problem of dynamic range is perhaps the greatest challenge of the digital photographer. Unless you have thousands of dollars to buy a medium format camera and get the increased dynamic range that the larger sensor size offers, you will need to take steps such as those above when you are shooting outside. Use these tips to overcome this obstacle and make your photos stand out.

The post 7 Ways to Handle High Contrast Scenes by Jim Hamel appeared first on Digital Photography School.


Digital Photography School

 
Comments Off on 7 Ways to Handle High Contrast Scenes

Posted in Photography


How to Get More Referrals Than You Can Handle

12 Aug

Referrals are an incredibly effective way to build your business and get great clients. Referred clients are often more loyal, consistent, more suited to work with you and they often send more referrals your way. How do I know this?

By Leo Reynolds

Referrals work – but have a system

My partner Nicole and I have gotten 80% of our videography work from referrals. And it didn’t happen by accident, we created a system that ensures we don’t have to go out looking for our next gig. A system that we created at the start to have referral clients reaching out to us with projects they wanted us for. Talk about turning the tables! So now, I’m going to share with you our exact system and how you can implement it right now.

What to consider before you get started building your referral system

But before we get into the nitty gritty of our system, there are a few important things you need to consider. Let’s take a look at the questions below; they will help you frame your understanding of our system. Answer these questions before we dive in and you’ll be ready to start implementing this system as soon as you finish reading this article.

By Stefano Bertolotti

1. Why would someone send a referral your way?

Before you begin to ask for referrals, create a list of the benefits your clients experience when they work with you. These are the same benefits a referral client would experience if they worked with you as well. What are the social, emotional and professional benefits that go along with being someone who refers people in need to those who can help? In this case, the referral client is in need and you are the person that can help.

2. Who would make an ideal referral for you?

Write down the types of people who make great referrals. Your customers may have no idea whom to refer to you, so make it easy for them to send the right people your way.

3. Where would a client find a potential referral to actually send your way?

Write down the places where your referrers would meet or connect with good referrals for you. Your goal here is to help your clients, and other acquaintances, understand who in their lives will benefit most from a referral, and where they cross paths with these people. This makes it easy for the referrer to start thinking of people to refer to you immediately.

4. How should someone go about sending you a referral?

Empower your clients to have a simple conversation with a potential referral who will effectively connect them to you and what you do. You absolutely cannot leave this to chance. You must be able to articulate what you do in a way that truly connects you to the people you want to serve. This is absolutely essential.

Write down how you’d like people to refer their contacts to you. What do you want them to say? Create a short script for them- they’ll thank you for it as you just made things even easier for them. How do you want them to talk about what you do? What specific words and phrases do you want them to use? Get very specific. You decide how you want people to talk about you.

Just thinking about these questions and writing down your responses is going to put you ahead of most of your completion. Your answers to these questions will play a major role in implementing our getting more referrals system; so take it seriously.

The four step referral system

All answered up? Okay, let’s get into the four steps of the referral system.

At the bottom of this post, there is a link where you can download a checklist that goes along with this system. Go ahead and download it now and I’ll meet you back here once you have it open along with this post.

Downloaded and opened? Awesome! Let’s get started. This system is broken into four major steps:

By Shereen M

Step 1: Know when to ask for a referral

We recommend asking for referrals at the time of delivery of your project, when the quality of your work, and the experience of working with you is fresh in the client’s mind. The optimal opportunity to ask for referrals during this time is when the client compliments your work or asks you questions about your business.

Step 2: Know how to ask for a referral

The actual words you use to ask for a referral is critical to getting the referral you want. This is why we are just flat-out giving you a script you can use when asking for referrals:

I really appreciate all the positive feedback about my work. I always want to exceed my client’s expectations; it’s actually how I get most of my projects. Most of my work comes from referrals from clients like you.

Can you take a few minutes today to help me help others with their photography needs? Could you introduce me to three of your contacts that you think might need my expertise? By making these connections, sharing with them how much you enjoyed working with me and how happy you are with the results, I can continue to serve people I love working with.

Thank you in advance for the introductions and creating the potential for another great experience.

A few things are being said here in this script.

  1. Your work speaks for itself and is the reason you continue to succeed in your field.
  2. The client understands that giving you referrals is what is expected since that’s how you get most your work.
  3. The client starts to feel important and plays a critical role in creating connections and providing great experiences for others.
  4. The “thanks in advance” assumes that they will actually take action which sets up an expectation. The client understands you expect them to send you some referrals.

Step 3: Your post referral strategy

Once you get a referral, follow up with them ASAP. You don’t want to wait too long. Reply the next day at the latest. Many times your client referred them to you the same day they reach out to you. You will want to capitalize on that moment of good will and excitement.

Also, make sure you circle back to the referrer, thank them and tell them how the project is going. It shows how serious you take your business and they will send you more referrals in the future.

Step 4: Giving referrals to get referrals

By Nan Palmero

Don’t just sit around and wait for clients to send you over referrals after you ask them to. One of the best ways to get referrals is to give them. Who are the other service providers that serve your target market? Make a shortlist of people you can refer to?

Are you a wedding photographer that can refer a videographer or banquet hall manager to someone? Maybe even a client of yours? The next time you see someone who would be an ideal client for someone else, go ahead and make that referral. If you are giving your colleagues in your target market referrals, chances are they will want to do the same for you in return.

Final advice

This is a tried and true system. Use it. The key is to stay consistent and go through the steps of this system every time you have a client.

Not working with a client right now? You don’t need to wait to put this into practice. Reach out to past clients you haven’t already asked for a referral and use the script above. You can change up the first paragraph of the script with: “I was reviewing some of my past work in my portfolio and was reminded how much I enjoyed working with you as a client. I’m always looking for ideal clients like you to work with.”

You got this! Don’t hesitate. Use this system and start getting more referral work today.

Download the checklist

Remember, there is a nifty checklist that goes along with this getting more referral system. You can download it here!

The post How to Get More Referrals Than You Can Handle by Omar Zenhom appeared first on Digital Photography School.


Digital Photography School

 
Comments Off on How to Get More Referrals Than You Can Handle

Posted in Photography


How to Handle Image Theft Peacefully

25 Feb

stockyards-entrance

First off, I am certainly not a lawyer and am not giving legal advice in this article, I’m simply telling my story and how I handle image theft. If you have questions about legal advice, please consult with an attorney.

Recently I received a phone call from a family member who believed a local news station was using one of my images as a green screen background. This was interesting considering I hadn’t had any conversations with any news stations recently about such a thing. I asked him to send me a photo of the segment and sure enough, it was mine.

I’ve dealt with my fair share of image theft over the last five years of being a professional photographer and I’ve certainly seen a lot more situations of other photographers getting their images stolen.

One thing that has never sat well with me is when I see some photographers attempt to completely destroy people for using their images without permission. Taking a situation like this to social media and damaging the reputation of the offender should be an absolute last resort, not a first knee-jerk reaction.

Quick Side Story

I had this same image stolen by a well known wedding photographer in the Dallas/Fort Worth area. I am friends with him on Facebook and was just scrolling through my feed when I saw this image being used as a photo booth background. I could not believe my eyes! What many photographers would have done is create a public post calling him out and saying what a despicable thing he had done. This would damage his local reputation and certainly go a long way toward making sure he never did it again.

Instead, I sent him an invoice for use of the image (it was in about 30 photo booth images in his wedding gallery), a cease and desist letter and a short email explaining why he was getting all this. Within 5 minutes he paid my invoice and sent very heartfelt apology letter and also thanked me for solving it privately instead of publicly. Turns out he hired someone to man the photo booth and told the person to only used free and clear images, but the person he hired was uneducated in finding the right images and found mine on Google and just assumed. Sure, he should have done a better job educating the hired help but it was a mistake. Not intentional.

Ok, Back on Topic – How I Handle Image Theft

Instead of calling the news station out publicly and demanding the image be taken down, I simply stepped back and analyzed the situation. I came to three conclusions…

  • The image was indeed used without my permission.
  • It had been shown on national television to hundreds of thousands (if not millions) of people.
  • Whether they stopped using the image or not, I deserved compensation for the use that had already occurred.

Now it was time to make contact. I sent this short email…

Hello,

My name is James Brandon and your news program used one of my copyrighted photographs without permission this evening (I’m attaching a photo in the email). Also attached is a Cease & Desist letter to stop further use. Since the image has already been used and run on air, I’ll be sending an invoice for the unauthorized use of the photo as well. Please let me know immediately how you plan to respond to this matter, so I can act accordingly.  

– James 

I got an email back shortly that simply said, “James, I’m forwarding this to our corporate attorneys.”

I’m guessing the person writing the email didn’t think I had a case and figured his attorneys would confirm that. The next email I got from him was a lot more wordy and apologetic. It said…

Second reply from offending party

James,

I’m so sorry about the use of your photo.  It was an unintentional error. 

The editor thought he had found something in the public domain. Obviously, he was mistaken.  He would never have used it if he’d realized it was copyrighted material.

OF COURSE we will immediately stop using the image.  I’ve already deleted it from our system so it doesn’t get used again. In light of the error, could you please consider waiving the fee you would normally charge for such use? 

– Mitch (name changed for purpose of article)

Decision time

This is where I had to make a decision. I didn’t send them an outrageously expensive invoice for thousands and thousands of dollars. Rather, I went to the Corbis website and used their pricing guide to figure out how much they would typically charge for similar use of a stock image. I then added a small percentage to that amount since it was unauthorized use. Should I just let them off the hook since he apologized? I think that I might have actually considered that option if that latest email had been the first thing he wrote me. I however got the impression that he was very unthreatened by my letter initially and only after talking to his corporate attorneys did he see the need to be nice to me and apologize. So I decided to (politely) press on.

Mitch,

 I appreciate the apology. Since the image has already been used and run on air (and who knows how long), I really don’t see how it’s fair to ask me to waive the fee. I sent you a very reasonable invoice. 

 I will however agree that once the invoice is paid, I will send over a licensing agreement so that you can keep using the image in the future (provided that it is left in it’s original state and not Photoshopped like it was). 

 Thanks. 

 P.S. Do you know where the editor found the image? Was it on my website? 

-James

Assuming that it actually was a mistake, I was more than willing to let them keep using the image if they were willing to pay my invoice. Some would say that’s too nice of me, but that’s just the decision I made. He wrote back quickly…

Hello, again, James. (<—-That didn’t sound very nice. I think he’s getting tired of me)

 The editor thought he was on a site for which we have rights and somehow managed to get onto another site.

 As to the invoice, I understand your need to charge for use of the image, accidental or otherwise.  The fee is quite high, however, considering that it was on the air for only a few seconds. 

 Could you cut the fee in half?  I could submit that invoice TODAY and we wouldn’t need the license to keep using the image.

 Mitch

At this point I was getting frustrated. He spoke with his attorneys and they clearly told him that the news station was in the wrong. Now he’s trying to barter with me. I could have said screw it and gone to social media. I could have gone off on him and demanded my money and threatened a lawsuit. Instead I simply stood my ground and let him know my stance on the situation. I also let him know how I could have handled the situation…

Mitch,

When bartering, there has to be incentive on both sides to negotiate. If we were speaking before the image aired, there would be at least some incentive to get my image up on your news program. In this case, the image has already aired without my permission. I didn’t get a say in that. 

This image has been stolen before, I guess there just aren’t that many photos of the Stockyards sign out there. The other people/companies that used the image paid my invoice without question (for the same price) and didn’t try to negotiate it. They understood they were in the wrong and didn’t want to risk having the matter becoming public. They were also nowhere near the size of your news program. 

What most photographers do in a situation like this is immediately call out the business or person using their image on social media and their website. This gets the photographer’s followers up in arms and they will typically go bombard the Facebook page of the person or company in question. This looks very bad to the person/company’s followers and it usually gets the ball rolling pretty fast to get it resolved. 

I’ve chosen to take a more peaceful approach, and attempt to settle this matter privately first. Please pay the invoice so we can put this matter behind us and move on.

-James 

That was the last contact I had with Mitch. After that email, I got an email from somebody higher up asking for a W-9 and new invoice sent directly to him. I ended up talking to that person on the phone and explained the situation. He apologized for Mitch’s behaviour and for the unauthorized use of my image and said that I had every right to be compensated for it. He also thanked me for handling it privately and not defaming them publicly. He then paid my invoice over the phone and the matter was settled.

Conclusion

There are many ways to handle image theft, but most situations can be handled professionally without the need for burning bridges or destroying reputations. It can also nearly always be resolved without the use of attorney or going to court.

If someone steals an image blatantly and then refuses to take it down or ignores all attempts at making contact, then by all means sound off on social media and send your army. That’s not what happened here. The entire process of finding out about my image being used and getting the issue resolved and the invoice paid took about 6 days. It took some patience but in the end it was resolved peacefully.

What are your thoughts? Was I too easy on them? Too hard? What would you have done differently? Let me know!

For more articles on some legal ins and outs of photography and copyright try these: 

  • Intellectual Copyright – What is considered ‘stealing’?
  • Using Image Watermarks In Lightroom
  • Working with a Second Photographer – Legal Ins and Outs

The post How to Handle Image Theft Peacefully by James Brandon appeared first on Digital Photography School.


Digital Photography School
 
Comments Off on How to Handle Image Theft Peacefully

Posted in Photography