RSS
 

Posts Tagged ‘Hacks’

5 Hacks and Tricks to up your Landscape Photography Game

05 May

Landscape photography is something that most photographers do. You may be a beginner or an advanced landscape photographer, you may have your own style, or you prefer certain subjects, but there’s always room for something more, something different.

This article is meant to show you five ways in which you can experiment with landscape photography. The techniques will force you to think differently about the surrounding landscape and will uncover new potential shots in places or situations where you might not have considered even getting your camera out.

Let’s see what these five landscape photography hacks that will up your game:

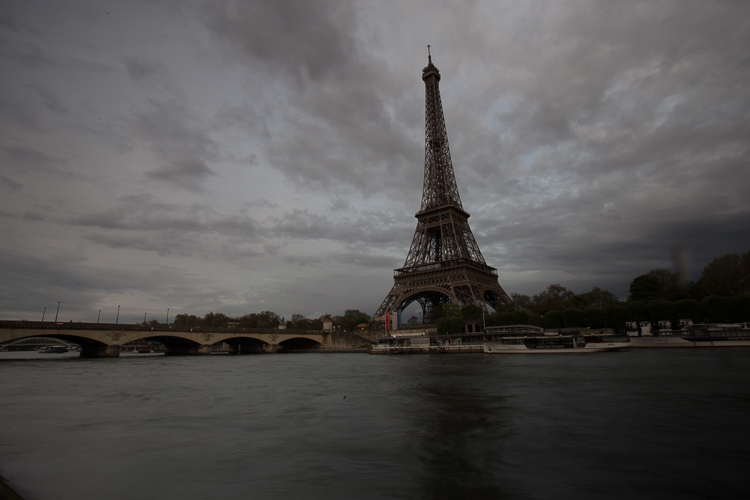
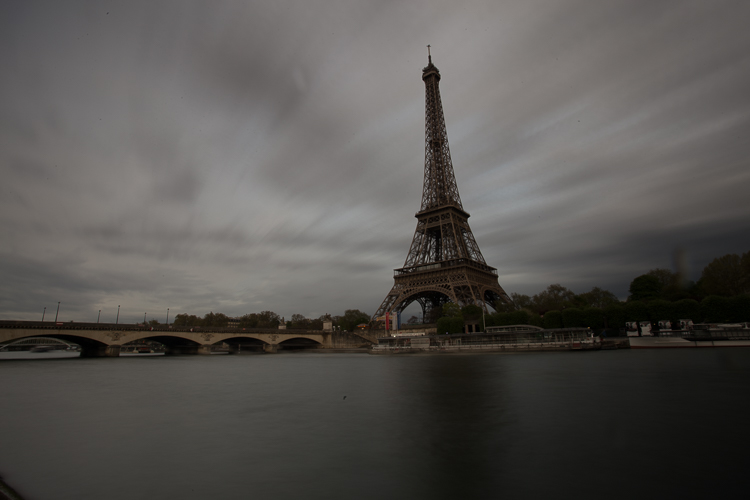
#1 – Long exposures in unusual places

When you think about long exposures you may be thinking of water flow, night photography, or everything that is in low light. The thing is, you can do a long exposure on anything that moves or changes over time. If something is still, then there is no point of doing this technique.

Sometimes you’ll need a Neutral Density filter of 6-stop or maybe even 10-stops if you want to do this during the day when the light is bright. In this case, you would need an ND to dim it down. The idea is to seek subjects that are moved by the wind for example; it works better if some elements of are still and some are moving. Maybe leaves or some thinner branches are moving and the thicker tree trunk is still.

5 Hacks and Tricks to up your Landscape Photography Game

5 Hacks and Tricks to up your Landscape Photography Game

Place your camera on the tripod, use the ND filter if necessary, and take the shot. You’ll get a simple, yet powerful image that represents not only a glimpse of time but few seconds. You can also try this with crops blown by the wind.

#2 – Move your camera while shooting

You usually try to stay still when you shoot so that’s why, as a landscape photographer, you use a tripod. But sometimes it’s interesting to bend the rules and see what the unexpected offers. You can try and move the camera while shooting. Move it from up to down or maybe you can rotate it slightly while the shutter is pressed.

This technique will produce more of an impression of what you see and certain movements work better with certain types of subjects; for example, move your camera up and down if you have straight tall trees. It also helps to have an exposure time of about one second.

5 Hacks and Tricks to up your Landscape Photography Game

5 Hacks and Tricks to up your Landscape Photography Game

5 Hacks and Tricks to up your Landscape Photography Game

5 Hacks and Tricks to up your Landscape Photography Game

5 Hacks and Tricks to up your Landscape Photography Game

#3 – Zoom your lens

Another element that usually stays the same while you press the trigger is the focal length. But what would happen if you changed it during the exposure? Of course, it helps a lot if you have longer exposure time so that you’ll have time to actually zoom.

You have two options with this technique. You can just zoom in or out and you get an interesting effect like everything is “running” to the edges of the photo.

5 Hacks and Tricks to up your Landscape Photography Game

Or you can first zoom your lens in all the way and hold the zoom ring. While you press the shutter button keep the zoom ring fixed and rotate the camera so that the lens zooms out. Don’t forget to keep the hand that is holding the zoom ring still; you are actually zooming out by moving the camera. You’ll get a twisted effect that I find it works better on pines or similar trees.

5 Hacks and Tricks to up your Landscape Photography Game

5 Hacks and Tricks to up your Landscape Photography Game

5 Hacks and Tricks to up your Landscape Photography Game

#4 – Use graduated filters in unusual ways

As a landscape photographer, you likely know how to use graduated ND filters to balance the brightness of the sky with the foreground, but you can do so much more with them too.

In the old days, photographers used to dodge and burn certain areas of a photo to lighten or darken those spots. The technique is still used today in post-processing.

But what if you could do this right in the camera using two graduated ND filters to darken the margins of an image. You only need to place the grad ND filters at a 90-degree angle, one facing left and the other facing right. You don’t even need to have the same filters; you can use a 2-stop and a 3-stop, for example. This will create a light beam effect.

5 Hacks and Tricks to up your Landscape Photography Game

#5 – Create Cinemagraphs

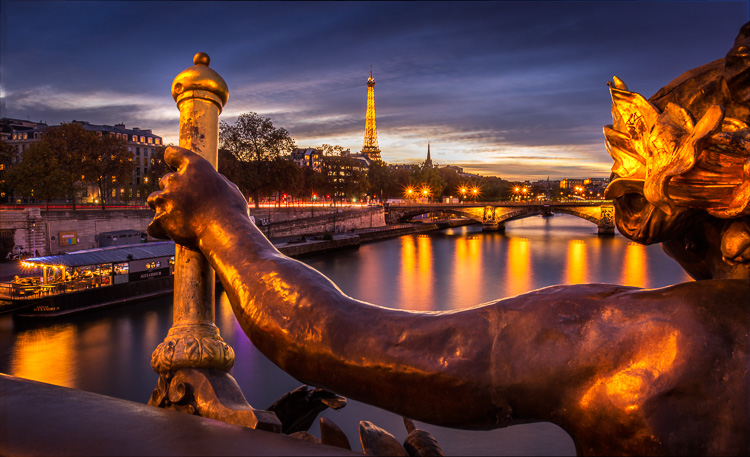
Cinemagraphs are the new thing, and they look cool. You may be wondering what is a Cinemagraph? Well, it’s a combination of still photography and video. The result is a video, but because of this combination, I included this idea here. Here’s an example of what they look like:

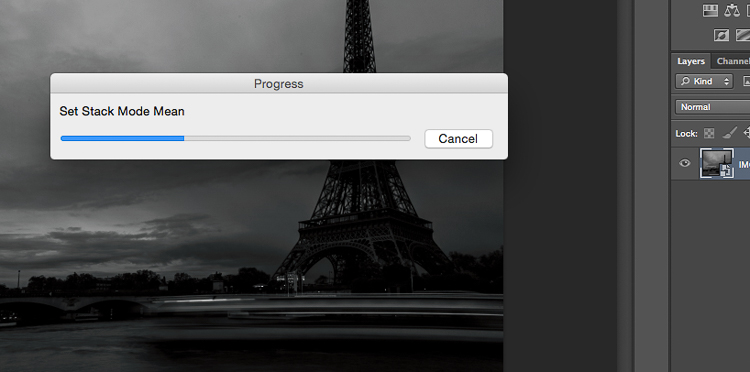
In short, the technique requires you to record a video, preferably with the camera on a tripod, freeze one of the frames and make it a photo, and then creating a mask that reveals only one element that moves. It looks better if you make the video loop-able but that is not absolutely necessary. The effect plays with your mind because everything is still apart from one element that moves.

Conclusion

I hope you’ll find these ideas interesting and you’ll use them to open new horizons and explore new techniques. I think experimenting plays a big part in photography and landscape photography is no exception.

Share your landscape tricks and tips in the comments below.

The post 5 Hacks and Tricks to up your Landscape Photography Game by Toma Bonciu appeared first on Digital Photography School.


Digital Photography School

 
Comments Off on 5 Hacks and Tricks to up your Landscape Photography Game

Posted in Photography


DIY Photography Hacks and Accessories You Can Make at Home

22 Nov

Everyone loves buying new gear, but not the bills that go with it. So why not try making some of your own accessories? Here are three videos that will give you some ideas for DIY photography hacks you can make at home.

some-diy-photography-hacks-and-accessories-you-can-make-at-home

This first one is from the guys over at COOPH (Cooperative of Photography). They present for you:

9 Easy Tricks and Hacks to Up Your DIY Photography Game

I won’t give it all away, you have to watch the video. But they make some pretty cool stuff including a bokeh wall, a shower curtain diffuser, and a pinhole camera.

6 DIY Filters from Sony

Sony brings us six ways to make DIY filters to soften and shape the light. These are fun!

And finally, . . .

7 Tricks everyone with a camera should know

googletag.cmd.push(function() {
tablet_slots.push( googletag.defineSlot( “/1005424/_dPSv4_tab-all-article-bottom_(300×250)”, [300, 250], “pb-ad-78623” ).addService( googletag.pubads() ) ); } );

googletag.cmd.push(function() {
mobile_slots.push( googletag.defineSlot( “/1005424/_dPSv4_mob-all-article-bottom_(300×250)”, [300, 250], “pb-ad-78158” ).addService( googletag.pubads() ) ); } );

The post DIY Photography Hacks and Accessories You Can Make at Home by Darlene Hildebrandt appeared first on Digital Photography School.


Digital Photography School

 
Comments Off on DIY Photography Hacks and Accessories You Can Make at Home

Posted in Photography


Tactical Urbanism: 15 Low-Cost City Hacks for Fun & Functionality

08 Sep

[ By SA Rogers in Architecture & Cities & Urbanism. ]

urban hacking poland square

The ways in which citizens modify public spaces to suit their own needs, whether by creating ‘goat trails’ in places that lack proper sidewalks or actively ‘hacking’ infrastructure, tell urban planners how cities need to be adapted and influence their growth. Urban hacktivism is a direct means of shaping cities to our desires, often through temporary guerrilla actions that ultimately lead to more permanent solutions. These city hacks range from taking over disused public squares and installing seating for the elderly to infusing everyday scenes with humor and fun, making the urban landscape one big playground.

Shopping Cart Sports by Florian Riviére

urban hacking shopping cart hockey

urban hacking shopping cart tennis

urban hacking shopping cart hockey 2

Among the many city hacks by French artist and activist Florian Riviére, the project ‘Don’t Pay, Play’ encourages customers to linger in the parking lot of a shopping center rather than going inside. The parking spots are modified using nothing more than some white tape to transform them into courts for basketball, hockey, tennis and more, with shopping carts used as goal nets or structural supports.

Wanderest Chair for the Elderly Attaches to Lamp Poles

urban hacking wanderest

Any light pole can become the backrest for a seat with ‘Wanderest’ by designer Nichola Trudgen. Easy attaching to any circular or octagonal lamp posts, the leaning stool is strategically installed in retirement areas where there’s little to no public seating available.

‘Info Pillars’ Guerrilla Takeover

urban hacking info pillars

urban hacking info pillars 2

So-called ‘info pillars’ in Toronto tend to contain advertisements instead of anything that’s actually useful for people exploring the city on foot. They also block large sections of the sidewalk, disrupting the flow of pedestrians. Creative team cARTographyTO hacked 35 of the signs and filled them with art, sculptures, maps and chalkboards, which got the attention of the city and encouraged them to reconsider their use of the pillars.

Tram Track Skateboarding

urban hacking tram skateboard

urban hacking tram skateboard 2

The tram rails in the city of Bratislava, Slovakia just happen to be the perfect width for a standard-issue European pallet. Modified with parts that keep it in place, it becomes something like a skateboard, zooming across the city with little to no effort as a free personal vehicle. Slovakian artist Tomas Moravec says of his project, “A new transport vehicle brings change into the spatial perspective of a passenger in motion and generally changes the life of the city, through which the pallet can run, guided by a map of the city lines.”

Urban Terrasse: Adaptive Furniture by Damien Gires

urban hacking terrasse 1

urban hacking terrasse 2

Octagonal cardboard boxes pop right onto existing anti-parking posts on the sidewalks of France, turning them into mini tables for adjacent cafes. ‘Urban Terrasse’ by French designer Damien Gires makes the sidewalks more functional, and encourages patrons of cafes lacking outdoor seating to be more engaged with their city environments.

Next Page – Click Below to Read More:
Tactical Urbanism 15 Low Cost City Hacks For Fun Functionality

Share on Facebook


[ By SA Rogers in Architecture & Cities & Urbanism. ]

[ WebUrbanist | Archives | Galleries | Privacy | TOS ]


WebUrbanist

 
Comments Off on Tactical Urbanism: 15 Low-Cost City Hacks for Fun & Functionality

Posted in Creativity


2 Long Exposure Photography Hacks to Try if You Don’t Have an ND Filter

20 Jun

We all love long exposures, well I personally do. They are a great way to create dynamism, movement, and add depth to your images.

In this tutorial, I’ll show you two long exposure hacks that can be useful if your Neutral Density filters are not dark enough, if it’s too bright outside and you cannot get a long exposure, or if you simply don’t have any ND filters. Dark ND filters can be really expensive, so this is a good alternative.

IMG 8076

Long exposures create this surreal, and yet very pleasing effect to give a WOW factor to your images. Whenever you take a photo at night you will automatically get a long exposure, unless you use a very high ISO. For this tutorial I am talking about long exposures during the daytime, which are a bit more complicated to achieve.

The two hacks involves taking nine different images, and stacking them together. Now before I actually explain them, I will briefly give you the best camera settings and shooting conditions:

Shooting and camera settings

  • You will ultimately get the best results if you shoot on a cloudy day with a lot of wind. Why? Because on a cloudy day you will get clouds, and the wind is going to give them movement, and that’s what you want – movement. On a cloudy day, you will also get the minimal amount of light to be able to extend your shutter time.
  • You absolutely need a tripod, first all of all because your images need to be aligned, and you want your images as sharp as possible. With a shutter speed slower than 1/60th, you will start to get blurry results without a tripod.
  • Use a cable release or a 2-second timer every time you take an image. This again is a great way to avoid camera shake and get sharp results.
  • Focus on your subject and put the lens to manual focus, before you start taking your images. DO NOT refocus between the nine shots you are going to take.
  • Use an ISO of 100. You are on a tripod, so you don’t really need a higher ISO.
  • Use a very small aperture, like f/22. This will cut down the light entering your camera as much as possible and with an ISO of 100, will help slow down the shutter speed.
  • Shoot one or two hours before sunset, then you will also have a minimal amount of light to extend your shutter speed even slower.
  • Use your ND filters if you have some. If your ND filters are very dark (10 stop for example) you won’t need these hacks because you will directly get long exposures. If your filters are not dark enough, I would still recommend using them even if you have a one second exposure.
  • I recommend exposing, and focusing before putting your ND filters on, because after that – well you won’t be able to see clearly.

Hack #1 – multiple exposure mode

The first hack consists of using the multi-exposure mode on your DSLR. If you do not have this mode, don’t worry the second hack works for all cameras. I personally use a Canon 6D, but this multi-exposure mode is mostly available for all sorts of advanced DSLRs.

You will find this mode on your menu, you just need to enable it.

IMAGE1

For the settings:

  • Average for the Multi-expos ctrl option
  • Continuously for Continue Mult-exp setting

You have the choice to pick how many exposures you want to shoot, the maximum will depend on your DSLR. I usually pick nine exposures to get as much movement on the clouds as I want.

This mode will allow you to multiply your shutter speed by the number of exposures you shoot. For example, If you shoot a single image with an exposure of one second, you will get a total exposure of nine seconds if you shoot nine exposures. It works the same if you have an exposure of 15 seconds.

With this mode, the camera will automatically stack the images together and give you one single image with all the cloud movement. This trick also works if you want some nice silky water.

If the clouds are moving really fast, then I recommend waiting around two seconds before you take another shot. The main trick is to not have the clouds at the same position one shot after the other. If the clouds are moving very slowly then I recommend waiting around 10-15 seconds between shots.

This mode will also tell you on your screen, how many images you have left to complete your multi-exposure.

This is an example of a long exposure I got using this method. My aperture was f/22, ISO 100, and I had a shutter speed of one second after using my ND filters. That wasn’t enough to get a long exposure with stretchy clouds, so I decided to use the multi-exposure mode. I took a total of nine shots, and you can see below the before and after using this mode. You can see that it does not only affect the clouds, my water looks nice and silky as well.

IMAGE2

Single image

IMAGE3

Nine shots using multi-exposure in-camera.

IMAGE4

After some retouching, I got this result!

Hack #1 – multiple exposures merged in Photoshop

The second hack consists of doing exactly the same thing but manually. If you are used to shooting time lapses, then this shouldn’t be too complicated to understand.

The multi-exposure mode in-camera gives you automatically, and directly, the long exposure result in one image. For this hack, will shoot nine separate images, one after the other.

You need to use the same camera settings I mentioned above (manual mode, manual focus, tripod, small aperture, ISO 100, release cable or 2-second timer). For the shooting conditions I would also recommend the same thing, and use ND filters if you have some.

You will basically shoot a time lapse of nine images only. Do not forget to have an interval of 10 seconds minimum between each shots. This process can be quite boring. I personally use the magic lantern camera hack that has an intervalometer built inside the camera. I can then pick how long I want my interval to be between each shot, and the camera will automatically take an image every 10 seconds, for example, until I decide to stop.

IMAGE5

You can buy an intervalometer or use the timer on your phone to count your intervals. It’s really up to you.

Here’s an example of nine images I shot one after the other with an interval of 15 seconds between each. You can clearly see that the clouds are moving. For demonstration purposes, I have intentionally underexposed these shots.

IMAGE6

So after you get all your images, import them into Photoshop as layers (from Bridge or Lightroom whatever fits with your workflow).

IMAGE7

Open as Layers in Photoshop after selecting the images in Lightroom.

Then next thing you want to do is to select all the layers, and create a smart object.

IMAGE8

IMAGE9

After that go to Layers -> Smart Objects -> Stacking -> Mean.

IMAGE10

IMAGE11

Photoshop will create a nice long exposure now, combining all the layers.

IMAGE12

Here’s the before and after:

IMAGE13

Before is on the right of a single image – after is on the left.

Conclusion

You don’t need super dark expensive filters to create long exposures. Of course, you will get the best results with them, but this is a pretty cool alternative. Now personally as a 19 year old student, I cannot spend a lot of money on gear, and so far these two hacks have worked perfectly for me.

IMG_7663-Edit

Enjoy the art, and share your hacked long exposure images in the comments below. I’d love to see your results.

googletag.cmd.push(function() {
tablet_slots.push( googletag.defineSlot( “/1005424/_dPSv4_tab-all-article-bottom_(300×250)”, [300, 250], “pb-ad-78623” ).addService( googletag.pubads() ) ); } );

googletag.cmd.push(function() {
mobile_slots.push( googletag.defineSlot( “/1005424/_dPSv4_mob-all-article-bottom_(300×250)”, [300, 250], “pb-ad-78158” ).addService( googletag.pubads() ) ); } );

The post 2 Long Exposure Photography Hacks to Try if You Don’t Have an ND Filter by Yacine Bessekhouad appeared first on Digital Photography School.


Digital Photography School

 
Comments Off on 2 Long Exposure Photography Hacks to Try if You Don’t Have an ND Filter

Posted in Photography


5 Camera Bag Hacks to Help You Curb the Temptation of Buying More

04 May

There has been quite a parade of camera bags launched on the market recently. Peak Design’s latest in their line of products with the Everyday Messenger Bag, achieved an incredible target on Kickstarter.

Check out Simon Ringsmuth’s review of the bag. ThinkTank Photo followed with the Lily Deanne bag, in the same price league but targeted more for women. Another Kickstarter venture by Progo gear successfully launched their carry-on/camera backpack in January of this year.

title

5 Hacks to curb the temptation to buy another camera bag

But, this article isn’t about reviewing yet another camera bag. Instead, it got me thinking no matter what camera bag that you may have, one fit doesn’t suit all. I’ll admit, I have a weakness for camera bags. There is such a vast array of camera bags on the market to suit every photographer’s needs. The types range from shoulder bags, backpacks, and rolling cases, to name just a few. However, when choosing a bag, the following factors should be considered:

  • Materials: I have a preference for man-made, hi-tech materials like ballistic nylon as opposed to natural fabrics, such as cotton or leather – simply because they are lighter and generally offer better water resistance.
  • Protection: Obviously, you want the best protection for your gear. This will mean a bag that has sufficient padding on the inside, and a material on the outside which protects against inclement weather. This can be the inherent material that the camera bag is made from, or a waterproof cover which you can pull over the bag if it rains.
  • Capacity: This will be very subjective to the type of photographer you are. A travel photographer’s gear and bag(s) will be in sharp contrast to a photographer on a fashion shoot in a studio.
  • Comfort: This is a very important factor. If you have to carry your bag at all, it should feel comfortable, and you shouldn’t really be aware of it. If you are, it’s a nuisance.

I do like features on so many different bag, and I wish that the sum of all these features were all rolled into one bag. But I am asking a lot here. So I thought, rather than buying another bag, why not customize or hack a bag that you already own?

Here’s my five hacks that may help you curb the temptation to go out to buy another camera bag – at least for now:

#1 Tent repair tape

The bottom of my camera bag isn’t really at all abrasion resistant, or waterproof. This was an initial concern for me when I was buying the bag. Most camera bags should, in my opinion, offer some degree of ruggedness to ensure the bottom of your camera bag will be protected for a number of years.

However, in the end, I decided to buy it, as it ticked most of the boxes for the type of bag I wanted. I came up with my own solution to safeguard the underneath part of the bag for general wear and tear.

Tent Repair Tape – found in most camping outdoor retail outlets.

I cut 3 strips of the tent repair tape to suit the dimensions of my camera bag.

Cut strips of tent repair tape the same length as your bag and apply them length ways across the bottom. This tape is super strong and waterproof. I also added feet to the bottom, like you would see on most bags, not just camera bags. I have a neat way to add feet to the bottom of your bag, without taking away from the aesthetic look. See #5 below for more details.

Tip: By putting another layer of cell foam dividers flat across the inside bottom of your camera bag helps to give more padded protection. I seem to have gathered a collection of these over the years!

Inside-padded-insert

I added another layer of spare foam cell pads at the bottom of my already padded insert.

#2 Carabiner Rings

These aluminium rings are so versatile for attaching extra accessories, that you simply can’t fit inside the bag. For example, side pockets are great for adding a flash gun or a drink bottle. But, what if your camera bag doesn’t have a side pocket?

This solution should work for any type of drink bottle. You will need two cable ties, one longer than the other. Secure the longer one around the neck of the bottle and the smaller one acts as a ring to attach to the carabiner, which is then looped around one of the metal rings on the bag’s strap.

carabiner-water-bottle

Water bottle attached to the camera strap, via the metal ring using two cable ties.

Tip: Water bottles can also serve as an extra weight to stabilize your tripod.

#3 Paracord

I wish every camera bag would come with at least two key fob straps. Of course, I don’t use mine for keys. Key fob straps are great for attaching the likes of SD/CF memory card wallet holders or other items that you may need to hand, without looking like a badger who is burrowing out of his nest.

My hotshoe adaptor and spare SD card attached to my paracord strap, which also doubles up as a wrist camera strap.

My hotshoe adaptor and spare SD card attached to my paracord strap, which also doubles up as a wrist camera strap.

This is a very simple method to add an extra key fob strap to any bag. Measure a length of a Paracord, in my case 27 inches. Tie both ends together. You will need to burn the ends of the cord, after the knot, to stop it from fraying. Loop one end around the bag’s strap ring on the outside and secure a plastic carabiner to the other end. See photo.

I used a plastic carabiner, as I don’t particularly like metal rings inside my camera bag. I have my business cards secured in their holder, attached to the carabiner. These are quick and easy to hand. No foraging around in your bag for what seems like an age looking for them!

A key fob strap made from paracord, using a plastic carabiner (even though it looks aluminum) attached to my business cards.

Tip: This strap can also double up as a camera wrist strap. See my other article for this tip and other DIY hacks.

#4 Insulation Foam Sleeves

I like the option to be able to carry my travel tripod with me, as it also doubles up as a light stand. But there isn’t a designated tripod holder on this type of bag. However, as it has a big front flap. I came up with this idea of using a foam insulation sleeve.

My travel tripod which I also use as a light stand.

These Economiser Polyethylene Pipe Insulation sleeves can be purchased at most DIY stores. Their function is to insulate heating pipes. I bought this 1/2″ Cosy Sleeve, 1 Metre length (3′ approx.) for less than $ 2.00 USD. It has a pre-cut slit down the length. To cut to the desired length is simple and quick.

Foam insulation sleeve for heating pipes, found in DIY stores.

Place the sleeve around one of the tripod legs. Cut two small strips of self-adhesive velcro strips and stick them onto the foam sleeve and then under the front flap of the bag. The tripod is resting on top of the removable padded insert. When the front flap is closed, the sleeve acts as a cushion to keep it place.

Foam insulation sleeve attached to one of the tripods legs. Velcro adhesive strips are used to secure to the underneath part of the front flap.

The tripod felt very secure, as it is resting on the inner padded insert, and when it is closed the sleeve acts as a cushion for a snug fit.

Tip: the foam sleeve can also be left on the tripod while in use to act as a cover (nicer on fingers in cold weather).

The foam sleeve can be left on the tripod when in use to act as a cover.

#5 Sugru

If you haven’t come across this product before, it’s simply brilliant, a DIYer’s dream. The company’s tagline is, “Mouldable glue that turns into rubber”. The methods or ways that it can be applied as fixes or hacks, are only limited to your own imagination.

You can create your own rubber feet for the bottom of your camera bag, to protect it against general wear and tear. I used a three pack ($ 13.50 for 3 packs) of pitch black Sugru to create these feet. Roll each one into a ball, and with a sharp kitchen knife, then cut each ball in half. Allow these to cure (set) for a day or two. In order to secure the feet to the bag, you will need some extra Sugru. (You can buy 8 packs for $ 22, which works out cheaper than 2 x 3 packs).

Sugru-balls-rubber-feet

Rubber feet moulded from Sugru, for underneath my camera bag as added protection.

Sugru-rubber-feet-attached-to-bag

The rubber feet attached to my camera bag along with the tent repair tape.

Here’s another tip for using Sugru. If your camera bag strap has a cushion pad but no silicone strips to prevent it from sliding off your shoulder, or they have simply worn away, you can make your own by rolling out strips of Sugru and stick them firmly on to the pad.

Do you any other camera bag hack ideas that you would like to share? Leave a comment below.

Disclaimer: I was not approached or sponsored by any of the companies mentioned in this article. All opinions are by the author.

googletag.cmd.push(function() {
tablet_slots.push( googletag.defineSlot( “/1005424/_dPSv4_tab-all-article-bottom_(300×250)”, [300, 250], “pb-ad-78623” ).addService( googletag.pubads() ) ); } );

googletag.cmd.push(function() {
mobile_slots.push( googletag.defineSlot( “/1005424/_dPSv4_mob-all-article-bottom_(300×250)”, [300, 250], “pb-ad-78158” ).addService( googletag.pubads() ) ); } );

The post 5 Camera Bag Hacks to Help You Curb the Temptation of Buying More by Sarah Hipwell appeared first on Digital Photography School.


Digital Photography School

 
Comments Off on 5 Camera Bag Hacks to Help You Curb the Temptation of Buying More

Posted in Photography


3 Body Language Hacks to Improve Your Portrait Photography

01 Nov

DPSarticle 1main

I’m going to ask you to put your camera down for now. I know it’s a lot to ask, but the secret I’ve discovered to better portrait photography has, in fact, very little to do with your camera.

One of the most common mistakes budding portrait photographers make is to be so focused on getting the technical aspects right, they completely forget about the most important feature of a portrait – the person standing in front of their lens.

I’m not saying that your camera and technique aren’t important, they absolutely are. But even when you have the best technique in the world, you will not have a good portrait if your subject feels, and looks, uncomfortable.

The secret to helping your subject be relaxed and look good in pictures is body language – both yours and their’s.

Body Language

DPSarticle 2bodylanguage

Body language is how our bodies communicate our feelings and intentions, and it makes up for a majority of how we communicate. Some studies found that as much as 92% of our communication is nonverbal, and experts all agree that, as humans, we rely first on what we see and feel, before believing any spoken word.

Why is this important in portrait photography? Because body language is the language spoken in our portraits.

Within one second of seeing a photograph, we make a snap judgment about the person – or people – in the image, and what our brain relies on to make this judgment is their body language. Big cues like slouched shoulders or crossed arms are obvious, but it’s also the small cues like a fake smile, tense hands, slightly pursed lips, or squinting eyes, that tell our brains on an instinctive level, how that person is feeling. Furthermore, if the feelings are negative, it can ruin your portrait.

So, what can you do? Let’s look at three things you can start doing right now to help your subject settle into relaxed and positive body language.

1. Identify discomfort

DPSarticle 3discomfort

It’s pretty uncomfortable for most people to have their portrait taken, even if they are really looking forward to it. This tension appears mainly through blocking and pacifying cues.

Blocking gestures occur when we put something between ourselves and an uncomfortable situation. Crossed or closed arms are the most obvious signs, but the person may also be holding something like a bag or a laptop in front of them, turning their bodies away from you, and even crossing their legs tightly when standing.

Rubbing or pressure movements are called pacifying gestures. You will observe this when she’s playing with her necklace, rubbing her arms or legs, or he’s playing with his clothes, or squeezing his fingers together. Another place to look for pacifying gestures is the mouth. Lip pressing and licking, and tongue movements pressing inside the cheeks or lips show high levels of stress.

When you see this happening before or during the shoot, your subject is feeling uncomfortable and it’s going to show up in your portraits. Let’s look at how you can help them relax.

2. Show, don’t tell

DPSarticle 4showdonttell

People feel uncomfortable during a photo shoot mostly because they don’t know what to do. It’s really stressful to be in front of a lens and be told to pose or act natural. They have no idea what you want from them, and telling them doesn’t help.

A client of mine shared this story with me;

At my last photo shoot, the photographer asked me to smile. So I smiled. “No! Not like that!” he said “you know, relax and smile!” All I could think is “Damn, I’m not relaxed, how do I relax?” which made me stress even more, and the more he was telling me to relax, the less I was! It was horrible! I look like I’m growling in all the photos. I hate them!

So if telling them what to do doesn’t help, what can you do? Show them! People can easily mirror what you want them to do. Ask them to mirror you, and show them exactly the pose you want them to take. Not only this will help them relax, it also allows you to get them into the right body language for the picture. When working with children, you can turn this into an imitation game, and they will be playing along with you in seconds.

Mirroring is a key bonding behavior in human body language. This interaction creates an immediate connection between you and your subject, and allows them to shift their attention away from the lens and focus on you instead.

3. Be in control -even when you’re not

DPSarticle 5incontrol

From the minute you meet your subject, until they walk away from the session, it’s vital that you appear in control by using confident body language, keeping your energy up, using positive words, and never showing any signs of stress – even when you’re freaking out because the settings you’re trying aren’t working.

I know this one is tough when you’re starting out, and you have to think of a million things – camera settings, composition, lighting, backgrounds, etc., and now I’m asking you to also think about what your client’s body is saying! But let’s think about this for a minute. How do you think your subject feels when they are working with a silent, stressed out, and fidgety photographer who is focusing all their attention on the camera or the lights? Not so great right? Guess where that’s going to show up? In your pictures.

They need to know that you’re in control, even when you’re not! This is a, “fake it until you become it” moment in your life. Talk to them. Explain what you’re doing. You might be concerned that they won’t take you seriously, but really, they are just curious about what’s going on. If they feel that you’re in control, that you know what you’re doing, you will keep the connection with them and help them to relax.

The best part is that you’re also going to feel more in control. Recent studies on body language have found that by changing our posture and behavior, we actually change our feelings too. Not only will you appear more confident, you’re actually going to feel more confident.

What’s next

DPSarticle 6next

This is really just the very beginning of how body language can help you with your portrait photography. The choice of body language cues you’re going to use in your portraits will also have a huge impact on the feeling and quality of your images, and your relationships with your subjects.

Understanding body language is not just an option if you want to be a portrait photographer, it’s a vital skill; as vital as breathing is to a singer, or taste is to a chef. You will not be able to consistently create beautiful portraits of people, or create a fun experience for them if you ignore it.

The good news is that this is a skill you are born with, and have unconsciously practiced since your youngest age. However, most of us simply don’t pay attention to it because nonverbal communication is not part of our training curriculum, at school or later. Just like a musician will be more alert to sounds through practice, and a chef to taste through experience, I’m confident that you will soon become attuned to your subjects body language if you put in a little work.

Soon you will have mastered an amazing skill that will not only be useful in your work as a photographer, but also in everyday life.

Do you have another other tips about body language? Please share in the comments below along with any images demonstrating body language in your portraits.

googletag.cmd.push(function() {
tablet_slots.push( googletag.defineSlot( “/1005424/_dPSv4_tab-all-article-bottom_(300×250)”, [300, 250], “pb-ad-78623” ).addService( googletag.pubads() ) ); } );

googletag.cmd.push(function() {
mobile_slots.push( googletag.defineSlot( “/1005424/_dPSv4_mob-all-article-bottom_(300×250)”, [300, 250], “pb-ad-78158” ).addService( googletag.pubads() ) ); } );

The post 3 Body Language Hacks to Improve Your Portrait Photography by Dee Libine appeared first on Digital Photography School.


Digital Photography School

 
Comments Off on 3 Body Language Hacks to Improve Your Portrait Photography

Posted in Photography


Video Share – Travel Photography Hacks and Gear Tips

03 May

In these two videos travel photographers Brendan van Son shares some of his hacks for travel photography gear – how to go lighter and spend less money.

In this first one he offers eight photography hacks to help you while you’re out on the road:

  1. Welding glass as a neutral density filter
  2. Macro extension tubes instead of a macro lens
  3. 2x teleconverter to extend the range of your lenses
  4. Tripod/monopod combination (he mentions he uses one of the 3-Legged Thing models)
  5. Trigger Trap remote release
  6. Camera cap case
  7. WiFi EyeFi memory cards
  8. The Crop Sensor advantage

Watch the whole video to see how you can use those tips to your advantage when travelling.

In this second video he talks about different camera strap options and which is the best for travel photography.

The strap he mentions is the Indigo Marble designer sling.

Some other options are:

  • imo Camera Straps: Review – for a bit more fashionable and stylish strap.
  • Black Rapid RS-7 Camera Strap Review
  • Peak Design Capture Camera Clip v2 review
  • Preview of the Slide and Clutch Camera Carrying System from Peak Design
  • Spider Camera Holster Review

Do you have any other tips for hacking your travel photography bag? Please share with us in the comments below. What goodies have you found?

googletag.cmd.push(function() {
tablet_slots.push( googletag.defineSlot( “/1005424/_dPSv4_tab-all-article-bottom_(300×250)”, [300, 250], “pb-ad-78623” ).addService( googletag.pubads() ) ); } );

googletag.cmd.push(function() {
mobile_slots.push( googletag.defineSlot( “/1005424/_dPSv4_mob-all-article-bottom_(300×250)”, [300, 250], “pb-ad-78158” ).addService( googletag.pubads() ) ); } );

The post Video Share – Travel Photography Hacks and Gear Tips by Darlene Hildebrandt appeared first on Digital Photography School.


Digital Photography School

 
Comments Off on Video Share – Travel Photography Hacks and Gear Tips

Posted in Photography


5 DIY Hacks to Have in Your Camera Bag

29 Apr
Paracord-wrist-strap-close-up

Close up of a DIY camera wrist strap made from paracord

1. Camera strap(s)

I stopped using the camera strap that comes with the camera (DSLR) quite awhile ago now. My fundamental gripes were as follows:

  • Not at all comfortable to wear around the neck, especially if you have a long lens attached to the camera.
  • Didn’t particularly like the camera brand name in bright colors screaming out to potential camera thieves that you have a nice camera worth taking!
  • The strap was a nuisance when the camera was mounted on a tripod.
  • Because of the strap length, it was irksome and fussy putting the camera back into the camera bag.
Paracord-wrist-strap

DIY paracord camera wrist strap

I like to switch from handheld to mounting the camera on a tripod when I shoot. I do however, like the security of a strap when holding my camera. Some years back, I found a useful DIY tutorial online, outlining how to make a camera wrist strap using paracord. Take a piece about 27 inches long and make a loop about 7-7.5 inches long by tying both ends together into knot. I used a simple overhand  knot but you could use a more sophisticated knot such as a Lanyard knot. You will need to burn the ends of the cord, after the knot, to stop it from fraying.

Paracord-wrist-strap-on-hand

Depending on the size of your hands, you want enough slack to be able to adjust the buttons on the camera.

This paracord is strong and really inexpensive to purchase. It comes in a variety of colors. There are a multitude of uses for this cord, it’s a dream for most DIY enthusiasts. However, this configuration of strap isn’t a fail safe option should you let your camera fall out of your hand.

Joby have a corded strap, specifically for DSLRs that is designed to automatically tighten around the wrist if the camera is dropped. Out of curiosity, I purchased one to try it out. It’s not expensive and does tighten around the wrist if the camera falls or drops out of your hand. It is very comfortable and I love the green color.

Joby-wrist-strap

The Joby DSLR wrist strap

However, for you DIY hackers out there, you can fashion a similar wrist strap with a built-in wrist tightener from paracord using a slip-knot. Just do a google search to get a tutorial online.

2. Wrist rubber band to prevent zoom creep

I used to own a Nikon 18-200mm VR lens. It was a great versatile lens. But after some time, when I would take macro or overhead shots, where the camera is at 45 angle or more, I’d notice the lens would creep (move slightly due to gravity). I found this neat solution online to put a wrist rubber band around the zoom ring and the barrel of the lens. It worked and was a perfect solution to prevent the lens from creeping.

Wrist-rubber-band-lens-creep

A wrist rubber band to stop lens creep.

This rubber band can also act to secure the Ziploc bag around the lens if safeguarding against the rain. See tip below.

3. Ziploc bags and cable ties

Sandbag(s) are great for adding stability to your lightstand or tripod. But they are not practical to bring with you on vacation or on a day trip. This is where having a couple of Ziploc baggies with you in your camera bag are ideal.

If you are away on vacation, purchase a bag of dried beans, rice, or soup mix. Make a small hole near the top of the bag, place a cable tie through the hole and create a plastic ring. Depending on the type of tripod that you have, place this on the hook or use another cable tie to create second ring that will secure the bag to the centre column of the tripod.

DIY-sandbag-on-tripod

A Ziploc bag filled with 1kg of rice suspended from the tripod using cable ties adds stability.

A Ziploc bag filled with dried beans etc., can be also used as an alternative bean bag tripod. If you are out and about shooting on a day trip, and there are no convenience stores nearby – use soil or sand to fill the Ziploc bags.

A large Ziploc bag can even be a turned into a quick rain guard. Make a hole for the lens and use the rubber wrist band to secure the bag around the lens.

4. Vaseline

This small tin of petroleum jelly is small to put in your camera bag and weighs practically nothing. If you are shooting portrait shots and your subject or model forgets to bring their lipstick, the vaseline gives sparkle to lips and helps catch some specular highlights.

You can get creative by applying some vaseline to an old UV filter, rather than on the lens itself, to create a dreamy retro look. It’s a bit messy, so use a Ziploc bag to put the UV filter in when you’re done and clean it when you get home.

Vaseline-plus-other-items

Vaseline, pen with gaffer tape plus other items to have in your camera bag.

If you are a landscape or street photographer, the elements can play havoc with your lips. Nothing worse than chapped lips. Apply some vaseline to protect them.

Vaseline-on-UV-filter

Petroleum jelly (Vaseline) smeared on the UV filter.

hanging-basket-flowers

Before shot without Vaseline.

flowers-vaseline-on-UV-filter

After shot with Vaseline on the UV filter.

I could have smeared more Vaseline to allow for a smaller opening, which would have created an even more dreamy effect. That is the beauty of this technique, just experiment.

5. A Bic pen or any plastic disposable pen

This inexpensive pen should be an automatic addition to your camera bag. After all, you never know when your smartphone or tablet might lose power and you will need to write down some specifics. A pen and paper always comes in handy. Wrap some gaffer or duct  tape around the middle of the pen rather than carry a big roll of it around. You never know when you may need a bit of tape.

All of these items are so small and compact that you won’t know that they are in your camera bag. Sometimes it is the small things that can make a BIG difference!

Do you have any hacks or tips that you would like to share?

googletag.cmd.push(function() {
tablet_slots.push( googletag.defineSlot( “/1005424/_dPSv4_tab-all-article-bottom_(300×250)”, [300, 250], “pb-ad-78623” ).addService( googletag.pubads() ) ); } );

googletag.cmd.push(function() {
mobile_slots.push( googletag.defineSlot( “/1005424/_dPSv4_mob-all-article-bottom_(300×250)”, [300, 250], “pb-ad-78158” ).addService( googletag.pubads() ) ); } );

The post 5 DIY Hacks to Have in Your Camera Bag by Sarah Hipwell appeared first on Digital Photography School.


Digital Photography School

 
Comments Off on 5 DIY Hacks to Have in Your Camera Bag

Posted in Photography


Selfie-mergency Hacks

06 Feb
Extra photos for bloggers: 1, 2, 3

They happen when you least expect it.

When your arms are *just* too short and an epic moment is about to go undocumented.

They’re selfie-mergencies and we’re here to make sure the world sees your mug even when your hands are otherwise occupied.

No tripod or selfie sticks required, here’s how to hack your way to the perfect selfie in 3 everyday situations.


Learn How To Take Emergency Selfies

WHY IT’S COOL

Um, because these hacks are the solution to all your selfie problems.

HACK 1: SELFIES ARE A BEACH

beforeWhen you’re at the beach and you’re trying to get your face, the water and your abs in the shot, hack 1 is here to save the day.

Fold your, preferably dry, towel in half lengthways, then keep alternating sideways folds until it’s stacked like an accordion or looks a bit like a tall, skinny book. Fold open to the middle and lean your phone with the folds.

Set that self timer, or fire up the CamMe app and strike a pose.


HACK 2: BOTTLE IT UP

beforeOkay, you’re going for a bike ride down the most picturesque mountain in all the land and you need evidence that you were there. Hack 2 to the rescue.

Undo your ponytail, and use the hair tie to secure your phone to your water bottle.

Jump back on the bike, show your good side, and stare longingly out to the view ever so naturally.


HACK 3: STICK IT

beforeHack 3 is for all you picnickers out there. You’re eating strawberries and noodle salad at the park with your friends when the urge for a group selfie strikes.

Just stick a, well stick, into the ground and angle according to your needs.

Duckface and post that bad boy to Instagram.


TAKING IT FURTHER

  • Buy a super handy keyprop and own any selfie-mergencency sitch
  • Hack 2 is just as handy at a restaurant. Just swap a wine bottle or tumbler instead of the water bottle.
  • For even more fun selfies, use an app like Party Party

© Erika for Photojojo, 2015. |
Permalink |
No comment |
Add to
del.icio.us

Post tags:


Photojojo

 
Comments Off on Selfie-mergency Hacks

Posted in Equipment


When Every Inch Counts: 14 More Clever Small Space Hacks

22 Sep

[ By Steph in Design & Furniture & Decor. ]

Small Space Hacks Compact Kitchen 3

Making a tiny living space comfortable and practical means integrating multi-purpose furniture, custom built-ins and lots of other clever space-saving tricks. These 14 (more) small space hacks include a few DIY projects that can be achieved with components purchased at Ikea.

Incredibly Compact Kitchen
Small Space Hacks Compact Kitchen 1

Small Space Hacks Compact Kitchen 2

Starting as a narrow dining table, this ultra-compact kitchen swings open to reveal an induction cooktop, oven, refrigerator and storage space with a sink and a work surface. Slide it under the white table unit when not in use or pull it out into its own little island – perfect for the minimalist cook working in a small space. Check out 15 more modular & multipurpose kitchens for small spaces.

Spaceflavor Mobile Cube: Office/Tea House in One
Small Space Hacks Spaceflavor Cube 1

Small Space Hacks Spaceflavor Cube 2

Feng Shui expert Liu Ming created the Mobile Cube to compartmentalize his personal space in a live/work apartment that has to accommodate over 30 students during classes. The entire cube is on wheels, with a lower portion that can contain a bedroom or an office, and a loft that functions as meditation space, a sleeping area or a tea room (as he uses it.) It measures just eight feet square and has hidden stairs that double as drawers, as well as cabinets, closet space and translucent roller shades.

Fold-Out Picnic Table
Small Space Hacks Fold Out Table 1

Small Space Hacks Fold Out Table 2

This picnic table offered by a Brazilian furniture store has enough seating for six people, yet folds completely flat against the wall when not in use, opening up the floor for other purposes.

IKEA Closet Makeover
Small Space Hacks Closet 1

Small Space Hacks Closet 2

A cluttered closet in a small Brooklyn apartment now has a dedicated space for everything from shoes to handbags courtesy of an IKEA makeover. While the overall size of this closet would be luxurious in most small spaces, the setup could easily be customized to your own needs while maintaining organization.

DIY Murphy Bed
Small Space Hacks DIY Murphy Bed 1

Small Space Hacks DIY Murphy Bed 2

If you’re an ambitious DIYer, you can attempt your own murphy bed, like this one at a sustainability camp in Maryland. DIY Network has plans for a simpler version, or you can try an Ikea hack with sliding doors over at Instructables.

Next Page – Click Below to Read More:
When Every Inch Counts 14 More Clever Small Space Hacks

Share on Facebook


[ By Steph in Design & Furniture & Decor. ]

[ WebUrbanist | Archives | Galleries | Privacy | TOS ]


WebUrbanist

 
Comments Off on When Every Inch Counts: 14 More Clever Small Space Hacks

Posted in Creativity