RSS
 

Posts Tagged ‘Grids’

Datascrapers: Infographic Skylines Overlay Income Inequality on City Grids

06 Nov

[ By WebUrbanist in Art & Drawing & Digital. ]

city-data-blocks

Somewhere between data visualization and civic artwork, these info-driven diagrams reveal wealth disparities in the centers of America’s second and third largest cities. Herwig Scherabon‘s project, titled simply Income Inequality, uses a matrix of blocks (minimicking magnetized iron) to highlight rich and poor neighborhoods.

urban-data-la-chicago

The city grids form a recognizable backdrop for these axonometric representations, allowing viewers to read the baseline built enviroment against the overlaid information. In turn, the millions of stacked pixel blocks end up forming an alternative landscape of skyscraper-like structures in the urban environment.

income-inequality-representations

The net result is a map of the city’s invisible patterns and correlations shaped by power, money and time, revealing inequalities and mechanisms of segregation. Above: Chicago’s infamous low-income South Side (with Lake Michigan for reference). Below: poor areas of Los Angeles located directly next to the downtown core.

cityscape-by-wealth-and-poverty

The final presentation was mounted on a pair of wooden boards with the city names shown on the cites, exhibited at the Glasgow School of Art graduate show. Captions on the side give more details on the diagrams.

city-captions-on-side

From the artist/designer: “The two large prints (150x75cm) are visualizations of income inequality in Los Angeles and Chicago and are currently shortlisted for the Information is Beautiful Awards. They are printed on matte Somerset Velvet paper and mounted on thick wooden boards. The images are abstract diagrams of these cities that show a high resolution matrix of blocks. The height of these blocks corresponds to the income in the respective output area.”

downtown-millions-of-blocks

wall-mounted-artworks

“It is part of the design idea to inspire the viewer to look for their own neighborhood or other areas that interest them. I want to trigger a train of thought for what the reasons behind inequality might be. I am always fascinated by the patterns and correlations in the urban fabric. The politics behind urban planning tell us a lot about the people who live in these places and the powers who shape them. I think that it is utterly important to try to unveil the inequalities and the segregating mechanism that we got used to live with.”

Share on Facebook


[ By WebUrbanist in Art & Drawing & Digital. ]

[ WebUrbanist | Archives | Galleries | Privacy | TOS ]


WebUrbanist

 
Comments Off on Datascrapers: Infographic Skylines Overlay Income Inequality on City Grids

Posted in Creativity


Urban Dog Tags: Wear City Grids Around Your Neck & The World

07 Nov

[ By WebUrbanist in Design & Products & Packaging. ]

urban dog tag design

Like giant-sized fingerprints, urban grid patterns are unique to each city – this project turns that individuating property into an wearable asset, allowing you to hang you hometown or favorite metropolis around your neck as a point of pride.

city dog tag laser metalk

nyc etched metal necklace

Currently in crowdfunding on Kickstarter, the Urban Gridded Dogtag set is a “collection of unisex accessory so that architects, cartographers, urban planners, urban explorers, nomads, travelers, jet setters” and others can enjoy. New York City, San Francisco, Paris and Tokyo – can you tell which is where? Many more are also shown below.

urban dog tag wearing

urban dog tag concrete

urban dog tag options

The tags come in laser-cut black, gold-plated or stainless steel, with circular variants also available for those who want something without the implicit military reference. Many major cities have already been ‘unlocked’ and further ones will become available depending on how well-funded the campaign becomes before it closes (just one week left!).

urban gridded dog tag

From the creators: “Each piece is carefully designed to capture the cities underlining iconic street network as a lace-like pendant. The information is sourced from gps data by openstreetmap to ensure accurate portraits of the city. With chemical etching technology, the pendants are produced on thick .020″ Stainless Steel with a high level of detail, consistency, and quality. We strive for the component of the dogtags to be locally sourced, made in the USA. Including packaging and mailing supply.”

Share on Facebook


[ By WebUrbanist in Design & Products & Packaging. ]

[ WebUrbanist | Archives | Galleries | Privacy | TOS ]


WebUrbanist

 
Comments Off on Urban Dog Tags: Wear City Grids Around Your Neck & The World

Posted in Creativity


Using AutoPano Giga To Create Panoramas With Gigapan Heads Or Freehand Shooting Grids

04 Feb

I know, it’s a long title but I want to show how easy it can be to assemble panoramas with either a Gigapan head or by shooting freehand, gridded panoramas. AutoPano Giga has been my panorama product of choice after starting with huggin, a free option that does quite well it its own right.

One ability AutoPano Giga excels at is the ability to take images and information from a number of automated shooting heads, such as Kolor’s own PanoGear or even other brands, such as the GigaPan EPIC Pro, which I reviewed for DPS two years ago. I noted in that post that Gigapan’s software was in its first stages and was quite basic and while the software has been upgrade over the intervening two years, it’s still not as robust as Kolor’s AutoPano Giga. Plus, it can not handle freehand panoramas

Utilizing AutoPano Giga to produce stunning panoramas shot with Gigapan’s heads (mine were shot with the EPIC Pro) is fairly simple.

Shoot

Shooting with the Gigapan EPIC Pro is explained in the previously mentioned post. That much hasn’t changed.

Import

Bringing images into your computer is no different than your normal shooting method. The nice thing about AutpoPano Giga is it will understand your RAW files no problem, so there is no need to convert (but you can if you are impatient and want smaller file sizes). I have found it handy to shoot panoramas, especially large ones, on a separate memory card reserved just for panoramas. That makes finding the files all the easier.

With all your panorama files in one location, it is time to use the stitching wizard in AutoPano Giga.

Wizard

The first step in the wizard is to pick the device that was used, in this case we select Gigapan.

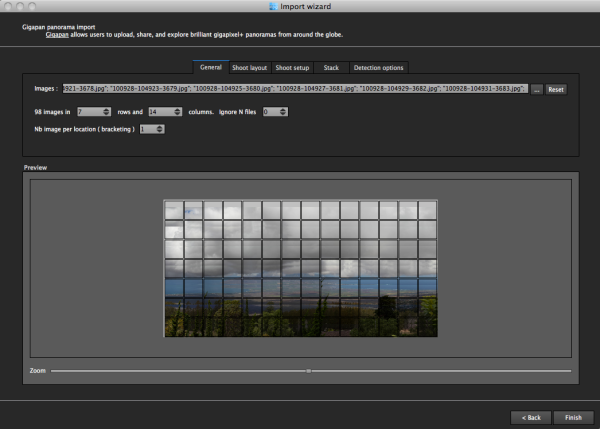
The next screen asks for input. If your shot went off without a hitch and you have a nice grid of images, AutoPano should know this. For instance, when I select the 98 images from my demonstration shot from Maui, Hawaii at the Ali’i Kula Lavender Farms, AutoPano knows this shot was 7 rows and 14 columns. The nice thing about this method is there is no need to import a control file that explains the grid to the software. This is also why, with careful execution, freehand panoramas can be imported.
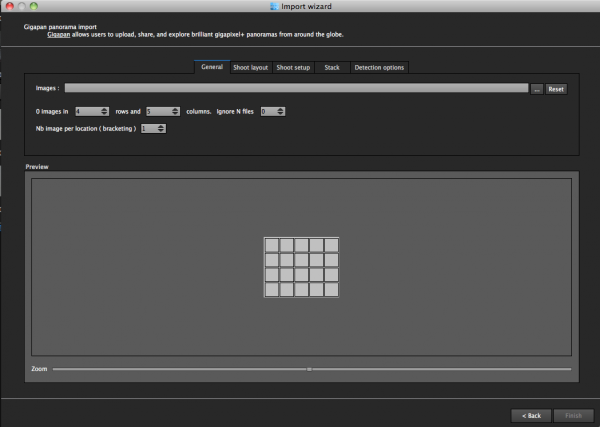
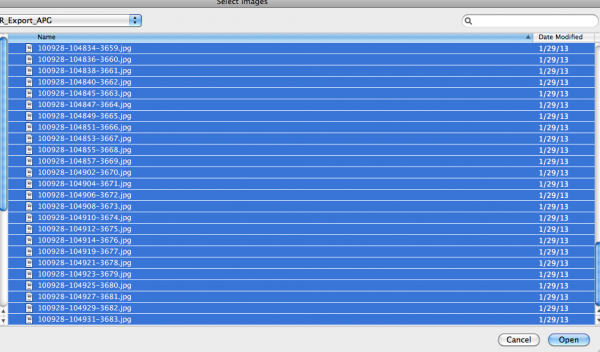
With a straightforward shot like this, there is little else for me to do, but let me show you what the other screens do, if you are curious.

The next screen allows for changing of the panorama shooting direction. One thing I wish this screen had is the ability to pick a grid shot top to bottom, then back up the next column, down the next, and so on, for those times when I shoot a panorama freehand, such as this 2.2 gigapixel image of the Taj Mahal (shot without a tripod and head because they are restricted).
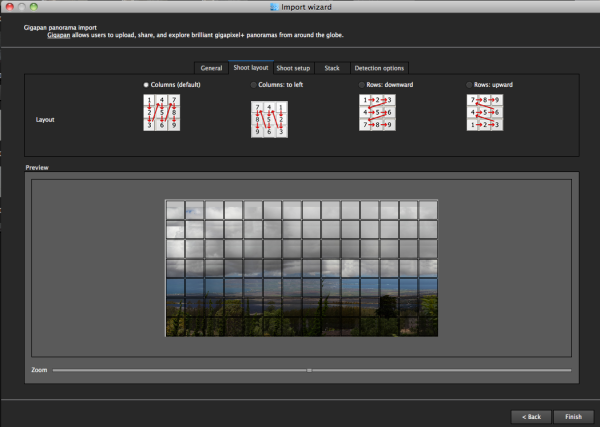
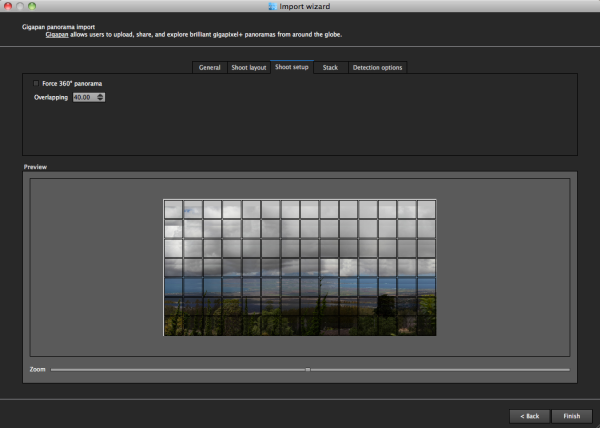
After that screen, custom overlap or forcing a 360 degree view can be selected.
The last two screens deal with control points and that can be left on auto unless you have a particularly good reason to change them. This software works quite well on auto (with some manual tweaks to come).

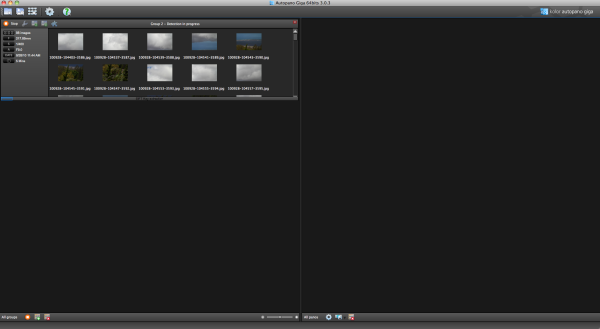
Press “Finish” and AutoPano takes you to the main screen and starts detecting and stitching. I like that, while I can tell the program the pattern of a shoot and the amount of overlay, it will still automatically detect control points and I can even set this number to 200 by default, to ensure the best matching.
Output

Things aren’t always perfect right out of the box because the software doesn’t know which type of projection you want. Below you will see the resultant output on the right, which has a planar projection.
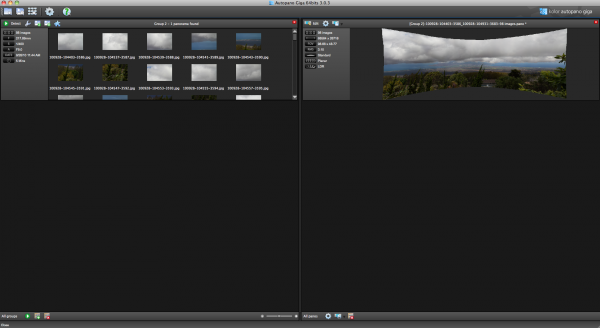
This is easily changed in the Edit screen, where a number of adjustments can be made if desired. I decided on a spherical projection to keep my sides straight.
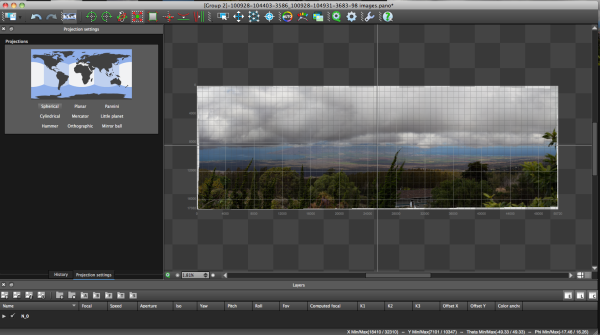
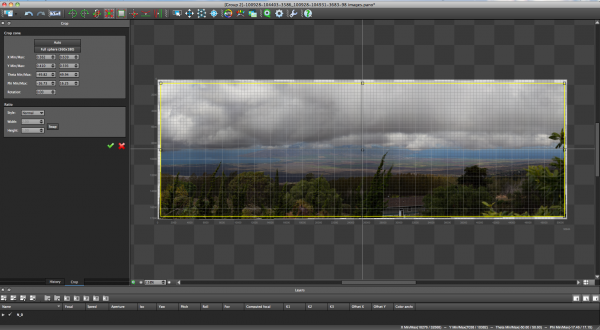
From there, the only change I saw that needed to be made was to crop the image, which is dead easy: click on the crop tool and it automatically selects the crop dimensions. Changes are made by dragging corners or sides and rotations can be made (in case your tripod wasn’t level when shooting).
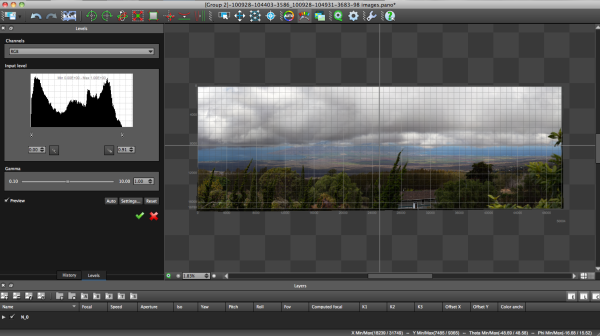
The last bit of editing I tend to do in the program is to set the levels, which is as easy as setting them in Photoshop or other programs.
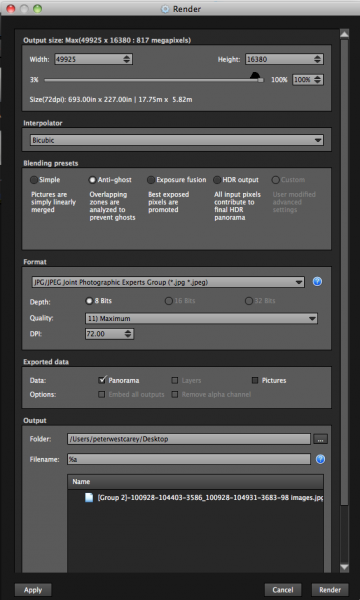
Before being completely done, we need to get the resultant image out of AutoPano Giga and that is done by clicking on the gear in the main screen in order to render the image. Settings on this screen allow for the resizing of the image once rendered (handy if you are sending this out as a JPEG as the max dimension for those is 30,000 pixels) as well as file type, compression, color depth and more.
What Else Can Be Done?

AutoPano Giga is a robust panoramic creation and editing program. This post is not intended to be a complete review of all the features as that list is rather long. Some of the highlights include:

  • Ability to handle HDR bracketed shots (it is available in the first screen of the wizard and is labeled Nb image per location (bracketing)
  • Manual removal of ghosts via masking(although the automatic option works well)
  • Saving results in a variety of file types, including .PSB and .TIFF
  • Batch processing
  • Editing vanishing points and pitch, roll and yaw

Results

How did it come out? Great! But…unfortunately DPS isn’t set up to show case large panoramas but I have hosted the resulting image on my blog. The final image is 43MB large and will take a little time to download with the amount of traffic DPS typically sees.

Click here to be taken to the image. Zoom in and use Full Screen mode for the best experience. Can you spot the airplane taking off? What about people surfing?

For references sake, the panorama was made with a Canon 7D and 28-300mm L lens. It was composed of 98 images shot in Manual Mode at ISO 100, 135mm, f/9, 1/400. The Gigapan EPIC Pro was lent to me from Borrowlenses.com.

AutoPano Giga is available for free trial download here.

Post originally from: Digital Photography Tips.

Check out our more Photography Tips at Photography Tips for Beginners, Portrait Photography Tips and Wedding Photography Tips.

Using AutoPano Giga To Create Panoramas With Gigapan Heads Or Freehand Shooting Grids


Digital Photography School

 
Comments Off on Using AutoPano Giga To Create Panoramas With Gigapan Heads Or Freehand Shooting Grids

Posted in Photography


Rogue Grids

21 Jan

I got a chance to use the new Rogue Grids from Expo Imaging. www.expoimaging.com I real like them! Thanks to the beautiful Julian for her modeling.

P???? ???????????? IRIN GORDON. ????? ?? ?????? ??????????. ????? 14 ??????? 2009 ???? ? ????? FORSAGE ????. ???????? ?????? ???????? ??????? CLUB-STYLES VIDEO MIX PROJECT ??????????: DJ Anna Lee ? DVJ Arnaby Photographer: Irin Gordon PRODUCTION NOTE: No Video cameras were used in the production of this music video. It was created entirely from Photographs taken by a Nikon D300.
Video Rating: 4 / 5

 
Comments Off on Rogue Grids

Posted in Nikon Videos


Jay P. Morgan on Feathering Grids

16 Dec

Using a KESSLER slider and a TAMRON lens and a DYNALITE flash and some NIK software, human Nascar* Jay P. Morgan will now give you some pretty darn good advice on grid spots.

But the real gem here is the feathering, which will almost always make your light more interesting.
__________

* I kid, Jay. Props to you. And also to LENS PRO TO GO. And GLIDECAM. And PHOTOFLEX. And VANGUARD. And AAZDEN. And ROSCO. And TRIPLE SCOOP MUSIC. And PHOTOGRAPHY TALK.

(Seriously, someone make this guy a jacket. This needs to happen.)

-30-


Strobist

 
Comments Off on Jay P. Morgan on Feathering Grids

Posted in Photography