RSS
 

Posts Tagged ‘Eyes’

Eyes on the Skies: Ambarella brings fast 4K to drones with H2 and H12 processors

07 Jan

Processor maker Ambarella has announced its two newest and most powerful chips. The H2 and H12 are 4K (UHD) capable processors, with the more powerful H2 able to compress 10-bit 4K/60p video using H.265 HEVC compression or 4K/120p with the less efficient H.264 AVC system. The company says it’s the drone market that’s now pushing the capabilities it needs to offer – way beyond what compact cameras tend to need.

With the drone market in mind, the H2 also includes a 1.2Ghz quad core processor that allows it to handle the data required to keep a drone in the air. It can also output a low-delay Full HD video stream at the same time as compressing a 4K stream, allowing a near-immediate high res view to be sent to a remote operator.

What we found interesting is not just that applications such as drones are so demanding (that makes sense), but that the expectations of the drone and sports camera markets are so far beyond what is being offered in the still camera market. One big difference between the two markets is that, with the continued decline of small-sensor compacts, most of the sensors used in stills photography are much larger than those used in action cams or drones, which makes heat management and data readout more challenging. Even with this difference, it’s interesting to know that 60p and 120p 4K processing is already ready for consumer devices.

Ambarella vice president of marketing and business development Chris Day says that sales of processors for drone/flying cameras now makes up 10% of the company’s revenues, highlighting how fast-moving the sector is. ‘These things need Ultra HD video, high frame rates, great imaging, electronic stabilization and lots of CPU power. And, of course, this all needs to be with low power consumption: it’s pretty demanding but it’s a great fit for us.’ he says. Asked about the impact these technologies are likely to have on the conventional stills camera market, he points out the narrowing of boundaries between sectors: ‘companies such as DJI are starting to make their own cameras, rather than mounting conventional Sony or Micro Four Thirds cameras on there.’

With fast, high quality, high bit-depth video likely to become more common on action cameras and flying cameras, it’ll be interesting to see how many of these capabilities start to appear on more conventional cameras in the coming months and years.


Press Release:

Ambarella Introduces Low Power 4K Ultra HD SoCs for Sports and Flying Cameras

SANTA CLARA, Calif.–(UNDER EMBARGO – until Jan. 6, 2016 at 8:00 AM Eastern)–Ambarella, Inc. (NASDAQ: AMBA), a leading developer of low-power, HD and Ultra HD video processing semiconductors, today introduced the H2 and H12 camera System-on-Chips (SoCs) for a new generation of sports and flying cameras. H2 targets high-end camera models with 4K Ultra HD H.265/HEVC video at 60 frames per second and 4K AVC video at 120 frames per second. These high frame rates deliver smooth video during fast action shots and slow motion playback. H2 also includes 10-bit High Dynamic Range (HDR) video processing to handle high contrast scenes and supports DSLR quality photography. H12 targets mainstream cameras and offers 4K Ultra HD HEVC video at 30 frames per second. Both SoCs have extremely low power consumption allowing for the design of small form factor cameras, and feature advanced 3D electronic image stabilization, potentially eliminating the need for mechanical gimbals.

“With the introduction of H2 and H12 we now provide a complete portfolio of 4K Ultra HD HEVC solutions for sports and flying cameras,” said Fermi Wang, President and CEO of Ambarella. “H2, our first 14nm chip, delivers 4Kp60 Ultra HD HEVC video with 10-bit HDR processing, as supported by the latest generation of 4K HDR televisions. H12 delivers 4Kp30 Ultra HD HEVC video for outstanding video quality at mainstream camera price points.”

H2 features a new generation image processing pipeline which includes 10-bit HDR video processing and excellent imaging, even in challenging low-light conditions. The integration of a 1.2 GHz quad-core ARM® Cortex®-A53 CPU with floating point and NEONTM provides significant processing power for customer applications including flying camera flight control, video analytics and wireless networking. Its hardware de-warp engine supports wide-angle panoramic camera designs, while USB 3.0 connectivity provides fast upload of high resolution video. H2 supports live streaming of a second, low-delay, Full HD video stream for wireless monitoring and camera control.

H12 supports both 4Kp30 Ultra HD HEVC and AVC video encoding. It integrates a 1GHz single-core ARM® Cortex®-A9 CPU with floating point and NEONTM to provide the processing power required for customer applications including flying camera flight control and wireless networking. Its de-warp capability allows the use of wide-angle lenses with minimal image distortion. H12 also supports the live video streaming of a second, low-delay Full HD video stream.

Ambarella will demonstrate both H2 and H12 at a private event during the Consumer Electronics Show in Las Vegas, January 6 – 9, 2016.

Pricing and Availability

For pricing and availability please contact Ambarella at www.ambarella.com/about/contact/inquiries
The URL for this news release is: www.ambarella.com/about/news-events.html
The URL for the related image is: www.ambarella.com/about/news-events/press-images/H2-H12-press-images.html

Articles: Digital Photography Review (dpreview.com)

 
Comments Off on Eyes on the Skies: Ambarella brings fast 4K to drones with H2 and H12 processors

Posted in Uncategorized


Feast Your Eyes on Our Festive Gift Guide

23 Nov
GG1

This week we’re thankful for a feast of new photo goodies in our shop. Tools like an SLR lens mount for your phone and an illuminating phone case. There’s even tassels, decals, and temp tattoos. Gobble them up quick, in plenty of time for the holidays!

(…)
Read the rest of Feast Your Eyes on Our Festive Gift Guide (0 words)


© Erin for Photojojo, 2015. |
Permalink |
No comment |
Add to
del.icio.us

Post tags:


Photojojo

 
Comments Off on Feast Your Eyes on Our Festive Gift Guide

Posted in Equipment


3 Simple Ways to Create Stunning Eyes in Your Portrait Photography

03 Oct

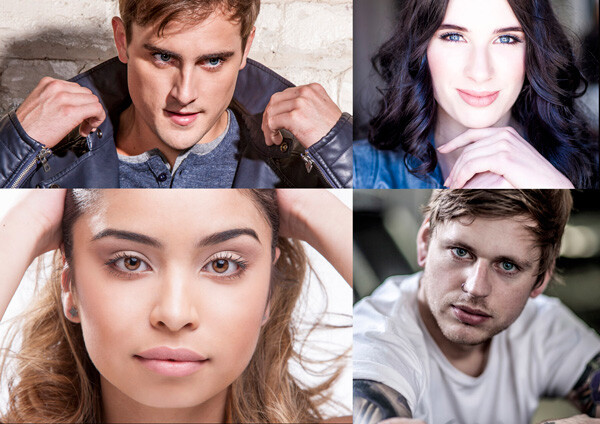
EYE MONTAGE

Image model credits, clockwise from top left: Chris Milligan/Fremantle Media, Rachael Lever, Danny Spannerz/East Brunswick Tattoos, Tiffany Diaz

“Here’s looking at you, kid.”

Reclusive Hollywood legend Marlon Brando would always close his eyes when paparazzi tried to take his photo. He knew that without his eyes open an image wasn’t worth publishing.

The eyes are the single most important feature of any portrait. Beautiful eyes can make even the dullest portrait mesmerizing. Poorly lit, out of focus eyes, or eyes that lack connection, will weaken the impact of a portrait.

Here are my three favorite techniques to make eyes really stand out in your portraits.

#1 – Light

Light makes photography. Embrace light. Admire it. Love it. But above all, know light. Know it for all you are worth, and you will know the key to photography.” – George Eastman

Eyes look best when they are lit well, with beautiful catch light. Catch lights are the reflection of a light source in the eyes. The size, shape, and brightness of your catch lights depend on the light source you use.

WindowLight

Two large, frosted windows from my studio create beautiful catch lights. Model: Bryana Karanikos

Naked Flash on camera

Diffused flash on-camera creates a slightly softer, rectangular catch light.

Med Soft off camera

Medium softbox, off-camera, positioned at 2 o’clock gives a soft, natural catch light.

ChasingLight 2250

Poorly lit eyes without catch lights look cold, and a bit creepy.

#2 – Expression

You are what you think. All that you are arises from your thoughts. With your thoughts you make your world.” – Anon.

EyesBA

In the image on the left (above), Tiffany’s eyes are cold, and she looks nervous. After I gave Tiffany a visualization exercise, her eyes appear warm, confident, and connected (right image above) Model: Tiffany Dias

How you communicate, connect, and direct your model is key to capturing a great expression in the eyes. If your model’s smile isn’t genuine, his or her eyes will appear cold and dull-looking. If your model is nervous or distracted, this too will be reflected in his or her eyes.

One technique I use to create a great expression is visualization. I ask my model, If you could be anywhere doing anything right now, where would that be? Tell me about that moment. Who is there? What does it feel like? Once they are in the moment of their visualization, their entire body language and expression changes.

#3 – Post-production

Be willing to give that extra effort that separates the winner from the one in second place.” — H. Jackson Brown Jr.

Post-production can lift your images from good to great, when it’s done well. The key to great post-production is not overdoing it. It’s easy to get excited with all the tricks and enhancements that post-production software offers. It’s addictive and much like opening a jar of Nutella – very difficult to control yourself once you’ve begun.

I try and use the overnight rule when it comes to retouching. Once I’ve worked on an image, I won’t look at it again for at least a day. I find my eyes constantly adjust to the modifications I’m making, so it’s more difficult to see when I’ve gone too far (much the same way I dressed in the ’80s).

Here’s a step-by-step technique to enhance eyes using Adobe Lightroom:

EYESBP 10

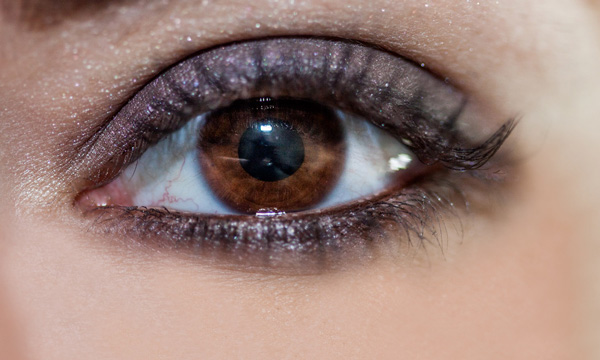
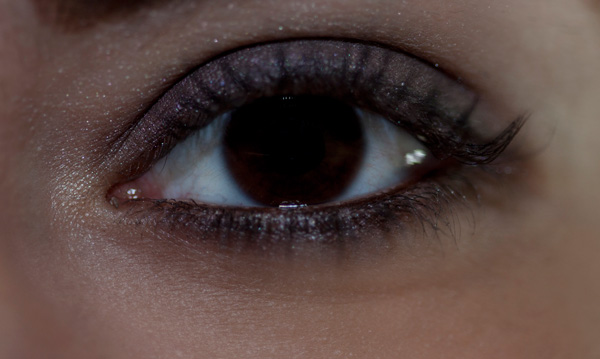
Before and after: I’ve used Lightroom to make the eyes sharper and brighter and enhanced their color.

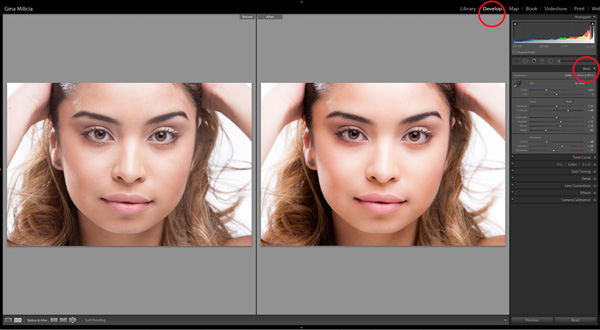
a) Import your image into Lightroom and use the basic development panel to develop the shot. In this case, I’ve used one of my own beauty presets.

EyesBP 2

EyesBP 2B

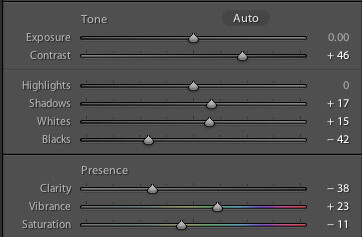
Here are the basic adjustments I’ve made for this image.

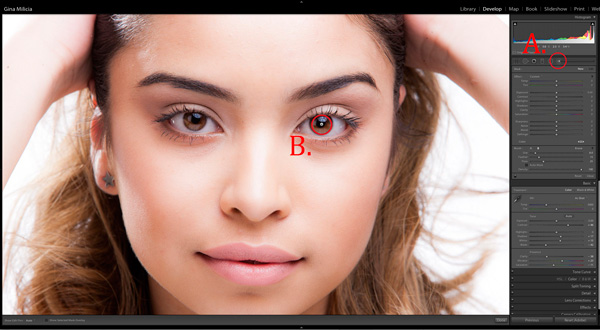
b) Zoom in to the eyes (B.) and select the adjustment brush tool (A.) You can also select the brush using keyboard shortcut K. See image above.

EyesBP 4

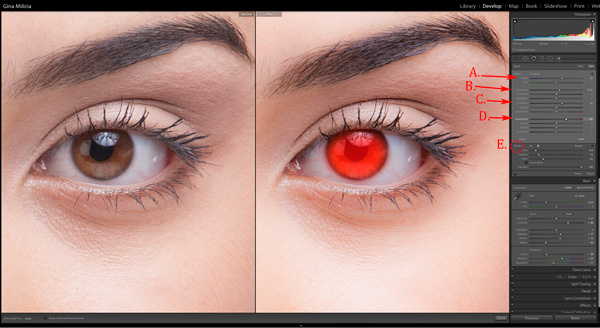
c) The next step is adjusting the eye color:

EyesBP 5

  • Increase the temperature slider (A.) to make the eyes appear warmer in tone.
  • Increase the exposure slider (B.) to brighten the iris.
  • Increase the shadow slider to bring more detail into the shadow area (C.)
  • Increase the sharpness slider to make the eyes appear more detailed.

Adjusted only the colored part (the iris) of her eye (highlighted in red) and set the brush to have a slight feather and low flow so you can build up your adjustments slowly.

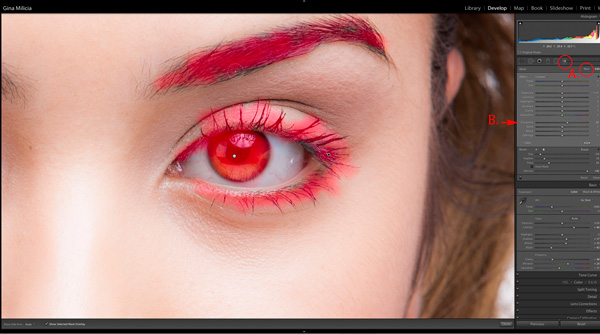
d) Next, select a new adjustment brush (A.), increase the sharpness slider (B.) by +22 and paint over the colored part of the eyes, eyelashes, and eyebrows. This will really make the eyes stand out.

EyesBP 6

e) Finally, select a new adjustment brush. Set the exposure slider to -29 and increase the clarity to +10. Paint around the edge of the iris. This will darken the area slightly and give the eye more definition.

f) The final image has been imported into Adobe® Photoshop®, where I have done a basic skin retouching to remove a few small blemishes.

EyesFINAL

I’d love to hear about your techniques for enhancing eyes and see some examples.

Gina has a new dPS ebook just released – Portraits: After the Shot – check out out here!

The post 3 Simple Ways to Create Stunning Eyes in Your Portrait Photography by Gina Milicia appeared first on Digital Photography School.


Digital Photography School

 
Comments Off on 3 Simple Ways to Create Stunning Eyes in Your Portrait Photography

Posted in Photography


You’ve got stars in your eyes thanks to the Lensbaby Spark!

01 Oct

Extra photos for bloggers: 1, 2, 3

Your effort to add a little sparkle to your photos has left your friends more shocked than excited… confetti in the face!

Try the new special edition Lensbaby Spark Lens next time for magical glitter explosions in your pics without the real life problem of “confetti eye.”

This limited edition lens attaches to your DSLR and gives you more creative control with tilt shift style and 9 special shaped plates for cool bokeh effects in your pics and videos.

Turn bursts of natural and colorful light in your pics into explosions of glowing hearts, stars, flowers and more! Your photos (and video too) will be full of the dreamy shine and sparkle you’ve been looking for.

Put Away the Confetti and Grab the Spark
$ 129.95 at the Photojojo Shop


© Britta for Photojojo, 2014. |
Permalink |
No comment |
Add to
del.icio.us

Post tags:


Photojojo

 
Comments Off on You’ve got stars in your eyes thanks to the Lensbaby Spark!

Posted in Equipment


Directing your Viewer’s Eyes with Lightroom to Make a More Powerful Image

17 Aug

One key to a successful photograph is that it directs the viewer’s attention towards the subject in question. There are many ways that this can be achieved through composition and lightning in the field, but did you know, you can also direct the attention of your viewer’s eyes through post-production?

truck edit-2

You still need an interesting subject for this to work, as directing your viewer’s eyes to a boring location within a frame is still going to result in a boring photograph. For the sake of this tutorial I’ll be using this photograph of an abandoned utility truck, but you could use anything from an interesting tree, to a model, to your pet, and achieve similar results.

First a few basic edits to bring the photo to life

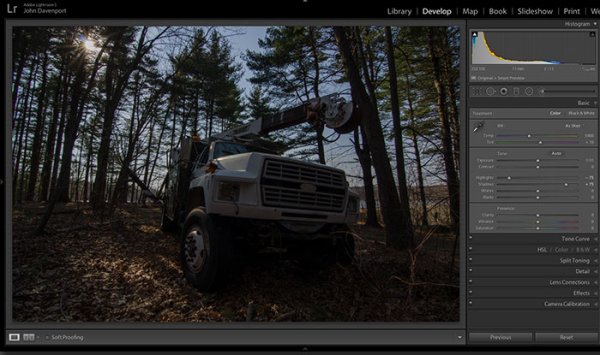
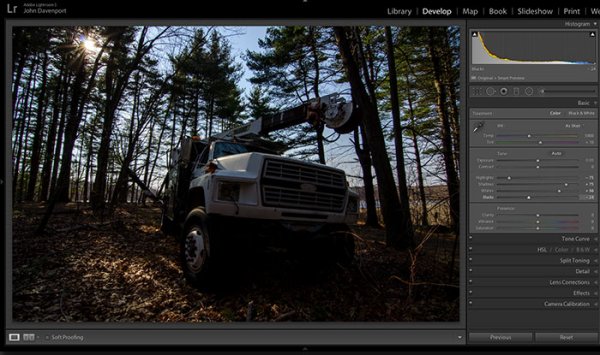
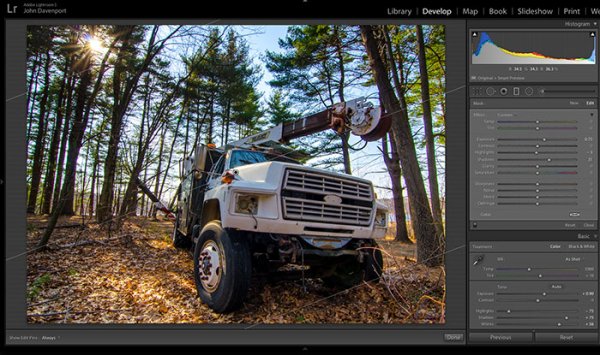
Before we can work on drawing the attention of the viewer this photograph needs a bit of life pumped back into it. Having shot this photograph into the sun, the foreground and front of the truck are going to require some basic recovery techniques. I’ll be using the Basic Tab in Lightroom 5 to recover the detail and add some interest to the shot.

Step One: Highlights and Shadows

direct-viewers-attention-11

Shooting into the sun can be tricky as it often will cause your sky to turn white. Reducing the highlights slider will help to counteract this. It does so by targeting the brightest areas of your photograph without effecting the overall white point of the image. The shadows slider has a similar effect on the darker areas of the image, allowing detail to be brought out in the grill of the truck and along some of the trees.

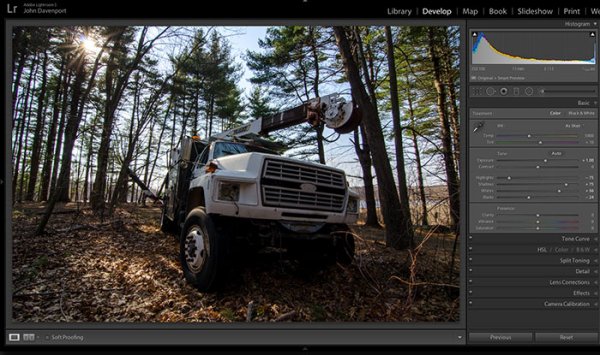
Step Two: Add contrast with the Blacks and Whites sliders

direct-viewers-attention-10

One of the problems with the highlights and shadow recovery technique above is that it often will reduce the contrast of the image and create a sort of muddled and dull look. To counteract this you can use the whites and blacks sliders to effectively set your white and black points, as well as bring a bit of contrast back into the image. This allows you to have a bit more control over the contrast of your image as opposed to the more global Contrast slider adjustment.

Do this by dragging your White slider to the right until your histogram touches the right edge of the graph. Make sure not to go too far and clip any highlights. Holding down the Alt (Option) key while you drag the slider will show any areas that are clipped – so drag to the right until you see some, then bring it back to the left just until they are no longer visible. Do the same with the Blacks slider by pulling it to the left. The Alt (Option) key works with this one too, but in the case of Blacks you actually do want a little clipping. Having a good black in your image will add that contrast you’re looking for.

Step Three: Even out the exposure

direct-viewers-attention-9

Now that the highlights, shadows, whites and blacks are set –  a quick bump up on the exposure slider will even out the rest of the scene and get us close to something we’re ready to work on.

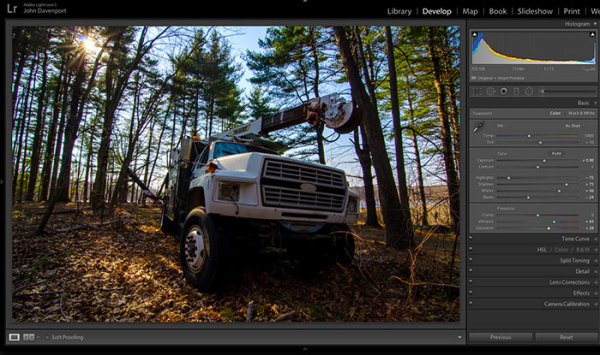
Step 4 (optional): Saturation and Vibrance

direct-viewers-attention-8

For this particular shot I wanted to add a bit more saturation to the trees and the floor of the forest. It’s going to depend on the shot that you’re working on, and the look that you are trying to achieve, as to whether this step is necessary. But it doesn’t hurt to play around with it before you move on to the next steps.

For more on Lightroom’s Basic Tab read: Master These Five Lightroom Sliders and Your Photos Will Pop

Now to draw the attention of the viewer

While the truck itself is a strong subject, and one that does capture the viewer’s attention on its own, there are a few tools that Lightroom has to offer which will allow for even more attention grabbing goodness.

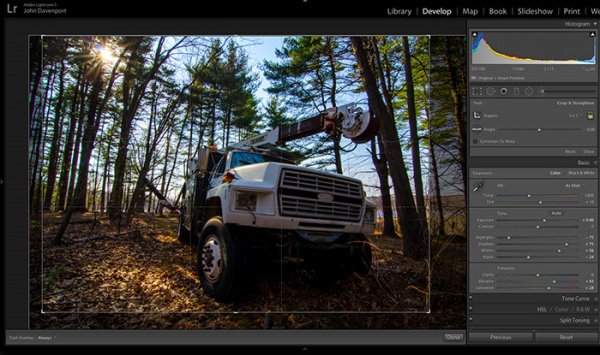
Cropping for better positioning

direct-viewers-attention-7

The crop tool allows you to have more control over the positioning of your subjects within the frame. In this shot the truck was a bit too centred and there was a little too much dead space in the forest so by cropping in a bit closer the shot becomes a bit more balanced, allowing the viewer’s eyes to stay focused on the truck.

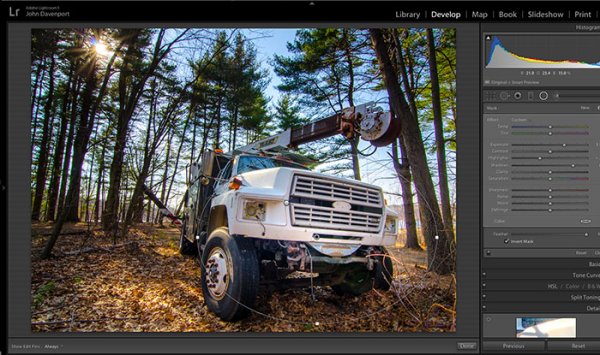
The Graduated Filter tool

direct-viewers-attention-6

By adding a graduated filter to the bottom right of the image more detail can be recovered from the front of the truck without effecting the rest of the exposure. This allows for a more compelling focal point for the viewer to rest their eyes on. When you go about placing graduated filters in your own images be sure to think about how it’s effecting the overall light of the scene and ask yourself if it looks natural.

Getting creative with graduated filters can allow you to have some really interesting results read 4 Fun Tricks to Enhance Your Photos With Lightroom’s Graduated Filter Tool for more creative uses of the graduated filter tool.

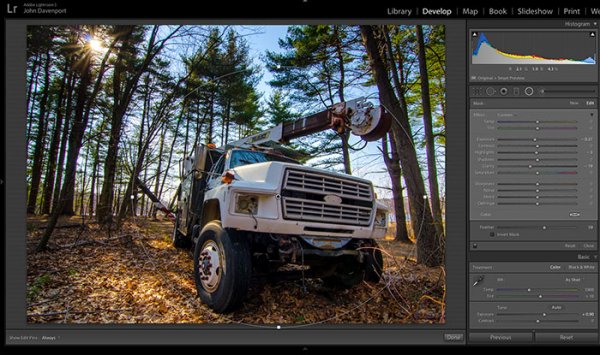
The Radial Filter tool

direct-viewers-attention-4

The radial filter allows for a subtle vignette to be added to the image which helps to keep the viewer’s eye within the frame. It also has the added benefit of darkening the sky, without darkening the truck, allowing for deeper blues to come through. After I was happy with this first radial filter I dropped in a second one to increase the brightness and detail of the grill of the truck. To do this the radial filter was inverted and the exposure and clarity sliders were increased.

direct-viewers-attention

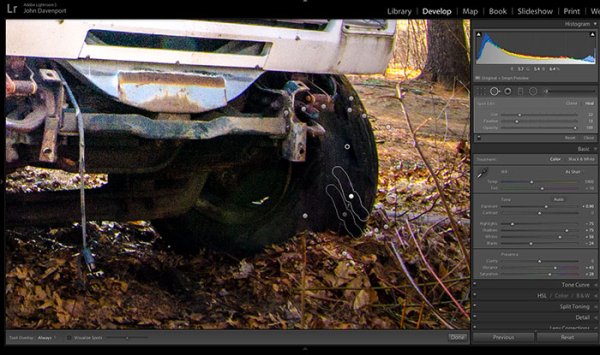
Removing distractions

direct-viewers-attention-2

Once you’ve gone through all the work of drawing attention to a particular area of a photograph you’ll want to go through with Lightroom’s clone/healing tool and remove anything that competes for that attention. Adobe has greatly improved this tool in Lightroom 5 allowing you to drag paths, making it possible to remove distracting branches with ease.

The Final Edit

With a few quick adjustments in the basic tab, a simple crop, and a few of Lightroom’s filters –  this utility truck really grabs the attention and is a vast improvement over the original straight out of camera shot. Go try this workflow for yourself and share your own before and after in the comments below!

truck-edit2

Watch this Edit Click for Click

For those who prefer to sit back and watch – here’s  a quick video of the edit above.

The post Directing your Viewer’s Eyes with Lightroom to Make a More Powerful Image by John Davenport appeared first on Digital Photography School.


Digital Photography School

 
Comments Off on Directing your Viewer’s Eyes with Lightroom to Make a More Powerful Image

Posted in Photography


The Pencil vs Camera Photo Project That Will Make Your Eyes Pop Out of Their Sockets

29 Nov

I’m going full steam ahead to continue our series of articles about awesome photography projects from all over the world. I hope you enjoyed the Cars Adventures and Oh, My Head photo projects we’ve previously posted! Today, I’m going to share with you the Pencil vs Camera project pictures by Ben Heine. His works are bursting full of surrealistic poetry, Continue Reading

The post The Pencil vs Camera Photo Project That Will Make Your Eyes Pop Out of Their Sockets appeared first on Photodoto.


Photodoto

 
Comments Off on The Pencil vs Camera Photo Project That Will Make Your Eyes Pop Out of Their Sockets

Posted in Photography


NYT offers a look ‘hometown’ across the U.S. through the eyes of teens

24 Sep

518022d39eff66dbb4000050-1024.jpg

The New York Times’ Lens Blog asked teenagers across the U.S. to submit photos of their hometowns for a project simply called ‘My Hometown.’ Thousands of teens responded to the call, with submissions coming from 45 states. The resulting collection is a yearbook of sorts, documenting the friends, family and places closest to a small sampling of the country’s young people. Lens Blog has published a selection of 145 Editor’s Choice photos, and the whole collection is available online – searchable by student or state. Take a look at a few standouts.

News: Digital Photography Review (dpreview.com)
 
Comments Off on NYT offers a look ‘hometown’ across the U.S. through the eyes of teens

Posted in Uncategorized


How Capturing Expressive Eyes Can Be The Key To Good Portraiture

13 Aug

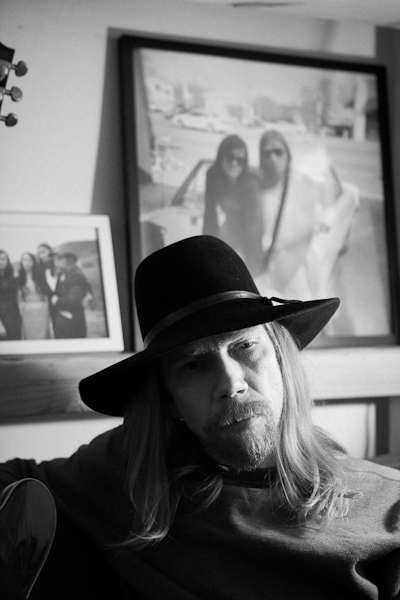
Paul Kostabi

If you look at some of the most famous photographs in history, such as Dorothea Lange’s Migrant Mother, Steve McCurry’s Afghan Girl, or much of Irving Penn’s work, you might notice there’s one thing that they have in common, a powerful emotion in the main subject’s eyes.

While this is far from a steadfast rule, if you’re doing portraiture, street photography, or photojournalism, catching a powerful expression in the eyes can be the difference between a mediocre photograph and the best photo you’ve ever taken.

If you watch a person’s eyes and wait, you can see when they are experiencing something, recalling a moment, or feeling an emotion.  That sometimes split second is when you need to take the shot.  You can create an amazing composition with gorgeous lighting, but if there is no expression coming through from the subject then the photograph will be lacking.  And that expression often begins with the eyes.

It could be a fleeting glance away from the camera as the subject recalls a story or a powerful gaze into the camera.   A momentary glance from the eyes can portray strength, fear, romance, nostalgia, confidence, glamour, and so many other emotions.

A good trick to elicit these emotions is to get the subject talking about a meaningful moment in their lives.  The more time you are able to spend with them, the more they will open up and the more opportunities you will have to capture these emotions.  Or with some, you can even simply state the emotion and they will be able to portray it (“Give me confidence!”)

So the next time you create a portrait, make sure to pay special attention to the eyes.

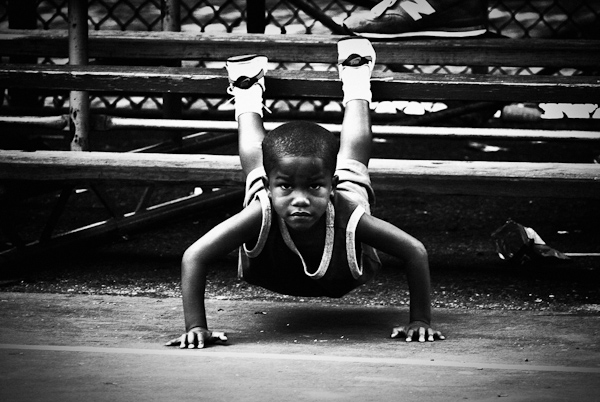
Pushups, Rucker Park

Post originally from: Digital Photography Tips.

Check out our more Photography Tips at Photography Tips for Beginners, Portrait Photography Tips and Wedding Photography Tips.

How Capturing Expressive Eyes Can Be The Key To Good Portraiture


Digital Photography School

 
Comments Off on How Capturing Expressive Eyes Can Be The Key To Good Portraiture

Posted in Photography


Eyebombing: 21 Street Artworks Utilize 42+ Googly Eyes

04 Apr

[ By WebUrbanist in Art & Street Art & Graffiti. ]

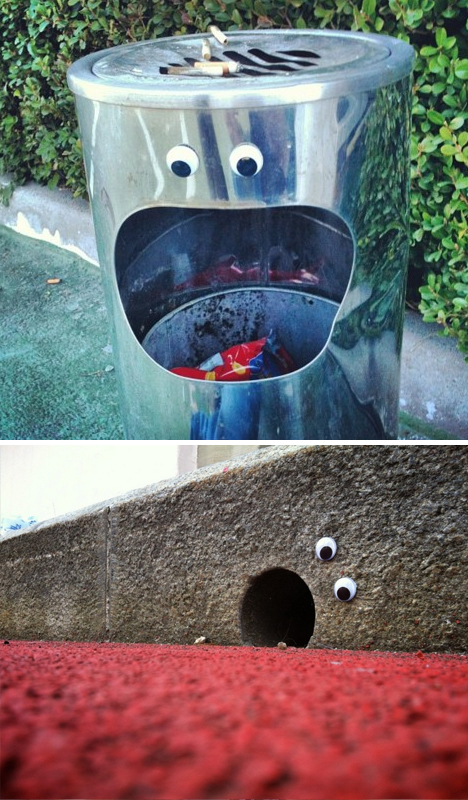
eyebombing googly eyes

Unlike graffiti tags or other stylized and personalized approaches to urban art, eyebombing is an equalizer. Like a crowd behind Guy Fawkes masks, the work of any of the following 21 example ‘eyebombers’ is inherently anonymous due to the similarly simple materials used in each case.

eyebombing happy sad faces

Of course, the eyes just set the stage for further anthropomorphic interpretation ; with them in place, other street elements like grates, slots, posts and more suddenly become faces, mouths and limbs.

eyebomb frown smile examples

Context, with or without the intention of an artist, supplies emotion – even the most neutral eye placement makes for implied facial expressions of all kinds.

eyebomb hand railing snake

Per Eyebombing.com, these unsigned interventions are “different from traditional types of street art like tagging, sticking, stencils” because “the above forms are largely driven by egocentric behaviour, like getting seen, respect and maybe a hope to get famous, often using vandalism as modus operandi.”

eyebomb expressive urban art

Instead, they claim, it is about the message, the humor and simply brightening someone’s day. And while you can buy eyes from their site, they are also (again like a generic mask) available essentially anywhere and quite inexpensively, making this an easy art form to get involved with wherever you may be.

Share on Facebook


[ By WebUrbanist in Art & Street Art & Graffiti. ]

[ WebUrbanist | Archives | Galleries | Privacy | TOS ]


WebUrbanist

 
Comments Off on Eyebombing: 21 Street Artworks Utilize 42+ Googly Eyes

Posted in Creativity


Weddings Through The Eyes of a “Noob”: Lessons I Learned

23 Feb
One of the things I'll do is set up a remote camera in the back of the ceremony, elevated if possible.  In this shot, a tilt-shift lens was used to create that miniature look.  EOS 5D Mark III, TS-E 17mm f/4L. Exposure was 1/320, ISO 3200, f/4.

One of the things I’ll do is set up a remote camera in the back of the ceremony, elevated if possible. In this shot, a tilt-shift lens was used to create that miniature look. EOS 5D Mark III, TS-E 17mm f/4L. Exposure was 1/320, ISO 3200, f/4. Photo by Rick Berk/kNot Photography

Throughout the first 20 years of my career in photography, I’d photographed a lot of different things- NHL All-Star games, Major League Baseball, NFL Football. I’d photographed portraits, boudoir, model portfolios. Landscape photography became a passion of mine. One thing I never photographed was a wedding.  When I began my career, I assisted on exactly two weddings. Never did I shoot one.  The two weddings I assisted on went so badly that I never wanted to touch one again.  I thought all weddings were like that. It wasn’t until years later that I understood it was more the photographer I worked for than it was the weddings themselves.

This type of shot is the kind that makes for a nice touch in the overall collection from a wedding.  They complete the set and really show a photographer's attention to detail.  EOS-1D X, EF 100mm f/2.8L IS Macro. ISO 800, 1/200, f/8.

This type of shot is the kind that makes for a nice touch in the overall collection from a wedding. They complete the set and really show a photographer’s attention to detail. EOS-1D X, EF 100mm f/2.8L IS Macro. ISO 800, 1/200, f/8. Photo by Rick Berk/ OneRedTreePhoto.com

For a variety of reasons, I made myself available as a second shooter in 2012, and got my first taste shooting weddings.  That first one was intimidating, but I learned a few things along the way.

This is a must. Depending on the setting it will always change, but at least one formal portrait of the bride is essential.  This shot simply used on camera flash, bounced into a reflector at camera left. EOS-1D X, EF 85mm f/1.2L II. 1/250, f/1.2, ISO 400.

This is a must. Depending on the setting it will always change, but at least one formal portrait of the bride is essential. This shot simply used on camera flash, bounced into a reflector at camera left. EOS-1D X, EF 85mm f/1.2L II. 1/250, f/1.2, ISO 400. Photo by Rick Berk/OneRedTreePhoto.com

1. Prepare and be organized.

Prior to the wedding day, speak to the bride and groom about what shots they absolutely must have. Plan when and where you will be shooting each of the shots. If you’re doing group shots in the park, make sure they know that’s the plan, and when you need them there.  Keep a shot list with you. Don’t promise anything more than that you will try to get these shots, because things could always happen preventing you from getting the shot. But at least this way you know what to try and focus on.  This is also where you manage their expectations so they understand that you can’t possibly get EVERYTHING, but you will try to get what’s most important to them.

2. It’s your job to manage things.

Your bride and groom have a ton on their plates on the wedding day. Photography is the last thing on their mind. But you still need to get the shots and you need to do so as efficiently as possible so as not to hold up the proceedings.  Gentle reminders to the bride and groom about the shots they wanted will help, especially if you can give them a few minutes warning. For instance, “We need to get the family portrait, and we have a window in 5 minutes if we can get you all together,” works fine.  They WILL ask why the shot isn’t there if you don’t get it, and even if they are resistant during the event, they will thank you later.

3. Do what you can without their cooperation.

Yes, there will be some shots you absolutely need to pull the bride and groom away for.  But if you can manage to get shots without interfering in their activities, you’ll be exactly the kind of wedding photographer everyone wants- an invisible one who delivers the goods. Shoot preparation shots, detail shots of the rings, the cake, etc., while you have the free time and nothing else is going on. Getting those kinds of shots out of the way makes it easier to get the really important stuff later.

4. Don’t try to go it alone.

It’s easy to underestimate how much work goes into shooting a wedding. Many times, a photographer’s first taste is when a friend asks them.  It’s an honor to be asked, but it’s also a great responsibility.  Theoretically, this is a once in a lifetime event.  You can’t be everywhere at once.  The weddings I worked as a second shooter, I wasn’t a secondary shooter.  I just wasn’t the guy contracted to do the job.  But I shared responsibility for getting certain shots. For instance, the bride and groom getting ready at different locations. One of us would go to the bride’s, one to the groom’s. We’d meet back at the church, or at another location where we might be doing shots, depending on how the day is planned.  This takes a huge amount of pressure off.  In terms of the ceremony, it ensures that multiple angles are covered so if one of you is blocked, the other might have a chance at getting the shot.

5. Be on the lookout for those special moments.

It can be easy to focus on the primary photos and lose sight of those smaller, special moments that, when captured, make for the best images. Be on the lookout for a tender moment between bride and groom, the bride and her father, or the groom and his mother. Look for moments with friends and relatives that might end up telling a story.  This means your camera is always ready and you are always watching. There is no time to let down your guard.

6. Approach it like any other shoot.

There are a lot of little moments that make up a wedding day. Near the end of the father-daughter dance, the bride looked up and had this beautiful expression of admiration for her father. When her mother saw the image, tears came to her eyes.  As a photographer, those are the moments I live for.

There are a lot of little moments that make up a wedding day. Near the end of the father-daughter dance, the bride looked up and had this beautiful expression of admiration for her father. When her mother saw the image, tears came to her eyes. As a photographer, those are the moments I live for. Photo by Rick Berk/OneRedTreePhoto.com

One common theme I’ve heard from all photographers thinking of diving into the wedding pool is that they build it up so much that they become intimidated by it. You were hired for your expertise, so approach it like anything else. Look for creative shots you can use to illustrate the day, to give a storybook feel to the images, and to capture the emotion. If you need the bride and groom and other family members in a certain spot, direct them as you would a portrait shoot. Don’t be afraid to ask for them to do something for you if you think that by doing so, you can provide them with a shot that will make them remember the day fondly for the rest of their lives.

7. Use ALL of what you have.

In my bag at most weddings I keep a 24-70mm lens and 70-200mm lens.  These are my workhorse lenses. But I try to offer variety and for me this means using different lenses for different shots.  I have a 100mm macro for ring and detail shots, but also for portraits.  I use a fisheye lens for some candids on the dance floor. I’ll use an ultra wide angle like a 16-35mm.  I keep a couple of speedlites with me.  Sometimes I use them on camera, sometimes off, and sometimes I turn it off and just shoot available light.  The point of all this is to provide variety.  Different shots with different looks create more interest when the images are viewed as a collection. Yes, you could get away with using a 24-70 for the entire day, but I like to change things up when I can.

8. Have backup.

This means a backup camera, flash, batteries, memory cards.  Anything that can die, go bad, break, corrupt.  If you are being paid, you are considered professional, and being a professional means that the words “My camera broke” cannot be used as an excuse.

9. Check with the officiant

Each priest, minister, judge, or other officiant I have worked with so far has had a different set of rules where photography during the ceremony is concerned. Prior to the ceremony, introduce yourself, and ask what is permissible and what isn’t as far as you are concerned. Is flash ok during the ceremony? Where would he prefer you NOT be during the ceremony? Laying the ground rules beforehand can make a huge difference in how you cover the event.

10. Have fun!

Weddings are fun, happy occasions. Enjoy it. There’s good music, happy people, and you get to capture the memories. If you are enjoying yourself, it will show in your work.

For 20 years I always swore I wouldn’t touch a wedding.  But having shot three of them now, I find I enjoy the challenge and creativity of capturing these once (or twice) in a lifetime event for the couples I’ve worked with. No, they aren’t for everyone. But with the right attitude and know-how, they can be incredibly satisfying to shoot.

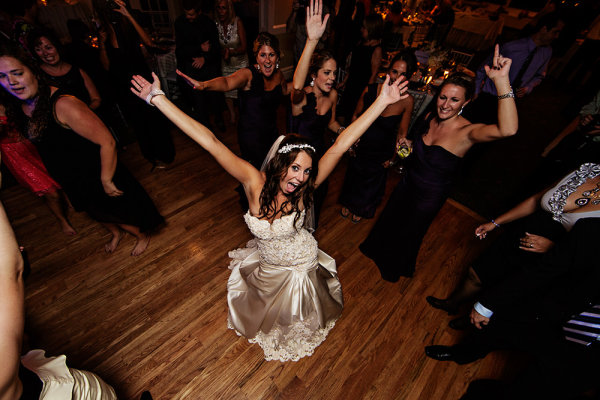
When the dancing started I decided I wanted something different. I mounted a 5D Mark III on a monopod with 14mm lens. a flash was mounted on the camera with the head aimed at the ceiling for bounce. Using a remote release, I got the bride's attention and waited for her reaction, firing when I saw it.

When the dancing started I decided I wanted something different. I mounted a 5D Mark III on a monopod with 14mm lens. a flash was mounted on the camera with the head aimed at the ceiling for bounce. I held the camera out over the dance floor by extending the monopod a few feet. Using a remote release, I got the bride’s attention and waited for her reaction, firing when I saw it. Photo by Rick Berk/kNot Photography

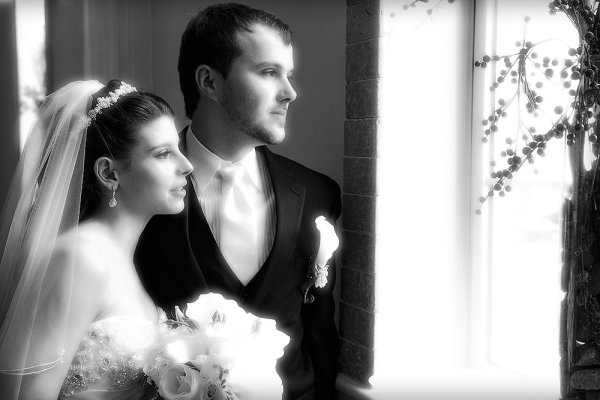
The church had these huge windows with light pouring in.  I knew I wanted to use it but time was tight.  I grabbed the bride and groom quickly and asked them to stand by the window and look out.  I fired off a handful of shots varying the exposure a bit. The black and white conversion added a nice artful touch. EOS-1D X with EF 24-70 f/2.8L II. ISO 1250, 1/100 f/5.6.

The church had these huge windows with light pouring in. I knew I wanted to use it but time was tight. I grabbed the bride and groom quickly and asked them to stand by the window and look out. I fired off a handful of shots varying the exposure a bit. The black and white conversion added a nice artful touch. EOS-1D X with EF 24-70 f/2.8L II. ISO 1250, 1/100 f/5.6. Photo by Rick Berk/OneRedTreePhoto.com

Further Wedding Photography Reading:

  • 21 Tips for Amateur Wedding Photographers
  • 50 Must Have Wedding Photography Shots
  • The One Location Technique for Wedding Photography

Post originally from: Digital Photography Tips.

Check out our more Photography Tips at Photography Tips for Beginners, Portrait Photography Tips and Wedding Photography Tips.

Weddings Through The Eyes of a “Noob”: Lessons I Learned


Digital Photography School

 
Comments Off on Weddings Through The Eyes of a “Noob”: Lessons I Learned

Posted in Photography