RSS
 

Posts Tagged ‘Examples’

Aerial Time Lapse Basics with DJI Mavic Pro 2 Drone Specific Examples

17 Apr

The post Aerial Time Lapse Basics with DJI Mavic Pro 2 Drone Specific Examples appeared first on Digital Photography School. It was authored by Peter West Carey.

Drones can capture images and footage you might have only dreamed of in the past. Now that ability is easily extended to time lapse photography.

I prefer to refer to my drone as a flying camera. While there is certainly some fun to be had in the simple joy of flying around and looking at stuff from high up, I use my drone primarily to create images and footage with an eye toward cinematic appeal. Time lapse imagery can convey a sense of place that still images and videos lack.

The Basics

This post is written based on experience with the latest model DJI Mavic 2 Pro. While manufacturers differ how they handle time-lapse creation, the tips below are meant to introduce you to what’s available. Some tips will be specific for this model but I will also offer more tips for aerial time-lapse creation in general.

Some drone manufacturers will compile the time lapse video for you while others simply record each individual photo, allowing you to compile the video yourself.

It’s important to note that all experimentation and practice should be done in an open space, away from people, buildings, pets and in accordance with all laws and regulations for your location. I practiced over land many, many times before I felt confident using the automatic modes for time lapses over water.

Tips Before Getting Started

Check exposure and anticipate

Changing exposure during a timelapse shoot, be it on land or in the air, is often a tricky endeavor. I suggest, when getting started, to anticipate your lighting situation and not attempt to change exposure during a timelapse shoot if your drone allows it.

It can be difficult to make exposure adjustments depending on your brand of drone (and some don’t allow it at all) – it’s hard enough to safely fly a drone while shooting. Try not to add too much complexity on top of that.

Try different interval timings and drone speed, 2 seconds is a lot different than 10 seconds

The speed of your drone, distance to objects and the length of your interval will have a large impact on your time lapse. There’s a reason DJI limits the speed of the drone in certain modes (explained below) to 4.5MPH. Anything faster than that and the video shows way too much motion to be palatable.

But if you’re flying slow, a 10-second interval might be ideal for helping show the movement of slow-moving clouds or shadows.

Let me show you the difference between a 2-second interval (at 1.6MPH) and a 5-second interval (at 4.5MPH) while a drone circles me.

It’s going to take some experimenting to get it right.

Look at your total time to create 

DPS writer, Ryan Chylinski, explains the importance of shoot length in this helpful post. When flying a drone, it’s even more important to make sure you don’t run out of card space and that you judge the movement of your drone compared to the total time it will take to shoot your time lapse.

Will you cover too much ground? Will your drone still be in line-of-sight (which most countries require as part of drone flying regulations)? What obstacles might your drone encounter when flying that long?

Plan ahead to avoid simple mistakes.

Point one way, film another

Facing one direction while flying another can offer a dynamic look to your video, rather than simply flying straight ahead. You can use a backward facing drone to get a typical pull-back shot or point slightly off of perpendicular for a dolly shot, such as the sunrise below.

Leave yourself time to return home

Do you have enough battery to shoot and return?

This is one of the most important question to ask. Some drones will warn you, but some won’t.

I had a frightening experience when I misjudged distance and return time while shooting a time lapse over water and nearly lost my drone (and polluted the environment). Midway through the flight I aborted the shoot and returned with a safe margin of battery, but I lost the shot.

Work altitude shifts into your scene

Altitude shifts are a like using a typical slider, but on steroids. You’re not limited to the four or 10 feet of a ground-based slider so the changes can be over a much larger distance. You also don’t need to stay moving parallel to the ground the whole time.

Here’s a simple example of a pullback that covered about 1000ft over land/water while steadily climbing 140ft in altitude.

Fly smooth

Using a pre-built, computer-controlled mode, like the ones mentioned below, help ensure smooth flight and operation. If you are controlling your drone manually while shooting a time lapse, ensure that your movements are slow and steady, allowing for your camera to shoot enough photos for a smooth video.

Here’s an example of what happens when I panned down then up too fast while shooting.

Result: Ruined video. Also, to my liking, the pan left and right are too fast.

DJI’s different methods – What do they mean?

DJI fits all of their time lapse modes into a section it calls Hyperlapse. Hyperlapse is just a cool sounding phrase meaning a moving time lapse. The Hyperlapse modes will all shoot and compile the video for you, typically in 1080p and 25 frames per second. You can also choose to save the individual RAW files if you wish to use your own time lapse software.

Safety Note: While the drone uses its side, front, rear, top and bottom sensors to detect objects, it still requires your attention at all times. If it finds an object in its path, it will stop shooting. It is very important to remain in control of the drone and ready to intervene. In Course Lock and Waypoints modes, if you make any adjustment to the controls of the drone, it will exit those modes and stop shooting.

Course lock

Course lock is the mode I use most often and it’s the one I’m going to start with. It allows you to aim the drone in one direction for flight and then either point the camera any way you like, or choose a subject to be tracked.

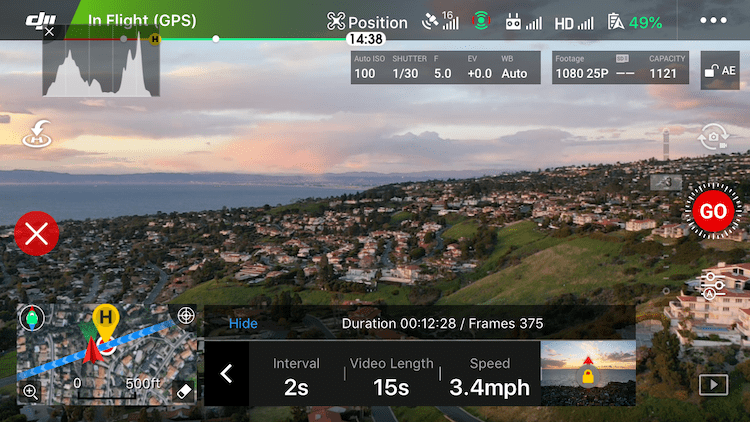
You start by setting course and then the interval, video length and speed. Each item is set by first tapping it and then moving the slider accordingly.

Setting the course is as simple as pointing the drone in the direction you wish to go and tapping the lock icon next to interval, video length and speed. In this case, I pointed the drone directly at the sun. The little image of a lock means my course is locked.

Next, you’ll want to point the drone’s camera in the direction you want to film. Then adjust the shooting settings.

In this example, I left the interval at 2 seconds but then set the video length to 15 seconds.

With that change to video length and interval, the app shows me how many photos it will take and the length of shooting.

After that I set the speed to 3.4MPH.

All that is left is to hit GO and watch the scene unfold! (Notice the course lock section still shows the drone’s intended direction toward the sun.)
Free/Manual

Free Mode is straight forward and gives you the most control. After setting the shooting interval and video length as you would in Course Lock Mode, you are free to fly any which way you please. Up, down, backward, forward, left and right.

But be warned: fast course changes or high speeds will cause your video to be anything less than smooth.

At any time you can press the C1 button (on the underside of the controller) to lock course and speed.

As Free Mode can be used while the drone is on the ground, you can actually use it as a still camera for time lapse.

Circle

As you saw in the videos up top, choosing your speed and interval is important for Circle Mode.

Start by setting the distance from your subject for your drone. Ensure the circle your drone will subscribe in the sky does not encounter any obstacles. If need be, adjust your drone’s height or distance from your subject to achieve the framing you desire.

Next, select Circle Mode from the Hyperlapse options.

Now set your interval, video length and speed as described in the Course Lock Mode. Then select the direction your drone will fly; either clockwise or counterclockwise.

Above these settings, the program will tell you how long the shoot will take and how many frames will be shot. In the example, that will be 5 minutes and 48 seconds to take 175 frames.

Most importantly, choose your subject! You do this by drawing a box on the screen by pressing and dragging until it highlights your subject.

Press GO and your drone will start snapping and moving. When it is finished, you will see a screen as the drone creates (synthesizes in DJI speak) the video.

In the example above, you will notice the path the drone took, which is a very pretty circle (with my initial flight path to get the drone in place mixed in). All Hyperlapse modes require this video synthesizing and the length of time depends on the number of shots. Until video creation is complete, you cannot take any photos or video, but you can fly the drone as normal.

Waypoints

Waypoints Mode is a bit trickier to work than the others, but offers a lot of control and unique results.

After selecting Waypoints Mode you will set your interval and video length as the other modes. You will then set the waypoints your drone will fly. You can set up to five waypoints and a minimum of two.

To do this, fly to the first waypoint, orient your view as you like and press the + symbol in the Hyperlapse tray at the bottom of the screen to lock that waypoint. Continue this method, flying to each waypoint and pressing +.

In this example, I have set two of my five waypoints and will continue adding until all five are set. The map on the left side shows each waypoint with a number and the direction the camera will face.

When you are finished plotting each waypoint, you have the choice to fly the waypoints in order marked or in reverse. If you choose “In Order”, the drone will fly itself to the first waypoint and begin. Otherwise, the drone will begin at the last waypoint selected and fly backwards (but will pay attention to your selected camera orientation for each waypoint).

While the drone flies, you will see the waypoints on the map along with a timer showing how long the drone has been flying and the total time it will fly the route. Next to that is the number of images taken followed by the total images to be shot.

More Examples

Course Lock while facing perpendicular to flight path

Course Lock while flying backward

Course Lock while flying backward with an upward pan for clouds

?

Conclusion

Time Lapse videos from a drone offer a unique and sometimes challenging option. They take planning not only to consider the subject matter and lighting, but also for the safe operation of your drone while it is taking photos.

Each mode offers different options and it’s best to play with them in a safe environment to get the hang of what you can accomplish.

Have fun and post some examples as you try out this technique. I’d love to see them!

The post Aerial Time Lapse Basics with DJI Mavic Pro 2 Drone Specific Examples appeared first on Digital Photography School. It was authored by Peter West Carey.


Digital Photography School

 
Comments Off on Aerial Time Lapse Basics with DJI Mavic Pro 2 Drone Specific Examples

Posted in Photography


Rolling shutter explained with simple side-by-side examples

01 Jul

We hold accurate technical knowledge in pretty high regard around here, which is why this video from YouTube channel SmarterEveryDay was such a pleasant surprise.

In 7 minutes, engineer Dustin Sandlin does a fantastic job explaining rolling shutter with plenty of useful examples where he simulates the rolling shutter effect using high-speed camera footage and After Effects. In this way, he can actually show you how rolling shutter distortion happens; in fact, he can recreate it perfectly:

In the example above, he basically recreates what happens in every single frame of a 24fps iPhone video when you’re recording an airplane propeller. As the green line moves down, it scans the prop… but the prop is moving, and so it’s causing this strange distortion known as the ‘rolling shutter effect.’

In this example, he actually traces the lines as your camera is seeing them over the course of the exposure:

You will capture different patterns depending on which way the propeller is rotating, but it’s not a guessing game. You can actually visualize it when you slow the footage way down the way Dustin has.

But he doesn’t stop with propellers (which is where most breakdowns of rolling shutter end), he goes on to show you how this affects cell phone video of all kinds of things. Fidget spinners, a coin spinning on a table top, guitar and mandolin strings, you name it: the rolling shutter effect visualized and simulated/recreated by using high speed footage.

Definitely check out the full video up top to really see rolling shutter in action. If you’ve always had a hard time conceptualizing how the rolling shutter effect worked, and why it produced the shapes it does, you won’t find a better side-by-side comparison than this.

And if you like this, definitely check out Dustin’s YouTube channel. This is far from the only interesting, educational and just plain cool thing on SmarterEveryDay.
Articles: Digital Photography Review (dpreview.com)

 
Comments Off on Rolling shutter explained with simple side-by-side examples

Posted in Uncategorized


The good, the bad and the ugly of aerial photography part 5: examples and comparison

17 Jun
The Holuhraun eruption in Iceland, taken from a helicopter. This remains one of my most rewarding photographic experiences.
So far in this series I have talked about the advantages of aerial photography and about shooting from a helicopter as opposed to shooting from a light plane. I have also talked about the right equipment for this kind of shoot, and about technique and parameter selection. In this final article in the series I want to discuss my experiences from 4 aerial photography sessions, compare them and analyze what I learned from them.

I won’t be presenting any new info, but I think it’s important to do a comparison since I learned a lot from these short sessions, and if you can learn from my experience and mainly from my mistakes, I will have done what I set out to do with this series of articles.

My first ‘serious’ photography flight was in Namibia, in March of 2014. I flew over Sossusvlei to capture the dunes of the Namib Desert in morning light. It was in a Robinson R44, mentioned earlier as a great helicopter for photography flights, and both doors were taken off. I flew around for 1:15 hours and the hourly rate was about $ 850, which is quite good. I took one Canon EOS 5D Mark III with a Tamron 24-70mm F2.8 stabilized lens on it, plus a 70-300mm which I never actually used. This was the flight on which I understood the need for 2 bodies, but I really did fine with the 24-70mm as most of the beauty was in the larger-scaled structures, mainly the shapes of the dunes.

About half an hour into the flight the pilot noticed mist between the dunes ahead, and it was an easy decision to carry on flying and shoot the dunes shrouded in mist. Overall the flight was a huge success, and it triggered my love for aerial photography. I highly recommend flying in Sossusvlei. The fact that the pilot was flexible and had enough insight to suggest flying further above the dunes made a huge difference. Where possible, you should always opt for a pilot with experience of photographers, and make sure you listen to their suggestions.

The second flight was during a very special event: the Holuhraun volcanic eruption in Iceland. I had come back to the hostel after shooting the eruption from the land three days before the flight, and I encountered several days of harsh winds and sand storms. Then finally the weather improved and I secured my spot on a sunset flight. We had an unbelievable flight over the volcano with a pink sunset in the background, and even today, that flight ranks among my favorite photography experiences

I took two bodies, a Canon EOS 5D Mark II and a 5D Mark III, with 24-70mm and 70-300mm zoom lenses. I used the telephoto lens quite a bit to shoot the details of the eruption, and in this case it was a good decision to opt for a telephoto instead of an ultra wide.

The flight was very costly. For 1:45 hours I paid 2600 Euros, at a rate of almost 1500 Euros an hour. Ouch. Helicopter flights in Iceland are more expensive than in other countries, so make sure it’s really worth it if you intend to fly there. These are some of my favorite shots from this flight. You can decide for yourself if it was worth it or not, but note that unique images such as these are the key to getting noticed: thanks to this shoot alone, I sealed an ongoing postcard deal in Iceland (which alone paid back for the trip), an interview with Iceland’s largest news website, several new private clients and a share by National Geographic on Facebook, hitting over 124,000 likes.

My third photography flight was in Disko Bay, Greenland. Unfortunately, this was also my most disappointing experience. I flew in a small airplane with a tiny hatch to shoot from, which both made it very hard to achieve a decent composition, and caused the lens to vibrate violently, rendering many of my shots blurry.

On top of that, communication with the pilot wasn’t good enough, and he didn’t understand that I needed more room on my right to shoot from. I paid way too much, over a thousand Euros for a flight I could have definitely done without. It was a bad experience, but at least I learned a great deal about what not to do.

My fourth and most recent photography flight was above the Lofoten Islands in Arctic Norway. It was an amazing flight, and it reinforced my belief in light planes. The pilot was highly experienced and understood exactly what I needed, even without words. It comes to show how important a good pilot who understand photography actually is. The flight was affordable at about $ 300 per hour, and the conditions were excellent.

Due to their relatively small size, the Lofoten Islands are a perfect place for photography flights. You can get from place to place very quickly, and the mountainous landscape is incredible from above. The famous shooting spots are easily recognizable, too, which is a wonderful bonus.

Aerial photography is amazing. I doubt that anyone who tries it will not like it, but it comes at a cost. I hope this series has helped you understand the benefits of shooting from the air, the different options and the importance of being prepared. Enjoy your flight!


Erez Marom is a professional nature photographer, photography guide and traveler based in Israel. You can follow Erez’s work on Instagram, Facebook and 500px, and subscribe to his mailing list for updates.

If you’d like to experience and shoot some of the most fascinating landscapes on earth with Erez as your guide, you’re welcome to take a look at his unique photography workshops around the world:

Land of Ice – Southern Iceland
Winter Paradise – Northern Iceland
Northern Spirits – The Lofoten Islands
Giants of the Andes and Fitz Roy Hiking Annex – Patagonia
Tales of Arctic Nights – Greenland
Saga of the Seas and The Far Reaches Annex – The Faroe Islands
Desert Storm – Namibia

More in This Series:

  • The good, the bad and the ugly of aerial photography – Part 1: Why shoot aerials?
  • The good, the bad and the ugly of aerial photography – Part 2: Aircraft
  • The good, the bad and the ugly of aerial photography – Part 3: Equipment
  • The good, the bad and the ugly of aerial photography – Part 4: Technique

Selected Articles by Erez Marom:

  • Parallelism in Landscape Photography
  • Behind the Shot: Dark Matter
  • Mountain Magic: Shooting in the Lofoten Islands
  • Behind the Shot: Nautilus
  • Behind the Shot: Lost in Space
  • Behind the Shot: Spot the Shark
  • Quick Look: The Art of the Unforeground
  • Whatever it Doesn’t Take
  • Winds of Change: Shooting changing landscapes
  • On the Importance of Naming Images
  • On Causality in Landscape Photography

Articles: Digital Photography Review (dpreview.com)

 
Comments Off on The good, the bad and the ugly of aerial photography part 5: examples and comparison

Posted in Uncategorized


Impactful: 12 Examples Of Crash Test Dummy Art

27 Mar

[ By Steve in Art & Street Art & Graffiti. ]

crash-test-dummy-art-1c
That’s gotta Hertz! These dozen examples of crash test dummy art & graffiti display a curious reverence for our impactful anthropomorphic analogs.

crash-test-dummy-art-1e

crash-test-dummy-art-1a

Crash Test, an art installation by Jamie Willis, is located in Hindmarsh Square, a pleasant urban green space in Adelaide, Australia. The piece consists of five bronze statues displaying black & white vector icons and mounted on posts. The statues’ heads are all tilted to one side as if, say, they were dangling from an invisible hangman’s noose… and that’s no coincidence.

crash-test-dummy-art-1d

crash-test-dummy-art-1b

According to Willis, the statues were inspired by a faded photo of a female Holocaust victim who had been hung from a lamppost. “Crash test dummies stand in for people in horrific situations,” explains Willis. “These figures seem to act out the crashes in human history, the colossal mistakes and the times we smashed into each other. The blandness of these unobtrusive, hovering dummies acts as a foil for the quiet, deafening violence their hanging implies.” Enjoy your picnic lunches, Adelaideans.

Driving School of Hard Knocks

crash-test-dummy-art-6a

Flickr user duluoz cats captured this slightly (ya think?) sketchy vehicle inspection center in Woodstock, NY on February 25th of 2007. “I came upon a child of God, he was walking along the road…” blame it on some billion-year-old carbon clogging up the carburetor.

Samcheongdong Style

crash-test-dummy-art-2a

crash-test-dummy-art-2b

A modern mashup of Michelangelo’s Pietà featuring crash test dummies? Yes please! You’ll find this unlikely artwork on a rooftop in Seoul, Korea’s Samcheongdong neighborhood. As archetypical Pietà sculptures depict a sorrowful Virgin Mary cradling the body of her deceased Son, employing crash test dummies in place of the Madonna and Child isn’t really such a stretch.

Belgian Combo

crash-test-dummy-art-7a

What is “NAWAS”, and why does that name appear on dozens of trains, walls and other outdoor infrastructure throughout the Low Countries? Call it the calling card of one of Belgium’s most noteworthy (or notorious, depending on one’s POV) graffiti crews. The otherwise anonymous artists don’t often depict crash test dummies in their graphics but when they do, it’s on the side of an SNCB train. Kudos to Flickr user New Fast Atomic Daffodil for the above image taken in June of 2014.

Next Page – Click Below to Read More:
Impactful 12 Examples Of Crash Test Dummy Art

Share on Facebook


[ By Steve in Art & Street Art & Graffiti. ]

[ WebUrbanist | Archives | Galleries | Privacy | TOS ]


WebUrbanist

 
Comments Off on Impactful: 12 Examples Of Crash Test Dummy Art

Posted in Creativity


Examples of Perspective Change for More Dynamic Images

08 Jul

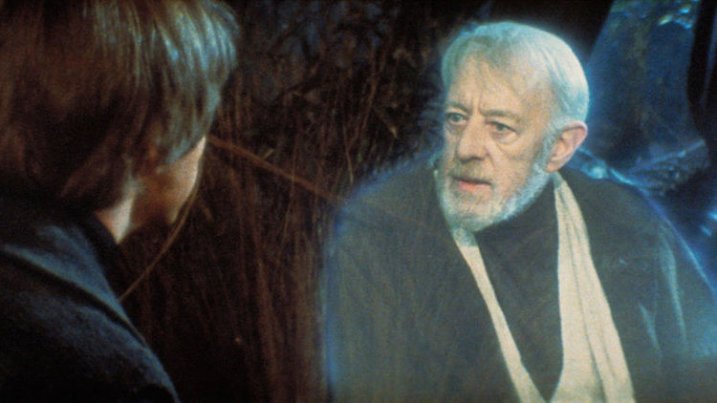
There’s a line in Return of the Jedi that has always struck me as particularly insightful, especially considering its inclusion in a movie filled with a two-ton slug-shaped bounty hunter and a planet full of fighting teddy bears. In a conversation with his former mentor Obi-Wan Kenobi, newly-minted Jedi Knight Luke Skywalker asks his sensei if Darth Vader is indeed his father. When Obi-Wan confirms the awful truth, Luke asks why his teacher had formerly lied to him, telling him instead that Darth Vader “betrayed and murdered your father.”

Luke Skywalker and Obi-Wan Kenobi discussing the importance of perspective.

Luke Skywalker and Obi-Wan Kenobi discussing the importance of perspective.

“What I told you was true,” Kenobi calmly replies, “from a certain point of view.” Incredulous, Luke balks at this assertion and wonders aloud how his mentor can claim such a relativistic stance on what is, in his mind, clearly a black-and-white issue. With a dose of characteristic zen Kenobi explains to his pupil, “Luke, you’re going to find that many of the truths we cling to depend greatly on our own point of view.”

Perspective and Photography

Without wading too deep into philosophical waters I just want to point out that this concept, also known as perspective, is critically important in photography, as well as cinematic space operas. Learning to shoot photos from different perspectives is a way of not only shaking up the status quo, but injecting new life into what might otherwise be dull, boring, or entirely pedestrian pictures. To illustrate how perspective changes can radically alter a picture, here are three examples that will hopefully give you an idea of some things to try if you want to breathe new life into your own photography.

Perspective in Nature

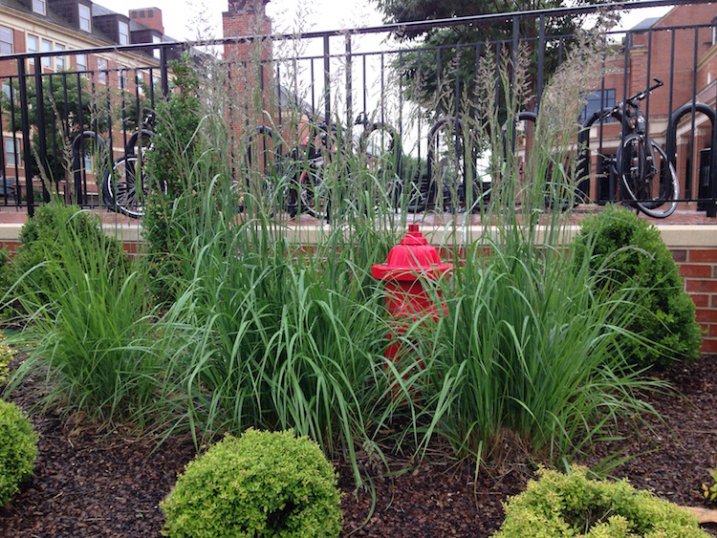
grass-full

Not a very photogenic location unless you look at it from a few different perspectives.

This is a fairly common scene you might find in any city: a fire plug with some tufts of grass sprouting clumps of purple seeds. It may not seem all that special, and indeed it’s the kind of scene I would probably pass by in pursuit of a more interesting picture. Look what happens with just a bit of perspective change, though:

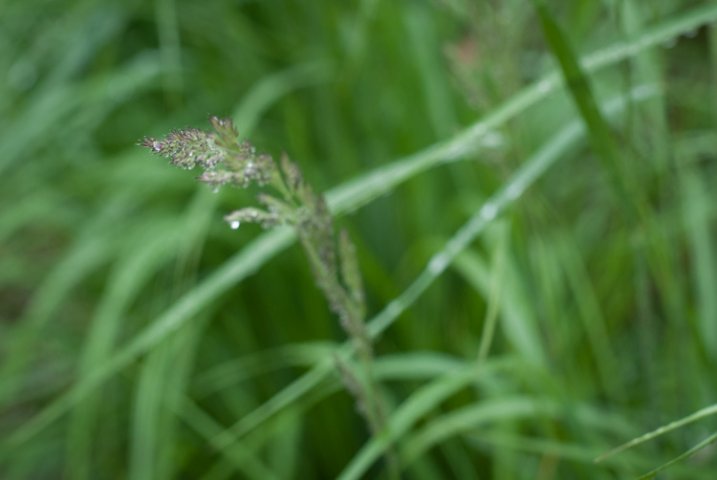
grass

Looking down and focusing on one strand of grass yields an entirely different picture.

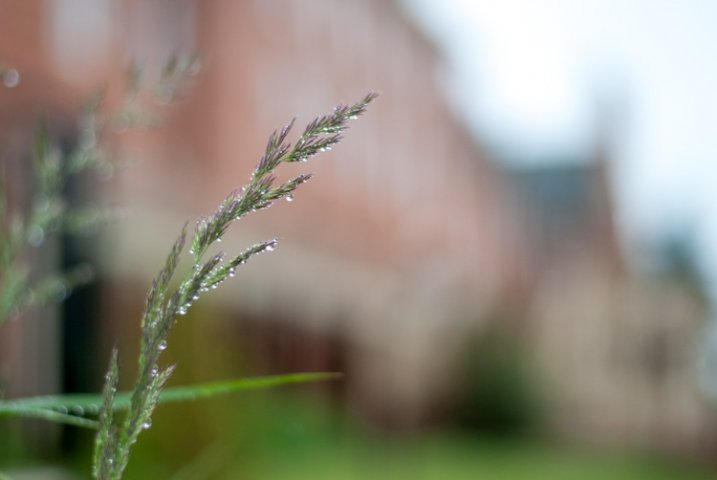
By getting up close with one of the stalks of grass and focusing on its purple seeds dripping, and slightly bent with fresh rain, I now have an entirely new picture of the same exact scene. This little perspective change results in a photograph that is much more intimate and reveals details that were invisible in the initial photo. Background elements such as the out-of-focus grass still give the impression that this stalk is part of a much larger scene though we also lose a few things too: the bicycles and other buildings are gone, which means the picture is much more isolated than the first one and lacking a larger context. Neither picture is inherently better, but both are quite different, even though they contain the same subject. One final perspective shift results in an entirely different picture yet again.

grass-building

Re-framing the same piece of grass makes for a new, and much more interesting image.

Now the same stalk of grass as the previous version (literally the exact same one and not a different piece of grass on the same plant) is given an entirely new context and the picture here is quite different. It has a much more urban feel with brick buildings instead of green grass in the background, and it feels more majestic and powerful overall. To get this picture I had to get out of my comfort zone a little by kneeling down and contorting my body, but the extra effort resulted in a photo that I like quite a lot. Perspective changes like this can add entirely new dimensions to a picture, and even change its whole meaning, and all it takes is a few seconds of extra work before you click the shutter.

Perspective in Architecture

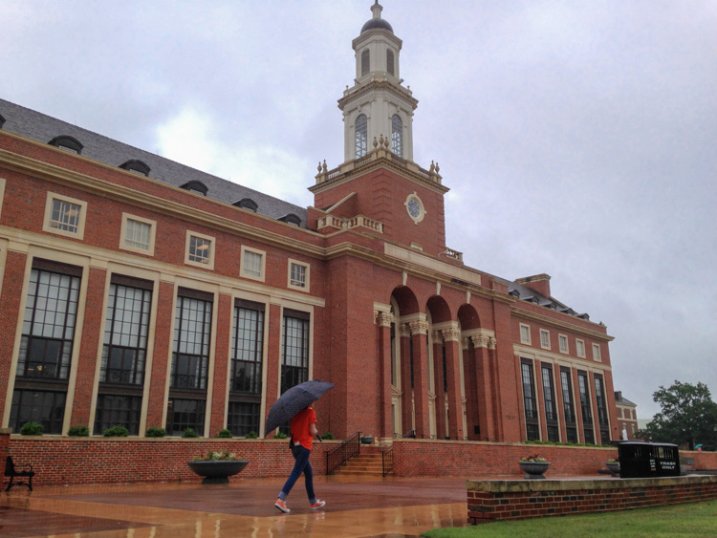
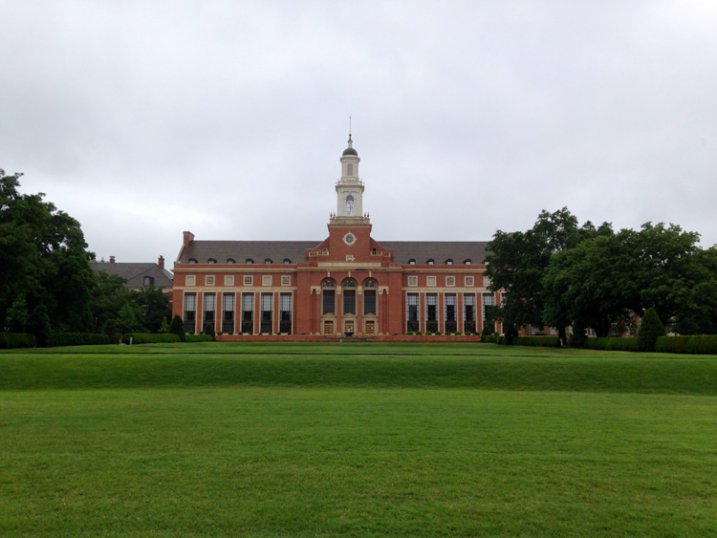
For another example of how perspective can alter a picture here’s a shot I took of the Edmon Low Library on the campus of Oklahoma State University in the midwest United States:

library-far

This perspective shows the Low Library within a larger context, sitting between trees and at the end of a grassy open mall.

It’s an interesting shot but virtually identical to hundreds if not thousands of other pictures you might find on a simple Google Images search. Watch what happens when I change perspective just a bit by walking closer:

library-medium

This perspective isolates the library itself, and imparts a feeling of scale and grandeur on the viewer that was missing in the first shot.

To get this picture I walked about a hundred yards down the lawn which isolated the building from its environment, and now the picture is much more constrained: it’s about the building itself, not the building in relation to the surrounding campus features. The picture is similar but subtly different, and its overall meaning has been changed by taking a very short walk (and as a bonus, getting a bit of exercise in the process). Watch what happens with one final change in perspective:

library-close

Finally we see the same building, on the same day, but in a much more dynamic and interesting context.

It’s still the same library, but the picture has changed dramatically from the first shot. Instead of a static image of a building surrounded by green spaces, this now shows the library in a whole new context. The imposing bell tower looms large over the veranda, and the student walking past adds a new dynamic element, to what was formerly a rather boring picture. Showing the building from this angle as it recedes into the background, illustrates how it is part of a much larger campus, and overall I find this a much more interesting image.

Working with People

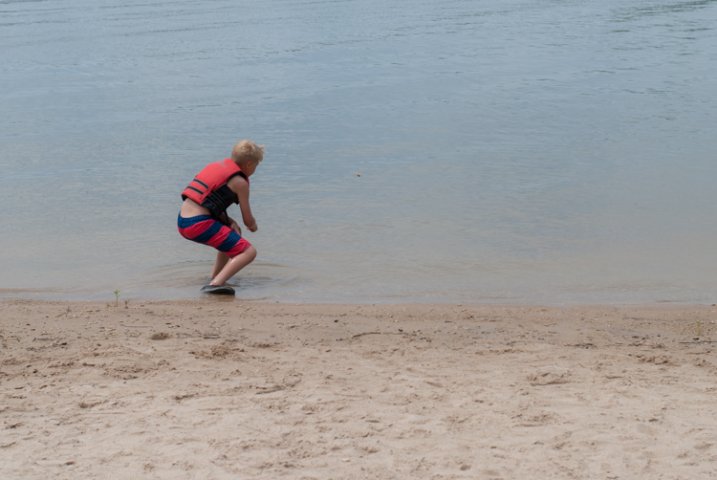
Looking at buildings and nature is one thing, but changing perspective when taking pictures of people can blow the doors wide open when it comes to creating pictures that are new, interesting, and much more impactful. To illustrate this, here are a few photos of my nephew skipping rocks at the beach on a recent family vacation.

My nephew practicing his rock-skipping technique.

My nephew practicing his rock-skipping technique.

There’s nothing particularly wrong with this photo but there’s nothing especially interesting about it either. To get this picture I stood on the beach with my camera while he skipped rocks, and did put in much effort to take perspective into account. It’s a decent snapshot that more or less captures the scene, but watch what happened when I changed my perspective:

photography-perspective-skipping-rocks-front-side

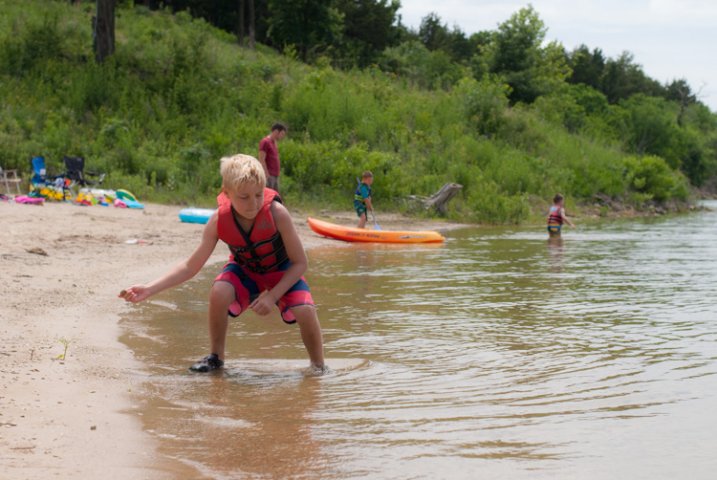
The same scene as above, but far more interesting with the background activity and low angle of view.

The scene has been drastically improved simply by walking 20 feet down to the beach, and crouching down to my nephew’s eye level. There’s now a sense of action and movement, and you can also see the intense concentration on the boy’s face as he winds up to skip a rock. In addition to these alterations you now have a sense of context; you see where the subject is in relation to his surroundings. By changing perspective I am able to show the rest of the beach, which includes some of his cousins and my brother having fun in the background. Here’s one final perspective change that alters the picture even more:

photography-perspective-skipping-rocks-front

That rock went sailing, and skipped a half dozen times.

This one is all about my nephew with nothing else except the beach to provide a sense of context and is, in my opinion, the best of the bunch. You see him alone, along with the same intense expression as in the previous photograph but without any distracting background elements. To get this picture I waded into the water and crouched down until my camera was just a few inches above the surface. It was more difficult to get this shot, and certainly would have been easier if my camera had an articulating LCD screen, but the payoff was well worth it. Compare this to the initial shot, and you will see a massive difference just from a little work on my part to change perspective.

Hopefully these examples give you a few things to ponder the next time you are out with your camera. It takes a little more work to shoot things from different perspectives, but you may find yourself with new creative possibilities and new ways of looking at your subjects and the world around you.

What are your favorite tips and tricks for finding and exploring new photographic perspectives? Share your thoughts in the comments below.

googletag.cmd.push(function() {
tablet_slots.push( googletag.defineSlot( “/1005424/_dPSv4_tab-all-article-bottom_(300×250)”, [300, 250], “pb-ad-78623” ).addService( googletag.pubads() ) ); } );

googletag.cmd.push(function() {
mobile_slots.push( googletag.defineSlot( “/1005424/_dPSv4_mob-all-article-bottom_(300×250)”, [300, 250], “pb-ad-78158” ).addService( googletag.pubads() ) ); } );

The post Examples of Perspective Change for More Dynamic Images by Simon Ringsmuth appeared first on Digital Photography School.


Digital Photography School

 
Comments Off on Examples of Perspective Change for More Dynamic Images

Posted in Photography


20 Thanksgiving Photography Examples to Get You in the Festive Mood

28 Nov

Thanksgiving is the time for warm get-togethers and celebration of the autumn harvest. It marks the start of the holiday season which is naturally a busy time for photographers. Festive mood, holiday decorations, and family gatherings – this is the perfect time to create memorable emotional shots that will be enjoyed long after. This Thanksgiving don’t miss an opportunity to Continue Reading

The post 20 Thanksgiving Photography Examples to Get You in the Festive Mood appeared first on Photodoto.


Photodoto

 
Comments Off on 20 Thanksgiving Photography Examples to Get You in the Festive Mood

Posted in Photography


30 Outstanding Examples of Full-Screen Image Background Sites for Your Inspiration

25 Oct

If you’re looking for a way to make a strong impression and a bold statement with your portfolio, a full-screen background image can do the job for sure. Focusing solely on images while providing easy navigation, this web design technique and photography websites just belong together. This approach can fit any kind of photography portfolio, but dramatic, bold photos are Continue Reading

The post 30 Outstanding Examples of Full-Screen Image Background Sites for Your Inspiration appeared first on Photodoto.


Photodoto

 
Comments Off on 30 Outstanding Examples of Full-Screen Image Background Sites for Your Inspiration

Posted in Photography


Urban Subversion: 13 Radical Examples of Guerrilla Housing

09 Oct

[ By Steph in Architecture & Cities & Urbanism. ]

guerrilla housing dumpster 3

Vacant lots, billboards, rooftops and even dumpsters are hacked into inhabitable spaces in these examples of often-illegal guerrilla housing. All manner of urban surfaces can be subverted into safe, dry shelters, often taking examples in gray areas of local laws or flying under the radar simply because they blend so well into the city environment.

Billboard Housing

guerilla housing billboard 3

guerilla housing billboard 1

guerilla housing billboard 2

Belgian artist and hacktivist Karl Philips focuses on “themes such as gaps in legal, economic and social systems, the omnipresence of advertisement, unrestrained capitalism and consumerism, etc” so it’s no surprise that he decided to turn a billboard into an illegal parasite apartment. Invisible from the street, the apartment consists of a simple wooden platform and a clear plastic enclosure. Another more capitalism-friendly project in Mexico City attached a 170-square-foot house onto the back of a billboard as a residence for artists, who hand-painted the billboard for paper company Scribe.

Inflatable Parasite Housing
guerilla housing parasite inflatables

Attach a specially-crafted plastic shelter to an air vent on a building and you’ve got an instant inflatable shelter for the homeless. Michael Rakowitz creates these ‘paraSITE shelters‘, which narrowly fit the legal definitions of temporary structures due to their size, on a budget of less than five dollars each.

Dumpster Housing
guerilla housing dumpster house 1

guerrilla housing dumpster house 2

Artist Gregory Kloehn turned an ordinary dumpster into a pop-up shelter with a working kitchen and toilet, storage and sleeping areas as well as a modular rooftop deck, outdoor shower, flower beds and even a bar. It took six months to modify the Brooklyn-based house, in which Kloehn actually lives part-time. Perhaps the ultimate in urban camouflage, the dumpster looks no different from any other trash container when it’s all closed up.

Shopping Cart House

guerrilla housing camper cart

It may not be spacious, but artist Kevin Cyr’s pop-up camper cart takes advantage of ubiquitous shopping carts to offer a dry, portable place to sleep. When not in use, the whole thing folds down into an inconspicuous wooden box that fits within the cart.

Next Page – Click Below to Read More:
Urban Subversion 13 Radical Examples Of Guerrilla Housing

Share on Facebook


[ By Steph in Architecture & Cities & Urbanism. ]

[ WebUrbanist | Archives | Galleries | Privacy | TOS ]


WebUrbanist

 
Comments Off on Urban Subversion: 13 Radical Examples of Guerrilla Housing

Posted in Creativity


40 Creative Examples of Photography Business Card Designs for Inspiration

04 Jul

What do a graphic designer, an owner of a local cafe, a hairdresser and a photographer have in common? It’s a business card, of course! Tons of similar, ordinary business cards made on a white piece of paper with black lettering on them overload the market. These days, you need to have a really creative business card to impress your Continue Reading

The post 40 Creative Examples of Photography Business Card Designs for Inspiration appeared first on Photodoto.


Photodoto

 
Comments Off on 40 Creative Examples of Photography Business Card Designs for Inspiration

Posted in Photography


The World of Fantasy: 40 Surreal Abstract Photography Examples

31 May

The concept of abstract photography is what appears to the eyes as random swathes of color and shapes tossed into a scene. A photographer takes an otherwise ordinary shot and takes it at just the right angle or focus to create a masterpiece of colors, patterns and textures. Abstract photography is totally based on your photographic eye. It’s when you’re Continue Reading

The post The World of Fantasy: 40 Surreal Abstract Photography Examples appeared first on Photodoto.


Photodoto

 
Comments Off on The World of Fantasy: 40 Surreal Abstract Photography Examples

Posted in Photography