RSS
 

Posts Tagged ‘Edit’

How to do Bulk Resize and Edit in Photoshop

25 May

Have you ever found yourself with a batch of photos that you needed to have edited in the same way? Rather than editing each image one-by-one, Adobe Photoshop offers batch editing processes that can help you save time, while preserving consistent quality among your images.

This tutorial will show you how to use Photoshop Actions to resize and edit multiple photos, along with a quick tip on how to replicate this process in Lightroom.

What You Need

The bulk editing process is pretty easy and straightforward, requiring just a handful of things:

  • A batch of images you want to bulk edit
  • Adobe Bridge
  • Adobe Photoshop
  • Basic Photoshop working knowledge

Get Started: Record an Action in Photoshop

The very first step is to determine the process or edit that you wish to have automated, and record it as an Action in Photoshop. In this case, let’s use the example of resizing an image. Then you’ll use Bridge to select your set of images and apply the Action to all of them at once.

Step 1: Open Photoshop and have a sample image open to perform this action on. Go to the main menu bar and click Window > Actions.

Photoshop bulk resizing edits


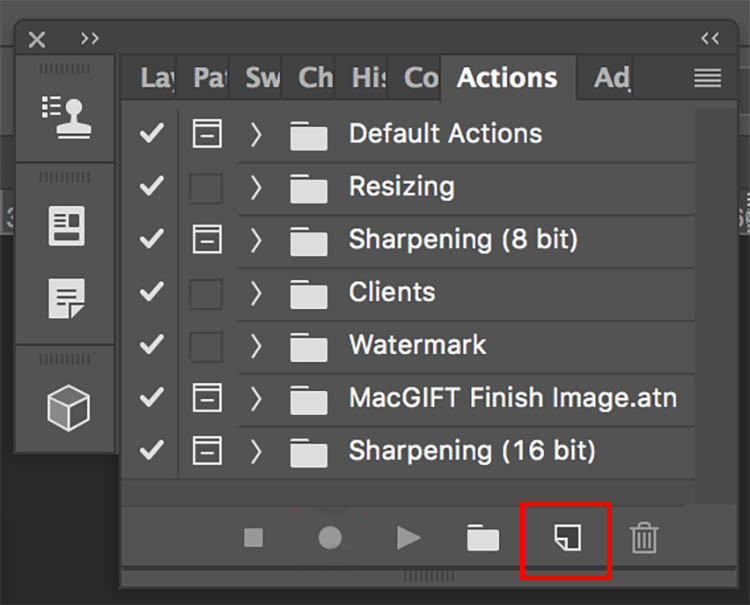
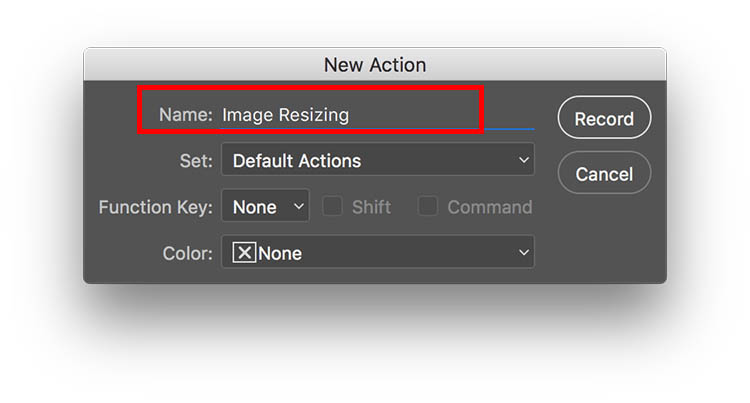
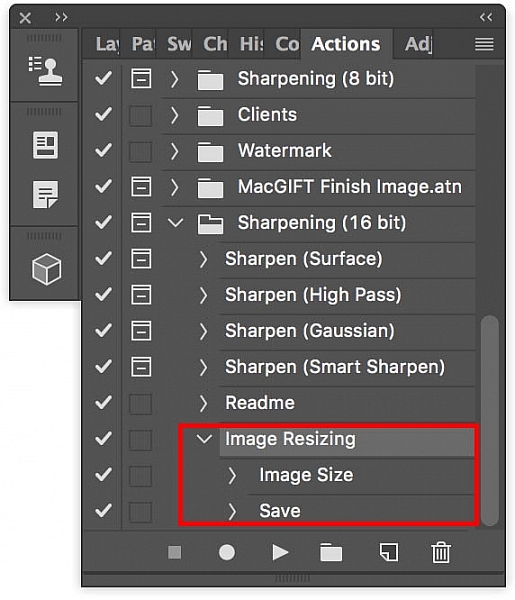
Step 2: When the Actions panel pops up, click the bottom right button next to the trash can icon that says “Create New Action.” Enter a name for your action, such as “Image Resizing.” Then start recording your new action by clicking the “Record” button.

Bulk edits new action

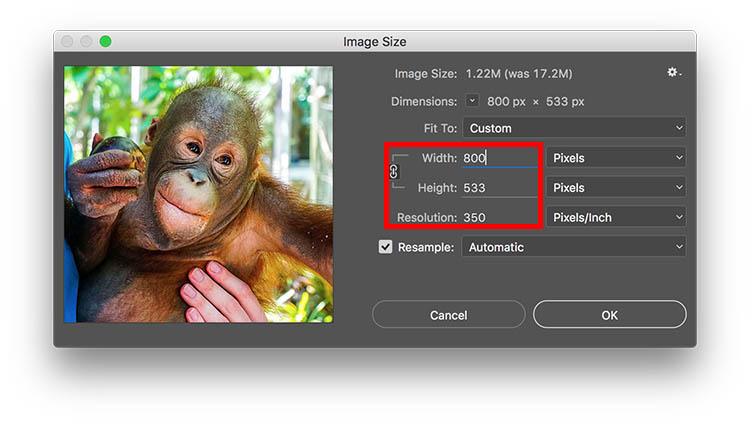
Step 3: Now begin the series of steps that you want to have recorded. For resizing, head up to the main Photoshop menu bar and go to Image > Image Size. Input your ideal photo size, such as 800 pixels wide.

Photoshop bulk resizing edits

Step 4: After you’ve completed all of the steps for your action, go back to the Actions panel and click on the Stop button to end recording. You should now see your saved action within the panel.

Bulk edits image resizing

Run A Batch of Images Through Photoshop

After you’ve created your action, it’s time to apply it to your batch of images.

Step 1: Put all of the photos you want to batch edit into one folder. Open Adobe Bridge and find your folder of images. Click on the folder and select all of the content.

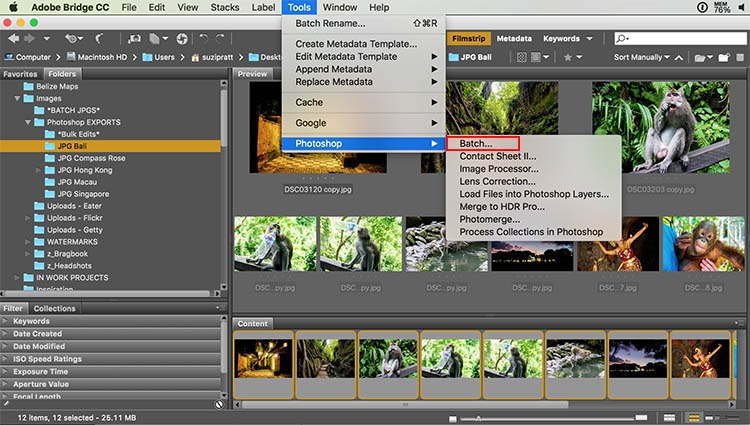
Step 2: Within Bridge, go to Tools > Photoshop > Batch.

Photoshop bulk resizing edits

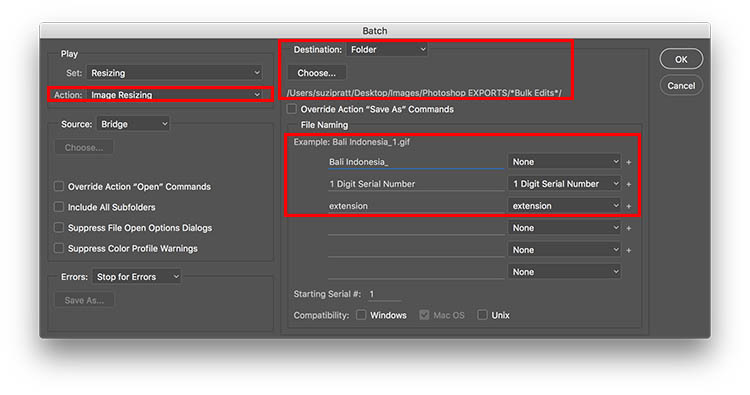
Step 3: A Batch dialogue box will appear and you’ll want to adjust these settings in particular.

  • In the top left corner, select the action that you want applied to your images (in our case, “Image Resizing.”).
  • In the middle of the dialogue box, specify the folder where your bulk edits should end up. I always have a folder called *Bulk Edits* where I automatically have all of my bulk edited images saved.
  • Finally, you can specify a particular image name that you want to give to your batch of images, as well as assign unique identifiers, such as numeric order. Then click OK to have the action applied to your batch of photos.

Photoshop bulk resizing edits

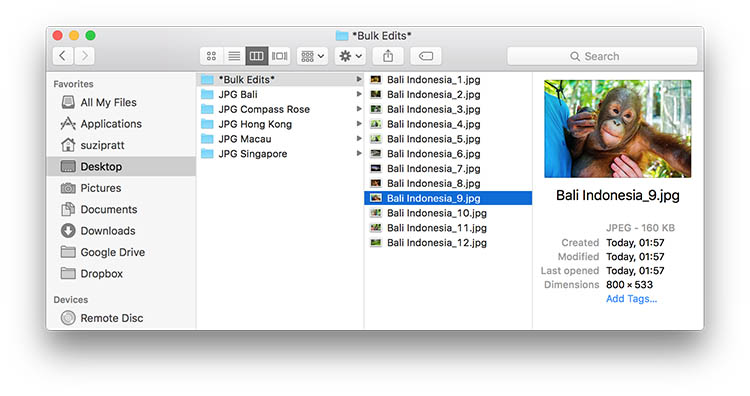
Step 4: After your batch of images are processed, go to your specified folder to check out the results.

Photoshop bulk resizing edits

Making bulk edits in Lightroom

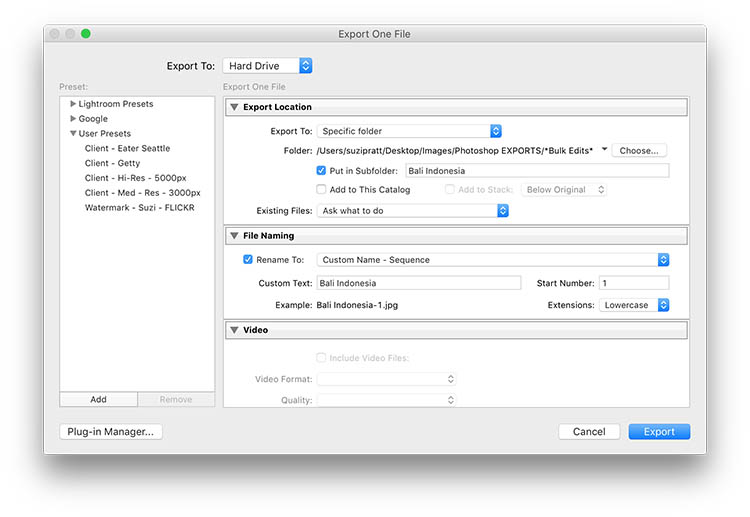
While doing bulk edits in Photoshop is relatively easy to do, it’s even quicker in Adobe Lightroom. If using Lightroom, import your images and select them all. Then go to File > Export. A pop up dialogue box will then appear with fields where you can specify where to save the images and also rename, resize, and watermark the images (you can also save that as an export preset)

Lightroom bulk resizing edits

Over to You

Do you perform many bulk edits in Photoshop or Lightroom? If so, what are the types of processes you tend to bulk edit? Let me know in the comments below!

googletag.cmd.push(function() {
tablet_slots.push( googletag.defineSlot( “/1005424/_dPSv4_tab-all-article-bottom_(300×250)”, [300, 250], “pb-ad-78623” ).addService( googletag.pubads() ) ); } );

googletag.cmd.push(function() {
mobile_slots.push( googletag.defineSlot( “/1005424/_dPSv4_mob-all-article-bottom_(300×250)”, [300, 250], “pb-ad-78158” ).addService( googletag.pubads() ) ); } );

The post How to do Bulk Resize and Edit in Photoshop by Suzi Pratt appeared first on Digital Photography School.


Digital Photography School

 
Comments Off on How to do Bulk Resize and Edit in Photoshop

Posted in Photography


Updated Kodak Moments app lets you share, edit and print your images

04 Aug

An update to the Kodak Moments app makes it a one-stop-shop for editing, sharing and printing, eliminating the need for a separate app to send images to Kodak’s Picture Kiosks. Read more

Articles: Digital Photography Review (dpreview.com)

 
Comments Off on Updated Kodak Moments app lets you share, edit and print your images

Posted in Uncategorized


How the Switch from DSLR to Mirrorless Changed How I Edit Photos

22 Jul

When I started in photography more than 10 years ago, the only viable option for editing images was Adobe Photoshop. At that time, 100% of my photo editing was done there.

A few years later, Adobe introduced Lightroom and I embraced it right away for its speed and organizational features. I immediately adopted it into my photo processing workflow and it was the first big transition that drastically changed my processing.

The next big change in my processing happened when I discovered HDR photography. As a photographer with a background in graphic design, I quickly saw the potential in the new processing technology and, again, I incorporated it into my workflow.

Images How Switch to Mirrorless Change Photo Edit 1

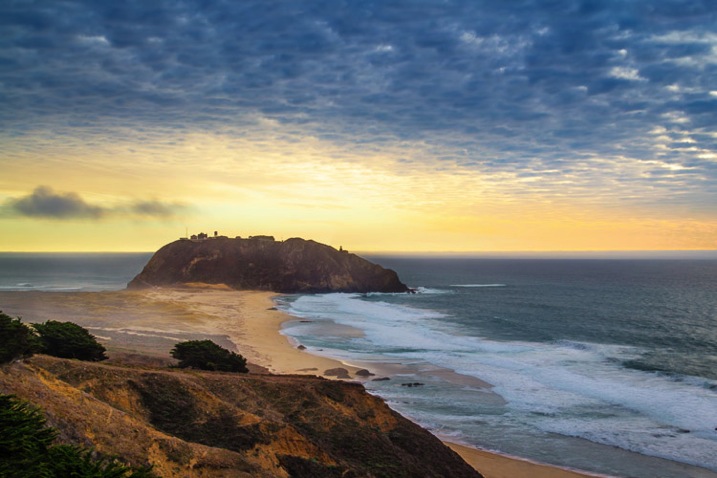
Canon 60D, HDR processed

By the end of 2014, after 10 years of shooting with a Canon DSLR, I had established my own photo editing workflow – one that I was comfortable with, that reflected my style of photography, and covered different scenarios of travel and landscape photography. Below is a list of four main processing techniques in my editing workflow, with the percentage of the total use for each.

HDR Processing in Photoshop HDR Pro and Lightroom – 50%

The foundation of my natural looking HDR photography style, this technique is based on merging bracketed photos in Photoshop HDR Pro and later editing the new HDR image in Lightroom. The beauty of this method is that Photoshop HDR Pro does not change the pixels (luminosity, contrast, saturation) of the original images. Instead, it combines data from the bracketed photos into one enormous 32-bit TIFF image.

I outlined this technique in detail in one of my previous articles: Natural Looking HDR in Photoshop and Lightroom in 5 Easy Steps.

Images How Switch to Mirrorless Change Photo Edit 2

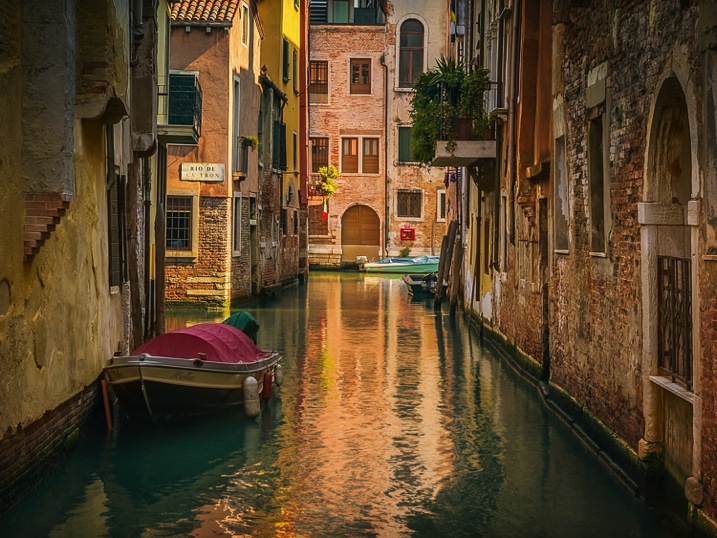
Canon 60D, HDR processed with Photoshop HDR Pro

HDR Processing in Photomatix – 30%

Photomatix is the most popular, and matured standalone HDR program. It has a completely different approach compared to Photoshop HDR Pro. Besides standard HDR features like image alignment, de-ghosting and merging for HDR, it has unique image editing tools that allow me to create distinctive looks in my photographs.

Images How Switch to Mirrorless Change Photo Edit 3

Canon 60D, HDR processed with Photomatix

Luminosity Blending in Photoshop – 10%

This technique is based on blending multiple images together in Photoshop using transparency masks. It gives me the most flexibility and control over image processing but, at the same time, it is the most involved and time consuming. I use it in the most complex cases when everything else has failed.

Images How Switch to Mirrorless Change Photo Edit 4

Canon 60D, digital blending with Luminosity Masks

Single RAW processing in Lightroom – 10%

When the light is not very dynamic, I use a single image and process it in Lightroom.

Images How Switch to Mirrorless Change Photo Edit 5

Canon Digital Rebel, single RAW image processed in Lightroom

The Switch

The biggest change in my photography happened at the end of 2014 when, after shooting with a Canon DSLR for 10 years, I switched to Sony mirrorless. It was quite an adjustment. After shooting for so long with one brand, I had become extremely comfortable with it. During the switch, I had to learn how to work with something very different (more details on that topic here: 5 Lessons Learned Switching from DSLR to Mirrorless for Travel Photography).

But, I did not expect that the brand switch would dramatically change my editing. I was wrong.

After I returned from my first photography trip to Hawaii and California, where I put my new equipment through the test of real life scenarios of travel photography, I had 3000 brand new photos shot with the Sony a6000.

When I started to edit the new photos, I could see some differences. In general, the images were much cleaner and sharper with a higher amount of detail. These changes did not surprise me because the a6000 has a new generation sensor with a higher pixel count, and in combination with quality lenses from Sony and Zeiss, it could easily resolve a staggering amount of detail.

What surprised me was how the images behaved when I started to edit them. I could immediately see that the images were more responsive, meaning that I could push them much further, with more aggressive editing, and that I could recover more shadows and highlights from a single RAW image. I realized that I could process some images without using HDR techniques, which was not possible before.

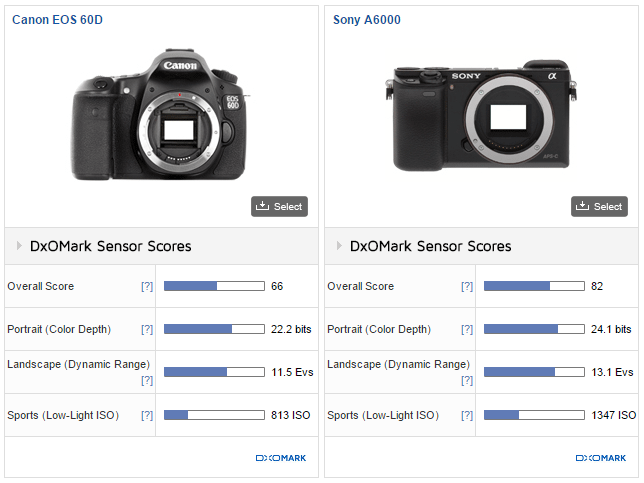
This is when I started to look around trying to find the reason for the different behaviour. I found my answers on the DoX Mark website when I compared camera sensors. The dynamic range of the Sony a6000 sensor is wider by almost 2 stops (11.5EV vs 13.2EV) or 14%.

Images How Switch to Mirrorless Change Photo Edit 6

The difference is probably not a big deal if you are a wedding or street photographer but, for someone like me who specializes in travel and landscape HDR photography, this was a game changer. I saw the opportunity to streamline and optimize my digital techniques once again.

Now, six months later, below is my new modified digital photography workflow.

Single RAW Preset Based Lightroom Processing – 50%

A major shift toward the single RAW Lightroom editing made me realize that it could be the perfect opportunity to optimize my workflow in order to save time on processing. I organized my Lightroom presets into four collections: Landscapes and HDR, Cross Processing, People and B&W. Now, I start the process of editing by applying different presets to the image trying to find the right look. When I find the one I like the best, I tweak it with standard Lightroom and Photoshop editing tools.

Images How Switch to Mirrorless Change Photo Edit 7

Sony A6000, Sony 10-18mm lens, Lightroom Preset Based Processing

HDR Processing in Photoshop HDR Pro and Lightroom – 20%

With Adobe introducing Merge to HDR in Lightroom 6, I find myself using it more and more but I still use Photoshop HDR Pro.

Images How Switch to Mirrorless Change Photo Edit 8

Sony A6000, Zeiss 16-70mm lens, Lightroom 6 HDR Processed

HDR Processing in Photomatix – 20%

Cleaner digital files allow me to push the images even further in Photomatix.

Luminosity Blending in Photoshop – 10%

Nothing has changed here.

Conclusion

The switch from Canon DSLR to Sony mirrorless had unexpected consequences that drastically changed the way I edit my photos. In the end, the change was very positive, it allowed me to save time on processing and editing photos. Also, the extended dynamic range of the new sensor resulted in me taking fewer photos. I do not have to take five or seven bracketed shots anymore; in most cases, three brackets are all that is needed.

Have you made the switch? Have you noticed any changes in your processing workflow? Share with us your thoughts in the comments below.

googletag.cmd.push(function() {
tablet_slots.push( googletag.defineSlot( “/1005424/_dPSv4_tab-all-article-bottom_(300×250)”, [300, 250], “pb-ad-78623” ).addService( googletag.pubads() ) ); } );

googletag.cmd.push(function() {
mobile_slots.push( googletag.defineSlot( “/1005424/_dPSv4_mob-all-article-bottom_(300×250)”, [300, 250], “pb-ad-78158” ).addService( googletag.pubads() ) ); } );

The post How the Switch from DSLR to Mirrorless Changed How I Edit Photos by Viktor Elizarov appeared first on Digital Photography School.


Digital Photography School

 
Comments Off on How the Switch from DSLR to Mirrorless Changed How I Edit Photos

Posted in Photography


6 Steps to Edit and Deliver Wedding Photographs in One Day

23 Mar

This is exactly how I process every wedding that I photograph. I am now on my fifth year of shooting weddings and have shot roughly 70 of them. I am a big fan of working smart and not hard. Every step of my workflow is thought out, and belongs for very specific reasons. Most of the time I am finishing and delivering my wedding photos within four to five days. If it wasn’t for attention span and the internet, I should be able to finish wedding photographs in 24 hours every time.
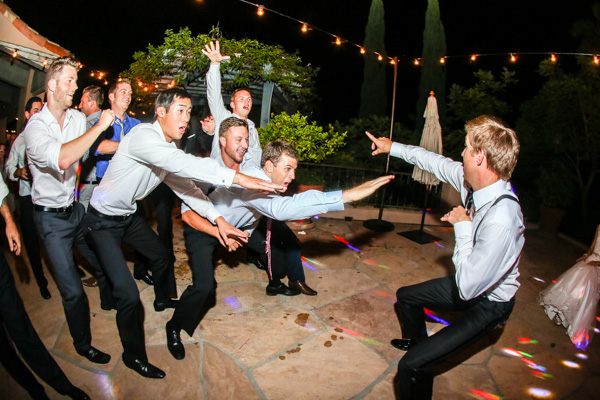
digitalphotographyschool-1-31

1/100, f/5.0, ISO 2000, 15mm fisheye

 Step #1 – Import and backup (1-3 hours)

I first import all images (1500-2000) via Lightroom into a folder (titled bride’s name and groom’s name, in alphabetical order) on my 1TB portable Lacie Porsche drive.

I work on the go a lot, and I am often editing in a coffee shop, friend’s place or co-working space, so I have my 13 inch Macbook Pro (retina display) and portable drive to work from. The drive currently holds about six months of images, or 80,000 photos.

I have a big gripe about people who organize their photos by date. In my opinion, it’s a terrible system when it comes to finding photos at a later date. When your bride Tiffany asks for a change in a photo from color to black and white, how do you find that folder with her wedding? On my drive it would be under “Weddings,” and in a subfolder titled “Jeremy & Tiffany.”
digitalphotographyschool-1-12

1/400, f/6.3, ISO 2500, on a Canon 135mm f/2

While my images are uploading I will be posting a Facebook album of the same day slideshow that I produced at the wedding, and tagging the bride and groom in it. This is usually 30-50 images that I’ve edited during dinner or during any sort of down time, like the end of cocktail hour.

Note: This means I have already added the bride and/or groom on Facebook, which is standard practice for me. Being friends with my clients is probably one of the greatest perks of my job, and it also guarantees tons of referrals. I have a competitive side that always wants to post the pictures faster and better than any friend, uncle or cousin at the wedding. Whoever posts first on Facebook will get the most attention. 
digitalphotographyschool-1-36

1/50, f/2.8, ISO 2500, 24mm with the Canon 24-70 2.8

I then plug in my backup 3TB drive, go to sleep and let my computer backup via Time Machine overnight.

Losing photos is the greatest fear of most photographers, and for that reason alone many professionals have multiple backup systems in place. I don’t usually format my memory cards until the wedding has been delivered or backed up, if I can help it. I also use Backblaze, a cloud-based backup system that constantly backs up files whenever I am online.
digitalphotographyschool-1-23

1/400, f/2.5, ISO 400 with the Canon 135mm f/2

Step #2 – Culling (30 min an hour)

In Lightroom I go through all 1500-2000 photos and select every photo that looks good, unique, and usable. I use the star rating system in Lightroom, by pressing the “1” key on the photos I like. I usually end up with about 800 photos after this. If you focus and know what you are looking for, this should only take about 30 minutes to an hour, maximum. No agonizing over which photo is best between two very similar ones. Just trust your gut and go.

One “trick” I’ve unconsciously been doing is usually selecting the last photo in a series of similar photos. If you’re like me, you take two or three photos of each thing you are photographing. I move on when I think I’ve got it, and that means the second or third photo in a series should be my selection.
digitalphotographyschool-1-17

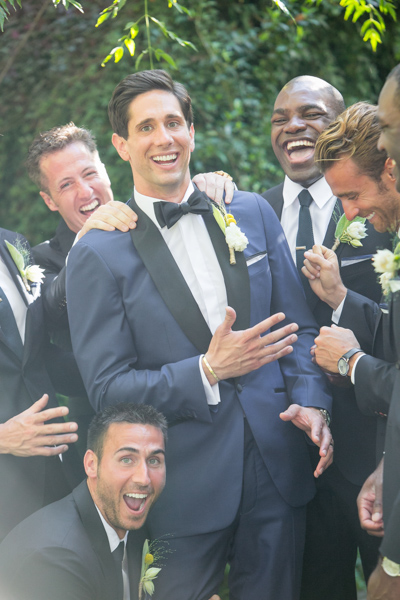
To get photos like these, I usually have the guys grouped together in a friendly way, and then I tell them to “harass the groom.”

Next I go through and do my two-star selects. These are the best photos from the day that tell a clear story from beginning to end. They are images that would likely end up in a photo album (besides family photos). I almost always end up with 100 photos, give or take a few. This should take about 10-15 minutes, since you are selecting from a much narrower field of photos. Also, you really have to trust your gut on which photos are winners here.

Step #3 – Editing and retouching (three hours)

After I’ve selected my favorites, I edit them first. I actually enjoy editing these ones, because I am proudest of them, and they are all different. I edit everything in Lightroom. I never open photoshop unless I’m making a diptych or doing heavy changes to a photo. Sometimes I start with a base preset in Lightroom, one I called “Typical Phil.” I hand edit all of these photos. This should take about an hour or two tops. These are then exported at 2500px, 300dpi, 88 quality, (and also renamed Highlights-0001.jpg, Highlights-0002.jpg, etc.), into a folder called Highlights which has been created inside the the main folder of images. I upload the Highlights into a PASS gallery, and deliver this immediately, so the clients don’t have to wait any longer to see some of their wedding images.

Never spend more than 30 seconds on a photo. If you do, you are editing for yourself and other photographers, not the client. Most clients won’t be able to tell the difference between good, great, and perfect. Aim for great.

My export settings make each of my images only about one or two megabytes in size, but they are able to be printed up to 11×14″. Anything larger and I’m happy to provide a specific file to my client directly. I do this in the interest of hard drive and cloud storage space. Also, clients are usually only printing at most one or two photos extra large, so I don’t see the need to make every photo 30 inches on the long edge.

PASS is a phenomenal application that is incredibly intuitive and easy to use for delivering digital photos to clients. Pixieset is another popular competitor. PASS charges per album of photos; Pixieset charges for bandwith/storage.
digitalphotographyschool-1-13

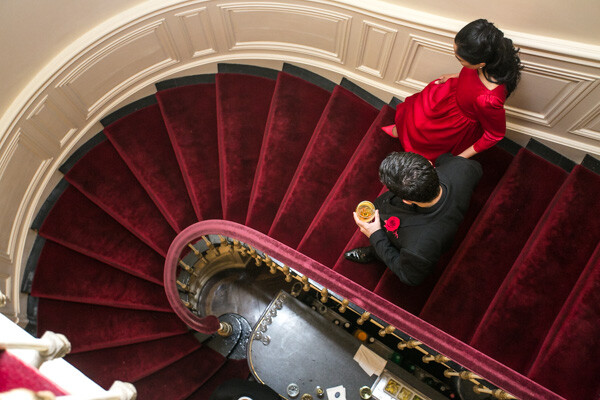
This next part is the secret to my rapid editing and turnaround of images. Take each of the favorite images that you’ve edited (two-star images), and copy each edit onto surrounding photos with a similar light source. If your exposure is consistent in this range of photos, the edit you do for one image should look great for every other image in that scene. This should take about two hours straight through.

Lightroom speed tip

Here is a Lightroom secret to make the copying and deselecting of images extra fast. With your main image selected, hold down Command and select all the other images you want to copy the edit to. In Develop mode, hold down the option key and press sync. This automatically copies the edit onto all the other photos (to make sure you are copying the appropriate edits across all photos, you can simply press sync and a dialogue box will pop up showing which edits are going to be copied).

Now that the edits are synced, you can deselect each image and check for consistency by pressing “/” which is the shortcut for deselecting the current image. I do this to make sure I’ve seen and checked each image for perfect exposure.
digitalphotographyschool-2-3

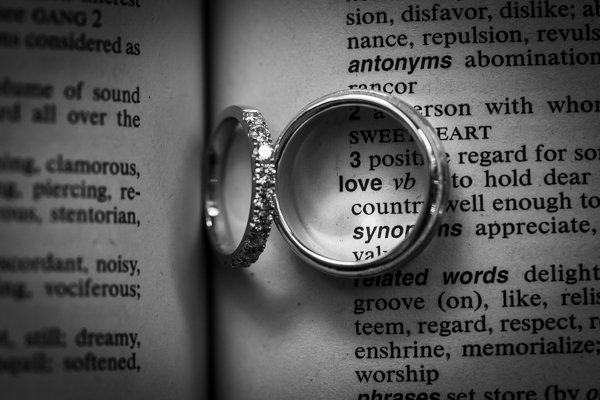
Remember, you’re not retouching every face, every sky, every element of a picture. You can spend a little more time doing that on the favorites, but chances are your couple isn’t going to be printing every single photo from their wedding, so why are you retouching random shots from the reception?

Step #4 – Exporting (45 minutes)

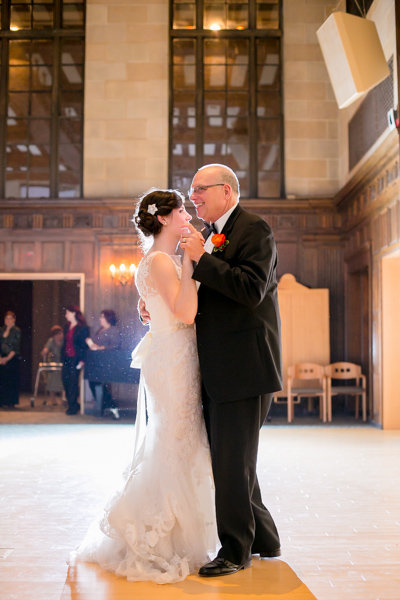
Export all images from each section of the wedding into their own folders. Folders and images can be named according to which part of the wedding they belong to (Getting Ready or Pre-Ceremony, Ceremony, Family, etc.). These can all be exported with these settings: 88 Quality, 2500 px long edge, 300dpi. This should take about ten minutes to start doing, and maybe an hour for the computer to finish (depending on number of images and your computer’s power and speed).
digitalphotographyschool-3-6

Step #5 – Uploading (one hour)

Upload all your files to your photo sharing service of choice (PASS, Pixieset, Zenfolio, Pixifi, etc.). Ideally, the first gallery that a viewer will see is the Favorites, or Highlights gallery. No need to overwhelm them with every photo from the Getting Ready series. Your top 50-100 photos makes for an excellent opener in an online wedding gallery, like this.

That should take about 10-30 minutes (up to an hour or so), depending on how fast your internet connection is.

digitalphotographyschool-1-15

Step #6 – Delivery (10 minutes)

Email the bride/groom the following:

“Hi! How is everything going? I know I said it would be a couple of weeks until the photos are finished, but I have good news for you! I’ve finished and edited ALL the photos and they are ready for you to see and download in this gallery here.

Simply click on the download button to create a zip file with all of the high resolution images to your computer. This will save you time having to wait for me to mail you a disk or thumb drive, which would have all the exact same files in it.

As a special surprise, I am gifting you $ 50 of print credit! Simply put in “bridegroomname” in the checkout section of ordering prints under coupon code. This should buy you up to X amount of 8×10’s, or X amount of 5×7’s.

Let me know if you have any questions about anything! Enjoy the photos :)

-Phil”

digitalphotographyschool-1-34
I recognize this doesn’t involve an in-person sales meeting, delivery of albums, or anything of that nature. This is simply the fastest way you can do business and work smart, not hard. I regularly book weddings between $ 3000-4000 doing exactly this. I have sold wedding albums, and that’s room for more profit, but also more headache and work. Write to me and I’ll let you know how to make album making a painless, quick process as well. It’s all about guiding your clients’ expectations.
digitalphotographyschool-5-2

Do you have any other workflow tips for weddings?

googletag.cmd.push(function() {
tablet_slots.push( googletag.defineSlot( “/1005424/_dPSv4_tab-all-article-bottom_(300×250)”, [300, 250], “pb-ad-78623” ).addService( googletag.pubads() ) ); } );

googletag.cmd.push(function() {
mobile_slots.push( googletag.defineSlot( “/1005424/_dPSv4_mob-all-article-bottom_(300×250)”, [300, 250], “pb-ad-78158” ).addService( googletag.pubads() ) ); } );

The post 6 Steps to Edit and Deliver Wedding Photographs in One Day by Phillip Van Nostrand appeared first on Digital Photography School.


Digital Photography School
 
Comments Off on 6 Steps to Edit and Deliver Wedding Photographs in One Day

Posted in Photography


How to Edit Newborn Photos Using Lightroom

04 Sep

Cole’s Newborn Photography Workshop is on sale now at Snapn Deals. Save 72% until September 16th, grab a seat now!

BW.jpgNewborn photography requires a tremendous amount of patience, skill, a willingness to be okay with accidents, and even stronger photo editing skills as these precious little newborns often have numerous skin imperfections that can cause you to spend a significant amount of time editing and retouching the photos.

Until recently, to truly excel at editing newborn photos you had to be quite proficient using Photoshop, but now with Lightroom 5′s newest tools you can get great results with far less time!

Here are my top 6 tips for quicker and more effective newborn photo editing in Lightroom:

1. Slightly Overexpose in Camera

To get amazing final edited newborn photos you first need to focus on getting your exposures as close as you can in camera. Since newborns often have some redness to their skin, the best way to help minimize that is to slightly overexpose your photos while shooting. Doing so will help you achieve that soft, creamy and bright skin that we all love!

Slight Overexpose

2. Shoot RAW

I always shoot in the RAW file format. There are many advantages of shooting in RAW, but for newborns which require a lot of touching up and white balance changes, shooting in RAW will help keep the color tones of your images as natural as possible – even when making big adjustments.

3. The Magic “C” Sliders

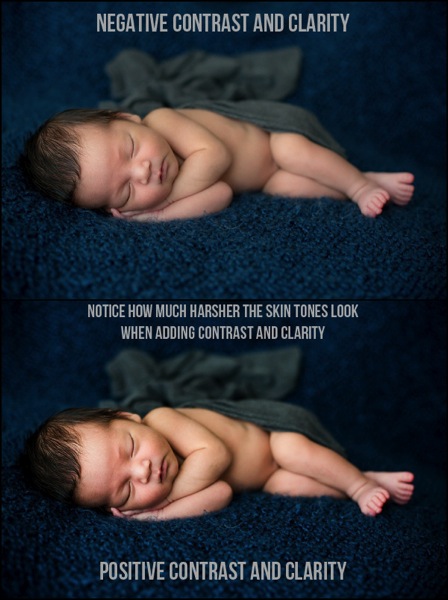
If you’re after soft and creamy skin tones, the two sliders in Lightroom that will help you the most are the contrast and clarity slider. By reducing contrast you will smooth out the tonality of the image (just watch the histogram when you change contrast) and it will help remove the dark shadow areas or even bright highlights. Remember, for most of us, the goal with newborns is soft, airy photos – rather than edgy high contrast imagery. Adjusting the clarity slider downward a bit will help give you the “creamy” factor. Just be very careful to not remove too much clarity! I recommend somewhere between -10 to -20.

Contrast and clarity sliders

4. HSL Sliders for Adjusting Skin Tones

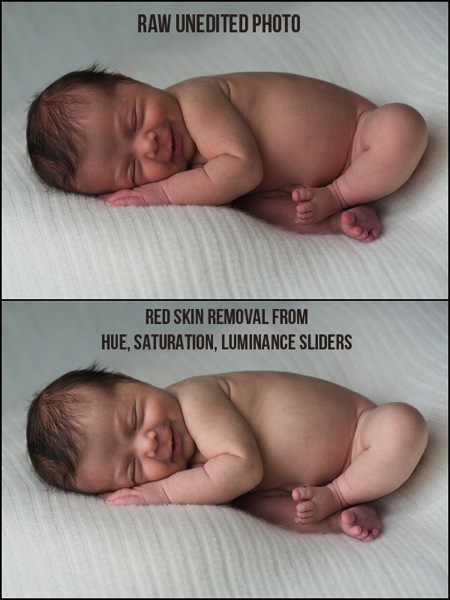
Adjusting the white balance will only get you so far, sometimes you need some fine tuning on the skin tones and that is where the HSL sliders can really help. While you can manually adjust each color slider, the real trick is to use the targeted adjustment tool on each element (Hue, Saturation, and Luminance) to fine tune your skin tone corrections. Simply click on the targeted adjustment tool, go over a part of the image with the skin tone color you want to fix, click (and hold) then adjust with your mouse up or down and you’ll see the sliders adjust.

HSL Sliders

Tip: if you are trying to remove redness, click in the photo where there the skin is red, and follow this sequence with each slider using the targeted adjustment tool:

Hue: move the mouse up and the red/orange sliders will move to the right
Saturation: lower the mouse and the sliders will shift to left lowering saturation
Luminance: raise the mouse to adjust the targeted color sliders to the right, raising the luminance (brightness) of those tones in the photo.

See below for video tutorial of this technique if you are a visual learner.

5. Choose Wraps, Blankets and Props Wisely

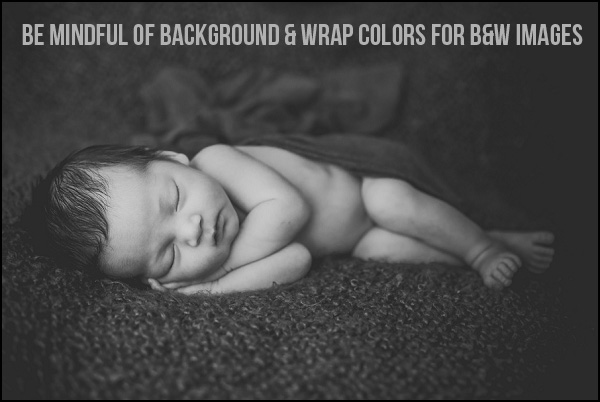
Extremely light colored wraps or blankets can be so cute, and can look great with color images. But, if you are a fan of classic, timeless, black and white images I’d urge you to stay away from blankets or wraps that are too light, or even white in color. There simply isn’t enough contrast in color between the baby and the blankets for an effective, and attractive black and white image, and your photo will often look too washed out.

B W

6. Presets for Speed and Consistency

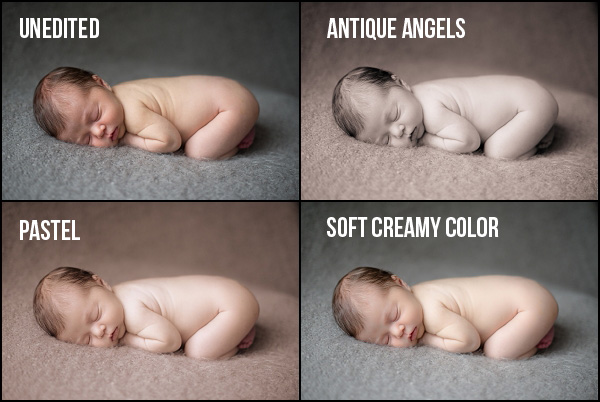
Once you find an edit or a look that you love, make sure to save it as a preset so you can use it on other photos that were taken with similar lighting and settings. Not only are presets vital for saving you a ton of time while editing, but they also will help you create a consistent look to your photos.

Specifically for newborn photography, I created a complete Lightroom presets collection that make soft, creamy and dreamy newborn photos with the simplicity of just one-click.

Newborn Lightroom Presets

I sure hope that you can put these six tips into use right away and start editing your newborn photos quicker, with better results. If you have any questions at all, just let me know down below, I’d love to hear from you.

Cole’s Newborn Photography Workshop is on sale now at Snapn Deals. Save 72% until September 16th, grab a seat now!

The post How to Edit Newborn Photos Using Lightroom by Cole Joseph appeared first on Digital Photography School.


Digital Photography School
 
Comments Off on How to Edit Newborn Photos Using Lightroom

Posted in Photography


Edit Like a Boss on Photoshop With ATNX Digital

04 Dec

Photoshop actions are the best thing in the world if you use Photoshop a lot. Not only do they save you time and trouble, but they also empower you to improve your pictures any way you want. We don’t generally spotlight that many young companies, but one that we just thought you absolutely had to know about is ATNX Digital. Continue Reading

The post Edit Like a Boss on Photoshop With ATNX Digital appeared first on Photodoto.


Photodoto

 
Comments Off on Edit Like a Boss on Photoshop With ATNX Digital

Posted in Photography


Creating a Black and White High Contrast Portrait Edit in Lightroom

17 Nov

Introduction

The Following is an excerpt from the SLR Lounge Lightroom Preset System v5 and accompanying workshop from the Lightroom Workshop Collection v5.  The Lightroom Preset System is designed to take you from Ordinary to Extraordinary photos in just a few seconds and clicks within Lightroom 4 and Lightroom 5.

Overview

In this tutorial we’re going to go over how to turn a regular color portrait into a nice high contrast black and white image. For this tutorial we have a portrait of a baby out in a field. The overalls, details in the field, and overall background blur will be complimented by a high contrast black and white edit. The SLR Lounge Lightroom Preset System v5 has presets specifically for high contrast black and white portraits which we are going to apply to this photo. If you don’t have the preset system, we’ll list all of our Develop settings so you can achieve the same look.

Here’s what our photo will look like before and after we’re done with the edit.

beforeafter

Unedited Photo on Left | High Contrast Black and White on Right

Lightroom Preset System v5 Mixology

For those who have the Preset System, you can follow the Mixology Recipe below to get to the same results. If you don’t have the Preset System, please read the article or watch the video below to see exactly how this look was achieved.

Develop Mixology

  • 01-10 BASE – SOFT: 13b. Light Crush – B&W
  • 03-70 ADJUST – VIGNETTING: 71c. Neutral – Zeroed

Written Tutorial

Step 1: Checking The EXIF Data

exifdata

We press “i” to pull up our EXIF data so we can see exactly how this image was shot. This image was shot with a 50mm lens at f/2. We want to keep in mind that the depth of field is shallow, and we may have to add sharpening to this image.

Step 2: Apply Preset

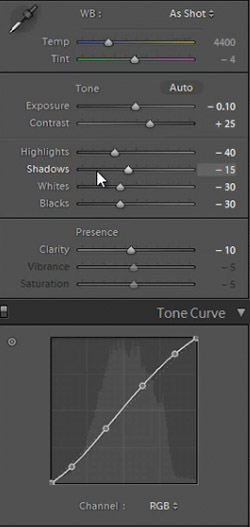
We’re starting with our “01-10 BASE – SOFT: 13b. Light Crush – B&W” preset, and after we lower the Exposure to -0.10 we have a nice high contrast black and white look. Then we apply a “03-70 ADJUST – VIGNETTING: 71c. Neutral – Zeroed” vignette preset so we can get a subtle edge darkening.

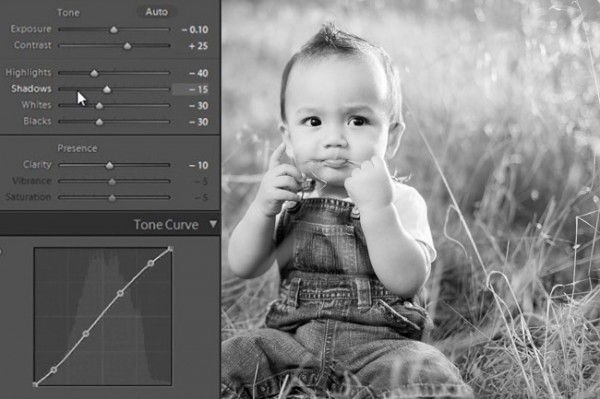
In the develop settings the Contrast was raised and the Shadows and Blacks have been dropped. This is giving our nice deep shadows and blacks, and adding to the high contrast look we’re editing for. The Highlights and Whites have also been dropped in order to bring the highlights in the skin closer to the mid tones.

developpanel1

With Settings Zeroed Out

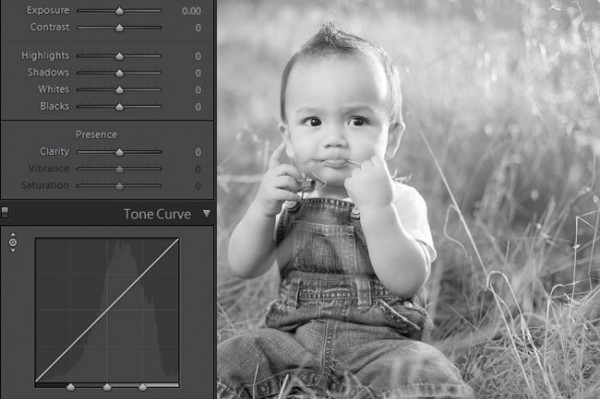
Here’s what our image looks like with a simple black and white conversion (convert by hitting “V”), without the adjustments in Contrast, Highlights, Shadows, Whites, Blacks, and Tone Curve.

Before High Contrast Settings

With High Contrast Settings

Here’s our image with Contrast, Highlights, Shadows, Whites, Blacks, and Tone Curve adjustments applied.

High Contrast Develop Settings

In the image below you can see a huge difference that the adjustments make. The eyes stand out, there’s more details in the hair and grass, and there’s more texture in the clothes.  All these subtle details combined add quality to an otherwise flat black and white image.

beforeandafter

All Settings Zeroed On Left. High Contrast Adjustments on Right


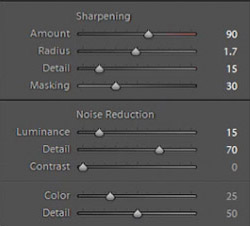
In our Sharpening settings our preset applied our standard amount, but the image is still a bit soft because of the shallow depth of field caused by shooting this image at f/2.0. To get a nice sharp portrait we raise the Amount, Radius, and Detail. The preset also adjusted our Noise Reduction settings, giving the subject in our portrait nice soft skin. All of the “SOFT” presets have this standard amount of Noise Reduction applied in order to soften and smooth out skin without going so far to kill fine details.

sharpening settings

Here’s what our image looks like before and after our presets are applied.

Before

lightroom-5-tutorial-high-contrast-b&w-newborn-0001

After

lightroom-5-tutorial-high-contrast-b&w-newborn-0002

Watch the Video Tutorial

If you would like to see exactly how all of the settings and adjustments were applied, please watch the video from the SLRLounge YouTube Channel.

Conclusion and Learn More

We hope you all enjoyed this tutorial. If you are interested in learning more or purchasing the SLR Lounge Lightroom Preset System v5 or the newly released Lightroom Workshop Collection v5, please click any of the links in this article.

Post originally from: Digital Photography Tips.

Check out our more Photography Tips at Photography Tips for Beginners, Portrait Photography Tips and Wedding Photography Tips.

Creating a Black and White High Contrast Portrait Edit in Lightroom

The post Creating a Black and White High Contrast Portrait Edit in Lightroom by Post Production Pye appeared first on Digital Photography School.


Digital Photography School
 
Comments Off on Creating a Black and White High Contrast Portrait Edit in Lightroom

Posted in Photography


Do you Edit or Post Process your Photos?

09 Nov

It is time for another reader poll – this time we’re going to talk ‘post production’.

Every time we talk about processing images we get a diversity of responses from readers. Some process every image, others some and some never edit any of their images – either because they don’t have the tools, are nervous or don’t believe in it.

So we thought we’d ask the question – do you edit or post process your photos?

Note: There is a poll embedded within this post, please visit the site to participate in this post’s poll.

Please tell us about your response in comments below – particularly if you’re in the ‘no’ camp.

Post originally from: Digital Photography Tips.

Check out our more Photography Tips at Photography Tips for Beginners, Portrait Photography Tips and Wedding Photography Tips.

Do you Edit or Post Process your Photos?

The post Do you Edit or Post Process your Photos? by Darren Rowse appeared first on Digital Photography School.


Digital Photography School
 
Comments Off on Do you Edit or Post Process your Photos?

Posted in Photography


Improve Your Photography By Learning to Edit

12 Feb

A Guest Post By: John Davenport

You might have read the title to this post and thought that I was going to talk about how editing your photographs can make you appear to be a better photographer, but no, I really do mean better – behind the camera.

Thin Ice

I came across this idea of improving my skill behind the camera, by focusing on my skill behind the computer, when I was going about launching my new YouTube series, “Let’s Edit”, which focuses on how to edit photos in Lightroom.

What Exactly Can Editing Teach Us?

As we start out on our photography journey we are learning everything there is to know about creating a photograph. From how our camera works to how different light effects our shots and this can be a bit overwhelming – especially when we’re out in the field taking photos.

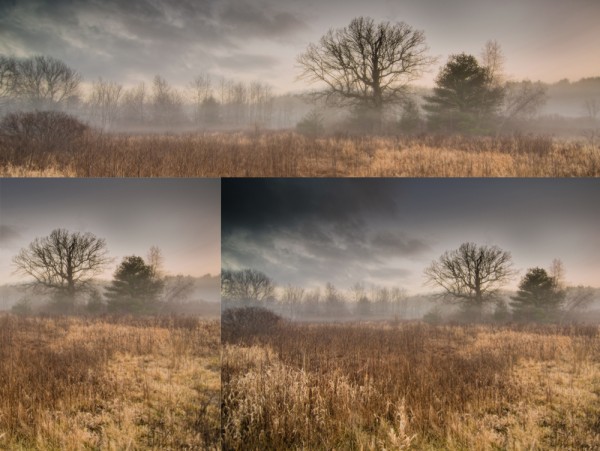
Optional Caption: Learning to Crop Differently Can Teach Composition

Learning to Crop Differently Can Teach Composition

When I first started photographing landscapes I would get lost in the act of trying to fiddle with dials and buttons and forget about composition, or when I’d focus on composition I’d forget about my shutter speed or ISO settings. There is so much that goes into creating a photograph that sometimes it helps to just sit down and learn a different way. So I thought I’d try to learn to take better photographs by focusing on learning how to edit the ones I did take.

One area that editing our photos can teach us is the idea of composition. I know there will be people screaming at the screen as they read this, maybe even ripping their hair out, when I say that cropping photos is an excellent way to experiment with composition, but it really truly is.

You can take the same photograph and crop it countless different ways and by doing this you are training your eye to see scenes differently. Apply this knowledge of composition the next time you’re in the field and you’ll actually see those different compositions as you’re looking through the viewfinder making it possible for you to take more photographs while you’re out in the field.

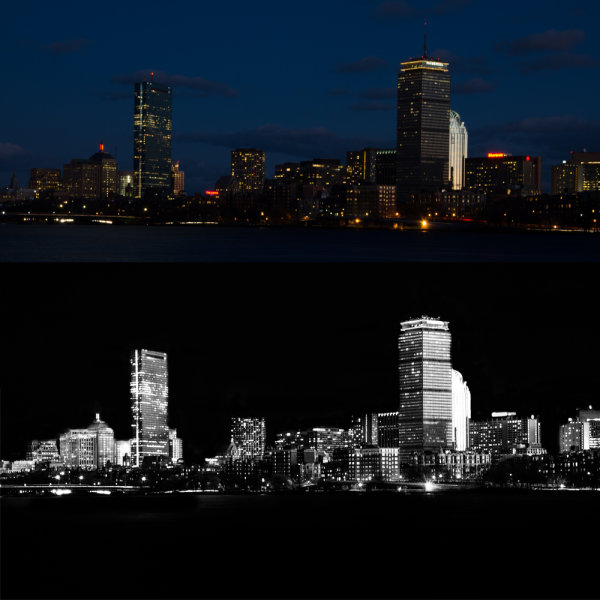
One other area that comes to mind is learning to see things in the field that will look good once edited. Take this black and white photograph of the Boston skyline that I took while I was out photographing the city with my sister.

By Seeing the Edit in the Field You Can Set Shots Up Accordingly

By Seeing the Edit in the Field You Can Set Shots Up Accordingly

By having the black and white image in my head as a concept I was able to know that by under exposing the frame then and there it’d make my life so much easier when I go about creating the final image back in Lightroom.

Now, this is just two concepts where editing can be applied to what we do in the field, I’m curious, have you ever thought about this idea of applying what you do behind the computer in the field? Do you think you can come up with other areas of editing that will make sense when you’re behind your camera? Let us know in the comments below!

John Davenport is an avid amateur photographer looking to make a name for himself. He has recently started a new YouTube series called “Let’s Edit” as well as launched a community site to go along with it. You can also find John on Facebook and Twitter.

Post originally from: Digital Photography Tips.

Check out our more Photography Tips at Photography Tips for Beginners, Portrait Photography Tips and Wedding Photography Tips.

Improve Your Photography By Learning to Edit


Digital Photography School
 
Comments Off on Improve Your Photography By Learning to Edit

Posted in Photography


san francisco street bmx group edit

02 Jan

bmx colab edit of used and unused footy from the last 5 months of local riders james precit, cornelio greer (me), matt hinton, shelby miller, and brett decker aka our crew sf shredders. cameras used panasonic dvx100, nikon d90, canon gl2, canon hv30, and iphone 4. edited by me (cornelio greer) enjoy!
Video Rating: 4 / 5