RSS
 

Posts Tagged ‘Dynamic’

RED unveils Monstro 8K VV full-frame sensor with 17+ stops of dynamic range

07 Oct

RED has just announced its new Monstro 8K VV full-frame sensor for Weapon cameras. The device features a 35.4MP 40.96mm x 21.60mm sensor and is able to record at a full 8K/60fps resolution. RED explains that the Monstro 8K VV replaces its existing DRAGON 8K VV sensor, and that anyone who has ordered the DRAGON 8K VV will be offered the Monstro as of October 5th.

The Monstro 8K VV sensor has full support for RED’s IPP2 image processing pipeline, as well as an “unprecedented dynamic range [of 17+ stops] and breathtaking color accuracy,” according to RED President Jarred Land. When coupled with the Weapon 8K VV, the device can simultaneously record Redcode RAW and either Avid DNxHD/HR or Apple ProRes, likewise offering data speeds up to 300MB/s. The sensor’s full technical spec sheet is insane, and available for your viewing pleasure here.

Existing carbon fiber Weapon customers have the option of upgrading for $ 29,500, while the new Weapon with the full-frame Monstro sensor is priced at $ 79,500. New orders for the device will start shipping to customers in early 2018.

Press Release

RED ANNOUNCES THE NEW MONSTRO 8K VV

Today RED announced a new cinematic Full Frame sensor for WEAPON cameras, MONSTRO™ 8K VV. MONSTRO is an evolutionary step beyond the RED DRAGON 8K VV sensor with improvements in image quality, including dynamic range and shadow detail.

This new camera and sensor combination, WEAPON 8K VV, offers Full Frame lens coverage, captures 8K full format motion at up to 60 fps, produces ultra-detailed 35.4 megapixel stills, and delivers incredibly fast data speeds of up to 300 MB/s. Like all of RED’s DSMC2 cameras, WEAPON shoots simultaneous REDCODE RAWand Apple ProRes or Avid DNxHD/HR recording and adheres to RED’s dedication to OBSOLESCENCEOBSOLETE—a core operating principle that allows current RED owners to upgrade their technology as innovations are unveiled as well as move between camera systems without having to purchase all new gear.

“RED’s internal sensor program continues to push the boundaries of pixel design and MONSTRO is the materialization of our relentless pursuit to make the absolute best image sensors on the planet,” says Jarred Land, President of RED Digital Cinema. “The Full Frame 8K VV MONSTRO provides unprecedented dynamic range and breathtaking color accuracy with full support for our IPP2 pipeline.”

The new WEAPON will be priced at $ 79,500 (for the camera BRAIN) with upgrades for carbon fiber WEAPONcustomers available for $ 29,500. MONSTRO 8K VV will replace the current RED DRAGON 8K VV sensor in RED’s lineup, and customers that had previously placed an order for a RED DRAGON 8K VV sensor will be offered this new sensor beginning today. New orders will start being fulfilled in early 2018.

RED has also announced a comprehensive service offering for WEAPON carbon fiber camera owners called REDARMOR-W. RED ARMOR-W offers enhanced and extended protection beyond basic RED ARMOR, and also includes one sensor swap each year.

“‘Good’ has never been ‘good enough’ for RED,” says Land. “We put ourselves in the shoes of our customers and see how we can improve how we can support them. RED ARMOR-W builds upon the foundation of our original extended warranty program and includes giving customers the ability to move between sensors based upon their shooting needs.”

Additionally, RED’s enhanced image processing pipeline (IPP2) is now available in-camera for all cameras with HELIUM and MONSTRO sensors through today’s v7.0 release firmware update. IPP2 offers a completely overhauled workflow experience, featuring enhancements such as smoother highlight roll-off, better management of challenging colors, an improved demosaicing algorithm, and more.

Articles: Digital Photography Review (dpreview.com)

 
Comments Off on RED unveils Monstro 8K VV full-frame sensor with 17+ stops of dynamic range

Posted in Uncategorized


Nikon D850: a look at dynamic range

11 Sep

The D810 offered excellent DR combined with a low base ISO that allowed it to tolerate lots of light. A look at the D850 suggests it’s been able to repeat this trick, while also seeing an improvement at high ISO settings.

Articles: Digital Photography Review (dpreview.com)

 
Comments Off on Nikon D850: a look at dynamic range

Posted in Uncategorized


Raw bit depth is about dynamic range, not the number of colors you get to capture

03 Sep
Shooting this image in 14-bit helped retain the full dynamic range captured by the sensor. Most of the time, with most cameras, 12-bit is enough.

Raw bit depth is often discussed as if it improves image quality and that more is better, but that’s not really the case. In fact, if your camera doesn’t need greater bit depth then you’ll just end up using hard drive space to record noise.

In fairness, it does sound as if bit depth is about the subtlety of color you can capture. After all, a 12-bit Raw file can record each pixel brightness with 4096 steps of subtlety, whereas a 14-bit one can capture tonal information with 16,384 levels of precision. But, as it turns out, that’s not really what ends up mattering. Instead, bit depth is primarily about how much of your camera’s captured dynamic range can be retained.

Much of this comes down to one factor: unlike our perception of brightness, Raw files are linear, not logarithmic. Let me explain why this matters.

Half the values in your Raw file are devoted to the brightest stop of light you captured

The human visual system (which includes the brain’s processing of the signals it gets from the eyes), interprets light in a non-linear manner: double the brightness of a light source by, say, turning on a second, identical light, and the perceptual difference isn’t that things have got twice as bright. Similarly, we’re much better as distinguishing between subtle differences in midtones than we are vast differences in bright ones. This is part of the way we’re able to cope with the high dynamic ranges in the scenes we encounter.

Digital sensors are different in this respect: double the light and you’ll get double the number of electrons released by the sensor, which results in double the value generated by the analogue-to-digital conversion process.

This diagram shows how the linear response of a digital sensor maps to the number of EV you can potentially capture. Note how the brightest stop of light takes up 1/2 of the available values of your Raw file.

Why does this matter? Because it means that half the values in your Raw file (the values between 2048 and 4096 in a 12-bit Raw file) are devoted to the brightest stop of light you captured. Which, with most typical tone curves, ends up translating to a series of near-indistinguishably bright tones in the final image. The next stop of light takes up the next 1024 values, and the third stop is recorded with the next 512, taking half of the remaining values each time.

In a typical out-of-camera JPEG rendering, the first ~3.5EV are captured above middle grey, and the first three of these stops of highlights have used up 7/8th of your available Raw values. The remaining Raw values are used to capture tones from just above middle grey all the way down to black.

Using the D750’s default JPEG tone curve as an example, you can see that around 3.5EV of the camera’s dynamic range is used for tones above middle grey. 1/2 the Raw values are used to capture the tones that end up being JPEG values of roughly 240 upwards, and more than 7/8ths of the available values on tones about middle grey.

Follow this logic onwards and you’ll see that the difference between 12 and 14-bit Raw has less to do with subtle transitions (after all, even in the example I describe, the tones around middle brightness would be encoded using 256 levels: the same number of steps used for the entire dynamic range of the image if saved as a JPEG or viewed on most, 8-bit monitors). Instead it has much more to do with having enough Raw values left to encode shadow detail.

By the time you’ve created a JPEG, the brightest stop of your image is likely to be made up from the tones in this image. Half of your Raw file was used for storing just these near-white tones.

Since every additional ‘bit’ of data doubles the number of available Raw values, but the brightest stop of light takes up half of your Raw values, you can see that all of those additional values increase the capacity of your Raw file by 1EV. Which, assuming neither you nor your camera’s exposure calibration are completely mad, ends up meaning an extra stop in the shadows.*

A 14-bit Raw file won’t generally give extra highlight capture, it’ll mean having sufficient Raw numbers left to be able to capture detail in the shadows. And if your camera is swamped by noise before you get to 14EV (most are), all this extra data will effectively be used to record shadow noise.

In other words, 12-bits provides enough room to encode roughly 12 stops of dynamic range, while 14 bits gives the extra space to capture up to around 14EV. Or to look at it from the opposite perspective: if your camera is overwhelmed by noise before you get to 12 stops of DR, you don’t benefit from more bit depth: all you’d be doing is capturing the shadow noise in your image in greater detail.

Bit depth in video

It’s a similar story in video. Because video capture is so data intensive, it’s not usually practical to try to save all the captured data, which usually means crushing everything down to just 8 or 10 bits.

Log gamma is a way of taking the linear data captured by the sensor and reformatting it so that each stop of captured light is given the same amount of values in the smaller file. This makes more sensible use of the file space and retains as much processing flexibility as possible.

And, even if you own, say, a Sony a7S (one of the few cameras we’ve encountered that has sufficiently large/clean pixels that it doesn’t have enough bit depth to capture its full dynamic range at base ISO), you need to remember that you only get the camera’s full DR at base ISO. As soon as you increase the ISO setting, you’ll amplify the brightest stop of captured data beyond clipping, such that you very quickly get to the stage where you’re losing 1EV of DR for every 1EV increase in ISO.

If your camera doesn’t capture more than 12 stops of DR, you probably shouldn’t clamor for 14-bit Raw

So, even though you started with a camera whose DR outstrips its bit depth, that stops being true as soon as you hike up the ISO: instead you just go back to encoding shadow noise with tremendous precision.

Consequently, if your camera doesn’t capture more than 12 stops of DR, you probably shouldn’t clamor for 14-bit Raw: it’s not going to increase the subtlety of gradation in your final images (especially not if you’re viewing them as 8-bit). All those extra bits would do is increase the amount of storage you’re using by around 16% with all of that space being devoted to an archive of noise.


Articles: Digital Photography Review (dpreview.com)

 
Comments Off on Raw bit depth is about dynamic range, not the number of colors you get to capture

Posted in Uncategorized


This eclipse photo shows the crazy dynamic range of today’s image sensors

23 Aug
Nikon D750 without any filters at 1/8s, F11, and ISO 100. Photo by Dan Plucinski

We talk about dynamic range (or lack thereof) a lot here at DPReview. But with all of the granular comparisons between the newest models, it’s easy to forget how incredible many of today’s image sensors have gotten in this regard. So here’s a quick example from photographer Dan Plucinski, who captured this photo in Oregon during the total solar eclipse on Monday.

The photograph on the right is a single image, not a composite. Plucinski simply took the shot on the left and pulled the shadows up in post; what you see on the right is the same image, with all of the shadow detail recovered.

The lesson is pretty straight-forward: always shoot Raw.


Photo by Dan Plucinski and used with permission.

Articles: Digital Photography Review (dpreview.com)

 
Comments Off on This eclipse photo shows the crazy dynamic range of today’s image sensors

Posted in Uncategorized


Dynamic symmetry: The genius of Henri Cartier-Bresson’s composition

19 Aug
Breaking down the composition of one of Henri Cartier-Bresson’s most famous images. Photo: Magnum Photos, screenshot from video

Henri Cartier-Bresson—the father of modern day street photography and master of the candid shot—was obsessive about the ‘geometry’ in his photographs. And in this two-part educational series, photographer Tavis Leaf Glover dives into some of Bresson’s best-known images to explain the dynamic symmetry at work and help you understand (and implement) it in your own photos.

This is NOT a beginner’s guide to composition. To the untrained (and many a trained) eye it can just look like Glover is overlaying so many lines onto each image that SOMEthing is going to line up no matter what. But for all that he coined the term the Decisive Moment, Bresson was extremely deliberate about his compositions.

Both videos dive into that deliberate vision—the way the iconic photographer saw the world around him and fit it into the 35mm frame just so. Check out both parts below, and then let us know what you think in the comments.

Part I

Part II

Articles: Digital Photography Review (dpreview.com)

 
Comments Off on Dynamic symmetry: The genius of Henri Cartier-Bresson’s composition

Posted in Uncategorized


Canon 6D Mark II dynamic range falls behind modern APS-C cameras

20 Jul

We’ve reported in recent years how Canon’s newer sensor designs have started to close the dynamic range gap, compared with chips from the likes of Sony and Toshiba. Dynamic range isn’t everything, of course: Canon’s Dual Pixel sensors have brought advances in live view and video autofocus that for many people will be every bit as significant as the noticeable shortfall in Raw file malleability. But it was promising to see Canon getting competitive in an area where it had fallen behind.

Sadly though, it seems the benefits that appeared in the sensors used in the EOS 80D and EOS 5D IV have not been applied to the latest EOS 6D II, and the new camera has less dynamic range than we’ve become used to. Graphs plotted by regular DPR collaborator Bill Claff illustrate this pretty clearly. In this article, we’re taking a look at what this might mean for your images.

Dynamic range assessment

Our exposure latitude test shows what happens if you brighten a series of increasingly dark set of exposures. This illustrates what happens if you try to pull detail out of the shadows of your image.

$ (document).ready(function() { ImageComparisonWidget({“containerId”:”reviewImageComparisonWidget-9522166″,”widgetId”:542,”initialStateId”:3691}) })

As you can see, the EOS 6D II begins to look noisy much sooner than the broadly comparable Nikon D750, meaning you have less processing flexibility before noise starts to detract from your images.

The EOS 6D II should have a 1.3EV image quality advantage over the 80D, when the images are compared at the same size, since its sensor is so much bigger. Despite this, the EOS 80D’s$ (document).ready(function() { $ (“#icl-3692–1019644042”).click(function() { ImageComparisonWidgetLink(3692); }); }) images shot with the same exposures look cleaner, when brightened to the same degree. Have a look and you’ll see the difference is around 1EV$ (document).ready(function() { $ (“#icl-3693–487818319”).click(function() { ImageComparisonWidgetLink(3693); }); }), despite the head start that the 6D II’s chip should have. This corroborates what Bill Claff’s data suggests.

ISO Invariance

The downside of our exposure latitude test is that reducing the exposure also increases the noise. Our ISO Invariance test uses the same exposure shot at different ISO settings, such that the shot noise contribution is the same in each image. This way any differences must be a consequence of electronic noise (and how well the camera’s amplification overcomes it, at higher ISO settings).

$ (document).ready(function() { ImageComparisonWidget({“containerId”:”reviewImageComparisonWidget-16732339″,”widgetId”:541,”initialStateId”:null}) })

This isn’t good, especially not by modern standards. We’re used to seeing sensors that add so little noise$ (document).ready(function() { $ (“#icl-3694–1065892121”).click(function() { ImageComparisonWidgetLink(3694); }); }) that there’s barely any visual difference between shooting at a high ISO and using a low ISO (retaining additional highlights) then brightening. Instead we see that you have to amplify to around ISO 3200 before you see no additional impact from the camera’s electronics. This suggests a reversion to the level of the original EOS 6D$ (document).ready(function() { $ (“#icl-3690-1001550611”).click(function() { ImageComparisonWidgetLink(3690); }); }).

Real world impact

If you shoot JPEG, you’ll never notice any of this, since the differences occur beyond the ~8.3EV or so that tend to be incorporated into a typical image. Similarly, at higher ISO settings, amplification overcomes the electronic noise, so you see the camera begin to out-perform the 80D and then close the gap with the D750, just as Bill’s chart suggests.

However, it means if you’re processing from Raw at low ISOs, you have much less flexibility in terms of what you can do with the file than we’d expect from a modern camera. Almost as soon as you start to push the image or pull detail out of the shadows, you risk hitting the camera’s electronic noise floor and hence you won’t see the advantage over the 80D that you might reasonably expect.

Canon EOS 6D Mark II | EF 35mm F2 IS | ISO 100| F9 | 1/200th Shadows lifted, highlights lowered, slight selective brightening to couples’ faces. As you’ll see if you click to view the full-sized image, noise in the areas of lifted shadow is very apparent.

This is an extreme example but it’s a photo I’d expect to be able to shoot on other full frame cameras without revealing so much noise. All of our test results suggest I could have achieved just as good a result from a contemporary APS-C camera.

Articles: Digital Photography Review (dpreview.com)

 
Comments Off on Canon 6D Mark II dynamic range falls behind modern APS-C cameras

Posted in Uncategorized


Sony a9: all that speed appears to have dynamic range cost

18 May

The Sony a9 is a powerhouse of technology, particularly when it comes to speed and autofocus. But does its image quality stack up? We’ve taken an initial look at Raw and JPEG image quality and have come away impressed, but how does the a9 stack up in terms of dynamic range?

At the recent launch in New York City, I had a chance to shoot our standard ISO-invariance test but on a real-world scene (our studio scene isn’t so portable…). Have a look at the performance below.

$ (document).ready(function() { ImageComparisonWidget({“containerId”:”reviewImageComparisonWidget-19343974″,”widgetId”:522,”initialStateId”:null}) })

It’s immediately obvious the a9 is not ISO-invariant (what is ‘ISO-invariance’?). This means the camera is adding a fair amount of read noise that results in noisy shadows, limiting dynamic range at base ISO. That’s why, for the same focal plane exposure, performing analog amplification by increasing ISO in-camera gets you a cleaner image than performing that amplification (or brightening) in post-processing.

It’s not the typical performance we’ve come to expect from Sony sensors and we suspect the higher readout speed is leading to greater noise. In other words, it appears this sensor was likely optimized for speed at the expense of low ISO dynamic range.

This sensor was likely optimized for speed at the expense of dynamic range

Ultimately, this limits the exposure latitude of a9 Raws so, much like with older Canon DSLRs, you’ll have limited ability to expose high contrast scenes for the highlights, then tonemap* (raise) shadows in post. You can check the effect of changing the Drive mode in the widget (EFCS = electronic first curtain, S = single, C = continuous), but there’s not much difference between them.

Effect of Drive mode

There is little to no difference in base ISO dynamic range in different drive modes. So the good news is that the drop to 12-bit in continuous drive comes at no cost. The bad news is that the 14-bit Raws aren’t any better than the 12-bit ones. Click here to load the above as a widget.

As we mentioned above, there’s no difference in shadow noise as you change Drive mode. This is particularly interesting because all Single drive modes, including fully electronic, support full 14-bit Raw (we shot uncompressed). The Continuous drive modes, however, switch the sensor into a 12-bit** readout mode which, by definition, means files with no more than 12 stops of dynamic range.

This indicates that even the 14-bit Raws have at most 12 EV of dynamic range at the pixel level, placing our estimates of base ISO dynamic range almost a full stop behind the a7, and likely further behind the a7R II at equivalent viewing size (normalized).

‘Dual Gain’ helps improve high ISO dynamic range

In our widget up top, you may have noticed that noise suddenly starts increasing once you fall below ISO 640 (how’s that for sounding completely back-to-front?). Below you’ll see this more clearly: shadow noise dramatically clears up as you go from an ISO 500 image (with a 3.7 EV push) to an ISO 640 image (with 3.3 EV push):

$ (document).ready(function() { ImageComparisonWidget({“containerId”:”reviewImageComparisonWidget-12344692″,”widgetId”:521,”initialStateId”:null}) })

Things clean up at ISO 640 (as with the a7R II) because of the sensor’s ‘dual gain’ architecture, where the camera increases the conversion gain (effectively amplification) at the pixel-level during readout, helping overcome the camera’s relatively high (for a Sony design) read noise.

Above ISO 640, the camera is fairly ISO-invariant, since it’s overcome most of its downstream read noise, but there’s still some benefit to increasing ISO to keep noise levels low if your scene demands it. Below ISO 640, the lower conversion gain means that you’ll start to see read noise if you push shadows.

Take home

The good news is that those worried about the camera dropping to 12-bit readout in continuous shooting needn’t worry: there’s no decrease in quality, since a 12 bit file can contain all its dynamic range. The bad news is that this is because the a9 doesn’t appear to have more than 12 EV pixel-level dynamic range to begin with, putting its base ISO dynamic range well behind that of the a7R II. By high ISO, general image quality catches up as the higher downstream read noise is overcome by the sensor’s (similar to the a7R II) dual gain architecture. Take a look at this ISO 51,200 comparison with the a7R II:

ISO 51,200 comparison of a7R II vs a9. Not much difference at all. In fact, normalized signal:noise ratio (SNR) measurements place the two neck-to-neck: 1.82 vs. 1.48 for the a7R II and a9 at the dark patches here, respectively. At ISO 25,600, the normalized SNR is exactly the same.

This means that if you’re shooting in conditions demanding high ISO, for any given focal plane exposure you may wish to at least increase in-camera amplification to ISO 640 to get most tones above the noise floor, if your scene demands the extra amplification to get a usable image. Dropping below ISO 640 to preserve highlights, and then raising shadows afterwards, will come at a greater noise cost than, say, Sony’s own a7R II.

Interestingly, this means there’s little advantage to those large (47MB) uncompressed 14-bit Raw files, save for the lack of compression artifacts. In a perfect world, Sony would have offered a 12-bit Raw mode with a lossless compression curve (without that second stage of localized compression that leads to edge artifacts) for smaller file sizes with minimal loss in quality.


Footnotes:

* There’s a very specific reason I like to use the word ‘tonemap’ instead of ‘raise the shadows’. We’re forced to raise shadows of high contrast Raw files exposed for the highlights today because of the limited brightness of most current displays. Future displays capable of far higher brightnesses (perhaps even ten-fold) will need less shadow pushing, or tone-mapping, to make visible what you currently see as ‘shadows’ in such traditionally underexposed Raw files. For example, shadows you currently push +4 EV will likely be visible without any pushing at all on a 4,000 nit-capable display. 

** We confirmed that continuous modes were in fact 12-bit, while single modes were in fact 14-bit, by comparing histograms of respective Raw files. The 14-bit single drive files do, in fact, have 14-bits of data compared to the 12-bit files (the histogram shows the latter missing levels 1, 2, and 3, in between 0 and 4, but the 14-bit files do have pixels with these values).

Articles: Digital Photography Review (dpreview.com)

 
Comments Off on Sony a9: all that speed appears to have dynamic range cost

Posted in Uncategorized


How to Create a Dynamic Zoom Burst Photograph

11 Jan

Who doesn’t love warp speed? In this article, you’ll go hurtling into the future at warp speed nine, and you don’t need any federation star fleet spaceships to do it! A DSLR camera with a zoom lens and a tripod is the only equipment you’re going to need for this exciting technique. There are similarities to light painting by camera rotation, and the zoom burst is indeed another form of kinetic light painting. Let’s take a look at this technique, what it will give to your photos, and how to do it.

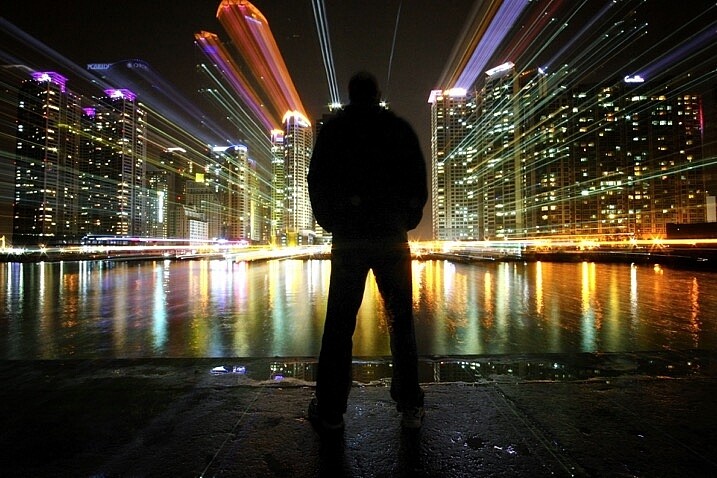
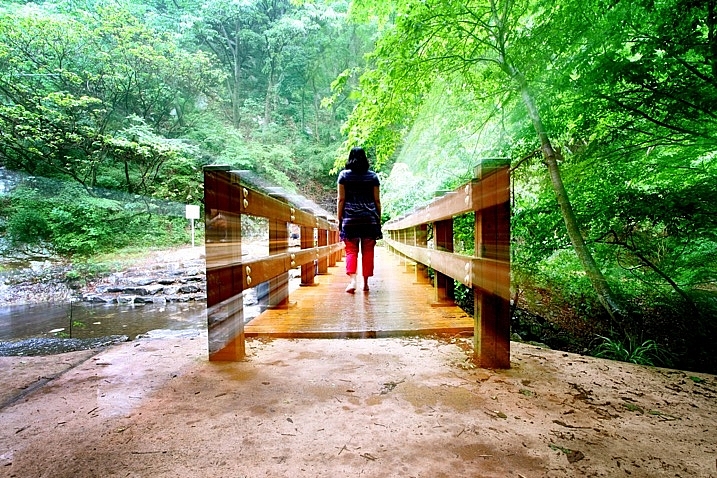
zoom burst photo cityscape

In this photo, a friend stood still in front of Marine iCty in Busan.

What does this technique add to your photograph?

Put simply, this gives a still frame a much more dynamic edge. This article will look at how you can apply zoom bursting to architectural photos and is best used in an urban environment. The nature of still frames is of course that they’re a single moment, by changing the focal length during long exposure you can add movement and urgency to your frame. The zoom also produces leading lines within your frame that all lead up to your main subject within the frame.

How to take zoom burst photographs

Taking a zoom burst photo is a simple technique, in fact, you can even do this handheld. The effect is achieved by changing the focal length of your camera lens during a long exposure. Follow these steps:

  1. Choose a scene that has mixed areas of light. You can use a forest with mottled light, or an apartment building where some lights are on and some are off.
  2. The exposure should be between half a second and 2 seconds long.
  3. You can take this photo handheld but it’s better to use a tripod.
  4. Change the focal length of the lens during the exposure. Zooming out tends to work better during the night for longer exposures, and zooming in works better during the day.
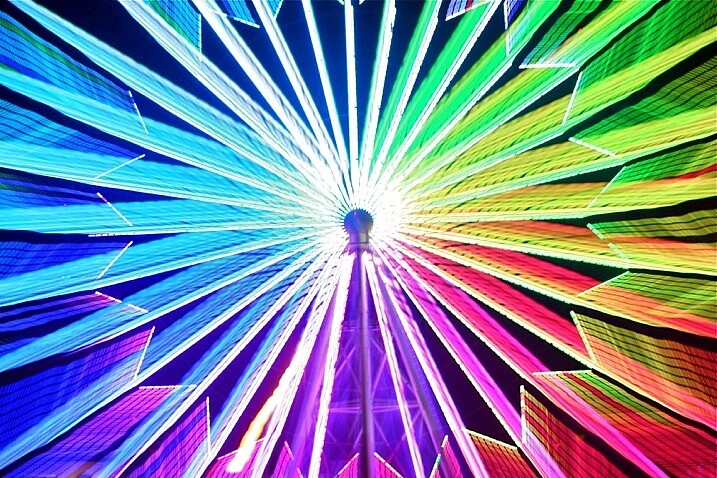
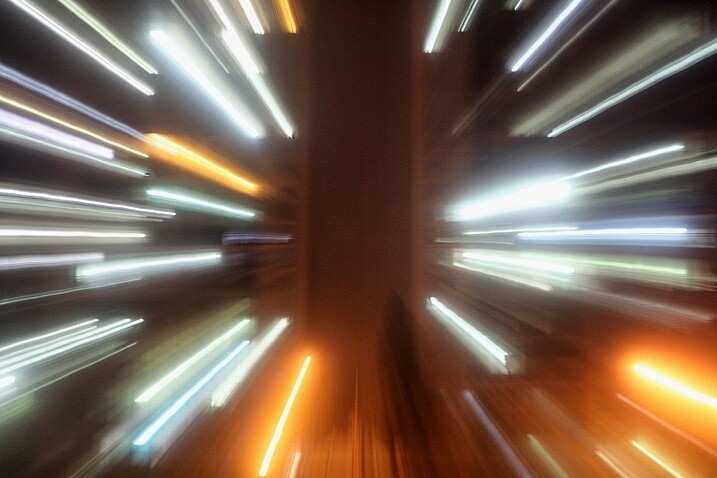
zoom burst lights

A photo that uses zoom with no stationary phase. This photo is colorful and abstract.

How to take zoom burst photos that show structures

Now that you know how to make a simple zoom burst, which looks abstract in nature, it’s time to move a step further. Now you are going to see how you can introduce architectural structures into this frame.

1 – Choose the correct location

Not all locations work well for zoom bursts, especially if they’re too cluttered. You need to choose a building that’s well lit and not surrounded by others. There are other options you can look at as well such as Ferris wheels or sculptures. Any location you choose should allow you to zoom into the structure, and then zoom out on the lights that surround it.

zoom burst too many buildings

When there are too many building in the frame, the zoom burst shot can get busy.

2 – Set the camera on a tripod

If this is going to be a long exposure of 25 or 30 seconds, you will have to use a tripod. You need to secure the tripod in position, making sure it doesn’t move about. A lot of tripods let you hook your camera bag to the extendable center, doing so will steady the tripod. Apply the same logic you would use to attain a sharp image. The focal length movement of the lens will prevent you getting maximum sharpness, though.

3 – Select the right lens

The best lens for this type of photo is a super zoom, one that goes from 18mm-300mm. A super-zoom gives you maximum flexibility over composition and allows for more creative photographs. If you don’t have a zoom with this kind of range, you can use a kit lens. The 18-55mm lens works very well for the zoom burst.

4 – Focus the camera using Live View

Now compose your photograph in the position you intend to finish your zoom burst. The final composition will be at the wider or widest end of your lenses focal length. Turn the camera’s Live View function on, and zoom into the central structure you wish to focus on. Use the lens’s manual focus so that the image on the Live View screen is sharp. Keep the camera lens in manual focus to prevent loss of focus during the exposure. Keep a mental note of the focal length where you focused, especially if that isn’t the widest part of the lens.

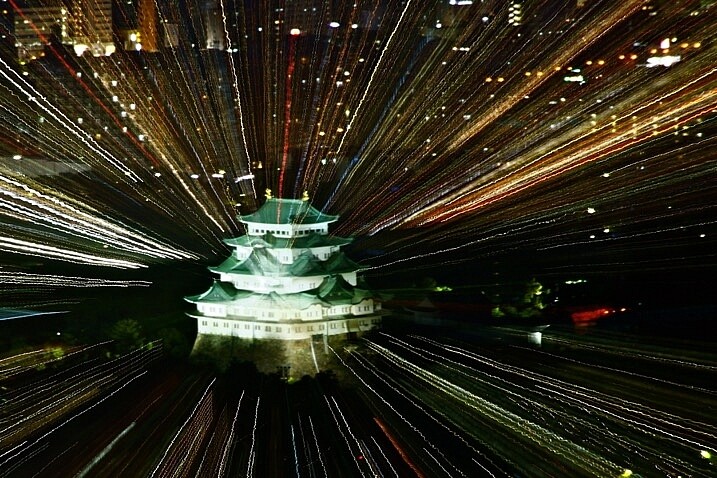
castle zoom burst photo

In this photo, Nagoya castle was focused on using a zoom. I zoomed into the castle.

5 – Zoom into the target area

Select the area of the scene you want to have as the center of your zoom, this should have been decided already during initial scene composition. Ensure that all your settings remain the same, as this is the final step before you begin the exposure. Set the camera to expose for 25-30 seconds, at f/8 or f/11. You can use a smaller aperture if you need to in order to get a longer exposure.

6 – Carry out the zoom burst

Set the camera to the 2-second timer (or 10 seconds if you want to prepare yourself for the zoom). Hit the shutter button to begin the countdown to the exposure. At the point when the shutter is about to open begin slowly zooming out. As the camera is exposing, continue to zoom out keeping it as smooth as possible to avoid camera shake.

You should be zooming out for between two and five seconds, the longer the zoom is the more pronounced the light trails will be in the image. As you zoom keep an eye on the focal length of the lens so you finish at your composed position.

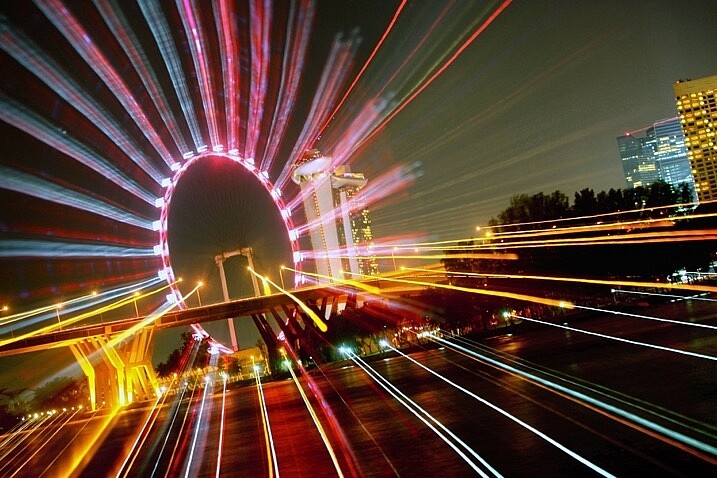
The ferris wheel is a great subject for zoom bursts. The middle is empty, and there is a ring of light to zoom out.

The Ferris wheel is a great subject for zoom bursts. The middle is empty, and there is a ring of light to zoom out.

7 – Allow the camera to finish the exposure

Once you have finished the zoom remove your hand from the lens, without moving the camera. The camera will continue to expose for 20-25 seconds depending on the exposure time you used. The image will now show zoom burst lights and architectural structures in the same exposure.

8 – Carry out post-processing work on the photo

The result in-camera will look nice, but adding contrast in post-processing is important. The image has “lost” five seconds of exposure time, so adjusting the contrast helps. You can use NIK color efex, which has a filter called pro-contrast and is an excellent choice for this type of photo. The centered position of the zoom can’t be adjusted in camera, though cropping the photo in post-processing allows you to move the zoom to an off-center position.

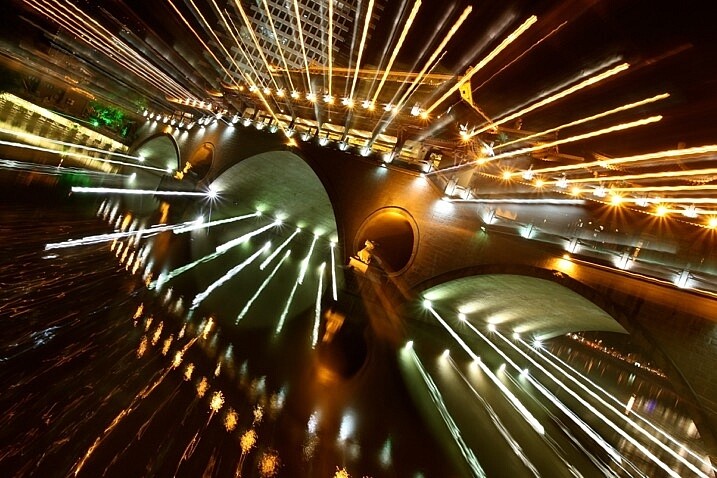
The bridge lit with many lights is a good subject for a zoom burst.

The bridge lit with many lights is a good subject for a zoom burst.

Where should I go to take zoom bursts?

The best place to take this type of photograph is in a city, one that’s well lit, and has interesting architecture. A Ferris wheel is a great structure to use as it’s circular, which helps with the centered nature of the zoom burst. Other architecture can also work as long as it’s alone and not surrounded by other structures. A cityscape with many buildings can look too busy with too many light streaks in one frame.

You can even take zoom burst photos during the day, but you will need an ND filter to do this. An ND filter that allows you to shoot for 30 seconds will allow you to create a zoom burst using the steps listed above, though the zoom should last longer.

img_2957

I look forward to seeing your photos using this zoom burst technique, please post any images you have in the comments section below.

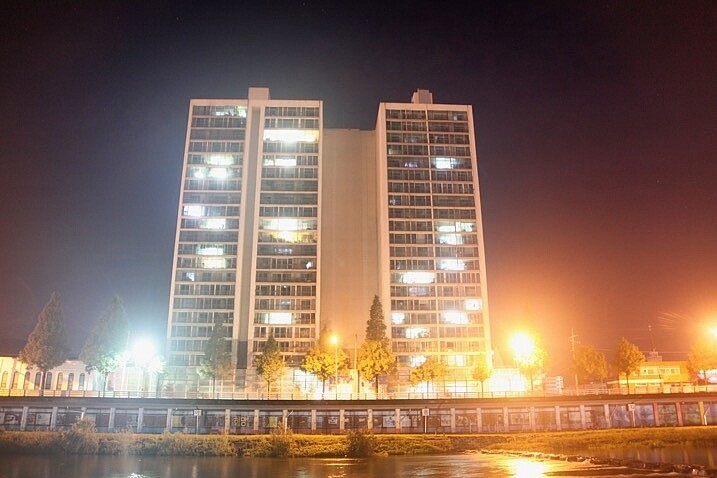
This is a good example of a lone building with lights on.

This is a good example of a lone building with lights on.

In this photo only zoom is used, there is no stationary phase.

In this photo only zoom was used, there was no stationary phase.

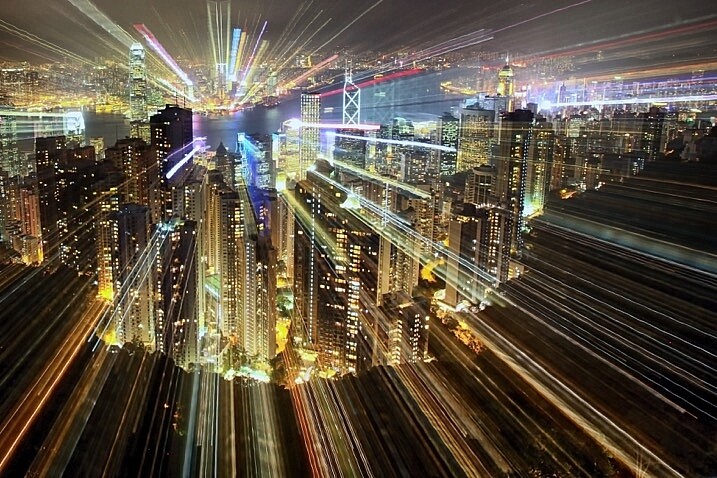
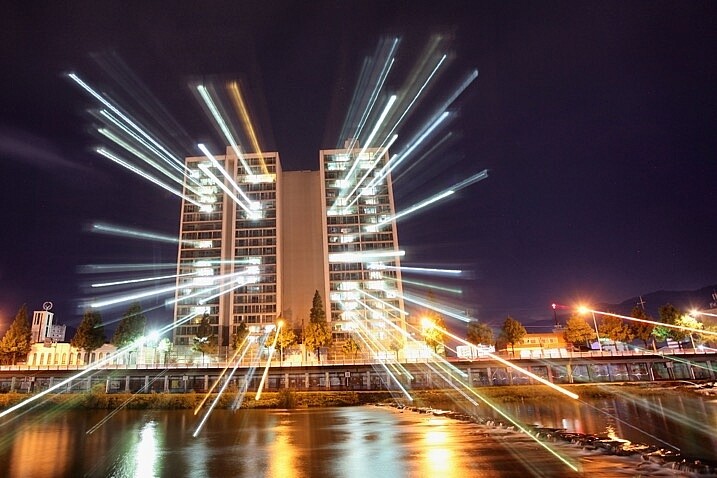
This photo shows how a zoom burst and static phase produces an image.

This photo shows how a zoom burst and static phase produces an image combining light streaks and architecture.

googletag.cmd.push(function() {
tablet_slots.push( googletag.defineSlot( “/1005424/_dPSv4_tab-all-article-bottom_(300×250)”, [300, 250], “pb-ad-78623” ).addService( googletag.pubads() ) ); } );

googletag.cmd.push(function() {
mobile_slots.push( googletag.defineSlot( “/1005424/_dPSv4_mob-all-article-bottom_(300×250)”, [300, 250], “pb-ad-78158” ).addService( googletag.pubads() ) ); } );

The post How to Create a Dynamic Zoom Burst Photograph by Simon Bond appeared first on Digital Photography School.


Digital Photography School

 
Comments Off on How to Create a Dynamic Zoom Burst Photograph

Posted in Photography


Stark contrast: how your camera copes with dynamic range capture

09 Nov

Managing dynamic range is challenging. There are few things more disappointing than looking through the viewfinder of a DSLR at a colorful, vibrant scene, hitting the shutter then glancing at the rear screen only to see a JPEG image with clipped highlights, crushed blacks, or both.

Dynamic range limitations can catch you out at the most unexpected moments. In this instance, the yellow leaf is catching the light, clipping the green channel and meaning that its color is misrepresented.

There are two challenges that the camera faces: picking a tone curve that can include a wide range of the tones in the final image and choosing an exposure that captures this wide range of tones. As you might expect, all in-camera DR modes aim to address one or both of these issues.

The first challenge comes because cameras tend to use a single, fixed JPEG tone curve designed to make most images look attractively punchy when they’re viewed on the relatively low dynamic range of most monitors or prints. High contrast scenes can extend beyond the range of tones squeezed into these images, which results in the darker tones in your image crushed to black and your highlights being clipped, if you try to expose the mid tones of your image correctly.

Much of the problem is caused by the camera’s tone curve: a system that maps the brightness of tones captured in the Raw file to the brightness levels used in the final image.*1

Why don’t camera makers just use a lower-contrast tone curves? Because, although a flatter tone curve would make it easier to include the extra tones in high-contrast scenes, they’d leave the rest of your images looking drab and flat.

The second challenge comes from from the tension between choosing a short/dark exposure to retain highlight information and a long/bright exposure to capture the most light to keep noise levels low.

With time, patience and a relatively modern camera it’s possible to bracket a few shots to ensure you capture a Raw file with the highlights you want preserved, which you can then carefully process to pull the detail out of the shadows – effectively creating a tone curve customized to that specific image.

DR compression modes

But not every photographer has the time, knowledge or the inclination to do this. So most manufacturers include some sort of mode to capture and compress the wide dynamic range of high contrast scenes into attractive images.

There are two main methods of doing this. One is to use a different tone curve to brighten up dark tones in the scene, and prevent blacks clipping so readily in high contrast scenes. The other is to capture or retain more highlight information and use a tone curve that incorporates these additional highlight tones.

The best solutions do a bit of both.

Method 1: Adaptive tone curves

Canon Auto Lighting Optimizer Nikon Active D-Lighting
Olympus Auto Gradation Pentax Shadow Adjustment
Sony Dynamic Range Optimizer Panasonic iDynamic

Adaptive tone curves are used to expand the range of tones in an image beyond the ones that a standard tone curve would include. They do this by selectively brightening up what would otherwise be the shadow and deep shadow regions of the image.

Many of these are based on the work of a company called Apical, whose algorithm increases the breadth of tones in the image (lowering overall contrast) by analysing each part of the image and brightening the shadows while working to preserve local contrast, so the overall image doesn’t look flat.

To demonstrate how this works, we’re going to use the tone flow diagrams we used in our articles about noise sources. These show the effect of changes in exposure, amplification and tone curve between the scene and the final image. Each element that changes is highlighted in red on the right-hand side of the diagram as you roll your mouse over the different states.

Default Exposure


Default Exposure with adaptive tone curve


Because the darker tones in an image are made up from less light, their signal-to-noise ratios are worse: they look noisier. Brightening them up makes it easier to see this noise, so DR compression modes of this type generally work best on larger sensor cameras and exposures that capture enough light to keep the quality high.

Other than revealing a little more noise in the shadows, adaptive tone curves themselves only affect the JPEG, not the Raw – they are just selectively applying a different tone curve (or, better still, a localized, context-specific tone response) to incorporate or emphasize more of the tones your camera captured.

Method 2: Capturing or retaining more highlight information

Canon Highlight Tone Priority Fujifilm Dynamic Range
Pentax Highlight Adjustment Ricoh Dynamic Range Correction

The other type of DR Compression method involves trying to capture a different set of tones, which usually means changing the exposure. Or, at least, changing which tones are captured and which are retained in the Raw file. This does change the Raw file.

The most basic of these systems change the exposure/amplification relationship of the camera. To understand what this means, it’s important to understand that final image brightness is made up of four components:

  • Illumination level of the scene
  • Exposure (Shutter speed and aperture)
  • Hardware amplification
  • Image tone curve (either in the camera or when processing the Raw file)

The ISO standard allows any combination hardware and software (tone curve) amplification, so long as the scene illumination and exposure give you the expected JPEG brightness*2. This means that there’s no fixed relationship between exposure, hardware amplification and final image brightness.

So, for instance, the camera can intentionally use a lower-than-usual level of amplification with your exposure so that highlight detail isn’t amplified beyond clipping, then use a different tone curve that retains these highlights. Such a tone curve would also pull its mid tones from deeper down the Raw file than in standard mode.*3

Default Exposure


DR Mode (Default Exposure –1EV with flatter tone curve to retain highlights)


The dead give away that your camera is doing this is a jump in the minimum available ISO when you engage DR mode. Because the base ISO setting is already using the lowest level of amplification, you can’t have a lowered amplification/exposure relationship until you use a shorter exposure (higher ISO).

This pattern becomes more obvious if you look at the Fujifilm ‘Dynamic Range’ system, which, with its three DR settings (DR100, DR200 and DR400) offers three*4 distinct balances of exposure and amplification. This table shows a simplification of the amplification level being applied in the different DRng modes at each available ISO setting:

  DR100 DR200 DR400

ISO 200
exposure

1X

ISO 400
exposure

2X 1X
ISO 800
exposure
4X 2X 1X
ISO 1600
exposure
8X 4X 2X
This table shows a simplification of the amplification level being applied at each DR mode and ISO setting.

Using this method the DR modes do result in different Raw files. In the example above, the two files have different exposures, so the Raw data is different. In the example below, where both shots have the same exposure, the DR200 shot has been amplified less than the DR100 shot, so contains more highlight information.*5

ISO 400  DR100 (Note the extra highlights captured with the reduced exposure are clipped by the 2X amplification)


ISO 400 DR200 (Same exposure but less amplification. A revised tone curve incorporates the extra highlight detail)


With modern sensors that add very little read noise to their images, there’s little or no noise cost to using lower amplification levels and then using a tone curve to make up for it. The only noise differences occur if you’re shooting in bright light and you choose to switch from using DR100 mode at base ISO to DR200 mode and have to use an ISO 400 exposure. In this instance it’s the shorter exposure that’s adding the noise, not the different way of using the sensor.

Adaptive exposure and tone curve

The final method is essentially a combination of the two techniques: reduced exposure/amplification and an adaptive tone curve.

Panasonic’s iDynamic and Olympus’ Auto Gradation modes will both reduce exposure by a 1/3EV or so to capture some additional highlights, then use an adaptive tone curve to brighten the shadows and as well as adding highlights. But it’s probably Nikon’s Active D-Lighting system that does the best job of this. It combines up to a 1EV exposure reduction with an adaptive tone curve to give well balanced JPEGs even in high contrast situations.

Short of providing the tools that would allow photographers to reliably expose to the right, these DR compression modes provide a really useful means of accessing the impressive capabilities of modern sensors, whether you know how they work or not.


Footnotes

*1 Technically it’s actually a combination of a gamma curve that converts the Raw file’s linear brightness response into sometime more closely matching the human eye’s response, to make better use of the file’s bit depth plus the effect of the tone curve added to make the image look more punchy.

*2 Strictly speaking it no longer even guarantees this: the REI section of the standard only requires that the camera gives what the manufacturer believes to be an appropriate image brightness.

*3 To an extent, this is what many manufacturers already do in their standard JPEGs: use lower amplification and a more highlight-weighted tone curve than historically required, to capture and retain more highlight information. This creates a discrepancy between the ISO rating and the result of Raw saturation testing – as conducted by DxOMark.

*4 You could argue that Fujifilm actually offers four levels of exposure/amplification: their camera’s extended ‘ISO 100’ mode is based on the same amplification as DR100’s ISO 200 mode, but with less highlight capture. In many respects it’s a DR50 mode.

*5 Even though the DR200 and DR100 images have received different amounts of amplification, and hence have different Raw files, the use of different tone curves for each DR mode means that the JPEGs appear with the same parts of the scene rendered as middle gray. As such they’re both considered to have been shot at the same ISO.

Articles: Digital Photography Review (dpreview.com)

 
Comments Off on Stark contrast: how your camera copes with dynamic range capture

Posted in Uncategorized


BenQ announces 32″ 4K high dynamic range monitor

12 Oct

BenQ America will be showing its new 32″ 4K UHD high dynamic range monitor at PhotoPlus Expo later this month. The wide gamut SW320 offers 99% Adobe RGB and 100% sRGB/Rec. 709 color space coverage, and 10-bit panels should ensure smooth gradients. The display has built-in tools that integrate with color calibrators, allowing them to access the 14-bit internal LUT for more accurate calibration (compared to adjusting the – typically – 8-bit video card output.) These are some very high-end features that discerning photographers are sure to appreciate.

What separates the SW320 from the SW2700PT (aside from size) is its support for high dynamic range input. We’ve reached out to BenQ for further comment on what the capabilities of this monitor are with respect to HDR, but our hopes are that the HDR certification means a higher static contrast ratio than the SW2700PT (which sports 1000:1 contrast, typical of IPS panels), and perhaps greater brightness as well. This will be important to content creators generating photos/videos for HDR displays, and also makes content consumption far more pleasing than one may be used to on IPS displays.

For video pros, BenQ will also be displaying its PV270, a 27″ Technicolor Color Certified 4K UHD monitor, which offers 10-bit panels with 100% Rec. 709 and sRGB color space coverage, albeit considerably less coverage of Adobe RGB than the SW320 or SW2700PT (the PV270 is technically not a ‘wide gamut’ monitor).

The SW and PV lines of monitors from BenQ are excellent for color critical work, as they are capable of reproducing color tones with Delta-E values ? 2, and have addressable 14-bit internal 3D LUTs for accurate color calibration.

Both monitors will be available in January. Pricing has not been disclosed.

Press Release:

BenQ Fuels the Creative Process With New Professional Monitors at PhotoPlus Expo 2016

Company Unveils Full Line of Professional Displays Designed to Maximize Workflow Efficiency

COSTA MESA, Calif. — Oct. 10, 2016 — BenQ America Corp., a leading innovator of professional displays, today announced it will showcase its Creative Series monitors for the first time at PhotoPlus Expo 2016, Oct. 20-22 at the Javits Convention Center in New York. The new lineup will be on display for photographers, video post-production pros, graphic designers, CAD/CAM specialists and other creative professionals at BenQ’s booth 1169.

“Our Creative Series monitors provide professionals with the color accuracy and efficiency that’s essential to their creative process,” said J.Y. Hu, vice president, business line management at BenQ America Corp. “At PhotoPlus, attendees will get a sneak peek of our new monitors and learn how they improve image visualization. They will also have an opportunity to participate in daily giveaways and hear a special session from polar wildlife photographer Joshua Holko.”

For photography professionals, BenQ will showcase its 32-inch SW320 4K UHD high dynamic range (HDR) monitor along with the award-winning 27-inch SW2700PT QHD display, TiPA’s Best Photo Monitor of 2016. Both the SW320 and SW2700PT offer 99-percent Adobe RGB, 100-percent sRGB and Rec. 709 spaces to deliver the most accurate color reproduction with the aid of easy-to-use tools for hardware calibration. The SW Series photography monitors offer unparalleled technology and have been built to reproduce images with the same precise detail in which they are captured, delivering true-to-life image quality.

Video post-production professionals will have a chance to experience the new Technicolor® Color Certified 27-inch QHD PV270 and the 32-inch PV3200PT 4K UHD monitors. With 10-bit 100-percent Rec. 709/sRGB color spaces, the PV Series video post-production monitors allow professionals to enjoy over 1 billion accurately displayed colors in accordance with the highest industry standards. All SW and PV Series color management monitors offer maximum color precision and reproduce color tones with a Delta-E value of less than or equal to two. A 14-bit 3D LUT achieves the most accurate color mixture for improved RGB color blending, resulting in impeccable color and gray tone reproduction.

For graphic design creatives, the Technicolor Color-Certified PD3200U and PD2700Q are packed with robust features to maximize workflow efficiency. Showing for the first time, the 32-inch PD3200U offers exceptional 4K ultra-high-definition resolution, while the now available 27-inch PD2700Q displays rich graphics at 2K QHD resolution. A 32-inch QHD version (PD3200Q) is also planned for release in Jan. 2017. Each of the creative canvases features 10-bit depths of color, 100-percent sRGB and Rec. 709 to represent a wider range of more than 1 billion colors. These panels expand the working space and offer a wider viewing angle (178 degrees in both horizontal and vertical planes) with crystal-clear clarity at all angles. Three premium display modes are tailor-made for designers to easily configure settings to best fit their preferences, including a Dark Room mode for dimmed environments, a CAD/CAM mode for superior image contrast and an Animation mode providing 10 levels of display brightness to enhance details in dark shadows. Furthering workflow optimization, each monitor offers DualView capabilities that allow users to divide the monitor for side-by-side window viewing. Designers can also take application window multitasking to the next level with BenQ’s optional Display Pilot software, which provides enhanced desktop partition for multi-application viewing.

In addition, attendees who stop by the BenQ booth 1169 can participate in daily giveaways and hear a special session from polar wildlife photographer Joshua Holko. He will be speaking about his remarkable expeditions and wildlife work on Oct. 21 and Oct. 22 at 2 p.m. Giveaways include a chance to win the new SW320 photography monitor and an opportunity to learn photo shoot techniques directly from expert wedding photographer Art Suwansang in California.

Centered on BenQ’s commitment to offer purpose-built monitors for creative professionals, each of these displays adds incredible value with features that speed up the creative process and increase visual comfort through BenQ’s leading Eye-Care technology. The SW2700PT, PV3200PT and PD2700Q monitors will be available for purchase during PhotoPlus Expo 2016, while the new PD3200U, PD3200Q PV270 and SW320 will release in Jan. 2017.

More information on the robust BenQ Creative Series monitor lineup is available at www.BenQ.us.

Articles: Digital Photography Review (dpreview.com)

 
Comments Off on BenQ announces 32″ 4K high dynamic range monitor

Posted in Uncategorized