RSS
 

Posts Tagged ‘Dreamy’

How to Photograph Long Exposures to Create Dreamy Images

02 Jun

The post How to Photograph Long Exposures to Create Dreamy Images appeared first on Digital Photography School. It was authored by Jeremy Flint.

dps-how-to-photograph-long-exposures

Many new photographers may not know how to photograph long exposures, or even what that means to their photography. Thanks to the development of camera accessories and filters, capturing long exposures is becoming a very popular medium of photography for enthusiast photographers.

Long exposure photography is a technique used by many landscape, cityscape and seascape photographers. Have you ever seen a picture of the city where clouds show motion, the car lights have been made streaky or the seawater is rendered blurry? Well this will usually be the result of using a filter to achieve a long exposure that captures the movement of the subject.

how to photograph long exposures
This long exposure has allowed the waves to soften. Illheus da Janella © Jeremy Flint
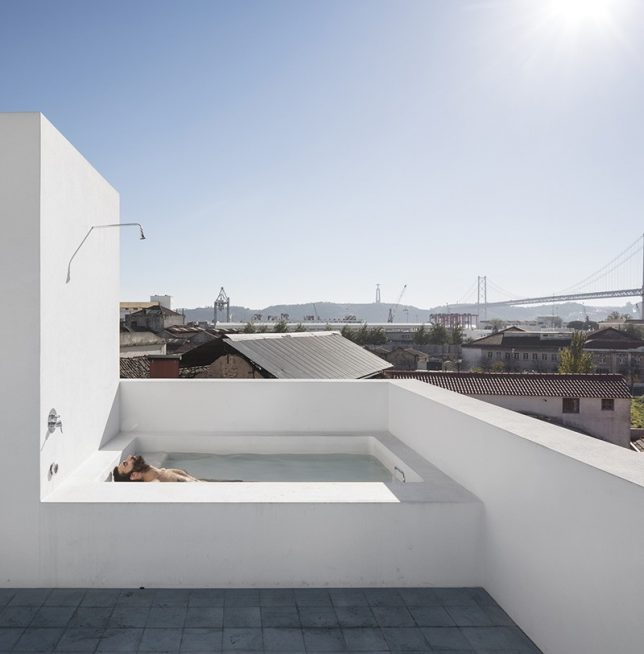
Canon 5DSR, EF24-70 f2.8 USM II | 30sec f/11 ISO 100

Before we look at how to photograph long exposures, it is first worth considering the meaning of a long exposure, and the different types of photography you can apply the method to.

A long exposure is “a timed exposure of a long duration where the shutter is open for a speed of several seconds where the purpose and aim of long exposures is to sharply capture and minimize movement of static objects within the frame whilst blurring the elements with motion.”

Samples of long exposure photography

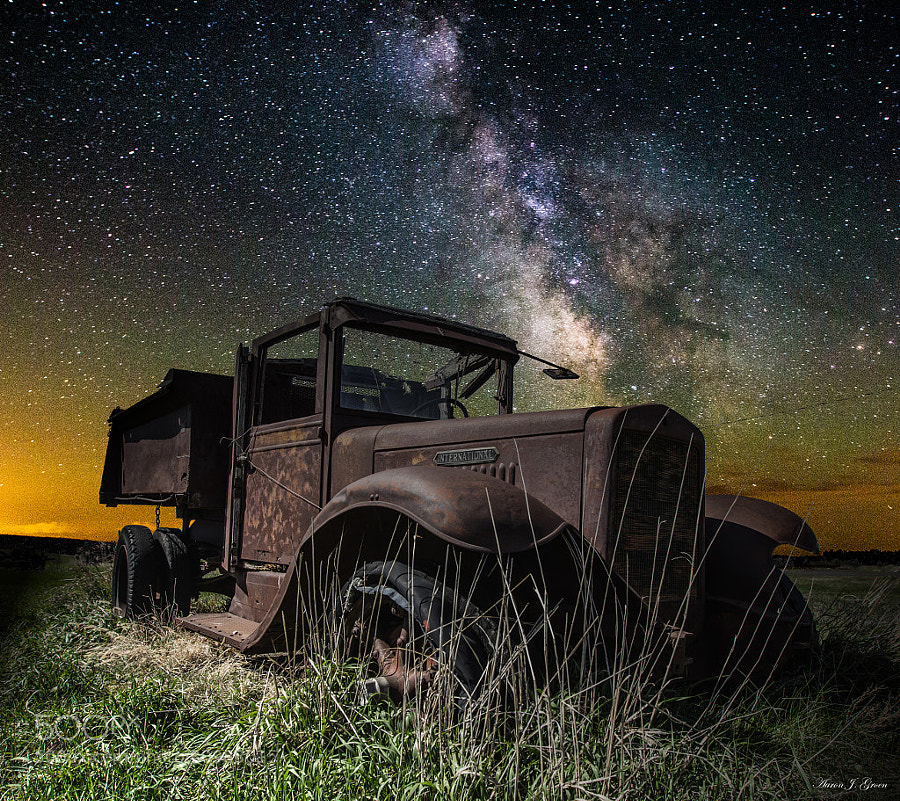
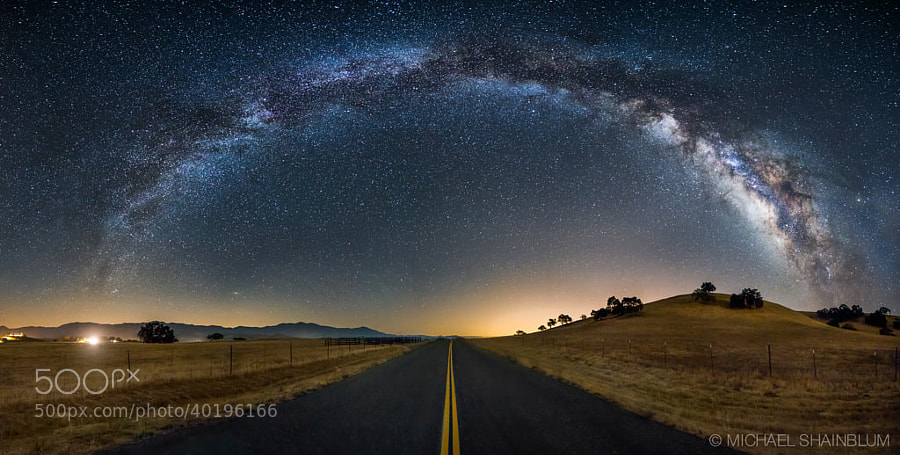
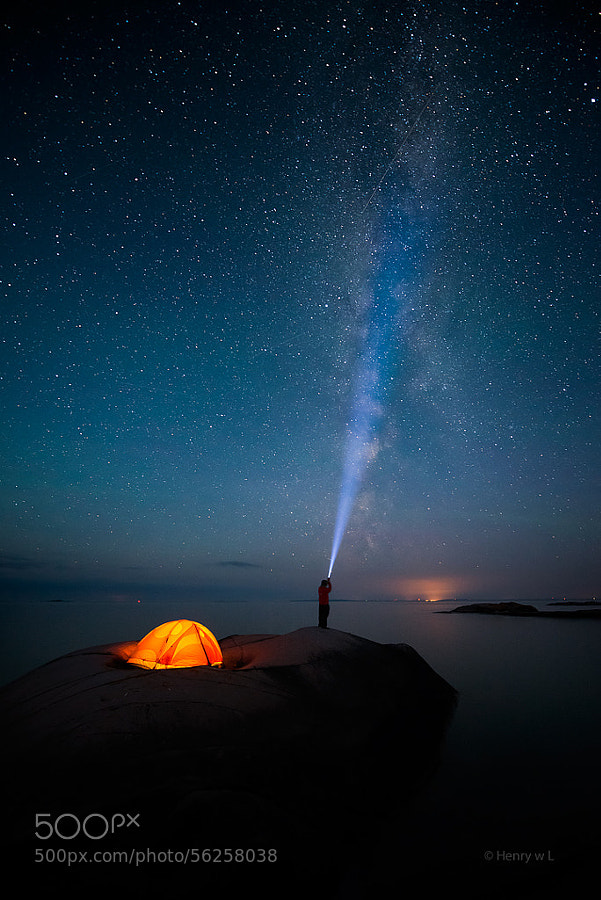
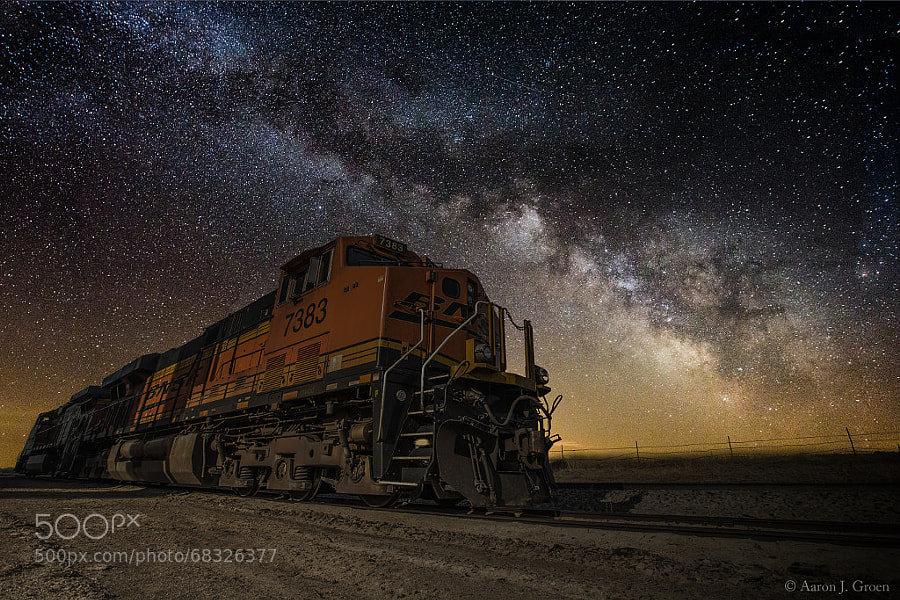
There are a variety of different styles of photography where using long exposure photography techniques can result in great images. Some examples of popular subjects include landscapes, cityscapes, seascapes, astrophotography (such as creating star trails), street scenes, and even abstract scenes.

Applying the technique of long exposure photography to landscape scenes can be a great way to create drama in skies or foregrounds with moving clouds or foliage.

Shooting water with long exposures can also benefit your images. Capturing moving water can bring an ethereal look and feel to seascapes as waves break or crash. Using a long exposure, you can capture the swell of the ocean or motion of tides for dreamy-looking images.

How to achieve long exposures

When considering how to photograph long exposures,
you will initially need to think about the kit that you will require, how to
set this up and the steps to capturing your image.

How to Photograph Long Exposures to Create Dreamy Images
The Lee Big and Little Stopper Neutral Density (ND) Filters are great for long exposure photography.

Kit required

A tripod is an essential piece of equipment to enable your camera to remain still during the image capture time when the shutter is open.

Next, you will need a cable release, or wireless remote so you can start and stop the long exposure. Please note this is only required if you need to extend your exposure time beyond 30 seconds. If you shoot below 30 seconds your cameras self-timer will be sufficient to trigger and close the shutter.

A filter holder is another essential item that is required to achieve long exposures. These are used to hold the filters in place that will be used to slow the exposure time down. 

how to photograph long exposures
The filter holder with the Lee 6-stop ND Filter attached to the camera.

With regard to using filters, neutral density (ND) filters are recommended to minimize the light entering your camera.

These vary in strength and the effect they can create. The darker the coating, the greater the number of stops of light and the stronger the filter will be. For example, a 10-stop filter will block out more light than a 3-stop or 6-stop filter, and enable you to achieve longer exposures. Examples of these filters include Lee Filters Big Stopper (10-stop) and Little Stopper (6-stop).

how to photograph long exposures
St Nectain’s Glen waterfall, Cornwall, England
Canon 5DSR, EF24-70 f2.8 USM II | 1.5sec f/4.5 ISO 100

Leaving your shutter open for an extended amount of time can result in some really interesting shots. With this shot of a waterfall, I wanted to make the water more blurry, so I set the camera up on my tripod and photographed it using an ND filter and a longer exposure. By increasing the exposure time, you can see I have been able to create a milky, smooth effect on the water, giving a pleasing result to the image.

Set Up

Once you have found a composition you like, you will need to place your camera on the tripod, attach your cable release and affix your filter holder. Next, focus the camera manually (using the MF button on the side of your camera) before putting the filter in place.

How to Photograph Long Exposures to Create Dreamy Images
Ponta do Rosto, Madeira
Canon 5D Mk IV, EF16-35 f2.8L III USM | 241sec f/11 ISO 100

Steps to photographing long exposures

Once your kit is set up, here are some simple steps on how to photograph long exposures using the equipment mentioned above to achieve sharper images.

1. Bulb mode

Arrange your camera so that you are shooting in bulb mode. This allows you to keep the shutter button open for longer. It will stay open as long as you hold it open.

2. Set your aperture and ISO

I recommend setting a small aperture of over f/8 to f/22. The larger the f/number the longer the exposure you can achieve and a low ISO of 100.

3. Exposure times

Depending on the strength of the ND filter you are using, your exposure time will change. Based on an initial exposure time of ½ second using a 6-stop filter, you will need to shoot for 30 seconds or 8 minutes using a 10-stop filter, for example.

how to photograph long exposures
Land’s End, Cornwall, England
Canon 5DSR, EF16-35 f2.8L III USM | 1.5sec f/4.5 ISO 100

Press the self-remote timer and lock the shutter open
or if you are using the cameras self-timer press the shutter button gently on
the camera. When you are ready to close the shutter unlock the cable release
(if you are using the self-timer the image will finish by itself).

4. Extra tips

If you are using a DSLR, it is also a good idea to use your mirror lock-up so that the mirror going up and down during your exposure doesn’t cause camera shake. Also, be sure to cover the back of the viewfinder to prevent light from entering and potentially ruining your pictures during the exposure. Many cameras have a little rubber cap that comes attached to the camera strap, to cover your viewfinder. That will stop any light leaking through.

Conclusion

In summary, shooting long exposures is a great technique you can use to enhance landscapes, seascapes and images of water where movement is added to the image by extending the exposure time.

When you are looking at how to photograph long exposures, be sure to get the right kit for the job such as a tripod, filter holder, ND filter and a cable release. Remember to follow the steps required above to capture your long exposures, and share the images you take with us below. It will be great to see what you capture.

If you want to go deeper into long exposures, see this article by DPS writer, Rick Ohnsman.

The post How to Photograph Long Exposures to Create Dreamy Images appeared first on Digital Photography School. It was authored by Jeremy Flint.


Digital Photography School

 
Comments Off on How to Photograph Long Exposures to Create Dreamy Images

Posted in Photography


Lensbaby releases the ‘Velvet 28,’ a wide-angle prime with ‘dreamy’ bokeh

23 Apr

Lensbaby has made available its latest lens, the Velvet 28. As the name suggests, it’s a 28mm F2.5 lens is a wide-angle lens available for a slew of full-frame and APS-C camera systems.

Like other focal lengths in its ‘Velvet’ lineup, the 28mm lens adds a ‘velvety glow’ to images when shot wide open. As the lens is stopped down, the effect becomes less pronounced. The lens is constructed of eight elements in seven groups, features a 12-blade aperture diaphragm, uses a 67mm front filter thread and also can also capture 1:2 ratio macro photos, with a minimum focusing distance of 14cm (5.5”).

Below is a sample gallery of images, provided by Lensbaby:

$ (document).ready(function() { SampleGalleryV2({“containerId”:”embeddedSampleGallery_1740231162″,”galleryId”:”1740231162″,”isEmbeddedWidget”:true,”selectedImageIndex”:0,”isMobile”:false}) });

The lens is offered in Canon EF, Canon RF, Fujifilm X, Micro Four Thirds, Nikon F, Nikon Z and Sony E mounts. While the dimensions and weight does differ slightly from mount to mount, it weighs roughly 600g (1.35lbs) and measures in at approximately 72mm (2.85”) by 89mm (3.5”). The Lensbaby Velvet 28mm F2.5 is currently available to purchase for $ 550 on Lensbaby’s online store, as well as Adorama and B&H.

Articles: Digital Photography Review (dpreview.com)

 
Comments Off on Lensbaby releases the ‘Velvet 28,’ a wide-angle prime with ‘dreamy’ bokeh

Posted in Uncategorized


Private Urban Paradise: 13 Dreamy Residential Rooftop Pools & Gardens

04 Aug

[ By SA Rogers in Architecture & Houses & Residential. ]

rooftop oasis madrid 1

If you don’t have access to your own private rooftop paradise, you can at least dream about it during the hottest months of the year with the help of this collection of dreamy swimming pools and lush gardens. Rooftop bathtubs, infinity pools overlooking some of the world’s most glamorous cities and elevated lawns offer respite from the heat and access to fresh air, even in densely populated urban areas.

Beach House Extension in Peru

Rooftop Oasis Beach House 1

rooftop oasis beach house 2

rooftop oasis beach house 3

This stepped home on a hillside overlooking the bay of Ancón in Lima, Peru features a rooftop infinity pool that seems to extend right out into the sea. Architect Adriá Noboa added to and renovated the existing home, built in 1958 by Swiss architect Theodor Cron, whose work in Peru is considered historically valuable.

Tel Aviv Townhouse Pool, Israel

rooftop oasis tel aviv 1

rooftop oasis tel aviv 2

rooftop oasis tel aviv 3

Another apartment terrace swimming pool in an urban area sits atop a six-level townhouse in Tel Aviv. Architect Pitsou Kedem placed the lap pool at the edge of the rooftop terrace alongside a lounge area. The pool feels open to the city when you’re enjoying it, yet remains private from ground level.

Rooftop Bathtub and Shower, Portugal

rooftop oasis bath

rooftop oasis bath 2

rooftop oasis bath 3

Enjoying a relaxing bath while staring up at the sky from your own private rooftop in Lisbon definitely isn’t too shabby. José Adrião Architects added this unusual feature to the all-white rooftop terrace of a home with a view of the historical city.

The Wall House, Singapore

rooftop oasis wall 1

rooftop oasis wall 2

There’s no house in the world quite like this one, designed for a client in Singapore who wanted two distinct yet connected homes for various generations of his family while maintaining lots of privacy and outdoor recreation space. FARM architects created a multi-level plan with a lower-level courtyard connecting both residences while the lushly planted rooftop levels are private, each with their own swimming pool.

Apartment Pool Overlooking Madrid, Spain

rooftop oasis madrid 1

rooftop oasis madrid 2

rooftop oasis madrid 3

A terrace sticks out of the side of this top floor apartment in the heart of Madrid, its kidney-shaped swimming pool nearly at roof level on one of the city’s tallest buildings. I! Arquitectura wanted to bring the ‘countryside’ to a city setting, with all the perks of living in the suburbs. That deck could only be better if the pool went right up to the edge, allowing you to take in the views while swimming.

Next Page – Click Below to Read More:
Residential Rooftop Dreams 13 Top Level Terraces Pools

Share on Facebook


[ By SA Rogers in Architecture & Houses & Residential. ]

[ WebUrbanist | Archives | Galleries | Privacy | TOS ]


WebUrbanist

 
Comments Off on Private Urban Paradise: 13 Dreamy Residential Rooftop Pools & Gardens

Posted in Creativity


A Collection of Dreamy Star Photography

24 May

Doing night photography is one of my favorite things to do. Photographing the stars is one of the toughest parts of night photography. We’ve had a few articles on night photography and specifically the stars here on dPS. Here are some tips on star photography for you:

  • Do you pack up and leave after sunset and miss the fun of night photography?
  • Nightscapes: Photographing the City at Night
  • How to Photograph the Stars

To give you some ideas of what’s possible with night photography and shooting the stars, here is a collection of star photographs.

Photograph International Milky Way by Aaron J. Groen on 500px

International Milky Way by Aaron J. Groen on 500px

Photograph The Galaxy Guides Us Home by Michael Shainblum on 500px

The Galaxy Guides Us Home by Michael Shainblum on 500px

Photograph What Once Was by Aaron J. Groen on 500px

What Once Was by Aaron J. Groen on 500px

Photograph Shooting the Stars by Henry Liu on 500px

Shooting the Stars by Henry Liu on 500px

Photograph Noctis by Lincoln Harrison on 500px

Noctis by Lincoln Harrison on 500px

Photograph Moraine Lake at night by Andrey Popov on 500px

Moraine Lake at night by Andrey Popov on 500px

Photograph Dolomites by Max Rive on 500px

Dolomites by Max Rive on 500px

Photograph Amid Myriads of Stars by AtomicZen : ) on 500px

Amid Myriads of Stars by AtomicZen : ) on 500px

Photograph *** by Lincoln Harrison on 500px

*** by Lincoln Harrison on 500px

Photograph Tree Of Life by Michael Shainblum on 500px

Tree Of Life by Michael Shainblum on 500px

Photograph Fossilized UFO by Sakhr Abdullah on 500px

Fossilized UFO by Sakhr Abdullah on 500px

Photograph Volcanoes of Kamchatka by ???????? ?????? on 500px

Volcanoes of Kamchatka by ???????? ?????? on 500px

Photograph Night Train by Aaron J. Groen on 500px

Night Train by Aaron J. Groen on 500px

Photograph Rainbow by Lincoln Harrison on 500px

Rainbow by Lincoln Harrison on 500px

Photograph Stars in Dead Vlei by Patrick Galibert on 500px

Stars in Dead Vlei by Patrick Galibert on 500px

Photograph Milky River From Pyramid to other ! by jamil ghanayem on 500px

Milky River From Pyramid to other ! by jamil ghanayem on 500px

Photograph Lonely Tree by Ajay George on 500px

Lonely Tree by Ajay George on 500px

Photograph Wagon Decay by Aaron J. Groen on 500px

Wagon Decay by Aaron J. Groen on 500px

Photograph Cottonwoods and Milky Way by Randy Halverson on 500px

Cottonwoods and Milky Way by Randy Halverson on 500px

Photograph In the Dream by Brad Goldpaint on 500px

In the Dream by Brad Goldpaint on 500px

Photograph Light painting Epupa Falls. by Patrick Galibert on 500px

Light painting Epupa Falls. by Patrick Galibert on 500px

Photograph Just a Dream by XeeShan Ch on 500px

Just a Dream by XeeShan Ch on 500px

Photograph Ancient Ruins V2 by Michael Shainblum on 500px

Ancient Ruins V2 by Michael Shainblum on 500px

Photograph Rendez-vous by David Keochkerian on 500px

Rendez-vous by David Keochkerian on 500px

Photograph Milky Way at Marshall Point Lighthouse by Mike Taylor on 500px

Milky Way at Marshall Point Lighthouse by Mike Taylor on 500px

Photograph Galileo's Muse by Brad Goldpaint on 500px

Galileo's Muse by Brad Goldpaint on 500px

The post A Collection of Dreamy Star Photography by Darlene Hildebrandt appeared first on Digital Photography School.


Digital Photography School

 
Comments Off on A Collection of Dreamy Star Photography

Posted in Photography


How to do Dreamy Landscape Photography with a Neutral Density Filter

18 Apr
Neutral density filter 01

16mm lens, ISO 100, f/13, 2 second exposure

Perhaps one of the most overlooked and undervalued tools you can own as a photographer is a Neutral Density filter (ND Filter) or Graduated ND Filter. In fact, if photography is considered painting with light then a ND filter would be considered the brush tip. You see, different paint brush tips can be used to regulate, if you will, the amount of paint you apply with each stroke – just like different Neutral Density or Graduated ND filters can be used to regulate the amount of light you allow to enter your camera.

What is a Neutral Density Filter?

A Neutral Density filter reduces the intensity of all wavelengths or colors of light equally. That’s just a fancy way of saying it lets less light into your camera. They come in different intensities and styles. One such style is the Graduated Neutral Density filter which blocks light on half of the filter, and gradually transitions to the other half which is clear.

neutral-density-filter-07

Same scene as above without the Graduated Neutral Density Filter. Notice however that it is the same exposure – 16mm lens, ISO 100, f/13, 2 seconds

Mastering the ND Filter or Graduated Neutral Density filter does not take a degree from Hogwarts School of Witchcraft (though it couldn’t hurt). Below I’ll show you the dynamic photographs you are able to capture with the proper tools and then I’ll show you a technique to replicate the ND filter in the off chance that you don’t already own one, or can’t afford one due to the fiscal restraints your significant other has put in place to reign in your “hobby budget”. Remember, there is often more than one way to achieve the desired results in photography.

The neutral density filter is probably best recognized by its ability to slow your camera’s shutter speed to the point that fast moving water looks calm and silky.

Neutral density filter 02

23mm lens, ISO 200, f/16, 2.3 seconds

Anytime you are working with slow shutter speeds you need to be careful of camera shake so it’s always recommended that you use a tripod and either a remote shutter release, or set the self-timer. Depending on the neutral density filter you use, you may be leaving your shutter open for many minutes at a time. Shooting in RAW is highly recommended as most ND filters leave a color cast on your photograph and you’ll want the flexibility to fine-tune your white balance in post processing.

The Difference

Neutral density filter 03

26mm lens, ISO 100, f/18, 25 seconds

The above photograph was taken with a 10 stop neutral density filter in order to enhance the reflections on the water. The ND filter slows the shutter speed significantly allowing the water to look like glass. This is a more subtle example than the first photograph, but either way the end result is more unique than what you’d be able to do without it.

Think Outside the Box

Neutral density filter 04

16mm lens, ISO 100, f/16, 0.6 second

By now, if you’re a regular reader, you’ll have learned that there is more than one way to photograph a subject or scene. There are many articles that talk about the harsh light during the afternoon – the neutral density filter tames that light and allows you to create some really interesting photography. The shot above was also taken with a 10 stop neutral density filter, on a very bright day. The ND filter allowed me to slow the shutter speed just enough to blur the couple who walked in front of me. The end result ended up being one of my favorite shots that day.

Fine Art

Neutral density filter 05

16mm lens, ISO 3200, f/4, 30 seconds

Fine art photography is created within accordance of your own vision as the artist photographer. Sound vague? It is, but that’s the great thing about fine art, you can express yourself through your photography without following anyones rules, not even your own. The photograph above is actually classified as Intentional Camera Shake (or ICM) and it’s created by moving your camera while the shutter is open. I used a 6 stop neutral density filter for this shot and panned the camera to the left, and then back to the right while the shutter was open. If you are new to Intentional Camera Shake, the ND filter will give you more time with the shutter open in order to make deliberate movements.

What if You Don’t Have a Neutral Density Filter?

If you don’t already have a neutral density filter, but you’d like to improve the look of your photographs right now, there is a little trick you can tuck away in the recesses of your mind for the next time you’re out and about. Remember how your shutter speed and aperture are so closely related? Well, you can slow your shutter speed enough to make choppy water look smooth even without a neutral density filter by making a couple of adjustments.

Note:  I’m going to recommend that you to close your aperture (smaller f-number) to the narrowest setting your lens will allow and you must be aware of the trade off. When you shoot with the smallest aperture your lens allows, you may cause lens diffraction. Lens diffraction is where your images will be less sharp due to light disbursement when passing through the small aperture opening of your lens. This is the tradeoff when trying to replicate the effects of a neutral density filter without having the actual filter.

For this example we are going to talk about fast moving water, the Virgin River to be precise. The photo below was taken at Zion National Park in rather bright conditions. The brighter the scene, the harder it will be to use this technique. In order to smooth the water you need to slow your shutter speed, right? Right. In order to slow your shutter speed without overexposing the image you need to compensate by reducing the amount of light that enters the camera another way. Opening your aperture (smaller f-number) lets more light in, while closing your aperture (larger f-number) will reduce the light, so we must close the aperture.

Neutral density filter 06

34mm lens, ISO 100, f/22, 1.3 seconds – no filter

Close the aperture as far as you can, and make sure your ISO is as low as possible as well. Slow your shutter speed (if you are shooting in aperture priority mode the shutter speed will adjust automatically). Be sure to use a tripod or you’ll have blurry photographs. You will want a shutter speed around 1/4th to 1.3 seconds.

Note: this will be pretty much impossible if you’re in full bright sunlight as the “Sunny f/16 rule” will apply and best you can do without a filter is 1/50th at f/22. So you’d need at least a 3 stop ND filter to slow down more than that, 6 stop would be even better in that situation. 

Finally

Remember, not all neutral density filters are created equally and the glass you put in front of your cameras sensor will directly impact the image quality of the photographs you take. You should strive for the best quality you can afford. The best ND filters can be purchased for $ 50-$ 200+ depending on the size and materials.

When shopping for a neutral density filter I’d recommend purchasing the screw on type to fit the size of your largest lens (the size of filter you need will be written on the lens with a little circle with a line through it next to it, and inside the lens cap). You will save yourself money if you stick with the largest lens size, as you can purchase cheap metal adapters, (called step down rings) generally less than $ 10, to accommodate your smaller lenses.

Let me leave you with this final tip. Your camera lets light in through the lens (and sometimes leakage around the lens) as well as through the viewfinder. When you shoot with fast shutter speeds this is not noticeable but when shooting with longer exposure times you’ll find that the light that comes through the viewfinder will cause brown areas to pollute your image. Cover your viewfinder when using a neutral density filter and you’ll eliminate this phenomenon. Enjoy.

Check out the newest dPS ebook – Loving Landscapes A guide to landscape photography workflow and post-production – a brand new dPS ebook by the authors of Living Landscapes

The post How to do Dreamy Landscape Photography with a Neutral Density Filter by John Barbiaux appeared first on Digital Photography School.


Digital Photography School

 
Comments Off on How to do Dreamy Landscape Photography with a Neutral Density Filter

Posted in Photography


Dreamy Theater 2nd – ????????? [M=Hatsune Miku]

18 Nov

Please read the Description Box/Info Box. .: Info about this Video :. Game Title: Project DIVA Dreamy Theater 2nd Platform: PlayStation 3 Developer: Sega Publisher: Sega Genre(s): Rhythm game Mode(s): Single-player Project DIVA is a rhythm game created by Sega and Crypton Future Media for the PlayStation Portable featuring the virtual-diva vocaloid Hatsune Miku. The gameplay is based on pressing buttons on the controller when floating gray button icons appear on top of the colored button icons. Project DIVA Dreamy Theater 2nd is an add-on of the sequel, Project Diva 2nd and now supported stereoscopic 3D display. Hatsune Miku (????) is a singing synthesizer application with a female persona, developed by Crypton Future Media. It uses Yamaha Corporation’s Vocaloid 2 synthesizing technology. The name of the character comes from a fusion of the Japanese for first (? hatsu), sound (? ne) and future (Miku (??) sounds like a nanori reading of future, ??, normally read as “mirai”), referring to her position as the first of Crypton’s “Character Vocal Series”. She was the second Vocaloid to be sold using the Vocaloid 2 engine and the first Japanese Vocaloid to use the Japanese version of the Vocaloid 2 engine. Her voice is sampled from Japanese voice actress, Saki Fujita. Hatsune Miku has performed onstage as a projection. [M = Modules] :: Song Titel :: Japanese: ?????????Romaji: Kuroba?Kurabu English: Clover?Club
Video Rating: 4 / 5

Geometry overlay used for 2D/3D conversion [illuminate 3d] Alice: Matchmove Supervisor [cafeFX santa monica] tracked shoulder, cameras, head objects, flamingo, and character roto cleanup (all for stereoscopic) Sweeney Todd: Environments TD / Sr Matchmove [MPC] shot rushing through london – layout and setup in maya to ‘stick’ all greenscreen people elements into the CG env and output corner-pin data to shake. HDR photography of real world elements for digital recreation. Created Greenscreen survey models from reference photos. Camera tracking. ElizebethII – Golden Age [MPC] Camera tracking / Object track of FG Ship for digital replacement (ocean and water is real – ships CG) Poseidon [MPC] digital head / chest roto to replace stunt double – blending into full CG for dive. Underwater shots tracked camera and created grid for water surface for comp to add additional fire elements. 10000BC [MPC] camera track X-men3 [MPC] char roto and camera for Storm head / face track of both actors for Cyclops kiss shot (veins and skin effect added to her and full face treatment for him) camera / clothing / head track/roto for disintegration camera tracking Charlie and the Chocolate Factory: Matchmove Supervisor [MPC] created survey models / geometry / camera tracks / data to motion control for ‘oompa’ shoots / char roto / head tracks. Final shot blending two cameras for pullback through window. Harry Potter I: Sr Matchmove TD [Rhythm & Hues] head tracks for sorting hat shots camera tracks
Video Rating: 5 / 5

 
Comments Off on Dreamy Theater 2nd – ????????? [M=Hatsune Miku]

Posted in 3D Videos


Dreamy Theater 2nd – ????????? [M=Hatsune Miku]

15 Nov

Please read the Description Box/Info Box. .: Info about this Video :. Game Title: Project DIVA Dreamy Theater 2nd Platform: PlayStation 3 Developer: Sega Publisher: Sega Genre(s): Rhythm game Mode(s): Single-player Project DIVA is a rhythm game created by Sega and Crypton Future Media for the PlayStation Portable featuring the virtual-diva vocaloid Hatsune Miku. The gameplay is based on pressing buttons on the controller when floating gray button icons appear on top of the colored button icons. Project DIVA Dreamy Theater 2nd is an add-on of the sequel, Project Diva 2nd and now supported stereoscopic 3D display. Hatsune Miku (????) is a singing synthesizer application with a female persona, developed by Crypton Future Media. It uses Yamaha Corporation’s Vocaloid 2 synthesizing technology. The name of the character comes from a fusion of the Japanese for first (? hatsu), sound (? ne) and future (Miku (??) sounds like a nanori reading of future, ??, normally read as “mirai”), referring to her position as the first of Crypton’s “Character Vocal Series”. She was the second Vocaloid to be sold using the Vocaloid 2 engine and the first Japanese Vocaloid to use the Japanese version of the Vocaloid 2 engine. Her voice is sampled from Japanese voice actress, Saki Fujita. Hatsune Miku has performed onstage as a projection. [M = Modules] :: Song Titel :: Japanese: ?????????Romaji: Warudo Izu Main English: World is Mine
Video Rating: 4 / 5

 
Comments Off on Dreamy Theater 2nd – ????????? [M=Hatsune Miku]

Posted in 3D Videos


Dreamy Theater 2nd – ?????????????????? [M=Hatsune Miku]

07 Nov

Please read the Description Box/Info Box. .: Info about this Video :. Game Title: Project DIVA Dreamy Theater 2nd Platform: PlayStation 3 Developer: Sega Publisher: Sega Genre(s): Rhythm game Mode(s): Single-player Project DIVA is a rhythm game created by Sega and Crypton Future Media for the PlayStation Portable featuring the virtual-diva vocaloid Hatsune Miku. The gameplay is based on pressing buttons on the controller when floating gray button icons appear on top of the colored button icons. Project DIVA Dreamy Theater 2nd is an add-on of the sequel, Project Diva 2nd and now supported stereoscopic 3D display. Hatsune Miku (????) is a singing synthesizer application with a female persona, developed by Crypton Future Media. It uses Yamaha Corporation’s Vocaloid 2 synthesizing technology. The name of the character comes from a fusion of the Japanese for first (? hatsu), sound (? ne) and future (Miku (??) sounds like a nanori reading of future, ??, normally read as “mirai”), referring to her position as the first of Crypton’s “Character Vocal Series”. She was the second Vocaloid to be sold using the Vocaloid 2 engine and the first Japanese Vocaloid to use the Japanese version of the Vocaloid 2 engine. Her voice is sampled from Japanese voice actress, Saki Fujita. Hatsune Miku has performed onstage as a projection. [M = Modules] :: Song Titel :: Japanese: ?????????????????? Romaji: Miku Miku ni Shite Ageru?(Shite Yanyo) English: I’ll Make You Do
Video Rating: 4 / 5

 
Comments Off on Dreamy Theater 2nd – ?????????????????? [M=Hatsune Miku]

Posted in 3D Videos


Dreamy Theater 2nd – ???????? [M=Hatsune Miku]

05 Nov

Please read the Description Box/Info Box. .: Info about this Video :. Game Title: Project DIVA Dreamy Theater 2nd Platform: PlayStation 3 Developer: Sega Publisher: Sega Genre(s): Rhythm game Mode(s): Single-player Project DIVA is a rhythm game created by Sega and Crypton Future Media for the PlayStation Portable featuring the virtual-diva vocaloid Hatsune Miku. The gameplay is based on pressing buttons on the controller when floating gray button icons appear on top of the colored button icons. Project DIVA Dreamy Theater 2nd is an add-on of the sequel, Project Diva 2nd and now supported stereoscopic 3D display. Hatsune Miku (????) is a singing synthesizer application with a female persona, developed by Crypton Future Media. It uses Yamaha Corporation’s Vocaloid 2 synthesizing technology. The name of the character comes from a fusion of the Japanese for first (? hatsu), sound (? ne) and future (Miku (??) sounds like a nanori reading of future, ??, normally read as “mirai”), referring to her position as the first of Crypton’s “Character Vocal Series”. She was the second Vocaloid to be sold using the Vocaloid 2 engine and the first Japanese Vocaloid to use the Japanese version of the Vocaloid 2 engine. Her voice is sampled from Japanese voice actress, Saki Fujita. Hatsune Miku has performed onstage as a projection. [M = Modules] :: Song Titel :: Japanese: ????????Romaji: Rabu Risuto Koushinchuu? English: Updating Your Love List
Video Rating: 4 / 5

 
Comments Off on Dreamy Theater 2nd – ???????? [M=Hatsune Miku]

Posted in 3D Videos


Dreamy Theater 2nd – ???? [M=Kagamine Len]

04 Nov

Please read the Description Box/Info Box. .: Info about this Video :. Game Title: Project DIVA Dreamy Theater 2nd Platform: PlayStation 3 Developer: Sega Publisher: Sega Genre(s): Rhythm game Mode(s): Single-player Project DIVA is a rhythm game created by Sega and Crypton Future Media for the PlayStation Portable featuring the virtual-diva vocaloid Hatsune Miku. The gameplay is based on pressing buttons on the controller when floating gray button icons appear on top of the colored button icons. Project DIVA Dreamy Theater 2nd is an add-on of the sequel, Project Diva 2nd and now supported stereoscopic 3D display. Hatsune Miku (????) is a singing synthesizer application with a female persona, developed by Crypton Future Media. It uses Yamaha Corporation’s Vocaloid 2 synthesizing technology. The name of the character comes from a fusion of the Japanese for first (? hatsu), sound (? ne) and future (Miku (??) sounds like a nanori reading of future, ??, normally read as “mirai”), referring to her position as the first of Crypton’s “Character Vocal Series”. She was the second Vocaloid to be sold using the Vocaloid 2 engine and the first Japanese Vocaloid to use the Japanese version of the Vocaloid 2 engine. Her voice is sampled from Japanese voice actress, Saki Fujita. Hatsune Miku has performed onstage as a projection. [M = Modules] :: Song Titel :: Japanese: ????Romaji: Migikata no Chou English: Butterfly on the Right Shoulder

 
Comments Off on Dreamy Theater 2nd – ???? [M=Kagamine Len]

Posted in 3D Videos