RSS
 

Posts Tagged ‘Details’

Canon patent application details hybrid speedlight with active cooling via internal fan

04 Nov
The fan, labeled ‘155,’ is located on the bottom of the flash head.

A recent patent application from Canon details the schematics for a hybrid speedlight that has built-in cooling for keeping the speedlight cool with continuous use.

Japanese patent application 2019-185021 shows various ways in which a fan underneath the flash head of the speedlight would pull in air from the ambient environment, direct it over the front of the main flash tube and cycle it out to keep temperatures at a more manageable level. Interestingly, the patent also shows a pair of LED lights above and below the main flash tube, the reason we consider this a ‘hybrid’ speedlight.

Various illustrations in the patent show how the air would be channeled through the flash head depending on where the flash tube is located inside the speedlight. This particular example shows how the air would flow in front of the flash tube (and LED lights, labeled 102 and 104) and cycle out of the speedlight via the empty space behind the flash head and LED lights.

The patent doesn’t specify whether or not the cooling mechanism is more for the main flash tube or the LED lights. But, considering fans aren’t necessarily a requirement on traditional speedlights and the incredible amount of heat LEDs can put out — especially in a confined package without much passive cooling — we believe it would make the most sense that this fan would run at times when the LED lights would be on for extended periods of time, where heat could built up without the chance to dissipate in a reasonable timeframe.

As noted by Canon News, who first broke down the patent, the detailed drawings and tech specifications for this speedlight indicate that quite a bit of work has gone into it already. As with all patents, it might never see the light of day, but it’s an interesting concept nonetheless.

Articles: Digital Photography Review (dpreview.com)

 
Comments Off on Canon patent application details hybrid speedlight with active cooling via internal fan

Posted in Uncategorized


Leaked photos of the a9 II and details about Sony’s event a mere block from PhotoPlus

28 Sep

Earlier this month, we caught our first glimpse of what might be Sony’s next flagship full-frame camera, the ‘a9 II.’ Now, a new photo has been leaked showing the mystery camera out in the wild yet again.

The leaked photo, seen below and shared by Sony Alpha Rumors, features what could be an a9 II attached to a taped-up battery grip and a Sony FE 400mm F2.8 GM OSS lens. The button placement and overall look is identical to the header image, which was leaked earlier this month.

As noted when the first image emerged, one noticeable change is the lack of the Focus Mode dial lock release button found on the a9. Aside from that, the externals of the camera appear largely unchanged from its predecessor.

As for internals, we don’t know much. Sony Alpha Rumors is reporting the camera will feature a 36-megapixel sensor, but that rumor has yet to be confirmed.

PhotoPlus 2019 is being held at the Jacob K. Javits Convention Center roughly a block away from the Creative Space NYC location where Sony is hosting its event.

If it’s indeed real, we’ll no doubt find out soon enough. Sony has shared the details for an event at ’Creative Space NYC,’ that will take place just around the corner from the convention center where PhotoPlus 2019 is going on. The ‘Creators’ Playground,’ as Sony is calling it, will be open from October 24 through the 26.

Articles: Digital Photography Review (dpreview.com)

 
Comments Off on Leaked photos of the a9 II and details about Sony’s event a mere block from PhotoPlus

Posted in Uncategorized


Sony details specs for a 47MP MFT sensor capable of recording 8K30p video

27 Sep

Sony has released a document detailing the specifications for a 47-megapixel Micro Four Thirds (MFT) sensor capable of shooting up to 8K video up to 30 frames per second (fps).

The sensor, known as IMX492LQJ (there’s also a monochrome IMX492LLJ version), is listed as ‘a diagonal 23.1 mm (Type 1.4) CMOS image sensor with a color square pixel array and approximately 47.08 M effective pixels.’ According to the features list, the sensor features 12-bit A/D conversion, has a 2.315 micrometer (?m) pixel size and offers a variable-speed electronic shutter function.

As the above specifications note, the sensor can capture, in 10-bit mode with a 17:9 crop, 8K video (8192 × 4320 pixels) at up to 30 fps when paired with an SLVS-EC output interface. This resolution is exactly double the 4K (4096 x 2160 pixels) resolution of the 17:9 crop mode on the Panasonic GH5S.

Decreased power consumption is also noted, which should help extend the battery life of any camera it’s used in (or at least make up for a fragment of the increased processing power that will be required to handle all of the data).

It’s worth noting that although Sony lists the applications for this sensor as ‘Surveillance, FA cameras and Industrial cameras,’ the IMX299 inside Panasonic’s GH5S was labeled as such as well.

We could speculate whether or not this will be available on the next-generation MFT camera from Panasonic or Olympus, but the reality of it is we have no idea and won’t until any such camera is released—and maybe not even then.

Articles: Digital Photography Review (dpreview.com)

 
Comments Off on Sony details specs for a 47MP MFT sensor capable of recording 8K30p video

Posted in Uncategorized


3 Easy Tips for Photographing Details in a Scene

21 Aug

The post 3 Easy Tips for Photographing Details in a Scene appeared first on Digital Photography School. It was authored by Lily Sawyer.

Regardless of the type of event I photograph, I ALWAYS photograph details. Why? Because details help tell the story of an event that nothing else can. Details aid the recollection of memories: words and conversations, scents and aromas, spoken and unspoken emotions. Details also help cement these memories in our brains.

photographing-details-in-a-scene-lily-sawyer

Newborns grow so fast and often parents are exhausted beyond belief. Photographing details helps them remember the sweet moments, especially of those first days. The first tuft of hair, the tiniest fingers, milk spots, windy smiles, hospital tags, first baby hats, and mittens. Captured in details, these moments can be cherished more often and for much longer.

Wedding days go in a total haze for many a couple. All the weeks and hours they have put into planning the decorations and color scheme down to the minutest detail and they don’t even have a moment to fully appreciate them on the wedding day. I carve out time to capture hundreds of detail photos during a wedding. They are just as important as all the other photojournalistic and documentary captures of people and events unfolding on the day.

dps-3-tips-capturing-details-lily-sawyer-photo

You don’t need to have an expensive kit to take some good, solid photos. All the photos in this article were intentional snapshots taken during a day trip with me as a tourist. No flashes, just a camera, a 60mm fixed lens and an observant eye looking for details.

Here are 3 tips I find helpful when photographing details:

1. Storytelling

Photographs are no doubt one of the most visually exciting ways to tell a story, so tell it well using photographs of details.

Let’s consider the five elements of a story to help us communicate it effectively: setting, characters, plot, conflict, resolution.

Below is a series of photographs I shot with intent to tell a simple short story (real captures and not staged) with the above elements in mind.

Setting

photographing-details-in-a-scene-lily-sawyer

Conflict

photographing-details-in-a-scene-lily-sawyer

Characters and Plot

photographing-details-in-a-scene-lily-sawyer

Resolution

photographing-details-in-a-scene-lily-sawyer

This is just a simplistic way of showing you how a story can be captured beautifully in details. The setting is in Copenhagen on a soaking wet and cold day. It had been heavily raining for a good while. Droplets have collected on the bridge adorned with love locks. It’s summer (as seen on the date in the newspaper), and the map is sodden. Somewhere nice and cozy to dry off and relax would be welcome. A girl wrapped in a thick blanket browses the menu. Hot cocoas put a big smile on the children’s faces. It’s a happy summer once again.

2. Composition

a. Rule of Thirds

The rule of thirds is probably the most well-known and popular composition techniques. It is also my favourite and the easiest that comes to me. The frame is divided into thirds horizontally and vertically. Where the sections intersect are the strongest points where your main image or interest in the image should be placed.

dps-3-tips-capturing-details-lily-sawyer-photo

This is illustrated above left where the yellow building occupies two-thirds of the space and one third on the left is the overcast sky. In the above right image, the two buildings intersect on a third of the frame. The point of the small tower is positioned about a third from the bottom of the image and a third from the left.

Plain snapshots like these look stronger with this rule of thirds composition.

dps-3-tips-capturing-details-lily-sawyer-photo

Can you see how these two images above use the rule of thirds composition?

b. Symmetry/centred

Another favorite of mine is symmetry; where the main point of interest in the image is placed at the center of the frame. A central composition accentuates the importance of the subject and emphasizes its superiority.

dps-3-tips-capturing-details-lily-sawyer-photo

The image above shows the fish at the center and two symmetrical areas on either side of it. More symmetry – the tables and chairs and the windows on either side – strengthens this image further. You can feel the solidity of the structure because of the centered composition.

c. Fill the Frame

As with the above, filling the frame strengthens composition and makes the viewer focus intensely on the subject without unnecessary distractions. The viewer can explore details that otherwise would be lost had the image not filled the frame and cropped distractions. Filling the frame is an effective way of highlighting a point of interest and telling its story from much closer.

dps-3-tips-capturing-details-lily-sawyer-photo

d. Depth and foreground interest

Photographs are two dimensional in nature. Many images only show the subject and background. Including foreground adds a third dimension to the space. It increases its depth and makes the viewer feel as if they are on the outside looking in. I use this technique for anything and everything: portraits, objects, or action.

A foreground interest also invites the viewer to explore other elements in the image and look deeper into the other areas of the frame, not just first thing that meets their eye. Because you are inviting the viewer’s eye to move around the image, you make your image more dynamic.

dps-3-tips-capturing-details-lily-sawyer-photodps-3-tips-capturing-details-lily-sawyer-photo

3. Angles

Change your point of view

We see virtually everything at eye level. We often walk around with our faces looking forward not upwards, downwards or sideways. So whenever we change our point of view into a bird’s eye view or worm’s eye view or perspective, we find ourselves seeing new interesting things in common and familiar objects. It’s something I always try to remind myself when shooting: look up, look down, look right, and look left.

In the image below, you can see I’ve also combined this bird’s eye view with the symmetrical composition and the rule of thirds.

dps-3-tips-capturing-details-lily-sawyer-photo

Perspective and leading lines

Something as mundane as a bird on a bench can be captured with a touch more interest by moving a few steps sideways and photographing it from a perspective viewpoint. Doing this is making use of the line of the bench to lead the viewer’s eye to the bird – the focal point of the image.

I didn’t want to get too close lest I scared it away. It caught my eye because I thought it was a crow. Then I noticed it was wearing some white feathers like a cardigan on its black body. Look out for leading lines, whether they be straight like benches, rails and fences, or curvy like windy paths, a stream of water or patterned tiles on pavements.

dps-3-tips-capturing-details-lily-sawyer-photo

Conclusion

I find photographing details exciting, mentally challenging, and thoroughly enjoyable. It keeps me on my toes, especially when I try to tell a story. I feel a sense of achievement when I’m happy with the results. I hope you try it sometime if you haven’t yet.

If you have any tips for photographing details, do share them in the comments below.


photographing-details-in-a-scene

The post 3 Easy Tips for Photographing Details in a Scene appeared first on Digital Photography School. It was authored by Lily Sawyer.


Digital Photography School

 
Comments Off on 3 Easy Tips for Photographing Details in a Scene

Posted in Photography


Canon patent application details wireless charging setup for camera systems

07 Aug

Wireless charging has become a standard in flagship smartphones, but like so many other technologies, the camera world seems a bit behind. Canon seems interested in changing that though if a recent patent application is any indication.

United States patent application 10,375,639 B2 details the schematics for a wireless charging setup that uses a combination of a power mat and a compatible device to offer wireless charging capabilities. The patent doesn’t limit the device being charged to cameras, but does explicitly say ‘the electronic apparatus [being charged] can be an imaging apparatus.’

According to the patent application text, the mat would be able to detect when a camera is present via near field communication (NFC) and adapt the power output to match the required power of the camera unit while also monitoring the temperature to prevent overheating.

It’s not clear whether Canon would rely on a pre-existing wireless charging standard, such as the Wireless Power Consortium’s Qi standard, but considering Qi’s ubiquity, it’s likely to be the case. Of course, there’s always the possibility this patent application never sees the light of day, so don’t get too excited.

Articles: Digital Photography Review (dpreview.com)

 
Comments Off on Canon patent application details wireless charging setup for camera systems

Posted in Uncategorized


Alternative Automotive Photography: Capturing the Details

16 Jul

The post Alternative Automotive Photography: Capturing the Details appeared first on Digital Photography School. It was authored by Charlie Moss.

Cars and photography often seem to go hand in hand. Whether you’re a car owner with a camera or a photographer with a passion for the classics, the perfect automotive photo can often seem just out of reach.

Automotive photography can be both tricky and expensive. To get catalog-ready images of cars, the top commercial photographers often utilize huge specialist studios with large banks of powerful lights and massive pieces of equipment to block or reflect light. Each shot can take days to set up even with a team of assistants.

Realistically, most car enthusiasts don’t have this kind of space or equipment at their disposal. Instead, we seek out opportunities to photograph cars at racetracks or other gatherings. These events rarely offer “perfect” conditions to create flawless images of cars, so a bit of creative thinking is usually required!

The Rallye Monte Carlo Historique stops in Banbury every year so that enthusiasts can see these classic cars up close. But the backdrop is far from ideal for beautiful photos!

Car meets can often be busy affairs with cars parked close together, uninspiring backdrops, and lots of people milling around. Concentrating on the details is one way to get around some of these problems and still come away with shots that you love and can feel proud adding to a portfolio. Detail shots often do well on platforms like Instagram too where the small format allows close-up images to shine.

So with that in mind, here are some ideas for bagging great pictures of the cars you see on your travels if you can’t shoot them in a location of your choice.

Get up close… closer than you think!

By getting in close you eliminate many of the problems that would otherwise sneak into your picture; other cars in the background, or people in the corner of your shot. Focussing on just one small part of a car can remove all of those distractions.

Alternative-Automotive-Photography-1

Not having to take into consideration the background also frees you up to concentrate more on composition. No more worrying about if the backdrop will compliment the car, or what the sky is doing!

You can also use a shallow depth of field to blur out distracting elements in your photographs. Use just enough depth to highlight the detail that you’re photographing. Everything else will then melt away into the background, keeping your viewer looking just where you want them to.

Pick a theme

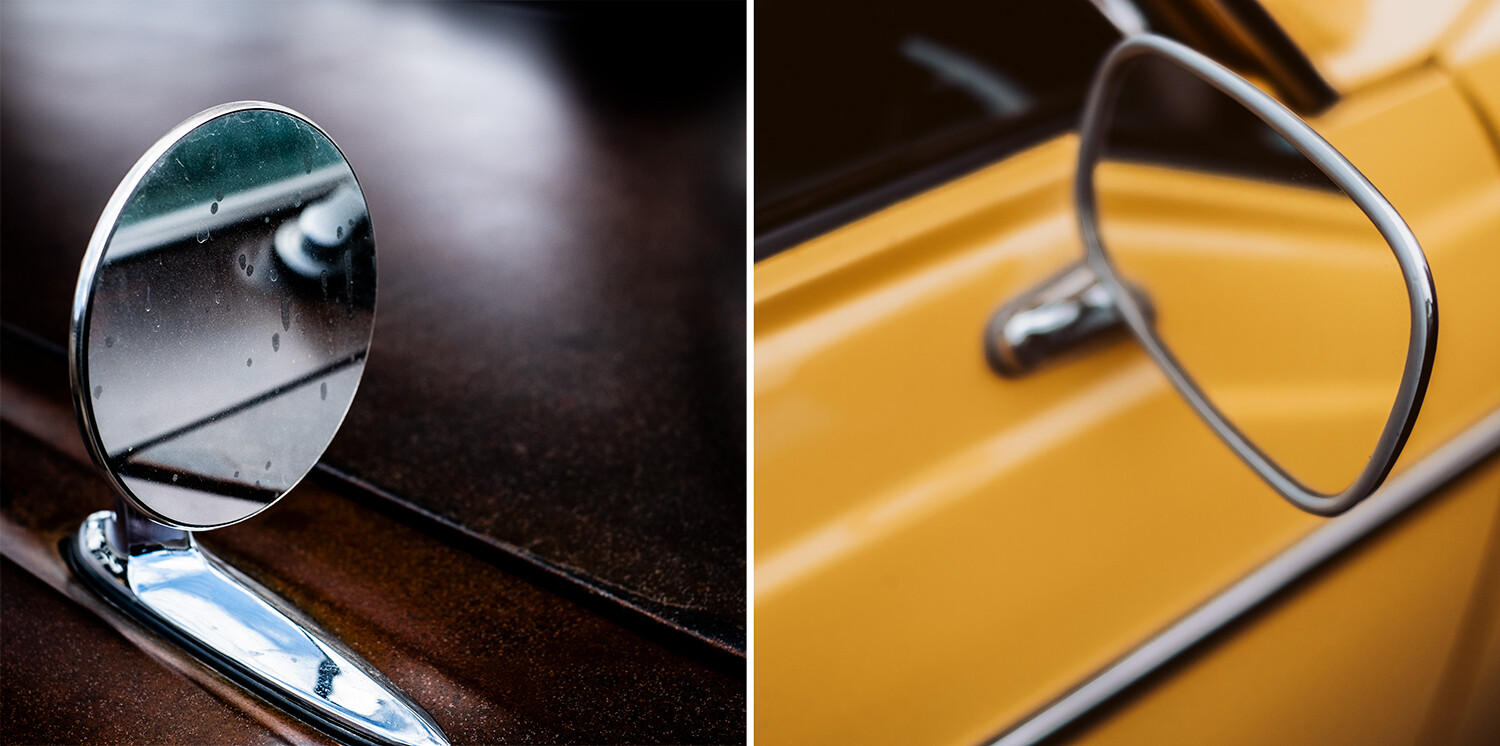
At some point over the years, I’ve picked up a habit of shooting the wing mirrors on cars. I don’t know which one was my first, but I soon started noticing the way that they were all different. Each mirror was only a small part of the car, but they pack a big punch when it comes to design! Now I can’t seem to walk past a classic car without taking a photograph of its mirrors!
Alternative-Automotive-Photography-2

By picking a theme, it will challenge you to go looking for shots that are different from what everyone else is shooting. Also, you’ll start to notice other details as you train your creativity. Before long, you will seek out creative and different images without even really having to think about it.

Shoot iconic details

Pick out just one detail to highlight and then try to take the perfect shot of just that part. Perhaps it’s a classic Cadillac fin or an elegant Rolls Royce grid that catches your eye. Whatever it is that you love most about a car, or is most iconic and well-known, use that as your starting point when you’re working out what pictures you want to take.

Alternative-Automotive-Photography-3

Cars are more than just machines that get us from A to B. The most iconic are beautiful and remarkable pieces of design that the original designer has spent hundreds of hours perfecting. Nothing on a great car is an accident; everything was designed to be exactly how you see it.

The good thing about iconic details is that they’re often instantly recognizable. It tells people what the photograph is of, even though it might be an abstracted close-up.

Portray the luxury

Beautiful cars are a luxury; there’s no debate to be had there. So challenge yourself to convey the luxury through your photographs.

Alternative-Automotive-Photography-4

Lifestyle photography with shallow depth of field, out of focus foregrounds, and toned colors are really in vogue right now for luxury brands. Now is the time to try this style out if you can get up close and personal with some top of the range machines!

Make sure that your focus is right on the nail if you’re attempting shots with a shallow depth of field. If you miss the focus even slightly, the shot won’t be worth keeping.

Stick to a neutral focal length

Extreme wide-angle photographs can look cool, there’s no doubt about it. And I know every car photographer has, at least once, got down at the front corner of a car with a wide-angle lens to try and make it look more imposing and dramatic.

But wide-angle focal lengths distort cars and change the carefully designed, and often iconic lines and features. Instead of grabbing the easy (and predictable) win when it comes to creating a dramatic image, try sticking to a neutral focal length and challenging yourself.

Keeping to a focal length like 50mm means shooting images that are much closer to how the human eye naturally sees the world. Using a focal length around 50mm means that you keep the cars much closer to the designer’s original vision when you photograph them.

This might mean that you have to work harder to look for different ways to produce impact with your photographs. However, it also means that you represent the cars in the way that they’re meant to be seen. It gives an element of authenticity to your images.

I’ve never been one for believing that photography is simply about recording the world around you exactly how it is. But when it comes to the design of cars, I’m pretty sure that the original designer knows more about how the car looks best than I do. So distorting it with wide-angle lenses is rarely high on my priority list!

Embrace reflections… and wear black

In ideal conditions, you’d be able to use black and white cards, and lights, to block and place reflections exactly where you want them on a car before you took a photograph. Realistically, though, you’re rarely going to get the opportunity to work with this kind of precision in the great outdoors.

Carry a 5-in-1 reflector in your kit by all means. Sometimes you just need to lift a shadow on a bit of paintwork or cut out a reflection in some chrome. But instead of trying to eliminate every reflection you dislike, try embracing them instead!

Reflections of the sky or foliage around you can make some interesting patterns when they reflect in the glass of a car. In the right conditions, with a well-polished car, they can even reflect in the bodywork. Use the reflections to add interest to your shots. They can focus the viewer’s attention exactly where you want them to look. Also, a well-placed reflection can blank out something messy that you don’t want to distract.

On that note, wear black when you go out with your camera to photograph cars! Too often have I ruined my own photographs by shooting the perfect image and then noticing afterward my own reflection while wearing a bright colored jacket. Wearing black won’t remove you from the image completely, but it will make you an awful lot less distracting when you do manage to capture yourself in a reflective surface.

Next time you head out to a car show to take some pictures, think smaller and capture the details for alternative automotive photography! And share them with us in the comments below.

Do you have any other tips you’d like to share?


alternative-automotive-photography

The post Alternative Automotive Photography: Capturing the Details appeared first on Digital Photography School. It was authored by Charlie Moss.


Digital Photography School

 
Comments Off on Alternative Automotive Photography: Capturing the Details

Posted in Photography


Canon patent details triple image stabilization system for low-light video recording

28 Jun
A diagram from the patent that details the process of integrating multiple image stabilization systems together.

Canon has patented a new image stabilization system that utilizes three different technologies to prevent blurry images: lens stabilization, image sensor stabilization and electronic image stabilization. The system would add another layer of movement prevention over Canon’s existing dual image stabilization option that uses both lens and digital stabilization when shooting in video mode.

The patent was first posted on the United States Patent and Trademark Office’s website (USPTO) on June 27. According to the document, Canon’s triple image stabilization system, which uses a combination of lens, sensor and electronic image stabilization technologies, kicks in to prevent slow shutter speed blurs that may otherwise exceed the capabilities of the current Dual IS system.

Canon splits camera shakes into two different categories: low-frequency for slight movements that can be corrected using electronic stabilization and high-frequency for stronger shakes like the vibration from a moving vehicle that can be corrected using optical stabilization.

The patent details a third type of movement Canon called ’accumulated shake’ resulting from low shutter speeds experienced in dim environments. In the case of recording in low-light situations, Canon explains:

…so-called ‘accumulated shake’ may occur, which is a blur occurring in a subject image due to the position at which an optical image is formed being displaced during exposure, and therefore, it may be impossible to acquire a favorable image even if a region that is to be cut out is adjusted.

It appears Canon patented this new system as a potential solution for this problem; the patent explains the system offers ‘favorable shake correction corresponding to the shutter speed.’ Based on the details provided in the patent, Canon may envision future cameras that utilize a detection method for determining when accumulated shake is a problem in order to utilize the triple image stabilization system.

The feature may be used to reduce blurs in videos recorded in low-light settings, but only speculation about Canon’s intentions is possible at this time. As with any patent, Canon may never bring this technology to the consumer market.

Articles: Digital Photography Review (dpreview.com)

 
Comments Off on Canon patent details triple image stabilization system for low-light video recording

Posted in Uncategorized


Kipon shares new details of upcoming 12mm F2.8 lens for Fujifilm X-mount cameras

29 May

Kipon has shared new details about an upcoming 12mm F2.8 manual wide angle lens for APS-C camera systems.

The Ibegon 12mm F2.8 lens is being sold under the Kipon name, but its optical formula was designed by the German IB/E Optics. Its optical construction consists of 12 elements in nine groups and it features a seven-blade aperture diaphragm. It has a minimum focusing distance of 15cm (approximately 6in) and an aperture range between F2.8 and F22.

Blurry MTF charts provided by Kipon.

Currently, the product page only mentions availability for Fujifilm X mount camera systems, but Kipon previously teased at CP+ 2014 that it would be available for MFT, Sony E and EOS M mounts as well. Kipon hasn’t shared specific pricing information, but says it plans to ship the lens starting September 2019.

Kipon hasn’t shared specific pricing information, but says it plans to ship the lens starting September 2019.

Articles: Digital Photography Review (dpreview.com)

 
Comments Off on Kipon shares new details of upcoming 12mm F2.8 lens for Fujifilm X-mount cameras

Posted in Uncategorized


Don’t Create Detail, Just Reveal It – How to Reveal the Hidden Details in Your Photos

24 May

The post Don’t Create Detail, Just Reveal It – How to Reveal the Hidden Details in Your Photos appeared first on Digital Photography School. It was authored by Herb Paynter.

Just as cleaning the lenses of your eyeglasses clarifies what you see, cleansing your pictures of dull lighting will put the sparkle in your photos.

Have you noticed how many individual tools are available in your favorite editing software for changing the values of pixels? The array is dazzling, and most of this editing involves “localized” procedures (dodging, burning, painting, cloning, masking, etc.) affecting specific areas.

But here’s something to consider.

Unless the image you are working on is either damaged (either completely blown-out highlights, plugged-up shadows) or just contains too much unwanted clutter, you rarely need to create specific detail with these tools. The detail is usually right there just below the surface waiting for discovery. You need only make global adjustments to the tones within the darker and lighter ends of the range to achieve pretty amazing results.

When I took this shot of my wife Barbara fifteen years ago, I put it in the reject file because it was so dark. But carefully adjusting and lightening the shadow and middle tones in the picture separated the deep shadow tones from the middle tones. Now both she and the picture are definite keepers. No local editing was necessary, and there is no tell-tale evidence of a touchup. The image contained all the necessary lighter tones – they simply had to be uncovered.

Push tones instead of pixels

Post-processing digital images is usually a process of subtraction; removing the visual obstacles that are covering the underlying detail in a photographic image. This detail will reveal itself if you merely nudge the tonal ranges instead of the pixels.

The fact is…all the detail in every subject has been duly captured and is hiding in either the shadows or the highlights, waiting to be discovered.

The digital camera’s image sensor sees and records the entire range of tones from black to white within every image it captures. What is hiding within this massive range of tones is the detail. Unfortunately, the camera sensor has no way of knowing the detail that may be under (or over) exposed within that range. It simply captures everything it sees inside the bookends of dark and light.

Camera image sensors can capture a range of tones up to 16,000 levels between solid color and no color. This doesn’t mean that all 16,000-pixel values are actually present in the picture; it just means that the darkest to the lightest tones are stretched out over the significant detail that is hiding in the middle.

Adjustments made to the image in Alien Skin’s Exposure X4.5 revealed detail in the sunlit walkway and darkened archway that appeared lost in the original capture. No painting or cloning tools were necessary.

The purpose of this article is not to get geeky about the science, but to assure you that there is an amazing amount of detail that you can recover from seemingly poor images.

A basic JPEG image can display more than 250 tones in each color. While that doesn’t sound like much, you should know that the human eye can only perceive a little over 100 distinct levels of each color. No kidding! Technically, 256 tones are too many.

The balancing act

Here’s a sobering truth. Your camera can capture more detail than your eye can detect and more tones than your monitor can display. As a matter of fact, it can capture up to 16,000 levels of tones and colors. That’s more than any publishing resource (computer monitor, inkjet printer, Internet, or even any printed publication) can reveal. Each of these other outlets is limited to reproducing just 8-bits (256 levels) of each color. The camera’s light-capture range is even beyond the scope of human vision. The range (light to dark) of your camera is immense compared to any reproduction process. What this means is that the editing part of the photography process needs MUCH more attention than the image capture process.

This introduces a complex but interesting phenomenon. Your post-production challenge is to emphasize the most important details recorded inside the tones captured by your camera and then distinguish them sufficiently for the printer, your monitor, or the Internet to reveal.

Your camera captures an incredible amount of detail in each scene that isn’t initially visible. However, with the right software, this detail can be uncovered just as an electron microscope can reveal detail buried deep inside things that the naked eye cannot perceive.

Image editing is all about discovering and revealing what is hiding in plain sight.

Image clarity

Bringing a picture to life doesn’t always require additional touchup procedures. Sometimes, just massaging the existing detail does the trick. The Highlights, Shadows, and Clarity sliders were all that were required to transpose this shot from average to special.

Clarity is the process of accentuating detail. The dictionary defines clarity as “the quality of being easy to see or hear; sharpness of image or sound.” When we clarify something, we clear it up. We understand it better. We view an issue from a different perspective.

Many image editing software packages have a slider called “clarity.” The function of this slider is to accentuate minor distinctions between lighter and darker areas within the image. Each of the other tone sliders (Exposure, Contrast, Highlights, Shadows, Whites, Blacks, Clarity, and Dehaze) all perform a clarifying process on specific tone ranges.

The real beauty of shooting with a 12/14-bit camera is the level of access you receive to the detail captured in each image. If you want to think “deep,” you can start with the editing process of your digital images. You’ll be amazed at what you will find when you learn to peel away the microlayers of distracting information in well-exposed photos.

Just as cleaning the lenses of your eyeglasses clarifies what you see, cleansing your pictures of dull lighting will put the sparkle in your photos.

Adobe Camera Raw controls reveal significant detail in the darker portions of the image by simply adjusting the Basic slider controls.

Learning to expose images correctly

The information you learn from excellent teaching resources like Digital Photography School teach you how to correctly set your equipment to capture a variety of subjects and scenes. Study the articles in this amazing collection and learn to shoot pictures understanding the basic tenets of good exposure. Poorly-captured images will hinder your discovery of detail. However, correctly exposed images will reward you with, not only beautiful color but, access to an amazing amount of detail.

Learn to harness the power of light correctly for the challenge that each scene presents by balancing the camera controls of ISO, Aperture, and Shutter Speed. The more balanced your original exposure, the less post-processing will be necessary.

Conclusion

Every scene presents a unique lighting situation and requires a solid understanding of your camera’s light-control processes to capture all possible detail. Any camera can capture events and document happenings, but it takes a serious student of photography to faithfully capture each scene in a way that allows all that information to be skillfully sculpted into a detailed image.


The post Don’t Create Detail, Just Reveal It – How to Reveal the Hidden Details in Your Photos appeared first on Digital Photography School. It was authored by Herb Paynter.


Digital Photography School

 
Comments Off on Don’t Create Detail, Just Reveal It – How to Reveal the Hidden Details in Your Photos

Posted in Photography


Chinese camera cuts through smog to record details almost 30 miles away

15 May
In this illustration (a) shows the distance between the camera and the target on a map of Shanghai, and (b) shows what the target building actually looks like. Image (c) is the view of the target through the smog of the city, while (d), (e) and (f) show earlier technologies attempting to record the target. Image (g) is the result of the researcher’s improvements

Researchers in China have created a camera that can record through the atmospheric pollutants of Shanghai to pick out objects just 60cm (2ft) high at a distance of 45 kilometers (28 miles). The ‘camera’ uses laser technology to fire light of a specific wavelength at a distant object and then uses a sensor to record the light when it returns so it can produce a picture that shows shapes with some distance information.

The project is being carried out by scientists at the University of Science and Technology of China in Shanghai, who have so far been able to record the form of a distant building with enough resolution to show the windows. The picture is technically a photograph, but not quite as we would expect to record with a normal visible light camera. The idea of the research is to produce an instrument that can ‘see’ further than is possible using visible light, and to be able to see in conditions visible light can’t get through.

At top left you can see the actual set-up of the LiDAR camera mounted inside the telescope, while the diagram top right shows what’s going on inside.

The scientists mounted a LiDAR (Light Detection And Ranging) camera inside a Cassegrain mirrored telescope and fired a near-infared (1550nm) beam from the top of a building on Chongming Island in Shanghai towards the K11 skyscraper 45km away in the centre of the city. As the scientists knew the distance and the speed of the light they were using they were able to calculate when it would return and thus isolate the image forming light from any other stray light in the scene.

An illustration showing how different methods of image extraction can be used to yield a more detailed image.

The quality of the image recorded is hardly going to serve for holiday pictures, but outlines, shapes and forms can easily be seen even when the atmosphere was too thick for visible light. The technology will be useful for seeing when we can’t see – through clouds, atmospheric haze and smog and for security surveillance.

This shows how the researchers are using distance information from the LiDAR to create depth maps of scenes that can hardly be seen with the naked eye

The researchers say they can improve the resolution and the range of their invention, and that they will be able to create 3D images in the future. Already with the range defining abilities of the LiDAR system they can incorporate depth and distance information into their images.

You can read the research paper as a PDF online.

Articles: Digital Photography Review (dpreview.com)

 
Comments Off on Chinese camera cuts through smog to record details almost 30 miles away

Posted in Uncategorized