RSS
 

Posts Tagged ‘Custom’

How to Use an iPad as a Softbox or Custom Background

30 Aug

What I really like about the iPad is the retina display screen; the quality of the images displayed on it is simply stunning. The brightness emitted from the screen is also quite powerful, so I was curious to see what apps are available in harnessing the light to aid photographers and see if the iPad can be used as a small softbox.
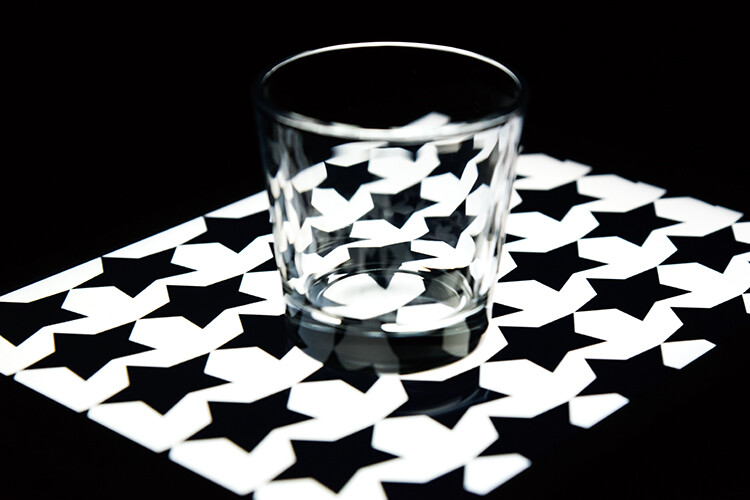
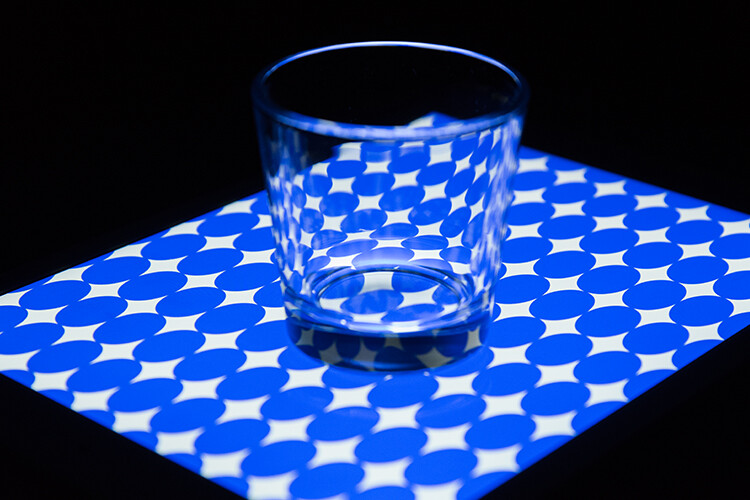
A glass tumbler shot on an iPad. I created the custom pattern using Photoshop.

For this article, I wanted to see how useful some of these apps on the iPad are for photographers. In particular, if you are only starting out in photography and you need to understand more about lighting. Or you are stuck in a hotel room, and you want to have a bit of fun experimenting with a light source.

Can an iPad be used as a Softbox? Or is it just an interesting alternative light source to explore your photography skills?

I will also demonstrate a simple step-by-step Photoshop tutorial on how to create simple pattern preset images for your iPad or tablet, that you can use as creative backgrounds for your shots.

If you are not interested in creating your own, you can simply download the free ones I’ve created specially for this article. Please click on the download button at the bottom.

What is a softbox?

A softbox is really only a light modifier, similar to an umbrella. However, a softbox controls the shape and direction of light more so than an umbrella does. A softbox has the flash (strobe) enclosed behind a diffuser, which prevents light-spill from occurring. They come in different shapes and sizes. The more common ones are square, rectangular and octagonal.

Softboxes also have the advantage of being able to produce natural-looking light by mimicking the shape of a window. As the name suggests, they produce a soft light for all types of shooting, be it food, product, portraiture, and so forth.

The regular size iPad has 9.7 inch (1536x2048px) display, and most softboxes range from small (12″) to quite large (four by six feet). This makes the iPad a very small softbox. A good rule of thumb is the bigger the light source relative to distance to the subject, the softer the light.

How to use a soft box?

A quick on search on iTunes and I came up with the following apps:

  • Photo Soft Box Pro HD – $ 2.99
  • Soft Box Color – FREE
  • SoftBox Pro for iPad – $ 2.99
  • Photo Light HD (SoftBox) – $ 1.99
  • Refboard – FREE (This app acts more like a board reflector)

As I can’t make the iPad bigger, I’m going to use the iPad as a softbox in four different ways:
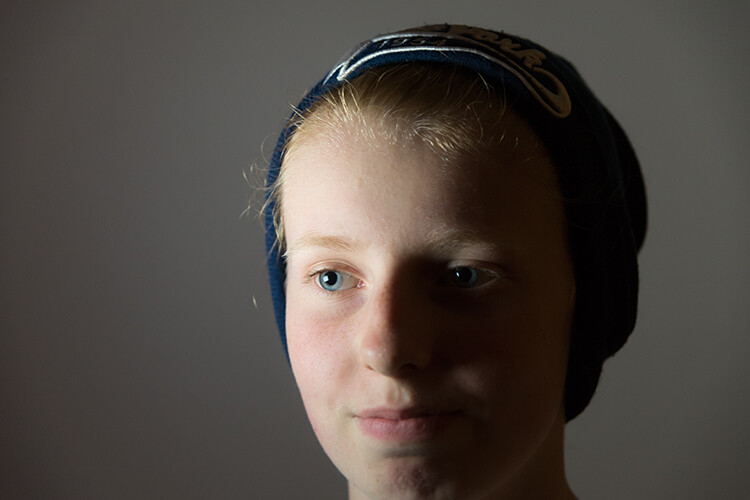
Head shot using an iPad as a soft box

My daughter shot with an iPad I used the Photo Light HD (Softbox) app

As a main light source

The first method is using the iPad as my main light source. I had the iPad on a tripod, close to my daughter’s face. You do need to turn off all other light sources. Having the iPad on a tripod made it easier for me to direct my subject. I downloaded the Photo Light HD app to test it out.
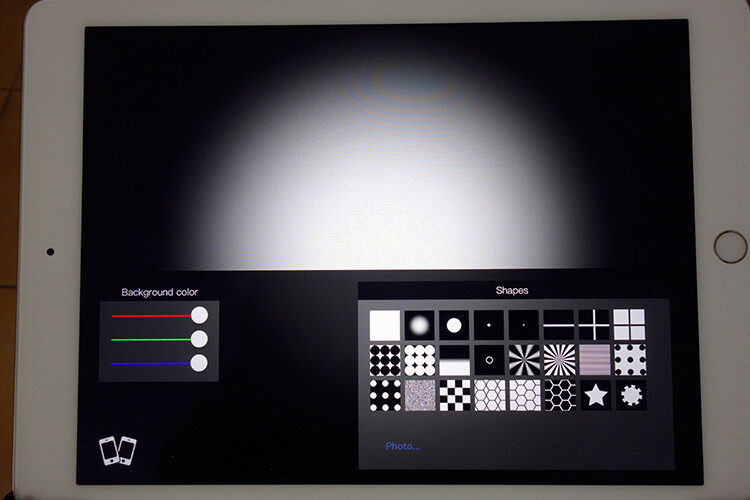
photo-light-HD-app

The Photo Light HD (SoftBox) app comes with 24 preset pattern images.
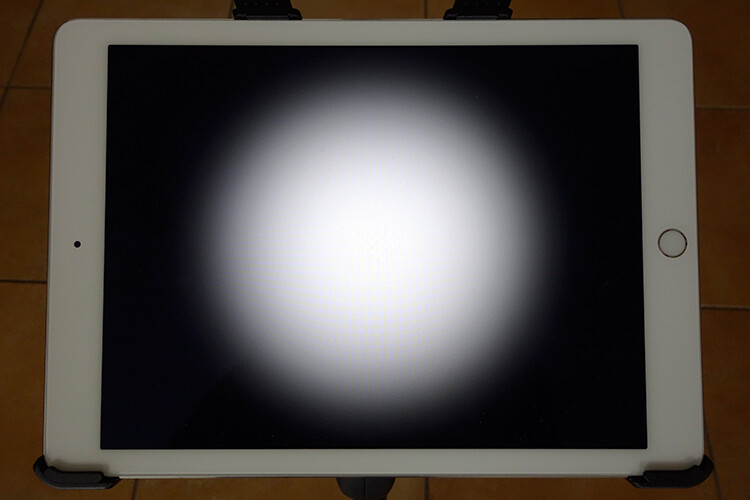
preset-image-photo-light-HD-app

One of the preset images that comes with the Photo Light HD (Softbox) app

It comes with 24 preset images. I used the second one here (see above photo). I was also able to use my iPhone as a remote with this app. I wanted a more dramatic portrait, where half of her face is illuminated, and the other half falls off to darkness. I did bump up the ISO quite high, as I handheld my camera.

Tip: You can mount your camera on a tripod and reduce the ISO, which will also help reduce noise in your photos.

Of course you don’t have to download this app. You could try out the Refboard or Soft Box Color apps instead, which are both free.
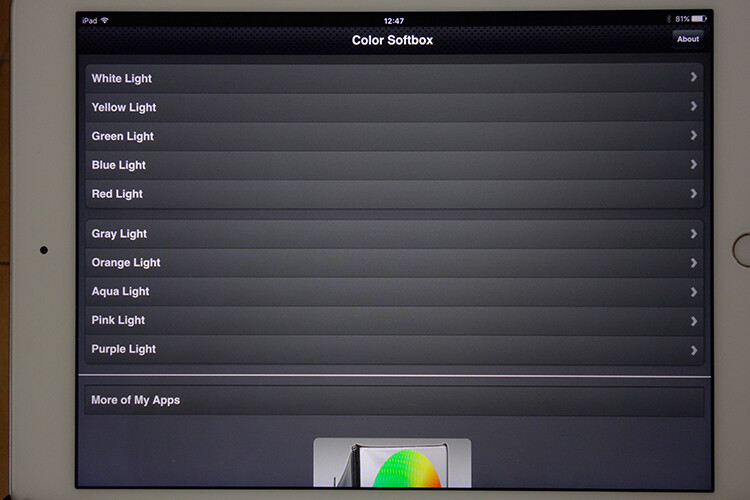
color-softbox-app

The Soft Box Color app is free to download.

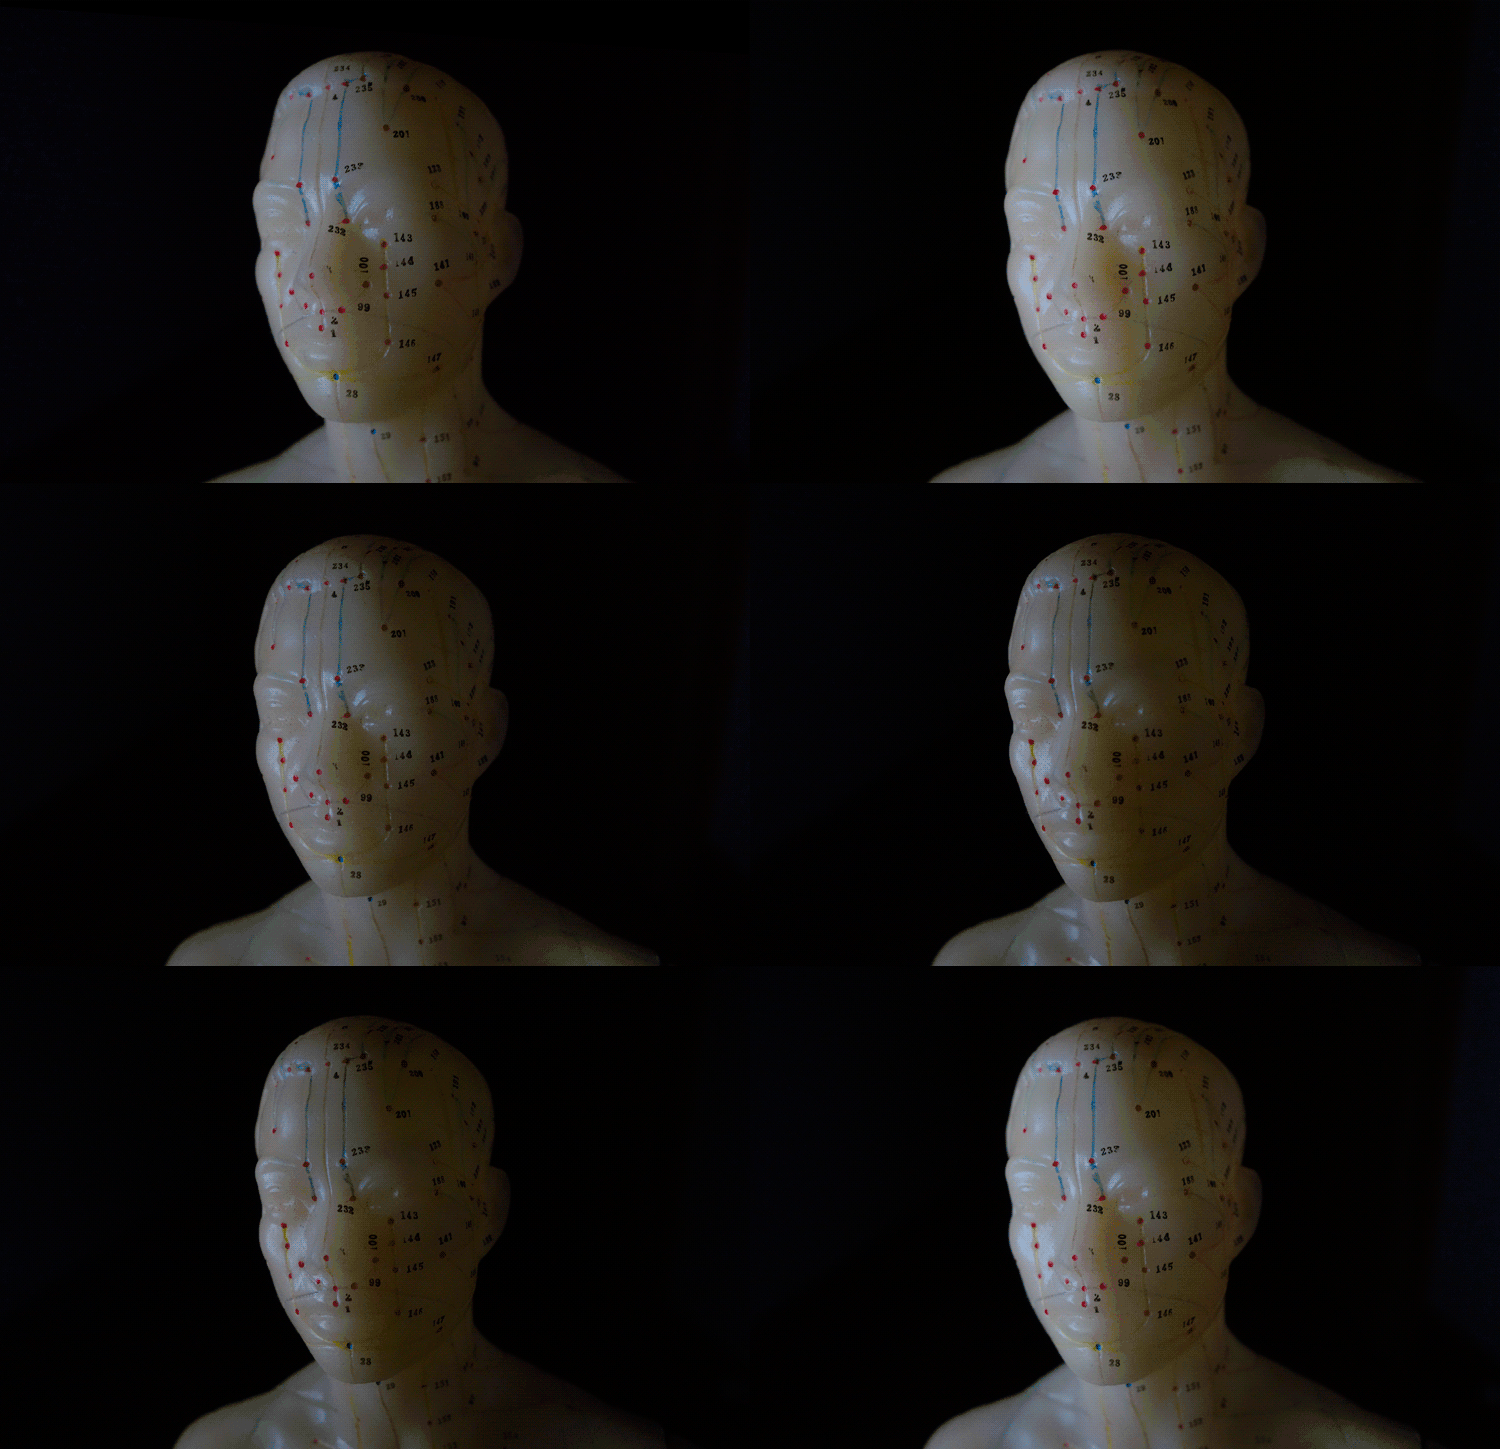
Set the background color to white. Use a willing subject or object, and experiment by moving the iPad nearer or closer. You will see how the light wraps around the subject. Pay attention to how the shadows appear and drop off. See animated gif below.
meridian-man

By moving the iPad nearer or further away from your subject. You can determine how soft or hard the light will be.

Monster lighting

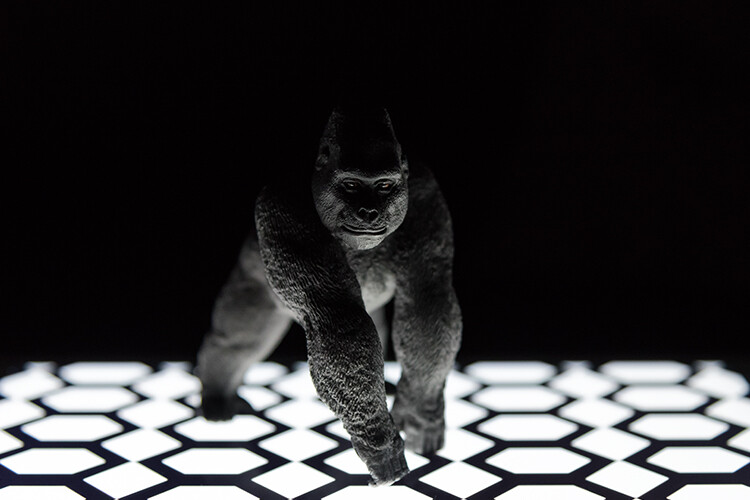
The second method is called Monster Lighting. This is done by placing the main light directly underneath the subject. So I positioned a toy gorilla on the iPad, and displayed a patterned image that I created to add more drama to the photo.
toy-gorilla

Monster Lighting – where the light source is directly underneath the subject.
lego-figure-blue-stars-background

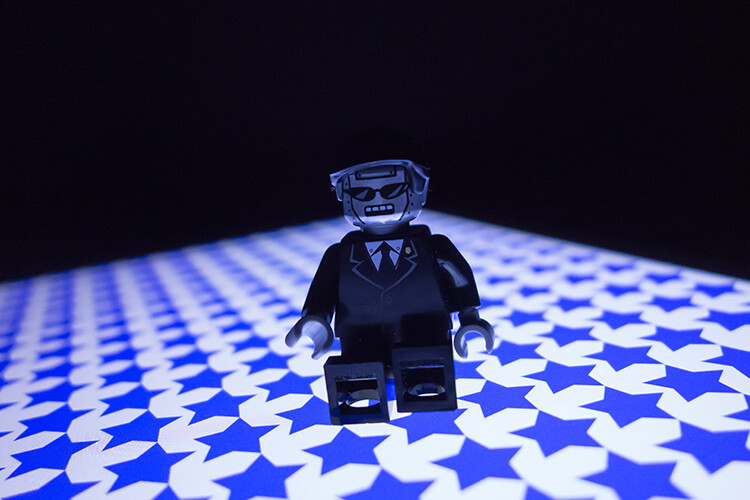
Another example of the Monster Light effect. The reflection of the pattern image highlighted just under the mouth of the Lego figure adds to the drama. I wish I could say that this was intentional but it was purely experimental.

In the photo of the Lego figure above, I used a different pattern. You can download this one for free along with two others. See the link at the bottom.

Colored patterns as a backdrop

For the third method, I used colored patterns on the iPad as an illuminated backdrop. I created my own in Photoshop, see the step-by-step tutorial below demonstrating how I created them. This is where you can get really creative, and have fun taking these types of shots.

By placing an ordinary tumbler on the iPad with a preset pattern image, you can get really interesting refractions in the glass. Experiment by moving your camera position slightly up or down, to find the angle that best suits your shot.
glass-tumbler-on-blue-circles-background

I love the way the pattern image is distorted by the glass.

I also shot this small plastic yellow ball, placed on another preset pattern of green circles, to create an abstract composition.
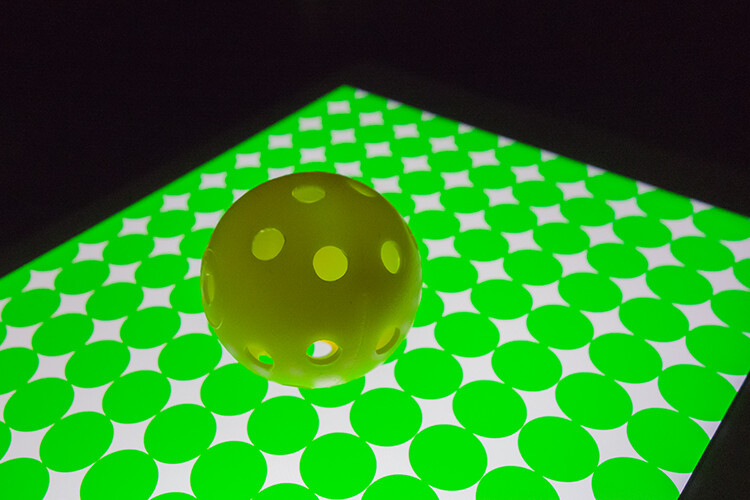
yellow-ball-on-green-circles-background

A small yellow plastic practice golf ball, shot on another custom pattern image on the iPad.

Create a silhouette

Creating a silhouette is simple to do. Use the Soft Box Color or the Refboard app, set to white. They are both free to download. Just make sure your brightness level on your iPad is set all the way to the right (brightest) in Settings. In the example below, I used a toy ostrich to create a silhouette.
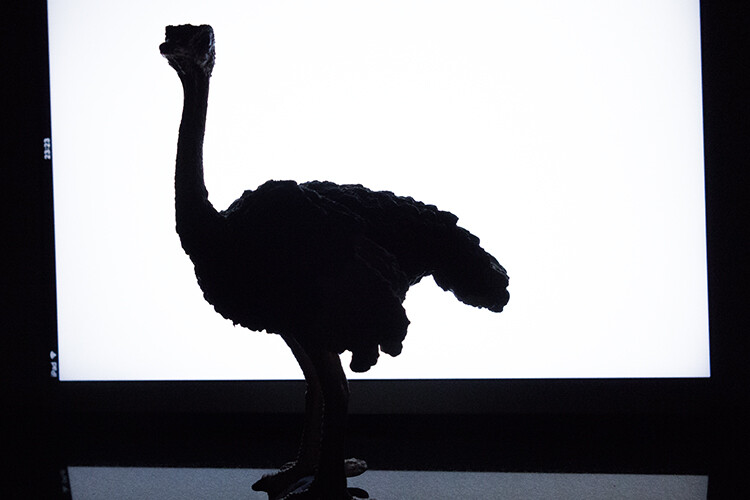
ostrich

A toy Ostrich silhouetted against an iPad, using the Soft Box Color app, set to white.

Creating your own patterned images in Photoshop

In this quick Photoshop tutorial I will show how easy it is to make these patterned image,s by using the Step and Repeat technique in Photoshop.

Start by opening a new document 2048px by 1536px. You can ignore the DPI setting. This only matters when you want to print your images. You will be saving this file as a PNG format which discard pixel density. Our concern here is pixel dimensions. I’m going to leave the background as white. You can choose any color you want.
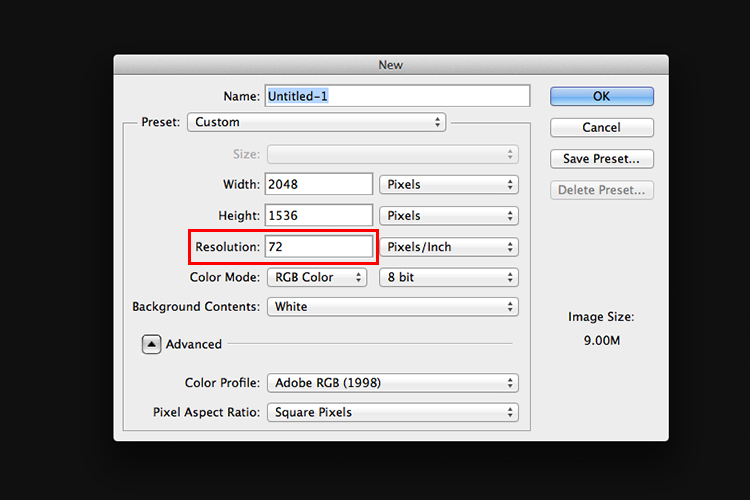
resolution-72dpi

In this example, I’m going to name the document “Circle Pattern” and click OK.

Make a shape

Click-and-hold on the Rectangle tool in the Toolbox and choose the Ellipse Tool from the menu. If you want a different shape, for example a star or diamond shape, you can select the Custom Shape Tool. There are many preset shapes to choose from.
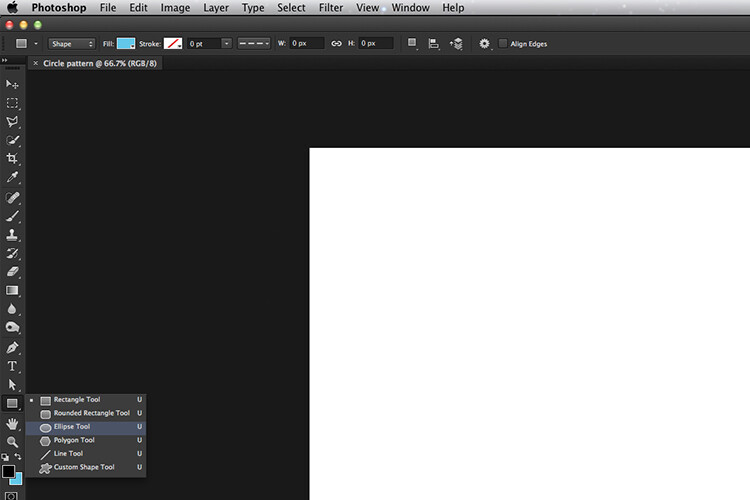
ellispe-tool

Ellipse tool

Custom shapes

Custom shapes

Then, up in the Options Bar, make sure the Shape Layers icon is selected. Choose whatever fill color you want. For this tutorial, I chose Black (with no stroke).

Hold down the Shift key and draw out a circle. The Shift key keeps the aspect ratio 1:1. I chose 154px, but again choose whatever size circle you want. With the Move tool (shortcut V on the keyboard) place the circle in the very top left corner of the new document file. Have the Info Panel open. Go to Window>Info.

Duplicating your shape

Pressing CMD/CNTL+T on your keyboard brings up the Free Transform Tool. But instead, hold down the Alt key as well so: CMD/CNTL+Alt+T. This is the important step, move the cursor over the circle shape. The cursor becomes a black arrow head. Hold down the Shift key and move the duplicated circle shape over by 154px, or equal to the width of your circle or shape. Look at your info panel when moving the circle shape. Release and click on the commit transform button or press Enter. That is the “Step” part of this technique.

To repeat this shape, hold down CMD/CNTL+Alt+Shift+T again. Keep holding down CMD/CNTL+Alt+Shift while pressing T multiple times, to create a line of circles across the document. Make sure the last circle goes beyond the document boundary (off the edge).

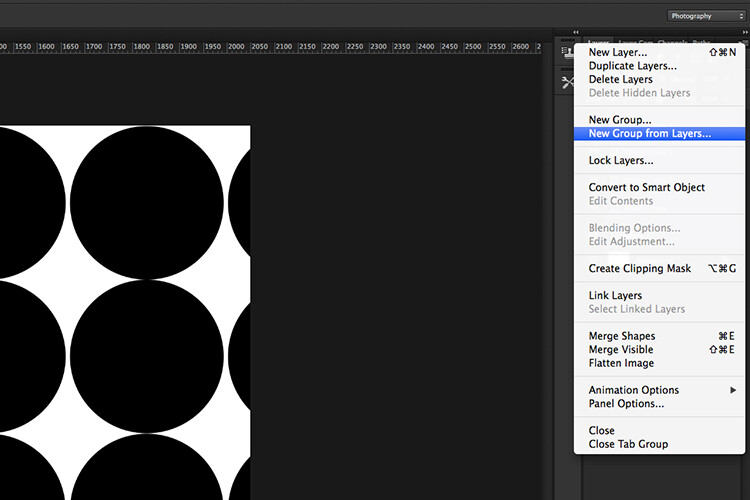
In your layers panel, you’ll notice that we have only the one layer and not duplicated layers for each circle. To create a new line of circles. Hold down the Shift+Alt keys and drag down by 154px. Continue all the way down the document until you have a document full of circles. Now go over to the Layers panel and select all the layers and put them into a group folder.
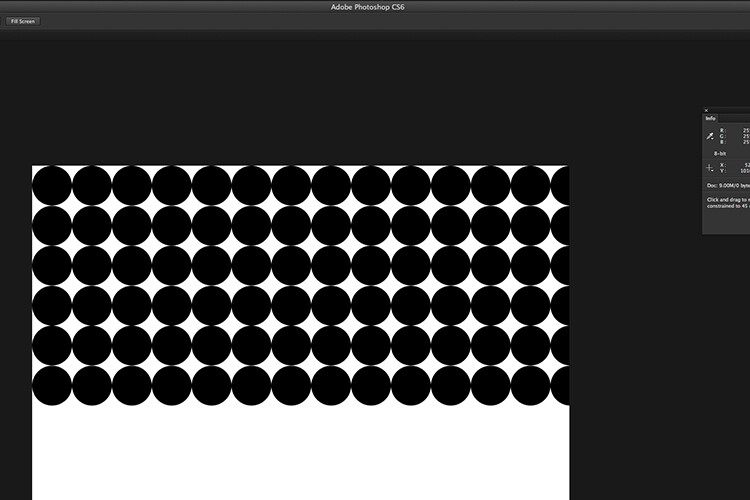
Creating a custom pattern image using the Step and Repeat technique in Photoshop.
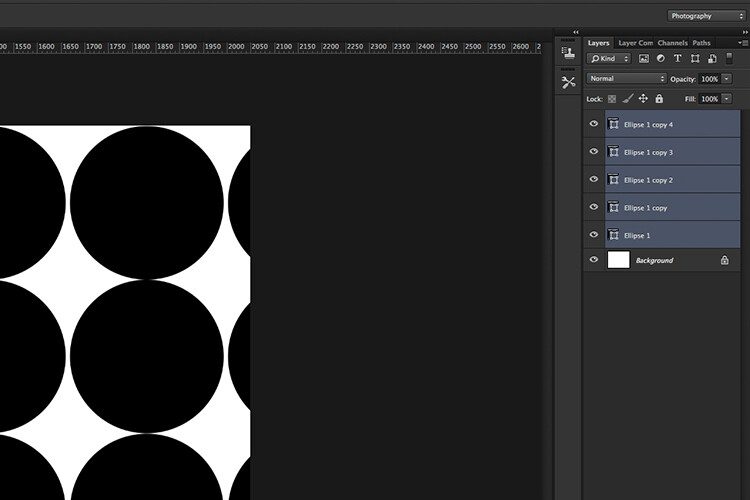
Creating a custom pattern image using the Step and Repeat technique in Photoshop.

select-layers

Select all your shape layers

select-layers-into-group

Make a group of all the shape layers

You can now use the Free Transform tool to hold to scale the shapes (CMD/CNTL+T ), so that they are all contained within the document boundaries to create a seamless pattern effect.

Go to File>Save for the Web. Choose PNG-8 for the file format and click Save. Another pop dialog box appears. Name your file and select the location on your computer and click Save.
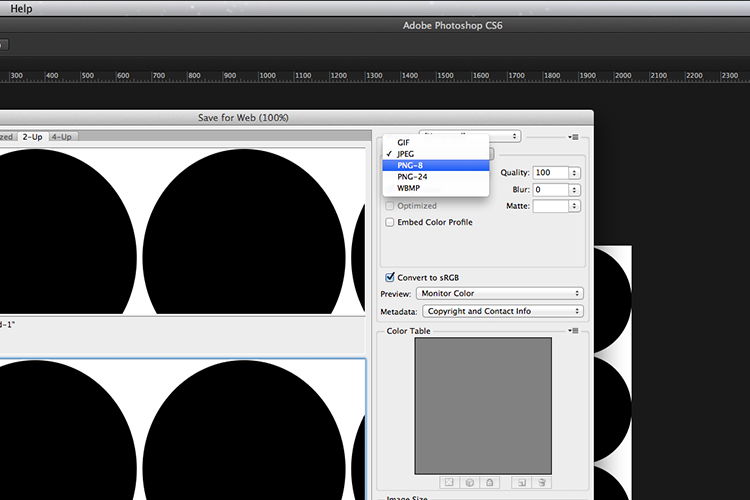
save-as-a-png-8

You now have a pattern preset image to transfer to your iPad or tablet.

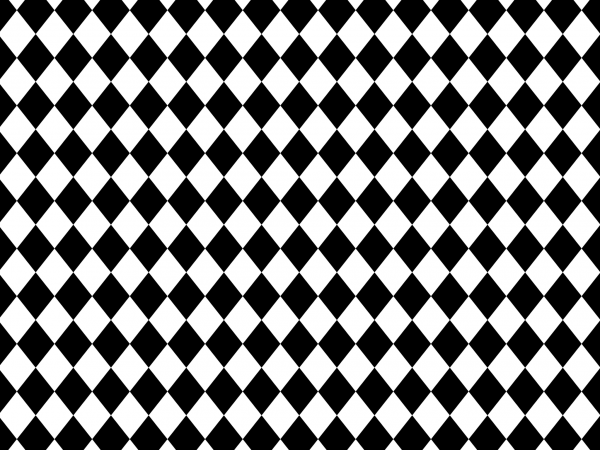
If you haven’t got Photoshop, feel free to download the preset images by downloading the ones I made below, enjoy (just right-click and choose “open link in new tab”, then right click and choose “Save Image As”).
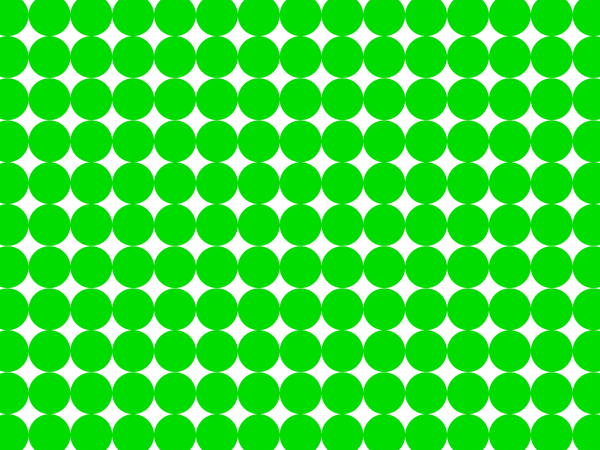
green-circles

diamonds

blue-stars

Summary

Can an iPad be used for photography? Well not in the professional world. If you a beginner to photography and experimenting with artificial light for the first time, give it a try if you have an iPad or tablet. But I wouldn’t suggest going out to purchase an iPad for this reason only.

I am great believer in using whatever light source(s) are available, to explore different shooting techniques and styles. So if you don’t have an iPad/tablet or photography lights, why not experiment with just a flashlight or LED light!

Do you have an iPad/tablet? If so what photography apps have you used? Please leave your comments below.

googletag.cmd.push(function() {
tablet_slots.push( googletag.defineSlot( “/1005424/_dPSv4_tab-all-article-bottom_(300×250)”, [300, 250], “pb-ad-78623” ).addService( googletag.pubads() ) ); } );

googletag.cmd.push(function() {
mobile_slots.push( googletag.defineSlot( “/1005424/_dPSv4_mob-all-article-bottom_(300×250)”, [300, 250], “pb-ad-78158” ).addService( googletag.pubads() ) ); } );

The post How to Use an iPad as a Softbox or Custom Background by Sarah Hipwell appeared first on Digital Photography School.


Digital Photography School

 
Comments Off on How to Use an iPad as a Softbox or Custom Background

Posted in Photography


Toasteroid: Print Your Own Custom Toast Design With This App

23 Aug

[ By SA Rogers in Gadgets & Geekery & Technology. ]

toasteroid

You don’t necessarily need skills to be a food artist these days, now that smartphone apps make it possible to do things like print custom designs on your breakfast. A gadget called the Toasteroid (a toaster on steroids?) caters to those who demand more than just the browning of bread from the typically simple kitchen appliance, boasting that it also functions as a personal weather forecaster, private messenger and doodle pad. If Kickstarter is any gauge, there’s been a long-simmering demand for just such a device.

toasteroid 2

The Toasteroid comes with a companion mobile app, and you connect your smart phone to the toaster via Bluetooth. Choose from a collection of templates available within the app or draw your own design, which will have to be fairly simple and pixelated by virtue of the way the toaster works. You can also request that the toaster prints today’s weather right onto your breakfast. There’s a fairly sensitive brownness control, and if you don’t feel like fussing with it, an ordinary lever on the side lets you use it like a normal toaster.

toasteroid 5

toasteroid 4

If you know somebody else who has a Toasteroid, you can send them a private message via toast. Presumably, the app will prompt them to stick a piece of bread into their own toaster so they can receive it. The makers also note that you can leave yourself or a loved one a reminder that’s hard to ignore – at least, until you stuff it into your mouth. Probably the most useful function is pleasing picky kids who demand that their favorite cartoon characters be visible on every conceivable surface.

toasteroid 6

toasteroid 8

If you’re still asking why, Toasteroid is ready with an answer: “Because why not.” Sure, not everything in our homes should be a needlessly complicated smart gadget, but the Toasteroid does have all the same functions as any high-end toaster and costs less than a lot of them if you get in on the pre-sale. 

Share on Facebook


[ By SA Rogers in Gadgets & Geekery & Technology. ]

[ WebUrbanist | Archives | Galleries | Privacy | TOS ]


WebUrbanist

 
Comments Off on Toasteroid: Print Your Own Custom Toast Design With This App

Posted in Creativity


DIY: $10 Custom Wooden Backdrop Mount

13 Jul

Do you have painted canvas backdrop, or other textile, that you use for portraits?

Why clamp it up to a crossbar (and crop the top) every time you use it, when for about $ 10 you can build a permanent wooden mounting bar that begs to be included in the frame?

Such was this morning's project.Read more »
Strobist

 
Comments Off on DIY: $10 Custom Wooden Backdrop Mount

Posted in Photography


7 Ways Custom Photo Backdrops Can Promote Your Business

13 Apr

How could you photograph a love story in Paris having less than $ 50 at your disposal? Or make local moms stand in line at your photo studio without running an expensive marketing campaign? That’s totally possible if you pay attention to one single element of your studio setup – background. Read on to find out how other photographers are successfully Continue Reading

The post 7 Ways Custom Photo Backdrops Can Promote Your Business appeared first on Photodoto.


Photodoto

 
Comments Off on 7 Ways Custom Photo Backdrops Can Promote Your Business

Posted in Photography


Dyslexic Designer Creates Custom Typeface Addressing Disorder

21 Jan

[ By WebUrbanist in Design & Graphics & Branding. ]

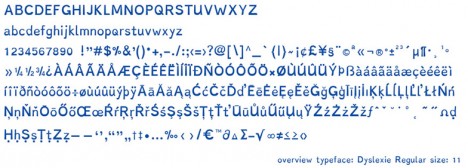
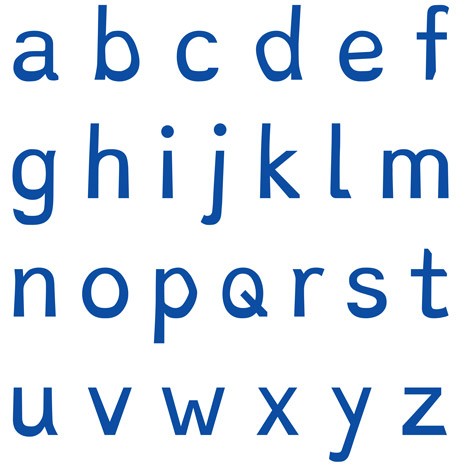
dyslexic typeface

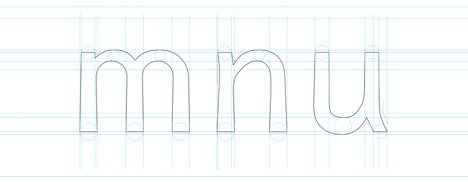
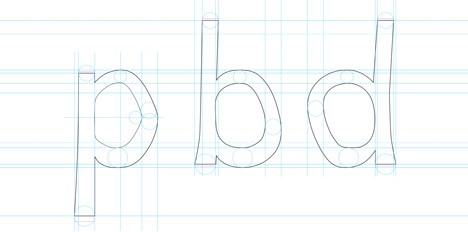
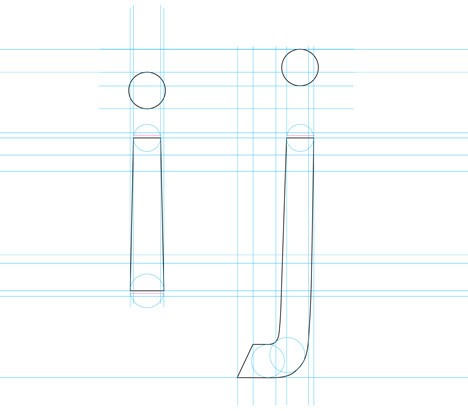
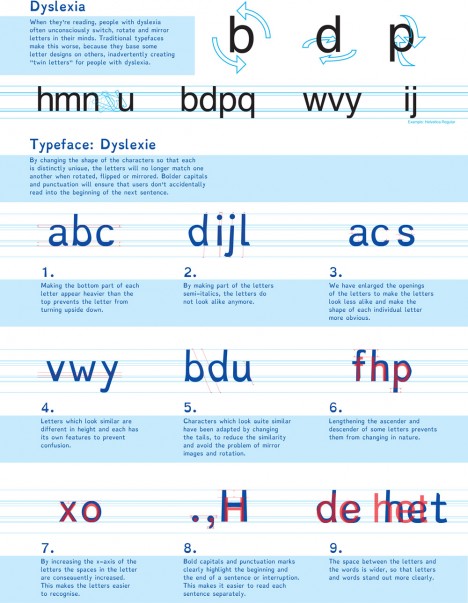
Designed to address the visual processing problems associated with dyslexia, this font uses a set of tailored strategies to make reading easier for those with the disability.

dyslexie bold letters bottoms

Christian Boer developed Dyslexie from first-hand knowledge of its effects. “When they’re reading, people with dyslexia often unconsciously switch, rotate and mirror letters in their minds,” he explains.

dyslexie regular design lines

“Traditional typefaces make this worse, because they base some letter designs on others, inadvertently creating ‘twin letters’ for people with dyslexia.”

dyslexie mirroring dislexic address

dyslexic p b q

For simplicity, clarity and consistency, most typefaces involve numerous mirrored letters, such as an ‘m’ that is a doubled ‘n’ which in turn is an upside-down ‘u’, or ‘b’ flipped to become ‘p’s and ‘q’s.

dyslexie design principles

To address this, Boer thickened the bottom portions of letters, making it more clear which end is up and creating clearer distinctions between different characters in the process. Larger spaces and punctuation are also made to make everything more legible.

dyslexie design strategy

“By changing the shape of the characters so that each is distinctly unique, the letters will no longer match one another when rotated, flipped or mirrored,” Boer said. “Bolder capitals and punctuation will ensure that users don’t accidentally read into the beginning of the next sentence.”

Share on Facebook


[ By WebUrbanist in Design & Graphics & Branding. ]

[ WebUrbanist | Archives | Galleries | Privacy | TOS ]


WebUrbanist

 
Comments Off on Dyslexic Designer Creates Custom Typeface Addressing Disorder

Posted in Creativity


Create Your Own Watermark using a Custom Shape in Photoshop

04 Dec
Transparent-watermark

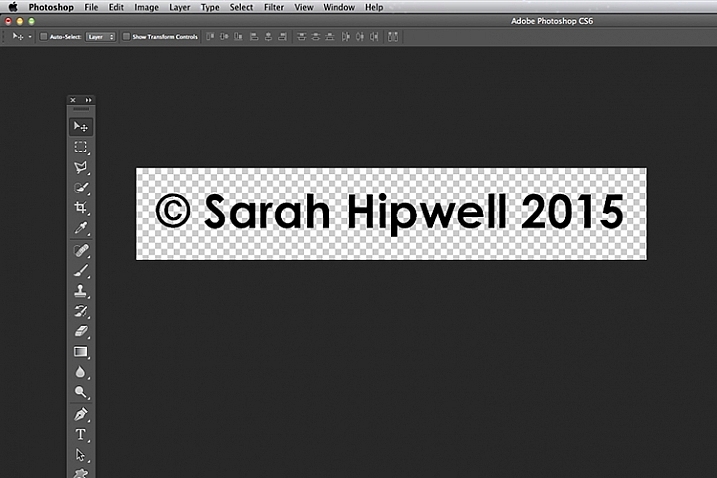
Big transparent type copyright watermark that you would use send to clients for proofing.

I know there are many ways of creating a watermark. Using the Watermark Editor in Lightroom for example allows you to add your own text or graphic to your images. In general there is a lot of debate whether or not to add a watermark to images.

This article isn’t going to discuss the pros and cons of watermarking your images. Instead, I will demonstrate a step-by-step tutorial using the Custom Tool in Photoshop.

Whether you upload your images to the various social media platforms, or you want to send a client a high resolution image for proofing. This easy tutorial will show you how to create your own watermark using the custom tool in Photoshop.

For a while, my method was opening an image file where I had my own custom copyright information on a text layer. So that I could easily drag and drop this text layer onto a new image. This made more sense and took less time to add a watermark image rather than creating it every time. That is until one day, I couldn’t find the file!

Here are my four easy to follow steps to creating your own custom watermark using the Custom Tool in Photoshop. I prefer to use a custom shape over a custom brush. Shapes are vectors which means they scale up or down without losing quality.

Step 1 – Create a new document

Open Photoshop and create a new document. Make it 1000 pixels wide, by 300 pixels high.

Step 2 – Add text

Press the letter D on your keyboard, to make sure your foreground color is black. Choose whatever font you like, then press T to select the type tool. Hold down ALT key on a Mac and press G (Alt+0169 on a PC). This brings up the copyright symbol, add a space and type your name and year.

Alt+G-type-your-name-and-year

Holding down the ALT key on a Mac and press G brings up the copyright symbol (Alt+0169 on a PC).

Step 3 – Convert the layer to a shape

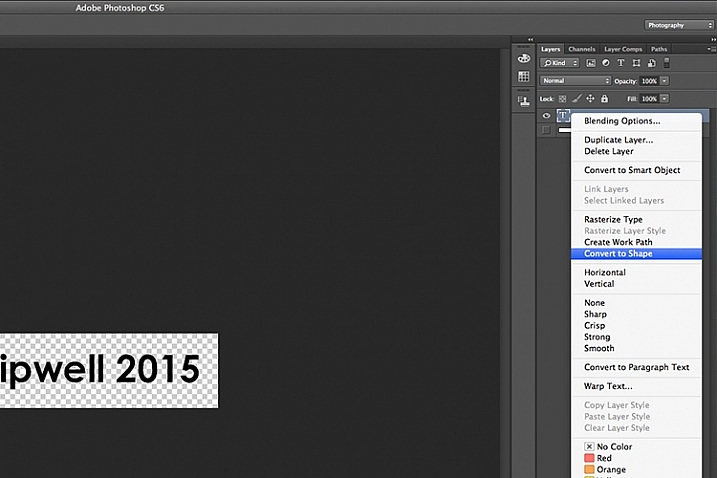
Go over to the layers panel. Right click on the text layer and go down to Convert to Shape.

Convert-text-layer-to-shape

When you have typed your watermark. Right click on the layer and select Convert to Shape.

This icon appears in the thumbnail to show that the layer is now a shape layer.

This-icon-shows-the-layer-is-a-shape

This icon in the thumbnail layer tells you that this is now a shape(vector) layer.

Step 4 – Save as a custom shape

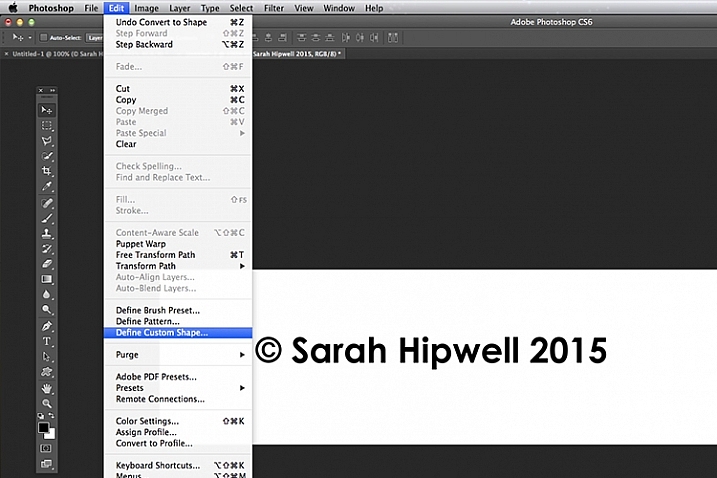
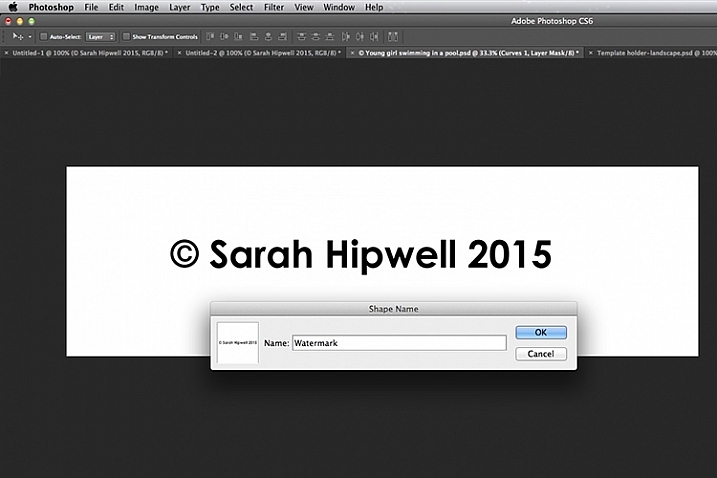
Go up to Edit menu and select Define Custom Shape. A Shape Name dialog box appears – type in Watermark and click OK. This now adds your type as a custom option in your Shape Presets Library.

Define-custom-shape-under-edit

This is how you save your watermark custom shape in the presets library to use again and again.

Shape-name-dialog-box

Give your watermark a name so that you can find it easily. Plus you may decide to have a few.

That’s it. It took just four steps to create your own custom copyright watermark. Let me show now how to access, and add it to your images.

Apply your watermark to images for online viewing

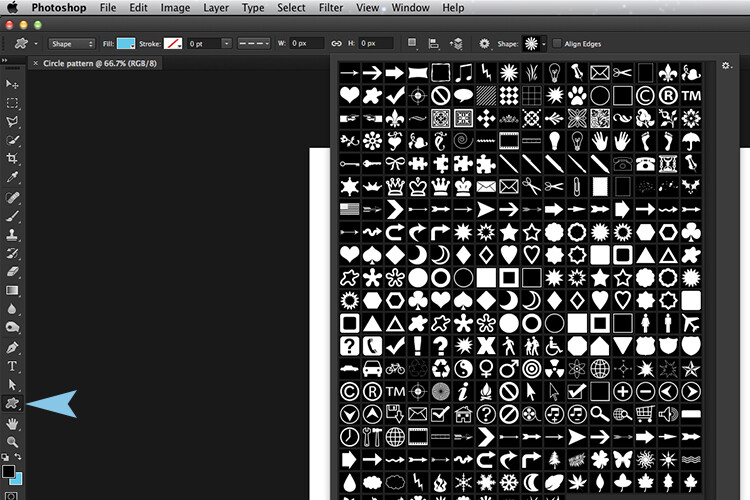
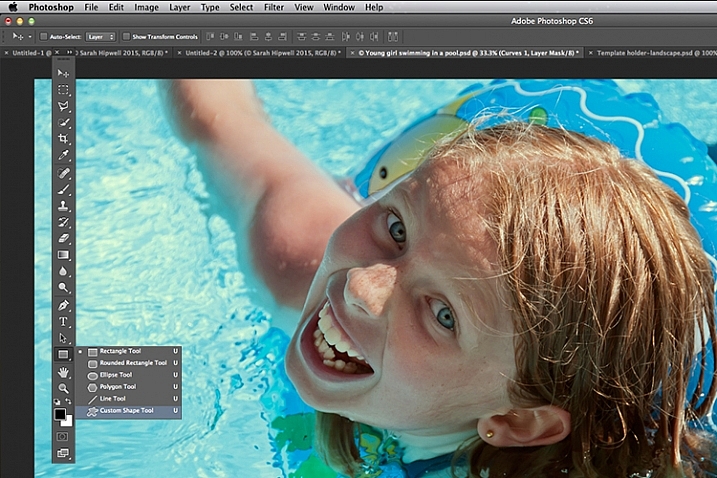
Open an image that you want to share on Facebook, Flickr, etc. Create a new layer in the Layers Panel. Choose the Custom Shape tool in the toolbar (press Shift+U)

Custom-shape-tool-highlighted-in-toolbar

This is where you find the Custom Shape Tool in the Toolbar.

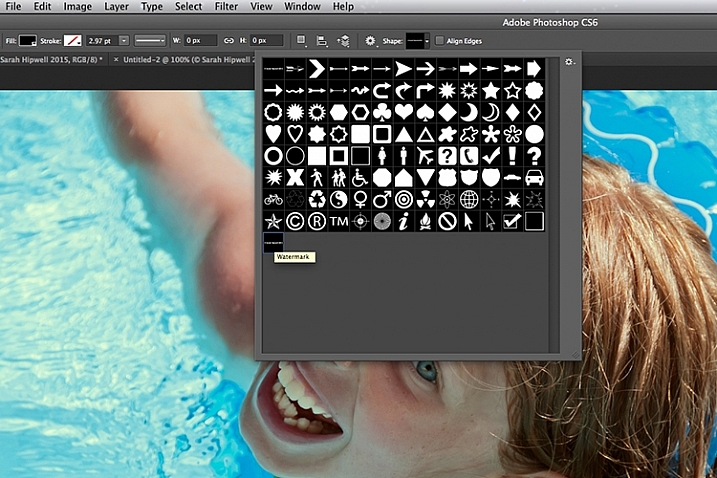
Go up to the Options Bar and click on the thumbnail next to the word Shape. This brings up the Shape Presets Library dialog box. At the very bottom, you will find the shape called Watermark.

Watermark-shape-at-the-bottom-in-presets-library

Custom shapes will always appear at the bottom in the presets library.

Now press and hold the Shift key, click and drag the watermark shape across your image. The Shift key ensures the shape remains in proportion. Don’t worry about the size just yet. Place it in position – in this case, I placed the watermark bottom right.

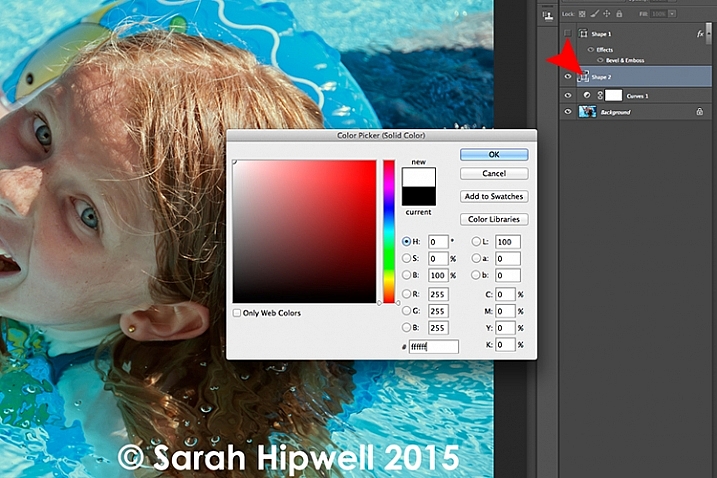
Now as the foreground color was set to black, I want to change the color to white. Go up to the Layers Panel and click on the Layer thumbnail and the color picker dialog box appears. You can choose whatever color you want here.

Changing-color-of-watermark-to-white

You can customise your watermark shape with any colour or style effect.

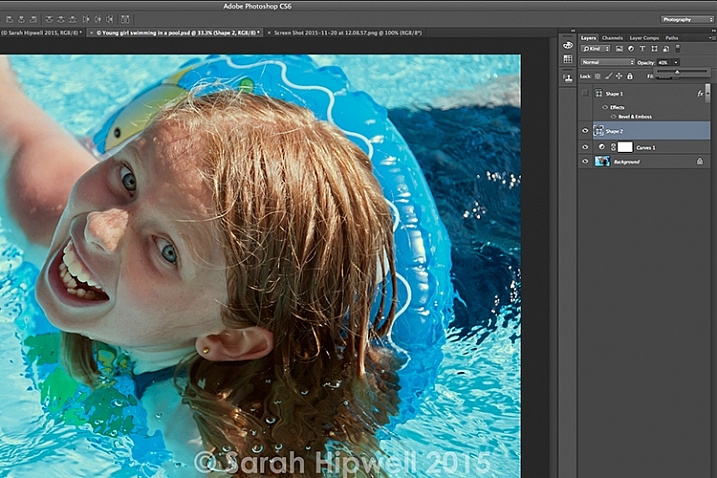
Go back up to the Layers Panel and reduce the opacity to your desired setting. I chose 40%.

Opacity-reduced-to-40-per-cent

Reducing the opacity allows for your watermark to be more discreet.

I now want to reduce the size of the watermark. Go up to the Edit menu and choose Free Transform Path (Cmd+T on a Mac). Holding down the Shift and Alt keys, drag any of the corners of the transform handles in towards the centre. This reduces the size while keeping the aspect in proportion. Press Enter or the Commit Transform button up in the Options Bar. Go up to File and Save for the Web.

Apply to high res images for proofing

Okay, so let’s say you want to send a higher resolution image to a client. Open up the image. Click on the Custom Shape Tool (Shift+U). The watermark shape is already selected, so hold the Shift key and click and drag right across the image. Leave the color as it is.

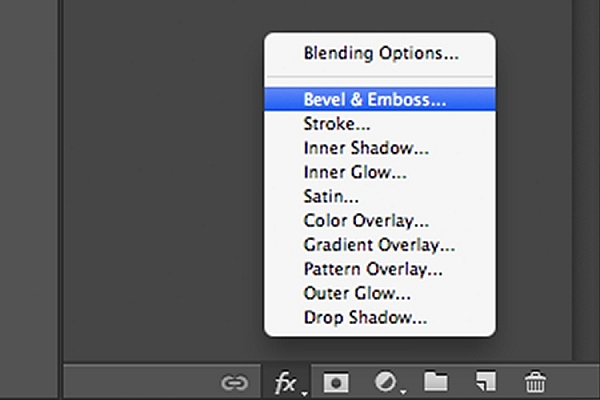
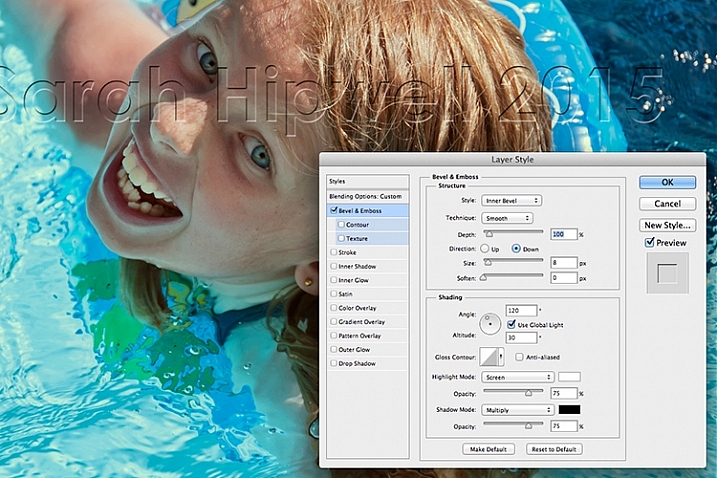
This watermark is going to be transparent. Click on the Add a Layer Style icon at the bottom of the Layers Panel and select Bevel and Emboss. The Layer Style dialog box appears. Increase the size to 8 pixels and change the direction to down.

Bevel-and-Emboss-layer-style

Layer styles can be found by clicking on this icon at the bottom of the layers Panel. Alternatively, go up to Layer menu and choose Layer Style.

Bevel-and-Emboss

The Bevel and Emboss is a good effect to add to your watermark if you want to make more transparent, while still protecting your image.

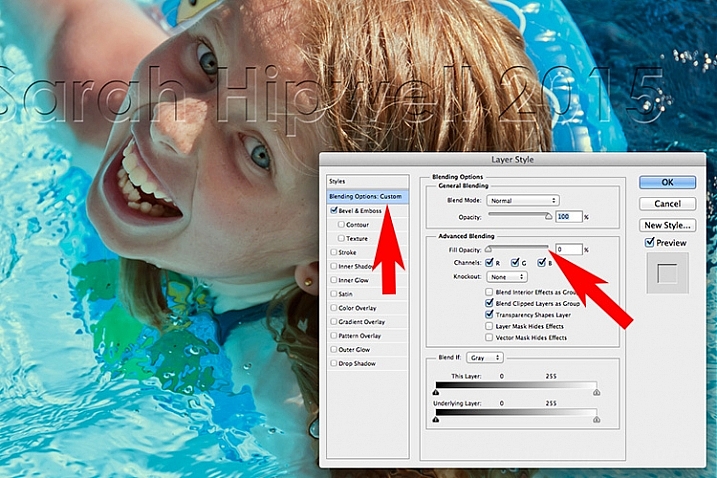
Next go over to the left and click on the Blending Options: Custom, which is directly above the Bevel and Emboss. Under Advance Blending bring the Fill Opacity slider down to zero and click OK. Go back up to Opacity in the Layers Panel and reduce to 68%.

Blending-Options-Custom-2

Reducing the Fill Opacity hides the colour and just leaves the effect.

Tip:

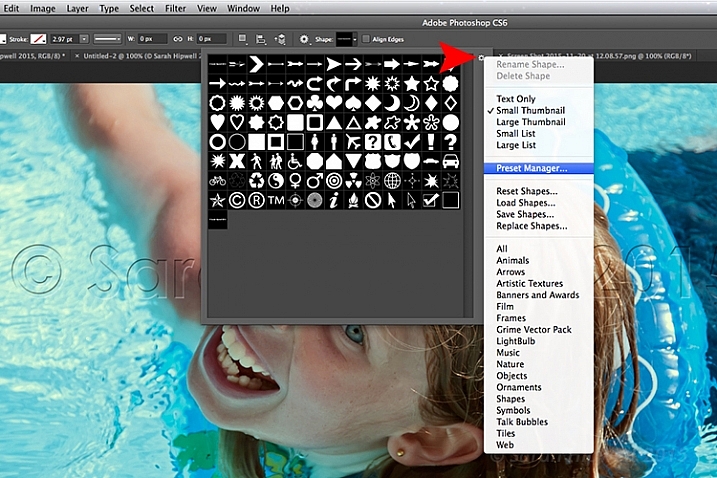
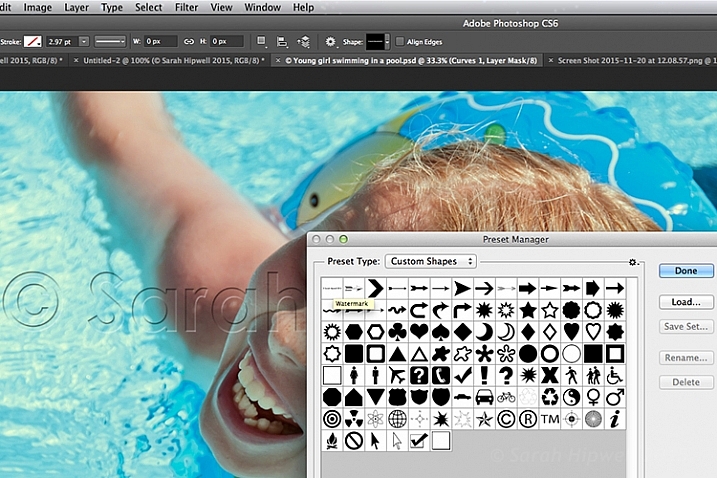
To place your Custom Watermark Shape at the top in the Presets Library, click on the thumbnail right of the word Shape in the Options Bar. The Shape Presets Library dialog box appears. Click on the gear icon and select Preset Manager, the Preset Manager dialog box appears with all the shapes. The Watermark shape is the very last one, click and drag it up to the top and click the Done button.

Location-of-Presets-Manager

By clicking on the gear icon, the pop-out menu where the Preset Manger is located appears.

Moving-watermark-shape-to-top-Presets-Manager

Here in the Preset Manager, you can rearrange the shapes inside of the dialog box. Just click on any shape and drag it where you want it. I moved the watermark shape to the top for easy access.

Do you use watermarks on your images? Why or why not?

What techniques do you use? Please share in the comments below.

googletag.cmd.push(function() {
tablet_slots.push( googletag.defineSlot( “/1005424/_dPSv4_tab-all-article-bottom_(300×250)”, [300, 250], “pb-ad-78623” ).addService( googletag.pubads() ) ); } );

googletag.cmd.push(function() {
mobile_slots.push( googletag.defineSlot( “/1005424/_dPSv4_mob-all-article-bottom_(300×250)”, [300, 250], “pb-ad-78158” ).addService( googletag.pubads() ) ); } );

The post Create Your Own Watermark using a Custom Shape in Photoshop by Sarah Hipwell appeared first on Digital Photography School.


Digital Photography School

 
Comments Off on Create Your Own Watermark using a Custom Shape in Photoshop

Posted in Photography


Review of the Nitz Custom Handmade Camera Strap

15 Nov

Camera straps are one of those secondary things that most of us photographers don’t really put much thought into. However, consider this: the only thing keeping your camera away from the hard ground when it’s out of your hands, is your strap. It needs to satisfy some basic requirements, in order to serve us well. It needs to be strong, well-secured to our camera, and it needs to be comfortable.

It also doesn’t hurt if the strap doesn’t break the bank; after all, we have many other things we’d like to spend our hard-earned money on, like lenses, other accessories, or even a new camera body.

Nitz Custom Handmade Camera Strap is a product that not only meets all of those requirements – it exceeds them with extreme prejudice.

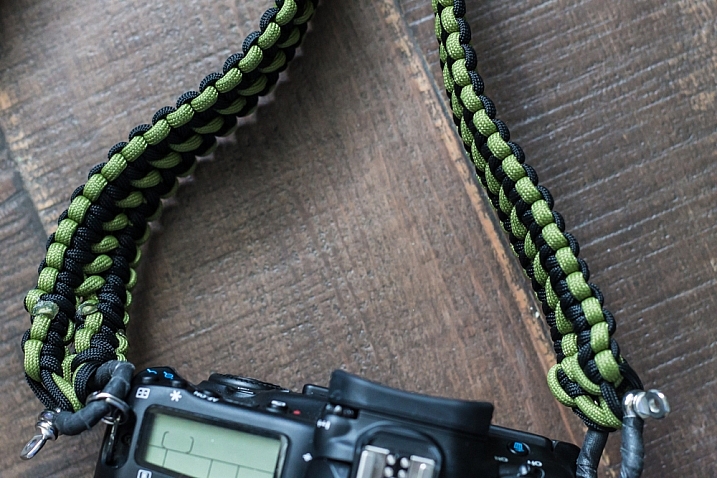
IMG_2209

Photographer Chris Nitz created the product initially out of his own need. He wasn’t happy with the mass-produced camera straps available on the market, and set out to create one on his own. After experimenting with different materials, he settled on Type III Commercial Grade 550 parachute cord, and began weaving a few prototypes together. The result was a strap that met all of his own requirements, and inevitably began to attract the attention of his fellow photographers.

My main takeaway from the experience of ordering, and using a Nitz strap, was how custom tailored the entire process is. When you order one of these products, you know a few things immediately from visiting the website. You know that this strap is being made specifically for you, as a photographer. You know that you’re getting a product that is meant to last, and protect the equipment you value so much. Chris is also proud of the fact that all of the materials for his straps are sourced from right here in the United States.

Finally, you understand immediately that Chris is well aware of the financial budgets many photographers have, and his commitment to our pocketbooks, as well as the environment, are clear.

My experience began by visiting the Nitz Strap online store. Several options are available for every aspect of the product, and you begin by choosing the type of strap. At the moment, Chris is concentrating on neck straps for the heavier cameras, and wrist straps for the smaller, lighter models.

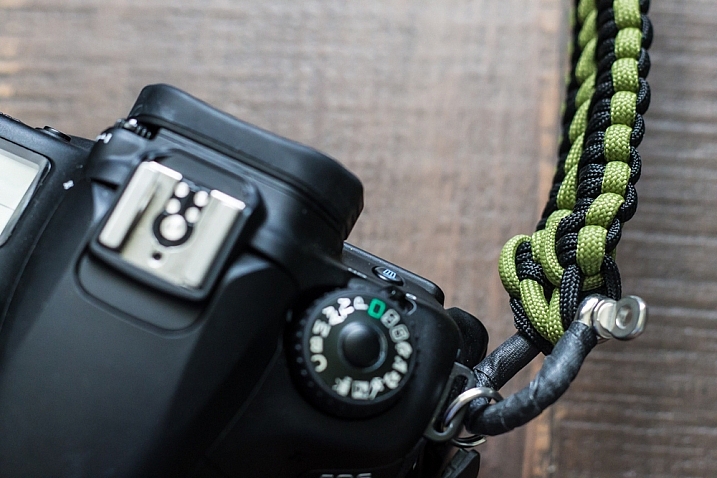
IMG_2208

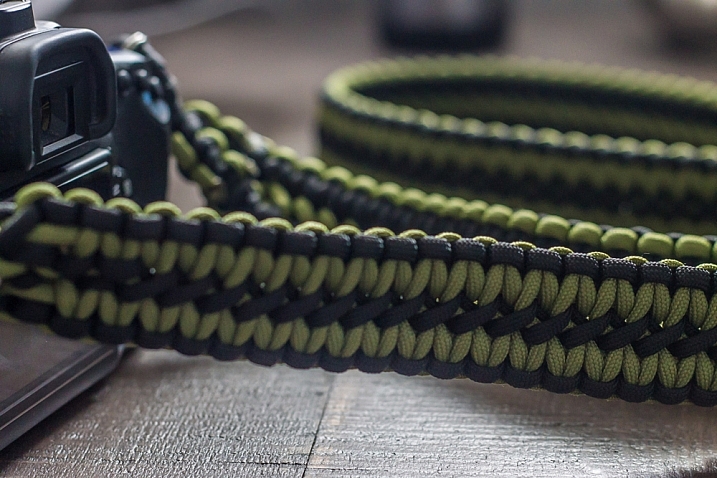
After choosing a strap type, you then move on to the length and width of the product. Several different types of weaves are offered, each one differing in width. Want something thin, compact and discreet? Choose the “Thin Line”, a weave about 3/4″ wide. If you need something beefier, there are three more options available. Lengths available range between 12″ and 16″ for wrist straps, and from 36″ to an impressive 50″ for neck straps.

As I wanted something wide that my future cameras could grow into, and a longer option than my Canon strap, I ordered the 50″ Double Cobra weave, which is Nitz’s widest strap at 1.25″. This would allow me a bit more length to let the camera hang from my shoulder (my most common setup), or wear my equipment cross-body to lessen the chance of it slipping off and falling to the ground.

After selecting these basics, it’s time to move on to choosing the hardware you’ll use to connect the strap to your camera and keep it secure. The options here almost invoke a feeling of overkill; these straps are rated to hold up to 150 pounds depending on hardware, and any configuration you choose will be a huge step up from the connections we’re used to getting in standard camera kits.

All straps include two very capable, metal split rings, to connect hardware to the strap points on your camera. But some ingenious additional options stand out here, including a simply perfect tripod screw that allows you to connect the strap directly into your tripod mount point for quick and easy removal. I chose the anchor shackle connector, a small, but immensely sturdy piece of metal rated up to 400 pounds on its own.

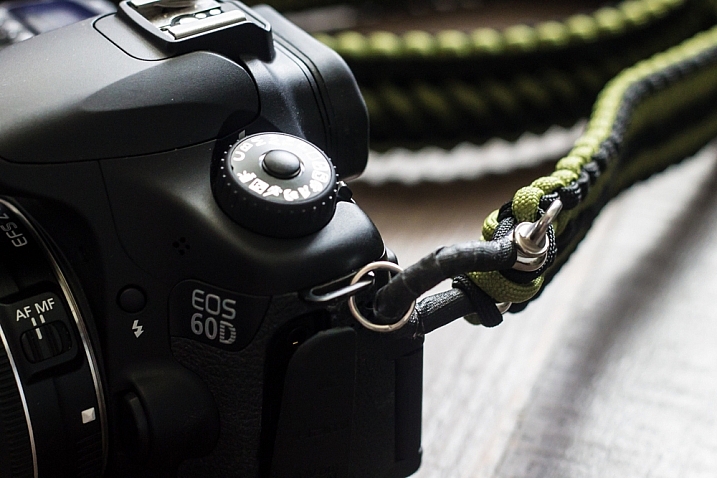
IMG_2210

At this point in the ordering process, it’s time to have some fun. Nitz Strap comes in a very impressive assortment of color and pattern options, many of which they keep in regular stock. Two colors are standard with your order, although you have the options of incorporating up to four colors into your creation, at the expense of possible additional wait time to get the product.

Want a camouflage strap? Check. American flag? Christmas themed? Tie Dye? They’re all there. You’ll have fun going through the over 200+ color options offered.

I wanted something that would satisfy my natural attraction to simple, dark, and matching palettes, and went with a very classy looking black and moss green weave that I figured would go with my all-black Canon body very well.

Another point that Chris means to make is that you don’t have to break the bank to keep your equipment safe and secure. Pricing differs depending on options of course, but I was able to create the custom camera strap of my dreams in less than 10 minutes, and ended up spending less than $ 100 USD.

My particular experience was a quick and completely painless one. I contacted Chris via e-mail about my order so he could talk me through some of the options I picked. I was amazed at how quickly he put the strap together and shipped it out (even though he had to order the moss green cord I requested as it was temporarily out of stock).

IMG_2212

Only five days went by between the time I clicked the order button, to the point I had the strap in my hand. The entire process really did make me feel I was having a custom strap made for me as an individual photographer, by another photographer.

And let’s be clear about this; these straps are beautiful. As cliché as it sounds, the craftsmanship on the strap I received was nothing short of impeccable. The hand weaving was perfectly done, with no loose ends. Even the way Chris tidies up the ends of the cords, blends in with the rest of the product.

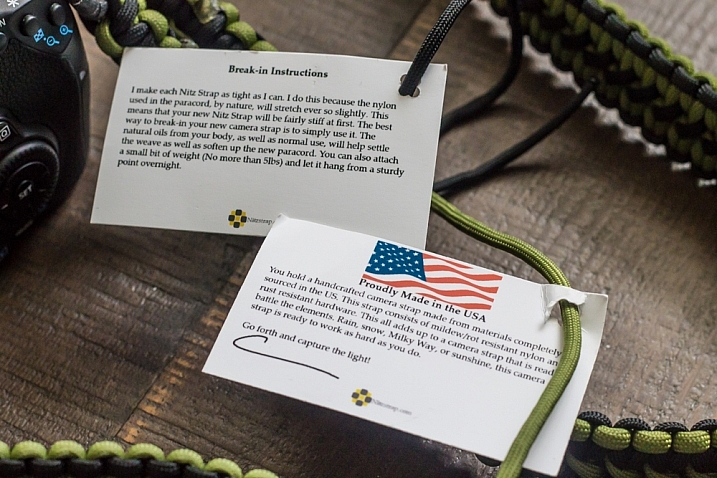
The strap came in very simple packaging, rolled up in a coil, with a couple of tags adorning it. These tags are made from recycled paper, and attached to the strap with the remaining end pieces of the cord that was used to create it. There are no paper receipts here, everything is handled through e-mail. You’re never going to get a bad rap from me when little details like this are included to make a small, but meaningful contribution to our environment.

IMG_2216

After struggling a bit to get the strap onto my camera via the heavy-duty split rings (since I didn’t choose one of the simpler attachment options available, I don’t plan to switch this strap out to a different camera), it was immediately obvious that I had found a permanent solution to keeping my 60D safely around my neck.

The strap was sturdy to the point of making me feel like it was almost too much for my camera. I would feel confident swinging it over my head by the strap as hard as I could; that’s how secure this thing feels. The strong anchor shackles are tightly wrapped in gaffer tape, and the whole package just looks professional, sturdy, and very, very slick.

If I had to nitpick about one thing, it would be how stiff and unforgiving the strap is at first touch out of the package. But even this is by design. Chris weaves the parachute cord together as tightly as possible for strength, creating an impossibly tough piece of fabric. This type of cord is known for softening over time, which means after a bit of use out in the field, the strap becomes much more pliable, and it conforms to your neck or shoulder. I have found this is exactly the case, as in less than two weeks my strap is almost perfectly broken in to my liking.

IMG_2220

Overall I couldn’t be much happier with the product I received from Nitz Strap. Even as a photographer who gets excited about little accessories for my camera, I was beyond pleased with what I ordered. I already plan to order another one for my film camera body in the near future. This strap definitely has my endorsement, and I recommend you at least visit Chris’ site at www.nitzstrap.com to check out all of the options I’ve discussed; I’m sure you’ll be just impressed with what you see as I was!

Disclaimer: Nitz Strap did provide this product to our writer to test out free of charge. However at dPS we only do completely unbiased reviews. But, as you can see the author plans on purchasing another one for his other cameras so that speaks to the product’s quality.

googletag.cmd.push(function() {
tablet_slots.push( googletag.defineSlot( “/1005424/_dPSv4_tab-all-article-bottom_(300×250)”, [300, 250], “pb-ad-78623” ).addService( googletag.pubads() ) ); } );

googletag.cmd.push(function() {
mobile_slots.push( googletag.defineSlot( “/1005424/_dPSv4_mob-all-article-bottom_(300×250)”, [300, 250], “pb-ad-78158” ).addService( googletag.pubads() ) ); } );

The post Review of the Nitz Custom Handmade Camera Strap by Tim Gilbreath appeared first on Digital Photography School.


Digital Photography School

 
Comments Off on Review of the Nitz Custom Handmade Camera Strap

Posted in Photography


Playable Landscapes: Custom Concrete 3D Puzzles of Cityscapes

13 Nov

[ By WebUrbanist in Design & Products & Packaging. ]

3d city maps

Pick any spot in the world and this company can print out a custom mould for a concrete pour, which, when cured, will make a 16- or 32-piece puzzle out of your favorite place.

3d cityscape

Using Open Street Map data, Logiplaces has already created a preliminary set of popular places voted up by fans for mass production, including downtown San Francisco and the Grand Canyon.

Liked a traditional puzzle, the sides of each piece can be matched up to create the whole, but unlike most puzzles, it is the vertical rather than the horizontal shapes that allow for matching. It becomes a matter of figure and ground, connecting building scales and typographies rather than colors and 2D patterns.

3d puzzles

At this point, fully-custom selections are cost-prohibitive for consumers, but the goal of the company is to make these accessible to mass markets as well. “When we came up with the idea of LOGIPLACES, we believed it had the potential to go global with loads of different places to cover. However, right now, we would first like to see, what are your favourite places that we can start manufacturing, and of course, we’re interested in what our first consumers think.”

Share on Facebook


[ By WebUrbanist in Design & Products & Packaging. ]

[ WebUrbanist | Archives | Galleries | Privacy | TOS ]


WebUrbanist

 
Comments Off on Playable Landscapes: Custom Concrete 3D Puzzles of Cityscapes

Posted in Creativity


Advertise Your Business by Using Custom Print Balloons

06 Sep

Where is the best place to put printed advertisement? You can print your advertisement on classifieds, hoping that newspaper readers will take a look at it and pay special attention to it. However, your expectation will soon vanish because your advertisement is just a tiny spot in the middle of the ocean of thousands of […]
Digital Photography Information Center

 
Comments Off on Advertise Your Business by Using Custom Print Balloons

Posted in Equipment


Custom SLR Dual Camera Strap – Product Review

25 Aug

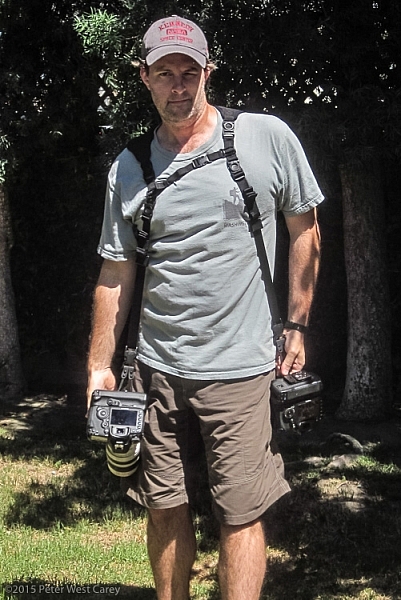
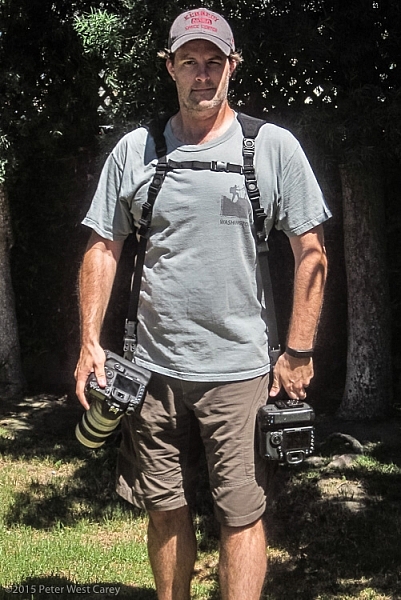
CustomSLR-Dual-Strap-DPS-PWC2015-0805-1314To be honest, I thought the Custom SLR Dual Camera Strap looked like a dorky idea when I was first asked to review it. The idea is simple: sometimes you need to carry two cameras (especially heavy cameras) and the logistics of such a feat have always been cumbersome. One strap over this way and the other maybe off of the other shoulder? Double criss-cross?

Custom SLR, a company that got its start thanks to a number of successful Kickstarter campaigns, crafted a solution using one of their best selling camera straps, times two. They sent me a copy of the Dual Camera Strap to test during a small boat cruise with UnCruise Adventures in Alaska last month. I was excited for the trip as it would mean I could take both my cameras and long lenses (28-300mm and a rented 150-600mm) for both close and distant images of marine wildlife. Having that range from 28mm-600mm (on crop factor cameras) always available was important to me so I was willing to try the Dual Camera Strap, with hopes I wouldn’t always be fumbling for the right camera.

What is it?

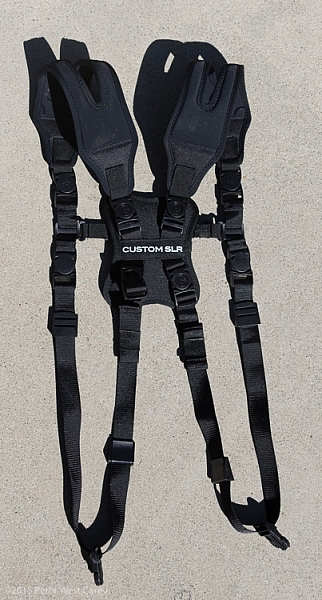
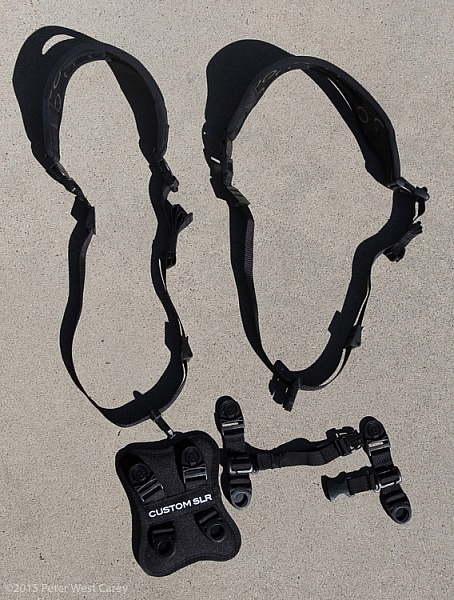
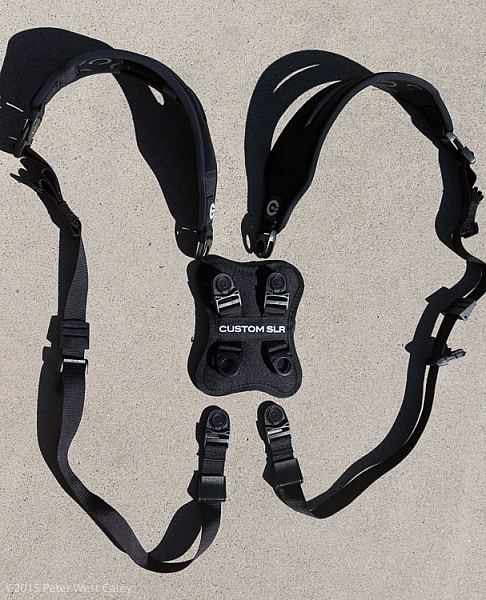
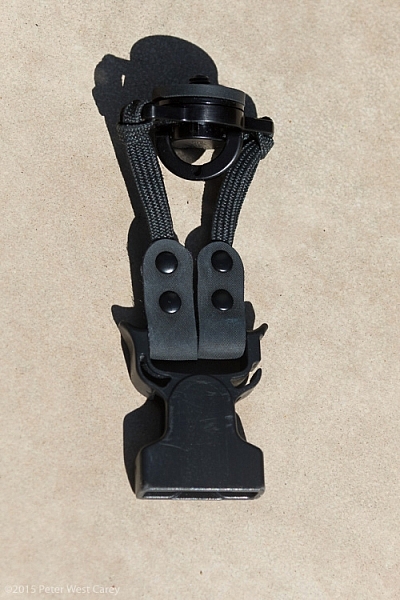
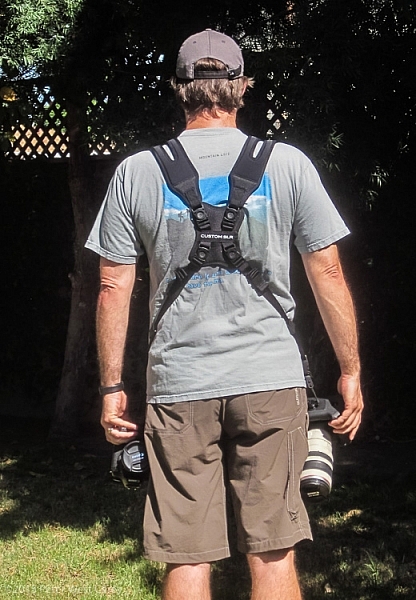
The unit is really five parts in one. Two of those parts are copies of the traditional Glide One Strap System by Custom SLR, meant to hold one camera, over one shoulder. Then they introduced a unique buckle connector that fits in the middle of your back. Lastly, there are two small pieces of webbing that add a sternum connector.

CustomSLR-Dual-Strap-DPS-PWC2015-0805-5547

The great thing about this setup is it uses two straps that can work alone. You’re not stuck with always using the dual setup when you only want to use one camera.

Let’s take a look at how it all fits together then I’ll tell you about my experience with the setup.

Anatomy of a Dual Camera Strap

The setup starts with the individual straps. Each has a piece of split neoprene to help evenly distribute weight on your shoulder. On the underside of the the split strap is a silicone print to provide traction, ensuring the strap doesn’t move around your shoulder.

CustomSLR-Dual-Strap-DPS-PWC2015-0805-5550

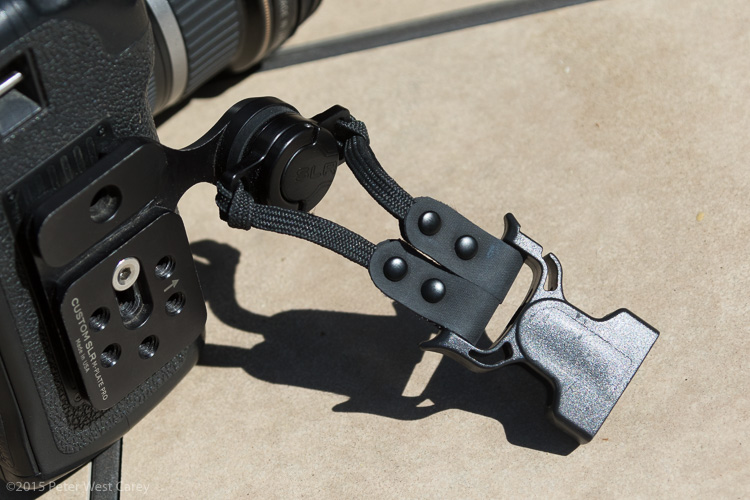
Cameras are connected to a strap via a beefy quick-release clip attached to a tripod screw, with a loop to make hand-tightening possible (no need for tools). I have used one of these single straps in my daily photography and travels to over a dozen countries for the past three years. It’s now getting a little frayed but never once has the screw mount or quick-release failed.

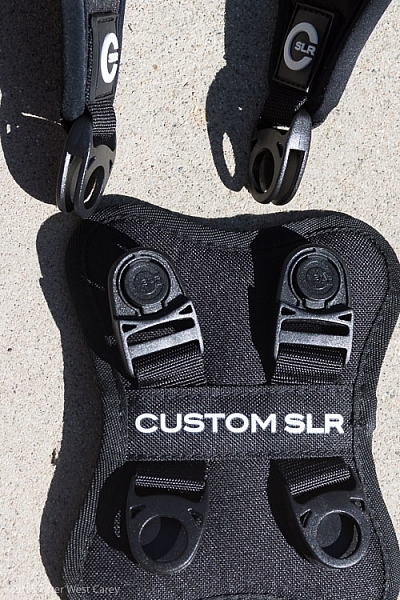
Next there is a connector that attaches the two straps in the middle of your back. Simply disconnect each single strap and clip them into the connector. The clips are one-way, making the process fairly idiot-proof.

CustomSLR-Dual-Strap-DPS-PWC2015-0805-5555

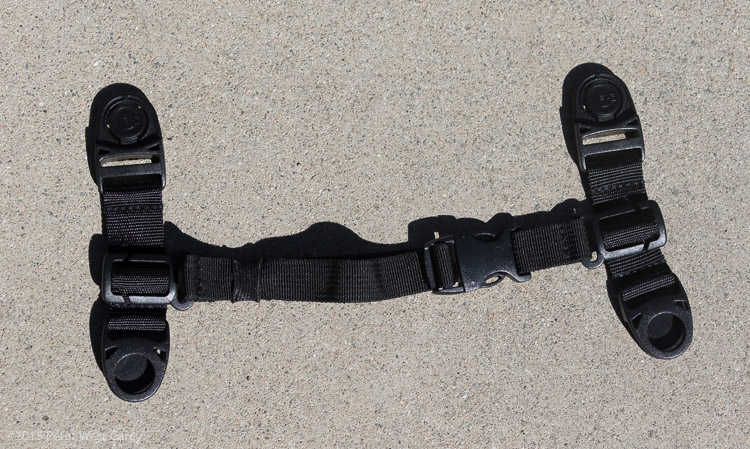
Lastly, to keep the system stable, you need to insert a sternum strap that clips the two single straps together in the front.

CustomSLR-Dual-Strap-DPS-PWC2015-0805-5551

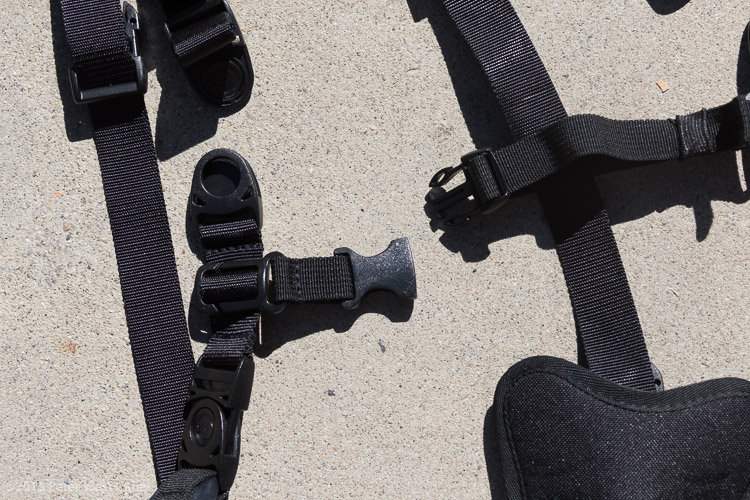
Having received my unit already setup, I took it apart, jumbled up the pieces, and tried to put it all together at a leisurely pace. It took me one minute and 50 seconds to go from two single straps to the Dual setup, and that included making a small error and correcting it. It’s pretty easy.

CustomSLR-Dual-Strap-DPS-PWC2015-0805-5554

CustomSLR-Dual-Strap-DPS-PWC2015-0805-5556

Attach Your Cameras

When changing from single straps to dual, the straps first need to be shortened. This is because each strap is simply looping around one shoulder and not across your body.

Next, screw in the tripod mount, called a C-Loop, to each camera. As Custom SLR likes to create a whole inter-functioning ecosystem, the C-Loop also works with their M-Plate tripod quick release system. This additional plate gives better stability when using long lenses, but is sold separately (shown in second photo).

CustomSLR-Dual-Strap-DPS-PWC2015-0805-5553

CustomSLR-Dual-Strap-DPS-PWC2015-0805-5552

Suiting-Up – Harness First, Then Cameras

Now to put it all together! It’s best to put on the harness first before attaching cameras. It can be done the other way around, but it is quite clunky and will bang up your cameras. Then, clip each camera into your preferred side.

CustomSLR-Dual-Strap-DPS-PWC2015-0805-1314

CustomSLR-Dual-Strap-DPS-PWC2015-0805-1317

How Does it Feel?

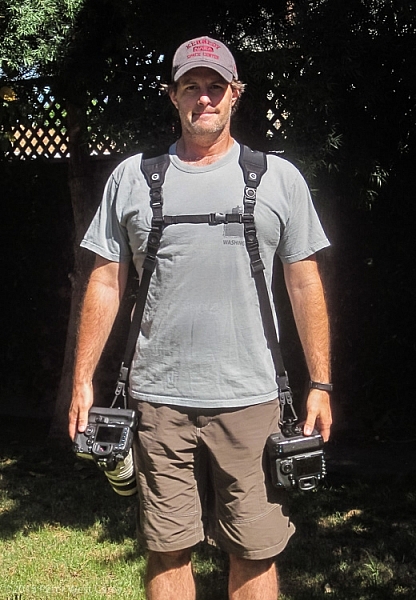
What I enjoyed about the Dual Strap was how comfortable it was with the weight. I was wearing about 16lbs (7.2kg) of gear and it was no different than using a solid backpack with cameras stowed inside. In fact, short of a waist belt, this setup is just like a backpack with two comfortable stretchy neoprene shoulder straps.

How Does it Work?

In practice the unit takes some getting used to during initial setup. Having two cameras dangling from your hips also takes a different sense of awareness when maneuvering in crowds, or around hard surfaces. Keeping your hands on your cameras helps with stability.

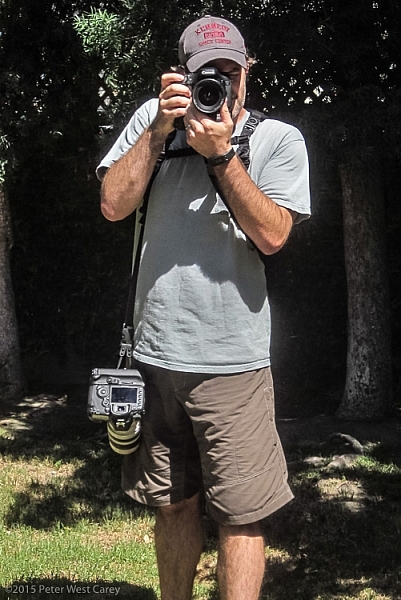
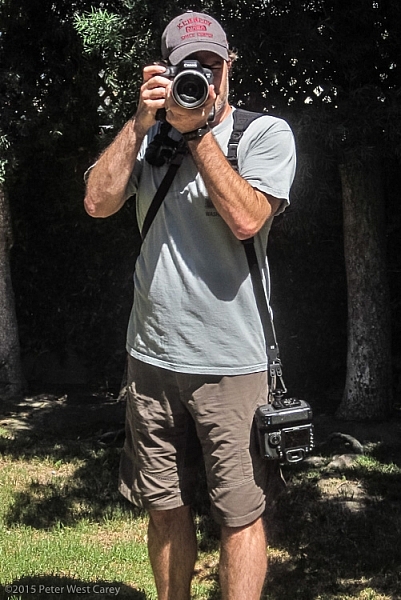
Each camera is free to glide up and down its own strap, yet is kept ready at your fingertips. When one camera is held up and the weight on that strap lessened, the second camera stays in place, without swinging to the side or sliding off your shoulder, as has been my case before using this strap.

CustomSLR-Dual-Strap-DPS-PWC2015-0805-1348  CustomSLR-Dual-Strap-DPS-PWC2015-0805-1349

CustomSLR-Dual-Strap-DPS-PWC2015-0805-1351 CustomSLR-Dual-Strap-DPS-PWC2015-0805-1352

I realize I look a little odd with this setup on my body. But the comfort and ease of use, quickly quieted my ego from worrying too much about what others think.

In short, the Dual Camera Strap now goes with me wherever I take both my camera bodies. I can break it down quickly for single camera use (I typically leave the sternum strap section attached to make setup quicker) and when I know I want both cameras at hand, there is simply no replacing this unit.

Additionally, I could still wear my F-Stop Lotus backpack over this setup, although range of motion was slightly lessened, but not enough to stop me from using the two together.

Conclusion

Dorkiness be damned, this thing works, and it works well. I wore the strap for more than 40 hours in a month, and after I figured out the best way to put it on (straps first, then attach cameras), it was a piece of cake.

There is something empowering having two cameras at the ready, and no longer worrying about one of them slipping off your shoulder. The Custom SLR Dual Camera Strap performs as advertised, and is a great solution if you have a two camera carrying problem.

Disclaimer: This product was provided to the author by the manufacturer for the purposes of doing a review. All reviews on dPS are 100% unbiased and based on the author’s opinions only. 

googletag.cmd.push(function() {
tablet_slots.push( googletag.defineSlot( “/1005424/_dPSv4_tab-all-article-bottom_(300×250)”, [300, 250], “pb-ad-78623” ).addService( googletag.pubads() ) ); } );

googletag.cmd.push(function() {
mobile_slots.push( googletag.defineSlot( “/1005424/_dPSv4_mob-all-article-bottom_(300×250)”, [300, 250], “pb-ad-78158” ).addService( googletag.pubads() ) ); } );

The post Custom SLR Dual Camera Strap – Product Review by Peter West Carey appeared first on Digital Photography School.


Digital Photography School

 
Comments Off on Custom SLR Dual Camera Strap – Product Review

Posted in Photography