
When you are starting out learning to edit in Photoshop there are a lot of tools from which to choose. The Curves Adjustment is one of the more advanced tools, so it often overwhelms new users. However it is such a powerful tool that it is well worth investing some time learning to use it. In this article I’ll explain what you can understand about your image from the Curves dialog and how to use curves to edit your photos.
Creating a Curves Adjustment
You can get to the Curves dialog in two ways; by choosing Image > Adjustments > Curves or you can add it as a new adjustment layer by selecting Layer > New Adjustment Layer > Curves. In each case the dialog is a little differently laid out but the same features are available.
This is the curves dialog you see when you choose Image > Adjustments > Curves:
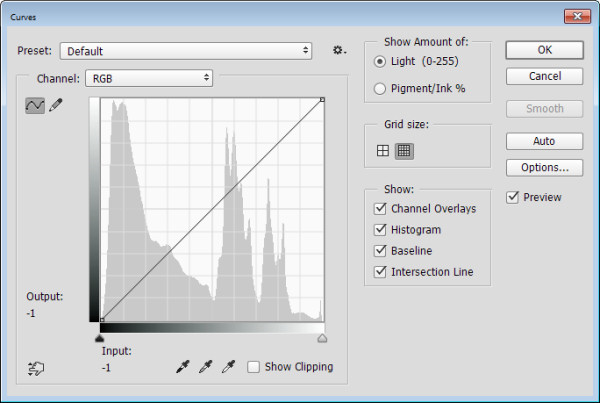
And this is the Curves dialog you see when you choose Layer > New Adjustment Layer > Curves:

In this article I’ll focus on the Curves Adjustment Layer dialog because when you edit a photo using Adjustment Layers you can come back later and remove the adjustment or fine tune it. It would be more difficult to do this if you were to apply the effect directly to the image. In addition an adjustment layer has a mask that you can use to remove its effect from selected areas of the image. In short, using a Curves adjustment layer is a non-destructive editing technique.
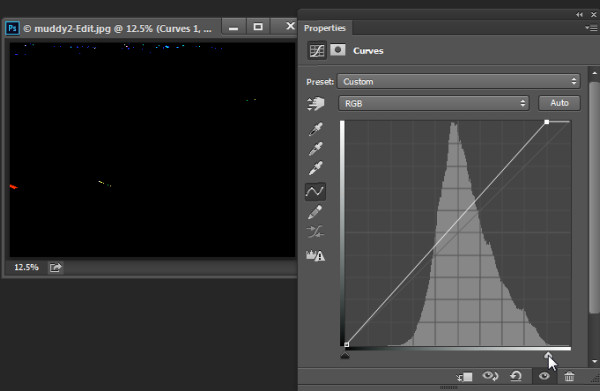
When you open the Curves dialog you’ll see a chart – called a histogram – beneath the curve line (you must be using Photoshop CS3 or later to see this). The histogram is a plot of the brightness of every pixel in the image so it is an indication of the image’s tonal range. The darker pixels are plotted on the left and the lighter pixels on the right.
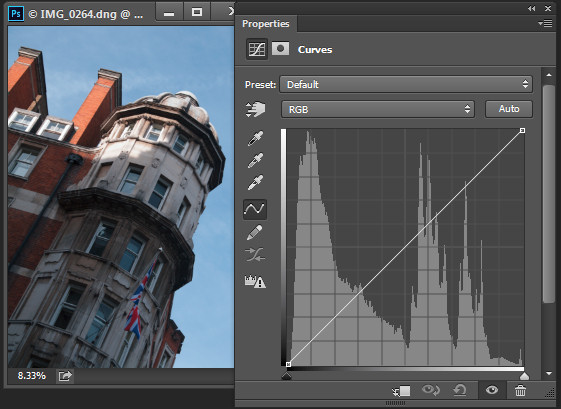
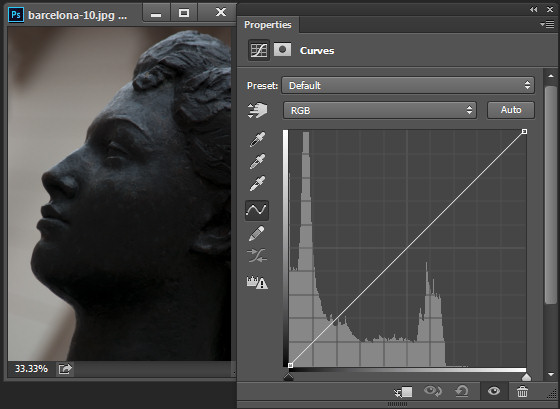
Ideally the histogram should stretch between the left and right side of the grid without bumping up heavily against either edge. If the histogram is hard up against the left edge of the grid as in the following example, the image is underexposed so the image contains plugged up shadows where detail has been lost.
On the other hand, if the histogram is jammed up against the right side of the grid, the image contains blown out highlights. It is overexposed and some detail has been lost in the highlight areas.
Plugged up shadows and blown out highlights may be difficult, if not impossible to recover, particularly if you capture images as jpeg files. If you capture in a raw format you have a better chance of recovering detail in these areas because more data is retained in the raw file.
Setting the White and Black points
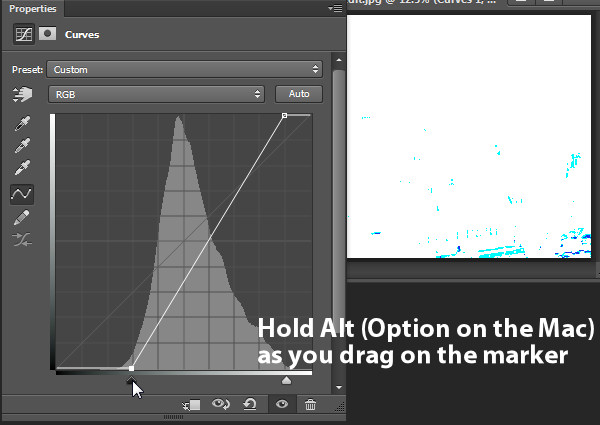
If the histogram does not reach either edge of the grid then you will have an image that lacks either blacks, whites, or both. Hold the Alt key (Option key on a Mac) and drag each triangle marker underneath the histogram to move them inwards so they appear just under the point where the first white or black pixels are located in the chart.
Holding the Alt or Option key ensures that you can see the pixels change on the image as you are adjusting them. Adjust the markers under the chart until you only just see a few white and black pixels in the image (as seen above as areas that are light or a color).
Remove a Color Cast
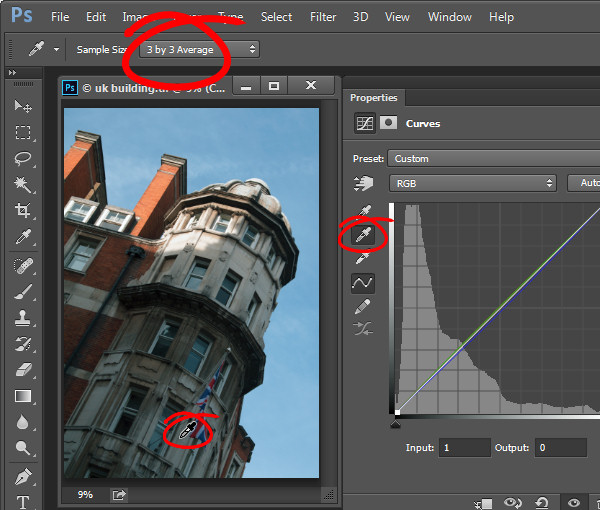
The Curves dialog also has an eyedropper that you can use to remove a color cast from the image. Click the middle of the three eyedroppers to set a grey point by clicking on an area of the image which should be neutral grey. If the color under the eyedropper isn’t neutral (if it’s Red, Green and Blue values are not equal) then Photoshop will adjust the image to make the color neutral – effectively removing the color cast. You can click repeatedly on the image until you find a place that gives you a good result. It is advisable to set the sample size on the tool options bar to 3 by 3 Average before you sample a gray point so that your sample is more than just a single pixel.
Adjusting the Curve
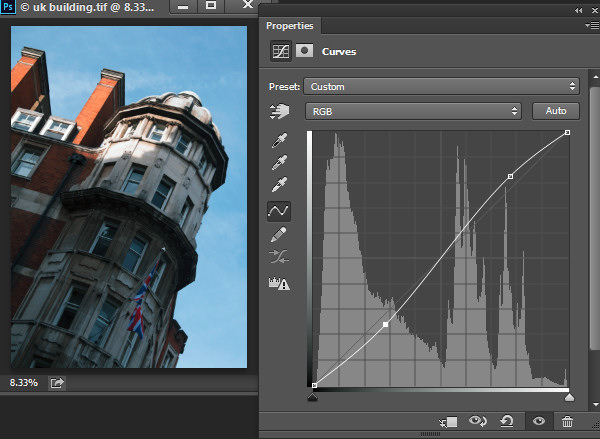
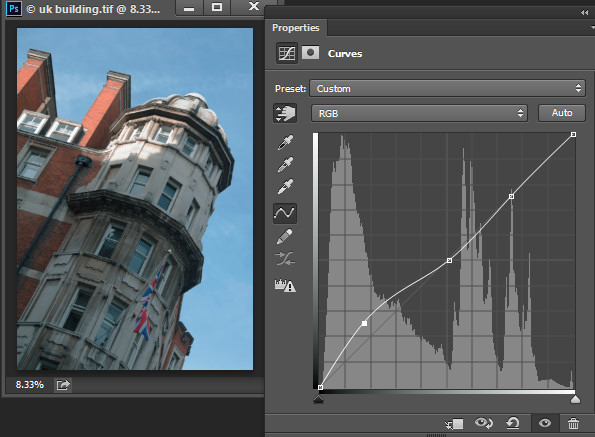
The standard curve is actually a straight line running diagonally across the grid from the bottom left to the top right of the chart. This straight line is equivalent to no adjustment at all so, by default, the Curves adjustment does nothing to the image.
You can adjust the Curve line a couple of ways. One option is to click and drag on the line in an upward or downward direction to adjust the pixels of that tone in the photo. One adjustment that you can perform using this technique is to drag the line into what is often referred to as a shallow S-curve.
To do this, click and drag the line down on the left side of the grid and drag the line slightly up on the top right of the grid. This adds additional contrast to the image mid-tones – because anywhere that the curve line is steepened, you add contrast and anywhere it is flatter you reduce the contrast. By dragging the line into a shallow S-curve you’re steepening the line through the area in which the image mid-tones are located increasing contrast in those tones.
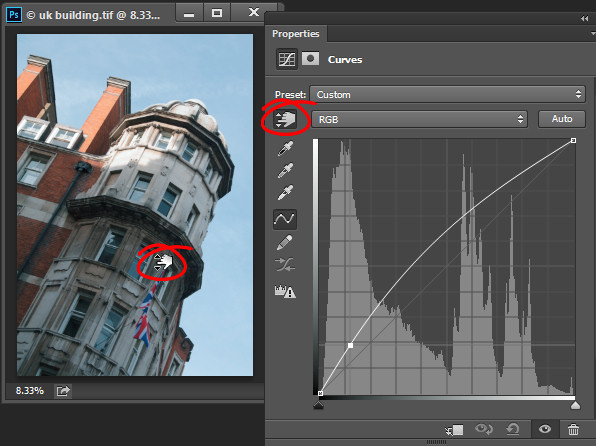
You can also adjust the curves line by clicking the onscreen adjustment tool and then drag on an area of the image that you want to adjust. Drag upward to lighten the tones represented by the pixels under the eyedropper, and drag downward to darken them. Notice that you aren’t just adjusting the area around the point where you are dragging, you are also adjusting all the pixels of that tonal value in the image, wherever they are located.
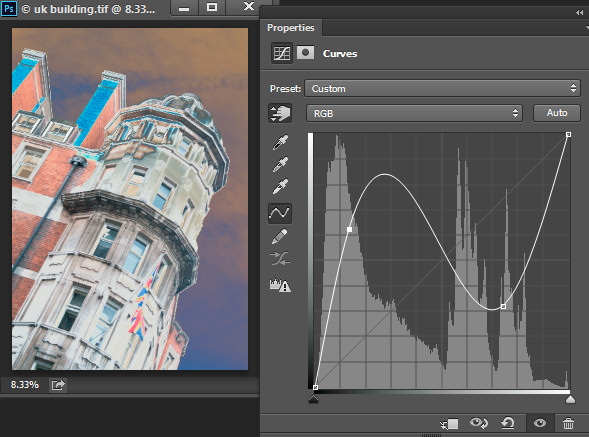
Whenever you’re adjusting the curve line make sure not to flatten it or invert it. If you invert the line as shown below then you’ll invert the colors in the image.
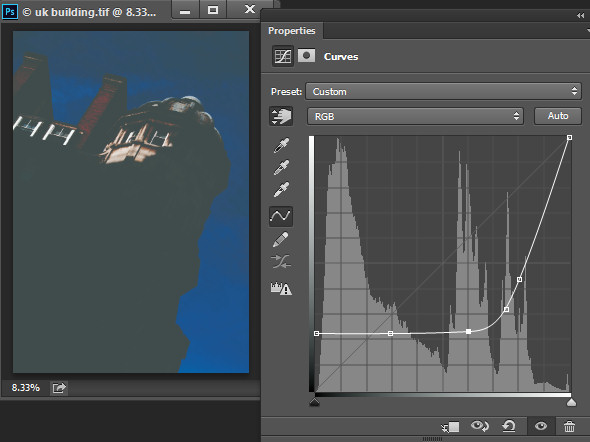
If the line is flat (horizonally) then the pixels in the flat area will all become the same shade of gray.
Working with Points on the Curve
To add points to the curve line simply click on the line where the point should be added. To remove a point on the curve, click on it and drag it off the edge of the chart and it will be removed.
Sometimes you may want to fix the line so it does not move, thus allowing you to adjust the curve on either side of the fixed point. To fix the line, click on it to add a point at its current position. Sometimes you may need to add a couple of points so that you can then adjust other areas of the line without also affecting tones that you don’t want to change. In the image below I have fixed the highlights so that the curve line wouldn’t move when I dragged up on the left end to lighten the darker areas of the photo. If I hadn’t locked down the highlights the entire curve line would have moved upwards, risking the highlights become too light.
Using the onscreen (targeted) adjustment tool you can also determine where on the curve line certain tones in the image are located. Instead of clicking and dragging on the image, simply hold your mouse pointer over an area of interest. When you do this the appropriate point on the curve that relates to the pixels under the mouse pointer will be indicated with a hollow circle.
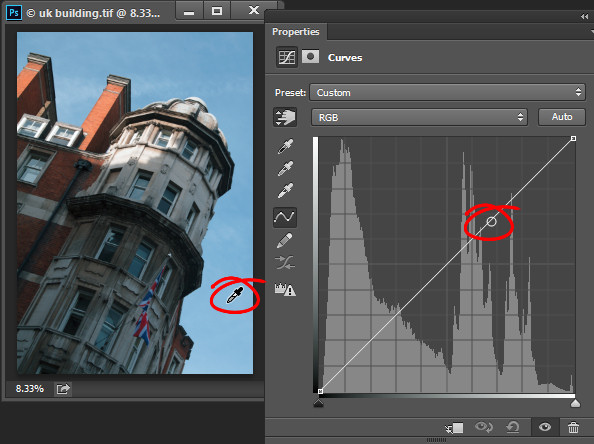
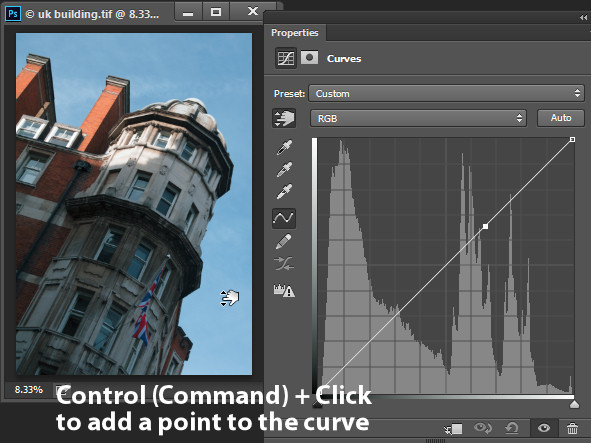
If you want to add a point on the curve at this location Ctrl + Click (Command + Click on a Mac) on the image to do so.
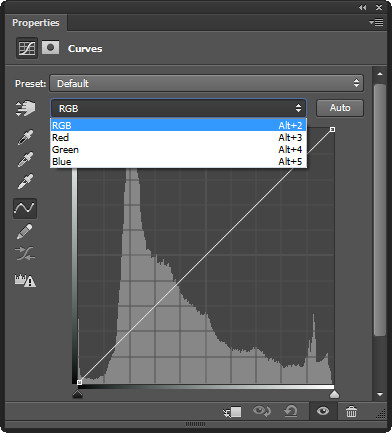
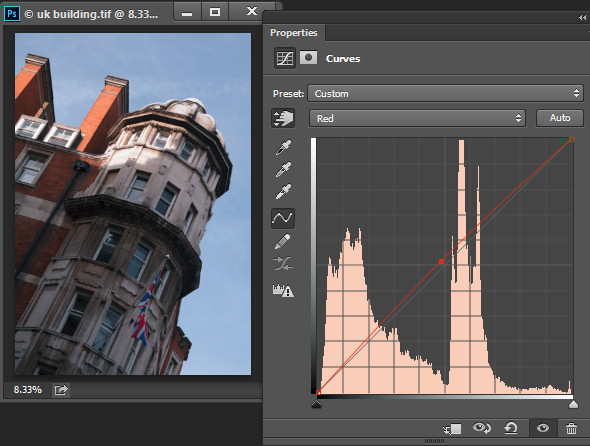
Adjusting Individual Colors with Curves
In addition to the RGB channel you can also adjust the curve for individual color channels. From the dropdown list that displays RGB by default, choose the channel you want to adjust – there are selectors for Red, Green and Blue.
The red channel controls both red and cyan in the image; drag upward to add red to the image and downward to add cyan. The green channel controls green and magenta, so drag upward to add green and downward to add magenta. Likewise the blue channel controls blue and yellow; drag upward to add blue and downward to add yellow.
Using the color channels you can, for example, warm up an image. You could do this by adding red (drag up on the curve in the red channel) or yellow (drag down on the curve in the blue channel), or both.
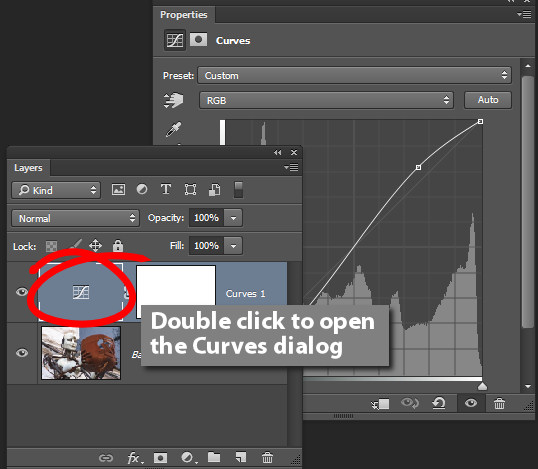
Adjusting the Curves Adjustment
Once you have applied a Curves adjustment to your photo you can close the Curves Properties dialog. At any time, if you used a curves adjustment layer you can double click on the curves layer thumbnail to open the curves dialog and further adjust it.
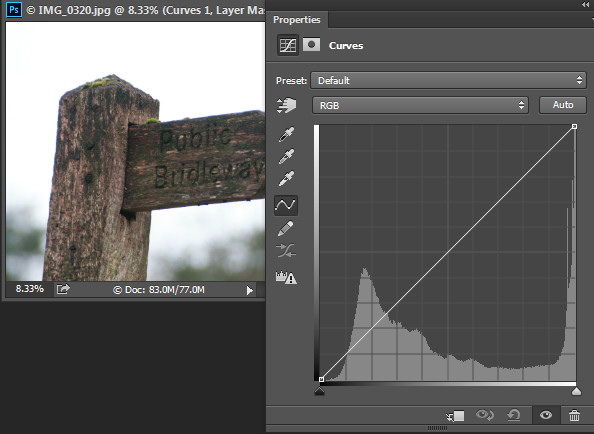
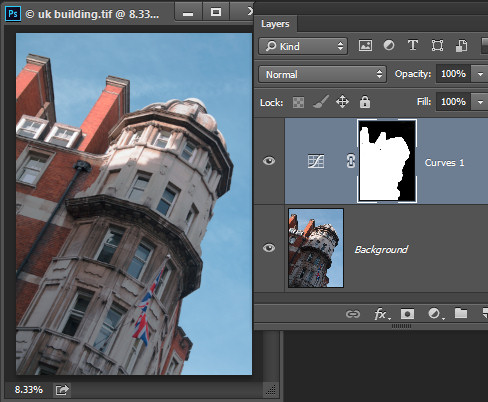
As with other adjustment layers a layer mask is automatically added to the curve adjustment layer. Target the mask in the Layers palette and you can then paint on it with black or gray to remove the effect of the curve from a selected area of the image. Paint on the mask with white to paint reveal the adjustment in that area again. In the image below, the mask shows that the curves adjustment affects only the building (white area) and not the sky (black area).
You can also add a black to white gradient fill to mask the curves adjustment so it is applied to the top part of the image and not the bottom.
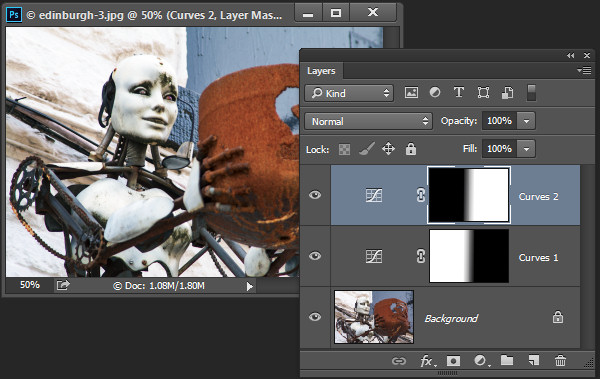
In some situations you may want to add multiple curve adjustments to an image – the first which fixes one part of the photo and another to fix another part of the photo. You can use the layer masks to control how each curves adjustment affects the photo.
Using Presets
Photoshop ships with some curves presets that you can use by selecting them from the Preset dropdown list.
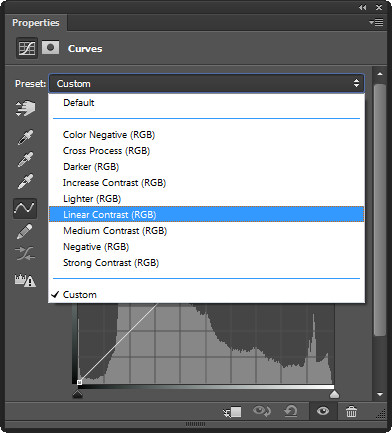
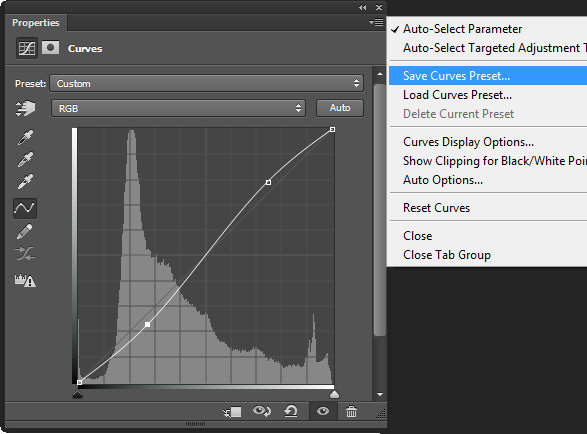
You can also create your own presets. So if there is an adjustment such as a shallow S-curve that you like to apply to many of your photos, you can save this curve as a preset by first adjusting the line to the desired shape then click the fly-out menu and choose Save Curves Preset, type a name, and click Save. In future your preset will be available from the list.
Learning to use curves will give you more options when editing your images in Photoshop. You’ll find curves are a feature of most advanced editing software so it is an adjustment you will find in other programs including Gimp, Lightroom and Adobe Camera Raw.
You can view a video of this tutorial on curves below:
Do you have any other tips for using curves in Photoshop? Please share in the comments below.
The post How to do Quick and Easy Curves Adjustments in Photoshop by Helen Bradley appeared first on Digital Photography School.


You must be logged in to post a comment.