RSS
 

Posts Tagged ‘Curves’

RawTherapee v5.5 released with Haze Removal, improved curves tool and much more

19 Dec

Free Raw photo-processing software RawTherapee has been updated to version 5.5, gaining a new Shadows/Highlights tool, a striping and banding tool, unbounded processing and numerous other updates. In addition to the new features, RawTherapee 5.5 brings a number of bug fixes, feature improvements, and speed enhancements.

RawTherapee 5.5 includes a Haze Removal tool that strips haze from images and a new Soft Light tool for boosting saturation and contrast in images. The old Shadows/Highlights tool was removed and replaced with an updated version and users now have Grid and Regions color toning options. The main histogram has three scaling methods now as well, and there’s a new Flexible tone curve type.

RawTherapee 5.5’s new artifact filter removes the striping artifacts that result from Sony’s Phase Detection Auto Focus, as well as the banding artifacts resulting from Nikon’s in-camera PDAF correction. At this time, the filter supports the Nikon Z6 / Z7 and the following eight Sony cameras:

  • Sony DSC-RX1RM2
  • Sony ILCE-6000
  • Sony ILCE-6300
  • Sony ILCE-6500
  • Sony ILCE-7M3
  • Sony ILCE-7RM2
  • Sony ILCE-7RM3
  • Sony ILCE-9

As always, RawTherapee is free to download on Mac, Windows, and Linux. The full v5.5 changelog detailing the new features and improvements is available here.

Articles: Digital Photography Review (dpreview.com)

 
Comments Off on RawTherapee v5.5 released with Haze Removal, improved curves tool and much more

Posted in Uncategorized


How to Make Color Adjustments Using Tone Curves in Lightroom

14 Jul

In this article, you’ll learn how to use tone curves in Lightroom to make color adjustments to your images and bring your visions to life.

Color and RAW format

If you photograph in RAW file format, you know that the images straight out of the camera are often a bit flat compared to photographing in JPEG format. Most RAW images require some sort of editing to make them look close to how you envision the scene when you took the shot.

Adjusting color in an image is a very powerful component in editing and can really make an image go from okay to wow when done correctly. Of course, it goes without saying that too much color and the image will appear unreal.

Color Adjustment Bread Still Life Photo - How to Make Color Adjustments Using Tone Curves in Lightroom

Lightroom color adjustment options

Whether you photograph in RAW or JPEG, Lightroom is one of the many editing software you can use to bring out the color in your images. Even within Lightroom, there are multiple ways to edit your image based on the look you want to create.

To understand how to edit the color, you need to first understand color in an image and how it is affected. One of the main things that impacts color in an image is the quality of the exposure. Apart from the exposure, there are other factors that can be adjusted to affect the color.

  • White Balance (read Adjusting White Balance in Lightroom)
  • Color Profile
  • HSL Panel (read Understanding the HSL Panel in Lightroom for Beginners)
  • Color Curves
  • Split-toning (read How to Rescue an Image in Lightroom With Split Toning)
Color Adjustment in Lightroom Blueberries in a bowl Still Life Photo - How to Make Color Adjustments Using Tone Curves in Lightroom

This image was straight out of the camera. You can see on the histogram that the image was slightly overexposed and the color temperature is that of a warm day.

You don’t need to adjust each and every one of these editing elements, but understanding how they work will help you figure out which one to use based on the desired outcome of your editing skills.

Color Adjustment Blueberries in a bowl photo still life image

The same image edited to my specific style and brand aesthetics – light, bright and airy – with some Tone Curve adjustments to the red and green channels applied.

I want to focus on the Color Curves Panel for the purpose of this article. I recently stumbled upon this panel and once I understood all of its capabilities, it quickly became one of my favorites in terms of experimenting with different colors to get the look and feel I wanted for my images.

Now, I am not saying that you have to use only the color panel for your images. But it is simply one of the tools you can use to edit your images.

What are Color Curves?

Color Adjustments in Lightroom Tone Curve Adjustments

Color Curves are located within the Tone Curve Panel in the Develop Module in Lightroom. The Tone Curve is one of Lightroom’s more powerful panels and it represents all the tones of your image.

The bottom of the Tone Curve is the Tone axis that represents the Shadows on the left and Highlights on the right. In the middle, you have mid-tones, which are then further split into darker mid-tones, called Darks, and brighter mid-tones, called Lights. The left axis represents the brightness or darkness of the specific tonal regions. The further up the left axis you go, the brighter the tones get.

Now within the Tone Curve, you can select RGB (all the colors) or you can select the curve for each specific color individually (Red, Green, and Blue).

When you adjust the RGB curve, you will find that your image starts to have a lot of depth. I typically adjust the RGB Curve first when I use Curves in my editing workflow.

Adjusting the Curves

To adjust the Tone Curve you can move the sliders or directly drag the line of the curve itself up or down to get the desired effect by changing the shape of the curve. To do this, you must first click the box in the lower right corner of the tone curve so that the sliders go away.

One of the most commonly used techniques for adjusting images is called an S-curve where the graph actually looks like the letter S. You can do this by dragging the lower third of the line down a bit and raising the upper third just slightly. The S-curve deepens the shadows and brightens the lighter portions (adding contrast), really helping the image pop.

Color Adjustments in Lightroom Public Transportation in Rural India Photo

Using Color Curves

The Color Curves in Lightroom can be used to fine-tune the color in specific regions of your image. For example, you can adjust the blues in your shadows or the greens in your mid-tones. You don’t have to adjust all three tone curves for every image.

When deciding what direction to adjust your Color Curve remember:

  • Red is the opposite of cyan.
  • Green is the opposite of magenta.
  • Blue is the opposite of yellow.

Reducing any one of those colors using Color Curves, increases that color’s opposite.

One of the most common reasons for using Color Curves is when correcting skin tones in images with people. Yes, you can adjust the skin tones by adjusting the White Balance. But if you want to adjust it even further if you’re not quite getting you the look you want, you can use Color Curves.

Color Adjustments in Lightroom Girl eating summer ice cream

An exaggerated example of using the Red tone curve to add a warm summer glow to an image and enhance the skin tones.

Applications

With Color Curves, you can adjust the color in a limited part of the tonal range versus the global adjustment (the whole image) you get with the temperature slider. For example, if your shadows are overly red you can reduce the red in the shadows through the Color Curve without impacting red globally.

Save your Color Curves as presets

Adjusting Color Curves can take a lot of time. So when you find a Color Curve combination that really works for you, you can save it as a preset. You can then use this as a starting point for your images and fine-tune the curve as each individual image necessitates.

To do this, click on the “+” button at the top of your Presets Panel on the left side of Lightroom. When the preset box pops up, just make sure you only check “Tone Curve” so that when you use this on other images, your preset is adjusting only the Tone Curve.

Not many people use the Tone Curve as an essential part of every edit. Most people just stick to the basics panel and make global edits to the image and call it done. I use the color panel when I want to elevate my image and/or when the basic adjustments are really not giving me the look I want for my image.

Another way to get acclimated to the tone curve is to study the tone curve adjustments for presets you already own and use. This gives you more insight into how to use the tone curve for subtle and specific changes.

Conclusion

There is no right or wrong way to edit color in an image. Each photo shoot has its own unique feel, and accordingly, will have its own unique color edit as well. There are multiple ways to achieve similar editing results in Lightroom. But what is most important is that you understand all the tools available to you within Lightroom so that you can take full creative control over the direction of your edits.

How do you use Color Curves? Please share in the comments below.

The post How to Make Color Adjustments Using Tone Curves in Lightroom appeared first on Digital Photography School.


Digital Photography School

 
Comments Off on How to Make Color Adjustments Using Tone Curves in Lightroom

Posted in Photography


Final Cut Pro X 10.4 adds HDR support, VR video editing, and (finally!) curves

15 Dec

Apple has released a Final Cut Pro X update that adds a slew of new features and expanded support to its video-editing software, most notable among those features being support for 360-degree and VR video. This is a major update for the software, which has been optimized to fully leverage the greater processing power of the new iMac Pro desktop systems.

In version 10.4, Final Cut Pro supports editing 360-degree videos and viewing them in real time using an HTC Vive VR headset. According to Apple, the software supports importing, editing, and delivering these VR videos, with available edits including “immersive effects,” removing camera rigs, straightening the horizon, and adding standard videos/images to VR projects.

In addition to its new 360/VR capabilities, Final Cut Pro 10.4 adds support for high dynamic range (HDR) videos in Rec. 2020 HDR10 and Rec. 2020 Hybrid Log Gamma formats, as well as new advanced color grading tools, including color wheels with controls for adjusting brightness, saturation, and hue.

The latest version of Final Cut Pro also offers color curves with multiple control points, enabling users to make “ultra-fine color adjustments,” according to Apple. Or, as our Senior Reviewer Richard Butler put it: “Curves! Curves! At long bloody last, Curves!”

Users have both manual white balance and eye dropper color sampling options, as well as the ability to apply custom lookup tables (LUTs) from Color Grading Central, PremiumBeat, and select other color grading apps. The latest version of Final Cut Pro combined with the new iMac Pro desktops also marks the first time a Mac can be used to edit full 8K-resolution videos.

Apple lists the following additional features as arriving in Final Cut Pro 10.4:

  • Easily import iMovie projects from iPhone and iPad into Final Cut Pro for advanced editing, audio work, motion graphics and color grading.
  • HEVC and HEIF support for importing and editing high efficiency video and photo formats from Apple devices.
  • Updated audio effects plug-ins from Logic Pro X with redesigned, resizable interfaces.
    Faster, higher quality optical flow analysis built on Metal, Apple’s advanced graphics technology.

The Final Cut Pro 10.4 update is available for free to existing Final Cut Pro owners, while new users will need to pay $ 300 USD for the application. Apple has also released Motion 5.4 and Compressor 4.4 for free to existing users, and at $ 50 USD each for new users.

To learn more or pick up a copy for yourself, head over to the Final Cut Pro website.

Press Release

Final Cut Pro X introduces 360-degree VR video editing

Apple’s Pro Video Editing App Also Adds Advanced Color Grading, HDR Support and More

Cupertino, California — Apple today announced a major update to its professional video editing app, Final Cut Pro X, with new features including 360-degree VR video editing, advanced color grading tools and support for High Dynamic Range (HDR) video.

Optimized to take full advantage of the incredible performance capabilities of the all-new iMac Pro, Final Cut Pro users can now edit full-resolution 8K video for the first time on a Mac. Apple is also extending 360-degree VR video support to Final Cut Pro companion apps, Motion and Compressor.

Today, with more than 2 million seats, Final Cut Pro X is the most popular version of the software ever and is used by professional video editors to create incredible works of art, from award-winning Hollywood feature films and commercials, to international broadcasts and the world’s most popular YouTube videos.

“With new features like 360-degree VR editing and motion graphics, advanced color grading and HDR support, Final Cut Pro gives video editors the tools to create stunning, next-generation content,” said Susan Prescott, Apple’s vice president of Apps Product Marketing. “When combined with the performance of Mac hardware, including the all-new iMac Pro, Final Cut Pro provides an incredibly powerful post-production studio to millions of video editors around the world.”

Final Cut Pro lets professional editors create VR content with the ability to import, edit and deliver 360-degree video and view the project in real time through a connected HTC VIVE headset with SteamVR. Users can easily add 360-degree titles in 2D or 3D; apply blurs, glows and other immersive effects; and use visual controls to straighten horizons or remove camera rigs from equirectangular videos. Standard photos and videos can also be added to VR projects and 360-degree video can be shared directly to popular websites including YouTube, Facebook and Vimeo.

The update also includes powerful tools for professional color grading. Unique color wheels feature built-in controls to adjust hue, saturation and brightness. Color curves allow for ultra-fine color adjustments with multiple control points to target specific color ranges, and eye droppers let users sample specific colors and apply manual white balance. Users can also apply custom lookup tables (LUTs) from popular color grading apps like DaVinci Resolve and websites including PremiumBeat, Color Grading Central and more.

With support for the most popular HDR formats, Final Cut Pro gains access to an expanded range of brightness levels to deliver incredibly realistic images. Editors can output video to HDR monitors using I/O devices from AJA and Blackmagic with brightness levels up to 10,000 nits. The new color grading tools support both HDR and Standard Dynamic Range (SDR) video, and with tone mapping, users can easily change HDR to SDR output for broadcast.

Additional Features in Final Cut Pro 10.4:

  • Easily import iMovie projects from iPhone and iPad into Final Cut Pro for advanced editing, audio work, motion graphics and color grading.
  • HEVC and HEIF support for importing and editing high efficiency video and photo formats from Apple devices.
  • Updated audio effects plug-ins from Logic Pro X with redesigned, resizable interfaces.
  • Faster, higher quality optical flow analysis built on Metal, Apple’s advanced graphics technology.

Motion 5.4 enables users to create immersive 360-degree VR titles and effects that can be instantly accessed in Final Cut Pro. The update also makes it easy to convert between any type of Motion project at any time, create realistic spring-loaded animations with the new Overshoot behavior and apply photographic-inspired looks with new filters. Compressor 4.4 lets users deliver 360-degree video with industry-standard spherical metadata. Compressor also lets users export HEVC and HDR video, while adding a range of new options for delivering MXF files.

Pricing and Availability

Final Cut Pro 10.4 is available as a free update today for existing users, and for $ 299.99(US) for new users on the Mac App Store. Motion 5.4 and Compressor 4.4 are also available as a free update today for existing users, and for $ 49.99 (US) each for new users on the Mac App Store. Education customers can purchase the Pro Apps Bundle for Education for $ 199.99 (US). For more information, please visit: apple.com/final-cut-pro.

Articles: Digital Photography Review (dpreview.com)

 
Comments Off on Final Cut Pro X 10.4 adds HDR support, VR video editing, and (finally!) curves

Posted in Uncategorized


Video: Using the RGB tone curves in Photoshop, a crash course

02 Dec

Photographer Conner Turmon has put together a quick video tutorial that will get you up to speed on using the RGB tone curves to post-process your photos in either Lightroom or Photoshop (although this info will work with any photo editing program that gives you access to the tone curve).

The video will only take up eight minutes of your time, so definitely give it a go if you want to see tone curve editing in action, but the key takeaways can be summarized in two points:

1. Know your color wheel. This way, you understand what tones you’re ‘adding’ and ‘subtracting’ when you pull or push any particular combination of Red, Blue and Green.

and

2. Focus only on the area you’re editing. If you’re editing in the shadows, look only at the shadows while you’re doing it; if you’re editing the highlights, same thing, look only at the highlights.

As far as how you should approach each individual photo, Turmon shared a solid tip on Reddit:

I find it super helpful to either do complementary colors (e.g., Purple-Yellow, Red-Green, Blue-Orange) or emulate a film type that you like! For example, Fuji is notorious for green shadows and blue highlights (at least I think).

Another good tip: download photographs you like (tone-wise), pull them into Photoshop, and use the eye dropper tool to inspect the shadows, midtones, and highlights to see how they’ve been edited. This will give you a better idea of how you might approach editing your own work.

But before you do any of that, check out the video above to get a quick breakdown of how RGB curves work; and if you like what you see, check out Turmon’s website, Instagram, and YouTube channel for more.

Articles: Digital Photography Review (dpreview.com)

 
Comments Off on Video: Using the RGB tone curves in Photoshop, a crash course

Posted in Uncategorized


How to do Color Correction Using the Photoshop Curves Tool

05 Sep

One of the most powerful Photoshop tools at your disposal is Curves. Though it’s often only used to tweak contrast, the curves tool is also hugely effective in correcting color. What’s more, learning how to use it gives you a greater knowledge of image editing in general. It’ll enhance your understanding of the histogram and teach you how to edit photos by numbers.

The idea of correct color

Correcting color in images is about removing unwanted color casts. The “unwanted” part is important because some color casts are desirable. For instance, you wouldn’t want to neutralize the warm hue of a sunset. However, you might want to remove the blue color cast that sometimes pervades photos taken on overcast days or in hazy conditions. By removing an unwanted color cast, you’ll reveal the true color of the objects and subjects in your photo and make the image “pop”.

The content of a photo will dictate how you edit it, so you shouldn’t obsess over correcting color in every photo. Many times, you’ll want to do little or nothing to the color. An appreciation of the curves tool and the numbers around it will help you decide what each photo needs.

A neutral histogram

When working with curves, histograms, and RGB numbers, it’s useful to know what the histogram is telling you. There’s no such thing as a right or wrong histogram, per se, since it only mirrors the pixel data of the image, but it will highlight potential problems.

By looking at all three RGB (red, green and blue) histograms at once, you can immediately get an idea of whether or not the image has a color cast. If there’s no color cast, the three histograms will look very similar. A black and white RGB image illustrates this perfectly because it’s completely neutral. In that case, the three RGB values will be equal in every part of the image and the histograms are identical.

Black and white photo with RGB histograms. How to do Color Correction Using the Photoshop Curves Tool

In this black and white RGB image, you can see that the red, green and blue histograms are identical. You won’t get this in a color photo, but if the histograms look similar, especially from the middle to the right-hand side, there is unlikely to be a noticeable color cast.

Getting ready

Before you start in curves, there are a couple of things you’ll need to prepare in Photoshop:

  • Be sure that the “Layers” and “Info” windows are open.
  • Select a “3 by 3 Average” or “5 by 5 Average” sample size for the eyedropper tool.

Easy one-click color correction using mid-tones

Whenever a photo contains an area that should be neutral gray in your estimation, you can use the mid-tone eyedropper tool in either levels or curves to quickly correct any color cast. Simply clicking on the supposedly gray portion of the image will correct the color. It’s usually worth clicking a few times in different areas until you achieve a result that pleases you. There are ways of calculating precise mid-tones in an image to make this method more precise, but guessing often works well and is far quicker.

RGB values of a magenta color cast - How to do Color Correction Using the Photoshop Curves Tool

By dragging the eyedropper tool over this gravestone, we can see that the green value is less than that of red or blue. We might reasonably expect this stone to have a neutral gray color, which would give roughly equal RGB values, but the green deficit (RGB 160, 149, 160) indicates a magenta (opposite of green) cast.

magenta cast color correction - How to do Color Correction Using the Photoshop Curves Tool

By opening curves or levels and clicking on the stone using the middle eyedropper, the magenta cast is corrected. As a result, the green in the photo is stronger.

Using curves and the info palette to correct color

By introducing the info palette into the equation, you can make far more precise color corrections. The technique you’re about to learn also teaches you to evaluate and edit photos by the numbers. Think about this – when you have nothing to compare an image to—no alternative version—it often looks “okay” at first glance. By studying the RGB values, you’ll get a clear idea of any potential problems in the photo.

Before you proceed, it’s important to note that an image always needs “neutral” areas for color correction to succeed. That’s because a neutral tone provides a known reference point that you can work from. Neutral pixels always have identical RGB values (e.g. 128, 128, 128). Any photo that doesn’t contain a neutral tone is difficult to accurately correct. This is true whether you’re adjusting color yourself or hitting an auto-color-correct button. Photographers often use gray cards to introduce a known neutral into the image for color correction later.

10 Steps to Color Correction with Curves

Here are the steps you might take to correct color using curves, the info panel, and histograms:

Step #1 – Select the eyedropper

With your image open, select the eyedropper tool from the Photoshop tools palette.

hotel in Switzerland - How to do Color Correction Using the Photoshop Curves Tool

This is a picture of a hotel in Switzerland before any color correction. There is no strong color cast, but you might detect its cool bias.

Step #2 – Check white RGB values

Hover the eyedropper tool over a diffuse white highlight in the photo with RGB values in the 230s or 240s (try to avoid high 250 values). Use the info palette to see these values.

How to do Color Correction Using the Photoshop Curves Tool

Hovering the eyedropper tool over diffuse white highlights, I can see the blue channel has consistently higher numbers than red or green. The difference isn’t drastic, but it does indicate a blue color cast.

Step #3 – Create a sample point

Hold down the Shift key and click to create a sample point from this white area, which will show in the info palette as #1. It’s possible to move a sample point after you’ve created it by holding down the Shift key and dragging.

Step #4 – Repeat with mid-tones

Repeat this procedure with a neutral gray mid-tone, if you can find one, with RGB values of around 120-140.

color correction info palette - How to do Color Correction Using the Photoshop Curves Tool

Here, we’re creating a mid-tone sample point. Again, you can see from the numbers (RGB 111, 120, 137) that there’s a strong blue presence. The highlight sample point that I’ve only just recorded is stored on the depicted info palette at the left, third down (marked as #1).

Step #5 – Repeat with shadows

Do the same thing with any black, shadow areas with values of about 10-30. After that, you’ll have created three sample points. Since color casts in shadows are inherently harder to see, this third sample point can often be skipped without ill effect.

color correction sample point shadow - How to do Color Correction Using the Photoshop Curves Tool

A shadow sample point from the trash bag records at RGB 20, 21, 29. We can see now that a cold color cast runs through the entire image from highlights to shadows. Once I’ve clicked on this, my three sample points are all stored and displayed in the info palette.

Step #6 – Analyze the three samples

Looking at the three RGB samples you’ve created, you should get an idea of any color casts that are present. You’ll typically see the same problem across all tones from highlights to shadows, though not always. Remember that a low RGB value in any of the three channels indicates an opposite color cast. Thus, a low red value indicates a cyan cast, low green is magenta, and low blue is yellow. This only applies in areas that should be neutral in color (i.e. white, gray, black).

Step #7 – Open a curves adjustment layer

Open a curves adjustment layer. Hold down the Ctrl and Shift (Cmd + Shift) keys and click once again exactly on the center of the second, mid-tone sample point you created (#2). This has the effect of placing a mid-tone point along each of the individual RGB curves.

How to do Color Correction Using the Photoshop Curves Tool

Holding down Ctrl + Shift (Cmd + Shift in Mac) and clicking with the eyedropper tool places a sample point on each of the three RGB curves. This is useful for adjusting specific mid-tones. Here, I’ve opened the red channel to illustrate this. To correct color, you have to adjust the individual red, green and blue channels until the corresponding output numbers on the info palette match.

Step #8 – Correct the color cast

Now it’s time to correct the color cast. On a curves graph, the top right point represents highlights and the lower left shadows. In between are any mid-tone points that you placed on the curve.

Starting with highlights (your #1 sample), open the individual red, green and blue curves channels one at a time and move the top right point either left or down along the outer edge of the graph so that, eventually, the three values match. As you move each point on the graph, the info palette gives you the updated output value.

Usually, it’s best to choose the lowest or middle of the three existing highlight values and match the other two to that (see “tip” below).

curves color correction - How to do Color Correction Using the Photoshop Curves Tool

This is an exaggerated example of a curves highlight adjustment in the blue channel. I’ve pulled the highlight point to the left, which has added blue to the image (far too much blue). Moving the point down the right-hand side of the graph would increase yellow. In reality, these edits will usually be very slight, moving only a small amount either way. The info palette will reflect these changes in the RGB output numbers.

Step #9 – Repeat for all three points

Repeat this process with the mid-tone and shadow points, so that all of the chosen neutral points in the image are in fact neutral. The bottom-left shadow point is also moved along the outer edge of the graph, either upwards or right. The mid-tone point you’ll drag either up or down. If the color looks wayward at the end of this process, it typically means that you’ve picked a sample point that wasn’t neutral. Ensure that your sample points contain no color noise or reflected color. Zoom in on the area you sample to make certain of this.

color correction curves info palette - How to do Color Correction Using the Photoshop Curves Tool

Here you’ll see that all three sets of RGB values have been equalized – for each point, you see the before (left) and after the (right) value (Red on point #1 went from 238 to 239, Blue from 244 to 239). 

Now all points are roughly similar, in other words, all the sample points I took that were estimated to be neutral have been made neutral. Note that the numbers don’t have to match perfectly like this as long as they’re close. In the curves graph, the red channel has been lifted and the blue channel pulled down slightly as a result of my edits. The green channel was untouched in this instance, so the corresponding line cuts straight through the middle.

Step #10 – Remove samples and save

Once the correction is complete, the sample points are removable by holding down Ctrl + Alt (Cmd + Option) keys and clicking on them. You should see the scissor icon when you hold these keys down. To finish, either save the image with its adjustment layer intact or flatten the layers, as required.

Before – uncorrected image.

color corrected image - How to do Color Correction Using the Photoshop Curves Tool

This is the color-corrected image. With the blue cast gone, other colors in the photo can breathe. In particular, the yellow color of the hotel and the green in the grass and trees are more prominent.

Tip: Since moving the endpoints of the curve line affects all highlights and shadows, you should edit conservatively. In particular, avoid choosing the highest of the three RGB values as the target when matching red, green and blue highlight channels. Otherwise, you may find that you blow out wanted detail in the brightest part of the image. Flaws in the shadows are generally less noticeable, but you still risk blocking detail if you adjust all the shadow RGB points to the lowest of the three values. In general, turn the numbers away from their extremes.

Mixed Lighting

The types of correction discussed in this article work best when there are naturally occurring color casts in the image. In mixed lighting, where the light sources are radically different (e.g. incandescent lighting and daylight), you’ll need to painstakingly address each affected area of the image using layers in Photoshop or the adjustment brush in Lightroom. Avoid this type of lighting wherever possible, since it’s difficult and time-consuming to correct in processing.

Finally

I don’t expect that you’ll use these techniques on every image, but I hope they’ll improve some of your pictures and that you’ll enjoy experimenting using curves in Photoshop. This type of mathematical editing gives you a good understanding of histograms and the meaning of RGB values.

Merely hovering the eyedropper tool over a picture while watching the numbers will tell you something about it. If there are no naturally occurring “neutrals” in the photo and you want consistent or accurate color, a high-quality gray card provides a solution.

Please don’t hesitate to fire questions my way if anything is unclear.

The post How to do Color Correction Using the Photoshop Curves Tool by Glenn Harper appeared first on Digital Photography School.


Digital Photography School

 
Comments Off on How to do Color Correction Using the Photoshop Curves Tool

Posted in Photography


How to Take Control of Contrast Using Curves and Levels in Photoshop

07 Aug

Have you ever found your photos flat? The colors are muted and it just looks dull? That’s because it lacks contrast. Sometimes regardless of your best exposure skills, the conditions are not suited to get a wide range of tones. Not to worry though, it can be fixed in post-processing. I’ll show you my workflow for how you can take control of contrast in your images using Curves and Levels in Photoshop.

Of course, there are many ways to adjust the contrast on Photoshop, there’s even a tool called Brightness and Contrast, however, it doesn’t give you much control. What I like to do is to manipulate Curves and Levels. In this article, I’ll explain to you why and how I use these tools to boost contrast.

The issue of low contrast

Low contrast can happen for many different reasons; bad weather for example or photographing through glass. In any case, the resulting image doesn’t show a wide range of tones, in other words, there’s not enough difference between the lights and the darks.

I find this problem occurs especially while traveling, because you can’t go back to the location when the weather is better, or because you are seeing things through a pane of glass. For example, the image I will use for this tutorial was taken through the window while traveling on a tour bus.

How to Take Control of Contrast Using Curves and Levels in Photoshop

How do you know it’s low contrast?

I chose an image where the contrast is clearly low so that you can easily see the effects of every step. However, in some cases, it won’t be as obvious, but you can always review the histogram to know the tonal range of your image.

A typically correct exposure should have a histogram that reaches from black (left) to white (right) evenly spread, with the highest values in the middle. Please note that this can change if you are going for a different effect like low key or high key where you purposely choose a specific range to work with, so I am just talking about the average image here.

As you can see, in this case, all the information is concentrated in the middle tones, but it doesn’t reach the black or the white side (see histogram below). This is why the image has no contrast.

How to Take Control of Contrast Using Curves and Levels in Photoshop

Using Curves

First, we are going to manipulate the Curves tool. Remember to do it on an adjustment layer and not directly on your original (this is non-destructive editing), that way you won’t loose any information and you can always go back and start again if you don’t like the results. To do this go to the menu then: Layers > New Adjustment Layer > Curves and a new window will pop up.

Curves

You can also get to Curves on the Adjustment panel.

Curves adjustment

Inside that, you’ll find a graph with the histogram on it. The line that crosses the graph controls the contrast; the steeper it is, the greater the contrast.

Curves- How to Take Control of Contrast Using Curves and Levels in Photoshop

You can fix anchor points along the line that you can move up or down to adjust the contrast of the image. Add as many anchor points as you need. The higher right quadrant controls the highlights and on the lower left one, you have the dark tones.

Curves Anchors - How to Take Control of Contrast Using Curves and Levels in Photoshop

If you want to increase contrast, as we do in this case, add one anchor point in the lower left quadrant and slowly pull it down. Watch how it affects the dark areas of the image. Move it until you’re happy with the result. Then add another anchor point in the upper right quadrant and pull it up slowly until the highlights are bright enough for your preference. By making the straight line into more of an s-curve you will add contrast to the image.

Note: if you have an image with too much contrast the opposite can work. Pull down the highlights, and push up the dark areas on the curve to get an inverted s-curve.

After fixing the curves for the overall image, this tool allows you to fine-tune by channel. The step we did before was working on RGB, however, if you click on the drop down menu you can choose each channel to work with separately.

In this case, let’s start with the Blue channel. If you pull up an anchor point from the highlights (the upper right quadrant) you are making the sky, which is the lighter part of the picture bluer. In the left lower quadrant (the shadows) pulling the anchor a little bit down allows you to remove some of the color cast.

Next is green channel so that you can get a wider tonal range out of the forest and nature of the scene. The adjustments are very subtitle because when you are working in such detail the tools become very sensitive. Move around the graph until you are happy with the result.

Remember different light sources have different colors;  a sunset has warmer colors than at noon, artificial light can be more yellow than natural light, etc. Apart from correcting any color bias, it works to add some special effects and get creative. In the next example, you can see what happens when the graph gets completely inverted in the red channel. You can also achieve this by playing with the different presets, in this case, color negative.


Using Levels

Next, you want to manipulate the Levels, also using an adjustment layer. You can do this by going to the menu > Layers > New Adjustment Layer > Levels (or you can find it on the Adjustments panel just to the left of Curves). Again a new window will appear with a different graph, this represents the darkest parts of the picture (0) to the lightest parts (255).

Levels - How to Take Control of Contrast Using Curves and Levels in Photoshop

You can manipulate contrast by dragging the sliders underneath the graph, however, you will have much more control if you use the eyedroppers. This is how to work with them:

First, choose the white eyedropper (bottom one next to the graph) and click on the lightest part of the image that still has information or detail. You’ll notice how your entire image becomes lighter and brighter. Don’t worry about getting it right on the first try, you can click around on the image until you are satisfied with how it looks.

Levels white eyedropper

Levels White - How to Take Control of Contrast Using Curves and Levels in Photoshop

Then pick the black eyedropper and click on the darkest part of the image with detail. Same as the white one, try it until you get it right. You can always do some final adjustments with the sliders as well.

Levels Black - How to Take Control of Contrast Using Curves and Levels in Photoshop

Finally use the gray (mid-tones) eyedropper to set the ambiance or mood of the scene, as it will change depending on where you click. Here some examples:


In Levels, you can also do the selective adjustments by channel if you need.

Before and after

And there you go, when you are satisfied with your results, flatten the image by going to the menu Layers – Flatten Image. See how the histogram has a much wider range now, and the final image has more impact.

How to Take Control of Contrast Using Curves and Levels in Photoshop

Before image.

Before - How to Take Control of Contrast Using Curves and Levels in Photoshop

Before adjustments for reference.

Histogram After - How to Take Control of Contrast Using Curves and Levels in Photoshop

Histogram after Curves and Levels adjustments.

after - How to Take Control of Contrast Using Curves and Levels in Photoshop

After image.

Handling reflections – example

Remember that when you are photographing through glass there might be reflections, and when you boost the contrast these reflections will be much more noticeable. So think about that before shooting, when you are composing your image.

In order to demonstrate this for you, I made a photo while enjoying a panoramic view from a skyscraper in Milan. It was a 360 degrees glass wall, so I was bound to have a reflection. In order to use it to my advantage, I decided to place my foot strategically so that its reflection would be in between two buildings and entitled the photo “Stepping into Milan”.

Skyscraper Before - How to Take Control of Contrast Using Curves and Levels in Photoshop

Before processing.

Skyscraper After - How to Take Control of Contrast Using Curves and Levels in Photoshop

After processing, notice my foot in the lower left corner?

Dull weather – example

As I mentioned before, it’s not only shooting through glass that can give you low contrast scenes. Here I have another example that had to do with the weather. It was a very cloudy day so there were no shadows, everything looked kind of gray and the light was very flat. This too can be fixed with Curves and Levels following the previous steps.

Canal Before - How to Take Control of Contrast Using Curves and Levels in Photoshop Canal After - How to Take Control of Contrast Using Curves and Levels in Photoshop

Conclusion

Now you know that a low contrast photo doesn’t mean you’ll end up with a flat or dull image, so shoot away! I hope you found this helpful and if you have any doubts or tips about contrast, please share them with us in the comments section below.

The post How to Take Control of Contrast Using Curves and Levels in Photoshop by Ana Mireles appeared first on Digital Photography School.


Digital Photography School

 
Comments Off on How to Take Control of Contrast Using Curves and Levels in Photoshop

Posted in Photography


How to Understand the Curves Tool in Photoshop

31 Mar

After you’ve mastered Levels, it’s time to take a step up to the tool that is probably the most useful for color and contrast control in Photoshop: Curves. As with levels, you should play around with the basic Curves command to get a feel for it. For safety’s sake, begin by duplicating your background layer, either from the Layer>New Layer from Copy menu, or use the shortcut Control/Command + J. You should make a habit of learning shortcuts because it speeds up your workflow.

The Curves Dialog

Here’s our starting image for this tutorial, shot on a hazy day at Formentor in Mallorca.

How to Understand Curves in Photoshop

Formentor, the northern tip of Mallorca

Use Control/Command + M to invoke the Curves dialog. Taking a look, you’ll see the main part of the dialog is the Curve itself. By default it’s a straight line from bottom left to top right – this is the baseline. There’s faded histogram in the background that corresponds to the tones in the image. There are two other tools to help you work in Curves.

There are two other tools to help you work in Curves. The first is the Channel Overlays, which show you the changes you make when applying curves to the individual red, green, and blue channel curves. The second is Intersection Lines, which appear when you drag a point on the curve. They let you see where the point is relative to the grid. The Channels Overlays, the Histogram, the Baseline, and the Intersection lines can all be turned off in the “Show” section of the dialog box. They’re all on by default.

How to Understand Curves in Photoshop

Another default is that the darker tones are on the left, and the lighter tones are on the right. It can be swapped by clicking the “Show Amount of:” option from Light (0-255) to Pigment/Ink %. Unless you have a specific reason to change it, leave it on the default option Light. The final option is for the Grid. You can change from quarters to tenths by alternating the grid size icon. Alternatively, you can Alt or Option click directly on the Grid to toggle between them.

Starting with Curves

To change the Curve, you click on the baseline to create a control point (we’ll just call them points from here). By dragging the point up, you will lighten the image at those tones and surrounding tone. Drag down, and you’ll see the image darken at the tones around your point.

The most basic change you can make is to click on the center of the curve and drag up. This lightens the mid-tones and acts in a similar way to the Brightness slider, but with more control over the center-point of the effect. By the way, you don’t even need to drag the point. Instead, you can click to create a point and then use the Up/Down/Left/Right arrow keys to move it. A single arrow click moves 1 point (in the range 0-255), while holding the Shift key down as well, moves it 10 points. For utter precision, you can enter the number directly into the Input (that’s the point you click) and Output (that’s the place it moves to).

How to Understand Curves in Photoshop

While it will work as a brightness tool, Curves is really about contrast. Contrast defines the relationship between the tones in your photo. A high contrast image will generally have strong shadows and highlights, with a lot of saturation. Low contrast photos will look flat and almost gray. That’s not to say low contrast is bad, it can be ethereal like the woods in fog, or a flared backlit portrait at sunset. A lot of photos can benefit from an increase in contrast.

So how can you do this? Well, you’ll need to make the shadows darker and the highlights lighter.

Creating Contrast

First of all, click on the line about a quarter of the way in from the left. Next, drag the point you’ve created down. This will darken your entire image. You don’t need to drag it down much to see a difference. After this, you should create a second point, this time about three-quarters of the way along and drag it up a little. Again, only a small amount is needed for this to work.

If you look at your curve, you’ll notice it resembles an S-shape. This S-Curve is probably one of the most common ways for you to create contrast with Curves. Our sample photo has better contrast now, but it is still a little dark, we’ll come to that shortly.

How to Understand Curves in Photoshop

Notice how the line now resembles the shape of the letter S.

As another way of working, start by placing a point in the center. This will be your anchor point. You’re not going to move this one. Now create the point for your shadows and drag it down. You’ll notice that as you drag the shadows down, the highlights will move up automatically across from the anchor point. By clicking and dragging the center up, you both brighten the image and increase contrast. If you want to control the image more, just add more points.

How to Understand Curves in Photoshop

Endpoints and Input

You’re not restricted to making just curves. You can also move the endpoints of the line in. This results in a look that’s similar to when you move the black and white points using Levels. This adjustment makes a huge difference with this image, where most of the tonal information is in the center of the histogram. Notice that as you move the endpoints in the black and white points on the Input Slider move to a corresponding position – so you could also just move these sliders.

How to Understand Curves in Photoshop

Moving the endpoints in curves.

To finish up this look, you can add a little S-Curve after moving the end points. You’ll notice that the increased contrast has also led to increased color saturation.

How to Understand Curves in Photoshop

Erase and Rewind

At any point that you want to start again without closing the dialog and reopening it, you can hold down the Alt or Option key, and click the Reset button that appears instead of the Cancel button.

How to Understand Curves in Photoshop - reset

If you only want to remove a single point, you’ve got a few options. Drag the point right off the grid. Or, you can click on a point and press the Delete key. The last option is to Control/Command+click on a point to remove it.

Presets

Just by way of mention, you should try the Curves presets in the menu to get a feel for what particular points can do to a curve. You can also save any curve you create yourself by clicking on the tiny cog beside the menu and choose “Save Preset”. Your Curves preset will then get added to the menu.

How to Understand Curves in Photoshop

Auto and Options

Just like Levels, there’s an Auto function for Curves. It too depends on the Options section. Rather than repeat it verbatim, go check out the Auto section in the Levels article.

Auto Curves - How to Understand Curves in Photoshop

Using Curves as an Adjustment Layer

Up to now, what you’ve done has been destructive editing. You’re completely changing the layer to which you apply the Curve. Instead, it’s best to use Curves as an Adjustment layer. From the bottom of the Layers panel, click the split circle icon and choose Curves.

How to Understand Curves in Photoshop

The Curve will appear in the Properties panel. Using the information you’ve got so far it should be no problem editing a file like this. I’ve started by pressing the Auto button, then added a curve to both increase contrast and brightness.

How to Understand Curves in Photoshop

Sectioning your photo with Curves Adjustment layers

So far you’ve been using Curves on the entire image. Not all areas in a photo may need the same work, but it’s easy for you to select different areas to work on.

Press L to bring up the Lasso tool, or select it in the toolbar. If it’s not the main lasso, use Shift+L to cycle through the options. At the top, enter 15px in the Feather option. You’re going to select the sky first. In order to draw outside the photo edge, hold down the Alt/Option key. You need to do this so the Feather, which softens the edge of the selection, doesn’t soften the edge of the photo. Join the two ends of the lasso to make a selection.

selection - How to Understand Curves in Photoshop

Now, create a new Curves Adjustment Layer. Notice that the mask beside the curve is white on top, and black on the bottom? That means your curve will only affect the top of the image. White means the effect is revealed, whereas black means it’s concealed. You can use the brush tool to add to a mask or remove from it using a black brush. Shades of gray will work too but act like an opacity control.

You can now go and edit the curve for the sky, separately to the main curve. Another advantage to using Curves as an adjustment layer is you can overdo the look of the curve, and then bring it back using the layer’s opacity slider.

How to Understand Curves in Photoshop

Before Curves adjustments.

How to Understand Curves in Photoshop

Here’s the version after curves have been applied.

The Tip of the Iceberg

Curves is a pretty useful tool and more versatile than Levels for advanced contrast control. You’ve seen a lot of what can be done here, but there’s also the color changes that can be done using the individual color channel curves, but that’s a topic for another article.

The post How to Understand the Curves Tool in Photoshop by Sean McCormack appeared first on Digital Photography School.


Digital Photography School

 
Comments Off on How to Understand the Curves Tool in Photoshop

Posted in Photography


How to Correct Skin Tones Using Lightroom’s Color Curves

27 Oct

Lightroom gives you a million and one ways to complete most photo edits. Having options is important. No two photos are alike, so no two edits are alike either. In this article, I’ll show you how to correct skin tones using Lightroom’s color curves.

There are times when the best way to edit color in general, and skin tones in particular, is to use Lightroom’s Color Curves. After reading this tutorial, you’ll be able to; measure RGB skin tone numbers to give you a general idea of which edits your photo needs, and correct the color issues using Lightroom’s Color Curves

skin-tones-Lightroom-curves-13.jpg

Finding the color numbers

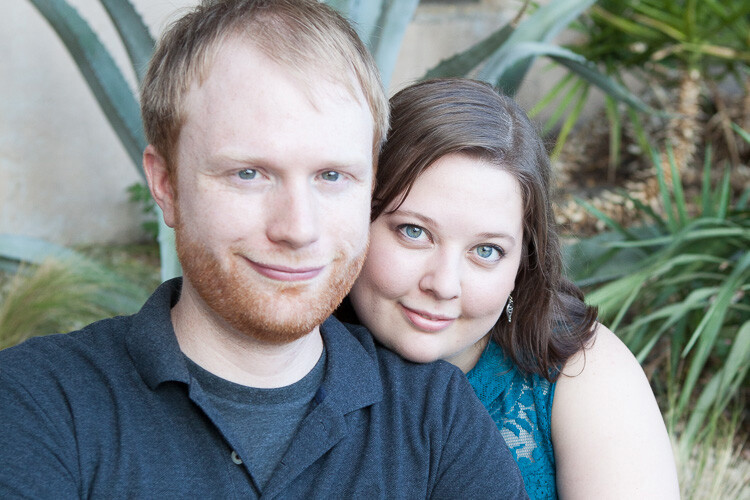
The image below is a photo that came out of the camera with a pretty good white balance and skin tone. Do you see the numbers under the histogram? Those are Red, Green and Blue (RGB) numbers.

Skin tones Lightroom curves 01

You can display the RGB numbers for your photos too. In Lightroom’s Develop module, hover your cursor over the area you want to measure. Look under the histogram for the corresponding RGB measurements.

These measurements tell us that the pixels next to the arrow in the screen shot had the following measurements:

  • Red: 73.1%
  • Green: 67.1%
  • Blue: 60.5%

RGB numbers are usually measured on a scale of 0-255, unless you are working in Lightroom. In Lightroom, you generally see them on a percent scale. 0% is the darkest value for any color, it’s so dark that there is no visible detail in that area. 100% is the brightest, and is so bright that no detail is visible.

Analyzing the color numbers

When analyzing RGB numbers for skin tone, look for the following indicators:

  • Red should be higher than Green. Green should be higher than Blue. This pattern is universal to all skin tones, regardless of age or ethnicity.
  • Each color should have at least a 2% difference, usually more, between it and the next number. Do you know how to identify a pure gray? That is a pixel that measures exactly the same in its Red, Green and Blue numbers. So skin whose RGB numbers are very close to each other is going to look gray. Not very appealing, right?
  • If any colors measure 94% or above, you probably have overexposure to deal with.
  • If any colors measure 6% or below, you probably have underexposure to deal with.

The RGB numbers in the photo above are consistent with expectations. This means that the skin is within “proper range” of a well-exposed photo with good white balance.

What do to with bad numbers?

What happens, however, if your photo doesn’t look so good straight out of camera?

Skin tones Lightroom curves 02

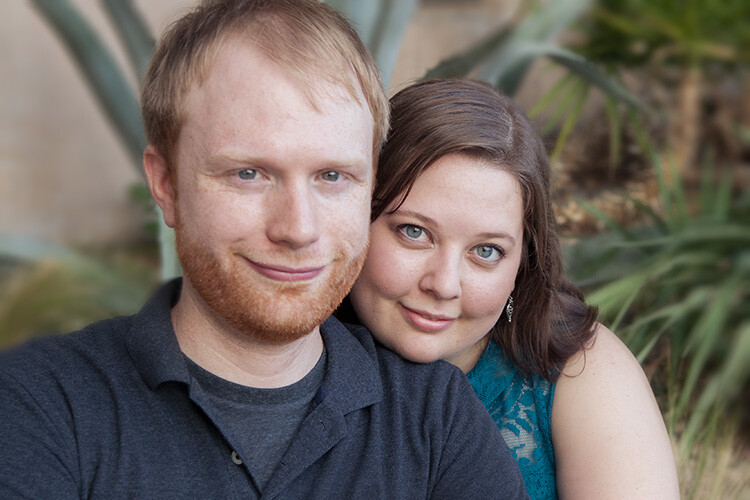
In this photo, the measurement point was just next to the arrow on her forehead. The numbers read: Red 93.8%, Green 92.5%, and Blue: 93.6%.

Anytime you see a photo with skin tones that measure like this, your eyes are going to tell you that something is off before the numbers do. The benefit of using the numbers is that they give you the direction to which your edits for the image need to go.

The numbers in this photo cause concern because:

  • Anything higher than 94% or so in Lightroom is bright enough that your image, if you print it, might not render good detail in those areas. That means that these areas are too bright.
  • Blue is higher than Green. Red should always be the highest and Blue the lowest otherwise the skin tone will appear cold.
  • The RGB numbers are too close together – they are approaching gray. This skin in this photo is lifeless as a result.

Correcting the skin tones

To fix this image, you would start by tweaking exposure. Proper exposure is a huge component of proper skin color. In fact, it’s often impossible to assess skin tone issues correctly without correcting exposure first.

A little-known bit of Lightroom awesomeness is that it’s easy to correct exposure while keeping an eye on the RGB numbers. In the Develop module, double click in the numeric entry field for Exposure so that the number is highlighted. Next, hover your cursor over the area of skin you are measuring without clicking. Use the up or down arrows on your keyboard to change exposure until a more appropriate measurement for the Red value appears under the histogram.

Skin tones Lightroom curves 03

Adjust Highlights (or Shadows, Whites, or Blacks) in the same way. Activate the numeric input field for editing then hover the cursor over the arrow you want to measure. Use the arrow keys on your keyboard to increase or decrease the adjustment.

Exposure for this photo is better with the adjustments you see above, but color is still off. When the RGB numbers are as close together as you see here, it’s often better to use Color Curves than the White Balance sliders to fix the issue.

Using Color Curves instead of White Balance Sliders

Color Curves has two major advantages over the white balance (WB) sliders.

You might have noticed already that Lightroom measures three colors (red, green and blue) for each pixel. However, the White Balance sliders don’t allow for editing the most important component of skin color – red. But, you can edit Red tones using Lightroom’s Color Curves.

The other big benefit of using Color Curves is that you can adjust colors in limited parts of the tonal range. For instance, if you reduce yellow in an image using the Temperature slider in the White Balance section, you are reducing yellow globally (everywhere in the image equally). Using Color Curves, however, you could reduce yellow only in the shadows, without taking away the yellow that properly belongs in the mid tones and highlights of an image.

To find Color Curves in Lightroom, scroll down to the Tone Curve section. By default, it shows you the parametric curve, which looks like this:

Skin tones Lightroom curves 04

Click on the small button in the lower right corner of the Curves panel to access the Point Curve. (It’s circled in the screen shot above.)

Now you are looking at the Point Curve interface:

Skin tones Lightroom curves 05

Using the Channel drop down menu, select the color you’d like to adjust.

Skin tones Lightroom curves 06

Which color channel to edit?

At this point, you may be wondering about adjusting colors other than red, green, and blue. For instance, what if your photo has too much yellow or orange? Think about it like this.

Each of the three colors measured in Lightroom has an opposite:

  • Red is the opposite of cyan
  • Green is the opposite of magenta
  • Blue is the opposite of yellow

Reducing any one of those colors using Color Curves, increases that color’s opposite. In other words, reducing blue is the same as increasing yellow.

Looking at the Curves panel, do you see the histogram behind the straight line? When you click and drag the straight line to create a curve, this tells Lightroom to adjust the pixels corresponding to that part of the histogram.

Say, for instance, that you wanted to add blue to the mid tones of an image. You would select the Blue channel and click the line in the middle of the histogram, where the midtones live. Dragging the line up would add blue to the bright parts of your photo’s tonal range.

Dragging up increases the color the channel is named after – blue, in this case. If it increases blue, that means that it’s also decreasing blue’s opposite, yellow.

Skin tones Lightroom curves 07

Dragging down decreases the color the channel is named after.

skin-tones-lightroom-curves-08b

Using the Targeted Adjustment Tool for Curves

That’s the way it works in general. But you can get much more precise color control by using Lightroom’s Targeted Adjustment Tool. Click on the button at the top left corner of your Curves panel to activate it (circled below).

Skin tones Lightroom curves 08

Hover this tool over the spot you’re using to measure the skin tone in your photo, but don’t click! Use the up and down arrows on your keyboard while keeping an eye on the RGB numbers beneath your histogram until the both the appearance of the photo and the RGB numbers improve.

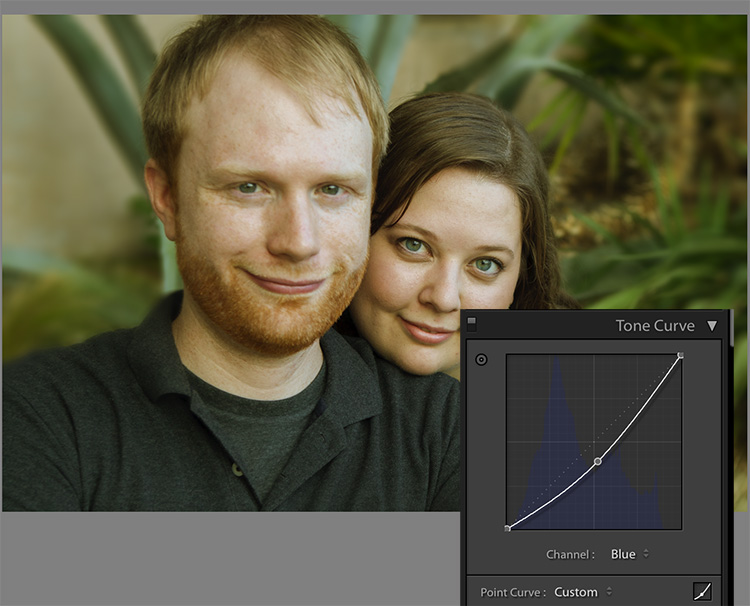
Moving the blue curve down, as in the screenshot below, provides better separation between the Green and Blue measurements. It also gives the photo the warmth it’s lacking.

Skin tones Lightroom curves 09

If the image still lacks vibrance, as this one does, move to the Red curve and increase the Red channel. Adding a touch of red is the best way to counteract gray skin.

Skin tones Lightroom curves 10

Next, decreasing green (to add magenta) makes the skin color, as well as the corresponding RGB numbers, look just about right.

Skin tones Lightroom curves 11

Tweaking things

However, the warmth of the plants behind them is overpowering the subjects. To downplay it, return to the Blue channel.

Using the Targeted Adjustment Tool, add Blue to the the shadows by hovering over a dark area of the photo and hitting the up arrow on your keyboard.

Skin tones Lightroom curves 12

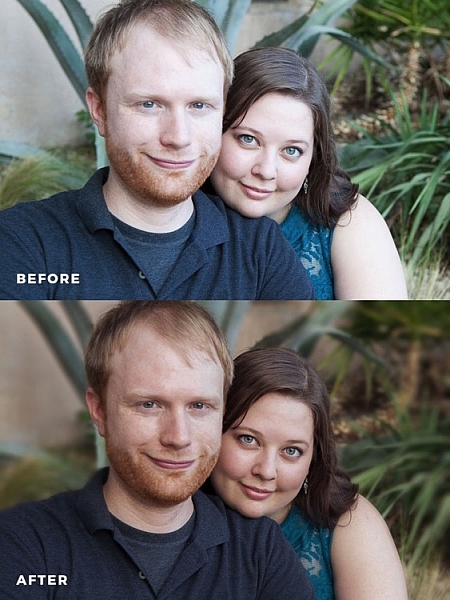
Compare the original and edited photos here:

Before

Before

After

After

Editing your own images with Color Curves and RGB numbers

Keep the following tips in mind when editing your own images.

#1 – First, a big caveat to anyone who has heard that using RGB numbers to edit will solve all skin tone problems! There are as many proper RGB measurements as there are people in the world. As you study RGB numbers, let trends in the numbers and generalities guide your edits, but don’t try for an exact numeric match.

#2 – Measure skin tones in the middle range of brightness. Look for mid-tones rather than bright highlights or deep shadows. Also avoid measuring on cheeks, the end of the nose, or other areas that are usually redder than others.

#3 – In general, when I’m editing photos, I look for tones in these ranges:

  • Red is highest > Green is middle > Blue is lowest – always.
  • The Red channel is usually between 70% and 90%. Very light skin can be as high as 94%. Very dark skin can go as low as 40-50%.
  • The Blue channel is usually between 30% and 80%.
  • It’s not possible to generalize how many percentage points difference should be between Red and Green, or Green and Blue. However, skin that has warmer tones will have less Blue in proportion to Red and Green.

#4 – Small movements of your tone curve impact your image dramatically. Don’t go overboard!

Conclusion

Studying the patterns in the RGB numbers of your photos is a great way to develop your editing eye. Everyone has photos that aren’t quite right. Analyzing the relationship between the numbers and the appearance of the photo will help you get to the point where you can eyeball a photo’s needs without referring to the RGB numbers at all.

Any questions? We could talk about this topic all day. Comment below and tell me what you think.

googletag.cmd.push(function() {
tablet_slots.push( googletag.defineSlot( “/1005424/_dPSv4_tab-all-article-bottom_(300×250)”, [300, 250], “pb-ad-78623” ).addService( googletag.pubads() ) ); } );

googletag.cmd.push(function() {
mobile_slots.push( googletag.defineSlot( “/1005424/_dPSv4_mob-all-article-bottom_(300×250)”, [300, 250], “pb-ad-78158” ).addService( googletag.pubads() ) ); } );

The post How to Correct Skin Tones Using Lightroom’s Color Curves by Erin Peloquin appeared first on Digital Photography School.


Digital Photography School

 
Comments Off on How to Correct Skin Tones Using Lightroom’s Color Curves

Posted in Photography


Bold Border Checkpoint: Cantilevered Curves Welcome Visitors

15 Oct

[ By Steph in Architecture & Public & Institutional. ]

sarpi checkpoint main

Passing over the border between Turkey and Georgia isn’t an experience you’re soon to forget thanks to the surreal, undulating concrete customs checkpoint structure looming over the Black Sea. A major stop for business travelers, yet located in the sleepy village of Sarpi, the building offered a chance for the client – Georgia’s Ministry of Finance – to make a lasting impression on visitors, representing the new, modern incarnation of the formerly Soviet-run country.

Sarpi checkpoint 1

sarpi checkpoint 4

sarpi checkpoint 5

sarpi checkpoint 3

sarpi checkpoint 9

The main volume of the building is low and long, lean as a ship, as if it’s making its way through the streets to launch itself into the water. From one end of this structure rises a strange tower with multiple cantilevered levels overlooking the coastline. It’s topped with a viewing platform, and in addition to the customs facilities, houses a cafeteria, staff rooms and a conference room.

sarpi checkpoint 6

sarpi checkpoint 3

sarpi checkpoint 7

sarpi checkpoint 8

Berlin-based architect J. Mayer H. wanted to represent “the progressive upsurge of the country” in visual form, departing from the usual architectural style of the region. While the highly unorthodox shape of the building fits in well with the rest of the architect’s oeuvre, including the Georgia rest stop pictured below, it’s also somehow fitting for a region still filled with bizarre Soviet monuments.

j mayer h rest stop 2

j mayer h rest stop

With its sculptural profile, the structure almost seems more like an oversized piece of public art than a functional building, reminiscent of the incredible futuristic concrete monuments built by the Soviets that can still be found in Yugoslavia today. In this sense, the Sarpi checkpoint almost seems retrofuturistic. Some people say it looks like an abstracted profile of Snoopy.

Share on Facebook


[ By Steph in Architecture & Public & Institutional. ]

[ WebUrbanist | Archives | Galleries | Privacy | TOS ]


WebUrbanist

 
Comments Off on Bold Border Checkpoint: Cantilevered Curves Welcome Visitors

Posted in Creativity


Photoshop Video Tutorial: Dodge & Burn Using Curves

11 Dec

From the early days of photography dodge & burning has been used to help add emphasis and impact to selective areas of images. Within photoshop we show one of the many ways to digitally dodge & burn an image with an added level of flexibility. Check out our LAB Color Correction Video Tutorial! Before After

The post Photoshop Video Tutorial: Dodge & Burn Using Curves appeared first on Photodoto.


Photodoto

 
Comments Off on Photoshop Video Tutorial: Dodge & Burn Using Curves

Posted in Photography