RSS
 

Posts Tagged ‘Converting’

Tips For Converting To Black & White Photography

22 Dec

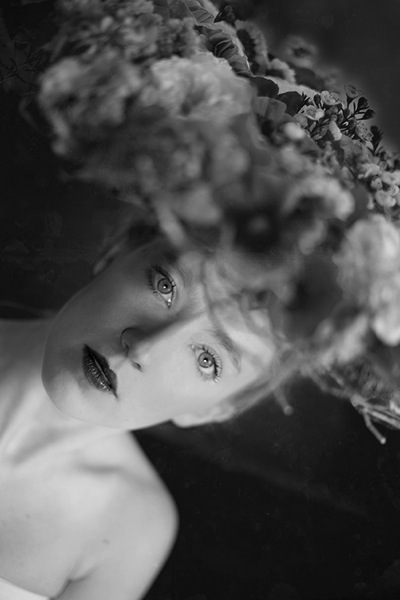
When shooting black and white fashion photography, how you convert from full-color Raw


Fashion Photography Blog

 
Comments Off on Tips For Converting To Black & White Photography

Posted in Uncategorized


Tips for Converting an Old Camera for Shooting Infrared Photography

30 Apr

A few years ago I become friends with a guy who likes dong infrared photography. It was something that I had tried when I was shooting film, but never quite figured out. My friend had converted an old camera of his and it seemed like a good idea. At the time, I had two old cameras and thought perhaps I could use one of them for infrared. However, the price was too high then.

Tips for Converting an Old Camera for Shooting Infrared Photography

Port Arthur and the main Penitentiary looks a lot better in infrared.

Move forward to a few years, and after buying a second-hand camera from a friend, I found myself in the same position. I had two extra camera bodies, so why not convert one to infrared.

You can do this by putting a filter on the end of the lens, but from searching around for information, getting the camera converted specifically for infrared seemed like a better alternative.

What is infrared photography

Perhaps before going any further, it might be good to get an understanding of what infrared photography is actually all about.

Infrared photography is the capture of part of the spectrum of light that is invisible to the naked human eye. Infrared light is at the top end of the spectrum and is not visible to the eye, so to capture it with a camera some special techniques and equipment are required.

It isn’t an easy concept to understand, but once you get out there and start doing it, you will figure out what works and what doesn’t.

Tips for Converting an Old Camera for Shooting Infrared Photography

Late winter at Alowyn Gardens. It never snows here, but the infrared camera makes it look like it had.

Different ways of doing infrared

As with most types of photography, there are various ways to go about it. Infrared photography is no different.

Computer conversion to infrared

You can find ways to do infrared conversions on the computer. There are processes that you can use that will help give you that infrared look, however, it is just a look and won’t be the same as doing it with filters or a dedicated camera. If you are curious, though, you could try this first before investing any extra money into it.

 Filters

leannecole-infrared-photography-0200

Alowyn Gardens again, looking again like winter and snow, or perhaps a frost.

There are filters that you can get to put on your lens that will help you to get infrared-style images. These will let the IR light through to your sensor. The advantage is that you don’t have to give up a camera body to do this. I’ve never tried them, so I can’t comment on how good they are or are not.

Camera

One thing a lot of photographers who love this kind of photography do is to get one of their cameras converted to be dedicated just for doing infrared photography. Some do this themselves, or you can take it to camera repair place to do it for you.

I took mine to a place to get the infrared conversion done. I’m always wary of playing around with the sensor. They have to remove the filter that comes with the camera and replace it with one that will let through the infrared light, and block all visible light.

Tips for Converting an Old Camera for Shooting Infrared Photography

Late winter at Alowyn Gardens. It never snows here, but the infrared camera can give it that look.

Choosing which sensor filter

You do have to choose which filter you want and some places will give you many choices. Where I sent my camera there were only two options.

The first choice is the 720nm filter. This will give you close to a full infrared effect, but it will allow you to put some color into your images. The second is the 850nm which would give you very rich dark blacks and perfect if all you want to do is black and white infrared.

For me the choice was easy, I wanted to get some of that color. Not all the time, but it was important to have a choice, so I went with the 720nm filter.

Tips for Converting an Old Camera for Shooting Infrared Photography - color infrared image

The 720nm sensor filter allows you to get some color, like having a blue sky.

What to photograph in infrared

Like any type of photography, you can photograph anything with an infrared camera or one with a special filter. However, not everything will have the same effect or give you great results. You really need to experiment with it to see what will work.

People

Portraits can be quite weird, and the infrared light does strange things to the skin and facial features. The hair can look funny too and the lips almost disappear. I don’t know that many people would enjoy getting their portrait done this way. Perhaps for a special event or something, maybe. Who knows.

infrared portrait - Tips for Converting an Old Camera for Shooting Infrared Photography

The infrared camera gives Chris a completely different look.

Trees and nature – give your scene the look of winter

Trees are fantastic for this type of photography. All the leaves come out looking white. The more moisture the leaves have the whiter they are in the image. The gum trees in Australia don’t have quite the same effect as trees that are not indigenous to the area.

It makes photographing in rain forests pointless as everything shows up as white and doesn’t have the same effect as it does with a color image. It’s hard to see any definition between the plants.

Tips for Converting an Old Camera for Shooting Infrared Photography - b/w of trees and forest in IR

Australian natives are a little different with infrared photography.

One thing I found was that dead trees looked amazing in infrared. If you photograph them surrounded by lots of other trees, or on their own you would get a very different look. They stand out with an elegance that color photography just doesn’t give them.

When traveling around Tasmania with my infrared converted camera I was looking for dead trees everywhere.

dead trees in IR b/w - Tips for Converting an Old Camera for Shooting Infrared Photography

Dead trees on the side of the road in Tasmania.

Architecture

One of the first times using the camera was in the city of Melbourne. I just walked around and took photos of the buildings and streets to see what could be captured in infrared.

The images were disappointing. Once converted to black and white they didn’t look any different than other images done with a normal camera. They did have a quality that gave them an antique look, but other than that there was no discernable differences.

b/w IR architecture - Tips for Converting an Old Camera for Shooting Infrared Photography

St Paul’s Cathedral in Melbourne, it looks like any black and white image, though taken with the infrared camera.

While on that same trip to Tasmania there did seem to be some buildings that were really suited  to infrared, like some old sandstone structures. Places like Port Arthur, where all of the buildings are made of stone, came out looking really good with the camera.

When visiting Port Arthur I took images with the infrared camera and the normal one. Once the photos were on the computer it seemed clear that the ones done with the special camera were by far more interesting. Many of the images were processed, some hand colored and then published on social media. The color images of the same subjects were boring in comparison.

Processing

All the images taken with the infrared camera need to be processed. You may find the sepia quality of the images quite good, but there is so much you can do to them. You can convert straight to black and white or play around with the white balance to get some color in the images.

hand colored IR image of a church - Tips for Converting an Old Camera for Shooting Infrared Photography

A small church in Tasmania, the sky was made blue because of the filter and the stone was hand colored on the computer later.

Experimenting

Really, this is what photography is all about. Get out there with your camera to see what you can capture, what will work, and what doesn’t. Each subject will look different with infrared photography, but you should try every type of photography you can think of to take images and then review your results.

Right now, I’m experimenting with a red filter on the lens. The images are interesting, but I need to try it a lot more.

Tips for Converting an Old Camera for Shooting Infrared Photography

Cascade Brewery is an old sandstone building that came out well. In the background, you can see the snow on Mount Wellington.

Finally

While it can be an expensive exercise converting a camera to infrared, if you have an old body lying around, then you might want to consider it. You can do a lot of experimenting with it and you will likely not regret getting it done.

If you like the look of this sort of photography, then there are also other options. It is amazing how much the world can change with infrared and it is a great way to add something different to your portfolio.

The post Tips for Converting an Old Camera for Shooting Infrared Photography appeared first on Digital Photography School.


Digital Photography School

 
Comments Off on Tips for Converting an Old Camera for Shooting Infrared Photography

Posted in Photography


3 Methods for Converting to Black and White Using Photoshop

16 Jun

I am a huge fan of color. I love bold colors to create a mood in my images, and often use the meaning behind colors to reinforce the message I want to convey.

Sometimes though, you want to get rid of the colors to draw the viewer’s attention to your compositional lines, to textures, or to make a contrast. To do so, you may want to turn a color picture to black and white, in order to see what works best.

I do not work so often with black and white, but I truly love it. There are some photographers who create amazing black and white pictures and I really appreciate such a beautiful images even if I am mainly drawn by color.
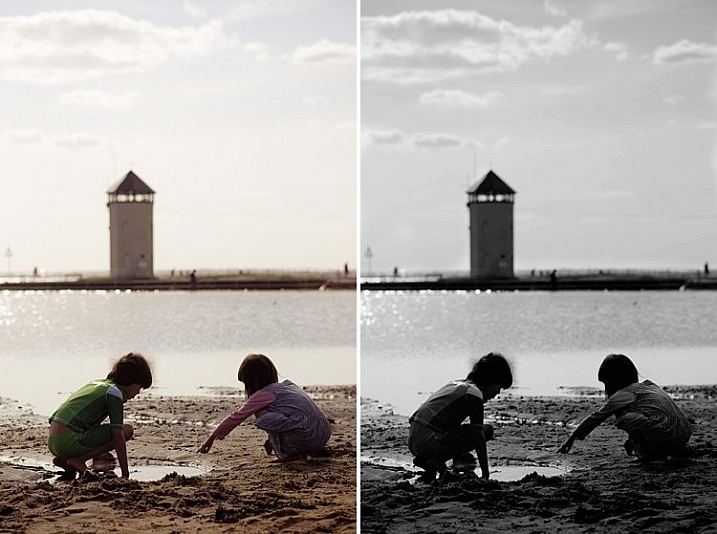
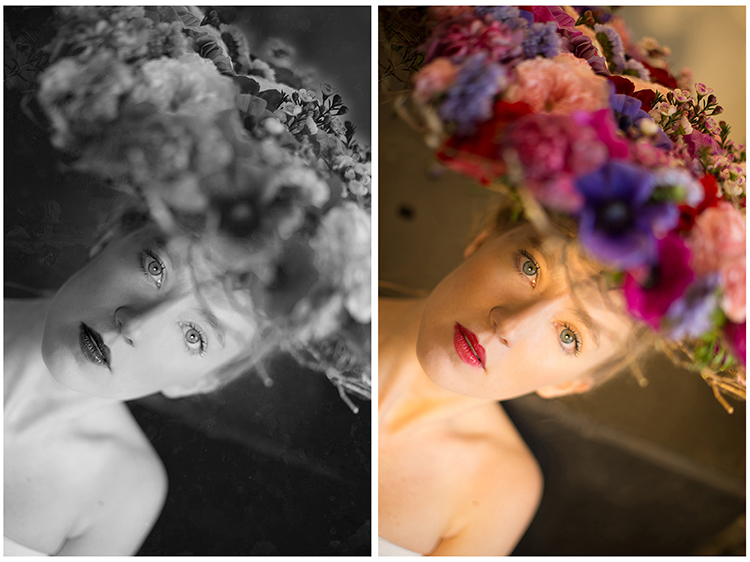
Setting the mood in color or in a black and white image is very different.

Color and bw image

There are very different types of black and white – whether you have a full tonal range from white to black, or merely light or dark grey tones. Dark or light tones will create different effects, and convey a different mood to your image. Dark tones are often associated with a sombre mood, while light tones are more optimistic, or positive. This is a generalization, of course, but it tends to be true most of the time.

Low contrast would impact a gentler mood, while high contrast will have a stronger impact. The eyes usually jump directly to the highest contrast area of an image. In addition to a well thought out composition, using contrast is a great way to highlight an important feature of your subject.

Think about what kind of black and white you are attracted to. It is very personal for you, plus it also depends on the genre of photography you are dealing with. As I am a portrait photographer, I will be showing you how I process a color portrait into a black and white one. I chose a portrait from a vegetal hairstyle shoot I did in Paris last month.

As usual you have many ways to achieve the same result in photoshop. Find the way that suits your workflow best, or the one that achieves the best results according to your photographic style, or mood of the day.

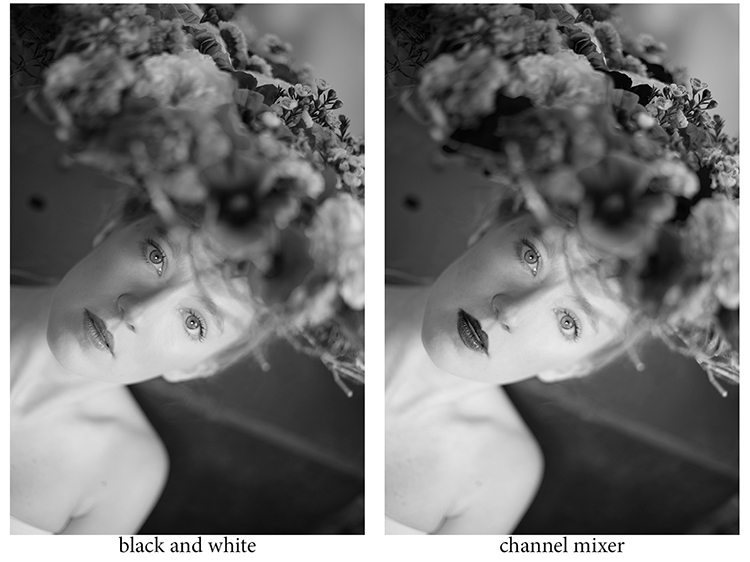
I am going to use two different adjustment layers to show you the difference regarding tones and contrast. Then, we are to combine those different layers, to keep the best part of each one.

1 – Channel mixer adjustment layer

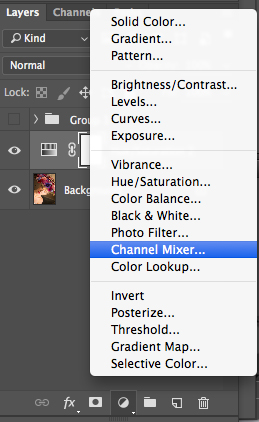
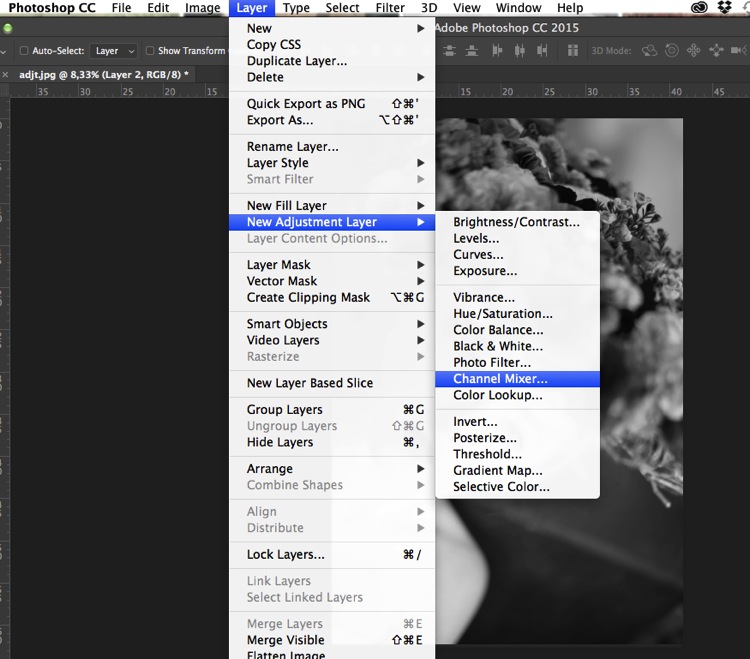
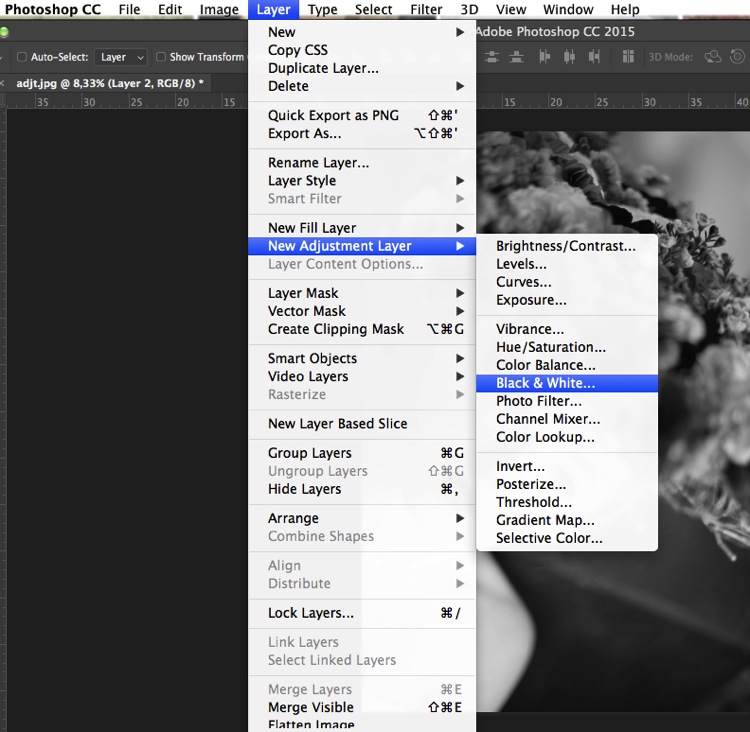
Go to your layer panel and click on Channel mixer, or go to Layer > New Adjustment Layer > Channel Mixer.

Add channel mixer

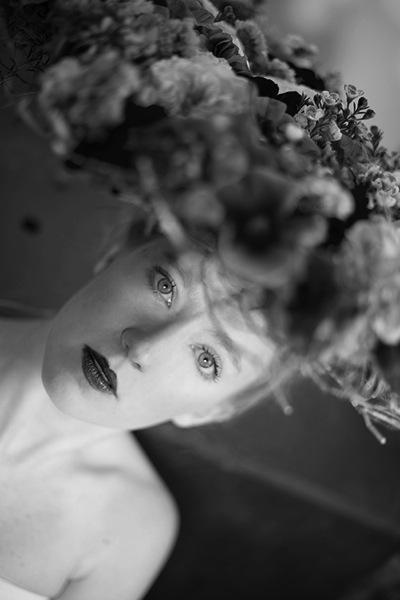
Channel mixer layer

With channel mixer you can do more than just desaturate your colors. You can get great results sorting by color channel. This will modify your input and output levels.

You can get lighter or darker tones, you can also play with your constant overall tone, which I use mainly to darken my background. You can play with each channel and see what you like the most. You can play with red channel in a portrait, as skin tones are usually red, therefore highlighting your subject.

Channel mixer

2 – Using a Black and White Adjustment layer

Black and white layer adjt

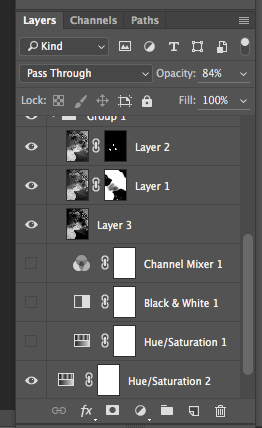
When working with black and white you cannot see different adjustments at once. To keep several adjustments visible, I create a stamp layer (a separate layer on which the adjustment has been applied directly to the image). To do so, press Shift + Option + CMD + E, and the stamp layer appears (combining all visible layers into one).

You can then combine with a black and white adjustment layer. To do so you go to Layer > New Adjustment layer > Black and white. Then, play with the different values for each color to adjust the tones as you wish in your image. As in the previous step I create a stamp visible layer.

Black and white

On the two different stamp visible layers I have different contrasts. I can choose to apply each of these contrasts on different parts of the final image, combining those layers.

Different contrats bw or channel mixer

Add a layer mask to each one, and paint on the mask using black, over the areas you want to hide, thus revealing the layer underneath. Paint with white (layer mask is white by default) to reveal the selected areas of the top layer.

If you are not so familiar with layer masks I would suggest you create only two types of black and white, making it easier to apply selectively the different effects.

Layer mask

Layer masks deserve an entire article, so I will save how I use them for another article.

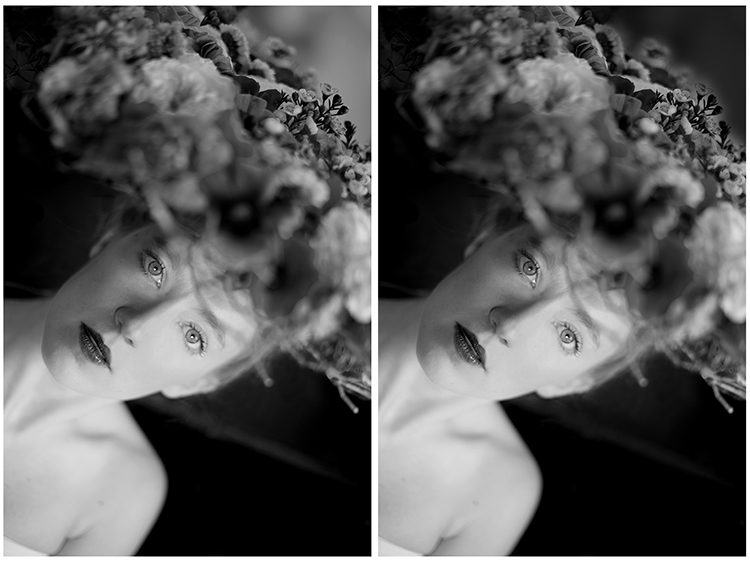
At the end, you have a mix of different contrasts in your image, and can apply those contrasts as they best suit each area where you want to drawing the viewers’ attention. There are so many ways to create a black and white images in Photoshop, each way giving a different look, and contrast to your image

For example see how I use gradient map in this previous tutorial: How to Create a Vintage Look for Your Image Using Photoshop

3 – Use a Level/curves adjustment layer

In this image I create a new curves adjustment to modify a little the overall light. Also, it is great to remove distractions such as you can see in this image.

Curves

Usually I do not pay much attention to small distraction in my backgrounds, as I would add a texture overlay to my image (therefore adding more details to a plain background). If you like smooth backgrounds it is very useful.

In this image I also wanted to remove the light distraction on the top right corner (too bright compared to the rest of the dark background).

Using curves to remove bg distractions

To finish this image I will add some texture.

Final image BW

Do you have other methods to convert to black and white using Photoshop? Please share in the comments section below.

googletag.cmd.push(function() {
tablet_slots.push( googletag.defineSlot( “/1005424/_dPSv4_tab-all-article-bottom_(300×250)”, [300, 250], “pb-ad-78623” ).addService( googletag.pubads() ) ); } );

googletag.cmd.push(function() {
mobile_slots.push( googletag.defineSlot( “/1005424/_dPSv4_mob-all-article-bottom_(300×250)”, [300, 250], “pb-ad-78158” ).addService( googletag.pubads() ) ); } );

The post 3 Methods for Converting to Black and White Using Photoshop by Amélie Berton appeared first on Digital Photography School.


Digital Photography School

 
Comments Off on 3 Methods for Converting to Black and White Using Photoshop

Posted in Photography


5 Reasons Why Converting to Black and White May Improve Your Image

09 May

Photography styles are always down to personal taste, in my opinion. I respect that; people have different preferences, and in the same vein photographers can’t please everybody. This also applies to black and white photos, which will be the focus of this article. I have clients who absolutely do not like black and white images, and clients who want a full set of black and white conversions. Personally I give my clients at least 95% color photos and the rest are in black and white.
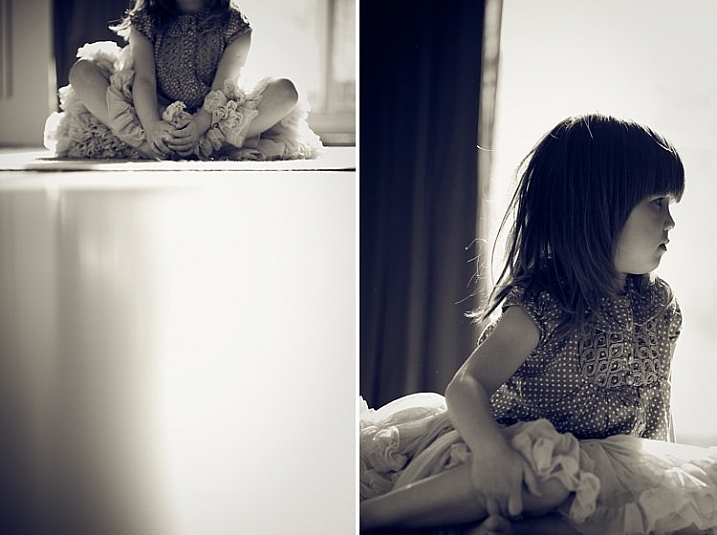
reasons-to-convert-to-black-white-tips-photography

But why convert to black and white? Is it ever necessary? When do I convert color images to black and white? Here are five reasons why I do black and white conversions on selected photos.

#1 When the background is colorful and distracting

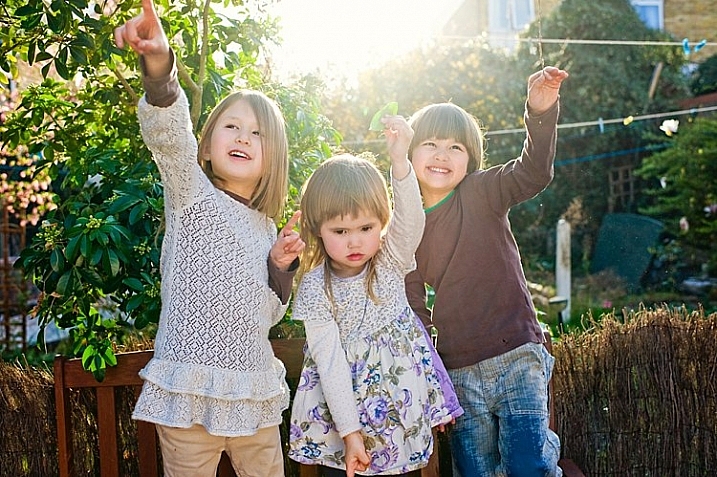
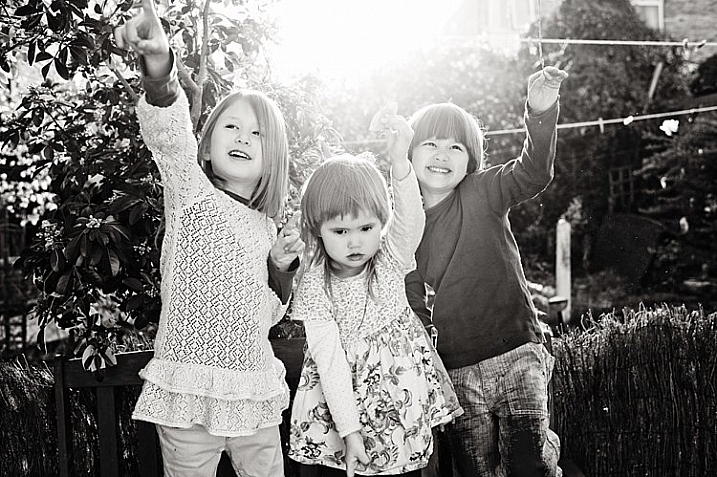
When there are too many colorful things cluttering in the background and taking the focus away from the subject, if they are not intended to be there, they are more likely to be a distraction rather than an enhancement to the image. It may also be that you have no control over the location and cannot move things away to de-clutter. In the photo below, my intention was to shoot backlit, and this was the only possible spot in a small patio. Light was my priority, and I had no control over the neighbor’s garden. This was a personal snap of my kids and I was not going to spend ages photoshopping the clutter away. Black and white was the way to go.

reasons-to-convert-to-black-white-tips-photography

reasons-to-convert-to-black-white-tips-photography

#2 When colors in the photo or the subject’s clothing do not enhance the image

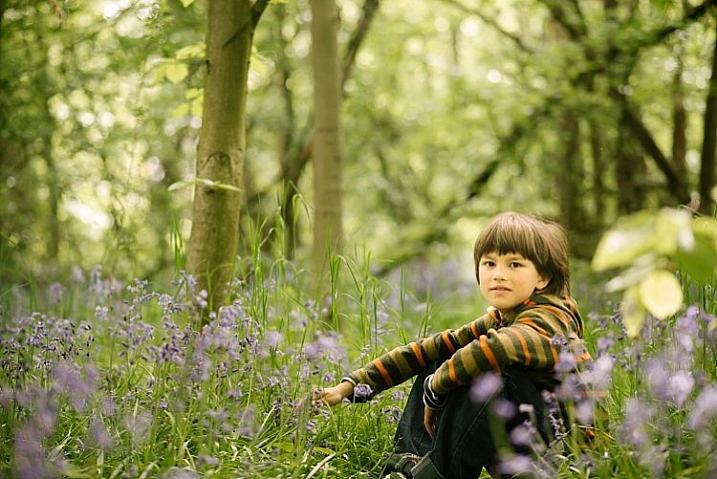
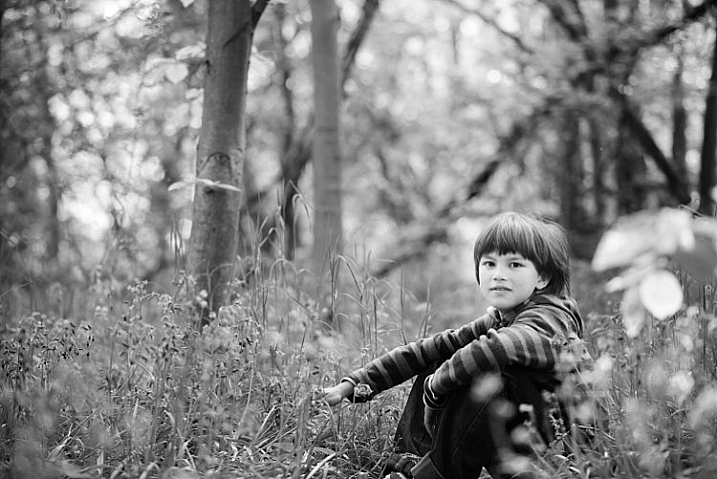
Sometimes you just have to go with the flow. When you have children, you choose your battles. This photo was taken during a family walk looking at the bluebells. It was hard enough getting the kids out of the house in good time, let alone fighting over which outfits they want to wear. Clearly my son’s outfit does not remotely fit in with the tone of this image. Another hooray for black and white.

If clients turn up during a photoshoot with outfits that are too bold or distracting, then you have the option of offering them a choice of color or black and white. Explain your reasons why you felt it was necessary to convert it, and show them the difference it makes on the impact of the image.

reasons-to-convert-to-black-white-tips-photography

reasons-to-convert-to-black-white-tips-photography

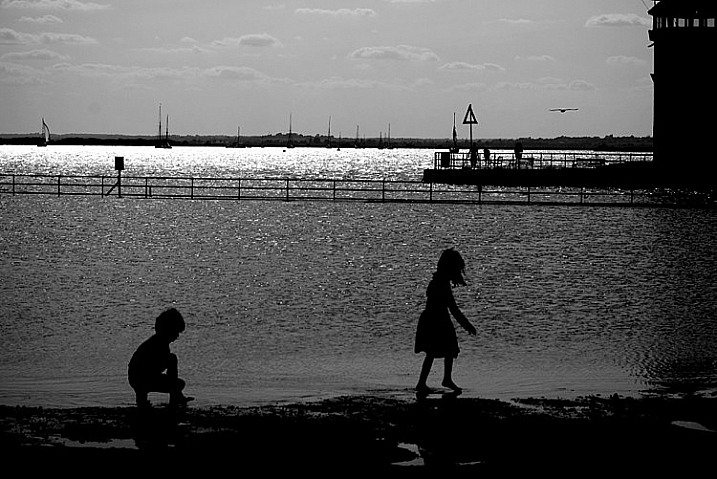
#3 For artistic purposes like exaggerating contrasts and silhouettes

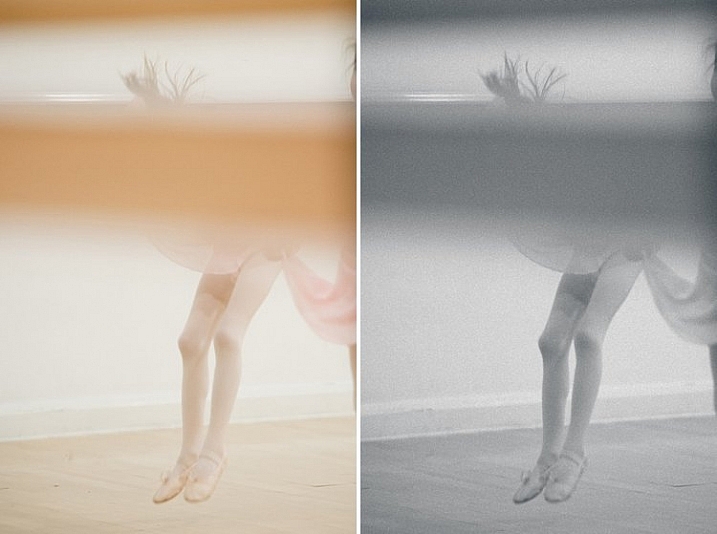
There are no rules in photography when it comes to creative style. It’s all down to your personal taste and vision. Artistic license is a great thing. You can photograph with motion blur and activity blur in mind, or add grain for more creative effect or a film look. Converting to black and white is just one more creative tool at your disposal.

reasons-to-convert-to-black-white-tips-photography

reasons-to-convert-to-black-white-tips-photography

#4 When black and white has more impact than color

Sometimes a scene just looks blah. It’s muddy and the colors seems non-committal; they are neither here nor there, not standing out, nor serving a purpose. Trust your gut. When I see “muddy” I run to black and white. An example would be a photoshoot in a living room with cream walls, a cream settee, and the subjects are also wearing cream. You can bring out more contrast in a black and white image.

At the other end of the spectrum, if the subject are wearing clashing colors that are too much, then converting to black and white turns the colors into varying values of gray, thus giving more cohesion to the overall look of the image.

In this snapshot of my kids below, I blew out the sky and wanted to bring some of the faint clouds back in. Apart from the muddy colors, it was easier to recover the blown out sky which would have looked very gray in a color image anyway.

reasons-to-convert-to-black-white-tips-photography

reasons-to-convert-to-black-white-tips-photography

#5 When the image is too noisy in color

Sometimes there are moments when your camera is not set correctly, and yet you see something you just have to capture in a split second, without having the chance to change your settings. The result would predictably be an underexposed image with unacceptable noise levels, or an overexposed image with plenty of highlights clipped. But the moment was priceless nonetheless. Black and white lessens the impact of the imperfection and makes the photo acceptable.

Perhaps this is because we are used to seeing grain in old black and white photos, and accepting the nostalgia associated with such a photo could forgive such an error in today’s digital image. However, beware of making this as an excuse. It should be a last resort to save a photo that is priceless, but never as part of your normal workflow.

reasons-to-convert-to-black-white-tips-photography

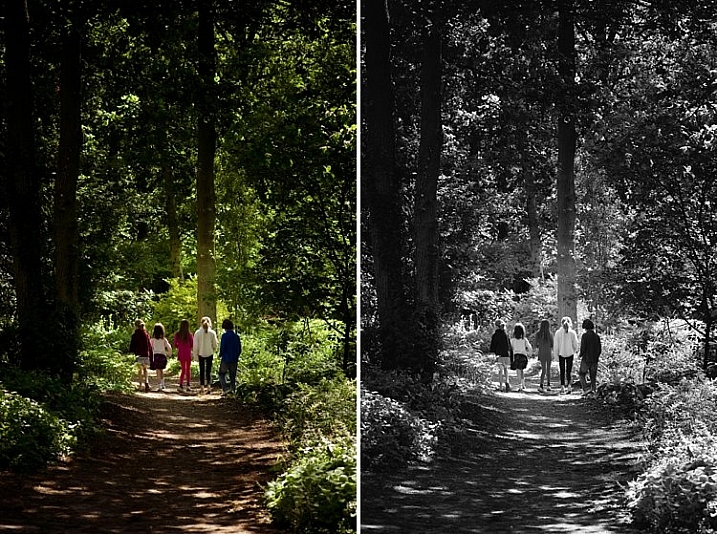
The kids in the photo above were never still, always running in different directions. I looked back and suddenly saw them walking in a row down a shaded path. I took a few successive shots knowing full well it would be underexposed based on the settings of my previous shots. I anticipated they would suddenly disperse, which they did in a few seconds, so I fired away. From the shots I took within seconds of this happening, I chose the one where they had just walked through a sunlit part of the path. There was still visible noise even after editing, but it becomes a non-issue in black and white.

How about you? Do you like black and white images? What reasons do you convert to black and white? Please share your thoughts in the comments below.

googletag.cmd.push(function() {
tablet_slots.push( googletag.defineSlot( “/1005424/_dPSv4_tab-all-article-bottom_(300×250)”, [300, 250], “pb-ad-78623” ).addService( googletag.pubads() ) ); } );

googletag.cmd.push(function() {
mobile_slots.push( googletag.defineSlot( “/1005424/_dPSv4_mob-all-article-bottom_(300×250)”, [300, 250], “pb-ad-78158” ).addService( googletag.pubads() ) ); } );

The post 5 Reasons Why Converting to Black and White May Improve Your Image by Lily Sawyer appeared first on Digital Photography School.


Digital Photography School

 
Comments Off on 5 Reasons Why Converting to Black and White May Improve Your Image

Posted in Photography


Instant Monster Truck: Converting Cars into Snowmobiles

08 Feb

[ By Steph in Technology & Vehicles & Mods. ]

Convert Truck Snowmobile 1

Anyone who has driven in heavy snow has witnessed an overconfident driver in a 4×4 go whizzing down the icy street only to fishtail or veer off into a ditch. Four wheel drive may not turn vehicles into magical snow beasts that can handle the worst of winter conditions, but these will: the Track N Go system, a series of treads that installs in just fifteen minutes to basically turn an ordinary vehicle into a monster truck.

Convert Truck Snowmobile 2

While monster trucks may seem ridiculous when seen on the streets in summertime, watching them tackle four-foot snow banks without a hitch might give some of us a twinge of envy when we’re sliding along at ten miles an hour after the latest blizzard. The Track N Go system is a series of four treads that lock onto a vehicle’s wheels to provide traction that tires can’t match.

Convert Truck Snowmobile 3

There’s a catch: you can’t exactly install these things on your Toyota Camry. They’re for 4x4s only, and they’ll set you back $ 25,000. But being that smug driver going where other vehicles can’t, and actually knowing that your car can handle it, might just be priceless.

Convert Truck Snowmobile 5

Of course, there have already been some Southerners perking up asking, do they work in mud? The answer is ‘maybe’ – they were developed specifically for snow, and mud trials haven’t started yet.

Share on Facebook


[ By Steph in Technology & Vehicles & Mods. ]

[ WebUrbanist | Archives | Galleries | Privacy | TOS ]


WebUrbanist

 
Comments Off on Instant Monster Truck: Converting Cars into Snowmobiles

Posted in Creativity


Converting from Android Back to the iPhone, Initial Observations

22 Oct

I’ve been using smartphones for a long time. I was an original owner of what I believe was the very first smart phone, the Kyocera PDQ 800 back in 2000. I had a couple of Microsoft Windows based phones after that. I waited in line down in Palo Alto with my pal Robert Scoble to get the very first iPhone when it was launched back in 2007. I then upgraded to an iPhone 3G, then an iPhone 3Gs. I skipped the iPhone 4 opting instead to give Android a run for the money. I switched to a Samsung Vibrant in 2010 and then in 2011 to a Samsung Galaxy Nexus.

On Friday my new iPhone 5s arrived.

I returned to the dark side of Apple for a lot of different reasons. I hated the poor battery life on both of my previous Android phones. I hated that it felt like the only way to get updates on Android phones was to buy a new Android phone. I thought it sucked how difficult it was getting updated software and I thought Google didn’t do enough to pressure the hardware manufacturers and carriers to better support Android updates in the aftermarket.

A lot of things felt broken on my Android phones all the time. Things crashed, didn’t work, etc. People kept suggesting that I “root” my phone to fix things — but I didn’t want to root my phone. I’m not a phone geek. I just want something really good that consistently works with little effort.

On my recent trip to New York City last month, I felt like I spent the whole trip apologizing to people who couldn’t get a hold of me on my Nexus because it was constantly dead. I didn’t dare listen to music on it or it would die even faster.

It’s totally unfair to compare my new iPhone with a 2 year old Galaxy Nexus, but I’m going to do it anyways. Maybe Android’s come a long way since my Nexus, but I’m not interested in shelling out $ 500 to see if in fact this is the case — not after feeling like I’ve been burned twice with my last two Android phones.

I’ve only been using my new iPhone for a few days, but here are my initial observations.

1. The iPhone battery is wayyy better than my old phone. Last night I went to bed with my iPhone fully charged, but unplugged. This morning it had 98% of it’s battery life still. That was amazing to me. My Nexus would have been dead. It’s so nice having a phone that actually has a battery life.

2. The internet reception is better on this phone than my Nexus. For the last two years I’ve thought that Verizon just had really crappy internet service in the Ferry Building here in San Francisco. It turns out it was my phone! All the places in the Ferry Building where I couldn’t get Verizon LTE service on my Android, now work perfectly with Verizon LTE on my iPhone. I was so frustrated all the time when my LTE connection wouldn’t work on my old phone. I was constantly blaming Verizon when the real culprit was MY PHONE! Verizon LTE works GREAT. I just needed the right phone.

3. I didn’t care about the fingerprint technology on the new iPhone. I never locked my Nexus and didn’t think I’d lock this one — I’m one of those optimists who never thinks they will lose their phone. It turns out that the fingerprint tech is so easy that I do now lock my iPhone. I totally get that the NSA likely now has my fingerprint, but I don’t care about stuff like that.

4. It’s nice to be able to hear my music again. One of the things that I disliked about my old Nexus was the music volume. It was too low at max volume. Sometimes when you are on a train or something you want the music louder. The iPhone music can go louder and that’s nice.

5. It’s nice having my iPhone sync with my iTunes. I transferred about 7,000 of my favorite songs on it. I tried downloading doubleTwist to somehow port my iTunes to my old Nexus, but I could never get it working. I think my music library was too large for doubleTwist or something. Letting iTunes manage my music flawlessly with my iPhone is great.

6. My new iPhone just feels better. I don’t know how to describe it. It feels more responsive, more accurate, faster. It feels smoother. The Flickr and Google+ apps flow easier on it.

7. The first shocker for me was how much smaller the phone and the screen felt to me. I got over this quickly and barely notice at this point.

8. I don’t really feel like I’m missing the best Google stuff from my Nexus. I can get Google Maps on my iPhone. I can get Gmail on my iPhone. I can get Google Chrome on my iPhone. All of the best things that sort of set Google apart initially for me as an incentive to go Android feel like they are now on iPhone.

9. Setting up my new iPhone took me a lot longer than I thought it would. Some of this was my fault and some was the phone’s I think. I couldn’t activate it at first. My phone couldn’t connect to the activation server. I finally got it activated and it wouldn’t connect with my wifi at home initially (now it works fine). I had to download all of my favorite apps. It seemed to take longer to download my apps than I would have liked. I had to reset some passwords because I’m always forgetting my passwords (on Flickr now your password must include upper and lowercase letters, a number, a special character AND be at least 8 digits!) I spent about an hour trying to figure out how to get my Google Calendar into my iPhone calendar. It turns out what was screwing me up was two step authentication. Once I turned that off at Google it worked.

Thanks to everyone online on Twitter, Google+, Facebook, etc. who gave me input on what phone I should buy next. Rosa Golijan was especially helpful. :)


Thomas Hawk Digital Connection

 
Comments Off on Converting from Android Back to the iPhone, Initial Observations

Posted in Photography


Converting Images to Black and White Properly

31 Mar

Header Image

by: David Wahlman of Wahlman Photography

Recently I was asked about the process of converting images to black & white; namely when to know the image would be good for it. So in this post I’m going to talk about when to convert an image to black & white and then how to do it in Photoshop without loosing quality.

When To Create A Black & White Image

There are about three ideas that come to my mind when I evaluate whether I should convert an image to black & white (here on referred  to as b&w).

  1. First of all, and somewhat obviously, what is your desired outcome? Is your client specifically asking for b&w images? Are you entering a b&w photo contest? Are you doing a gallery set of b&w (because, generally speaking it doesn’t look too good to have just one or two b&w mixed in with colors. You want a good balance.)? Like I said, it should be pretty obvious that your outcome needs to be considered, but it was worth saying.
  2. Second, you should consider the value range of the image. In photography the term “value” speaks of darks vs lights. So when I say to judge the image’s value range, I’m talking about if you have deep blacks and bright whites. What’s your dynamic range like? For the most part, ‘flat’ images don’t look very good in b&w. Traditional b&w have good contrast and well spread value all across the histogram. So, if your image has these elements, then it may be a good choice for converting into a b&w.
  3. I’ll be doing a post soon on color theory and color relationship, but if you have odd colors or colors that don’t work well together, then it may be a good candidate for being converted to b&w. Let’s just face it, some colors don’t really work well together. B&w may be a good way to avoid these colors but keep the great shot.
  4. Just a tip, if you squint your eyes while looking at an image, you will see less color and more of the total value. This can be good for getting an idea of if your image has good value range.

How To Convert A Color Image To Black & White

Alright, now lets talk about how to convert your image, because there is a right and wrong way. You may get the same result, but if you do it wrong you actually loose quality (to be technical, you sacrifice bytes of information). For this article I’m going to be talking about using Adobe Photoshop. There is conversion software that you can buy, but for all intensive purposes, why pay extra when you can do it in Photoshop really easily.

Step 1

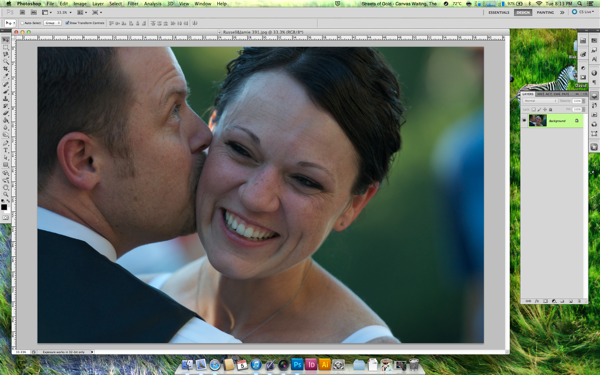
If you found an image that you want to convert, then step one would be opening the image in Photoshop. For my example, I’m using one of my wedding photographs that you may have seen on my website. It was shot during the first dance and I just really love this photo in b&w.

Screen Shot 2013 03 05 at 8 13 48 PM

Step 2

Screen Shot 2013 03 05 at 8 13 57 PMNext, most people would try to go to the top menu, go to Image>Mode and change the color profile to “Grayscale.”

Don’t do this!

Long story short, you’re actually changing the color profile, which means you will lose pixel information in your colors. You don’t want that; you want to retain as much information in your image as possible.

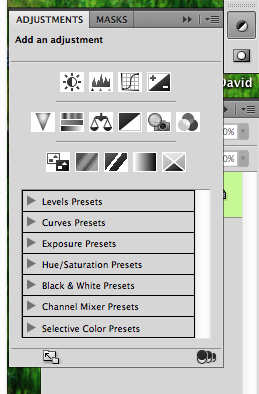
What you want to do is use the black & white adjustments. You can access this either by going to the top menu to Image>Adjustments>Black&White or in your side bar click on the adjustments button (as shown in picture) and then click on the b&w icon, which is the black and white box divided diagonally.

Step 3

Screen Shot 2013 03 05 at 8 14 10 PMOnce you’ve clicked this, you should see adjustments for the value of each color (see image). Notice that Photoshop has kept track of colors in the image. It’s just displaying them as b&w, but your keeping the information in tack.
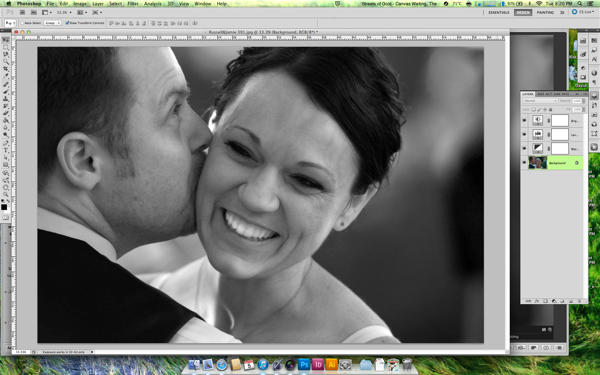
This also gives you more control on editing your b&w cause you can adjust it by color section now. Be aware, that you don’t want to push the limits on these colors too much, you’ll start to see ‘clipping’ in gradient colors such as skies. You’ll see it in your preview as you do it, then you’ll know what I’m talking about.

Step 4

After this, you can use these other adjustments (which act as smart layers, if you know what that means. It’s a good thing) to adjust the image how ever you need; exposure, contrast, levels, curves, filters, etc.

Step 5

After you’ve done all the editing you feel you need to do you should hopefully have an image you’re pleased with as a final. From you there you can save it however you need and depending on your desired outcome. 

Screen Shot 2013 03 05 at 8 20 12 PM

If you found this article helpful or interesting, please share it with friends and family by using the media share buttons below. Thanks

David Wahlman is a wedding and portrait photographer from Redding, CA. He works all around California and is aiming to get into destination photography. You can see his best work at www.wahlmanphotography.com and follow his updates on his facebook page.

Post originally from: Digital Photography Tips.

Check out our more Photography Tips at Photography Tips for Beginners, Portrait Photography Tips and Wedding Photography Tips.

Converting Images to Black and White Properly


Digital Photography School

 
Comments Off on Converting Images to Black and White Properly

Posted in Photography