by: David Wahlman of Wahlman Photography
Recently I was asked about the process of converting images to black & white; namely when to know the image would be good for it. So in this post I’m going to talk about when to convert an image to black & white and then how to do it in Photoshop without loosing quality.
When To Create A Black & White Image
There are about three ideas that come to my mind when I evaluate whether I should convert an image to black & white (here on referred to as b&w).
- First of all, and somewhat obviously, what is your desired outcome? Is your client specifically asking for b&w images? Are you entering a b&w photo contest? Are you doing a gallery set of b&w (because, generally speaking it doesn’t look too good to have just one or two b&w mixed in with colors. You want a good balance.)? Like I said, it should be pretty obvious that your outcome needs to be considered, but it was worth saying.
- Second, you should consider the value range of the image. In photography the term “value” speaks of darks vs lights. So when I say to judge the image’s value range, I’m talking about if you have deep blacks and bright whites. What’s your dynamic range like? For the most part, ‘flat’ images don’t look very good in b&w. Traditional b&w have good contrast and well spread value all across the histogram. So, if your image has these elements, then it may be a good choice for converting into a b&w.
- I’ll be doing a post soon on color theory and color relationship, but if you have odd colors or colors that don’t work well together, then it may be a good candidate for being converted to b&w. Let’s just face it, some colors don’t really work well together. B&w may be a good way to avoid these colors but keep the great shot.
- Just a tip, if you squint your eyes while looking at an image, you will see less color and more of the total value. This can be good for getting an idea of if your image has good value range.
How To Convert A Color Image To Black & White
Alright, now lets talk about how to convert your image, because there is a right and wrong way. You may get the same result, but if you do it wrong you actually loose quality (to be technical, you sacrifice bytes of information). For this article I’m going to be talking about using Adobe Photoshop. There is conversion software that you can buy, but for all intensive purposes, why pay extra when you can do it in Photoshop really easily.
Step 1
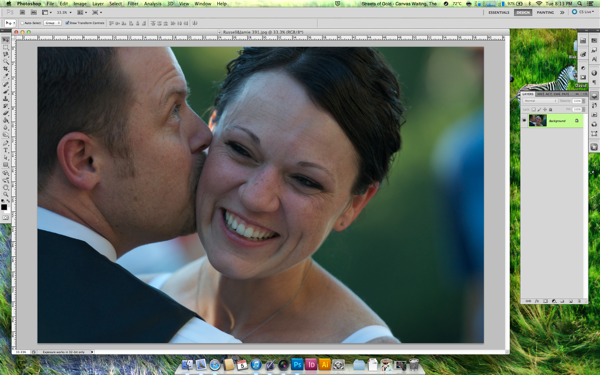
If you found an image that you want to convert, then step one would be opening the image in Photoshop. For my example, I’m using one of my wedding photographs that you may have seen on my website. It was shot during the first dance and I just really love this photo in b&w.

Step 2
 Next, most people would try to go to the top menu, go to Image>Mode and change the color profile to “Grayscale.”
Don’t do this!
Long story short, you’re actually changing the color profile, which means you will lose pixel information in your colors. You don’t want that; you want to retain as much information in your image as possible.
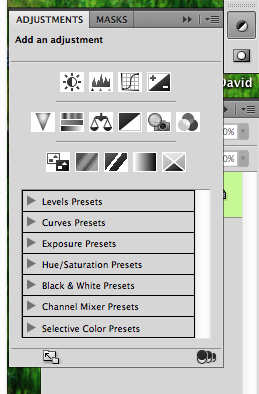
What you want to do is use the black & white adjustments. You can access this either by going to the top menu to Image>Adjustments>Black&White or in your side bar click on the adjustments button (as shown in picture) and then click on the b&w icon, which is the black and white box divided diagonally.
Step 3
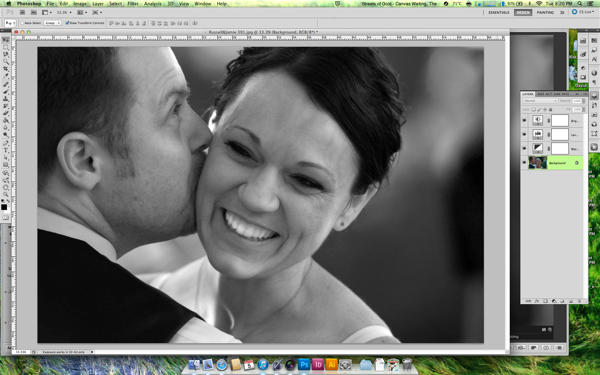
 Once you’ve clicked this, you should see adjustments for the value of each color (see image). Notice that Photoshop has kept track of colors in the image. It’s just displaying them as b&w, but your keeping the information in tack.
This also gives you more control on editing your b&w cause you can adjust it by color section now. Be aware, that you don’t want to push the limits on these colors too much, you’ll start to see ‘clipping’ in gradient colors such as skies. You’ll see it in your preview as you do it, then you’ll know what I’m talking about.
Step 4
After this, you can use these other adjustments (which act as smart layers, if you know what that means. It’s a good thing) to adjust the image how ever you need; exposure, contrast, levels, curves, filters, etc.
Step 5
After you’ve done all the editing you feel you need to do you should hopefully have an image you’re pleased with as a final. From you there you can save it however you need and depending on your desired outcome.

If you found this article helpful or interesting, please share it with friends and family by using the media share buttons below. Thanks
David Wahlman is a wedding and portrait photographer from Redding, CA. He works all around California and is aiming to get into destination photography. You can see his best work at www.wahlmanphotography.com and follow his updates on his facebook page.
Post originally from: Digital Photography Tips.
Check out our more Photography Tips at Photography Tips for Beginners, Portrait Photography Tips and Wedding Photography Tips.
Converting Images to Black and White Properly