RSS
 

Posts Tagged ‘comparisons’

Side-by-side Comparisons of Basic Studio Light Modifiers

26 Oct

Side-by-side Comparisons of Basic Studio Light Modifiers 1

Have you ever wondered what difference studio light modifiers make to your portraits?

Are you even convinced that they make a difference in the quality of light? I thought I’d do a little experiment to show you the effects that a few basic studio light modifiers can have on your portraits.

For some, the right modifier may make an image great, and the wrong modifier could break it.

Technical terms

Firstly, if you are new to artificial lighting, let’s look at some technical terms.

Flash – an electronic artificial light source which gives out a brief, sudden burst of light. A flash is also known as a strobe in North America.

Reflector – a panel that bounces light back towards the source and comes in silver, gold, black, white, fabric or other material.

Light modifier – an object attached to the front of the flash to change the quality and effect of light entering the camera.

Shoot – through Umbrella – an umbrella made of translucent fabric that allows light to pass through it.

Diffusion – a material that scatters light evenly as it passes through, thereby making the light softer and with less glare and harshness.

Softbox – a closed chamber usually lined in white or silver fabric, available in various shapes (such as a square, rectangle, umbrella, octagon). A softbox confines the light from the flash and releases it through a diffusion material, thereby allowing more control as to the size and spread of light that reaches your subject.

Grid – usually made from fabric strips of material that are sewn together to form a 3D grid that is attached to the light modifier. A grid restricts the focus of light, making it more directional, allowing the photographer more control. It also limits or restricts the spill of light onto other areas.

The studio light modifiers used in this article

Let’s start with the lighting diagram as shown below. My set-up consisted of 2 lights and the following:

Side-by-side Comparisons of Basic Studio Light Modifiers 2

  • a dark wall
  • a large silver panel reflector on camera left
  • a flash high up on the camera left to give a bit of hair light – I wasn’t after a vast separation from the background as I was using a light colored sofa that separates the background and the subject already. I also wanted a rather dark, moody lighting, so I covered the flash with a few layers of diffuser fabric. Doing this cut light out and limited it to the subject rather than hitting the wall
  • a flash on camera right onto which I attached various modifiers
  • studio light modifiers: flash hood, translucent umbrella, umbrella softbox, 90 x 60 softbox, diffuser fabric, grid

You can also shoot with one light, of course, see here for a beginner’s tutorial on how to create dramatic portraits with one light.

Side-by-side Comparisons of Basic Studio Light Modifiers 3

Left: #1 Shoot-through umbrella facing away. Right: #2 Shoot-through umbrella facing toward.

#1 Shoot-through umbrella facing away from subject

For the above-left image, I used an umbrella as a shoot through with the flash facing away from the subject. You can see there is still light hitting the subject’s face, but the shadows on the left side of the face and the neck are a lot more pronounced and harsh. The light was not able to reach the reflector to the left of the subject at all.

#2 Shoot-through umbrella facing toward subject

Compare this with the image on the right. I turned the flash and umbrella 180 degrees so that the flash was facing the subject and shot from behind the umbrella. The shadows are much softer, more light has reached the subject, and you can also see the light hitting the sofa on the far left which means the reflector was doing its job of bouncing some light back.

Side-by-side Comparisons of Basic Studio Light Modifiers 4

Left: #3 Bare flash with hood. Right: #4 Umbrella softbox

#3 Bare flash with hood

For the above-left image, I shot using just the electronic flash and the hood that comes with it. As it is rather small, it restricts the spread of light a little and focuses it more on the area you are lighting.

The light spills only as the light leaves the hood. Shadows on the face here are still defined, and not as smooth as I’d like it, but it is much better than on #1, where the shadows are much darker and harsher.

#4 Umbrella softbox

In the above-right image, I used a deep umbrella softbox allowing me to face both the flash and umbrella away from my subject. The umbrella is silver-lined which bounces all the light back towards the subject through a diffuser fabric. The resulting light quality is softer and more evenly spread due to bouncing and diffusion.

Compare this to image #2 that used only the shoot-through umbrella without the bounce. Notice how the light quality is gentler on the skin and more evenly spread, with softer shadows on the neck and under the nose.

Side-by-side Comparisons of Basic Studio Light Modifiers 5

Left: #5 Softbox Without the Diffusion Panel. Right: #6 Softbox with diffusion panel.

#5 Softbox without the diffusion panel

I switched to a 90 x 60 rectangular softbox for the images above. The one on the left is an example without the diffusion panel that covers the softbox. Shooting your subject without the diffusion panel is like shooting with a hood, as per example #3 (the hood also has a silver lining), only the softbox is larger.

The light is flashed away from the subject onto the silver lining of the softbox and bounced from the silver lining towards the subject without having to go through a diffusion panel.

#6 Softbox with diffusion panel

Comparing both images above, do you notice the softer quality of the light on the subject’s face on the image with the diffusion ‘on’? It is a subtle difference, but I can see it. Look even closer and you see the light without the diffusion is cooler and slightly harsher. It comes directly from the silver lining of the softbox not having gone through any diffusion.

This difference is noticeable on the sofa; the one on the left is a touch sharper and the one on the right darker and even. Compare the subject’s left eye (on camera right) – the shadow on the left image is stronger and deeper than the one on the right.

Such is the modifying effect of even just one diffuser fabric!

Side-by-side Comparisons of Basic Studio Light Modifiers 6

Left: #7 Softbox with the grid. Right: #8 Gridded softbox with the power adjusted.

#7 Softbox with grid

I attached a grid to the light set-up above so that it’s a silver-lined softbox with a diffusion panel plus a grid attached on the front of the diffusion panel. This setup is called a gridded softbox.

Notice just how much of the light has been cut out. Light gets focused on the face, and there are very few spills of light on the clothes, arms and outer areas of the space photographed.

The resulting image is a lot darker, moodier, and warmer in tone. However, I feel this is too underexposed, and details on the dress get lost, when I wanted these to show. The green wall looked too black, and the dress seemed to blend too much into it.

#8 Gridded softbox with power adjusted

On the above-right image, I kept the gridded softbox on and adjusted the flash power to my liking in order bring back the details I wanted. This new flash setting illuminated the face more and brought highlights back onto the hair and eyes. It also allowed a touch of light on the background too.

Finally, the end product I had in my mind used a textured background, so I added this texture to my dark green wall in Photoshop. For a step-by-step guide on how to add textures and creative overlays, see this post. In my opinion, the subtle texture adds more drama to the image and fits in better with the dark and moody lighting I was after.

Side-by-side Comparisons of Basic Studio Light Modifiers 7

Did you find this side-by-side comparison on light modifiers helpful? Please let me know and also share your studio lighting experiments in the comments below.

The post Side-by-side Comparisons of Basic Studio Light Modifiers appeared first on Digital Photography School.
Digital Photography School

 
Comments Off on Side-by-side Comparisons of Basic Studio Light Modifiers

Posted in Photography


Photography Equipment Comparisons – Entry-Level Versus High-End Gear Does it Matter?

16 Feb

Photographers tend to get obsessed with having the latest, greatest toys. But does it matter which camera or bits of equipment you use? If so, how much? Or is it more about how you use it, and the skills you possess?

Let’s take a look at three video comparisons of some of the top level photography equipment available and some entry-level options.

Rich photographer – poor photographer

I like the play on words here, hinting at the concept of the “Rich Dad Poor Dad” series of books by Robert Kiyosaki. In the video, the guys over at f-stoppers do a portrait shoot with two different sets of lighting equipment. One which costs nearly $ 10,000, and the “poor man’s” version which will run you about $ 425.

Can you see a difference in the final portrait results? No, I can’t see much difference either.

$ 1100 versus $ 5499

In this second video, Peter McKinnon looks at the virtues of both the Canon 80D ($ 1099) and the Canon 1Dx Mark II (Note: at the time of writing, this camera is listed at $ 5499). Is the latter worth five times as much? You decide.

If you are a sports shooter, you may need the extra frames per second rate the 1DX offers. But if you’re a wildlife photographer you may prefer the extended reach of the crop sensor in the 80D. Portrait photography can be done with either, but you likely don’t need to spend the extra money on the 1DX if that’s what you shoot.

Note: when the video was made the 1DX was likely priced higher, so please note the difference in prices in the video to current pricing.

Camera shootout – it’s not about the gear

In this last video let’s see what happens if two professional photographers each pick up an entry-level Canon Rebel T3i and hand their Canon 5D Mark IV to an amateur. They do a little shootout with the same model, in the same lighting conditions and studio. Let’s see who comes out on top.

The Canon T3i is discontinued, the price for the current model, the T6 is $ 449 with the 18-55mm lens. The Canon 5D Mark IV  is $ 3299 + $ 1699 for the 35mm f/1.4 lens shown in the video = total $ 4998.

?

Your thoughts?

So what are your thoughts after watching the videos? Have you made the decision to invest in high-end lenses or a full frame camera body? If so, have you found it to fill your needs better – was it worth it? Let’s discuss in the comments below.

The post Photography Equipment Comparisons – Entry-Level Versus High-End Gear Does it Matter? by Darlene Hildebrandt appeared first on Digital Photography School.


Digital Photography School

 
Comments Off on Photography Equipment Comparisons – Entry-Level Versus High-End Gear Does it Matter?

Posted in Photography


Merge to 32 bit – HDR technique comparisons

04 Jul

HDR is an often discussed and debated subject in photography circles. There’s much talk about “bad” HDR, or a whether or not one should even do it in the first place. I think a lot of that stems from what I’d consider to be overdone, over-processed versions.

IS MERGE TO 32-BIT A SOLUTION FOR BAD HDR?

Depending on the software used to make your tone-mapped HDR images you may be given an option to view and/or save a 32-bit version. Prior to Lightroom 4 we there wasn’t really much we could do with such a file so most photographers never bothered saving it. Now that LR4 and PS can handle a 32bit file it has opened up a whole new set of options for HDR, one that is a lot simpler, more photo realistic, and many would venture to say – better.

The problem with most overdone HDR images is that they are often:

  • too overly saturated, way past surreal into unpleasant looking by many accounts
  • too flat, the blacks are grey and the highlights are grey and muddy looking
  • too far into the realm of “surreal” or “artistic” where the shadows are now brighter than some of the highlights, and the highlights are darker than some of the shadows. It seems unnatural and many people reject it because their brain’s can’t even register it.
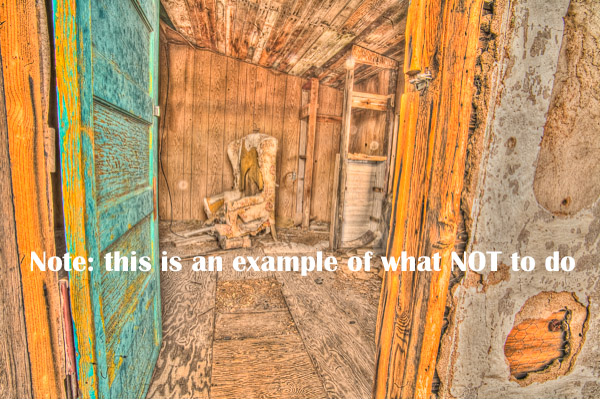
NOTE this is an example of what NOT to do, please do NOT make HDR that looks like this.

Please do NOT make HDR that looks like this!

WHO IS MERGE TO 32-BIT HDR FOR?

  • perhaps you’ve tried HDR and been unhappy with the results
  • maybe you vowed never to touch it for fear of producing something that falls into one of the above areas. If that is the case I urge you do take a second look and see if this is more to your tastes.
  • the process baffles you and you just want a good final result without having to learn yet another software

Photomatix Pro has been one of the front runners for HDR tone-mapping software since its creation. Now they offer a new plugin for using that 32-bit image. I’m not going to get into the step by step how to use shoot your bracketed images or use this plugin (they already have that on their site here), rather a comparison of a three different methods of making HDR images and the resulting images.

THE MERGE TO 32-BIT PROCESS

Okay in a nutshell, this is how the plugin works.

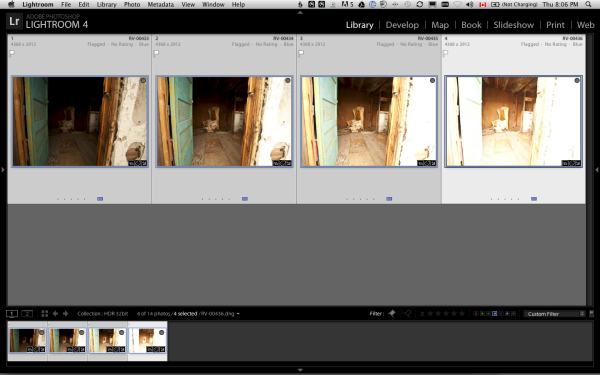
  1. select your bracketed images in LR or PS
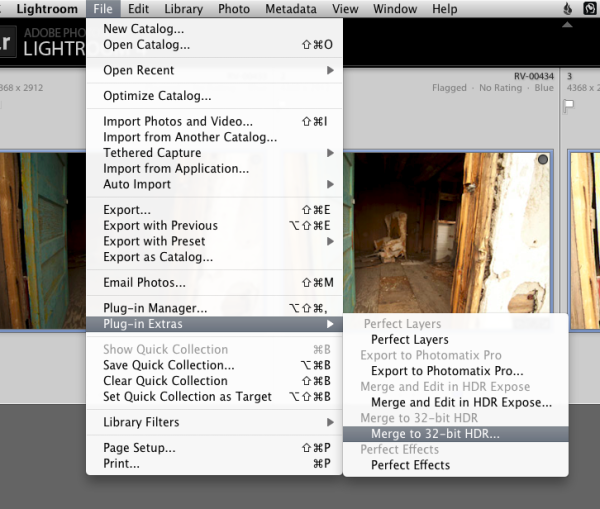
  2. launch the 32-bit plug in (and select a couple options) and it does its thing in the background
  3. take the resulting 32-bit image and finish it in LR or PS
Screen shot 2013-06-27 at 8.06.37 PM

Select bracketed images

Screen shot 2013-06-27 at 8.07.20 PM

Launch the Merge to 32-bit HDR plugin

Screen shot 2013-06-27 at 8.41.07 PM

And away it goes! How easy right?

That’s it!  No sliders to play with, no presets, no way to muck it up – the software just merges them together into one massive file with a whole lot of exposure data. Then you work the magic on it in Lightroom or Photoshop (or your favorite image editor) to lighten where you want, and darken where you want – with no loss of image quality or detail.

AN EXAMPLE DONE TWO WAYS

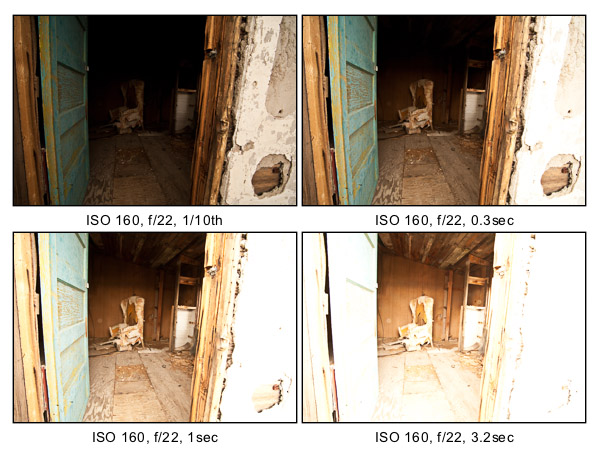
Below you see the four bracketed images I’m using for this example. Notice that the darkest image shows lots of detail in the white wall on the right of the doorway, and the lightest image has tons of detail on the ceiling inside the building. I use the histogram and shoot in manual to make sure I capture enough range and generally bracket 2 tops apart (these are about 1 and 2/3rds apart as it was enough to get the range I needed) – notice I only ever adjust the shutter speed, keep my ISO low and use a tripod whenever possible.

4-bracketed-images

Bracketed images shot in Manual mode on tripod

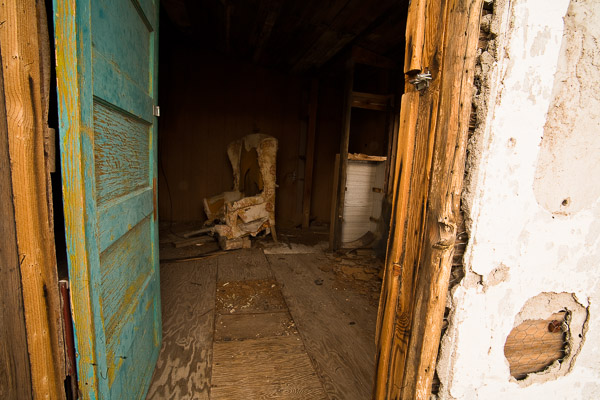
Below you see the 32-bit image as it first appears in Lightroom. It looks pretty contrasty (almost exactly like the second image above) but unlike using just a single image there is plenty of detail in ALL areas of this image, you just have to manipulate it out a bit!

RV-00433_4_5_6-32bitb-600px

Merge 32-bit image before Lightroom processing.

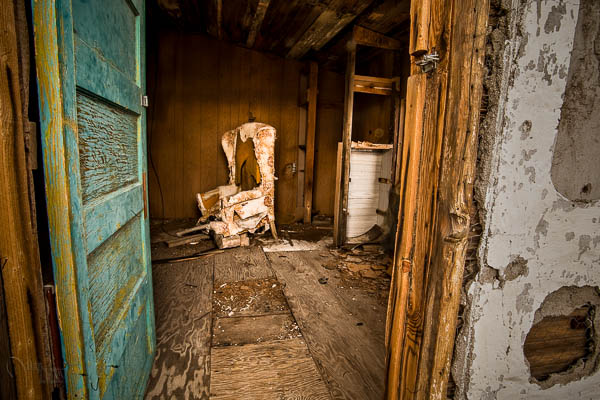
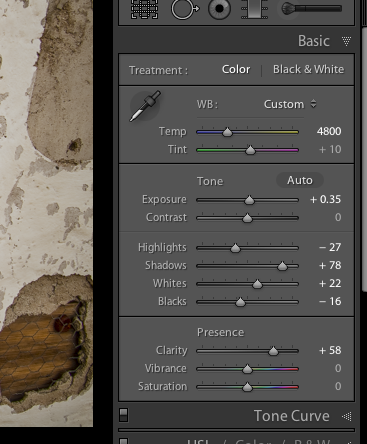
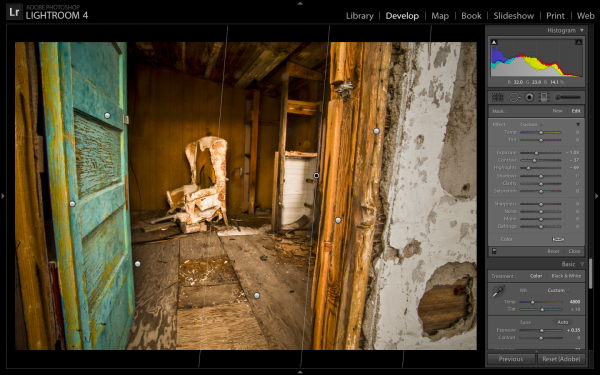
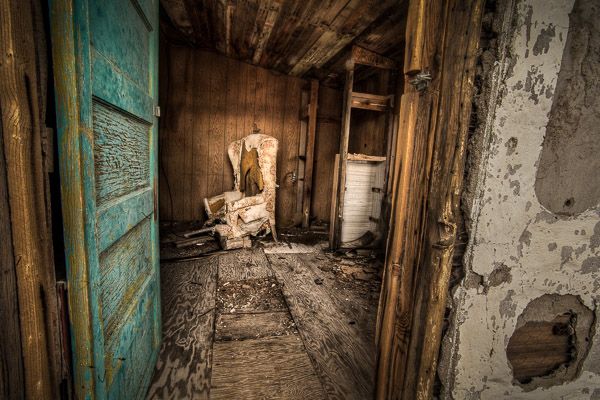
Here is the final version after doing some Lightroom magic.  I’ve used several of the sliders pulled to the max (see screen shot of my Basic panel below), as well as some Graduated filters on the edges (see screen shot below), a post-crop vignette, and several adjustment brushes to lighten and darken areas I wanted to control. Notice the white wall on the left is quite dark now, almost grey – however the highlights inside the house are still bright white. If you just darken all the highlights you end up with a flat, muddy looking mess. I’ve also darkened the wall outside intentionally to draw your eye inwards towards the brighter areas and the chair. If the wall was still pure white it would scream and draw your attention.  Notice how the image still has dark areas, light areas, and a good contrast range. All I’ve done is control the tonal values to retain detail where I wanted.

32bit-dps-01

Final image after Lightroom adjustments

Basic panel adjustments in LR

Basic panel adjustments in LR

Gradient filters used to darken the edges of the doorway

Gradient filters used to darken the edges of the doorway

Now have a look at another version of the same bracketed image set, but this time created using the full Photomatix Pro software and LR adjustments afterwards.  It’s a much grungier look, which some people dislike. Personally I like this look and it’s not going too far for my tastes. There’s still pure black, and pure white in the image and it has good contrast – the tones have just been adjusted in a different way.

HDR done by tonemapping in Photomatix Pro

HDR done by tonemapping in Photomatix Pro

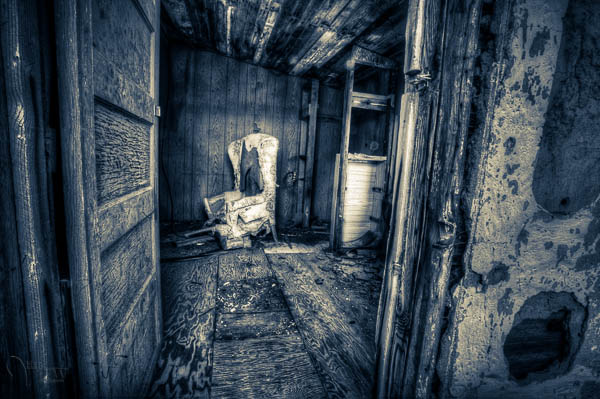
One more version, also tone mapped in Photomatix then split toned in LR

One more version, also tone mapped in Photomatix then split toned in LR

CAN YOU GUESS HOW THESE WERE DONE?

Let’s look at two more images as examples. I’ve used three different processes to get the final results in each set:

  • using just Lightroom adjustments
  • using the regular Photomatix Pro tone-mapping process
  • using the merge to 32bit method

Can you guess which is which in each trio?  No fair peeking at the file names!   Look over the three versions of each scene and tell me in the comments below which was done with what process.  How can be first to get it all right?  GO!

32bit-LR2

32bit-merged

32bit-tonemapped

Hawaii2012-32bit-600px

Hawaii2012-LR-600px

Hawaii2012-TM-600px

SUMMARY

To revisit my original question – is merge to 32-bit the answer for better HDR? I think that’s probably still up for debate. It does however allow you to create a much more photo realistic result with relatively few easy steps, and less hassle. So if you fall into one of the categories at the top of the article I’d suggest you give it a try especially if you want to do tone control but not alter the look of the image beyond that of reality.

As always, give me your thoughts and opinions. There’s always many different options and opinions and no one solution is right for everyone.

Post originally from: Digital Photography Tips.

Check out our more Photography Tips at Photography Tips for Beginners, Portrait Photography Tips and Wedding Photography Tips.

Merge to 32 bit – HDR technique comparisons


Digital Photography School

 
Comments Off on Merge to 32 bit – HDR technique comparisons

Posted in Photography


Ricoh GR Preview extended with further details and more comparisons

23 Apr

Ricoh_GR.jpg

We’ve extended our Ricoh GR Preview with additional comparisons, studio shots, a larger gallery and more details on the camera’s behavior. We’ve shot our standard test scene with both the Ricoh and Sigma’s DP1 Merrill, and added the DP1M to the comparison using our forthcoming test scene. Furthermore we’ve shot the GR next to the Coolpix A in a real-world setting. Click here for all this and more.

News: Digital Photography Review (dpreview.com)

 
Comments Off on Ricoh GR Preview extended with further details and more comparisons

Posted in Uncategorized


Fujifilm X-series studio comparisons updated with new ACR 7.4 raw process

06 Apr

newplugin_2.jpg

Following the recent public release of Adobe Camera Raw 7.4, we’ve updated our studio comparison database with new raw conversions of files from the Fujifilm X-Pro 1, X-E1 and X100S. We’ve been using the release candidate version of ACR 7.4 for some time, which contained significant improvements to Adobe’s treatment of files from Fujifilm’s X-TRANS sensors. The official public release version of ACR 7.4 brings some further (very minor) tweaks. Click through for links to the studio comparison pages in our X-Pro 1 and X-E1 reviews, and X100S preview, now with ACR 7.4 raw conversions. 

News: Digital Photography Review (dpreview.com)

 
Comments Off on Fujifilm X-series studio comparisons updated with new ACR 7.4 raw process

Posted in Uncategorized


Camera comparisons

02 Aug

Nikon D300. Nikon D200. Nikon D80
Video Rating: 5 / 5

My take on nikon’s beginner DSLR I do not take credit for the music played it is the sole property of the artists and their subsidiaries